x02: Preparing Coaching Calls and Webinars for Coaches
x02: Preparing Coaching Calls and Webinars for Coaches
This process will help you set up a coaching call or webinar for the coaches.
1
Start Here:
2
Setup Call in Zoom:
3
For Troy's Coaching Call
4
For Coaches Coaching Call
5
For Troy's Webinar
6
For Coaches Webinar
7
Add Guest Presenter (if required)
8
Confirm No Registration Required
9
Check Correct Email in "Manage Webinar"
10
Copy the Link
11
Time Zone Converter
12
Store Links
13
Promote the Call:
14
Infusionsoft
15
Troy's Webinar
16
Coaches Webinar
17
Troy's Coaching Call
18
Coaches Coaching Call
19
Tagging Subscribers
20
Update Asana
21
Complete:
22
Finish Here
Start Here:
Why?
Each week we run a webinar or a coaching call for our members to help them in their business. These calls are facilitated by our coaches. To help the coaches out, we set up the calls for them using Zoom.us, convert the call into different time zones and promote the call to our members via email and the members website.
This process is the same if you are setting up one call or multiple calls at the same time (for example when the three coaches run a coaching call on the same day).
If you do not have access to these resources, please contact Troy or Gin to request access.
Technical Considerations
This process is triggered by Zapier when a task is tagged in Asana with the "call-details" tag. This tag is applied in Asana by the host of the call once they have added the title and summary of the call in Asana. At this point, all of the information is ready and the call can be setup in Zoom and promoted to our members.
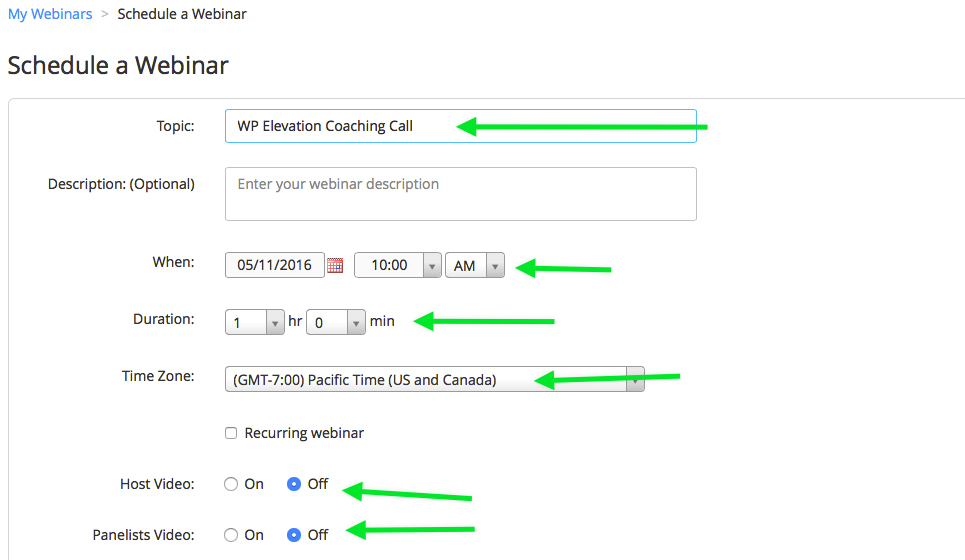
WHEN: Choose the date of the call you are setting up. This should always be set to Los Angles time which is indicated in the Asana task. That is: (GMT-7:00) Pacific Time (US and Canada)
DURATION: 1 hr
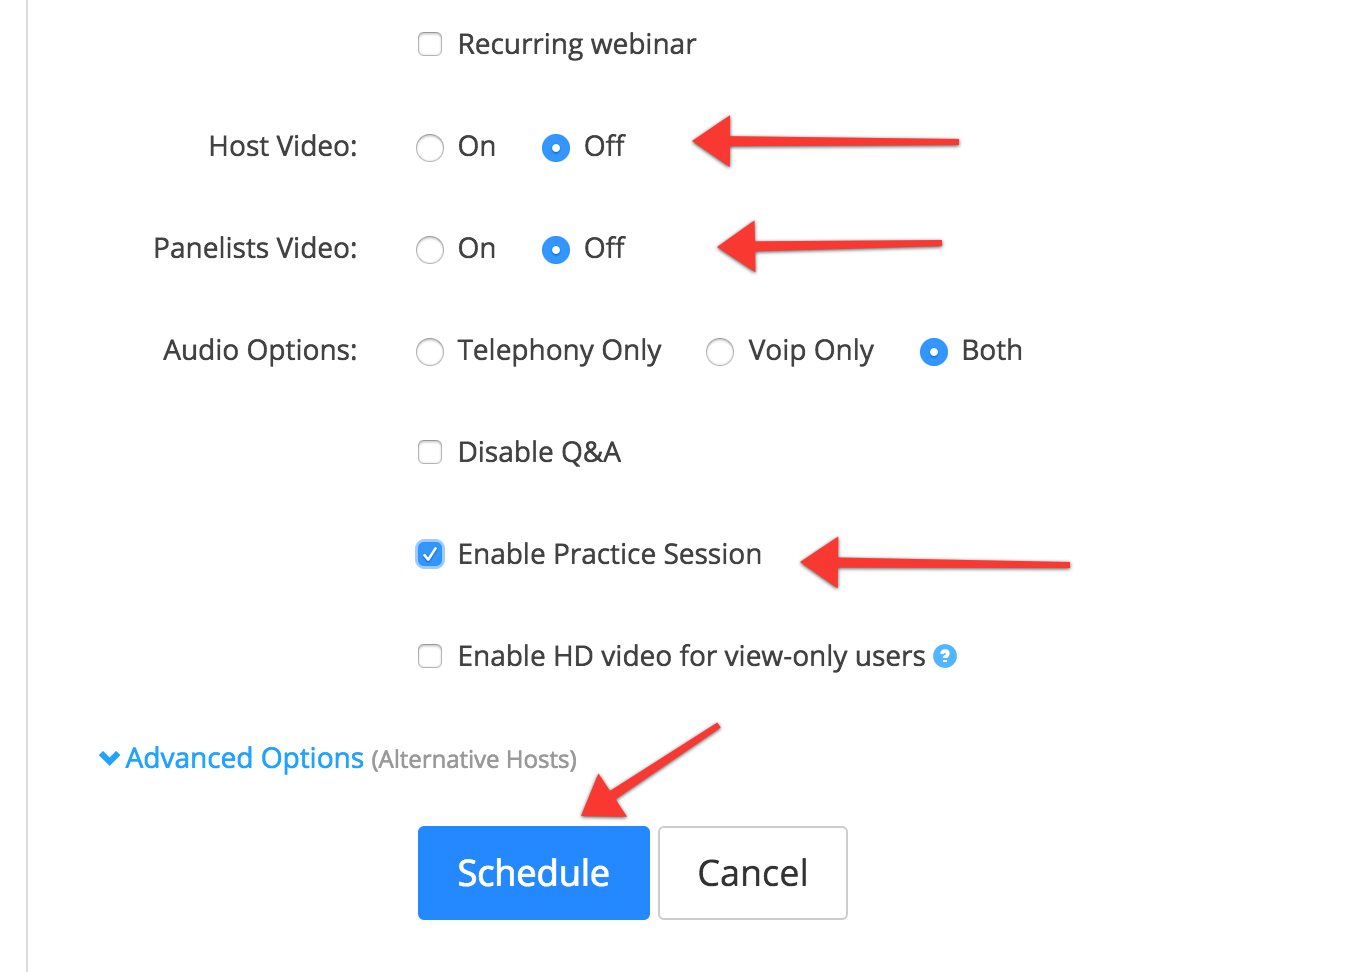
Make sure Host Video and Panelists Video are set to off.
Tick Enable Practice Session and hit the Schedule button.
For Coaches Coaching Call
LOGIN
Login to Zoom with the logins from the 1Password Vault.
TOPIC: COUNTRY CODE (AU, Americas or UK / EU) WP Elevation Coaching Call [ ie: AU WP Elevation Coaching Call ]
WHEN: Choose the date of the call you are setting up. This should always be set to Los Angles time which is indicated in the Asana task. That is: (GMT-7:00) Pacific Time (US and Canada)
DURATION: 1 hr
Make sure Host Video and Panelists Video are set to off.
Tick Enable Practice Session and hit the Schedule button.
For Troy's Webinar
LOGIN
Login to Zoom with the logins from the 1Password Vault.
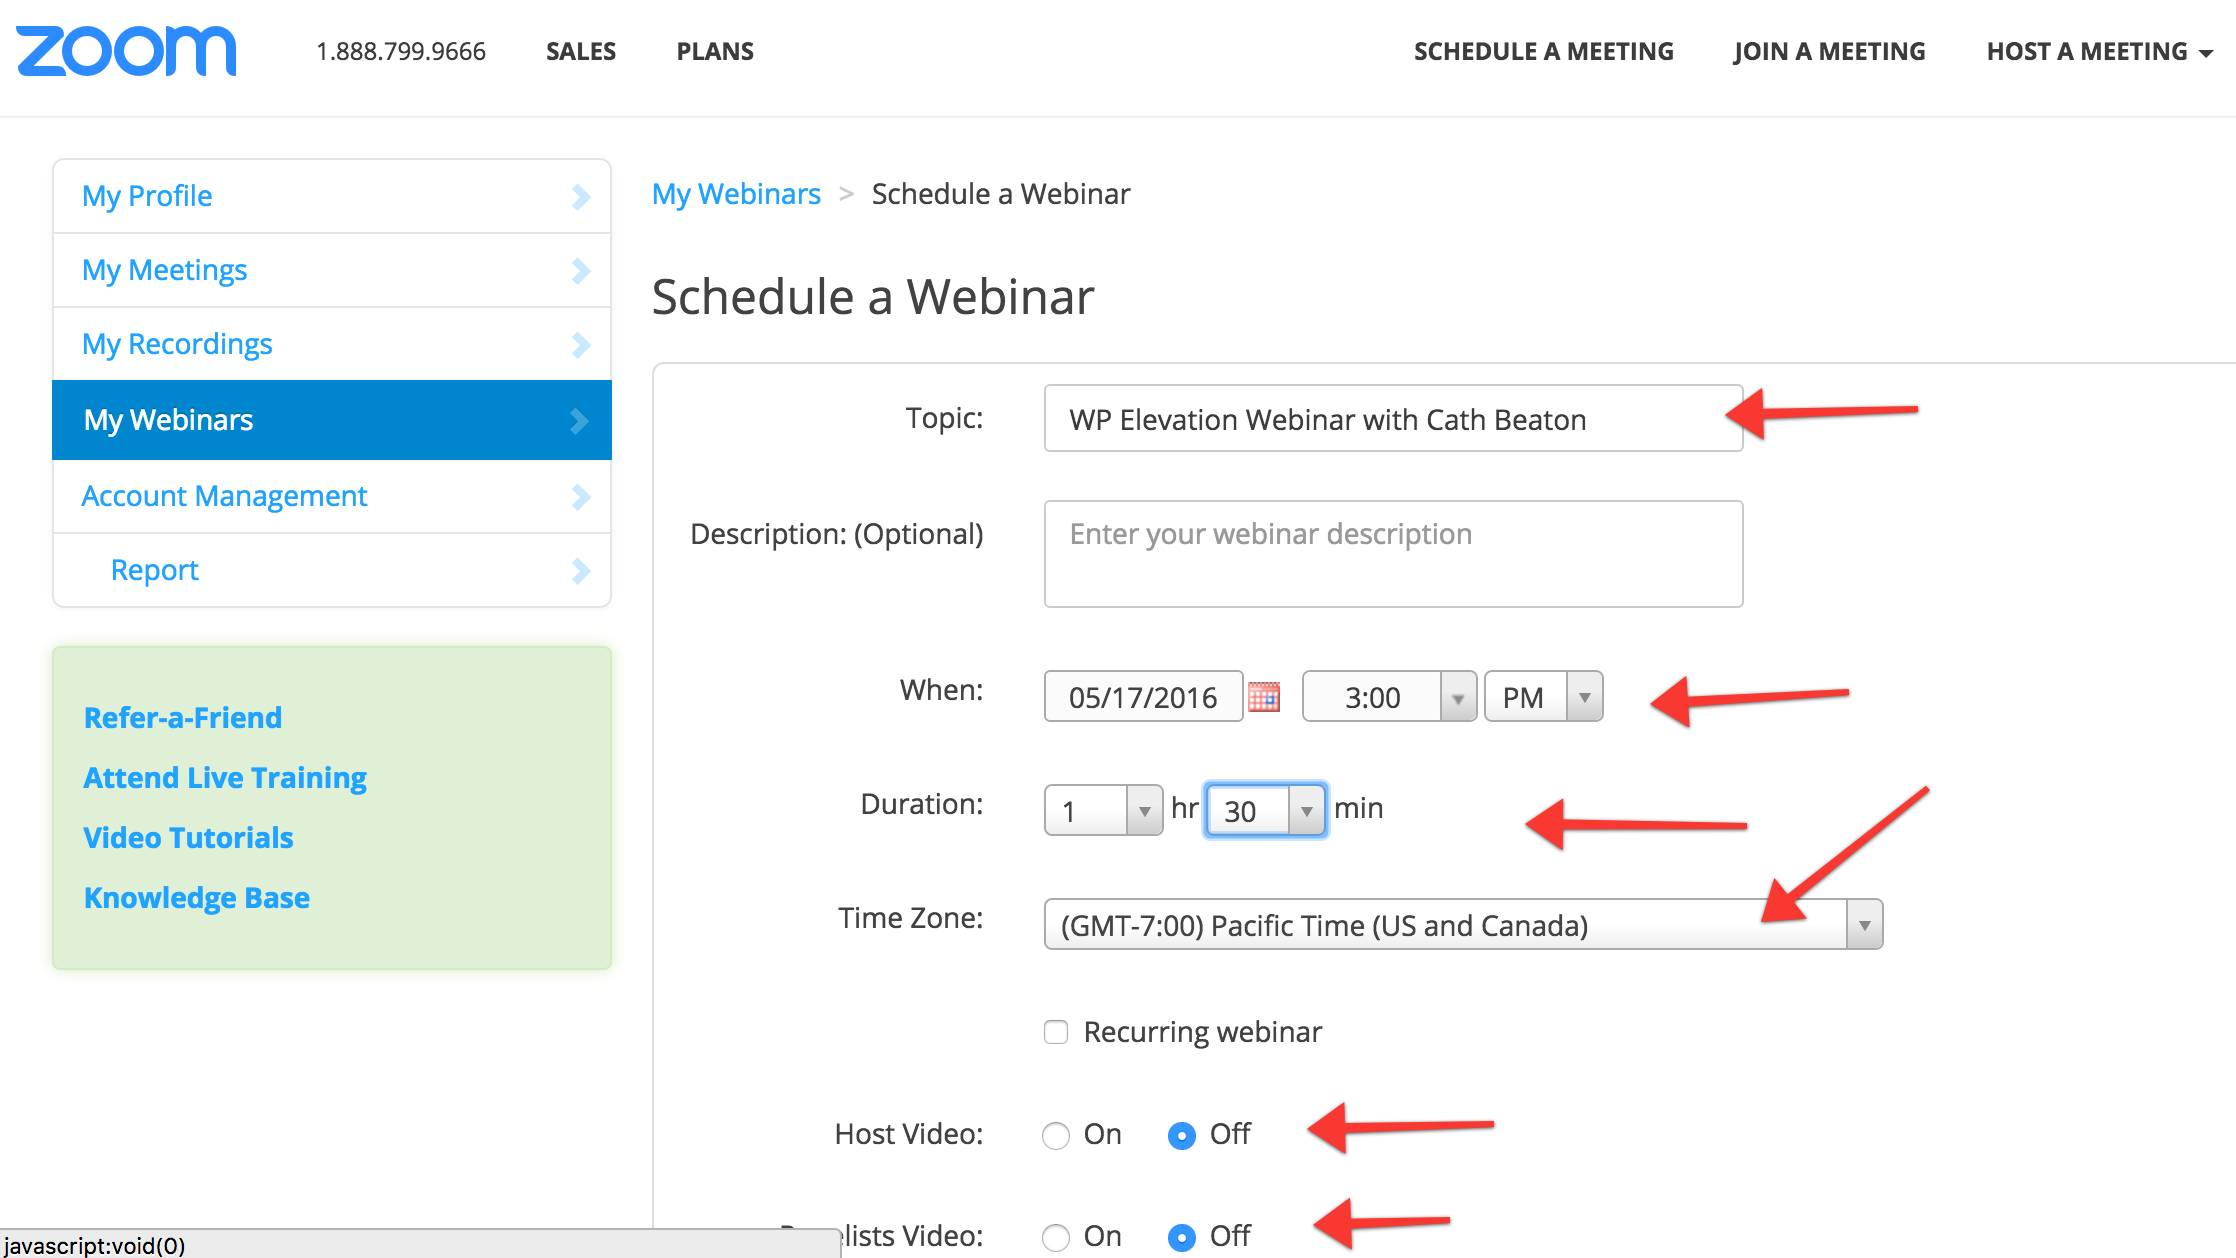
TOPIC: WP Elevation Webinar with [insert coach's name][ie: WP Elevation Webinar with Cath Beaton]
WHEN: Choose the date of the call you are setting up. This should always be set to Los Angles time which is indicated in the Asana task. That is: (GMT-7:00) Pacific Time (US and Canada)
DURATION: 1 hr and 30 mins
Make sure Host Video and Panelists Video are set to off.
Tick Enable Practice Session and hit the Schedule button.
For Coaches Webinar
LOGIN
Login to Zoom with the logins from the 1Password Vault.
TOPIC: WP Elevation Webinar with [insert coach's name][ie: WP Elevation Webinar with Cath Beaton]
WHEN: Choose the date of the call you are setting up. This should always be set to Los Angles time which is indicated in the Asana task. That is: (GMT-7:00) Pacific Time (US and Canada)
DURATION: 1 hr and 30 mins
Make sure Host Video and Panelists Video are set to off.
Tick Enable Practice Session and hit the Schedule button.
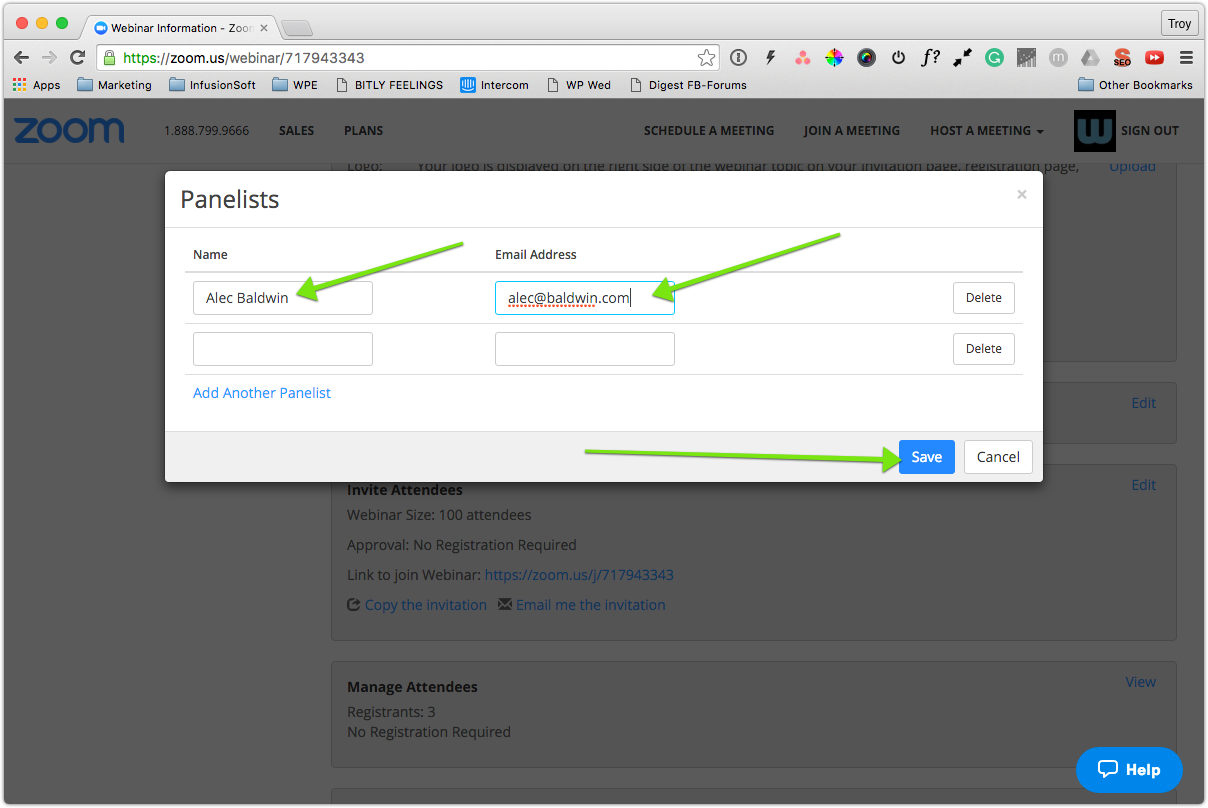
Add Guest Presenter (if required)
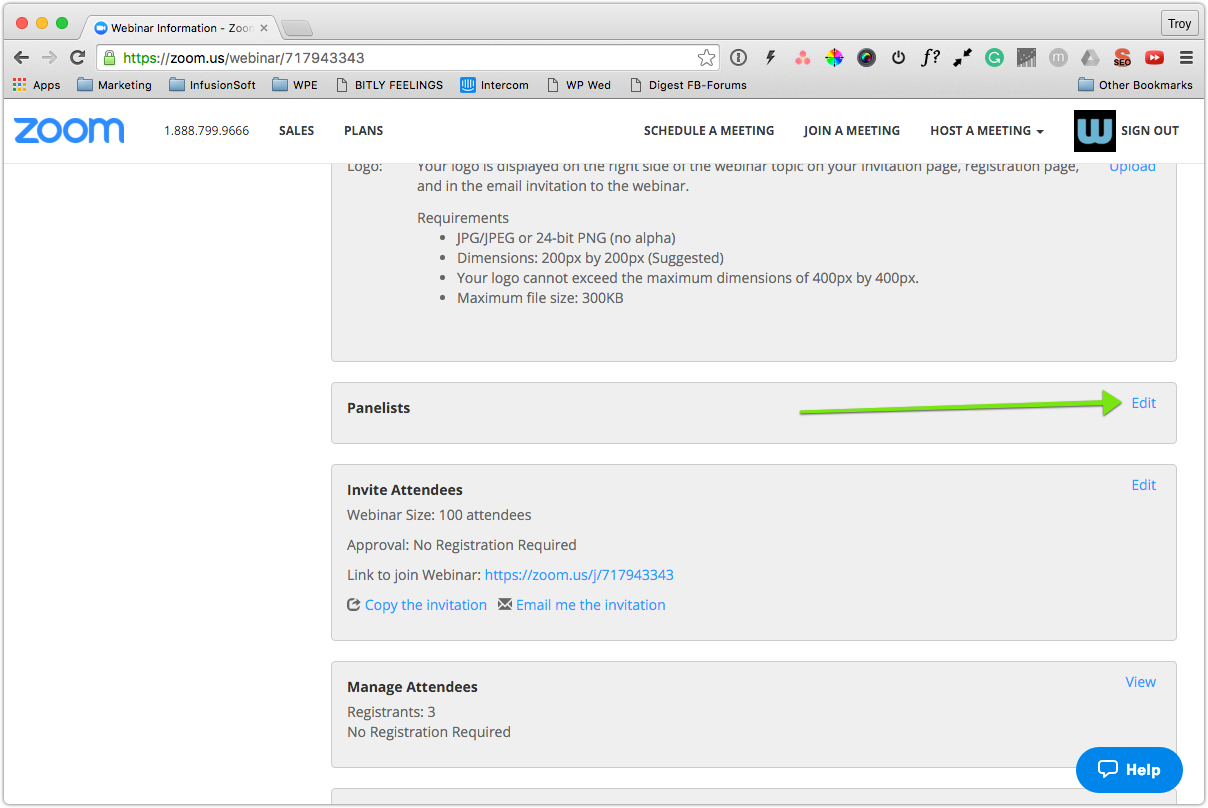
If you are heading a guest presenter to this webinar, click the name of the webinar to edit it and then click the edit link in the Panelists section. Enter the panelists name and email address and they will receive an email and be added to the call as a panellist.
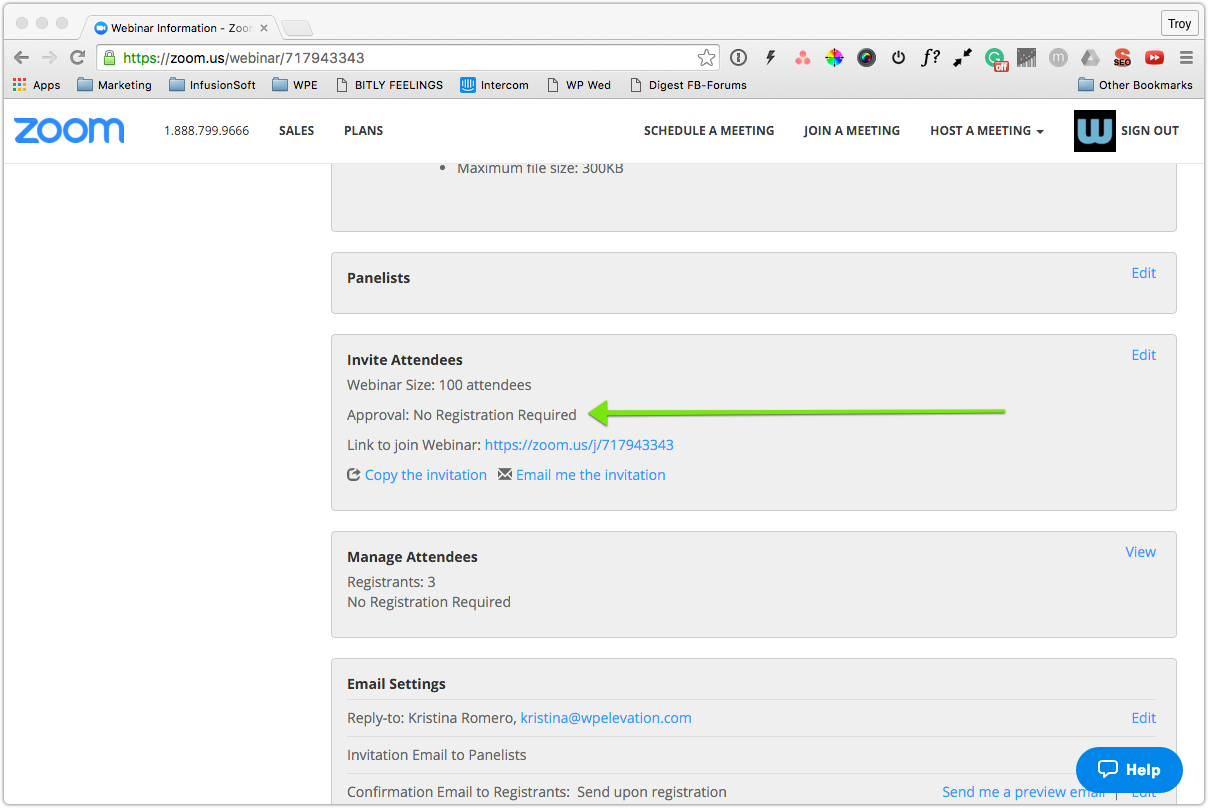
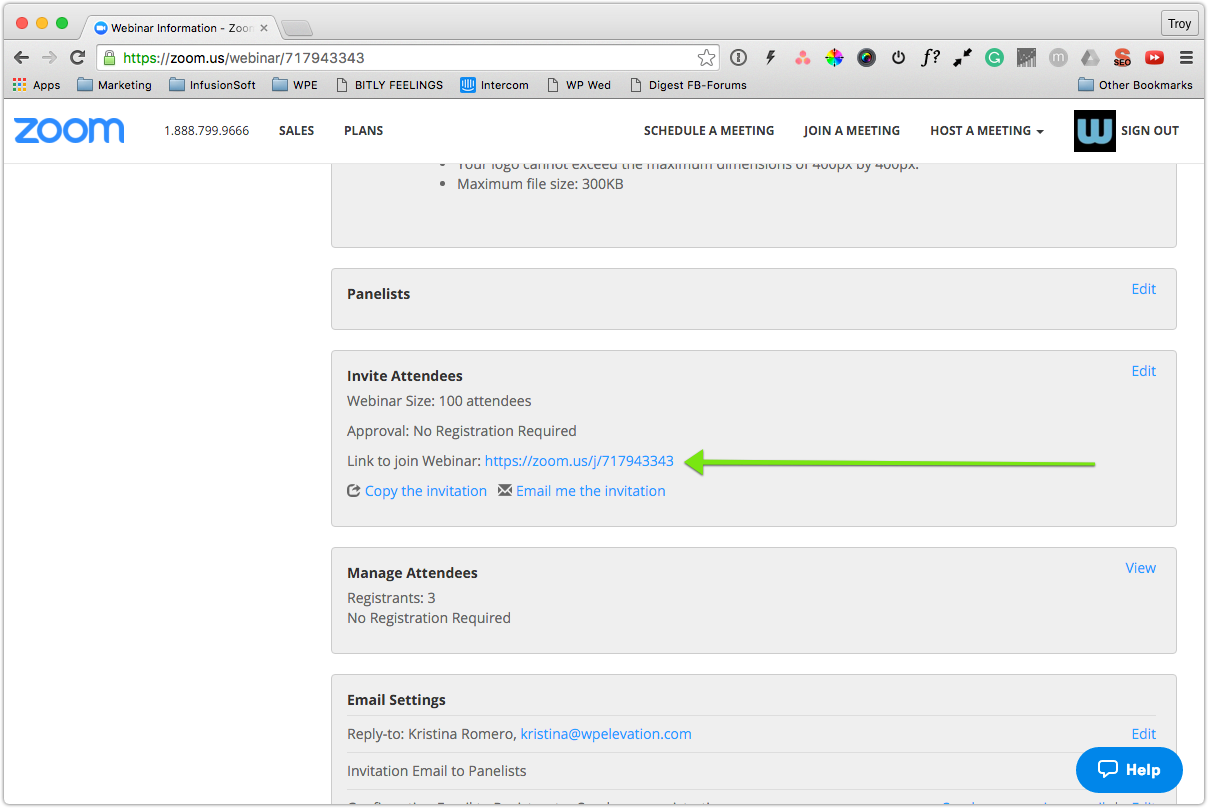
Confirm No Registration Required
Confirm that the call does not require attendees to register. This means that we will register all of our members for the call without requiring them to fill in a registration form. This increases the number of people we have attend each call.
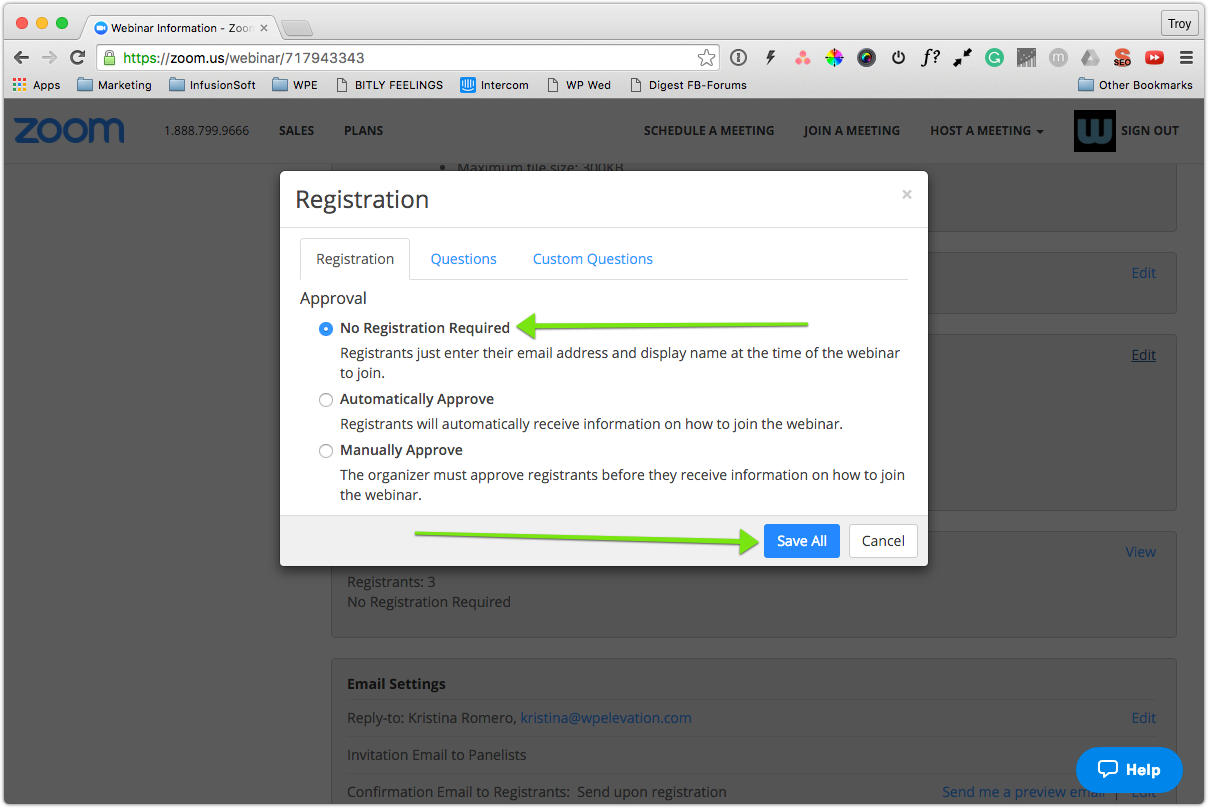
Click on the name of the call to edit it (or go to "Manage Webinars") and then scroll down to the Invite Attendees section and make sure No Registration Required is selected.
If registration is required click the edit link, and change this setting.
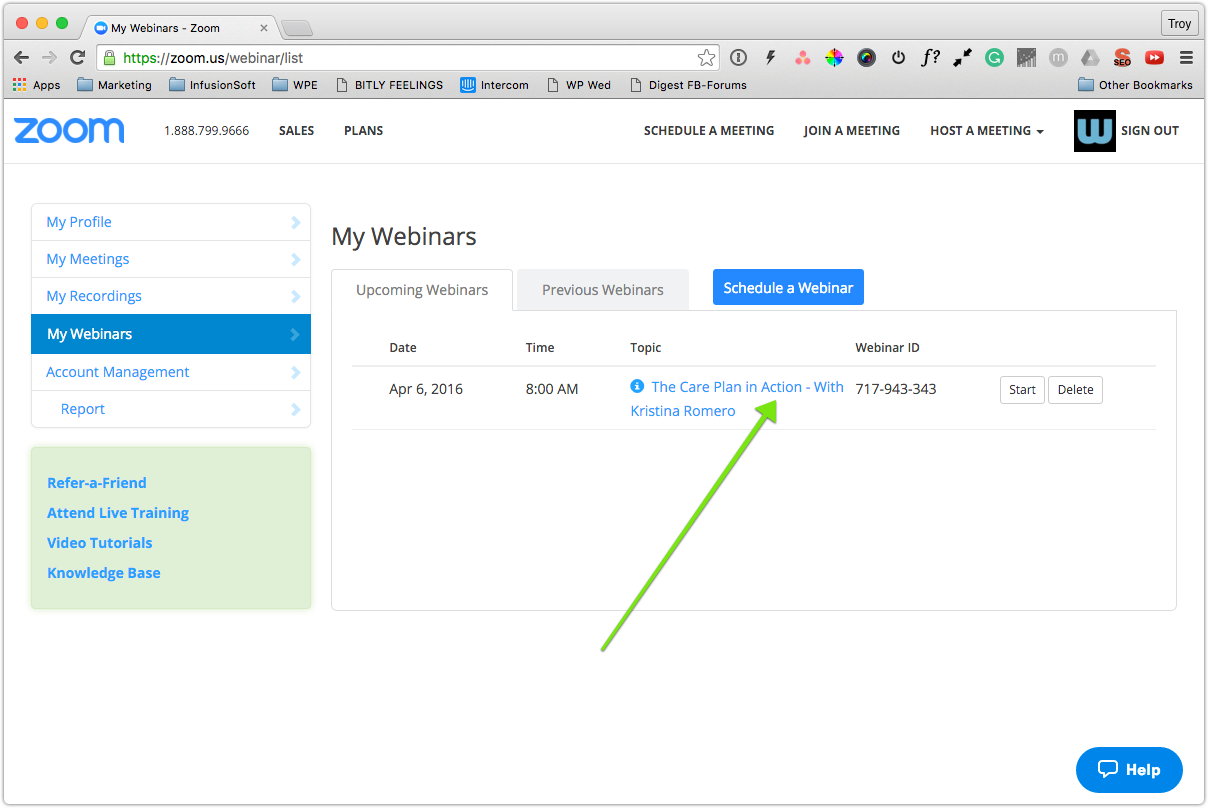
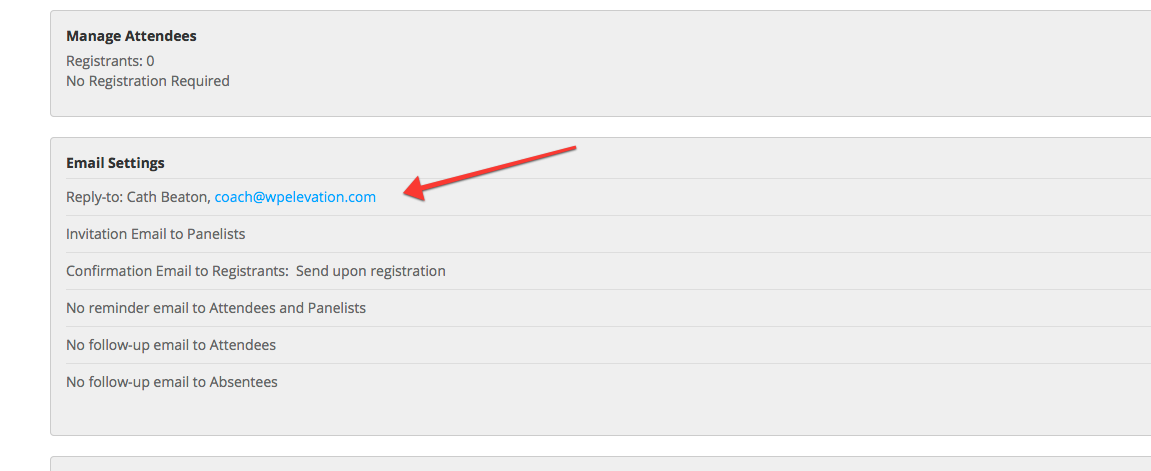
Check Correct Email in "Manage Webinar"
In the setting "Manage Webinar" which you should be taken to once the call has been set up, you will need to make sure the email address is set to that of the coach / person conducting the call.
If Troy is taking the call, the call will be set up using his's Zoom account ([email protected] ) and it should appear by default.
If the call is being taken by the coaches, you will have signed in using the coaches joint zoom account ([email protected]) which will mean the email will be set according to who last did a call. You will therefore have to change it to the correct coach's name (keeping the coach@wpelevation.com email)
Copy the Link
Once you are happy that the call is set up correctly, click on the name to edit the call and scroll down to the Invite Attendees section and find the link to join the webinar.
Copy this link and paste it somewhere on your desktop for now as we will be using these links in a moment.
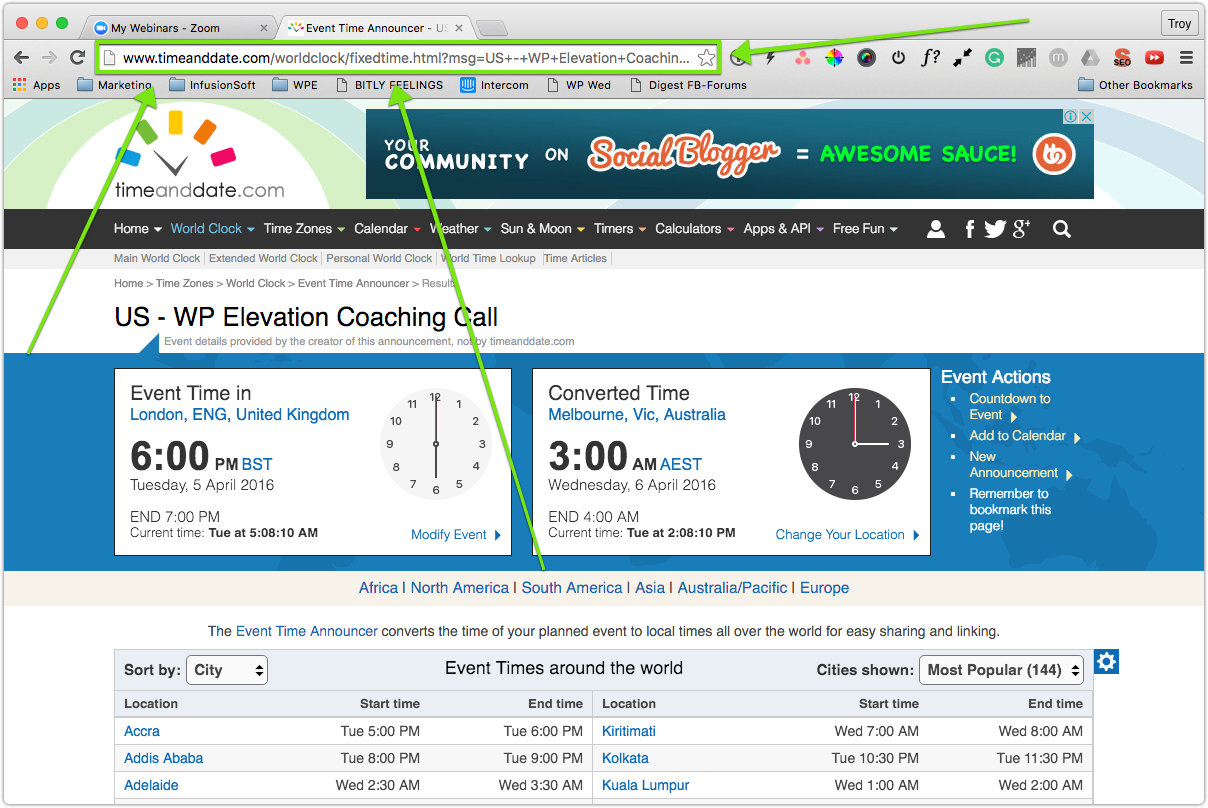
Time Zone Converter
In this section we are going to convert the time of the call into multiple time zones to make it easier for our members to see when the call is on.
Enter the name of the event as the same as the name of the call.
Enter the location of the event as city of the coach running the call.
Enter the date and time of the event as the same date and time you set up in Zoom.
Enter one hour as the duration of the event if it's a Coaching Call and 1.5hrs if it's a webinar and then click Show Result.
EG: If you are setting up a call for Kristina for April 5 at 6 PM you would enter the details as:
Name of Event: Americas WP Elevation Coaching Call Location: Baltimore Date: April 5, Time: 18:00 Duration: 1Hour
See the screenshot below is an example.
Use the following locations for the various coaches:
Troy: Melbourne Cath: Sydney Kristina: Baltimore Mike: London
When you click on Show Result you will be taken to a page that shows the call in multiple time zones around the world.
Double check that the time is correct by checking the times in some of the cities on the list as well.
Copy the URL of this page and paste it somewhere on your desktop for now as we will be using them in a moment.
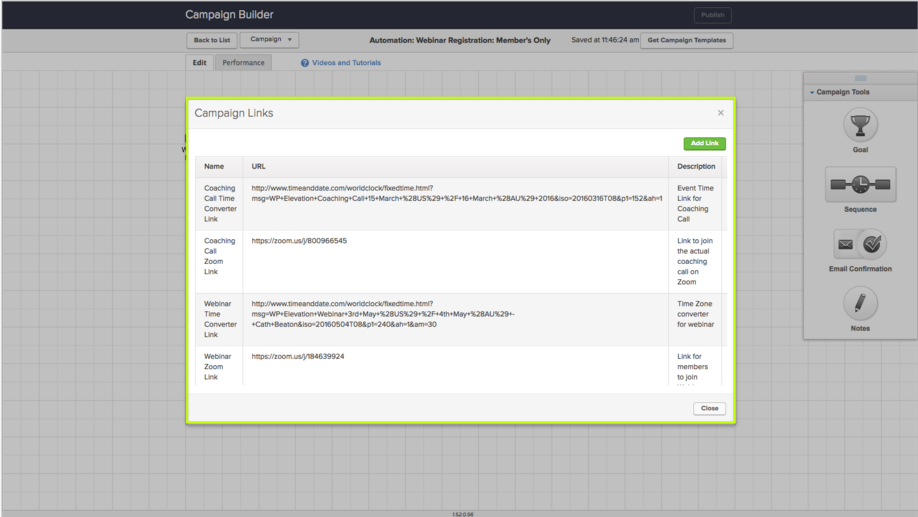
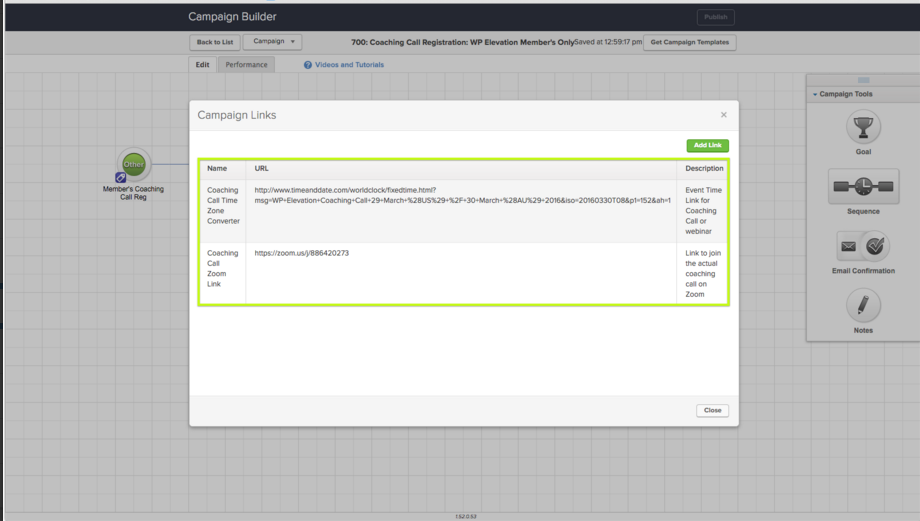
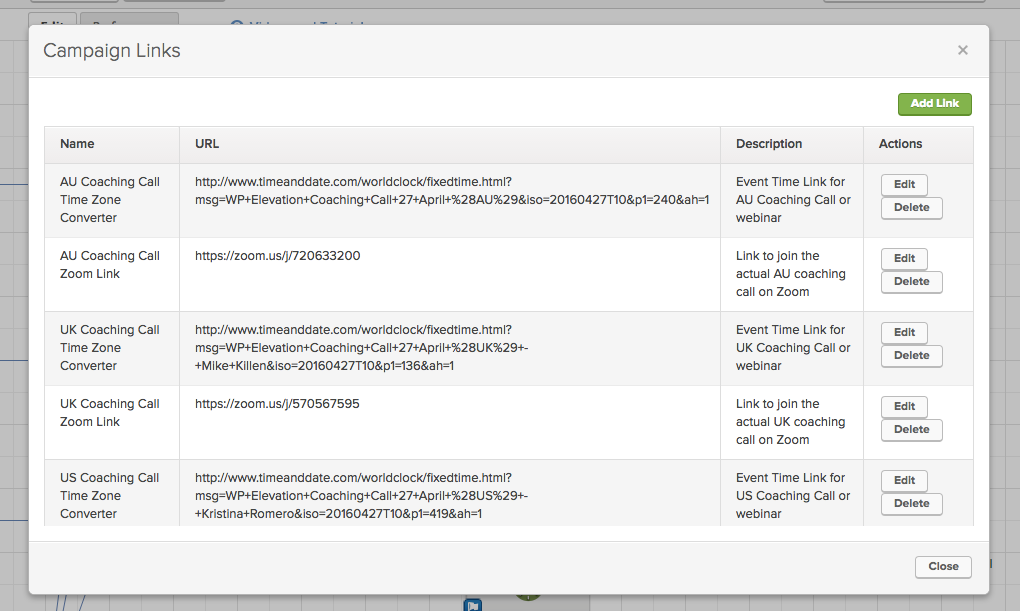
Store Links
Paste the links below from the Time and Date time zone conversion and the actual link to the call in Zoom for each call you are working on. If you are only working on one webinar or one coaching call then you will most likely only have two links to paste in here, one for the time zone conversion and one for Zoom.
You will use these links shortly as Campaign Links in Infusionsoft.
Promote the Call:
Now that the call is all set up, it's time to promote the call to our members. We do this by sending an email from Infusionsoft.
Infusionsoft
Login to Infusionsoft and find the correct campaign for promoting this call.
Each campaign in Infusionsoft includes links and fieds that are placed within each email. These are called Campaign Links and Merge Fields and make it easy to update all emails by changing the information in one place, rather than having to edit each email.
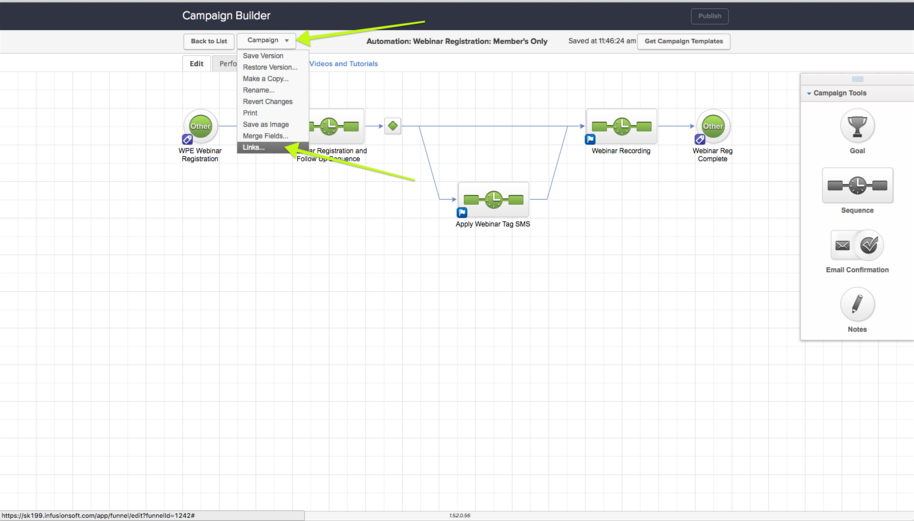
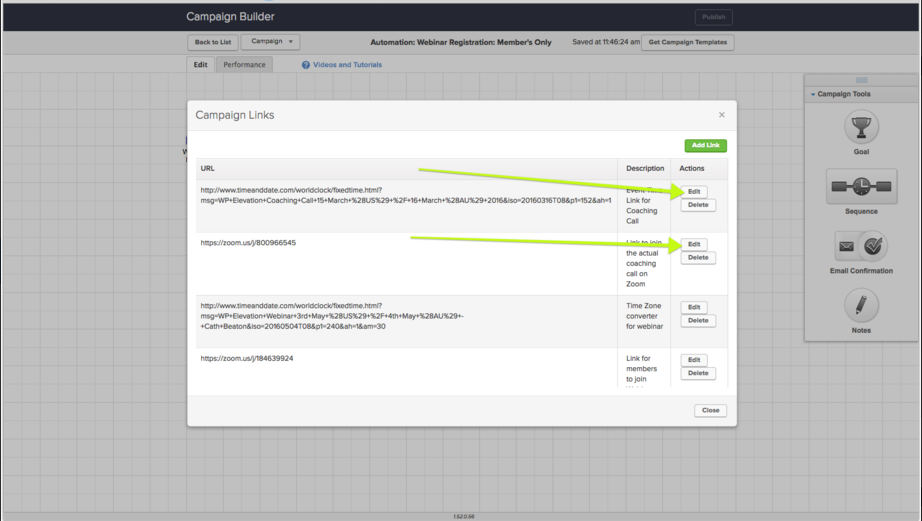
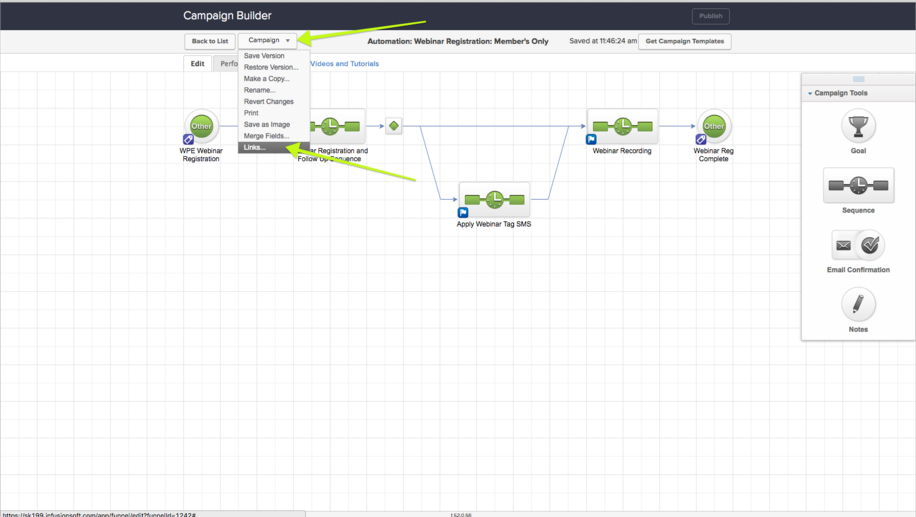
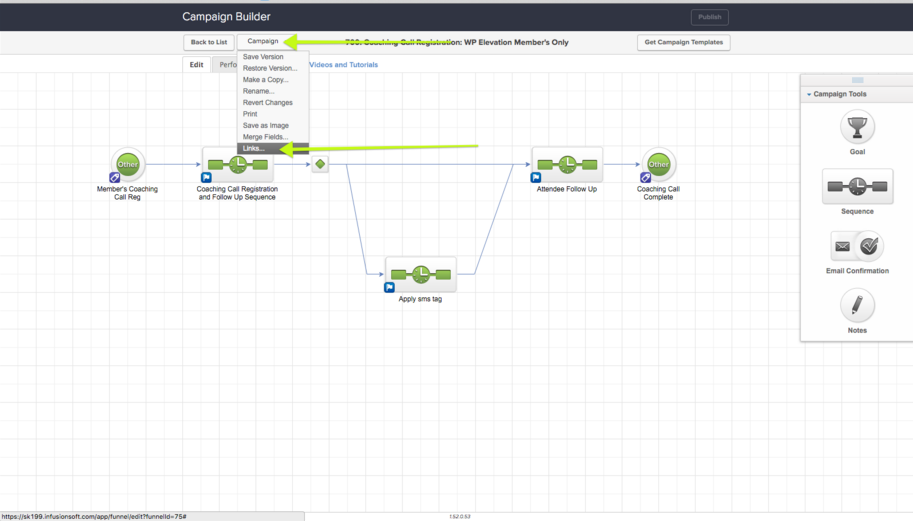
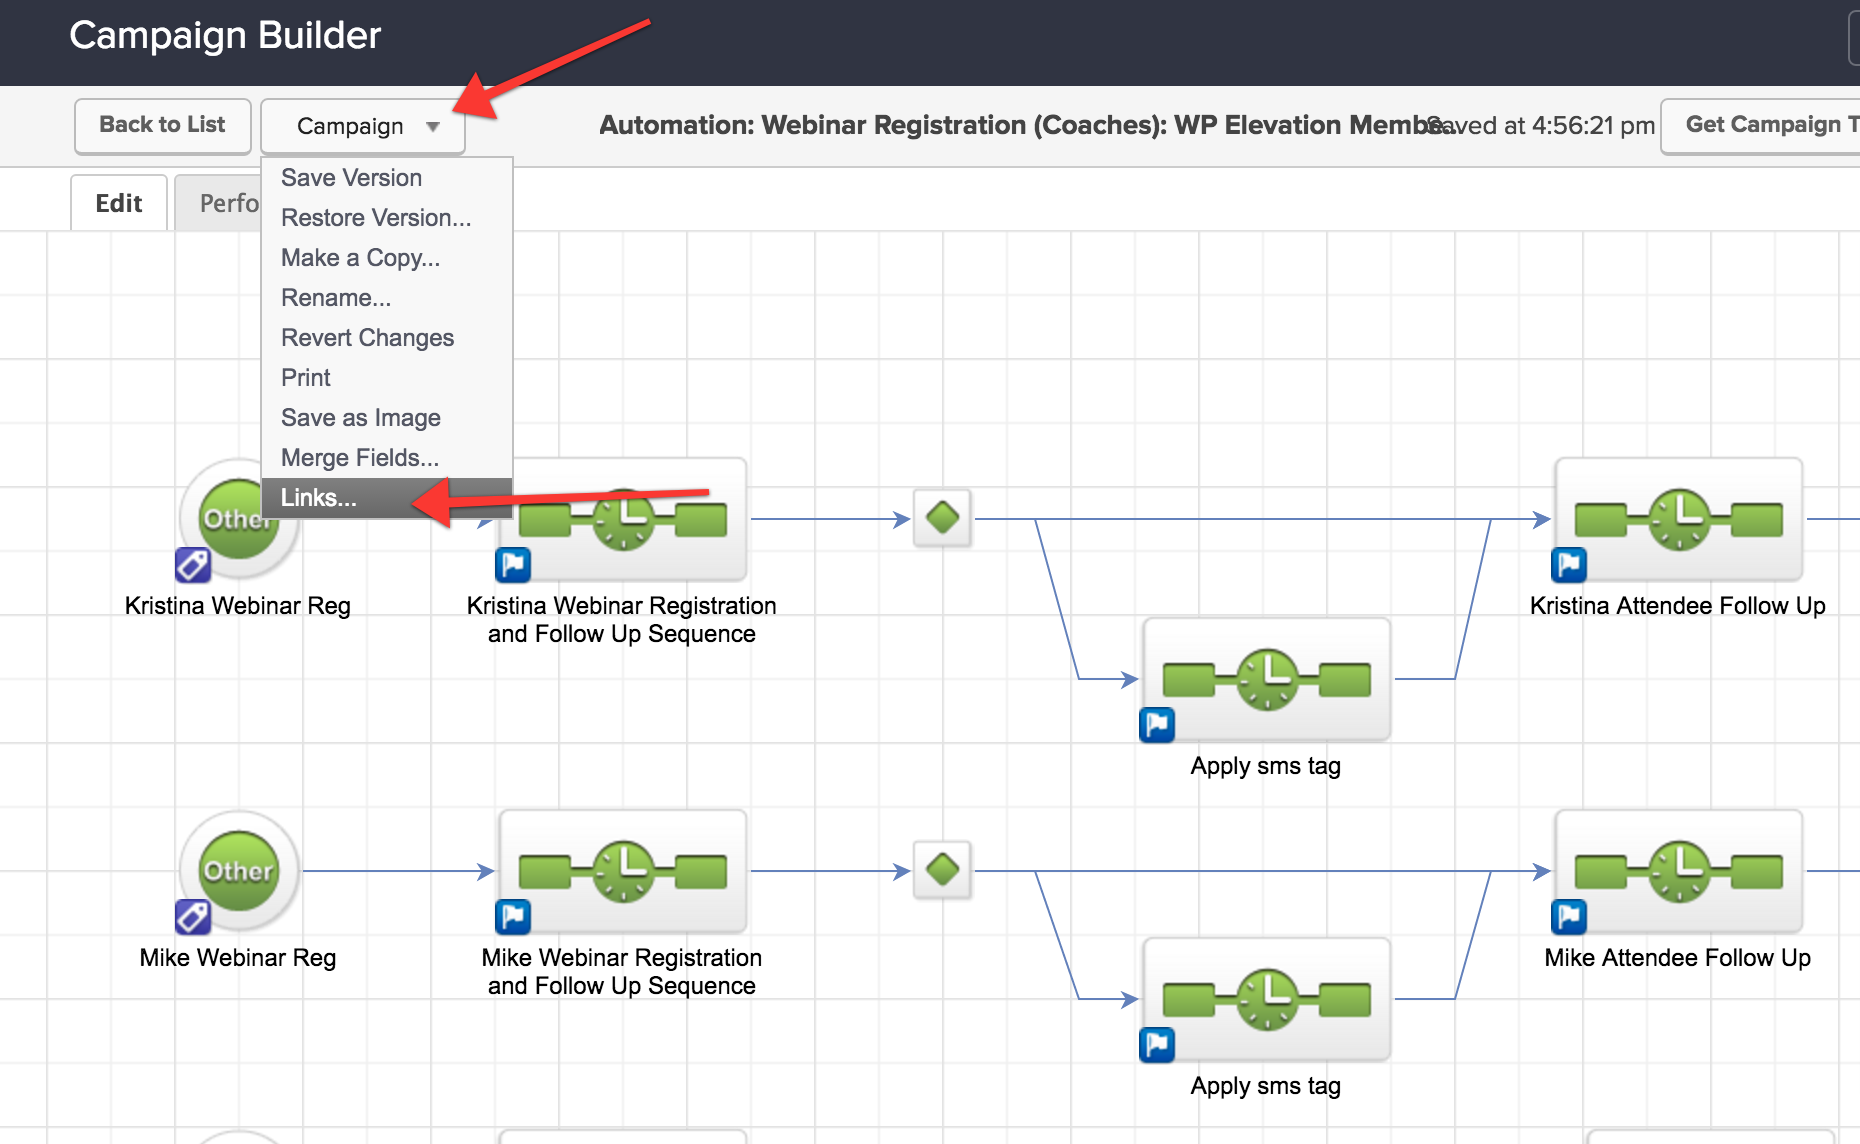
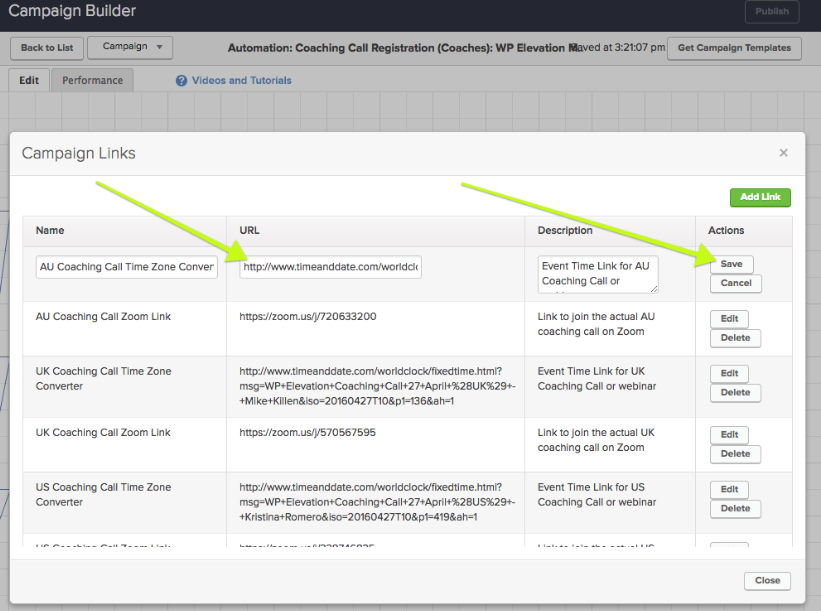
Edit Campaign Links
From the Campaign dropdown, choose Links in order to edit the Campaign links.
These are the links you stored previously for the Zoom call and the time zone conversions.
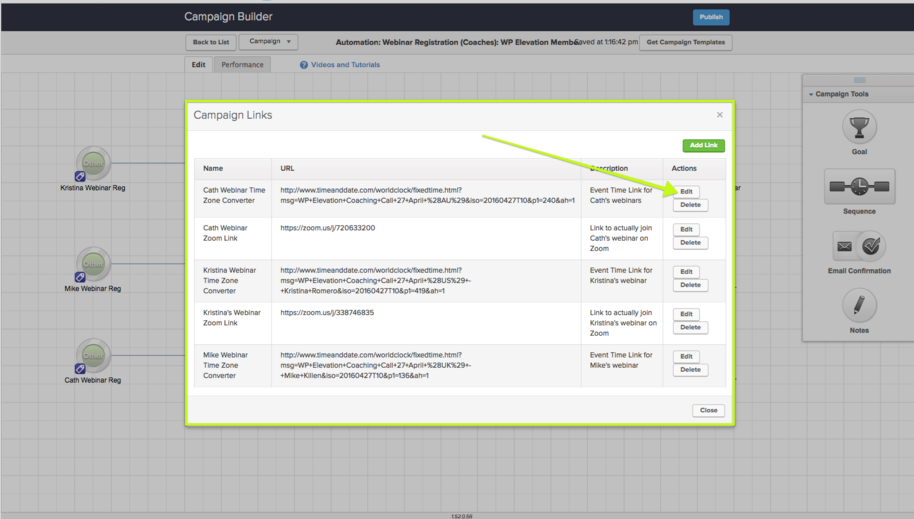
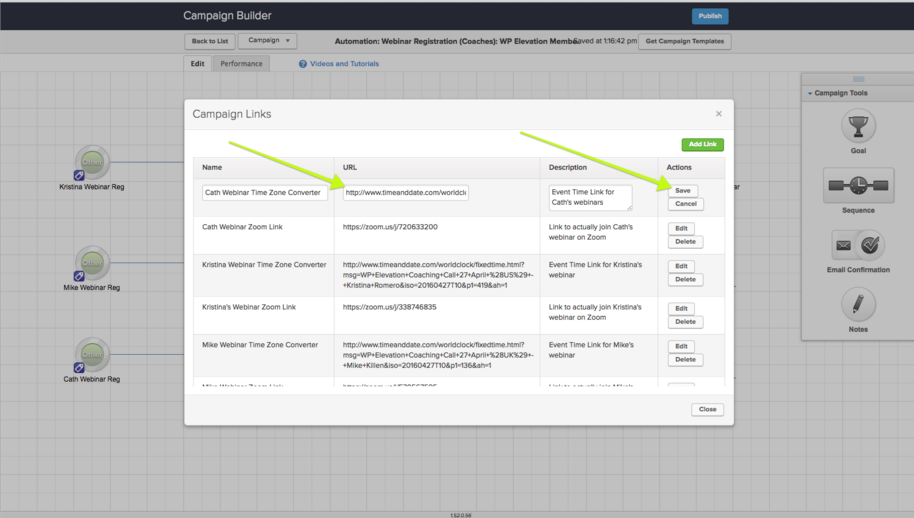
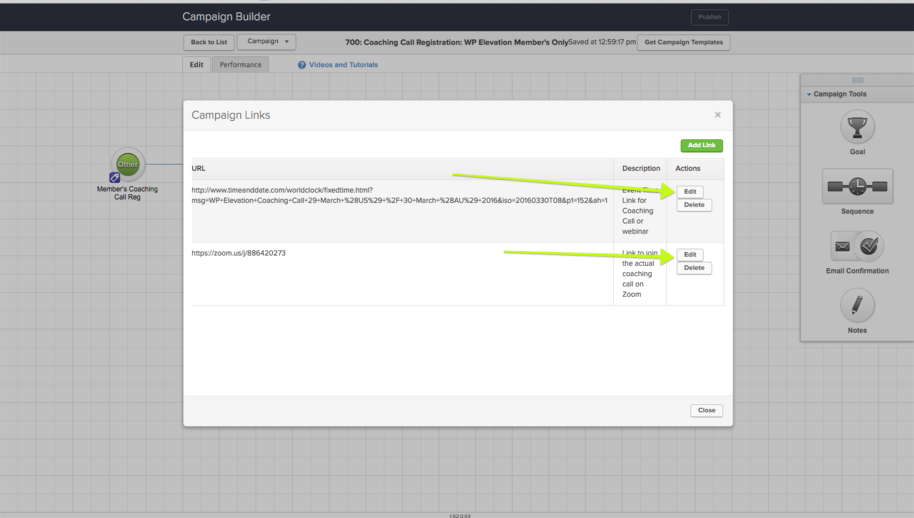
Edit each link by clicking the Edit button, adding the new links to update the link, and then choosing Save.
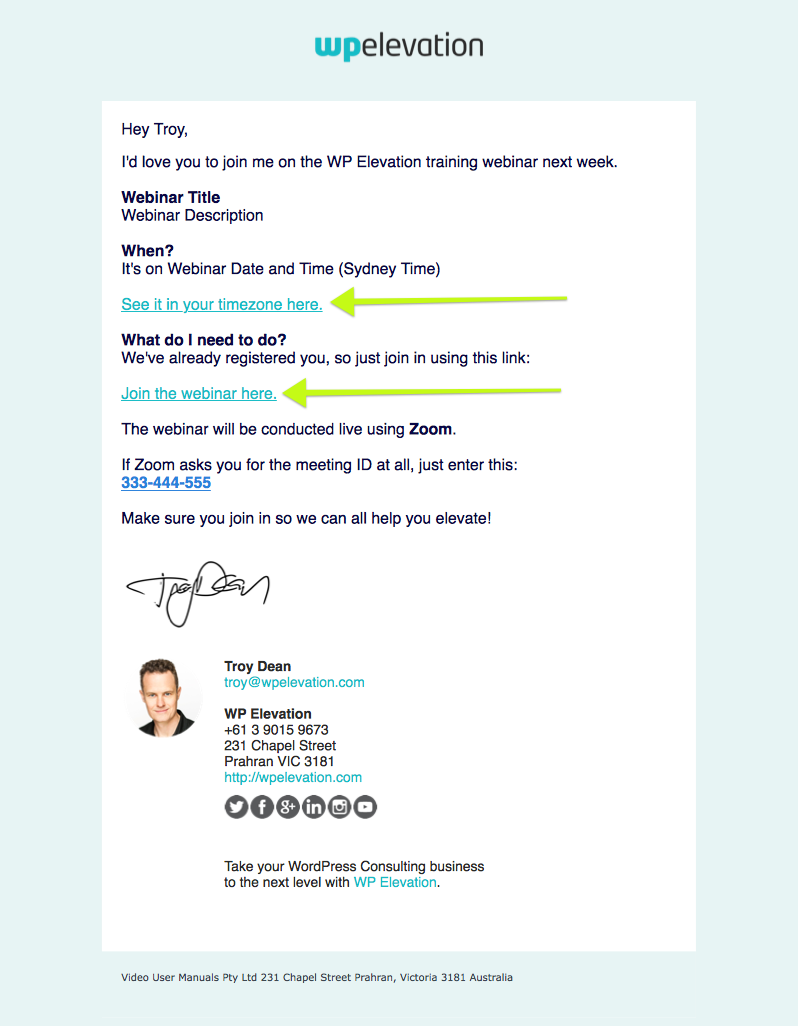
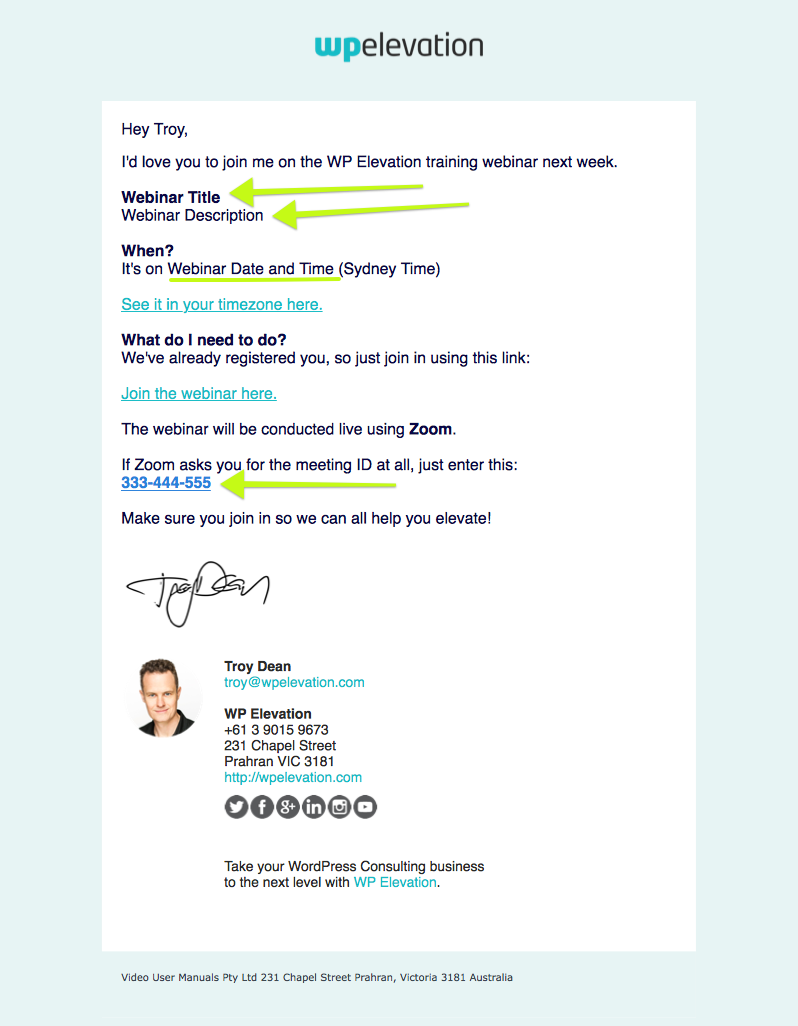
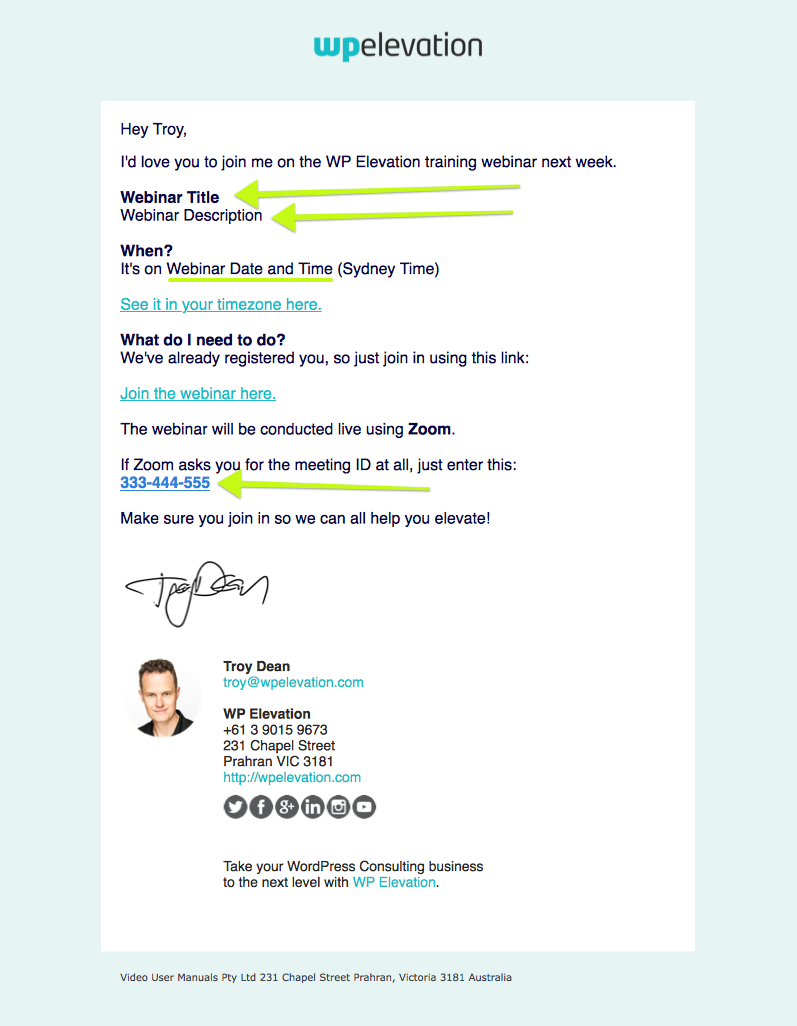
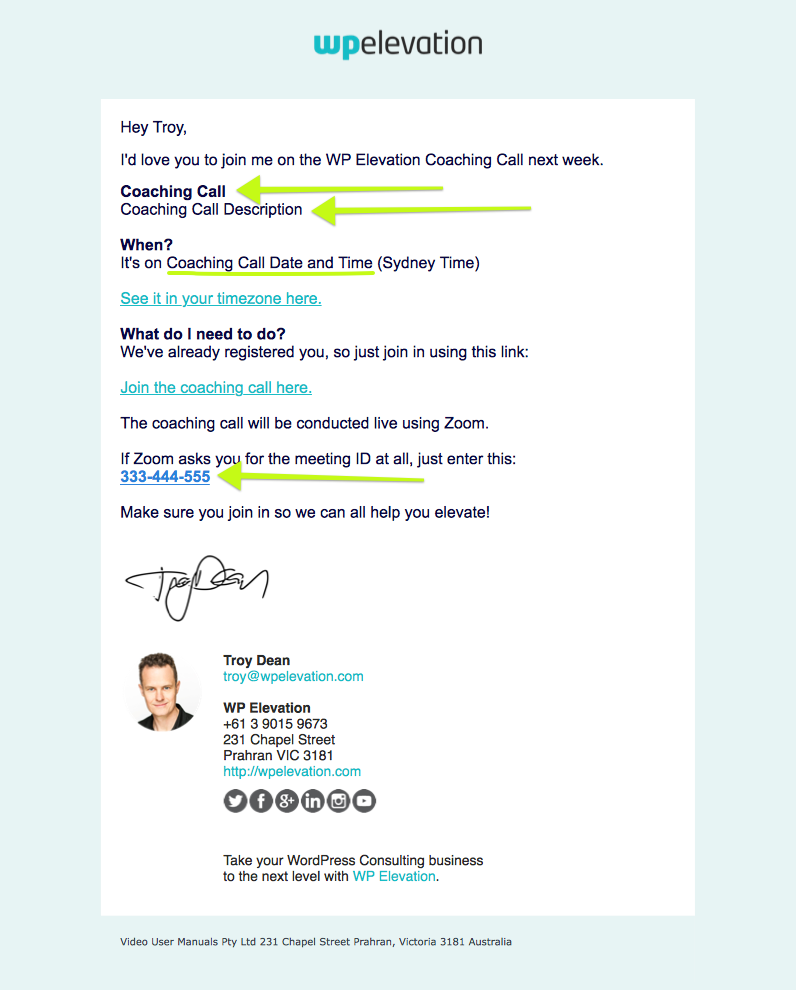
Here is a screenshot of an email to show you where the campaign links are situated.
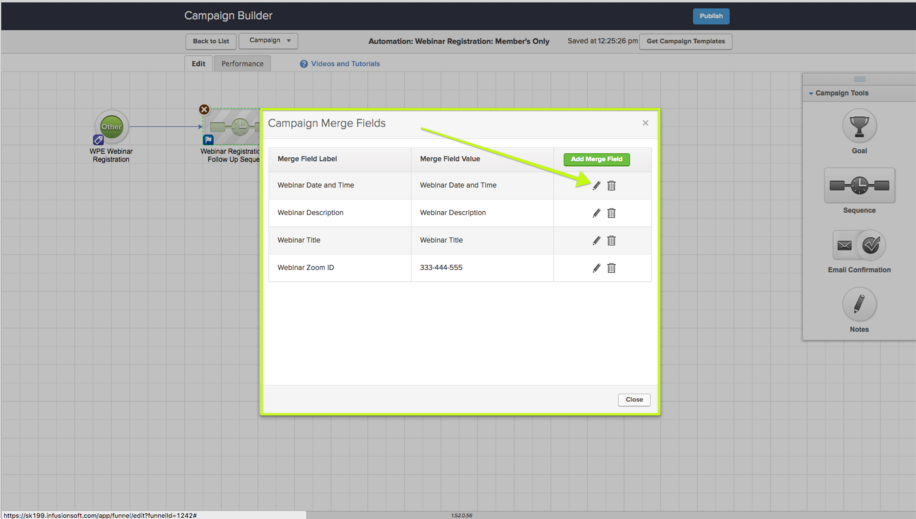
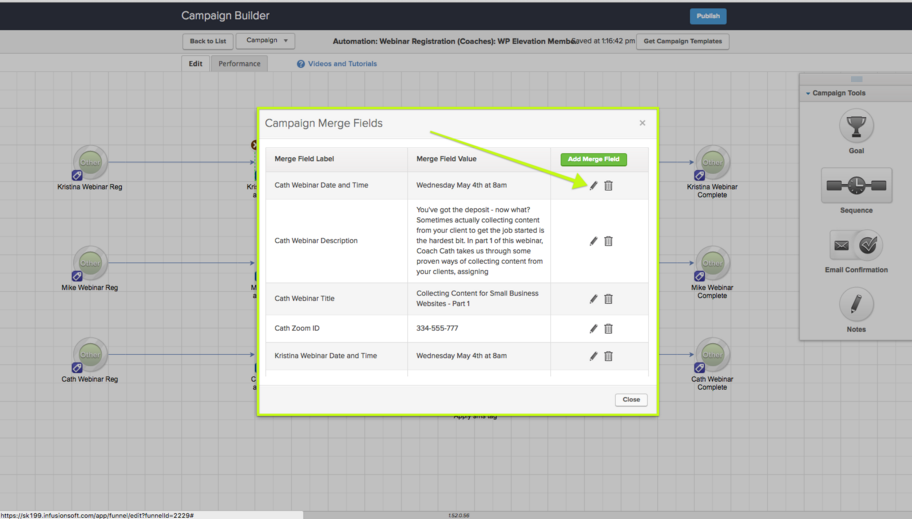
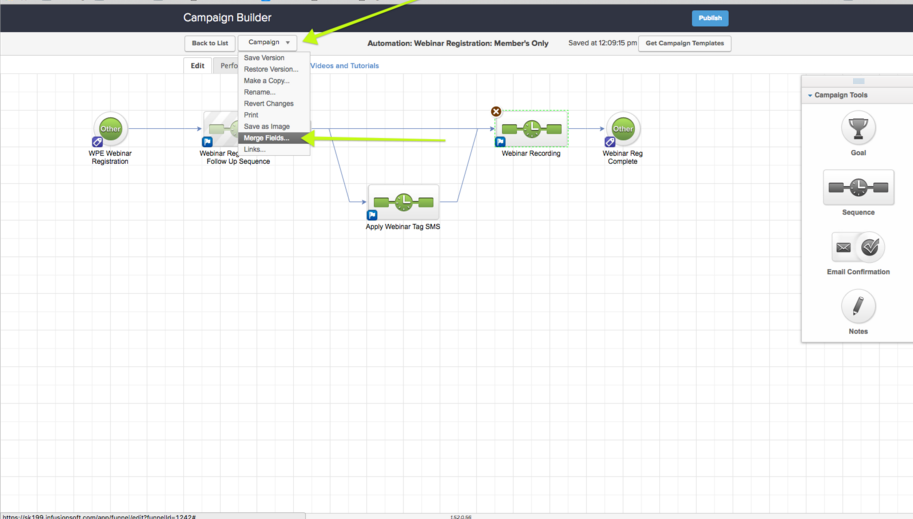
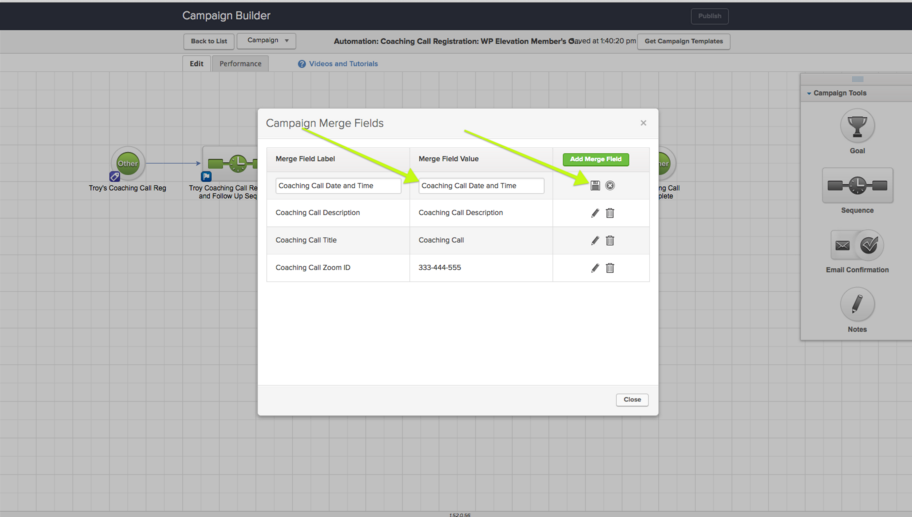
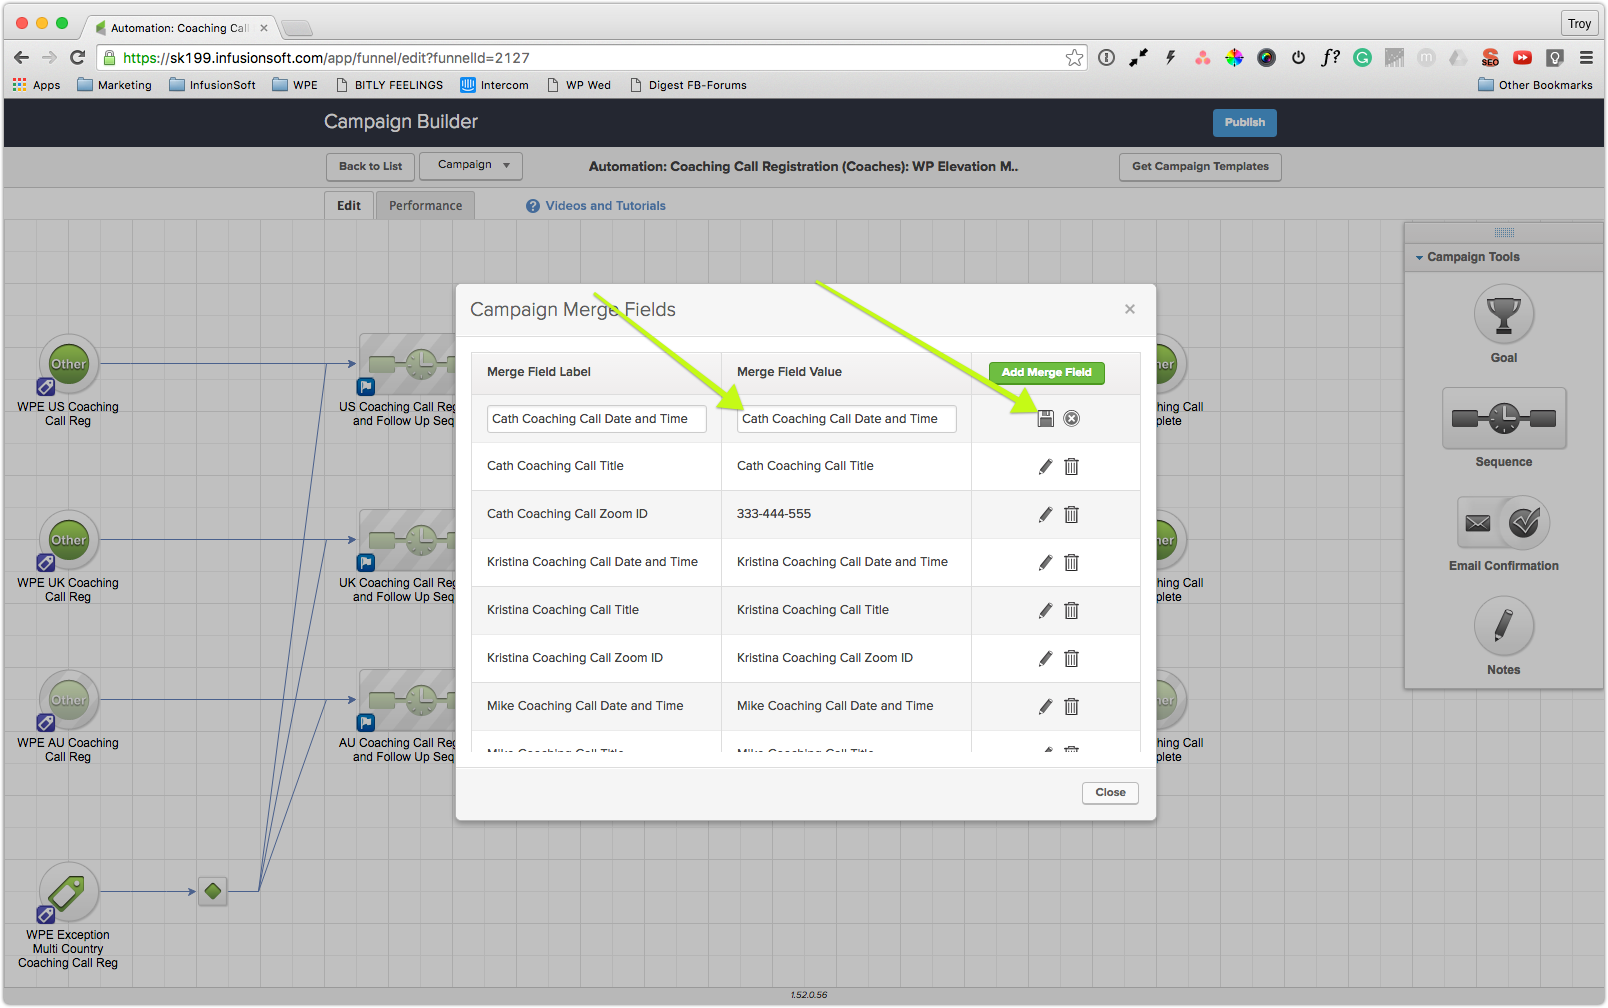
Edit Merge Fields
From the Campaign dropdown, choose Merge Fields in order to edit the merge fields.
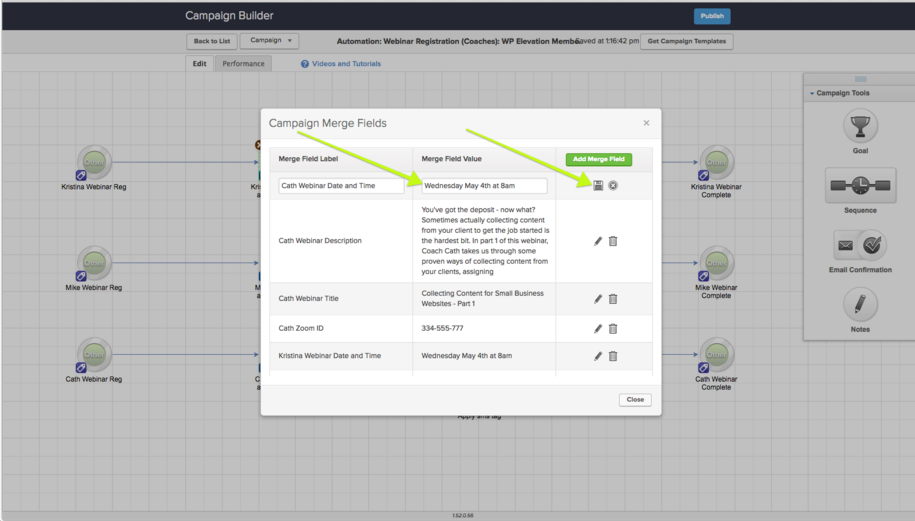
Edit each merge field by clicking the Edit button, adding the new information and then choosing Save.
The information for the Webinar Title and Description will be in the Asana Content Calendar.
The Date and Time should always be entered as Sydney Time.
EG: Wednesday May 18 at 8am
The Zoom ID you will have saved earlier in the Store Links task.
Here is a screenshot of an email to show you where the merge fields are situated.
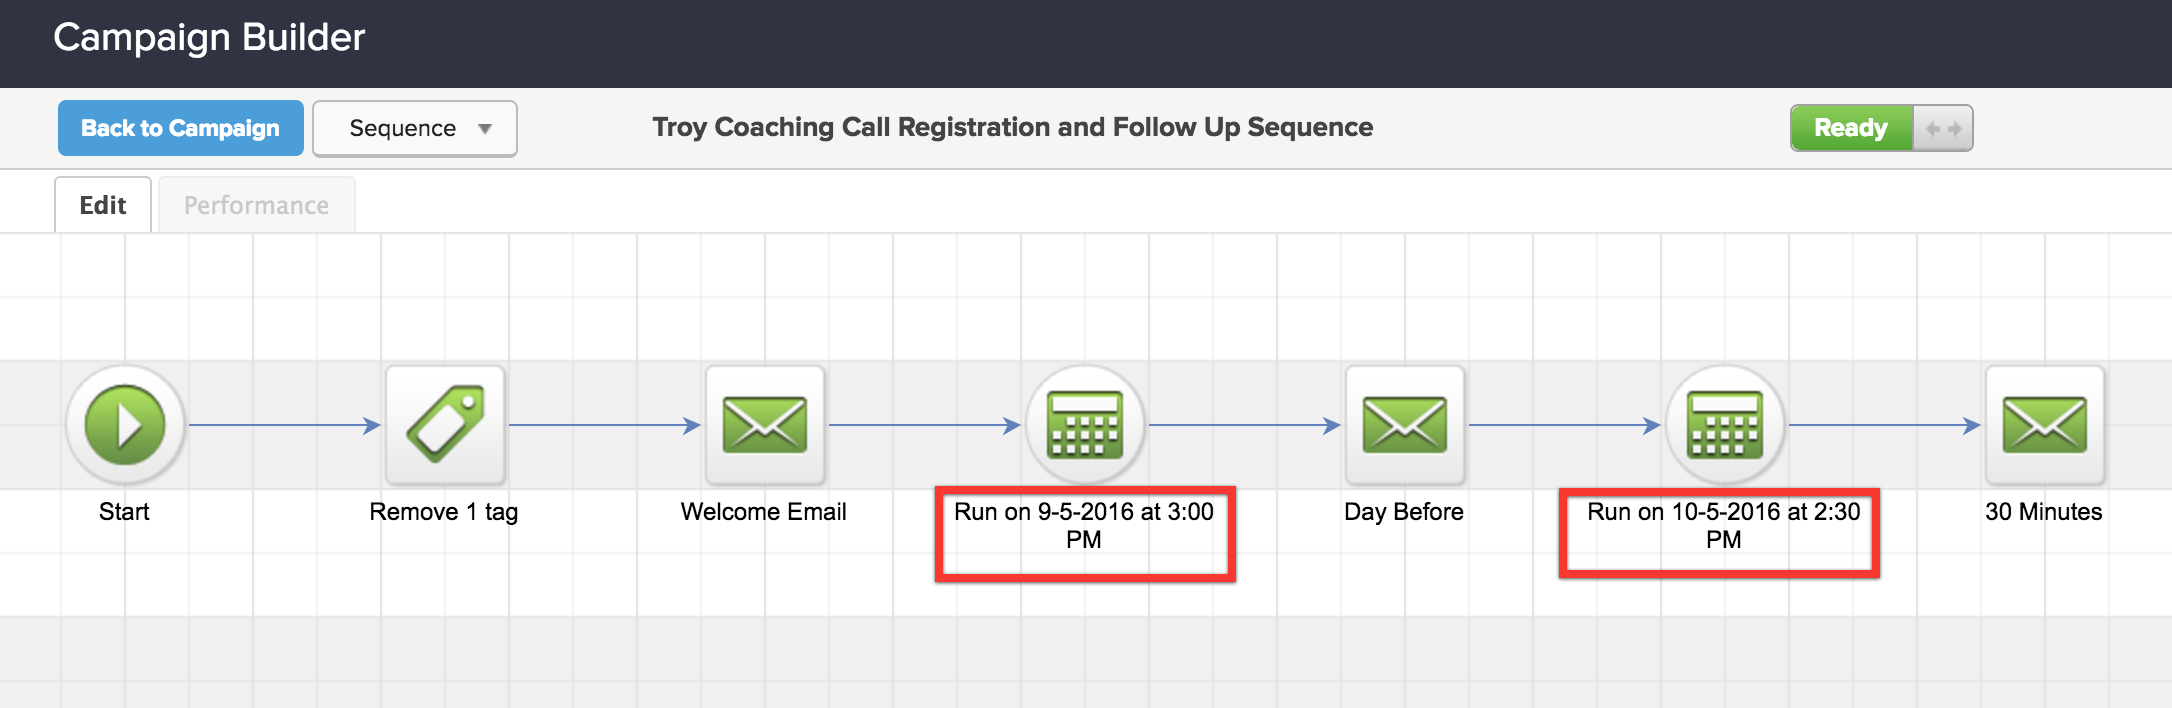
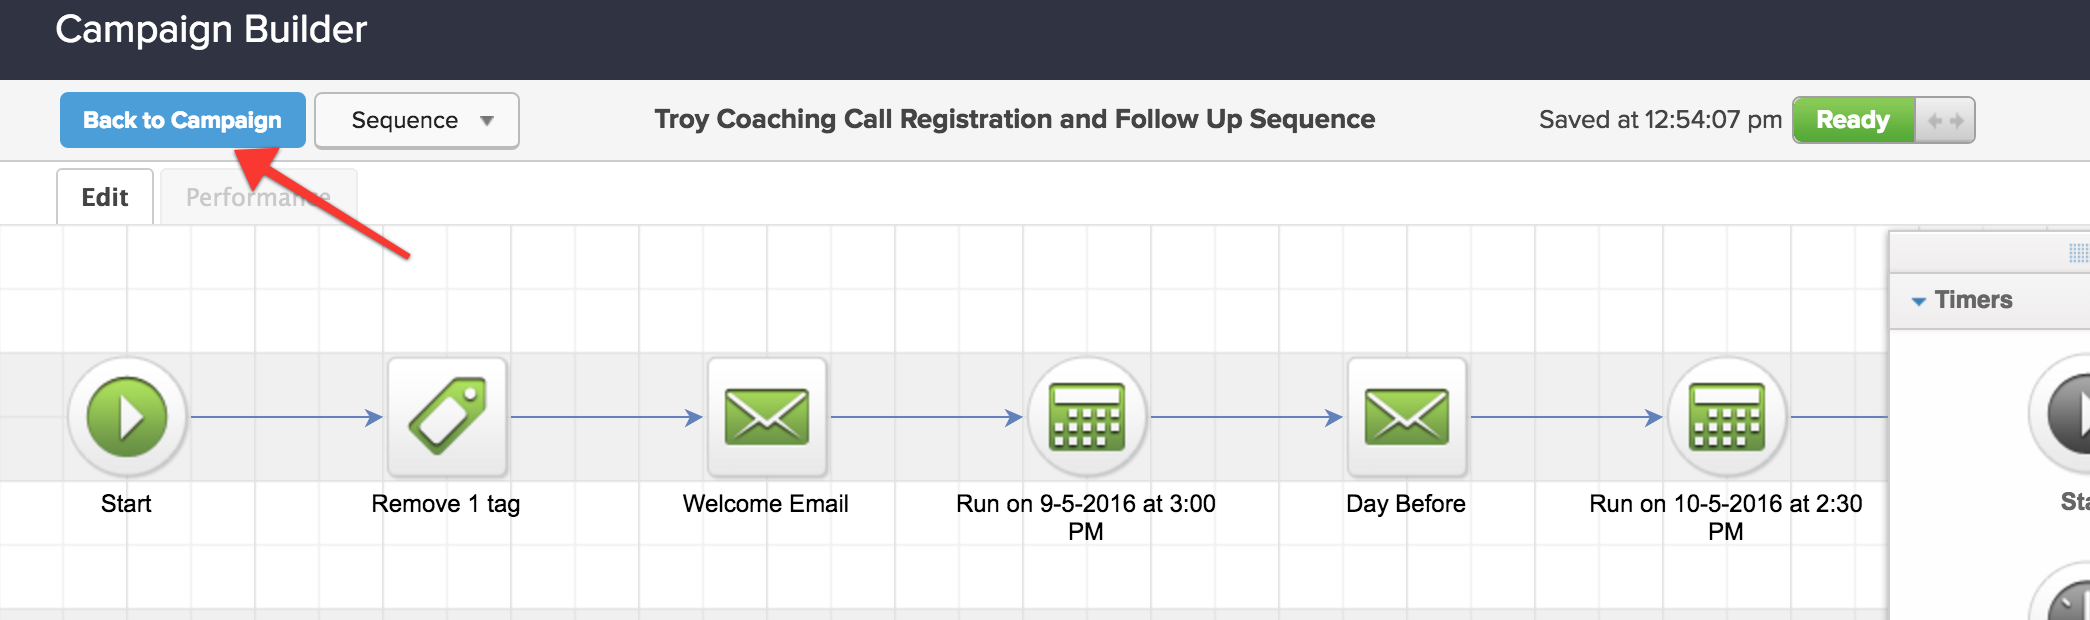
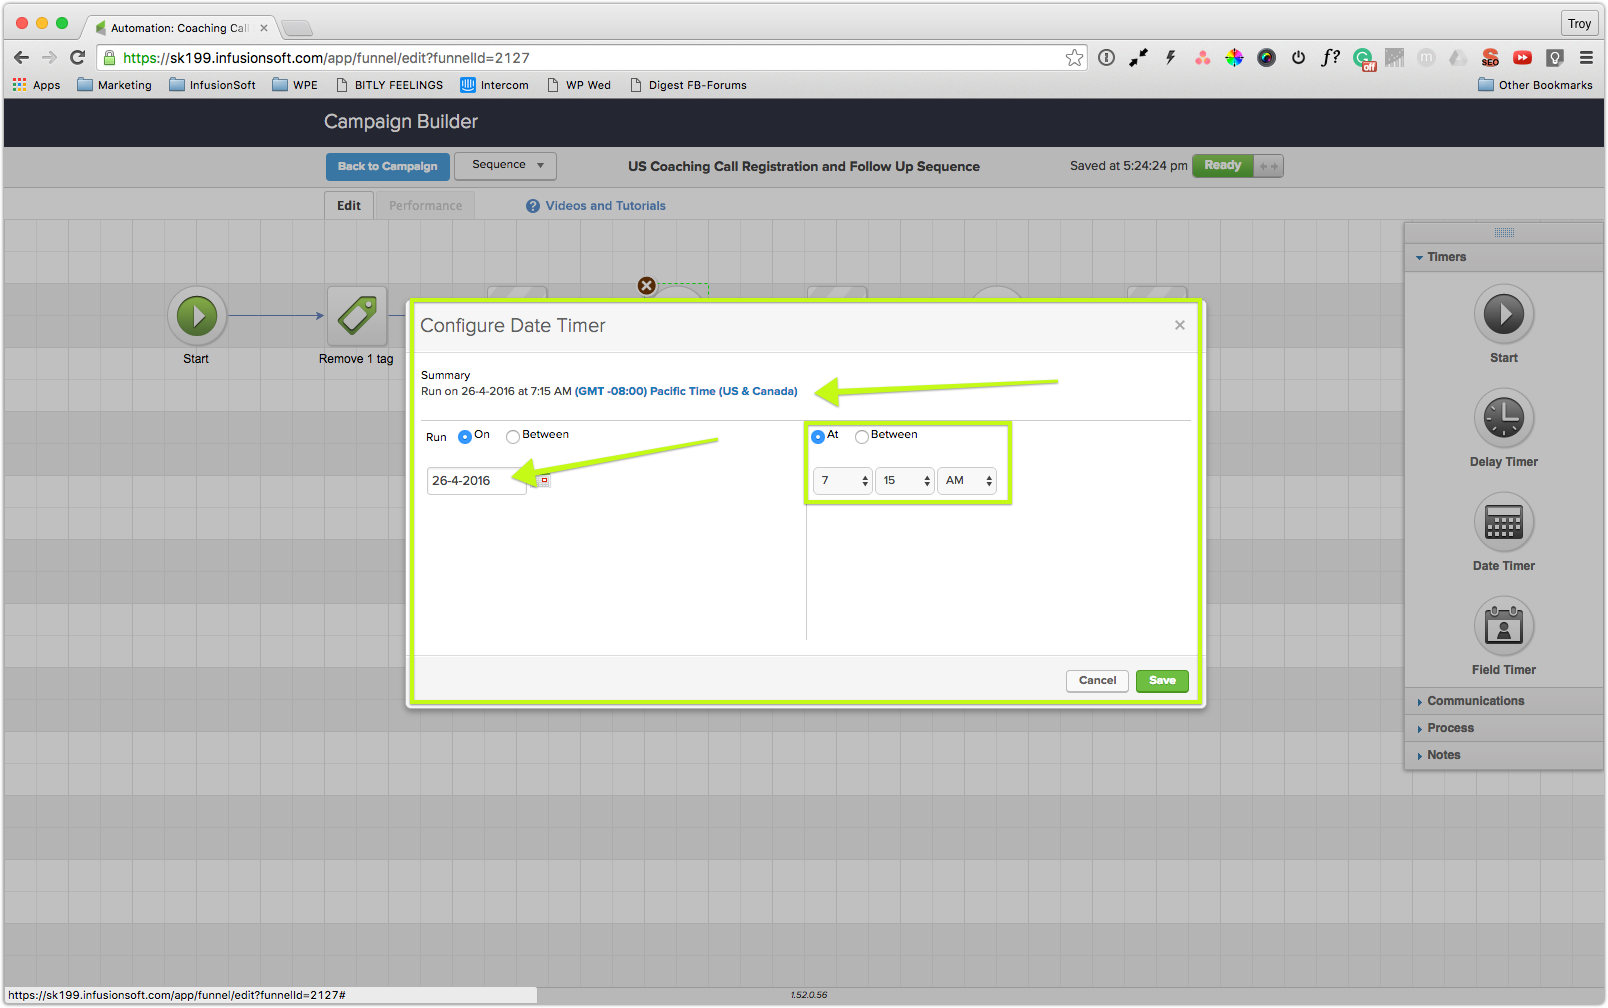
Timers
Edit the dates on when the email should be sent out. Start on the calendar icon on the far right , just before the "30 minutes" email icon. Followed by the calendar icon that appears before the "Day Before" email icon.
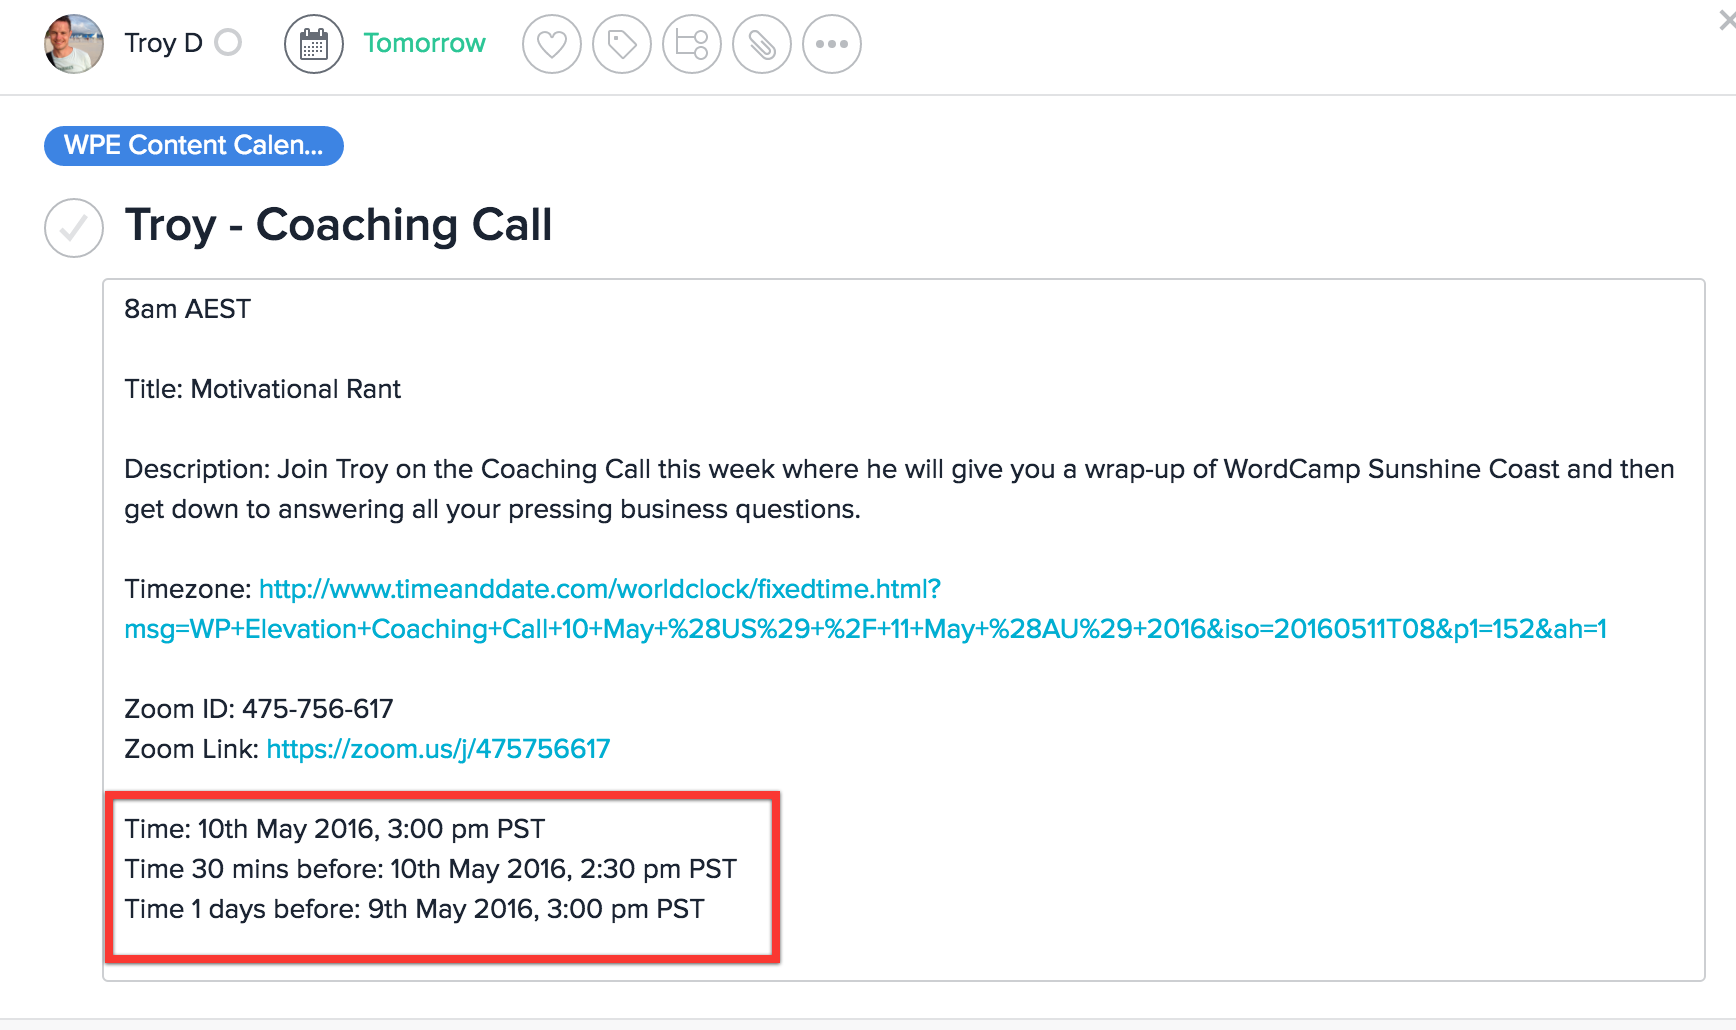
Refer to the Content Calendar in asana for the correct schedule
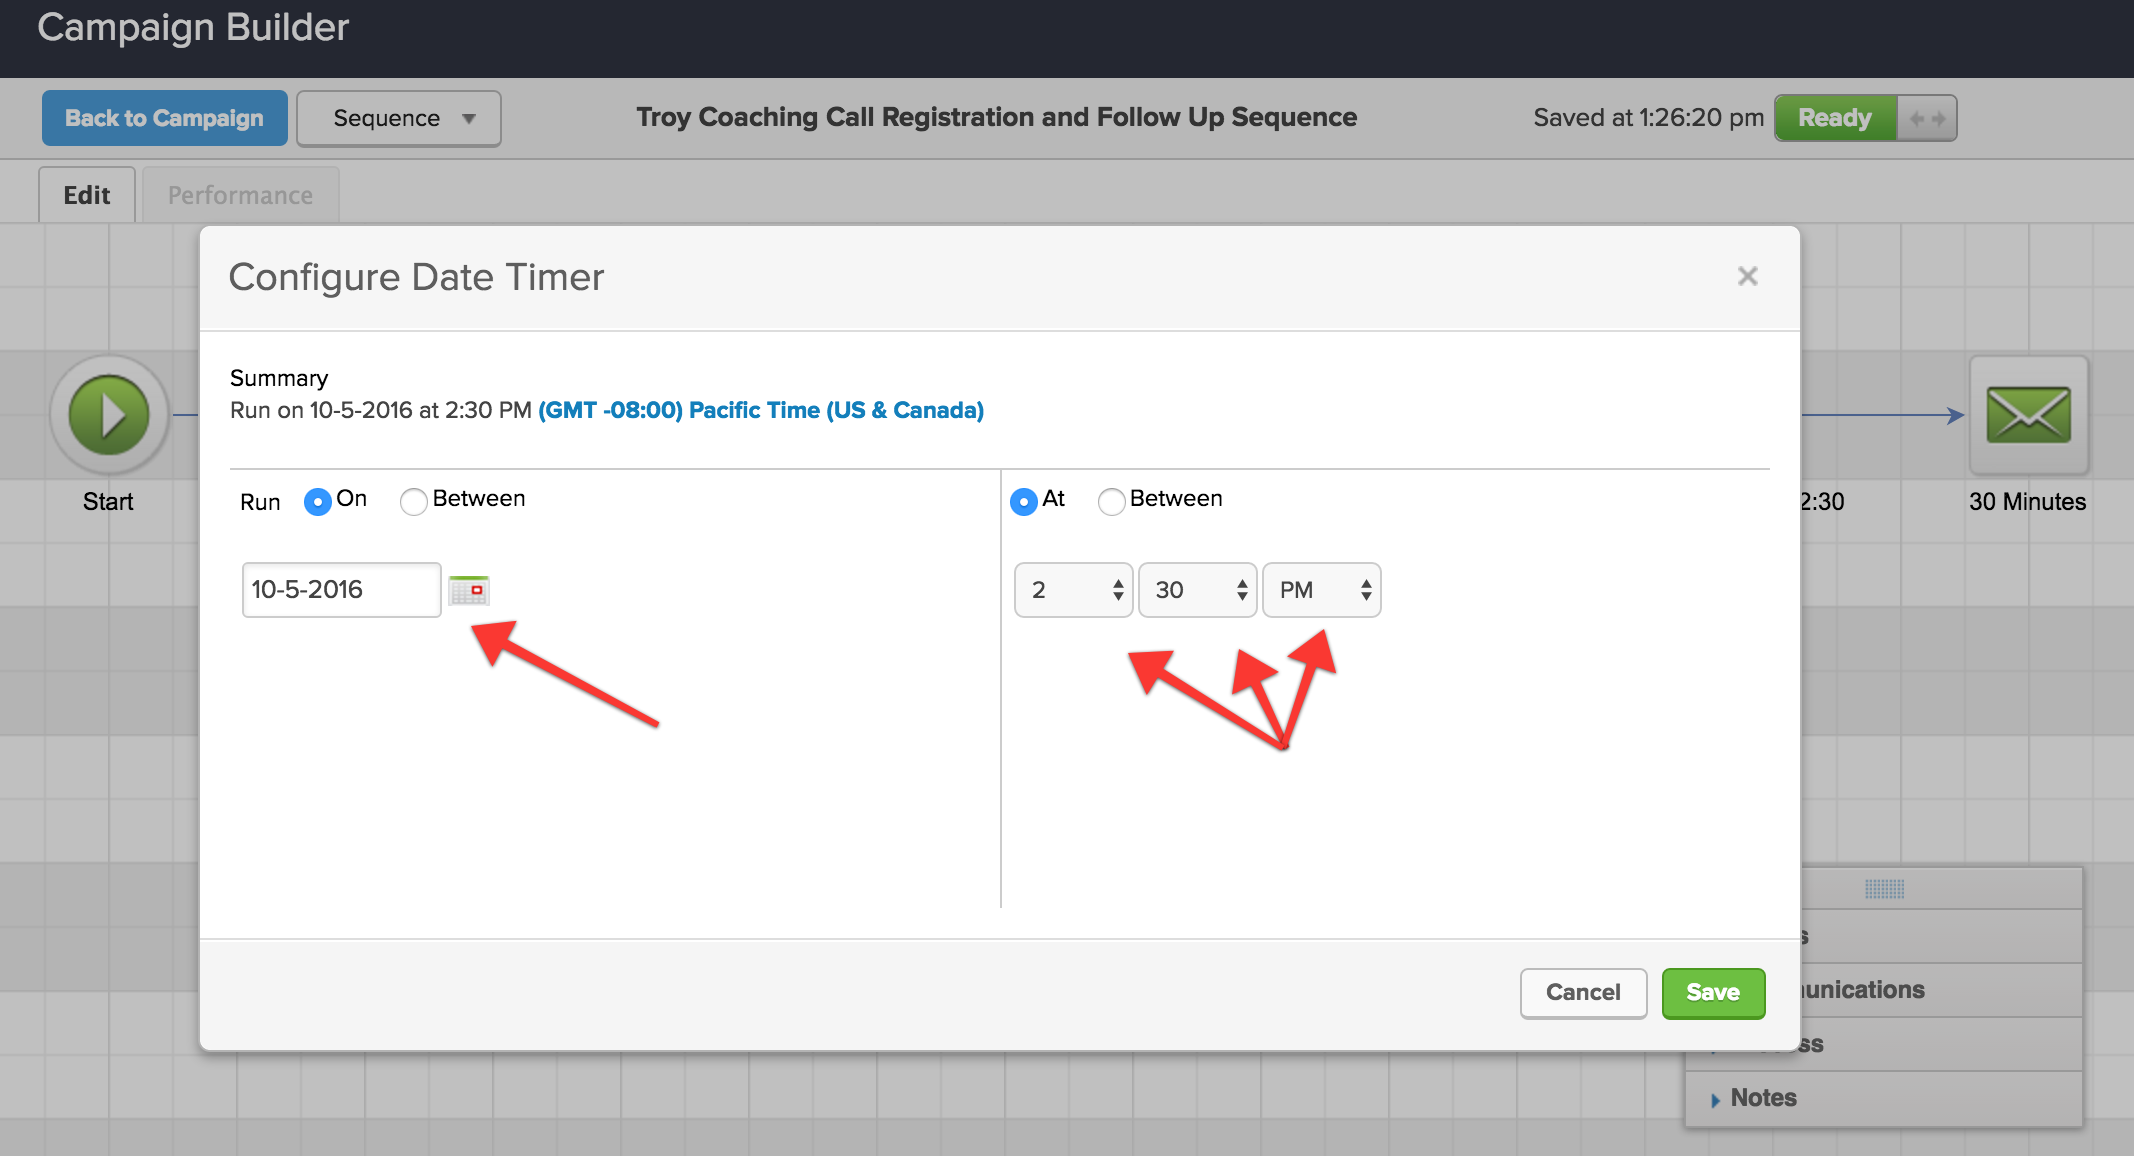
Double click on the calendar icons in the InfusionSoft campaign to configure the dates and time
Test
When you have made all the changes to the emails, double click on the Welcome Email icon and click on the "Send Test" button on the upper right side of the page, choose your name to send a test to yourself to see if the merge fields values appears correctly.
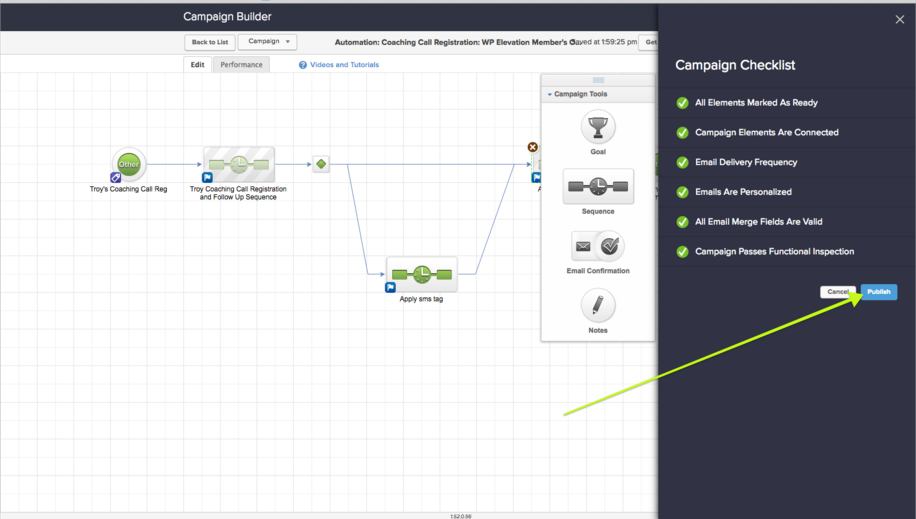
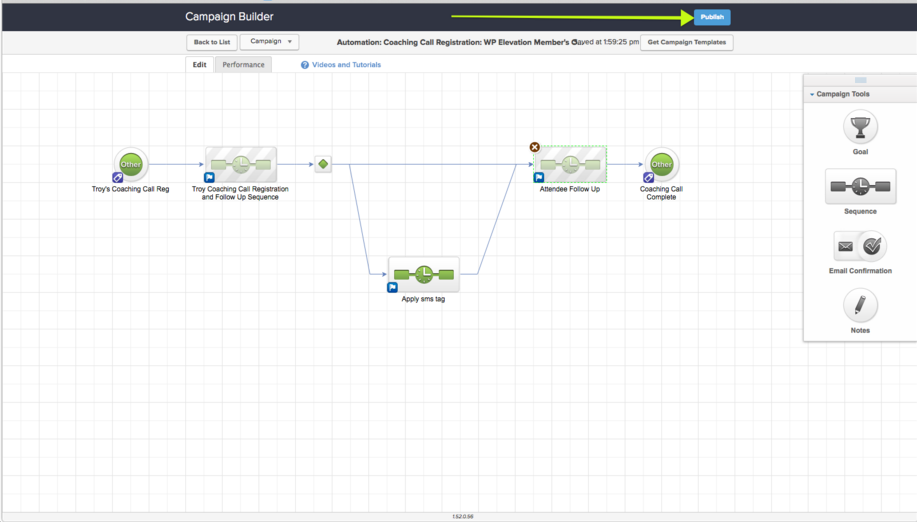
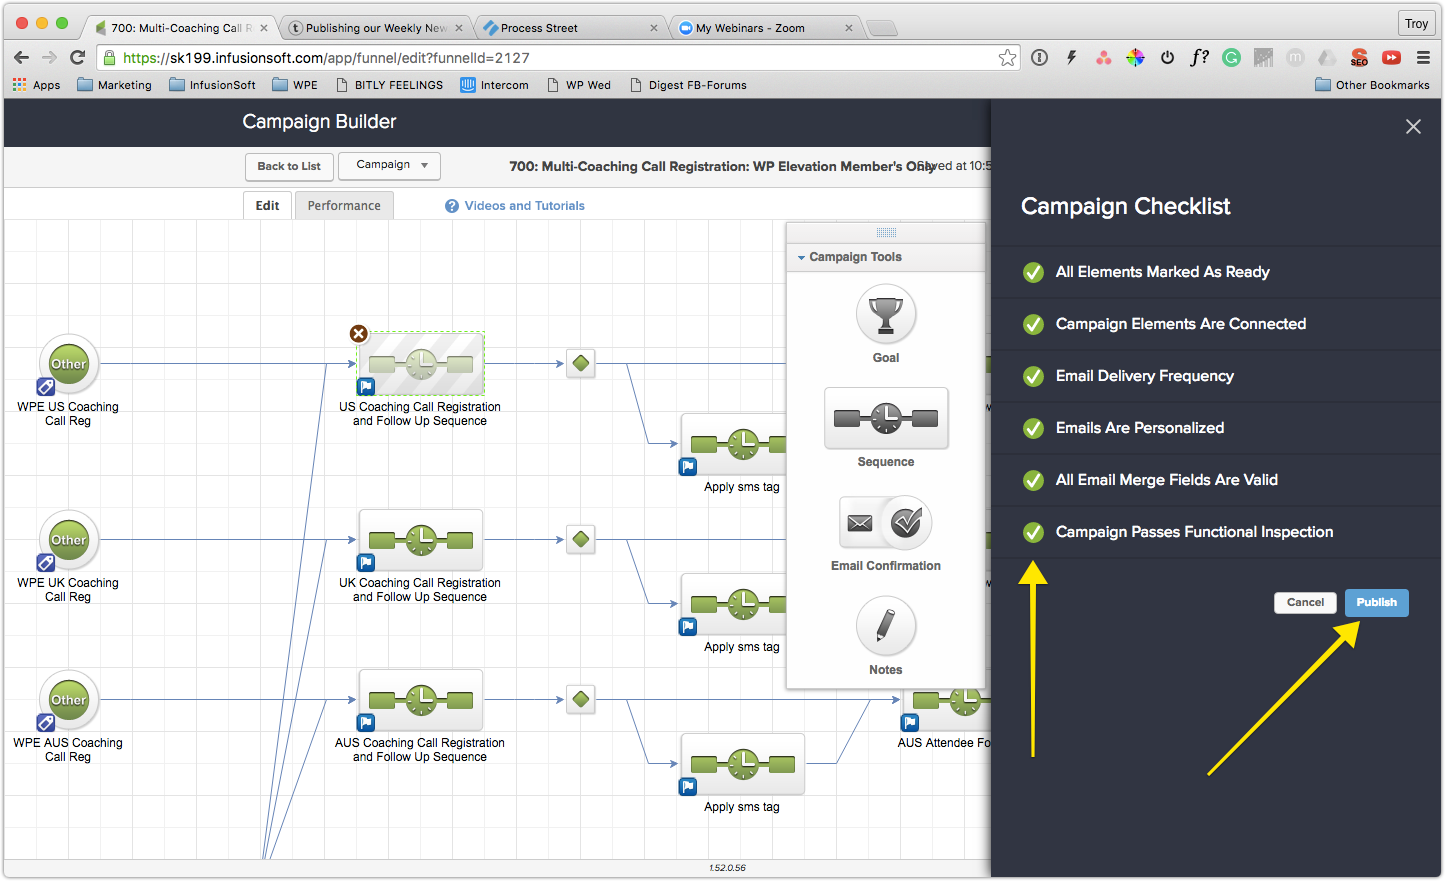
Publish
When you have made all the changes to the emails and sent test emails to double check the links and the details, then publish the campaign by choosing the publish button and then confirming you want to publish.
Each campaign in Infusionsoft includes links and fieds that are placed within each email. These are called Campaign Links and Merge Fields and make it easy to update all emails by changing the information in one place, rather than having to edit each email.
Edit Campaign Links
From the Campaign dropdown, choose Links in order to edit the Campaign links.
These are the links you stored previously for the Zoom call and the time zone conversions.
Edit each link by clicking the Edit button, adding the new links to update the link, and then choosing Save.
Here is a screenshot of an email to show you where the campaign links are situated.
Edit Merge Fields
From the Campaign dropdown, choose Merge Fields in order to edit the merge fields.
Edit each merge field by clicking the Edit button, adding the new information and then choosing Save.
There should only be 4 merge fields relevant for each webinar.
EG: For one of Cath's webinars, the 4 merge fields to edit are:
Cath Webinar Date and Time
Cath Webinar Description
Cath Webinar Title
Cath Zoom ID
The information for the Webinar Title and Description will be in the Asana Content Calendar.
The Date and Time should always be entered as Sydney Time.
EG: Wednesday May 18 at 8am
The Zoom ID you will have saved earlier in the Store Links task.
Here is a screenshot of an email to show you where the merge fields are situated.
Timers
Edit the dates on when the email should be sent out. Start on the calendar icon on the far right , just before the "30 minutes" email icon. Followed by the calendar icon that appears before the "Day Before" email icon.
Refer to the Content Calendar in asana for the correct schedule
Double click on the calendar icons in the InfusionSoft campaign to configure the dates and time
Test
When you have made all the changes to the emails, double click on the Welcome Email icon and click on the "Send Test" button on the upper right side of the page, choose your name to send a test to yourself to see if the merge fields values appears correctly.
Publish
When you have made all the changes to the emails and sent test emails to double check the links and the details, then publish the campaign by choosing the publish button and then confirming you want to publish.
Troy's Coaching Call
Each campaign in Infusionsoft includes links that are placed within each email. These are called Campaign Links and make it easy to update all emails by changing the link in one place, rather than having to edit each link in each email.
From the Campaign dropdown, choose Links in order to edit the Campaign links.
These are the links you stored previously for the Zoom call and the time zone conversions.
Edit Campaign Links
Edit each link by clicking the Edit button, adding the new links to update the link, and then choosing Save.
Edit Merge Fields
From the Campaign dropdown, choose Merge Fields in order to edit the merge fields.
Edit each merge field by clicking the Edit button, adding the new information and then choosing Save.
The information for the Coaching Call Title and Description will be in the Asana Content Calendar.
The Date and Time should always be entered as Sydney Time.
EG: Wednesday May 18 at 8am
The Zoom ID you will have saved earlier in the Store Links task.
Here is a screenshot of an email to show you where the merge fields are situated.
Timers
Edit the dates on when the email should be sent out. Start on the calendar icon on the far right , just before the "30 minutes" email icon. Followed by the calendar icon that appears before the "Day Before" email icon.
Refer to the Content Calendar in asana for the correct schedule
Double click on the calendar icons in the InfusionSoft campaign to configure the dates and time
Test
When you have made all the changes to the emails, double click on the Welcome Email icon and click on the "Send Test" button on the upper right side of the page, choose your name to send a test to yourself to see if the merge fields values appears correctly.
Publish
Double check the links and the details on the test email that you received. When you're happy with the test email, go back to InfusionSoft campaign and hit "Back to Campaign" button,
then publish the campaign by clicking the publish button and then confirming you want to publish.
Coaches Coaching Call
Towards the end of each month, we run three separate coaching calls; one in the US, UK and AU that the coaches facilitate as a way of catering for our global audience in their relevant time zones.
The process for promoting these calls is exactly the same as promoting Troy's call, however we need to update more Campaign Links and edit more emails.
This campaign includes six campaign links,
one for each of the three Zoom calls, and
one for each of the three time zone conversion links
From the Campaign dropdown, choose Links in order to edit the Campaign links.
These are the links you stored previously for the Zoom call and the time zone conversions.
Edit each link by clicking the Edit button, adding the new links to update the link, and then choosing Save.
Edit Merge Fields
From the Campaign dropdown, choose Merge Fields in order to edit the merge fields.
Edit each merge field by clicking the Edit button, adding the new information and then choosing Save.
All 9 merge fields need to be updated for this coaching call.
Cath Webinar Date and Time
Cath Webinar Title
Cath Zoom ID
Kristina Webinar Date and Time
Kristina Webinar Title
Kristina Zoom ID
Mike Webinar Date and Time
Mike Webinar Title
Mike Zoom ID
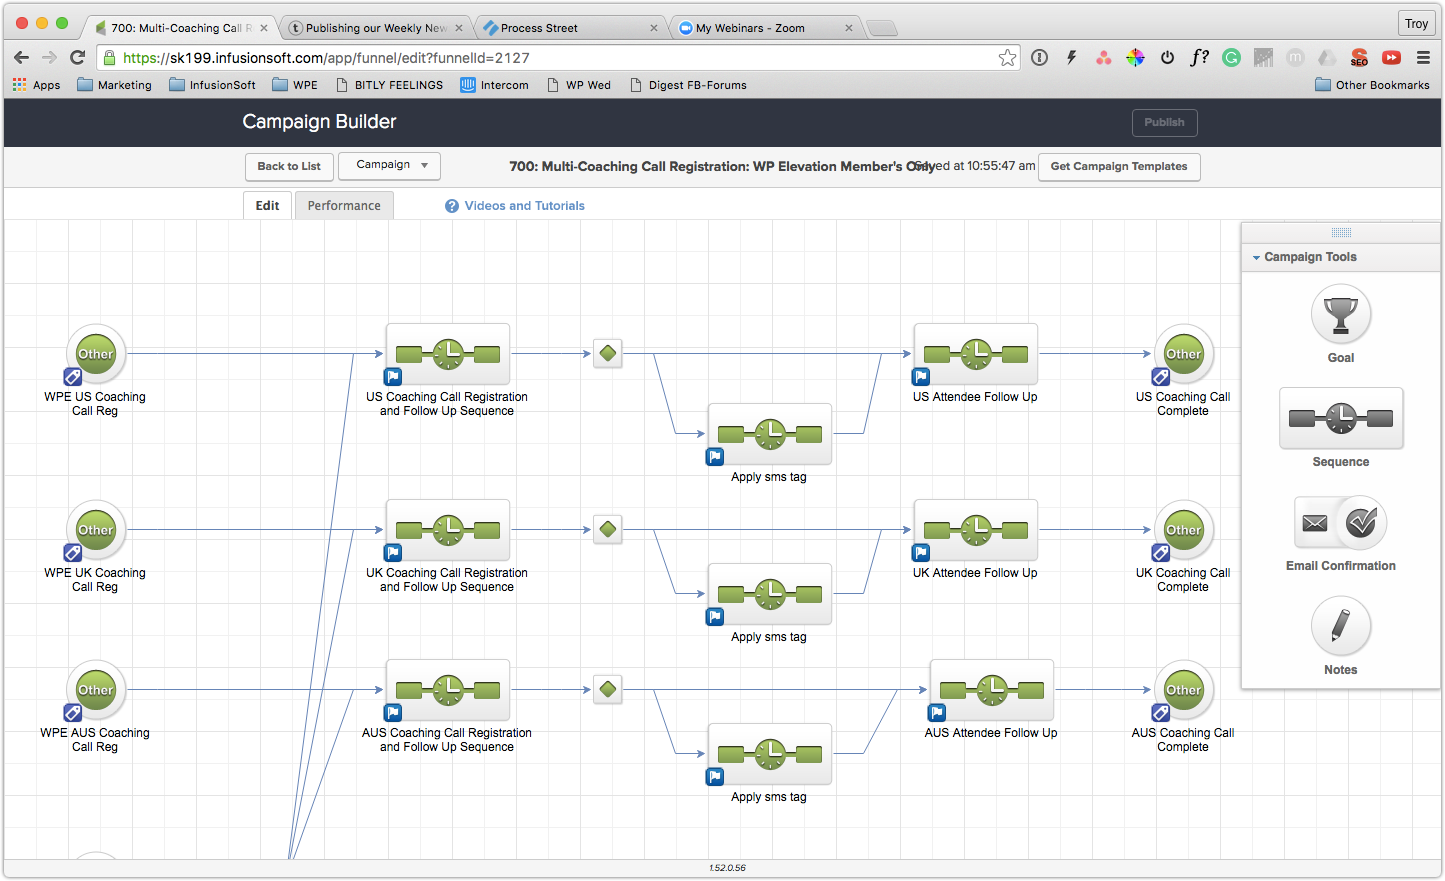
This campaign also includes three sets of sequences that need to be updated.
Again, do NOT change the links in the emails as they are already set to point to the CampaignLinks. Just update the content of each of the emails (see the previous step #11 for how to update the email content).
Timers
Finally, you might want to just double check the timers to make sure that each Day Before email is due to go out just under 24 hours before the call and that each 30 Mins email is due to go out 30 minutes before the call.
Use World Time Buddy to double check the timers and take into account daylight savings.
All timers in the Infusionsoft campaigns should be set to run according to Pacific US Time (Los Angeles).
If you need any assistance with this, please contact Troy Dean.
Check these details to make sure the 24 hour and 30 minute reminder emails go out at the right times.
Publish
When you have made all the changes to the emails and sent test emails to double check the links and the details, then publish the campaign by choosing the Publish button and then confirming you want to Publish.
Tagging Subscribers
The mechanism for actually sending the emails to our members to invite them to the call, is to tag them in Infusionsoft with the correct tag to trigger the campaign.
For Troy's Coaching Calls.
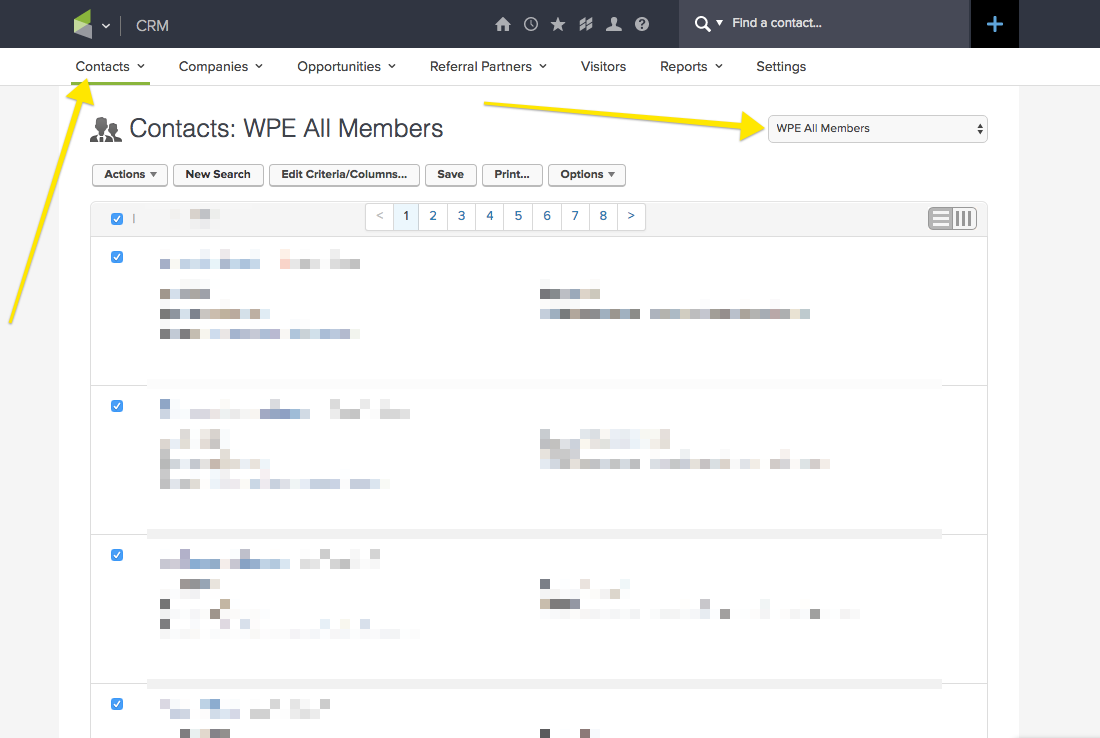
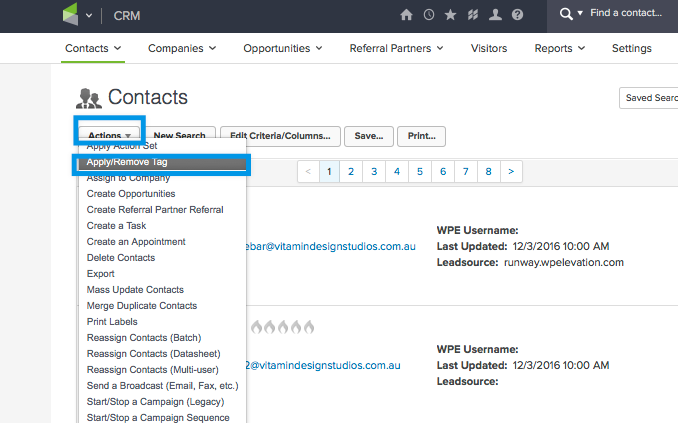
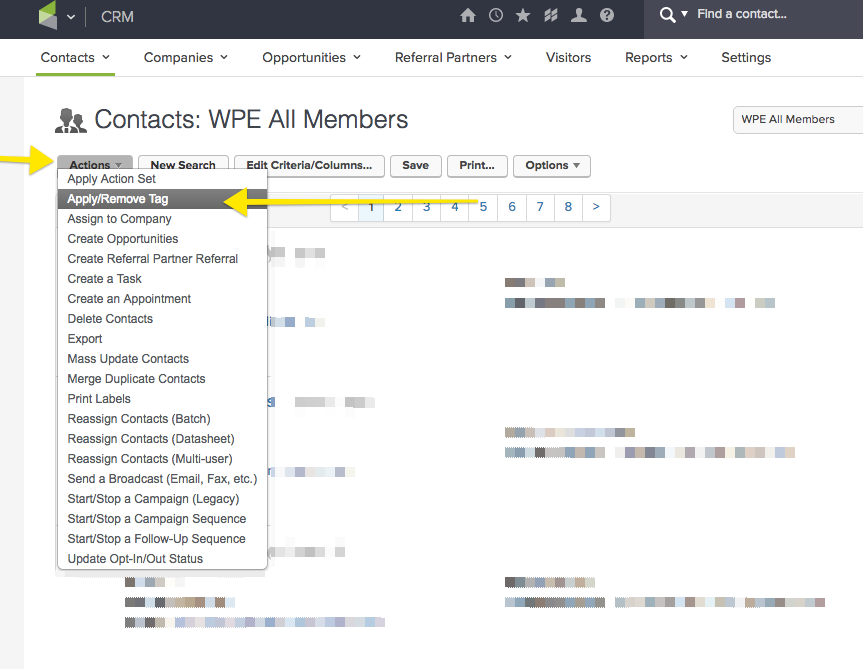
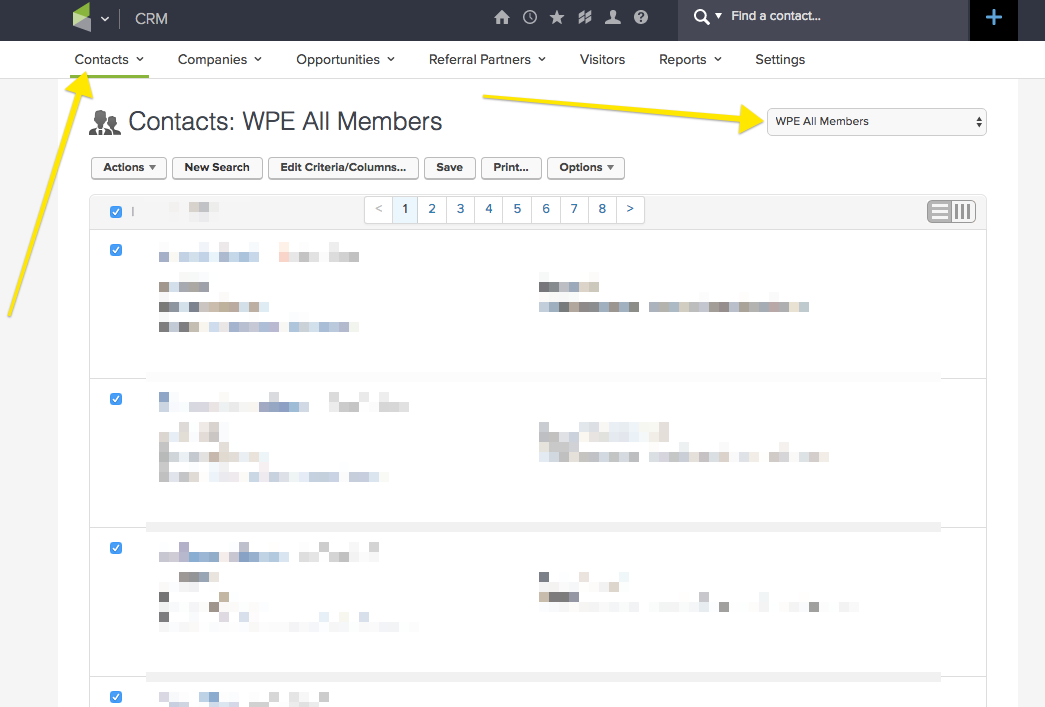
Login to Infusionsoft and navigate to CRM > Contacts and choose WPE All Members from the Saved Search dropdown.
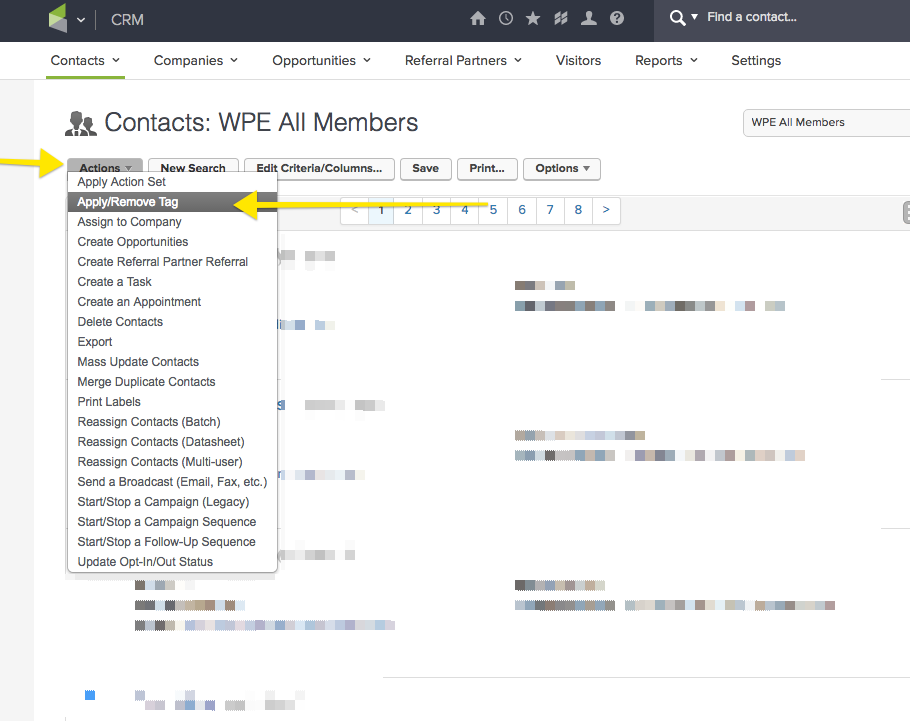
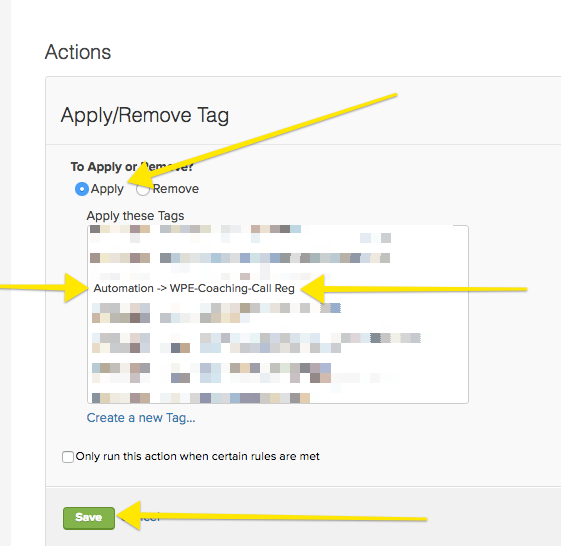
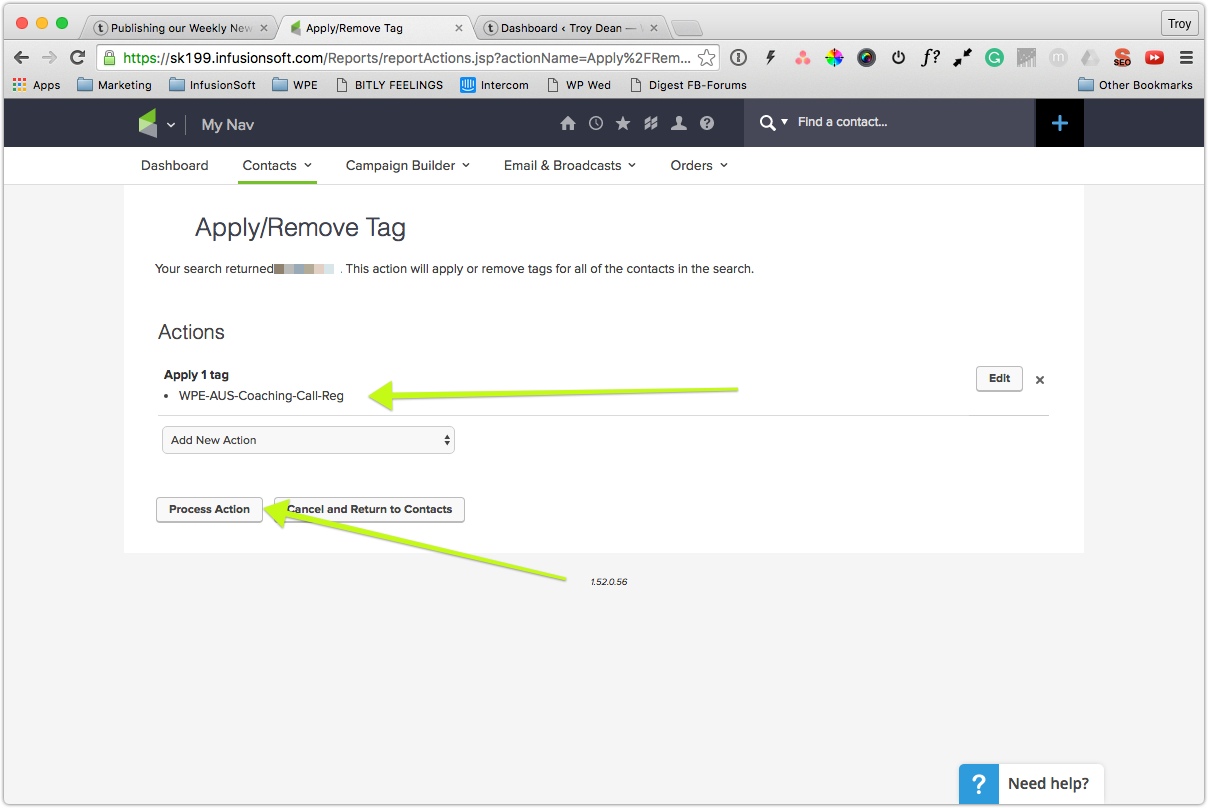
Make sure all contacts are ticked and then choose Apply/Remove Tag from the Actions dropdown.
Choose Apply and select the Automation > WPE-Coaching-Call Reg tag from the list of tags. Then click Save.
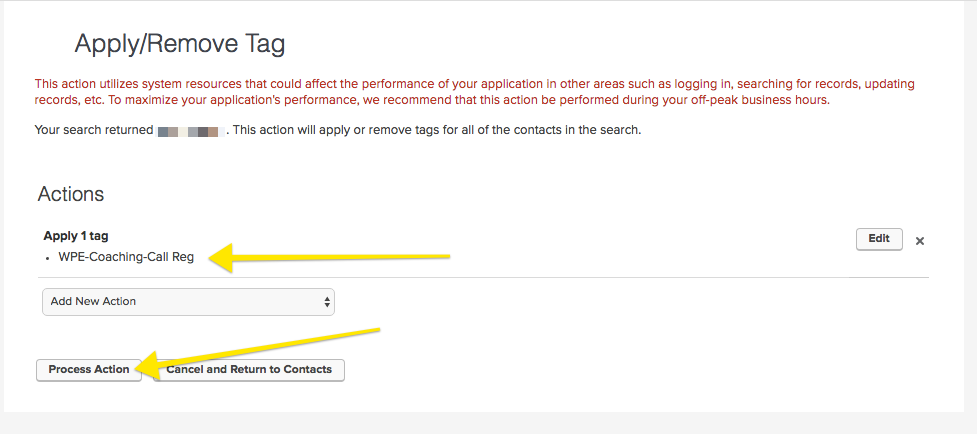
When you are satisfied you are about to apply the correct tag, click the ProcessAction button. This will begin the process of tagging all active WP Elevation members with the correct tag to trigger the Registration and Follow Up Sequence so they all get emails inviting them to the coaching call.
Phew!
For Multi-Coaches Calls.
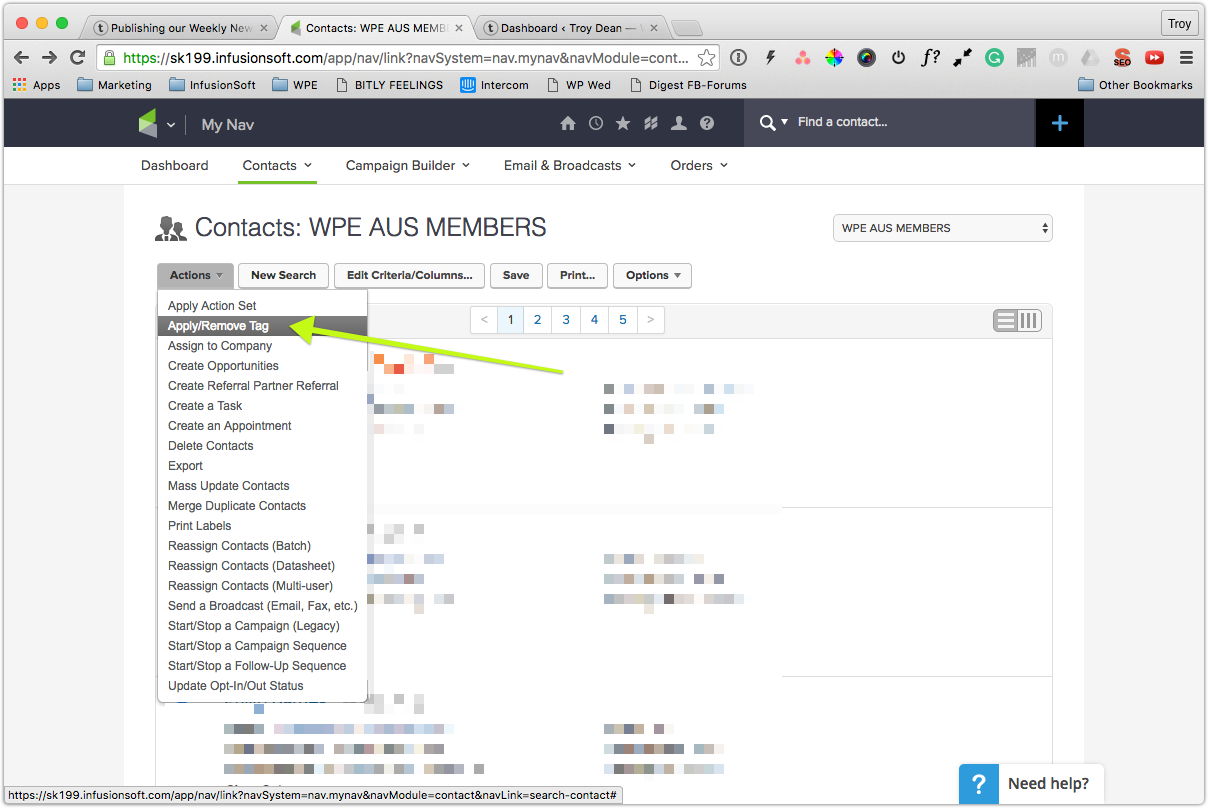
Login to Infusionsoft and navigate to CRM > Contacts and choose WPE AUS Members from the Saved Search dropdown to begin the registration of the AUSTRALIAN Coaching Call.
NB: To begin the the UK and US coaching calls you would choose the WPE UK Members and WPE US Members saved searches respectively.
Make sure all contacts are ticked and then choose Apply/Remove Tag from the Actions dropdown.
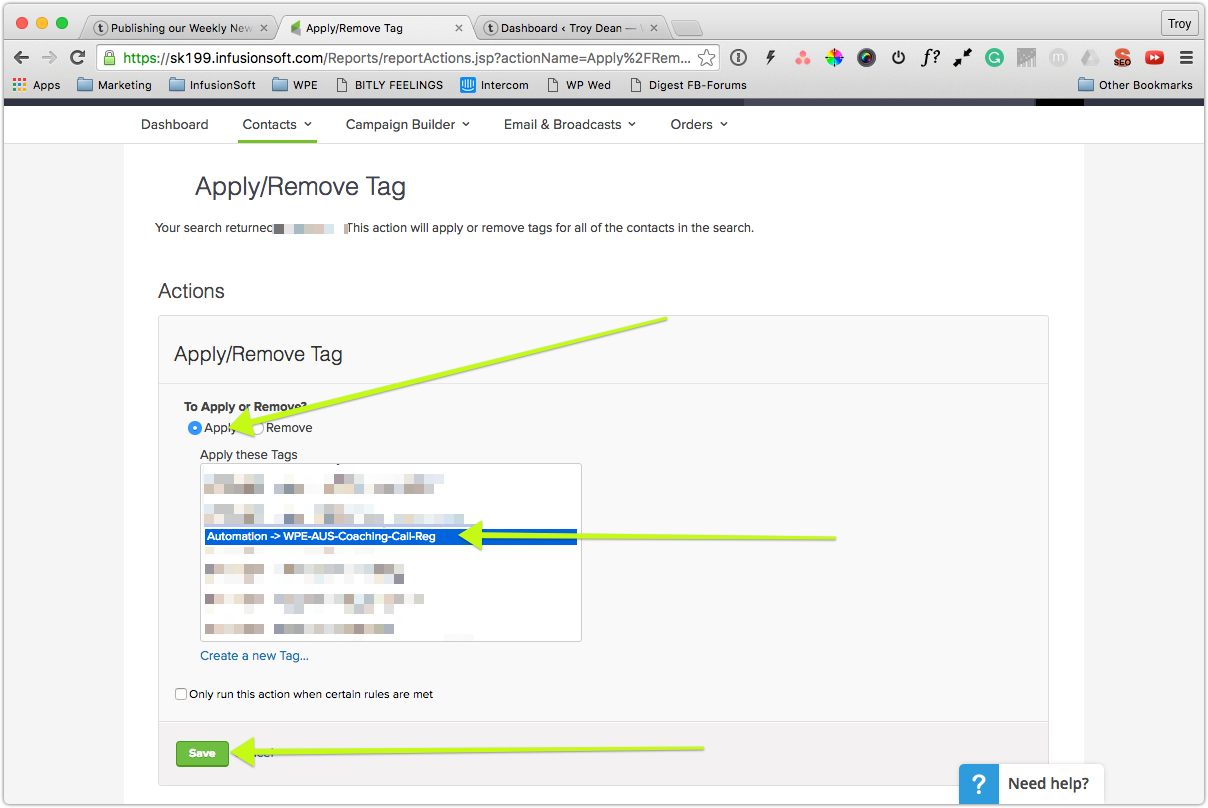
Choose Apply and select the Automation > WPE-AUS-Coaching-Call Reg tag from the list of tags. Then click Save.
NB: Choose the WPE-UK-Coaching-Call-Reg and WPE-US-Coaching-Call-Reg tags to begin the UK and US registration processes.
When you are satisfied you are about to apply the correct tag, click the ProcessAction button. This will begin the process of tagging all relevant WP Elevation members for this specific geographic region with the correct tag to trigger the Registration and Follow Up Sequence so they all get emails inviting them to the correct coaching call.
Phew!
Tagging Exceptions.
There are a handful of members who prefer to to attend coaching calls that are not specifically in their region. EG: Members in Hawaii prefer to be on Australian coaching calls, because the US coaching calls run at approx. 4am for our Hawaiian friends.
In this case, we have manually tagged these members with the tags WPE-Exception-Multi-Country-Coaching-Call-Reg and WPE-Multi-Country-AUS.
The campaign is also setup to recognise these tags and register these members for correct coaching call based on their preference.
So the final piece of this puzzle is to tag these few members.
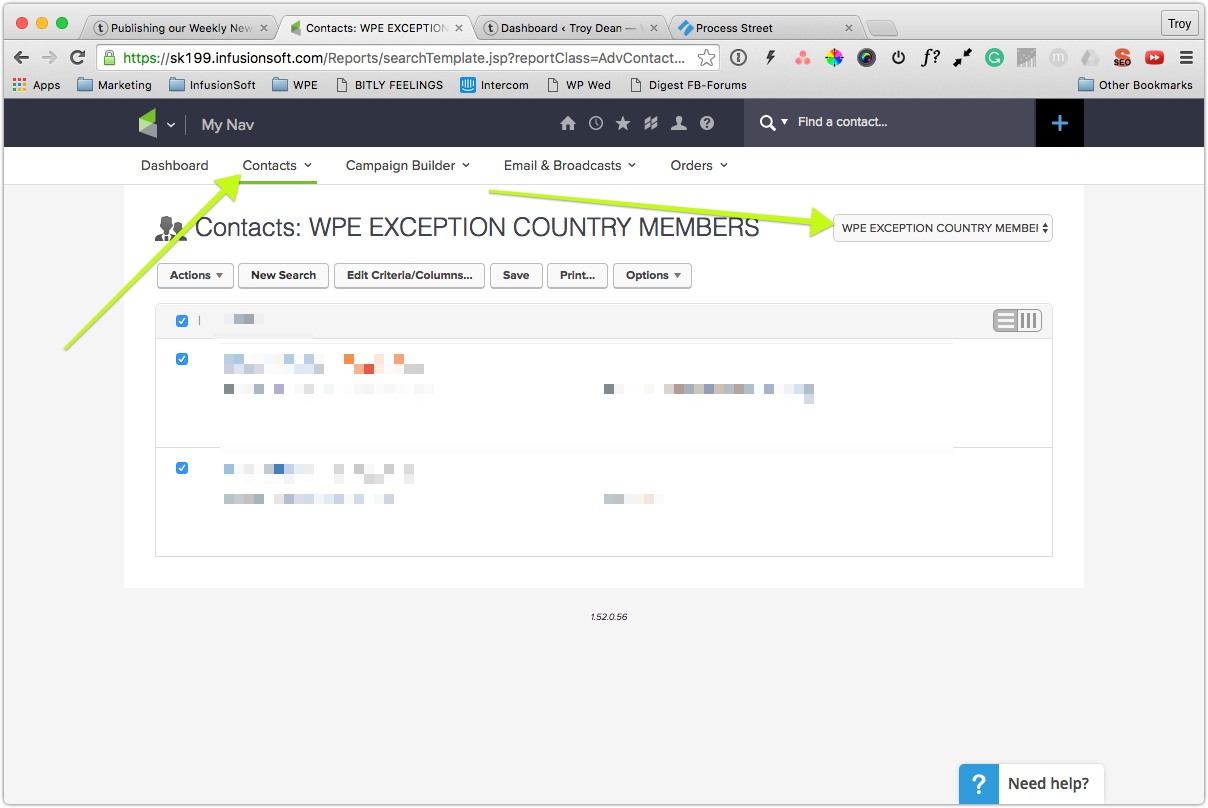
Login to Infusionsoft and navigate to CRM > Contacts and choose WPE EXCEPTION COUNTRY MEMBERS from the Saved Search dropdown to begin the registration of the Coaching Call.
Make sure all contacts are ticked and then choose Apply/Remove Tag from the Actions dropdown.
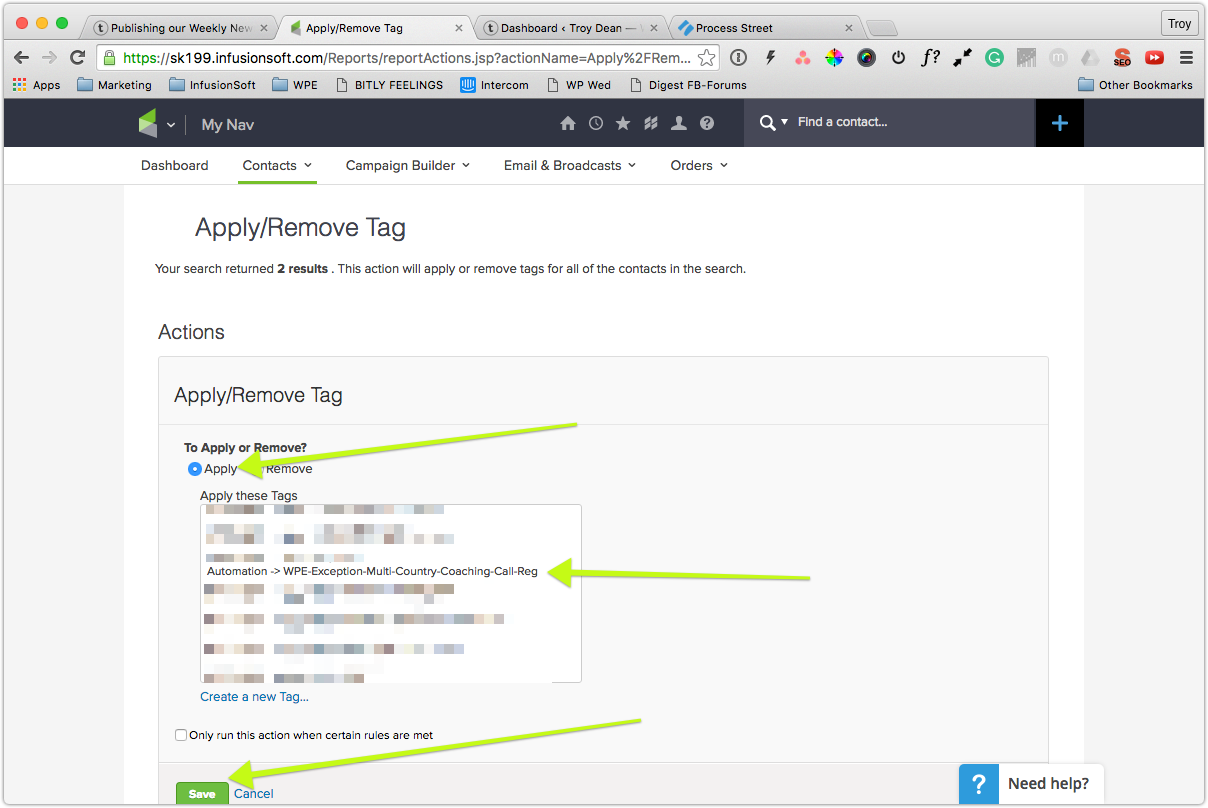
Choose Apply and select the Automation > WPE-Exception-Multi-Country-Coaching-Call-Reg tag from the list of tags. Then click Save.
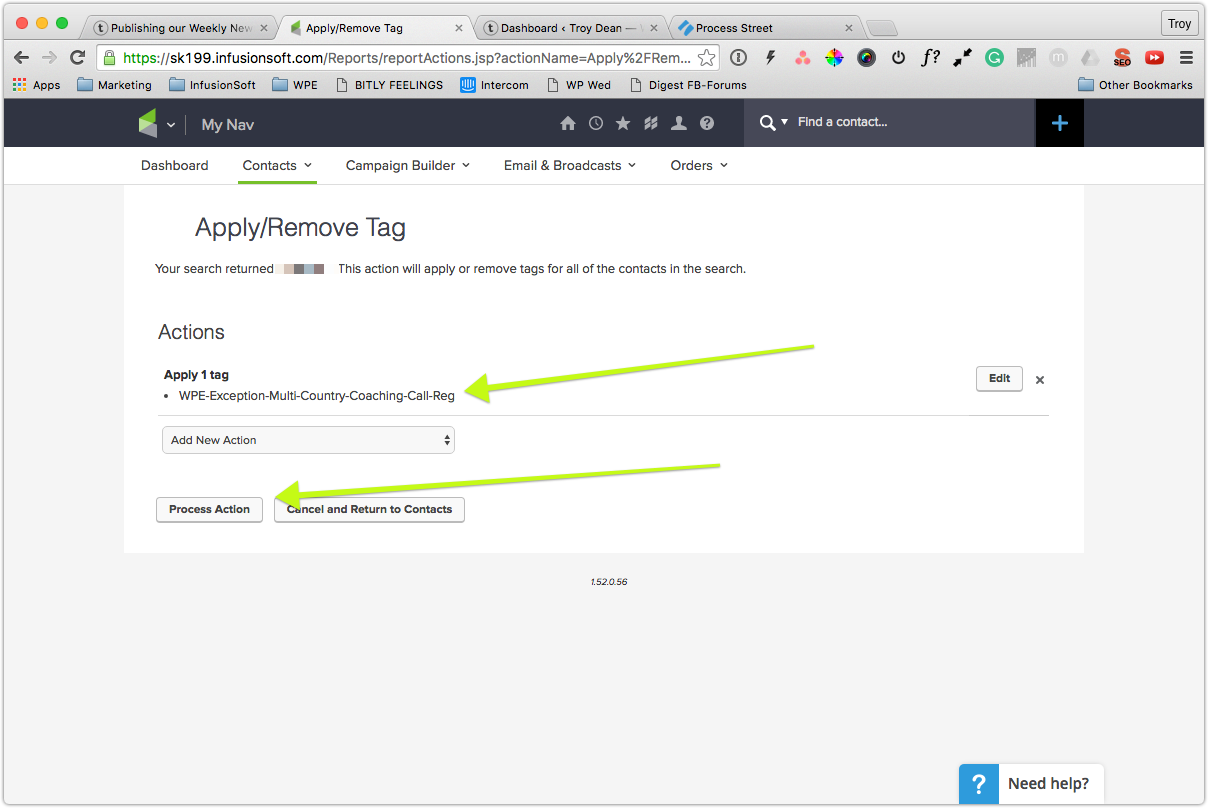
When you are satisfied you are about to apply the correct tag, click the ProcessAction button. This will begin the process of tagging all relevant WP Elevation members for this specific geographic region with the correct tag to trigger the Registration and Follow Up Sequence so they all get emails inviting them to the correct coaching call.
Phew!
For Troy's Webinars
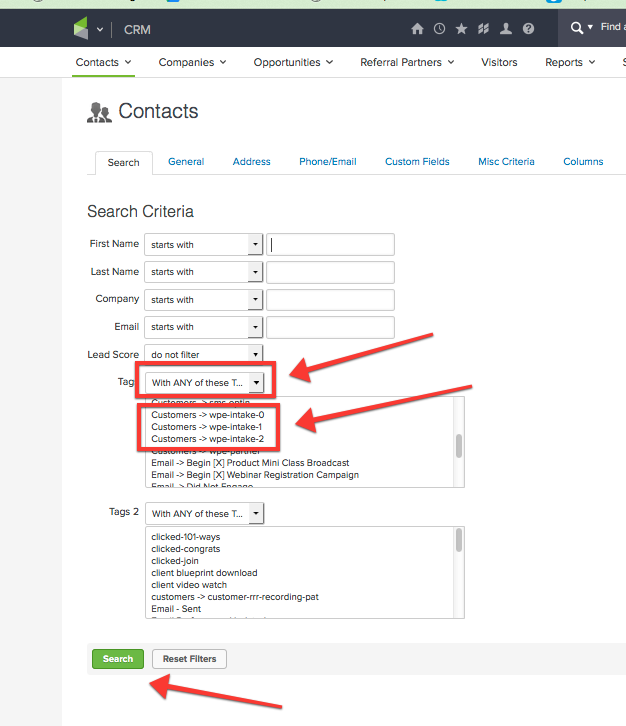
Tagging for webinars will vary depending on whether or not the Blueprint course is in progress. Over the 7 weeks of the Blueprint course, we DO NOT include the new members in the webinars because we want their focus to be solely on the course and course Coaching Calls.
Blueprint Course in Progress?
Tag every intake apart from the current Blueprint intake eg. Intake 0, Intake 1, Intake 2 but not Intake 3.
See below....
So from "Contacts" select the intakes that you want the email sent to. Then hit "Search."
Then from the top menu, choose the drop down "Action" > "Apply/Remove Tags"
Choose "Apply" then "Automation: WPE Webinar Reg" > Save
Then like in the above calls, when you are satisfied you are about to apply the correct tag, click the ProcessAction button. This will begin the process of tagging all relevant WP Elevation members.
Blueprint course NOT in progress?
For the webinar set up the process will be the same as for Troy's Coaching Call - where we choose all WPE members, but instead of choosing the tag of "Automation: WPE Coaching Call Reg", we will choose "Automation: WPE-Webinar-Reg"
Then like in the above calls, when you are satisfied you are about to apply the correct tag, click the ProcessAction button. This will begin the process of tagging all relevant WP Elevation members.
For Coaches Webinar
For the coaches webinar tagging process will be the same as for Troy's webinar - where we choose WPE All Members, but our tag will depend on which among the host will be leading the webinar.
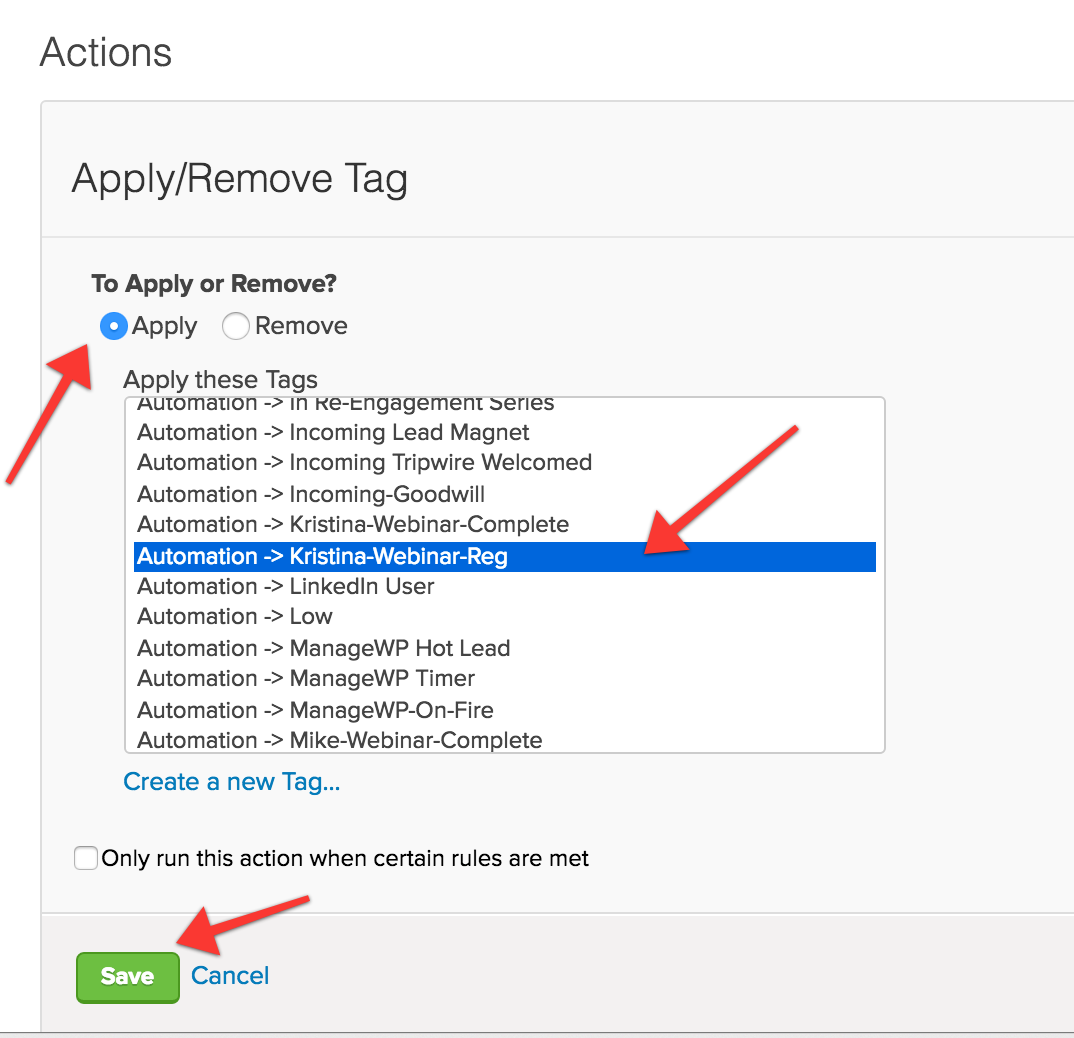
IF ITS KRISTINA
Tick "Apply" and choose Automation -> Kristina-Webinar-Reg
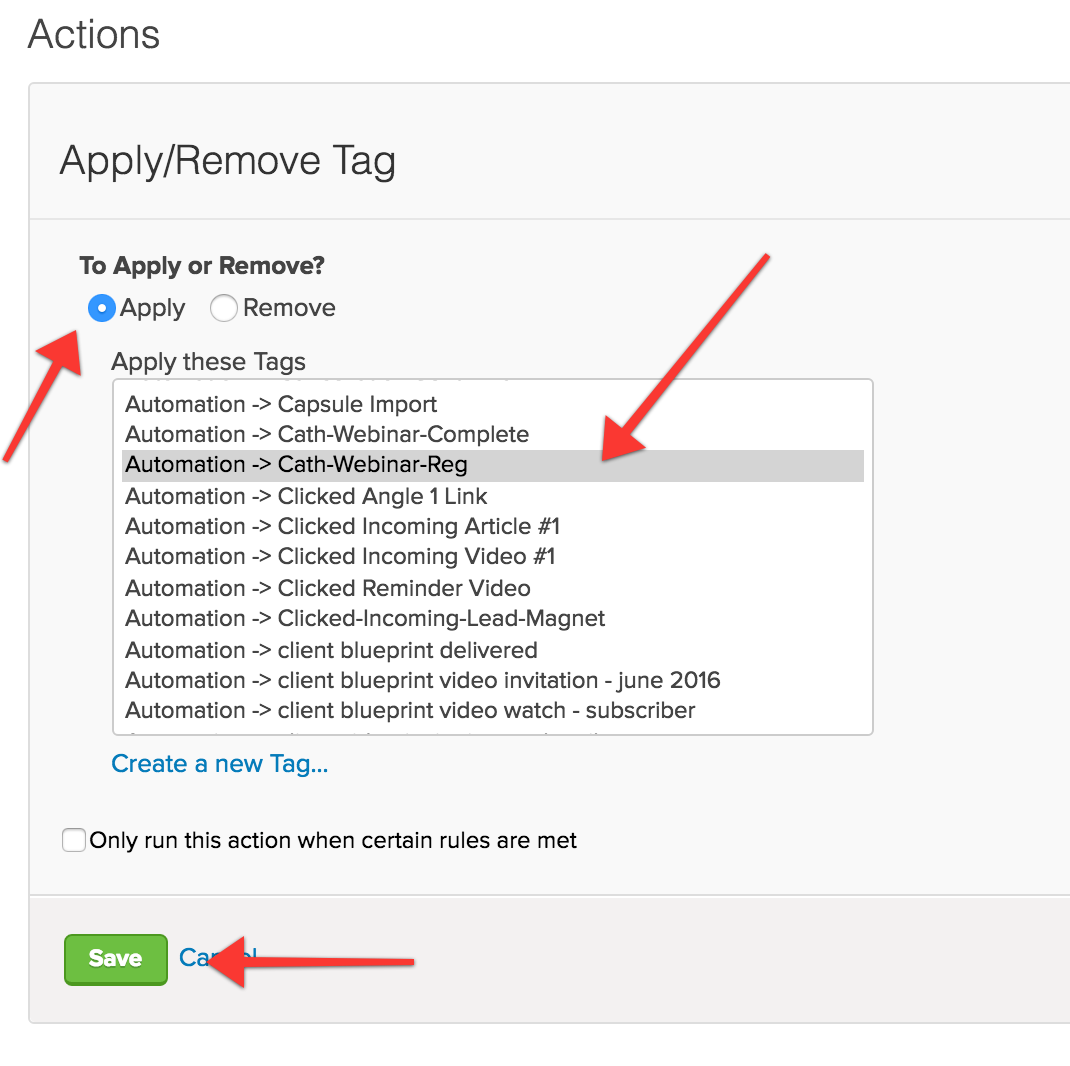
IF ITS CATH BEATON
Tick "Apply" and choose Automation -> Cath-Webinar-Reg
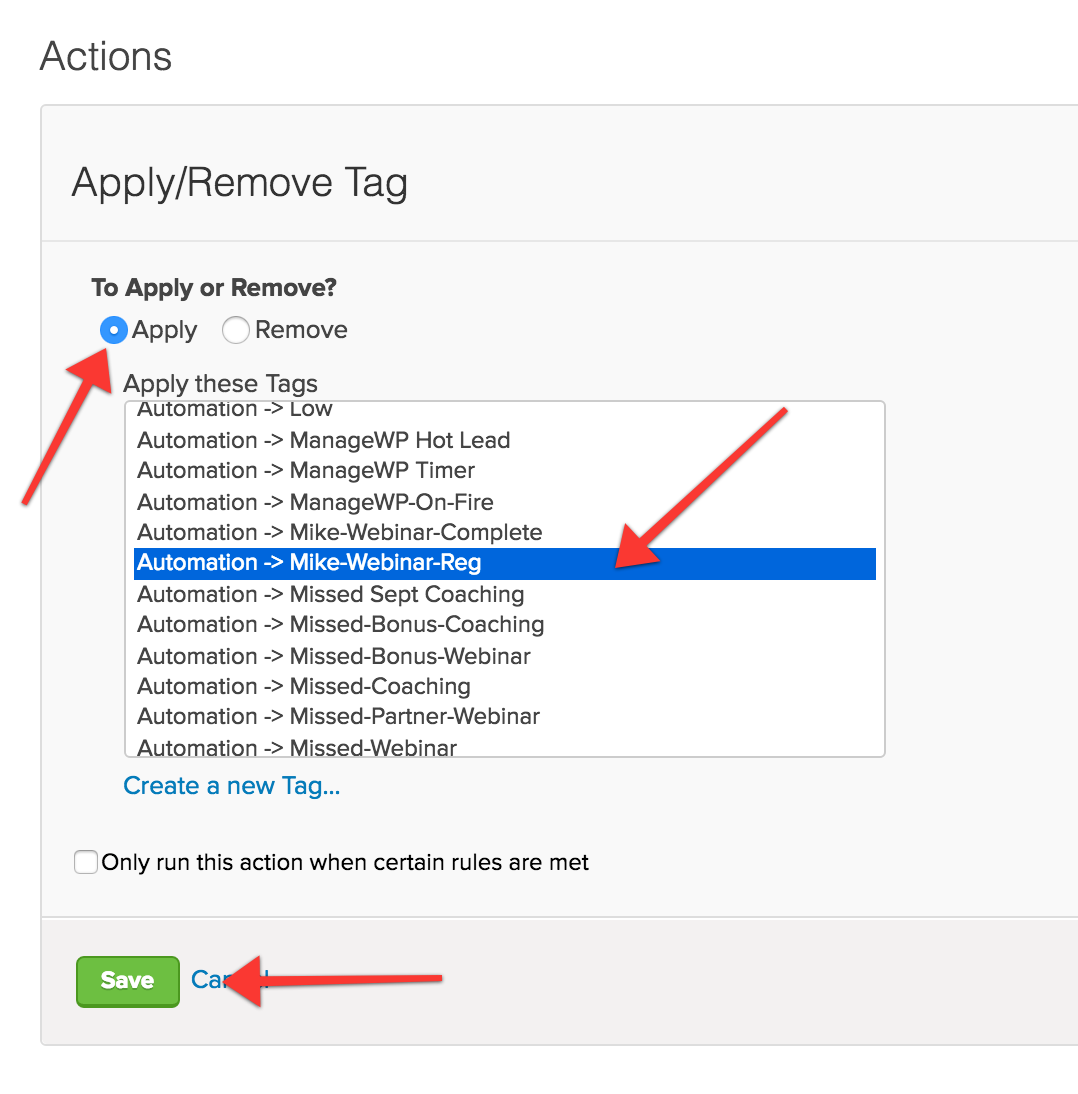
IF ITS MIKE KILLEN
Tick "Apply" and choose Automation -> Cath-Webinar-Reg
Then like in the above calls, when you are satisfied you are about to apply the correct tag, click the ProcessAction button. This will begin the process of tagging all relevant WP Elevation members.
Update Asana
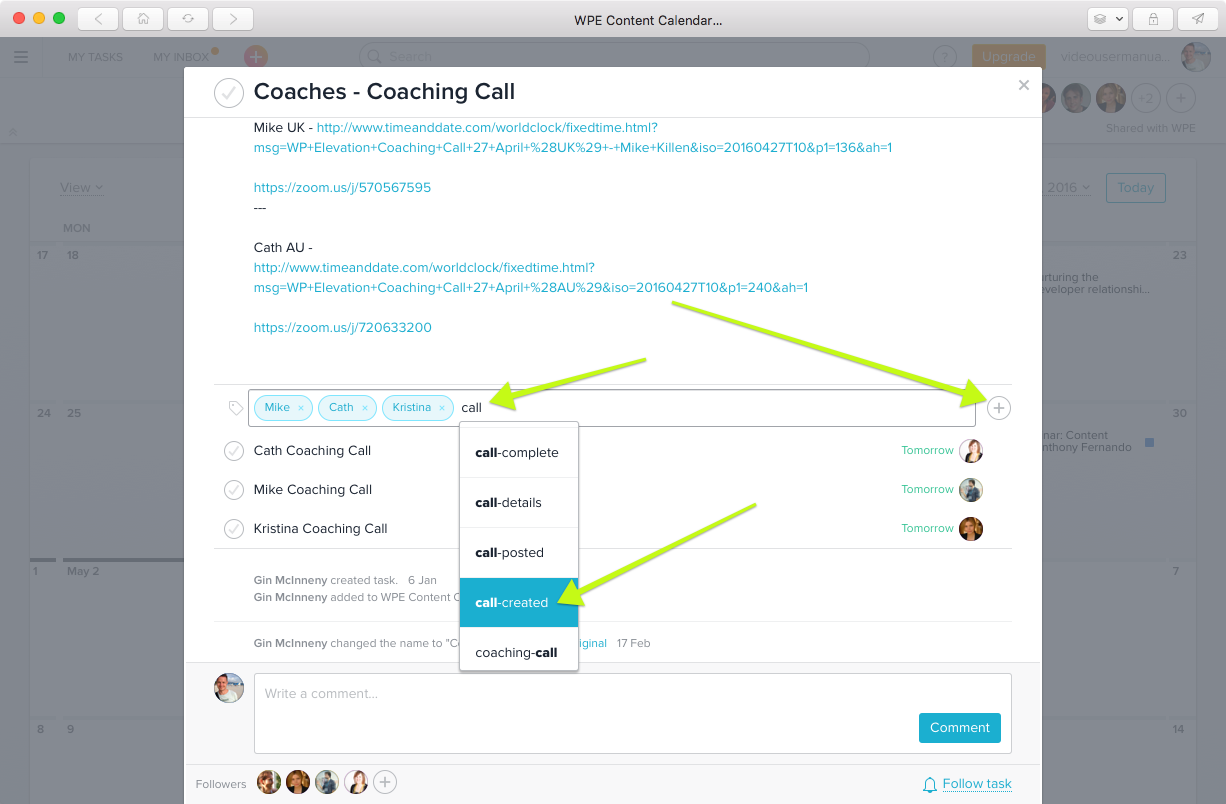
Once you have set up the call in Zoom, updated the campaigns and tagged all the correct members in Infusionsoft, it is essential that you update the task in Asana by adding the tag "call-created".
This will automatically create a checklist and task for our designer to find an image from our Bigstockphoto.com library for the video recording of the call and prepare the images so the are ready for when the call is uploaded to the members' website.
In Asana, find the task for the call, click the Plus sign next to the list of tags, type "call" in the field and then choose "call-created" from the dropdown list.
NB: Please make sure you remember this step.
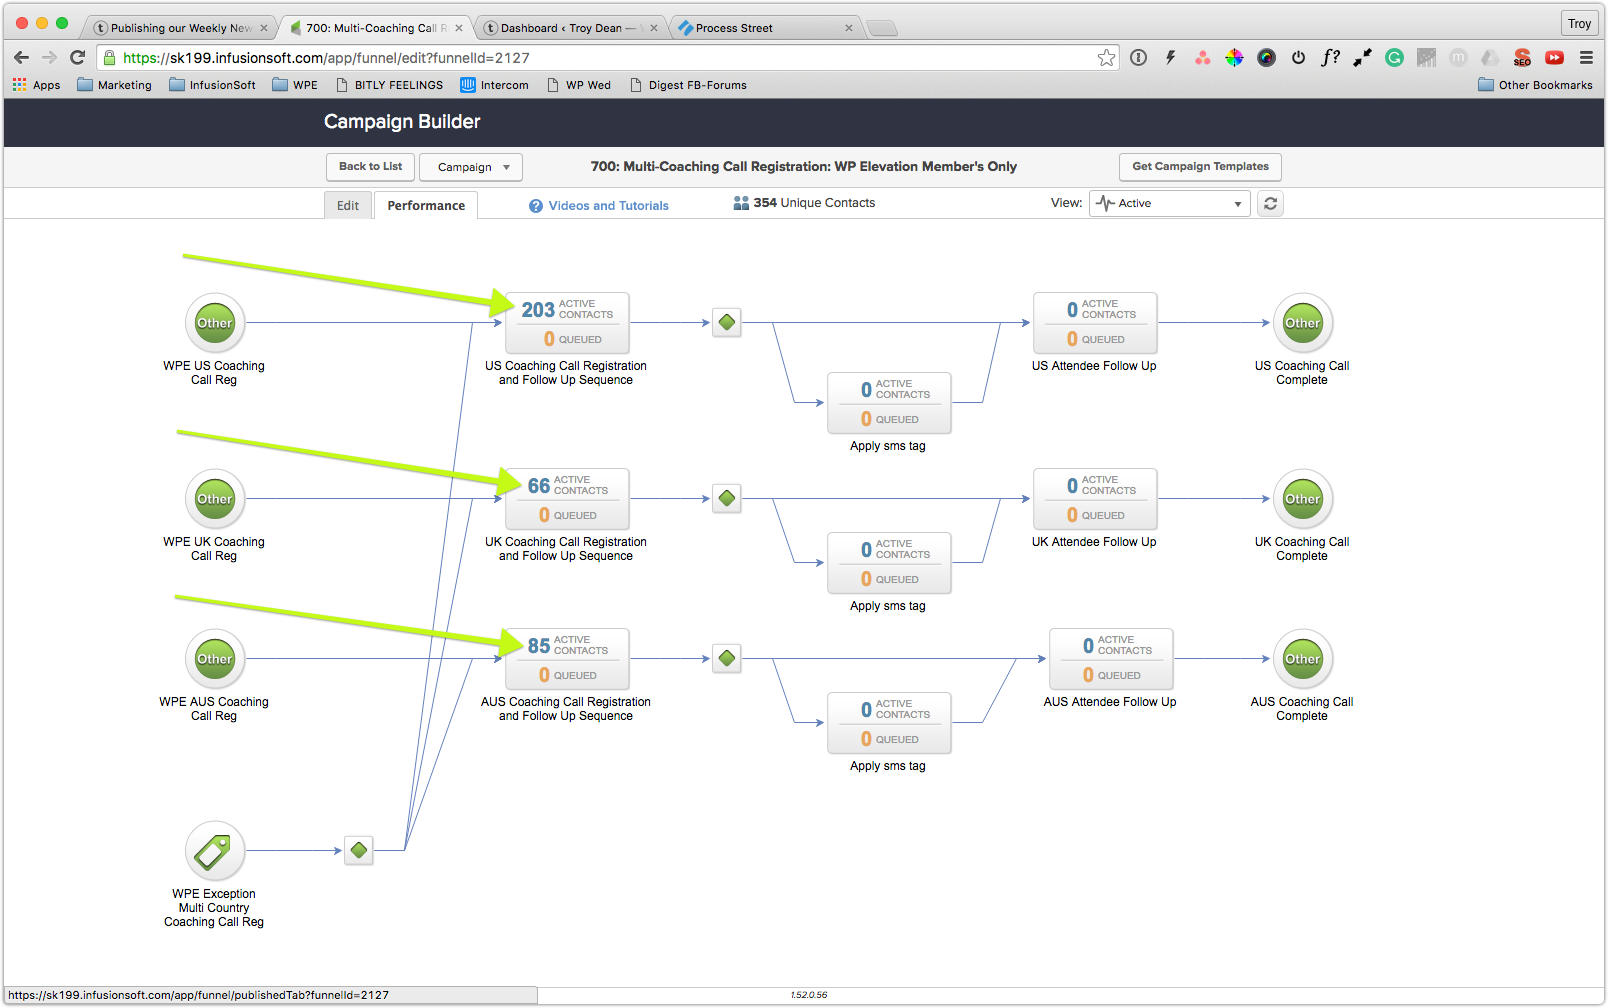
Complete:
Finish Here
You will know you have completed this process when you check the correct Infusionsoft campaign in Performance mode and you can see that members have been added to the welcome and follow up sequences in either the Coaching Call, Multi Coaching Call or Webinar Campaigns.