
Before we start with the meat of the process, you need to ensure that all vital information is recorded in the form fields below for later reference.
Before we start with the meat of the process, you need to ensure that all vital information is recorded in the form fields below for later reference.
This is primarily to ensure that you have a consistent record of when each computer last had maintenance run, along with the person who was responsible for that session.
If you wish to record more or different information, just add or edit the appropriate form fields.
It's pretty easy to update your macOS system. We've outlined all of the steps in the sub-checklist down below, just check off each step as you go.
If you do not wish to update a specific item, you can also choose to update your programs one by one instead.
To check for system updates on a Windows device, first load up your Settings app by either navigating to it from your start menu, then your "All apps" list, or by typing it into your search bar. The whole process is outlined below:
If your machine is running pre-Windows 10, all that changes is your navigation to Windows Update, which should be available through either a glance at the program list from the start menu, or by typing "Windows Update" into your search bar.
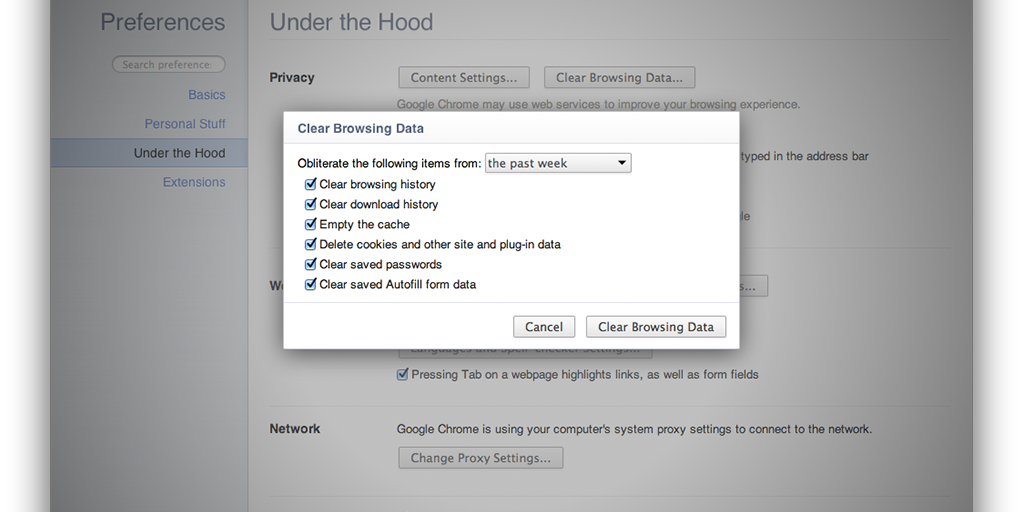
Next up in the maintenance blitz is the task of clearing out unnecessary browser files.
We recommend that you at least clear your browsing history, download history, cache, and cookies for security best practice, and to ensure that nothing is clogging up your system or flagging you as a target for spam.
This will also help to improve the security of your system by getting rid of temporary files created by the sites you visit, but this will vary depending on your situation.
In any case, we've outlined the whole process for you here:
The method to clearing your firefox files is simple; the whole process is clearly outlined in the sub-checklist below.
Most browsers have a similar method to clear their files, but if you're uncertain then look up the method to your particular browser.
For security reasons, we'd recommend you to at least clear your cookies and cached files, so that you're not at risk of being a spam or phishing target.
Now you're tasked with the clearing out of unnecessary browser files.
For security best practice, you should at least clear your browsing history, download history, cache, and cookies. This is to ensure that nothing is clogging up your system or flagging you as a target for spam.
We've done the job of outlining the whole process for you down below:
Macs usually run programs which boot us when you log in, rather than when the system starts up - if you can't find the program you wish to deactivate in you Login Items, read this post by Joe Kissell to delve into the older Startup system.
Follow these steps to open up the "Login Items" menu and remove unwanted programs:
In Windows 10, you can choose your startup programs from your Task Manager. Either right-click your Start icon and select Task Manager or just hit Ctrl+Shift+Esc (a handy tip for if a full-screen program becomes unresponsive too).
From here, you can change the status of a startup program (enabled or disabled) by right-clicking on the item within the Task Manager.
The full procedure is outlined in this sub-checklist:
Macs, and the macOS operating system they use, contain the security vulnerabilities as real as any Windows machine. As such, you should be running regular anti-malware scans on the system.
With whatever antivirus software that is installed on the machine, perform a full system check.
After the check, you'll want to deal with any threats the software has detected by removing or quarantining them.
Next on our list of security measures in the IT support process to open and run whatever antivirus program is installed on the machine.
Malwarebytes Anti-Malware is completely free and does the job splendidly; head to their site and download it now if there's nothing else installed already.
Once you have Malwarebytes (or your program of choice), run it and make sure that your entire system is included in the scan.
This can also take a hefty chunk of time depending on the size of your system, so make sure you factor that in and inform your client or whoever is waiting on the maintenance.
Finally, erase or quarantine any threats which are detected.
Computers consist of working hardware parts, and as well as their software components, the hardware must be regularly checked and inspected for faults or irregularities.
Using the sub-checklist in this task, inspect each component carefully and record what you find across the various form fields.
If you've got faulty or damaged parts, you'll need to make sure they're replaced ASAP. Even if you're doing the repairs yourself, you'll need to let management and accounting know about the parts needed and the inventory updates.
We've planned ahead and done the dirty work for you - the results of your maintenance report so far have been collected together in this useful little email widget.
All you need to do is check that the information there is all correct, and hit "Send".

It's easy to forget about the cleanliness of two of the most important and heavily-touched parts of the computer system: the keyboard and mouse.
Both of these components can be easily cleaned with compressed air. Make use of the fine nozzle on the can to get into the nooks and crannies of your keyboard and mouse to blow out any residing dust or grime.
Laptops can be especially prone to gummed-up keyboards due to their portable nature, so take extra care if cleaning a laptop keyboard.
Whatever you do, never use a vacuum cleaner to clean your physical components. The potential damage to a keyboard or mouse is small, however it's best to break the habit before moving on to cleaning your tower, as the static generated by a vacuum cleaner can damage your electrical components.
Dust can seriously affect the performance of a computer, especially if it clogs the fans.
Towers or laptop cases can be easily dusted down with a dry, clean cloth, but remember to stay away from any electrical components to avoid static damage. If you can see that your desktop fan is gummed up with dust, spray a little compressed air to dislodge it (after making sure your machine is off first).
It's always a good idea to factor in and run your disk cleanup program as part of a routine maintenance.
Disk cleanup, when not performed regularly, can take a while to complete, but you can keep the scan time down to a minimum by running it every time you're doing regular maintenance.
This will essentially remove all junk and temporary files on your computer, akin to earlier when we deleted our browsing history and cache.
See the video below by Meditational State for a quick guide on disk cleanup in your Mac. The process is outlined in the sub-tasks here:
To perform a disk cleanup on Windows, start by searching "Disk Cleanup" in the Search Bar and clicking the resulting program.
Select the drive you wish to clean up, then click "OK".
Disk Cleanup will then run on your chosen drive, presenting you with the options of what you can delete.
For the whole process, just follow these sub-tasks and you'll have your disc cleaned up in no time at all:
Defragmenting your drives isn't something the average user thinks to do, but can pay huge dividends if done regularly - it's time to make sure that you're not the average user and defragment your drives.
You can defragment your drives on Windows by typing "Defragment and Optimize Drives" into your search bar and selecting the resulting program.
With the program loaded you need to analyze each and every drive on the list by selecting it and clicking "Analyze".
If any come back with the slightest level of fragmentation, that particular drive will need to be optimized (which is another way of saying "Defragmented").
This one is hardly rocket science, but remembering to empty the recycle bin regularly can work wonders for keeping your machine running smoothly.
Emptying the recycle bin is one of the few processes that is pretty much the same on nearly every operating system with a graphical user interface. The only difference is what the different systems choose to call the icon.
For Windows, it's "Recycle Bin", for macOS users it's "Trash", and for Linux (Ubuntu) it's the "Rubbish Bin".
Just right click on your recycle bin icon from the desktop and select "Empty".
To remove an app from your Mac, all you need to do is drag the application in question to your Trash and then empty the bin.
To uninstall an unnecessary program within Windows, type "Programs and Features" into your search bar, or follow this path:
From this screen you can sort your installed programs by criteria such as date installed, size and when it was last used.
To uninstall a program:
All that's left is for you to restart your computer one final time to apply any necessary updates or configurations.
As well as finalizing any updates or software changes, this will also provide hard evidence as to the effects of your maintenance efforts.
For example, after this final reboot, pay attention to your new system boot time; if you have disabled any number of startup programs or even just removed a chunk of temporary files, you should be able to see a noticeable improvement already in the setup time.
Congratulations, your routine computer maintenance checklist is complete.


