
1. Update Task 5 with Your Contract Fee Options:
1. Update Task 5 with Your Contract Fee Options:
2. Update Task 6 with Lease Only Fee Options
3. Update Task 7 with Maintenance Only Fee Options
4. Update Task 10 with Your Insurance Guidelines
5. Update Task 26 - Last subtask list
6. Update Task 27 - Vendors
7. Update Task 44 - Non Renewal Process
Template Naming Convention:
NPO Owner Last Name Property Street Address Onboarding
Example: "NPO Smith 123 Maple Lane Onboarding"
All the information on fees, etc so that a contract can be prepared and sent for signature
If the property is held in an individuals name, expect the W-9 to include SSN.
If the property is held in an LLC or Corp, expect the W-9 to include an EIN.
The owner is required to obtain a Landlord Insurance Policy, also sometimes referred to as a Dwelling Policy or DP-3. The Owner must then add PMI DBA as Additional Interested Party on the policy.
The owner is required to obtain a commercial insurance policy. These are often called a Lessor Risk Only or LRO policy. The owner must then add PMI DBA as Additionally Insured on the policy.
Minimum Qualifications as Stated in Agreement:
At all times during this agreement, Owner must maintain in effect a public liability insurance policy that names Manager as a co-insured or additional insured and covers losses related to the Property in an amount of not less than $500,000 for single family homes, $600,000 for 2 to 4 unit properties, and $1,000,000 for commercial buildings, per occurrence basis; and
It is highly recommended that each PMI Office also require tenant liability insurance for all tenants and obtain an umbrella policy to better protect your company in the event of damage to a rental property. PMI Corporate is not licensed as an insurance company, we recommend that you consult with your insurance professionals for any insurance advice or guidance. Any insurance information provided are merely suggestion and it is the responsibility of each franchisee to verify and confirm best practices for all things insurance with their local insurance professionals.
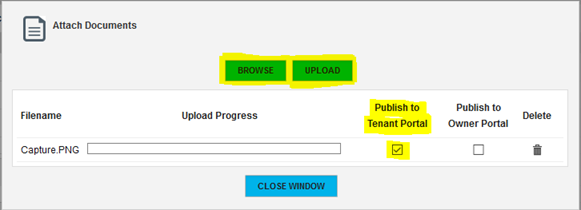
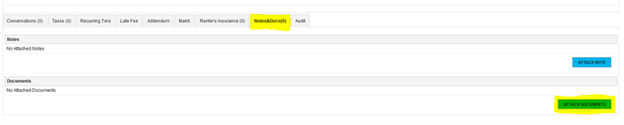
By Marking Off the Below Checkboxes, you confirm you have received copies of each document. If the document is not required for this property, please leave it unchecked.
2. Select “Browse”
3. Choose the desired document
4. If desired, Check box “Publish to Tenant Portal” and/or "Publish to Owner Portal"
5. Select “Upload”
Initial Onboarding Payment from your owner should be in the form of check, wire transfer (be aware of any fees), cashier's check, or money order
After the Owner has signed your Property Management Agreement, you will want to make sure you move their card to indicate that this is a won deal.
Double check and make sure all information on the process has been completed before you close the deal.
Collecting ALL Keys for the Property is important. Please make sure you receive keys for ALL doors in the property, including: Front and back doors, garage doors, storm doors, screens, sliding doors, storage rooms, sheds, etc.
If your property is in an HOA, you may have to obtain fobs, key cards, etc from the HOA.
Collect all key codes and manuals for reprograming key codes.
Indicate Who Is Responsible for the Following Utilities:
If you are managing utility accounts on behalf of the property owner, you will want to collect all account information from the owner. You will need the name of the service provider and the associated account number. These should then be entered into the property details on your property management software.
Lawn Care: Current Provider Info. If None, decision on who will handle
ATTENTION OFFICE STAFF:
Collect Information for Any Vendors Currently Employed for the Property. If you choose to continue contracts with these vendors, establish them as preferred vendors for your company.
Contracts - Management Agreements
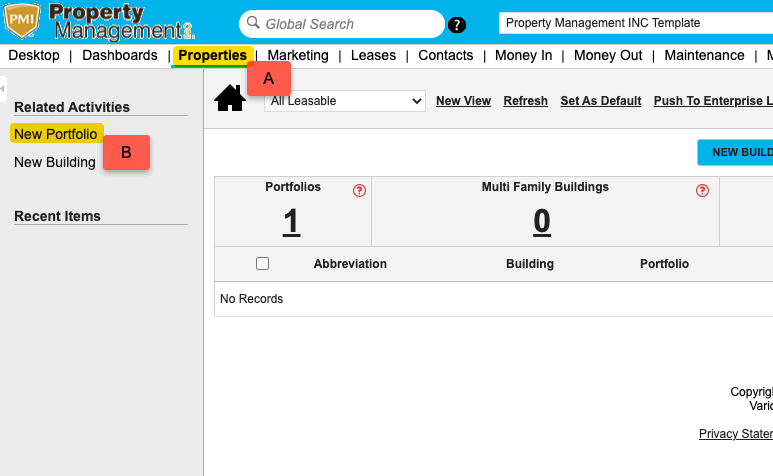
1. Create the portfolio
a. Select the “Properties” module
b. Select “New Portfolio” under Related Activities
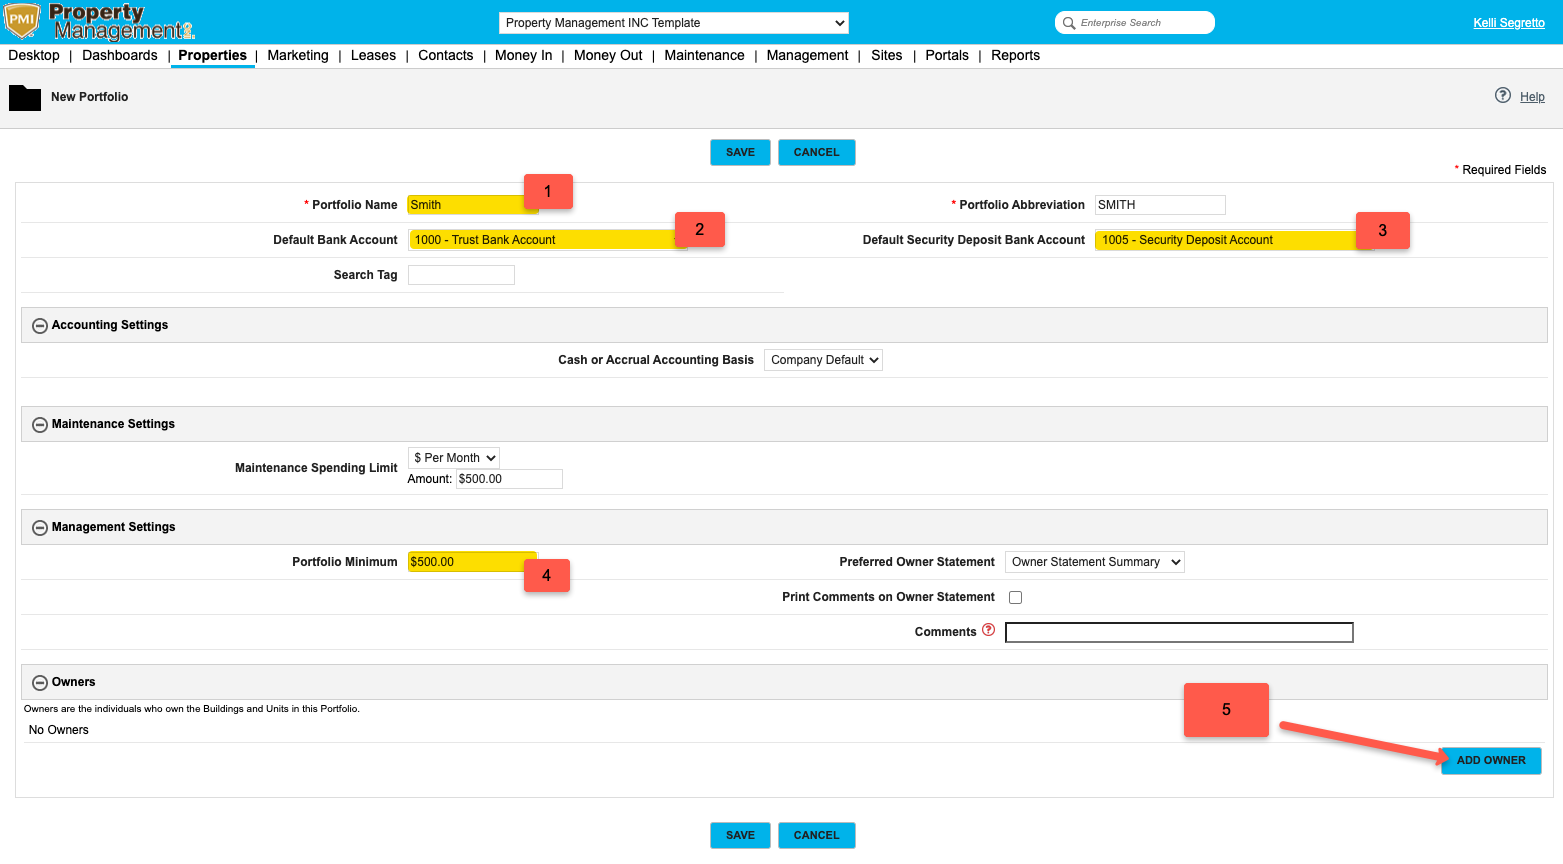
2. Fill out the following fields
Portfolio name – Typically the last name of the owner
Default Bank Account
Default Security Deposit Bank Account
The Portfolio Minimum
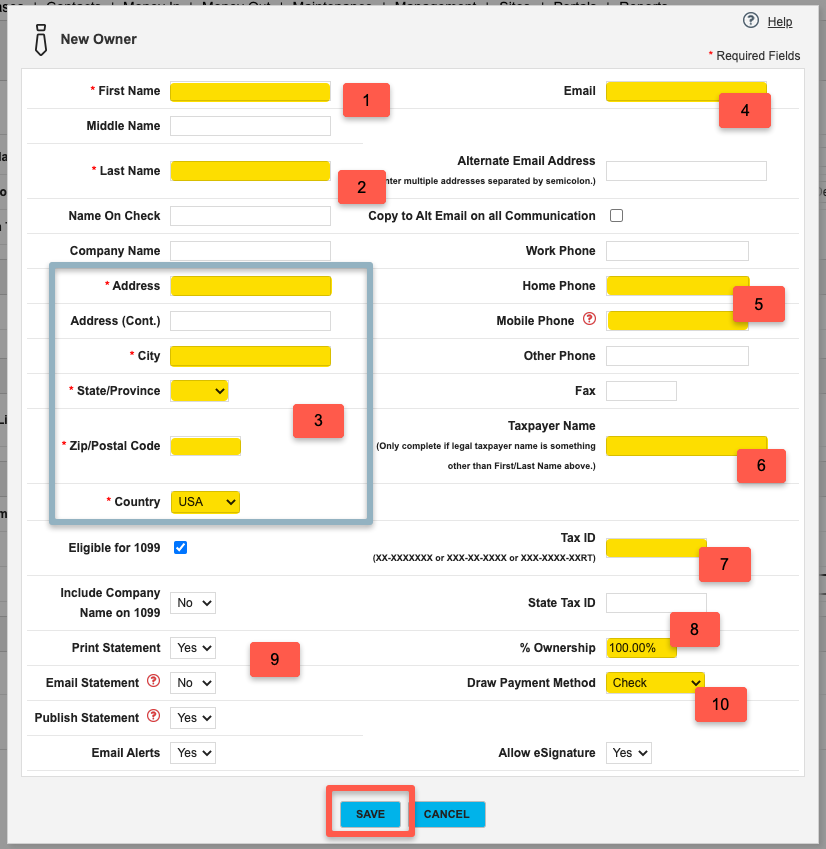
Owners
Click the blue “Add Owner” button
Select "New Owner"
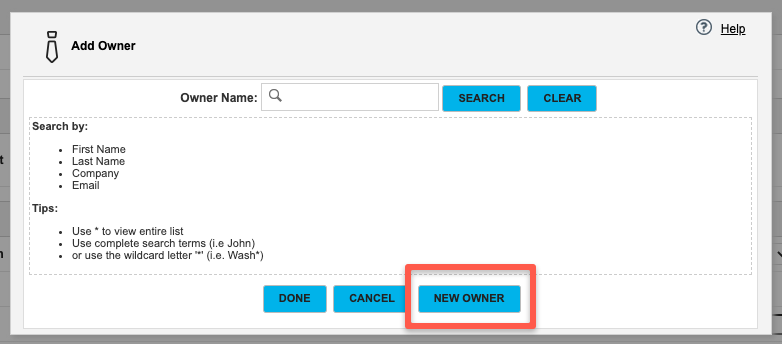
Fill out the following fields
First name
Last name
Address
Phone number
Select "Save"
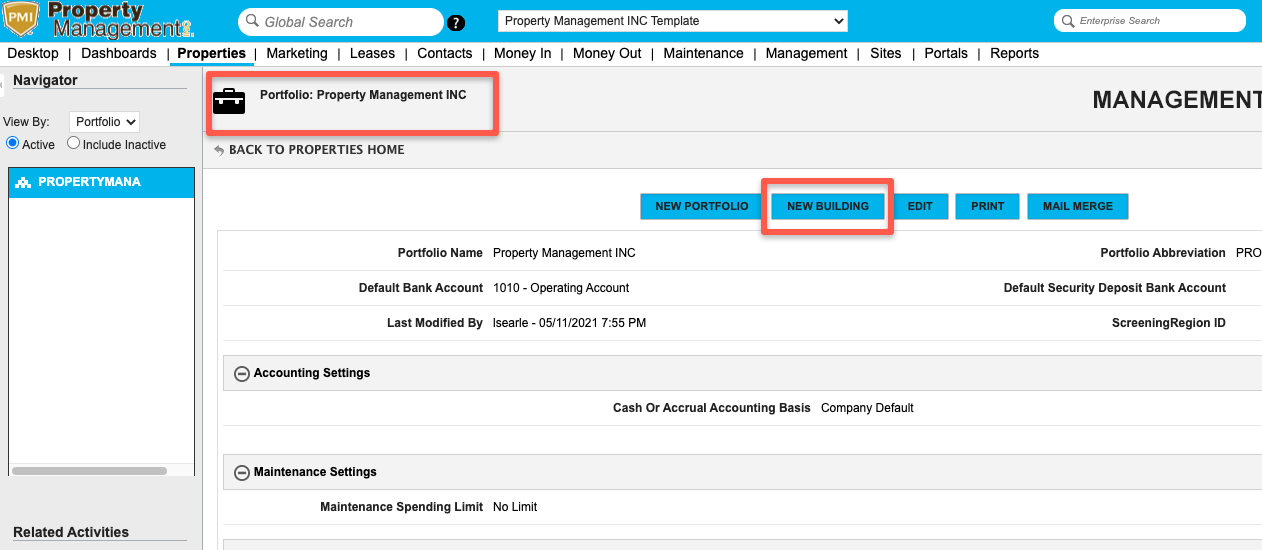
Add A New Building
From the Properties Page
1. Click on the Portfolio that you would like to add a building to
2. Click on the New Building button
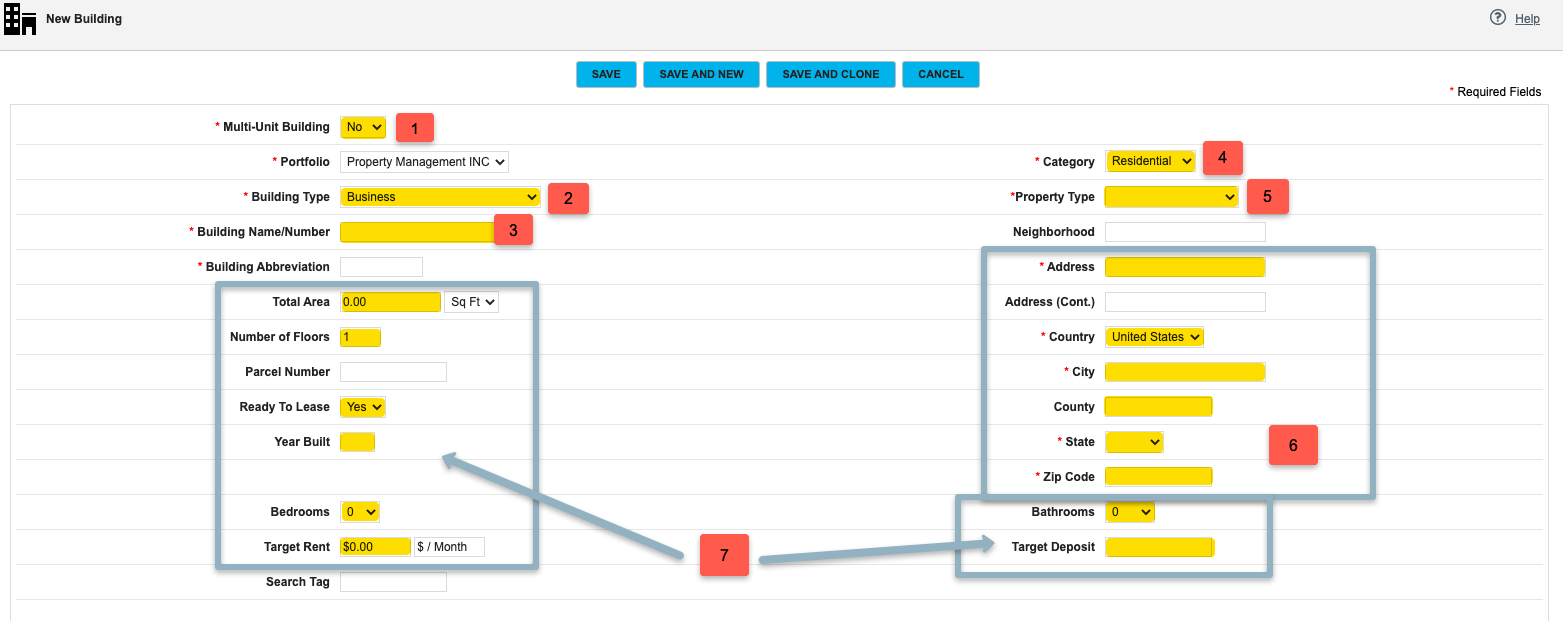
Fill out the following fields
Multi-Unit Building
Building Type
Building Name/Number (Just enter the street address here)
Category
Property Type
Complete address
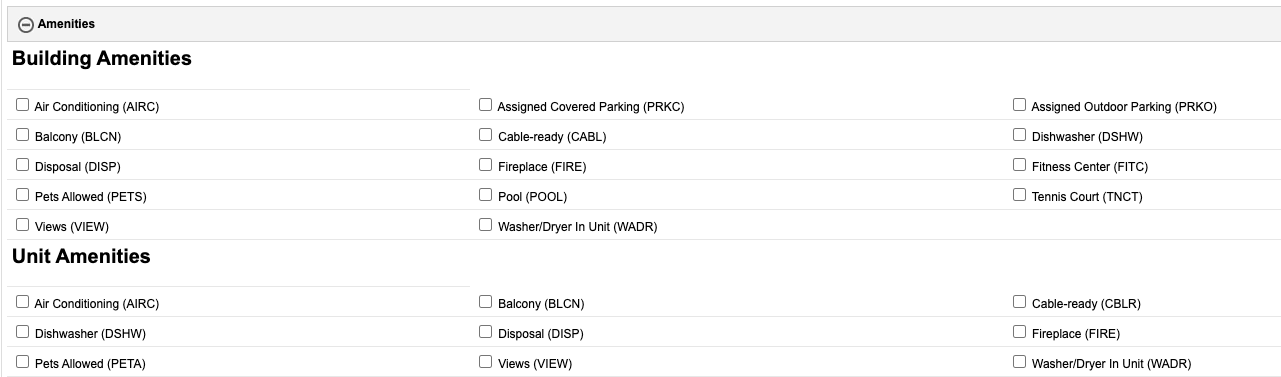
Place a Checkmark in all boxes that indicate INCLUDED amenities.
Accounting Settings
Ensure that Designated accounts are correct

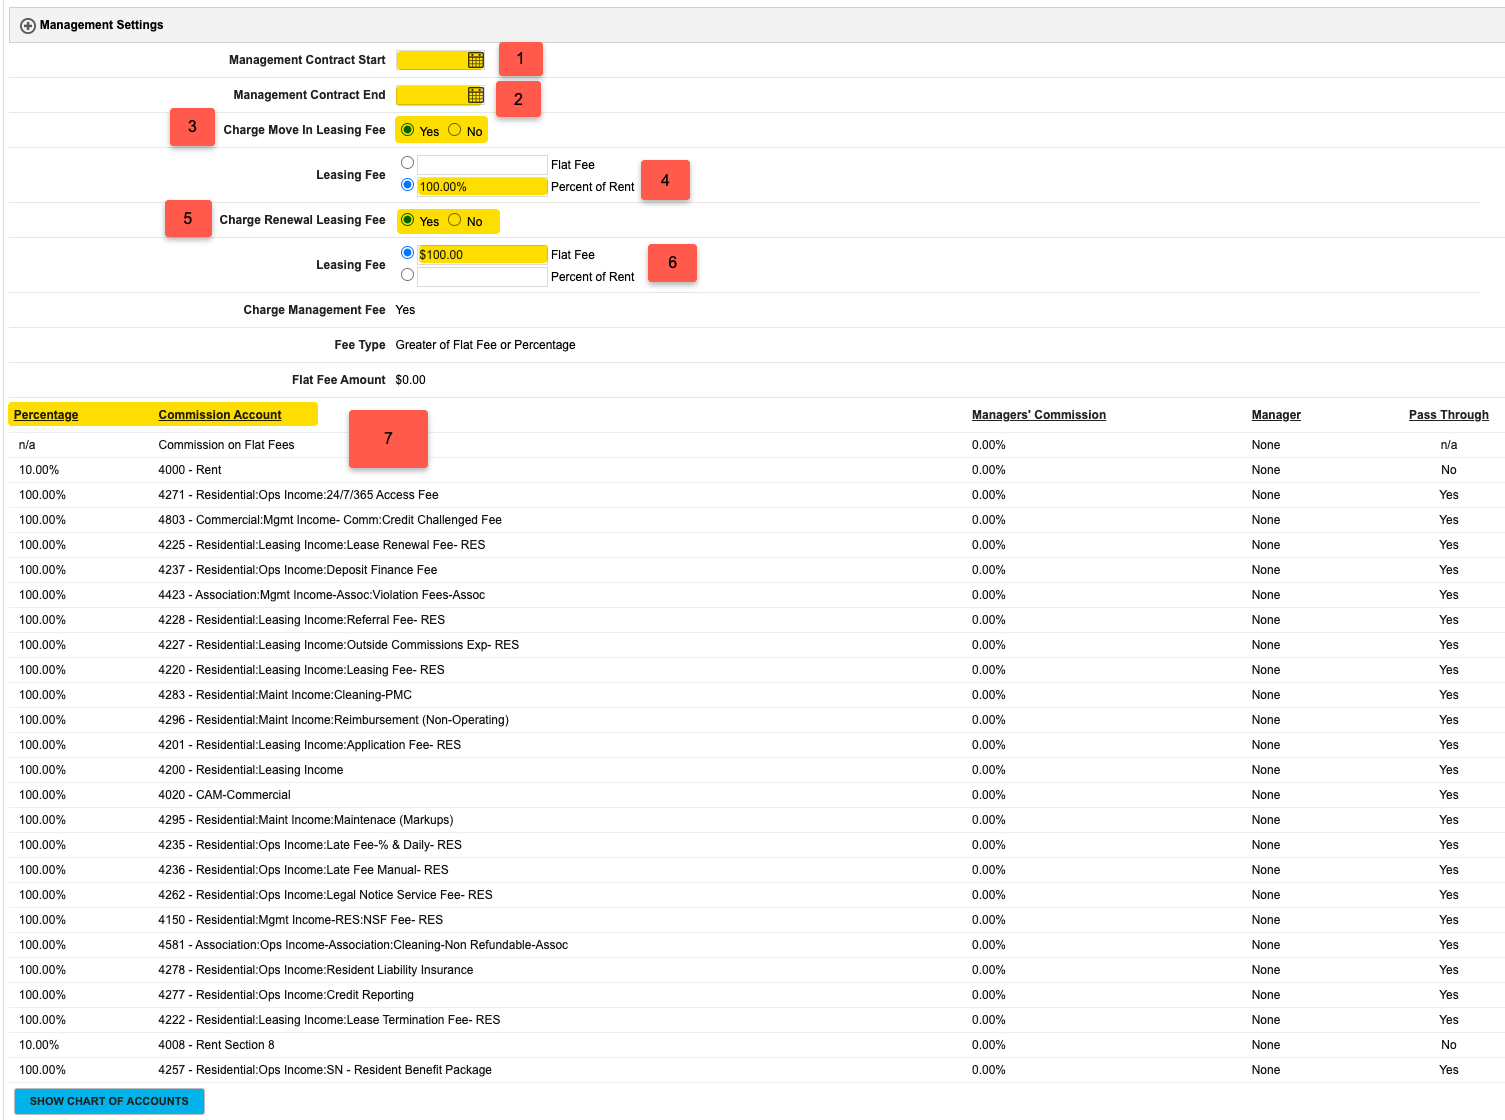
Management Settings
1. Enter Contract Start Date
2. Enter Contract End Date
3. Indicate whether or not you charge a Move In Leasing Fee
4. Enter Either your Flat Rate or % of Rent for your Leasing Fee
5. Indicate Whether or Not you charge a renewal fee
6. Add Leasing Fee
7. Double Check Chart of Accounts and Commission Accounts. Verify all is correct for this account.
a. Commission Accounts
i. Ensure all percentages are correct
ii. Add any missing accounts that are to be collected by management
Add any monthly bills/auto bills under vendor PMI (e.g.: Express Pay, Processing Fee, etc.)
Verify accuracy of building settings
Add Calendar Events for Periodic Evaluations (Quarterly, Semi-Annual, or Annual) as selected in Property Management Agreement
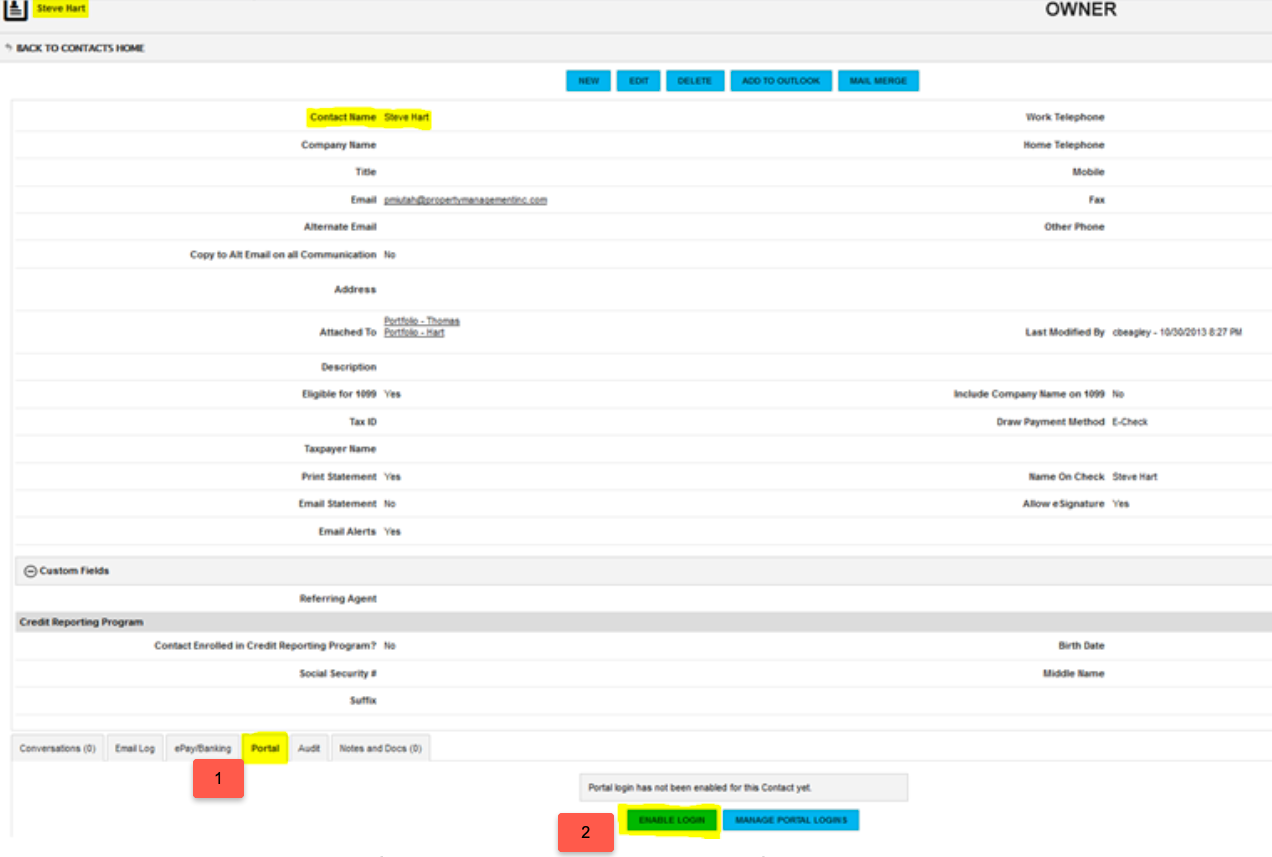
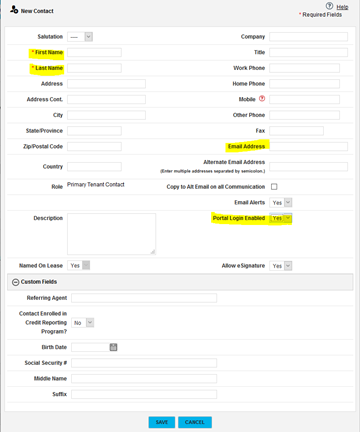
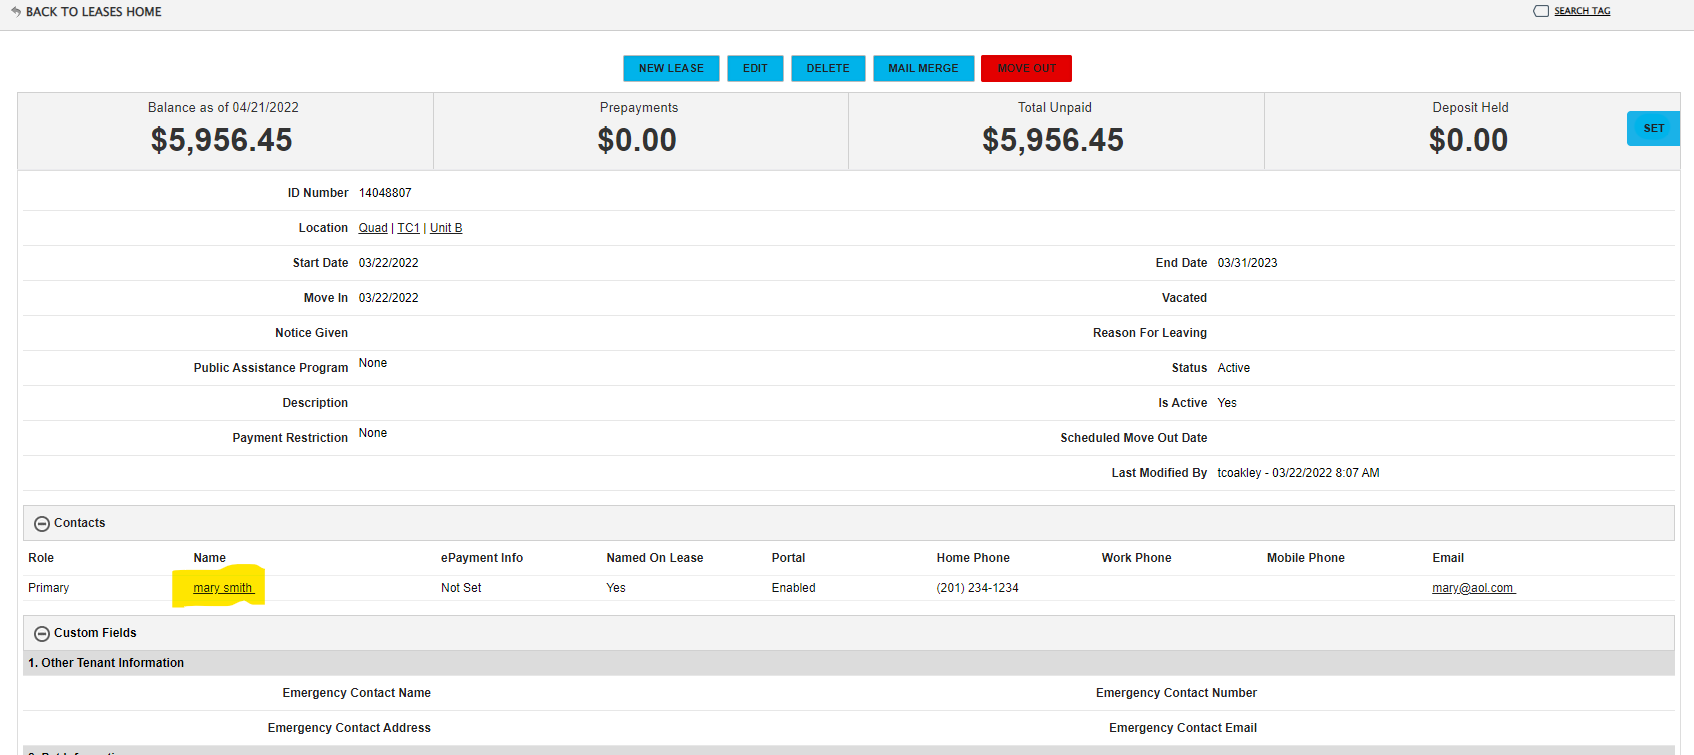
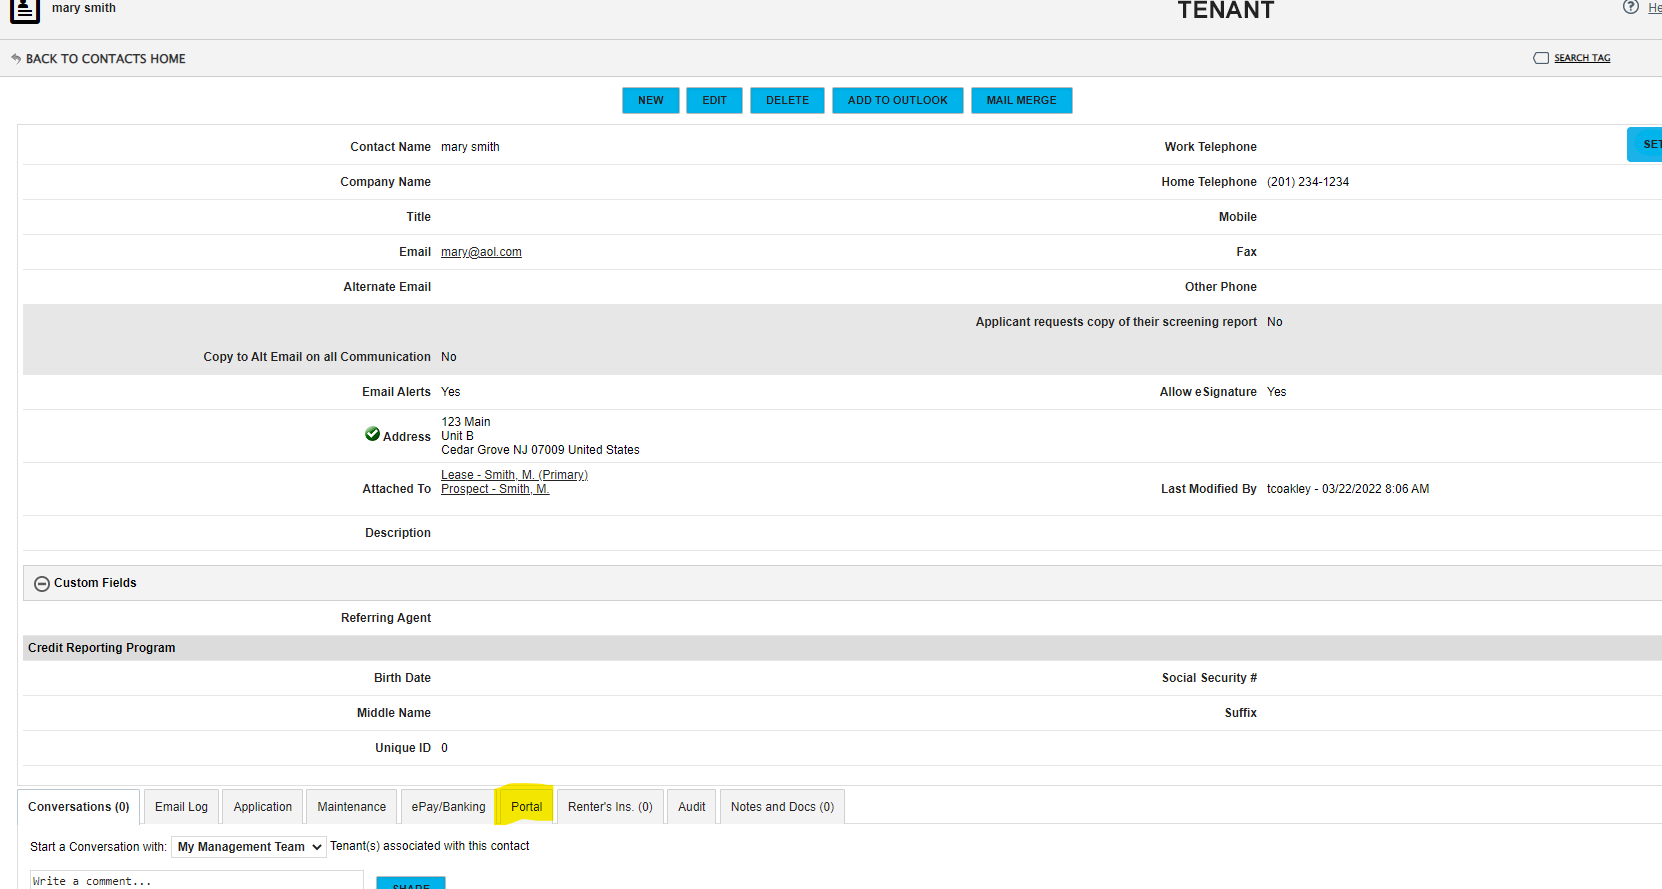
Navigate to the Owner Contact Sheet
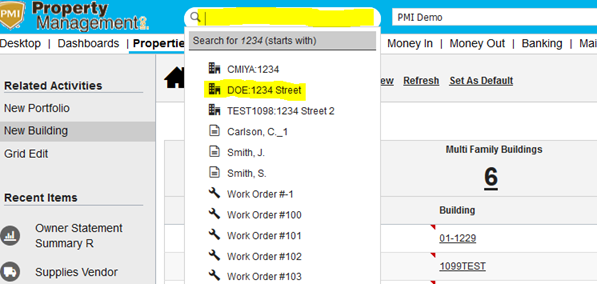
1. In the top menu, Click in the Global Search field and search for the owner you are seeking. Start Typing in their name and a drop down of selections will appear. Click on the desired name.

Go to the owners contact sheet
Select the “Portal” tab
Select “Enable Login”
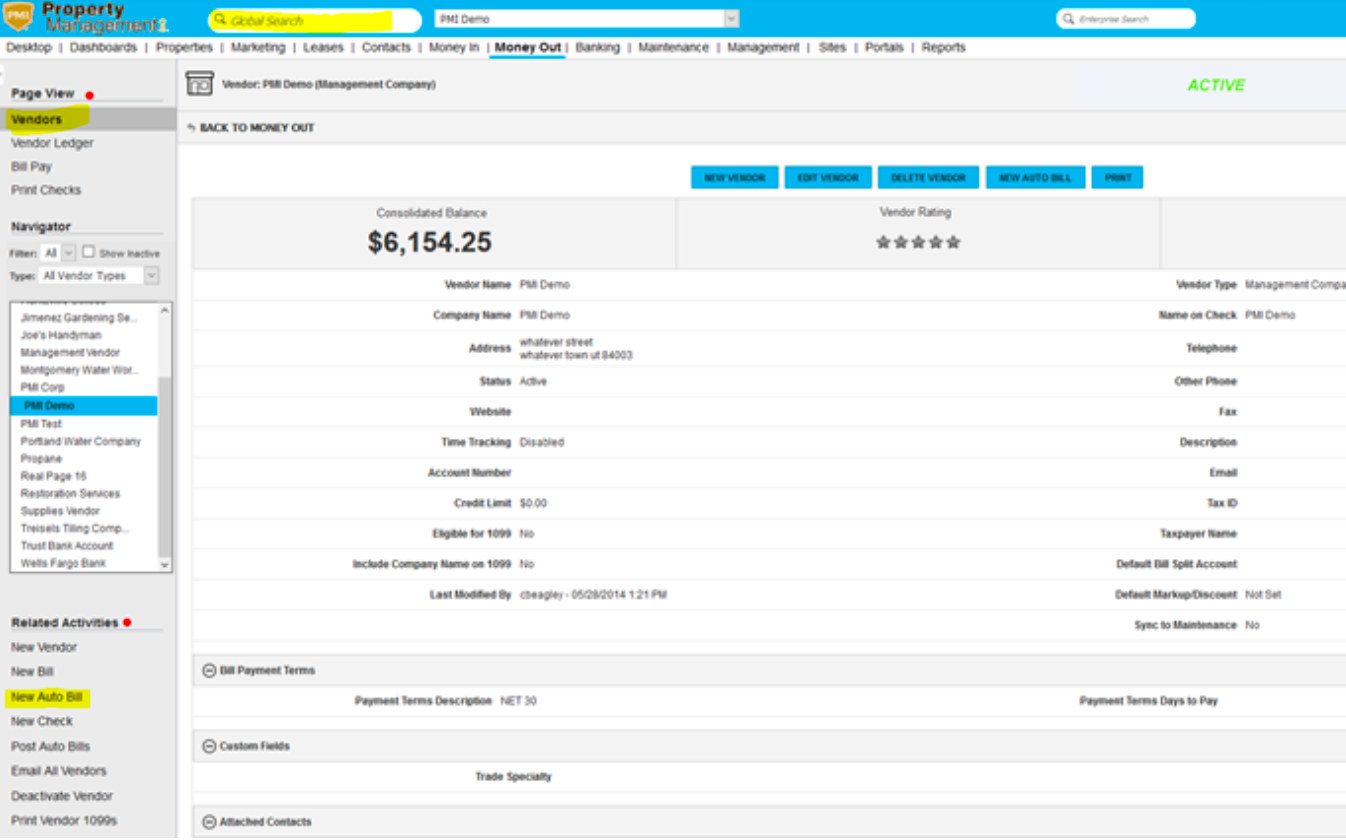
Auto Bills
a. Creating an auto bill
Create the auto bill under the desired vendor
Search for the vendor in the “Global Search”
Select “Vendors” under Page View
Select “New Auto Bill” under “Related Activities”
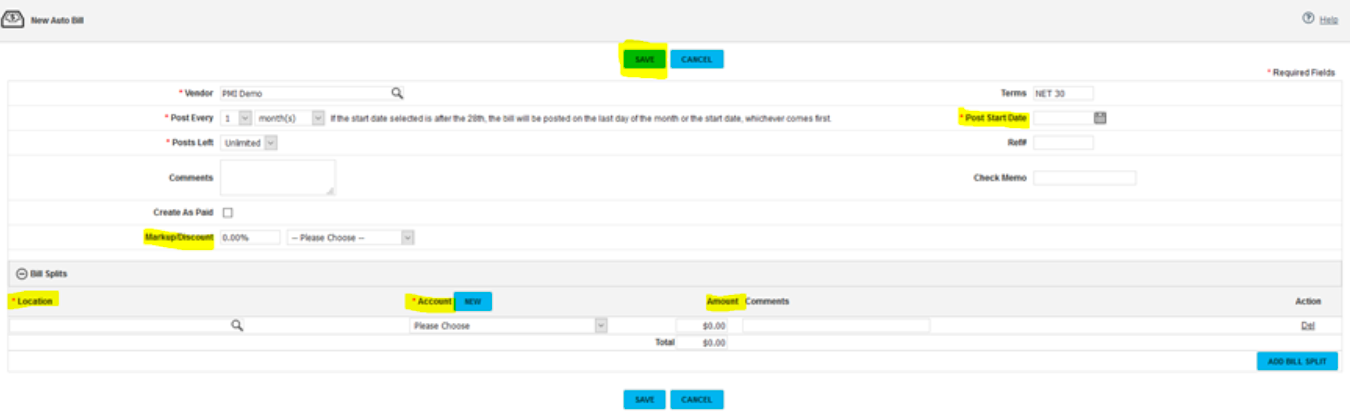
v. Fill out the following information
Post Start Date – This can only be a future date. If you need to
start it on the first of each month but it’s after the first, start it for the first of the following month and manually enter the bill for the current month
Location
GL Account
Amount
Markup/Discount (if any)
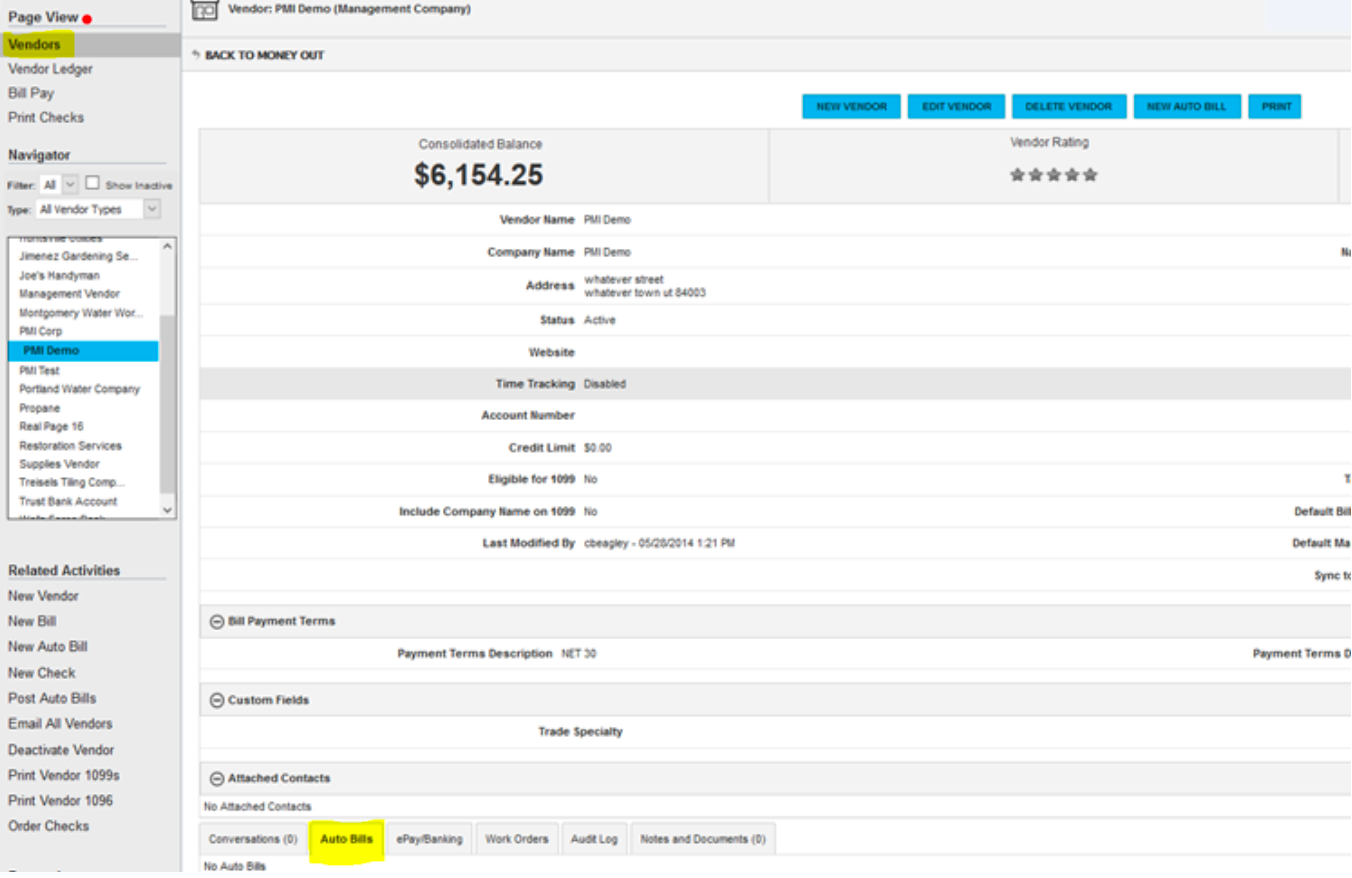
b. Viewing Auto Bills
i. Follow steps 1a-1b listed above so you are on the “Vendor” page view under the desired vendor
ii. Select the “Auto Bills” tab
iii. From here you can view, edit, or delete auto bills
Any one time charges are treated as New Invoices in the system. For any one time start up charges, you will want to create a new entry to record the charges properly.
Money Out - Recording Invoices
1. Receive the invoice with the following information
What owner to charge
Mark up amount
Vendor
Invoice number
Invoice amount
Invoice Date
Invoice description
Is the invoice paid or does it need to be paid
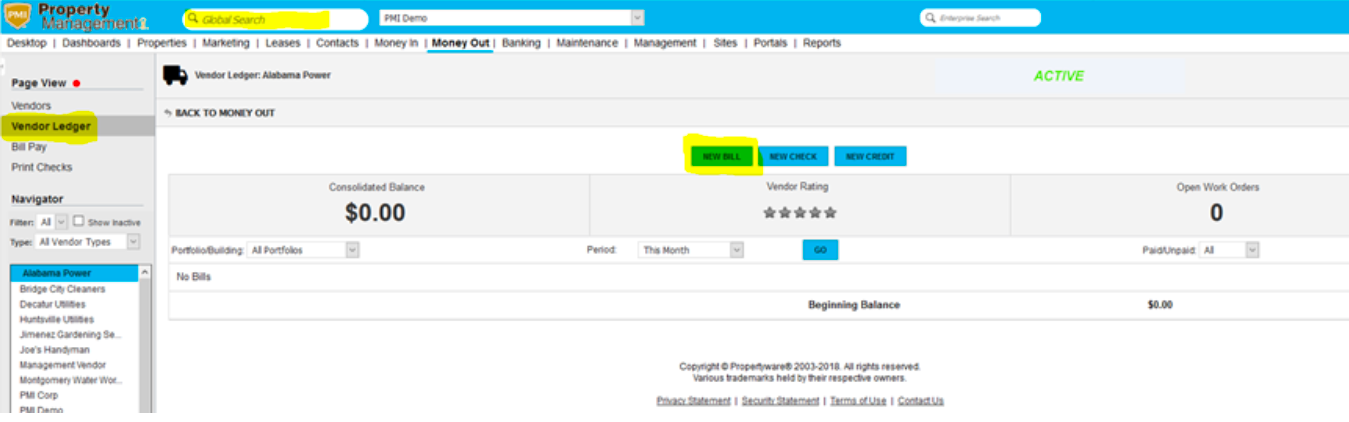
Record the invoice in Propertyware
Search for the vendor in the “Global Search”
Select “Vendor Ledger” under Page View
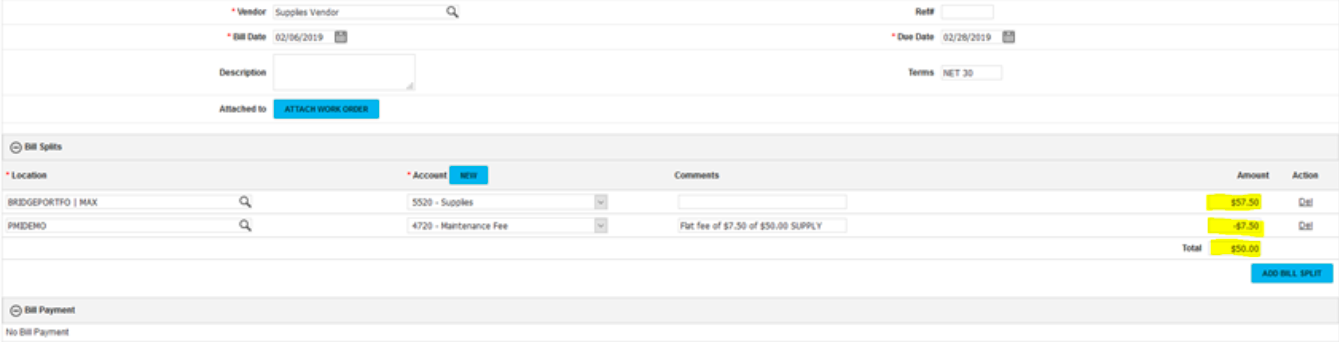
Select “New Bill”
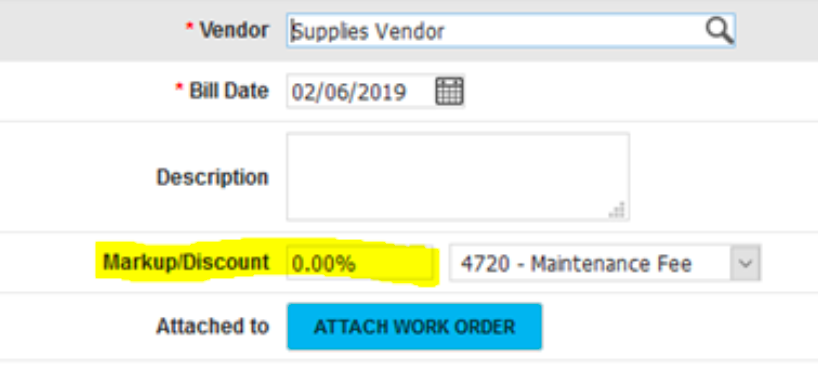
d. Fill out the following fields
Markup/Discount
GL code is always “4720 – Maintenance Fee”
Leave blank if there’s no mark up
Ref#
Due Date
Location
Account
Comments (invoice description)
Amount
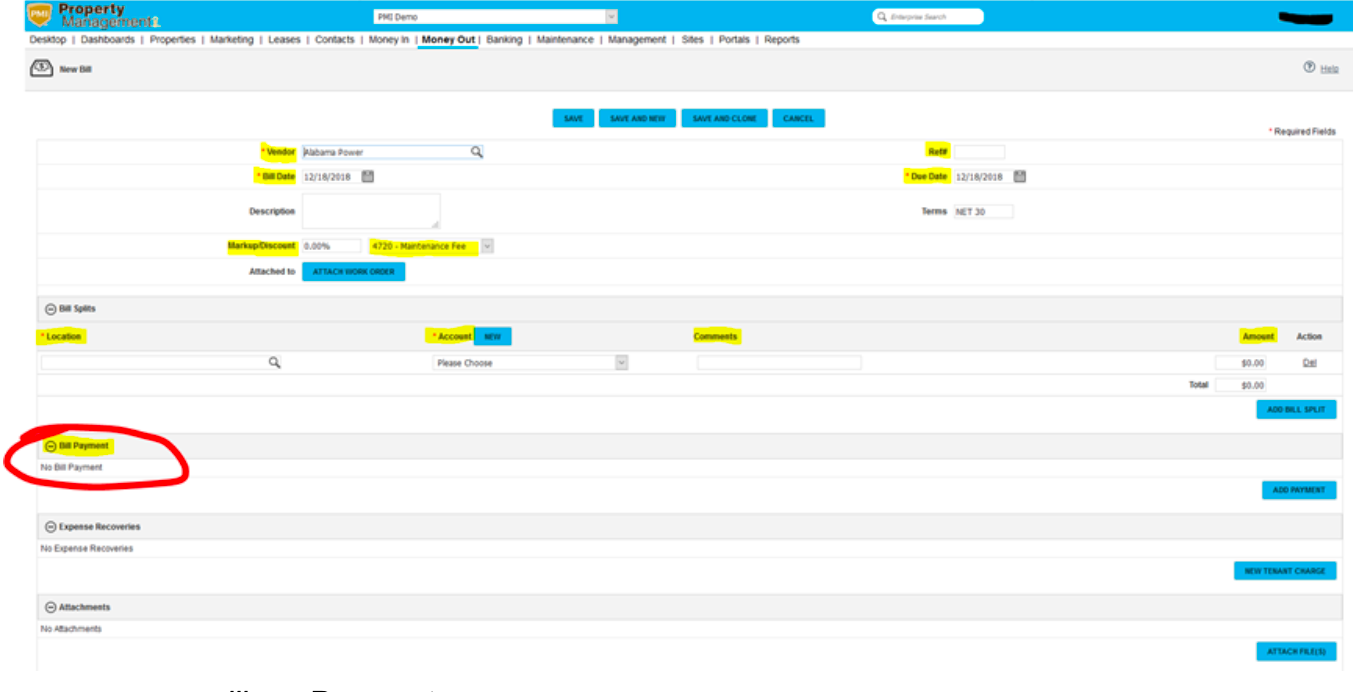
viii. Payment
If the invoice has been paid by check, bank bill pay, or other
means, add this section and fill it out accordingly

2. If the invoice has not been paid and they are using the print checks window to pay it, add this section and leave “To Be Printed” checked

3. If the invoice has not been paid and they are not using the print checks window to pay it, you do not need to add payment
e. Select “Save”
3. Reimbursements
Follow the steps listed out in #2 to record the invoice
In the “Location” field, input the owner associated with the expense
In the “Payment Account” field, input the “operating account”
The expense will be reimbursed to the operating account when a month end
close is performed the following month (training on month end close in separate training)
4. Mark Ups
a. Flat Fee Mark Ups
Calculate the percentage of the flat fee from the total bill (eg: Total bill is $50, mark up needs to be $7.50 = $7.50/$50 = 15%)
Enter that percentage into the “Markup/Discount” percentage box
Once you’ve completed the bill, save it, then select to edit it again
Ensure that the mark up amount in the mark up split line is correct
If corrections need to be made, manually enter the correct amount
Edit the top split amount to reflect the total bill plus the mark up
Detailed Instructions COMING SOON!
Detailed Instructions COMING SOON!!
For Second Nature, their support team will assist you in setup. The typical steps they will go through with you are as follows:
1. They will create a new GL code for you.
2. They use a report that they will create to view who has this GL being charged to the tenant's ledger.
This is how they know who is on the program, and this is how they know which tenants to bill on.
All Information Collected for the owner and properties should be uploaded into your property management software. Upload the following documents:
By Marking each box complete, you are verifying these documents have been uploaded into PM Software.
Uploaded Into Owner Documents:
Upload into Property Documents:
Double check the set up for Owner/Property
If there is not a current lease or lease is expired:
Note: Non Renewal Process will vary by state. Please check your local guidelines to ensure you meet all requirements before performing this step.
You may be coming into an eviction at various points in the process.
Kick off the Eviction Process
Onboarding is a great opportunity to confirm all details for the current occupants in a property. As you receive information from the owner or previous property manager, make sure you verify the following information:
You may elect to provide a one page document to the residents for them to fill in.
Provide a Welcome Packet to All Tenants. This should include the following information:
Perform a property evaluation within 30 days of taking over management. You will want to use zInspector to capture the property. Make sure you are taking photos of the property itself and not the personal items of the residents. Ensure you don't capture any people in your photos, especially children.
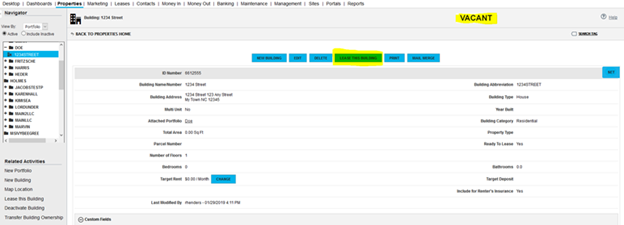
1. In the Global Search, type in the building address and select the desired building
2. Select “Lease This Building”
3. Fill out the following fields with information from the lease
Ie: You can either add an existing prospect (below), or....
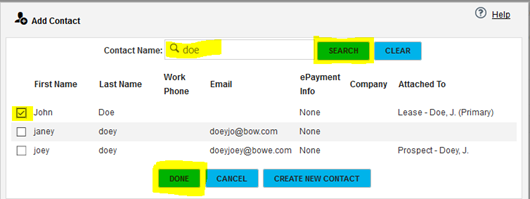
Ie: Create a new contact
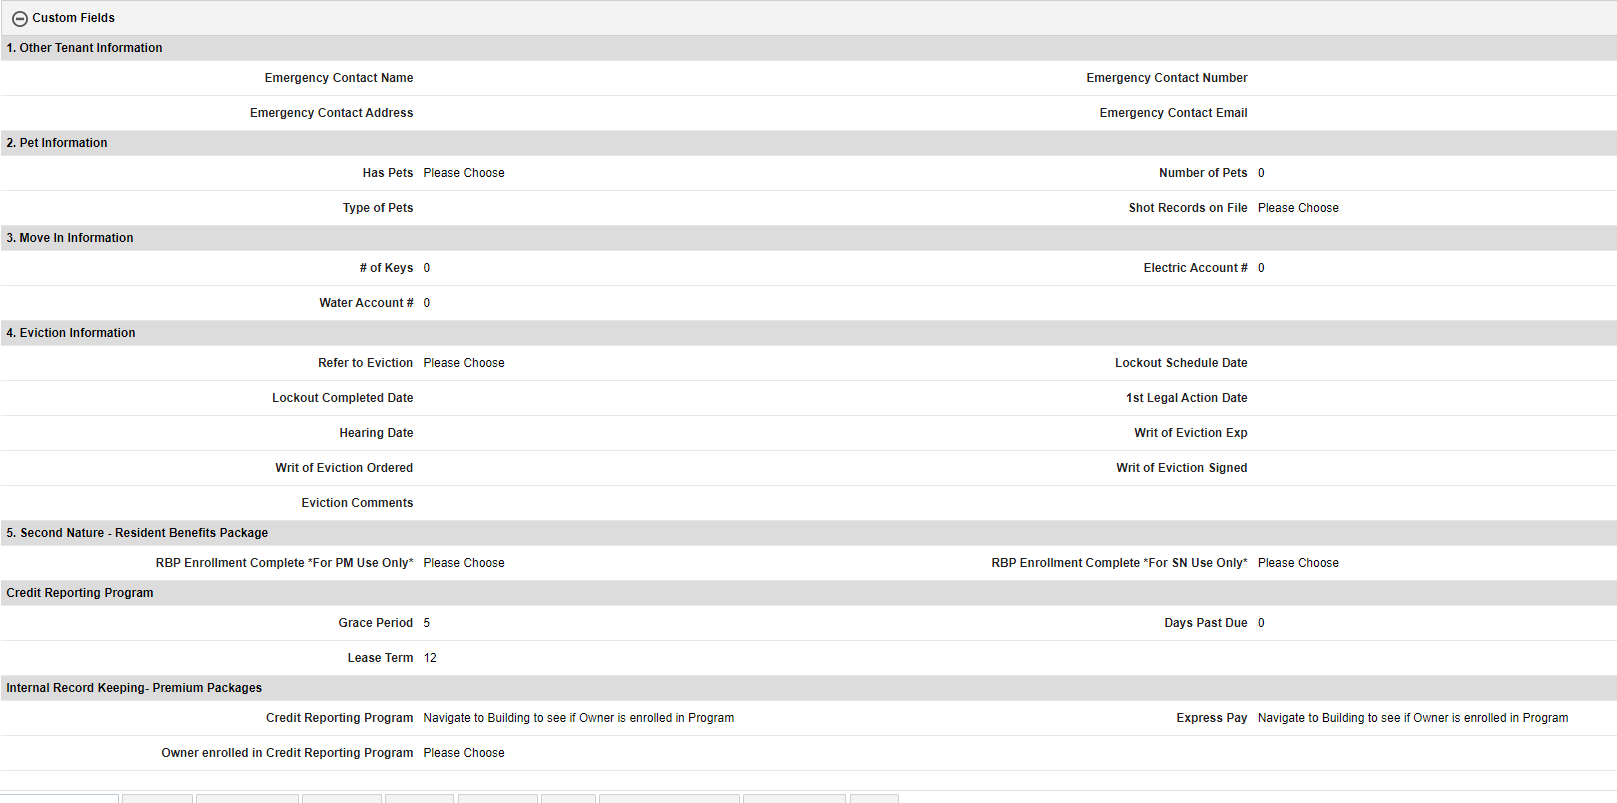
4. Fill out appropriate custom fields
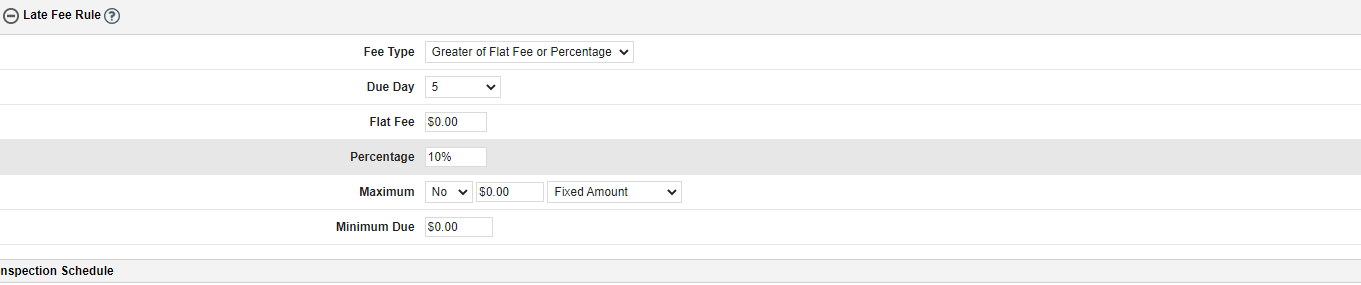
1. After selecting "edit" at the top of the lease summary page, scroll to the bottom of the window where you will see "Late Fee Rule"

Ie: If your late fee needs to be a percentage of the remaining amount owed to rent, still set fee type to "greater of flat fee or percentage" (see image below)
A. The due day will be the last day that the tenant is able to pay without incurring a late fee. (Most leases will say rent is due on the 1st, but is not late until after the 5th. In this case, the due day to set here will be the 5th)
B. Leave the flat fee as 0, and update the percentage to the appropriate amount
C. Leave "maximum" and "minimum due" to 0.
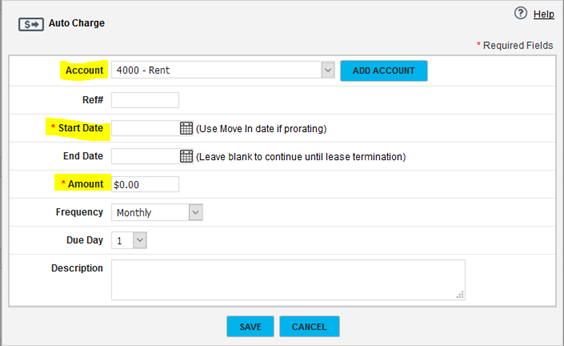
1. From the lease summary page, select edit at the top of the window and scroll down to "Auto Charges."
2. Select "New Auto Charge

1. From the lease summary page, select the contacts that you have now added to the lease

Double Check Tenant set up
Onsite Evaluation of Property and Condition
Discuss any suggested repairs, improvements, cleaning with the owner of the property. Provide them with the estimate and answer any questions they may have. Be prepared to discuss potential value add opportunities on the property. Use real examples of properties in the area for reference.
Confirm property is make ready. Do not complete this task until property has been physically evaluated to confirm all work is complete.
Kick Off Market Vacant Property Checklist
Many owners have never hired a professional property manager. You will want to check in with the owner after they receive their first Owner Statement. This allows you to check in with them, walk them through their first statement, and continue to demonstrate why you are the best property manager in town! By adding this appointment to your calendar NOW, you wont miss it!
Personal Touch MATTERS. Send your Owner a quick thank you note to show them that you care. Include a personal message that recalls details from your previous conversations.


