Templates /
User Story Template

User Story Template

Run this user story template every time you need to groom a user story
1
Introduction
2
Writing the Story:
3
Select the first source in your grooming queue
4
Check the story's information is stored
5
Update the title
6
State any acceptance criteria
7
Update the description
8
Add a label
9
Set the due date
10
Add relevant attachments (optional)
11
Prioritize the story
12
Estimate points based on complexity
13
Assess the size of the task
14
Move your story to the production queue
15
Sources:
16
Relevant Checklists:

Introduction

User stories make up the backbone of any decent software engineering team. Standardizing all of the potential tasks for your team with a user story template, however, can be a daunting task.

Written language is often very imprecise, and there’s no guarantee that a customer and developer will interpret a statement in the same way‘ – Mike Cohn

In order to prevent this confusion from happening and wasting both you and your colleagues’ time, we’ve come up with this handy little user story template. Whether you’re tracking your stories in JIRA, GitHub or Fogbugz, by running this every time you need to standardize a user story, you can easily detail:

  • The entire user story in a concise manner
  • The context of the issue
  • Additional features (such as labels) to organize your backlog effectively
  • How complex the issue is

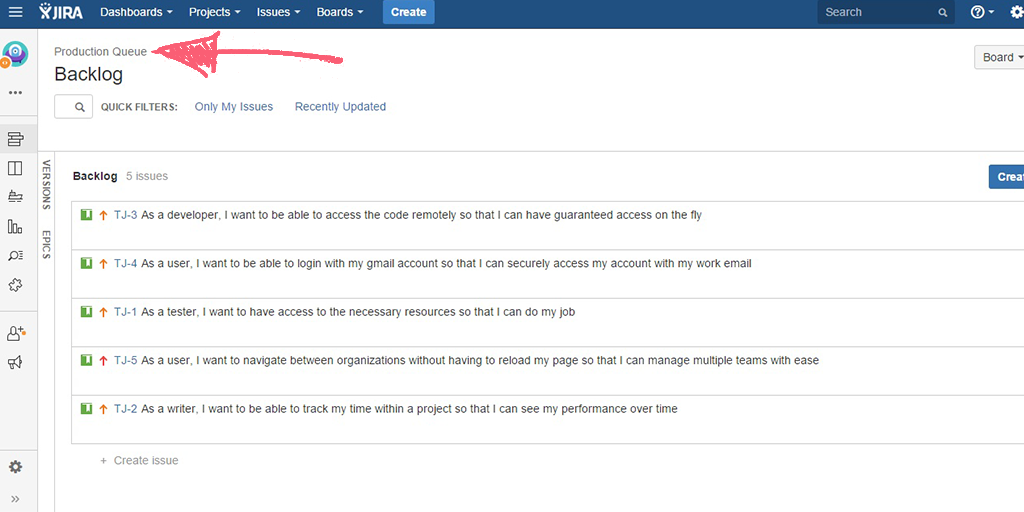
Before we begin, however, it is worth mentioning that we have assumed all of your potential user stories have been collected into one grooming queue. If you are unsure of whether or not this has already happened, check that all issues which the developers will need to work on have been tracked before continuing.

Grooming queue ready? Well then, let’s get started!

Writing the Story:

Select the first source in your grooming queue

First up, in order to perform this user story template you’ll need the original source to go off, be it a bug report or a desire expressed by one of your developers. 

All user stories need grooming, so just go into the first one in your grooming queue. Bear in mind, this can consist of many things, including (but not limited to):

  • A support ticket requesting a new feature
  • Bug reports
  • One of your developers requesting a new back-end feature
  • You own musings on how a particular customer may want to use your product

Don’t worry about complexity, how vague or specific the source is or anything like that. For now, just get the first source.

Check the story’s information is stored

Once you’ve selected your user story, you need to make sure that the original data for it is stored as proof of grooming. Ideally, at least one will have automatically been filled out in the form fields below.


Above are the form fields for the Story ID, Original Title and Original Description; more fields can be added if desired by editing this template. The Story ID should all automatically fill when linked to your project management software correctly.

As for the Title and Description fields, unless they are automatically filled just copy and paste the story’s current title and description in there.

Update the title

The whole aim of this user story template is to standardize them, ready to later plan into your sprints. To this end, the first step in writing the story should be to change the title to concisely describe the story.

Enter the new title into the form field below – note that this can be linked back to your project management software to automatically update the user story card itself.


Although there are a couple of different methods for formatting this, the most commonly used is the Agile method, which is as follows:

  • As a <user identity>, I want <desired feature> in order to <goal>

Fill in the blanks by either working with what the story already tells or, or with small logic leaps (such as predicting the user’s goal, based on their identity and desired feature). Note that the title of bugs should also be formatted in the same way or, at least, as much as possible.

Keep it short and sweet! Ideally, the title should be entirely visible from the dashboard view of your tracking software. This won’t always be possible, but strive to be concise.

An example of a complete title would be:

  • As a user, I can indicate folders not to backup so that my backup drive isn’t filled up with things I don’t need saved

State any acceptance criteria

Acceptance criteria eliminate doubt from your issues and are vital to include when writing your user stories. Remember to keep them in basic language that cannot be misinterpreted.

If you are unsure of what to write, all you need to do is to picture the boundaries of your user story, and what must be true in order for a story to be confirmed in working as intended.

For example, Sandy Mamoli states that this user story:

  • As an <internet banking customer> I want <to see a rolling balance for my everyday accounts> so that <I know the balance of my account after each transaction is applied>

Has the acceptance criteria of:

  • The rolling balance is displayed
  • The rolling balance is calculated for each transaction
  • The balance is displayed for every transaction for the full period of time transactions are available
  • The balance is not displayed if a filter has been applied

Update the description

The final text field to edit in the user story is the description. Although the story’s title and acceptance criteria should detail everything the software team needs to know, enter any extra information which may be helpful in the form field below.

As always, this field can be linked back to automatically update the original card.


The level of extra detail will depend on the complexity of the issue, but as a general rule of thumb, update the description with a bit of brief context to the issue (if applicable) or any outside factors to consider.

Once again, we’ve got a form field for you to go ahead and write the description in; you can map this back to JIRA for automatic card updates too!

Add a label

Now that the meat of the story is complete, you need to start filling in the remaining fields. First on our list is the story’s label, which should be selected from the forms dropdown below.


Although the labels will vary (sadly, we aren’t psychically linked to your company just yet), these should be pretty self-explanatory. Whether they are indications of the affected feature or the team which will benefit, label your story and move on.

Forms are once again to the rescue here, with the ability to update your labels and tags directly within this template! Feel free to edit the drop-down options to your heart’s content.

Set the due date

Next up we have a due date to set! If your user story has a particular date by which it must be complete, note this in the form field below.

Due dates are not always applicable (to either stories or certain tracking software), so don’t worry too much if you do not know of any particular due date to set, or are plain unable to.

Add relevant attachments (optional)

The third (and final) optional section of this user story template is adding attachments to your user story. Once again, this should only be done if relevant and necessary, and should be recorded using the form field below.

For example, a user story created from a bug report may require a screenshot of the issue to be take and attached in order to speed up the software debugging process.

Prioritize the story

You’re in the home stretch of the user story template! Now you’ll need to consider the urgency of the story and assign it a priority.

Once again, this is an area where you’ll need to use your own judgment rather than any particular guidelines. In general, consider how widespread the effect of completing the story will be, and how great an impact it will have within that blast radius.

For example, product-breaking glitches and bugs should probably be high priority, whilst minor additions to features which will not be implemented for months  would be either low or medium.

Estimate points based on complexity

When prioritizing user tickets for the next sprint, it is incredibly important to know how complex an issue is. Hence, you must now assign points to your user story based on the complexity of the issue.

Score the issues based on their perceived complexity, the effort required to achieve them and the level of doubt in the process. Mike Cohn recommends scoring based on a "bucket" grouping system based on a Fibonacci sequence (0, 1, 2, 3, 5, 8, 13, 20, 40, 100), as this lessens the effect of small uncertainties.

Remember to consider the points assigned rationally; if putting your story in the "3" bucket, ask yourself if it is truly three times more complicated than a recent 1 point issue.

Assess the size of the task

Whilst most user stories are singular tasks, every so often you can stumble across something much larger. Before you spend time planning your user story within a certain sprint, you need to assess the size of the problem posed.

If your story consists of a significantly large task, you should consider turning the story into an epic. For example, if the task (let’s say, the creation of an entirely new feature) is unrealistic to achieve in a single sprint, it’s probably an epic.

Epics will require breaking up into several smaller stories, all of which must then be groomed with this same user story template.

Move your story to the production queue

To finish off the user story template, you need to move the complete user story into the production queue (or backlog), ready to prioritize. Usually, this just requires you to move the story to the next list in your tracking system

This can be automated to a certain degree, but you need to check for the presence of the new entry even if you do not have a manual system. Congratulations! Your user story template is complete, and it’s time to move on to the next one.

Sources:

Relevant Checklists:

Take control of your workflows today.