 Workflows
 Forms
Forms Data Sets
 Pages
Pages Process AI
 Automations
 Analytics
 Apps
Apps Integrations
 Property management
 Human resources
 Customer management
 Information technology


 Screencasts are true powerhouses in team communication; they allow us here at Process Street to convey everything in a concise manner with both visual and audial cues, whilst giving the viewer a resource that they can run through as many times as they want.
Unfortunately, many teams put off using screencasts because you have to:
- Spend time recording it
- Wait for the file to export
- Wait for the video to convert
- Wait for the video to upload
- Remember you recorded a video that has now finished uploading
- Manually send it to the right team member
Whilst conversations are more likely to be forgotten or lost, their ease makes them the go-to method for communication (or, at best, a Skype call). This is a huge mistake.
Using just a couple of free screencasting apps you can record your video, spend three seconds saving it and then have it automatically sent to to the right person. Rather than waiting for your time zones to match up or the other person to reply, you can record, save, then get on with the rest of your day.
How You Can Communicate Quickly Using Free Screencasting Apps
Below is a video showing how our CEO, Vinay Patankar (check out his podcast), uses free screencasting apps to communicate with our team in a fraction of the time any other method would take.
As you can see, there are two main workflows for automating your screencast process with free apps, both of which will be demonstrated in detail later in this post.
Workflow 1: Save To Cloud Storage And Automatically Move The Video To Your Project Management App
The first option is to link your cloud storage platform to your project management app. This means that all you have to do is record the screencast, save it to a folder in your Dropbox or Google Drive, then sit back and relax as the video is automatically moved into Trello, Asana or whichever app you use.
A task or card will be created, and the video will reach its mark with only a couple of seconds of work for you after the actual recording is finished. This is fantastic for teams which regularly use screencasts, or for recording videos which need to have limited access.
Workflow 2: Save To Cloud Storage And Receive An Automatic Email With A Video Link
The other option is to save the video to your cloud storage and then have a link to that video automatically emailed to you. Once you have the link, you can share it with whoever needs to see the video manually. This is a better option for teams who use screencasts sparingly, or for recording videos which can have public access.
Cloud communication has a series of benefits. Check out a detailed exploration of cloud communication here: Cloud Communications: Public, Private, and Hybrid.
No matter which workflow you choose to go for, the first thing you need to do is choose the app which you’ll be recording with.
Choosing Your Free Screencasting Apps
Before making your screencasts automatically go where you want, you need to figure out which app you want to use to record your videos. Whilst there’s a huge selection of apps out there, we’ve suggested a few good quality free apps for both Mac and Windows.
Use Quicktime With Mac
First up, if you’re using a Mac then you’re in luck; Quicktime is one of the best free screencasting apps you could hope for in terms of ease of use and speed of recording and saving. All you need to do is boot it up, choose your recording window, record, then save in your desired location.
Or OBS With Windows
Windows users, sadly, don’t have it quite so easy. The best way I’ve found to record screencasts quickly is to use OBS Studio; a tool primarily used to stream on sites like Twitch, which also has a “record” feature. The only issue with this is that you’ll need to change the output folder before you record every time, as the file will automatically save once you’ve finished.
No matter which tool you use, make sure that you’re saving to a Dropbox or Google Drive folder. This will both provide a cloud copy of the file and allow us to automatically send it to whoever we want.
How To Automatically Send Screencasts To Your Team
Our favourite tool for doing this is Zapier. First up, if you haven’t heard us rave about Zapier before, where have you been? Second, you can link Google Drive to your project management app to automatically create a task with the screencast you just saved. Going one step further, you could even send a message alert to the target of the video by linking up your messenger app too.
This means that your instructions are not only aided with visuals, but your team member is given an actionable task to work through with almost no extra effort on your part.
 Still, I’m getting ahead of myself; Zapier can be a beast to tackle if you’re a first time user, so let’s take this one step at a time. I’ll run through the two workflows for automating your screencast process, the first of which will be saving the video to Google Drive, which will then ship it into a new Trello card. If you’re using Dropbox or Asana instead, don’t panic! Just swap your app in and apply the same rules.
If you prefer a little more manual control over where the videos go, I’ll also detail how to email yourself a link to the screencast once it’s been saved. Also, if you’d like to know what other processes you can automate, take a look at our business process automation guide; it’s completely free!
Workflow 1: From Cloud Storage To Project Management App
Obviously, the first thing that you’re going to want to do is log into Zapier. If you don’t have an account, now’s the time to go and make one!
Once you’ve logged in, go ahead and hit “Make A Zap!”. Zaps are Zapier’s cause-and-effect model which we’ll be using to automatically send your screencasts to where they need to go. In this case, the aim is to make Google Drive your Trigger (the thing which starts off the process) and Trello your Action (the thing which is ultimately affected). 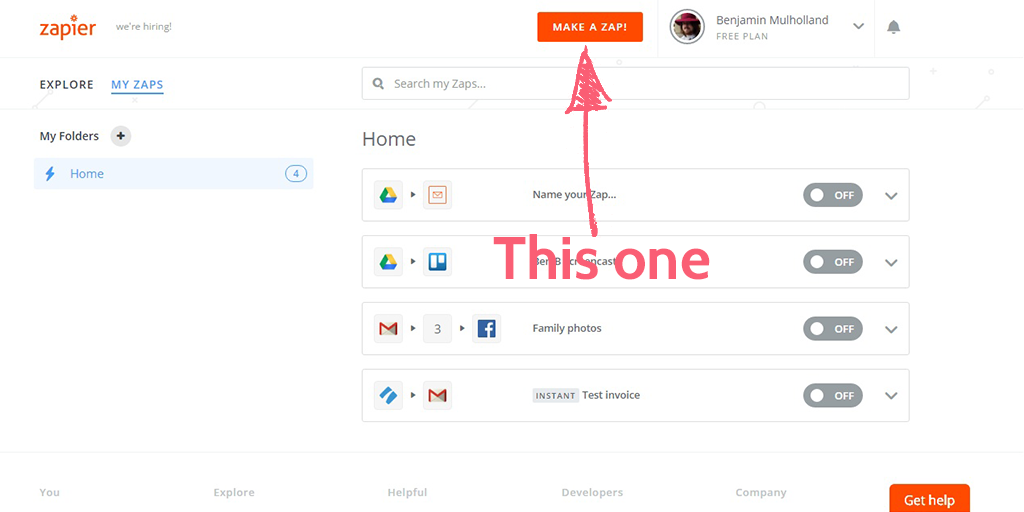
Set Up Your Google Drive Trigger
Once your new Zap has loaded, type “Drive” or “Google Drive” into the search bar – both will show Google Drive as a result, which you then need to click on. This tells Zapier that it needs to be looking out for an event in your Google Drive account to start off the process – it is now set to be your Trigger.
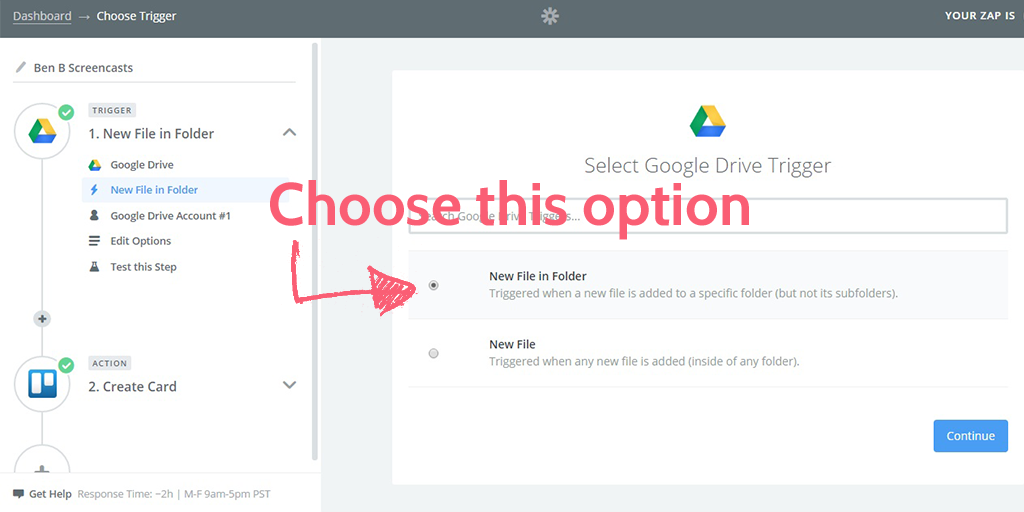
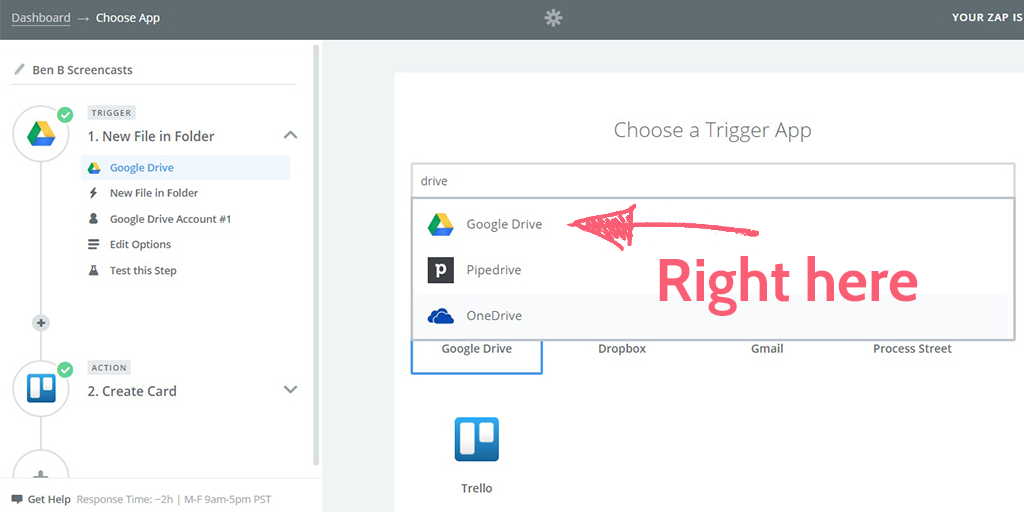 Once you’ve selected Drive, choose “New File in Folder” as your Trigger, then hit “Save + Continue”. This means that your automated process (the Zap) will only fire when a new file is saved into a specific folder of your Drive account.
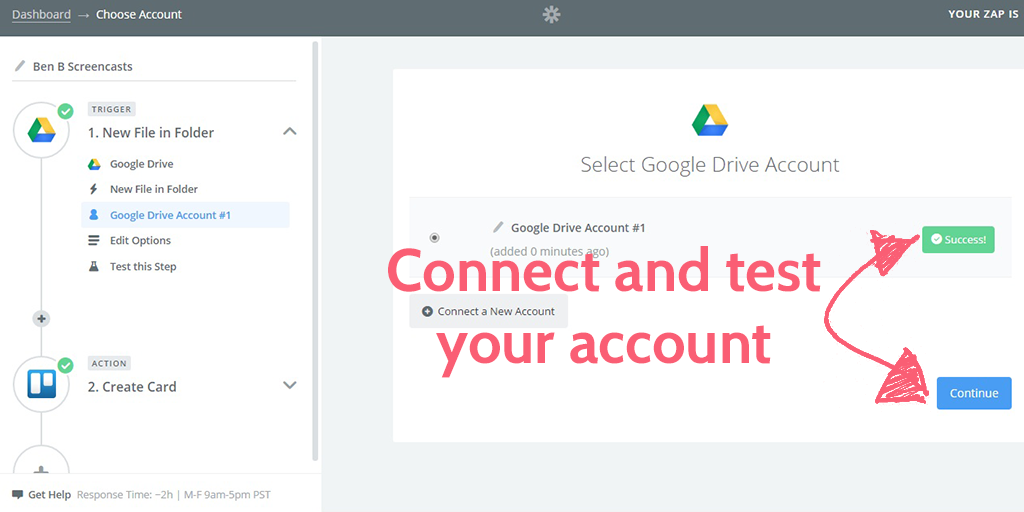
 Next up, you’ll have to connect your Google Drive account. The step in front of you will generate a new window in which you will be asked to login with your Google account and allow Zapier access. Do this and, once you have been taken back to your WIP Zap, hit “Test” to the right of the newly connected account. If the test is successful, hit “Save + Continue”. If not, try connecting your account again, or using a different login.
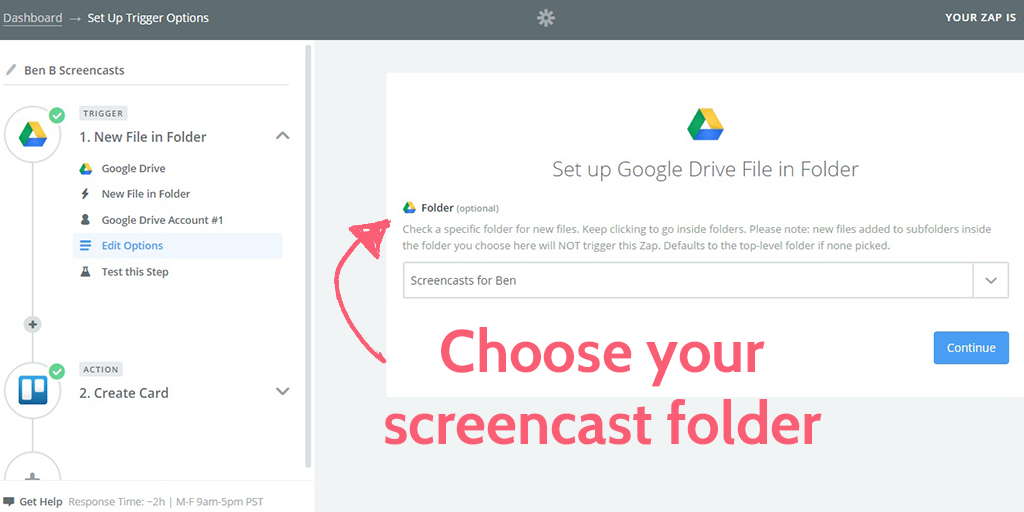
 Now you need to choose which folder you’ll be saving your screencasts to. Remember that this folder should be reserved for screencasts aimed at a single person; all files saved to this folder will be picked up and shipped into Zapier, so a dedicated folder is the best way to go. For the sake of ease, if you want to send screencasts to a second team member too, create a new folder (and make a new Zap) specifically for this purpose and give them permanent access to the folder.
 Once you’ve chosen your folder, hit “Continue”. The only thing left for your Trigger is to test it, so go ahead and save a file to the folder where you’ll be saving your screencasts (it can be anything, as any file saved to this folder in future will be picked up by this Zap). Once you’ve done this, click “Fetch & Continue”.
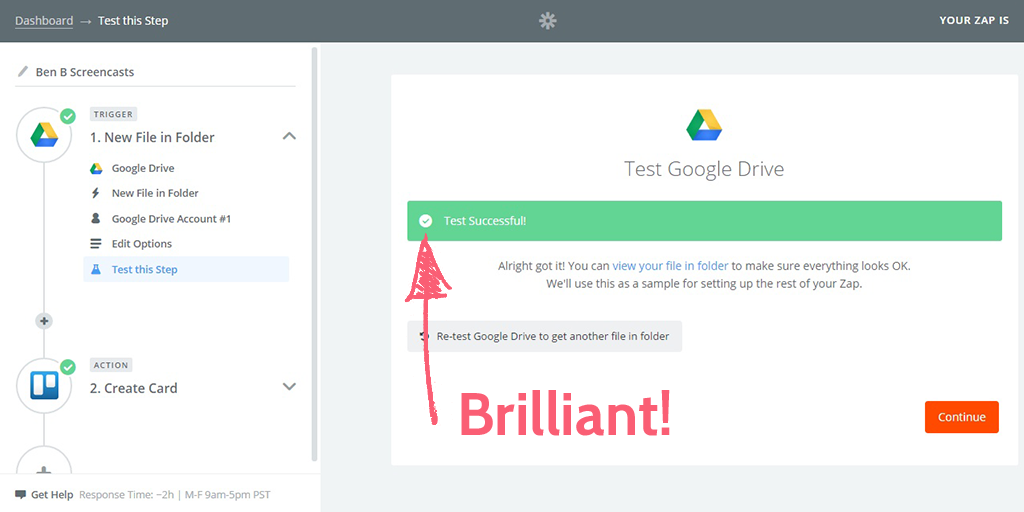 There you have it! Assuming the test was successful (remember, you need a file to have been recently saved to the screencast folder in order for it to work), your Trigger is up and running. Now it’s time to click “Continue” and set up your Action – the thing which will happen when your Trigger is detected.
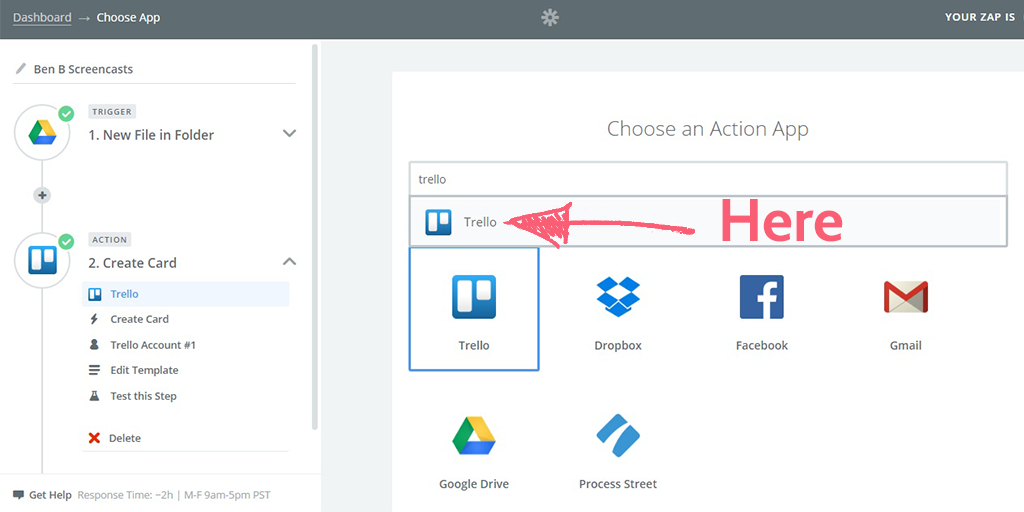
Set Up Your Trello Action
As you did with selecting Google Drive in your Trigger, you now need to use the search bar to look for Trello. Type it in, and select the app to continue.
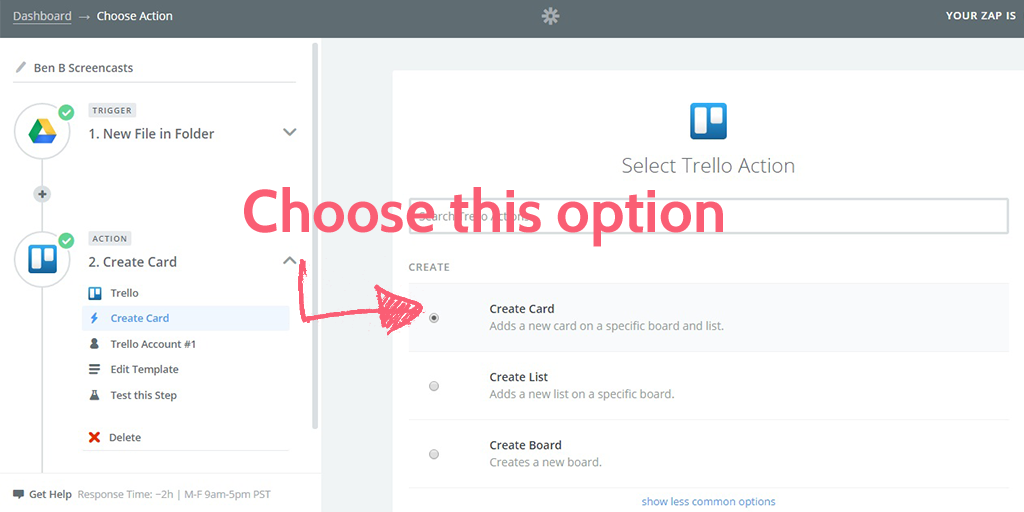
 Next up, select “Create Card” as your Trello Action, scroll to the bottom of the page and then click “Save + Continue”. This tells Zapier to create a new card when the Trigger is detected.
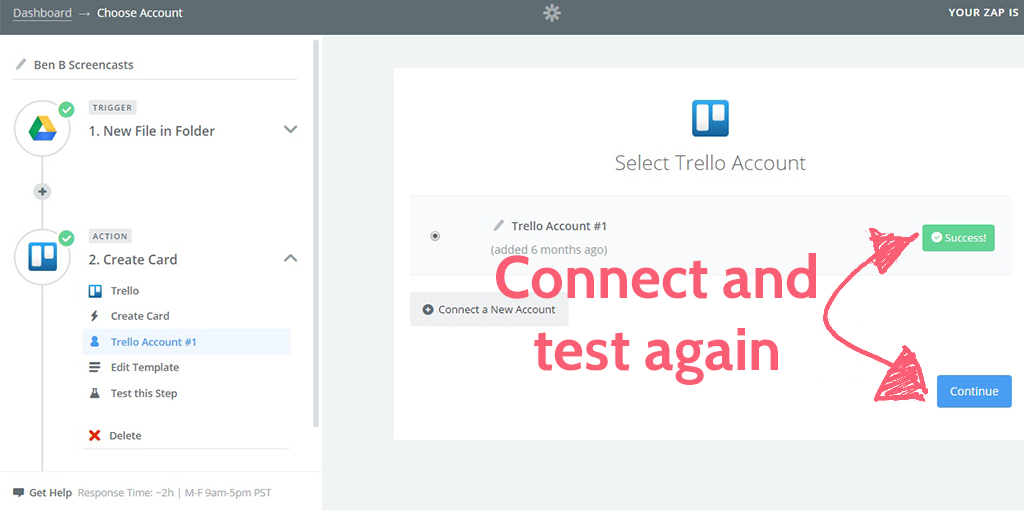
 Now you need to connect your Trello account with Zapier; this is done in much the same way as you did for Google Drive. Allow access to your account using the window which will appear, test it to make sure that it’s working, then hit “Continue”.
 The next step is to select where your new card will be created in Trello. Obviously, this should relate back to the person you’re intending to send the screencast to, along with the folder you’ve selected in Google Drive. For the name of the card, click the button to the right of the field and select “Title”; this will make sure that the new card will be named the same as the file being saved to Google Drive.
You’ll also need to fill in the description of the card with a link to the file you saved. Do this by clicking the button to the right-hand side of the “Description” field and selecting “Alternate Link”. Now the card that’s created will be called the same as your saved file and will contain a link to the Google Drive file in the description.
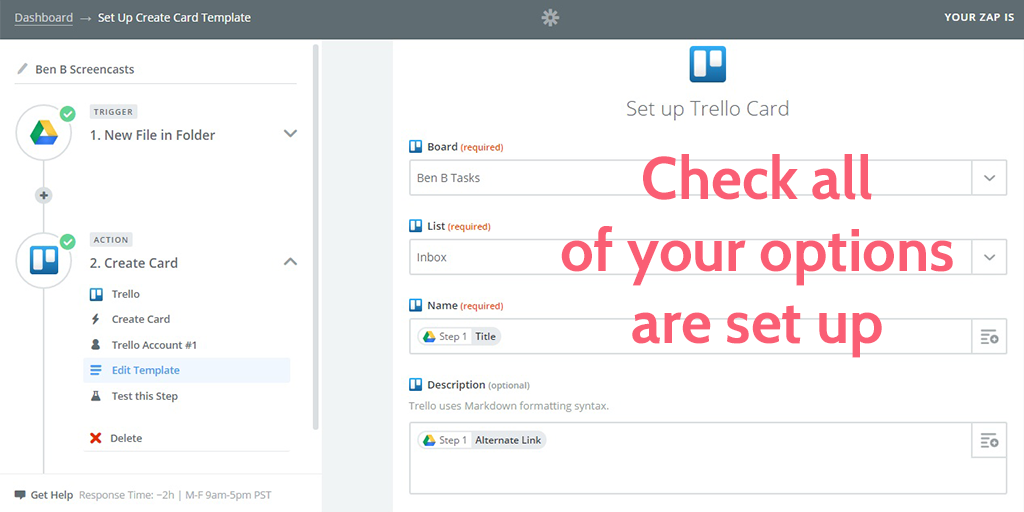 If you wish, you can also add in fields such as the labels attached to the card or the due date assigned. Fill in any extra information you wish, but remember that every single card created by this Zap will have the exact same information applied to it. Once you’ve finished adding details to your cards-to-be, scroll to the bottom and hit “Continue”.
As with your Trigger, the only thing you’ve got left to do is to test your action by hitting “Create & Continue”.
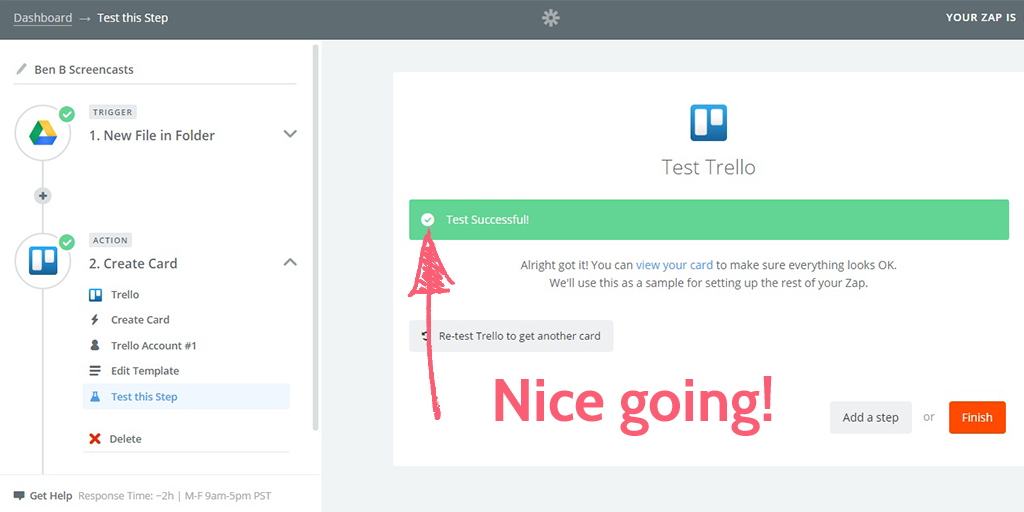 Next, double check the Trello board you’ve chosen for the new card and make sure that your link is working. If all’s well, then congratulations! You’ve just automated your screencast process. All you need to do now is hit “Continue” in Zapier, name your Zap and then turn it on.
Workflow 2: From Cloud Storage To Automatic Email
If you don’t use screencasts too often, or want a little more flexibility in where you can save and send your videos, you can alternatively use Zapier to send yourself and email with a link to any screencast you save in Google Drive.
The first half of this process is exactly the same as setting up the Drive–>Trello Zap above. Log into Zapier, make a new Zap, link your Drive account, select “New File In Folder”, choose the folder you’re going to save the videos to (likely one which your whole team can access), test it and then hit “Continue”.
The action, however, will be different, as your screencasts will not be sent to Trello. Instead, follow the instructions below to get your automatic screencast emails up and running.
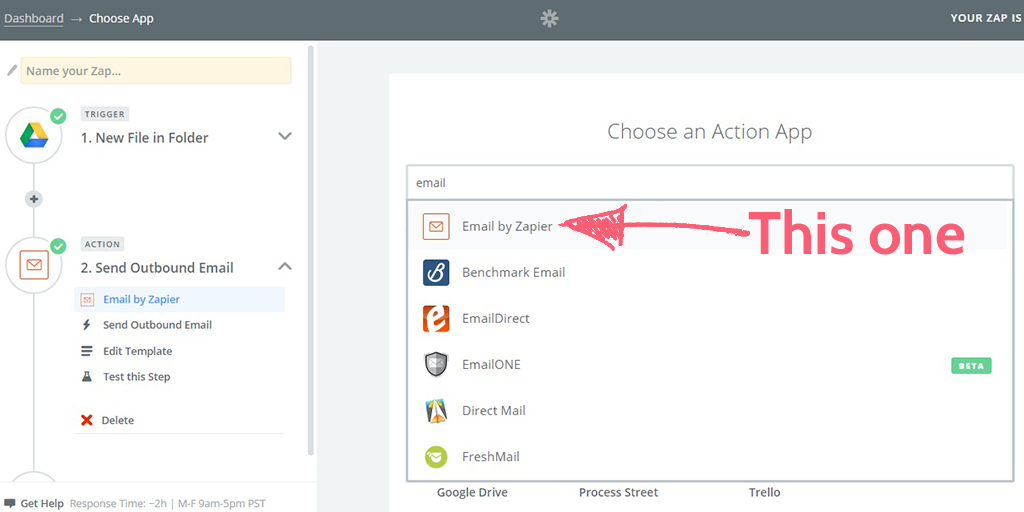
Set Up Your Outbound Email Action
This time, you need to search for (and select) “Email by Zapier” as your Action app. This is done in the same manner as when you searched for Google Drive; just punch “Email” into the search bar, and select it.
 Once you’ve selected email, click on “Send Outbound Email”, then “Save + Continue”. This is the only option available, so we won’t patronize you with a screenshot here.
You should now see the step for setting up your email template. The “To” field needs to be filled out with your own email address, in order to ensure that you are always the one being sent a link. Next, click the button on the right-hand side of the “Subject” field and select “Title”, so that the email is called the same as your filename.
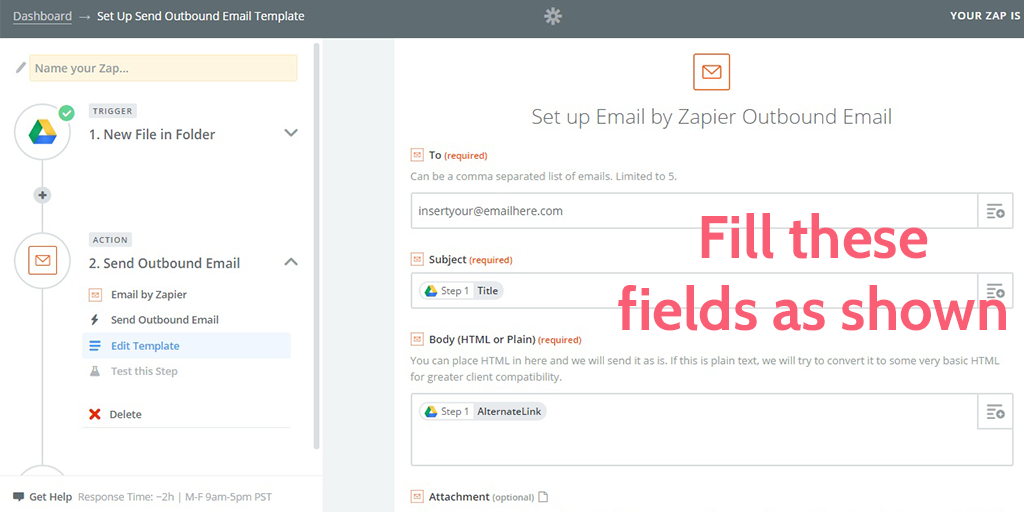 Finally, click the same button next to the “Body” field and select “Alternate Link” in order to include a link to the file in Drive. Once you have all of these options filled in, click “Continue” at the bottom of the page.
The last step in setting up an email as your Action is to test it. Again, this is done in the same manner as testing your Trello card from the previous process, but I’ll go through it here anyway.
Scroll to the bottom of the testing step and click “Create & Continue”. This should create an email called the same as your filename in Drive, with a link to the file in the body of it; check your email for it to make sure that it’s come through and working as intended (remember to check your spam folder).
If everything’s in order, hit “Finish”, name your Zap and make it live.
 Whilst you can’t cover every possibility in giving feedback to a team member through a screencast, by using these methods you can create them so quickly that, even with 4 or 5 renditions, you’re still saving time and effort when compared to traditional email or messenger conversations.
Also, remember that these are just a few of the many ways you could solve this communication problem. Whether you’re using a to-do list, Evernote, Asana or something a little more niche, all you have to do is adapt your workflow a little to use these free screencasting apps to deploy videos around the world in seconds.
What do you think; sound feedback strategy, or have you created something even better within your own company? Do you have your own little tips and tricks to boost the effectiveness of your organization apps? We’d love to know in the comments below!
Ben Mulholland
Ben Mulholland is an Editor at Process Street, and winds down with a casual article or two on Mulholland Writing. Find him on Twitter here.