
Before getting started please take a second to watch our Team Sports Headquarters overview.
Before getting started please take a second to watch our Team Sports Headquarters overview.
You should have received a URL and login credentials to your new website. If you have not received your login information please reach back out to your sales representative.
If you do have the URL and login credentials please proceed to login to your new website.

A successful login will land you on the registration landing page. Where you will be able to build a new registration form.

Before building a registration form lets take a second to get oriented to the Admin Toolbar. You will only see this toolbar when you are logged in as admin.
For users who are just getting started, you will need to focus on the Registration tab as well as the Website tab.

If you are not already there navigate to the Registration landing page by clicking on the Registration button in the Admin Toolbar.

Next, click the +New Program button on the upper right side of the page.

This will cause a pop-up window to appear with 4 program types.
Blue Sombrero offers an intuitive, two-step registration process for handling tryouts online.
Once you've selected your program type you will be sent to step one of your registration form. Please click the next button to move on to Step 1: Program Information
Congratulations on building a new registration form. You are now looking at Step 1 of the registration form.

Your next step should be to select your activity type.

Depending on your organization the National Affiliation drop-down menu may be the most important selection you make during the registration form creation process. Please make sure you take your time in the step and make the proper selection.


In the second step of your registration form, you will add all the questions you want to be answered during the registration process.
There are two types of questions that can be added to your registration form.
1. Predefined Questions

2. Custom Questions


While editing a step 2 question you will notice that each question has an Advanced Settings button.

There is not a limit to the number of questions which can be added to step 2 of the registration form and all questions can be reported on.
Step 3 will allow you to configure a Volume Discount, Family Discount, Resident Discount, or a Non-resident Fee that will be specific to this program. As well as add Custom Fees and Discounts in the form of questions.

Volume Discount: If a participant signs up for more than 1 Division in this Program, a Volume Discount can automatically be subtracted from the price (configured in Step 6) of the 2nd, 3rd, and so on Divisions. This is common for Camp Program Types.
Family Discount: If more than 1 participant in a family signs up for this Program, a Family Discount can automatically be subtracted from the price (configured in Step 6 of the Registration Wizard) of the Division for the 2nd, 3rd, and so on participants. The 1st participant will never receive the Family Discount. Click on Edit next to the Family Discount Amount to set a Max # of Participants per family that the Family Discount will apply to.
Non-Resident Fee OR Resident Discount: If a user lives within a particular city or zip code, you can add a Non-Resident Fee OR Subtract a Resident Discount from their Division Price. Click on Edit to select if this is a Non-Resident Fee or Resident Discount. Cities and Zip Codes are configured in Site Settings.
Non-Volunteer Fee: A Non-Volunteer Fee can be automatically added to the price if a volunteer role is not selected before check out.
In Step 3 you will also have the ability to add a Custom Fee OR Discount.

After the Add a Custom Fee or Discount button is clicked you can create three different types of discounts or fees. Below you will see an example of all three.
1. Custom DIscount

2. Optional Fee

3. Mandatory Fee

Once you've completed adding all of your Custom Fee's and Discounts click the Next button to move on to step number 4.

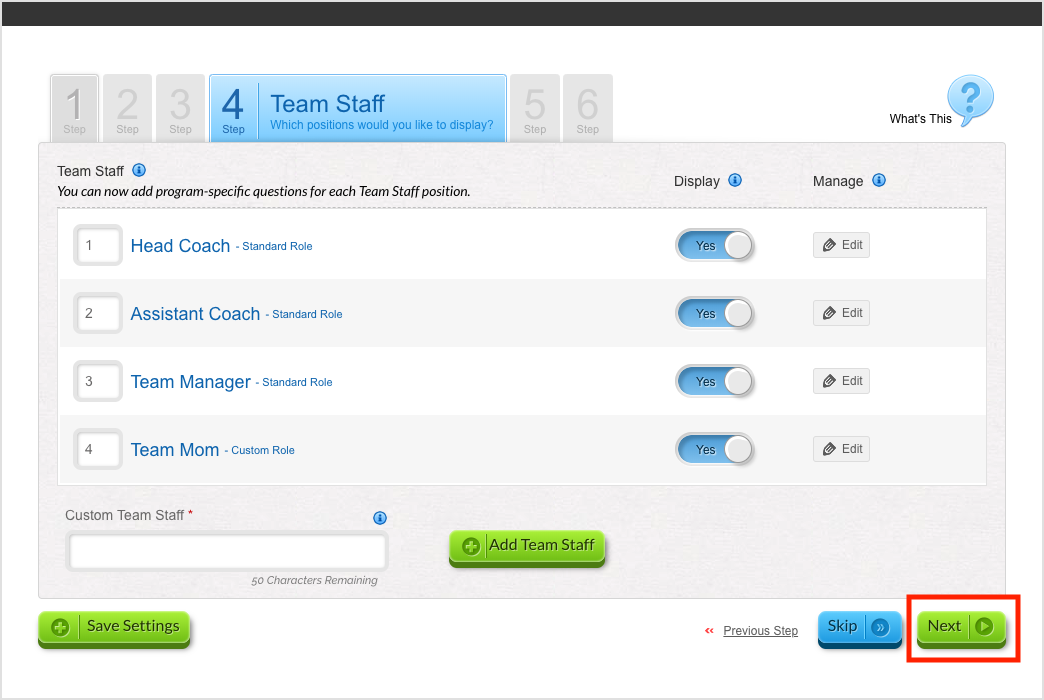
Display stock Team Personnel Roles, or add Custom Team Personnel Roles, that will be available for users to sign up for during the registration process.

You can choose to add a new team staff role by typing in the name of your role in the box which is labeled Custom Team Staff and clicking the Add Team Staff button.


After you've established all of your volunteer roles you notice that each role had an edit button to the right of it. Clicking this edit button allows you to select which question will be asked of a team staff member during staff/volunteer registration.


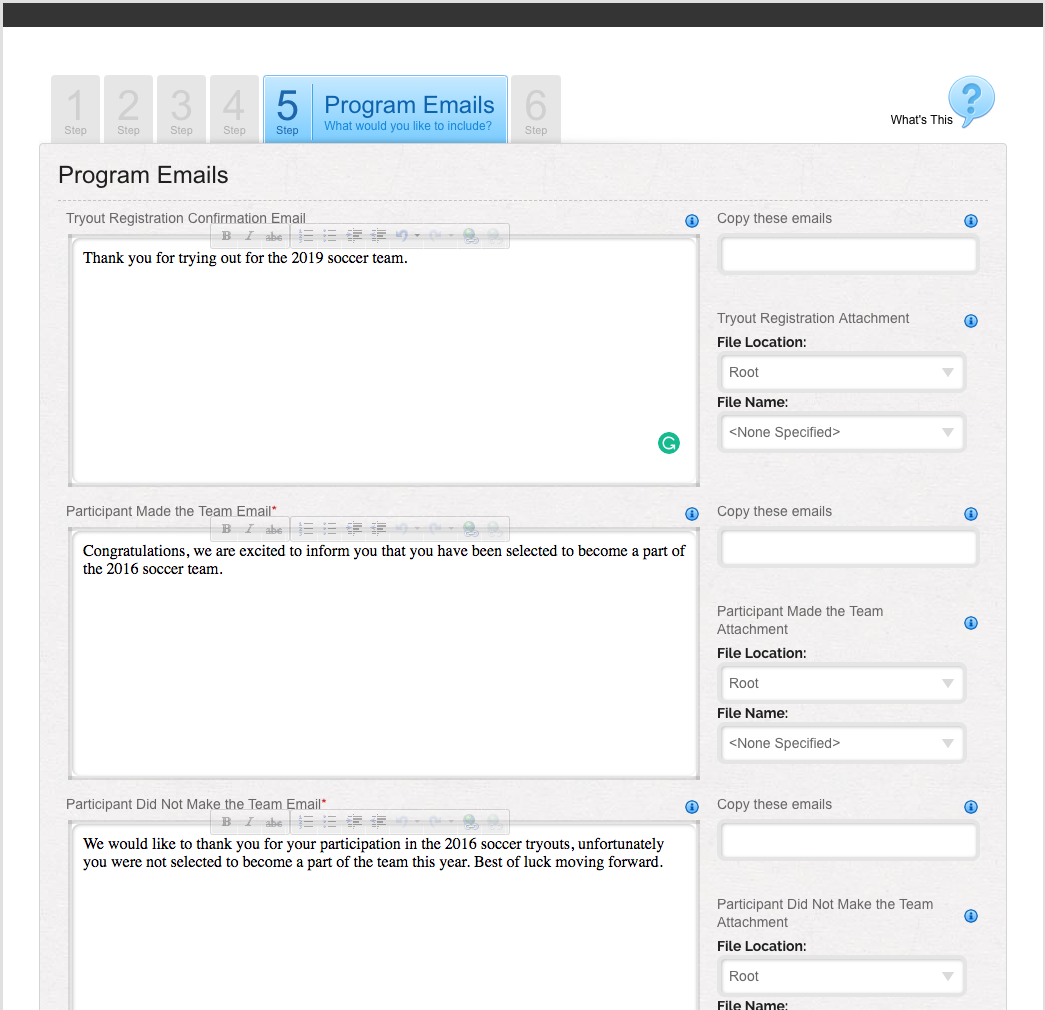
Add any additional text to go along with our default text for the Program Email(s). *We already include a copy of their receipt for any Confirmation Emails, and the Team Name for the Participant Made the Team Email. You can also attach a single file to each email here. Make sure you upload these files through the File Manager before you try to attach them to the emails described below.
The Recreational/Non-Competitive Program type only requires one email to be entered. (Division Registration Confirmation Email)


The Tryout/Competitive Program type requires 5 emails to be entered during program creation.

The Team Registration Program requires two emails to be entered during Program creation.

The Camp Program type only requires one email to be entered. (Division Registration Confirmation Email)
Programs contain any number of Divisions (i.e. U10 Boys, 8th Grade Girls, 10 AM Coed Session, etc). Configure the following division-specific information:
*You’ll need to go to the Advanced settings for each Division to configure this information.
If you've selected US Youth Soccer as your affiliation type and your State utilizes Affinity as its State Database you may notice that your divisions auto-populate.

There are 4 actions that can be completed for each division.
If you've selected SAY Soccer as your affiliation type and your State utilizes Affinity as its State Database you may notice that your divisions auto-populate.
There are 4 actions that can be completed for each division.
If you've selected Pony Baseball and Softball as your affiliation type you may notice that your division auto-populate.

There are 4 actions that can be completed for each division.
If you've selected National Flag Football as your affiliation type you will get required to build out your divisions.

To create a division from scratch you will need to complete the items below.

There are 4 additional actions that can be completed for each division.
If you've selected Little League Baseball and Softball as your affiliation type you may notice that your division auto-populate.

There are 4 actions that can be completed for each division.
If you've selected Pop Warner Football and Cheer as your affiliation type you may notice that your division auto-populate.

There are 4 actions that can be completed for each division.
If you've selected None as your affiliation type you will get required to build out your divisions.
To create a division from scratch you will need to complete the items below.
There are 4 additional actions that can be completed for each division.
Each division has an Advanced Settings section where you can configure the following division-specific information:

There are 4 major sections under the advanced section of each division.
Basic Information: This section allows you to limit the number of participants which can sign-up for this division as well as a division description.

Fees and Discounts: Within this section, you have a number of different features.

Waitlist: In the basic information of the advanced section you can limit the number of participants which can sign up. If you remember in my example above I limited my division to 250 participants. If the waitlist is enabled the 251st player to register will go onto the waitlist. Your organization can then choose to activate a participant or participants from the waitlist.

Configure Payment Plan: You can configure payment plans for you members to opt into. When a parent opts into a payment plan they will be locked into automatic reoccurring payments.

When you are creating a payment plan you will need to first enter a plan name, and plan description. You will then want to make sure your payment plan is toggled to active so that users can select this payment plan.
You will then want to enter due dates for your future payments. If you need to add more payments click the +Add New button to add an additional payment.


At this point, you should have completed the configuration of all of your division. Clicking the Finish button at the bottom of the page will complete your program set up.

From the registration landing page, you can either build a new registration form or edit an existing form.


