Templates /
Creating a Newsletter

Creating a Newsletter

Run this checklist every time you need to create a newsletter
1
Introduction:
2
Making The Newsletter:
3
Write your content
4
Run spell check on content
5
Editing The Newsletter:
6
Proof content #1
7
Approval: Peer review
8
Proof content #2
9
Paste into Notepad to remove formatting
10
Publishing The Newsletter:
11
Login to Mailchimp
12
Select new campaign
13
Select list 'Subscribers'
14
Name your campaign
15
Paste email subject line
16
Leave rest of settings as default, click next
17
Select "Saved Templates"
18
Select "Weekly Newsletter Template"
19
Add content to template
20
Add content to plain text email
21
Check your email in preview mode
22
Send a test email
23
Forward test email to team member to check
24
Click Next
25
Schedule email for delivery

Introduction:

Weekly newsletters are a fantastic way to communicate to your customers everything they need to know in a single, helpful email. However, unless you have some sort of process in place to regulate the quality of these newsletters, they could end up being fraught with spelling and grammatical errors, or even broken links.

That’s why we here at Process Street have come up with this template for creating a newsletter. Running this checklist every time you need to create a newsletter (be it weekly or monthly) will ensure consistently high quality in every edition.

Let’s get started!

Making The Newsletter:

Write your content

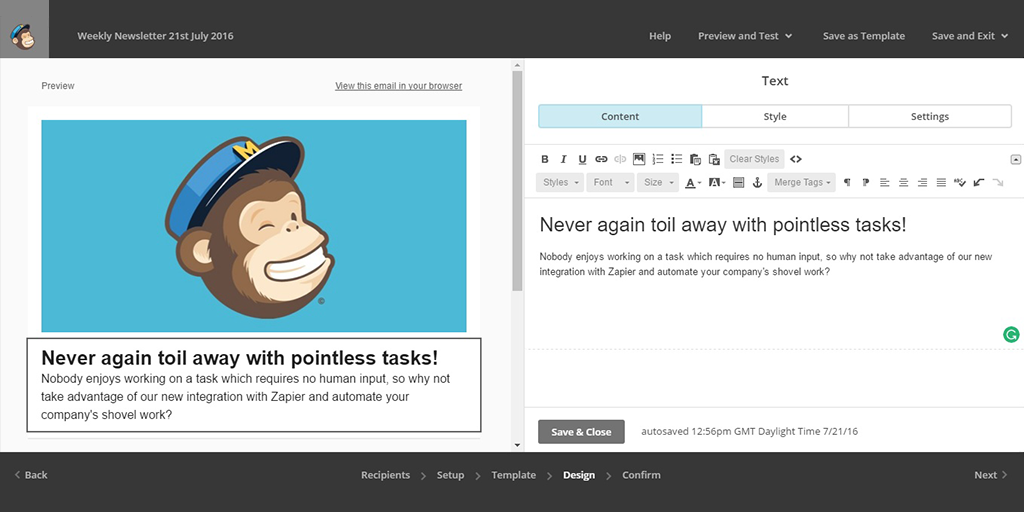
Start off by writing the content for the weekly newsletter. Try to write 2-3 different subjects and test them out on your team. Utilize the form fields and sub-checklist below to ensure that you have every vital topic covered.


  • 1

    Consider your audience
  • 2

    Choose your topic
  • 3

    Ask questions
  • 4

    Research your topic
  • 5

    Make it understandable
  • 6

    Use interesting headlines

How to Start Writing the Content

Consider your audience. Before deciding on what content you need for your newsletter printing, take a moment to define your audience; gather demographics, and decide what topics will interest them. For instance, an audience of mostly middle-aged women probably won’t be interested in a detailed article explaining a product. Instead, choose a topic that will connect with them, specifically on a personal level.

Choose your topic. Include a variety of topics and sections that will make your newsletter more interesting to a variety of audience. Just as a newspaper contains different sections, your newsletter should incorporate similar sections such as a response section, letters to the editor, industry news, and featured articles. Include tips or customer reviews within boxes to break up the layout.

Ask questions. Keep all information accurate. Use the six questions to give your newsletter a versatility: who, what, when, where, why and how. The best articles incorporate all six of these questions and answers, if applicable. This may require some research such as interviewing, but it is worth it if you want to make an effective newsletter with your audience’s opinions expressed.

Research your topic. Writing subjectively can severely harm your credibility. Without proper research, you risk presenting incorrect or inaccurate information, which may offend or confuse your audience. Provide information such as statistics, expert opinions, and quotes to prove the validity of your research. Make sure to give the source (e.g., magazine, website, book) credit where credit is due.

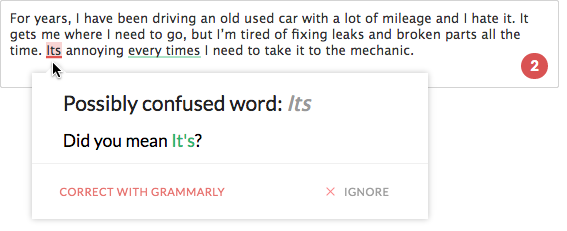
Make it understandable. Use concise and comprehensible vocabulary to ensure readability. Avoid verbose language. For instance, rather than using an adverb/verb combo, use a verb that denotes the same meaning.

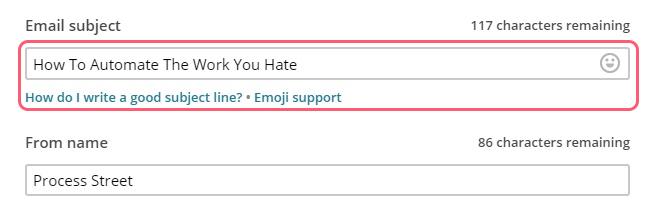
Use interesting headlines. Write dynamic headlines by using action verbs that evoke curiosity. Without an interesting headline, readers may skim over your articles, because they find it uninteresting. Headlines are one of the keys to creating loyal readers, since a well-written headline means a well-read article means a well-read newsletter. Also, if any of your articles are more than a few paragraphs long, use subheadings to break up the text.

Source: http://www.wikihow.com/Write-a-Good-Newsletter

Run spell check on content

Microsoft Word, Corel WordPerfect and OpenOffice have the ability to spell check a document.

There are several online solutions that users can use to spell check their documents online as well as add-ons that enable you to spell check in-browser. For example, Grammarly is a fantastic plugin for Google Chrome which checks your spelling and grammar whilst also tracking your weekly word count.

Editing The Newsletter:

Proof content #1

Read your work again. Double check all newsletters. Quality is of the utmost importance as it goes out to thousands of customers.

Print off the text and proofread on paper – it is much easier to spot errors on paper than on-screen, and if you attempt to proof the content online after staring at a screen all day, you’re going to miss errors.

  1. On the first read, it is a good idea to focus only on reading rather than on correcting, to get an idea of the overall content and meaning, and to spot anything missed at the editing stage.
  2. Then, on subsequent reads, focus on correcting different types of errors each time.
  3. To spot typographical errors, you may wish to do one read backwards, to disconnect your mind from the content and focus fully on the text word by word. This will not help for grammar, punctuation or some spelling errors, though, which can only be spotted in the context of the sentence.

Once you’ve checked your work, the next task – which is an approval task – will get a colleague to look over the written content you uploaded in task #3 – “Write your content”. 

Make sure to assign the colleague to the approval task with task assignments!

Approval: Peer review

Will be submitted for approval:

  • Write your content

    Will be submitted

Proof content #2

Once checked by another team member, check it again yourself. It is important that there are no mistakes in the company newsletter.

Go through the sub-checklist below to fine-comb your newsletter for possible errors.

  • 1

    Tense agreement: mixing past and present tenses throughout a piece of text
  • 2

    Subject/verb agreement: using plural verb conjugations with single subjects (e.g. ‘one in ten people are …’ instead of ‘one in ten people is …’)
  • 3

    Pronoun/case agreement: confusing the subject and object of the sentence (e.g. ‘He sat between Bob and I’ instead of ‘He sat between Bob and me’, or ‘Me and John are working on that project’ instead of ‘John and I are working on that project’)
  • 4

    Confusing similar words, such as the verbs ‘imply’ and ‘infer’, which describe different angles (‘imply’ is when the speaker/writer suggests something without explicitly stating it, and ‘infer’ is when the listener/reader logically deduces something from the information given by the speaker/writer) – another example is ‘affect’ and ‘effect’ (‘affect’ is normally used as a verb meaning ‘to make a difference to’, and ‘effect’ is used as both a noun and a verb – as a noun, it means ‘a change that results from an action or cause’, and as a verb it means ‘to cause or bring about something’)
  • 5

    Misuse of apostrophe before ‘s’ at the end of a word, which is often incorrectly added before the ‘s’ in plural words, e.g. ‘The report’s are finished’ instead of ‘The reports are finished’ – an apostrophe should only be used before ‘s’ to indicate possession (genitive case), e.g. ‘The minister’s cat is black’ or ‘My friend’s desk is tidy’. However, in the case of the pronoun ‘it’, the possessive form is ‘its’ without an apostrophe. Adding an apostrophe and ‘s’ to ‘it’ indicates the abbreviated form of ‘it is’ or ‘it has’. Look at the difference between ‘The dog has lost its collar’ (possessive form, i.e. the collar belongs to the dog) and ‘Look over there – it’s the dog without the collar’ (it is). Apostrophes follow the added ‘s’ when indicating possession by more than one person, e.g. Gents’ toilet, the pupils’ classroom.
  • 6

    Incorrect conjugation of modal verbs, such as ‘should of’ or ‘would of’ instead of ‘should have’ or ‘would have’
  • 7

    Words with similar spelling or pronunciation but different meanings, which cannot always be detected by automatic spelling and grammar checks, such as ‘they’re/‘their’/‘there’, or ‘where’/‘were’/‘we’re’/‘wear’.

Paste into Notepad to remove formatting

Make sure you remove the formatting of your text. This is due to the fact that, if you are editing in Microsoft Word or Evernote, they can add extra formatting which can be copied when you move the content to MailChimp.

To remove this formatting, open Notepad, paste all the text in and then copy it back out again, adding just the raw text to your clipboard. You will need to manually add the images and links into Mailchimp as Notepad will also remove these. 

Publishing The Newsletter:

Login to Mailchimp

Now you need to log into MailChimp. Record the company username and password using the form fields below, or automatically ship the information into these form fields by integrating Process Street with another app.


Select new campaign

At the top right, you’ll see a menu that says “Create Campaign”. Once you click on it, it will display a menu with a list of different types of campaigns. 

Click on the one that best fits the type of campaign you’re creating. If you’re not sure on which would be best, just go with a “Regular” campaign.

Select list ‘Subscribers’

Next, you need to select who you are going to send the newsletter to. Unless you have a specific setup, select “Send to entire list”.

Name your campaign

This is pretty self-explanatory; you need to name your campaign. We’d advise adopting a naming policy which makes it easy to see for future reference, such as “Newsletter MMDDYYY”.

No matter what naming policy you use, record the name of your campaign using the form field below.


Paste email subject line

Enter the subject line you created when writing the newsletter. Take the opportunity to record this in the form field below.


Leave rest of settings as default, click next

There’s really not much to say here; just leave the settings as default and click “Next”.

Select “Saved Templates”

As per the task title, select “Saved Templates”.

Select “Weekly Newsletter Template”

Once again, go right ahead and select “Weekly Newsletter Template”.

If you don’t have a weekly newsletter template, go ahead and set one up now so that your weekly emails will have a consistent style.

Add content to template

Copy the content from Notepad to Mailchimp. Remember to add images and links again. 

Add content to plain text email

Add text content and raw links to the plain text email template.

Check your email in preview mode

Now you need to check the content of your email in preview mode. To do this, click the “Preview and Test” dropdown at the top of the page, then click on “Enter preview mode”.

Make sure that you check how the email will appear in Desktop, Mobile and Inbox views; this means checking your formatting, along with all of your links and images.

Send a test email

Send a test email to yourself so that you can check that everything is in order. This can be done by going into the “Preview and Test” menu again and clicking “Send a test email”.

Note the status of the newsletter using the dropdown below.


Remember to check that all of your links work and lead to the right place, none of your images (which don’t require them) are links and that the formatting is as desired.

Forward test email to team member to check

Once you have checked the newsletter yourself, go ahead and forward the test email to a team member to have them give a second opinion.

Click Next

Who would’ve guessed? All you need to do in this step is to go ahead and click “Next”.

Schedule email for delivery

Now that your newsletter is set up and ready to go after being thoroughly checked, you just need to schedule the email for delivery! Note the date that the email is scheduled to go out using the form field below.

Take control of your workflows today.