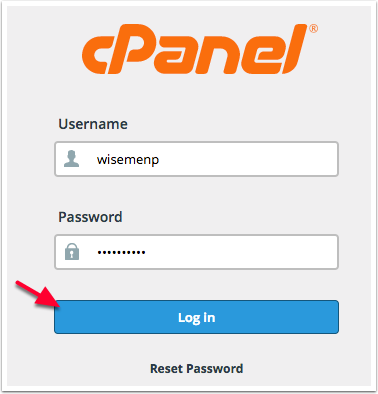
1. Login to cPanel using the credentials provided.
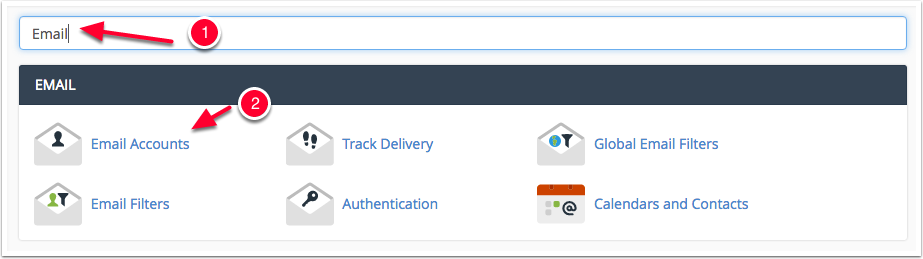
2. Enter the phrase "Email" into the Search Bar 3. The search box will filter down to show you the results when you type "Email" - Click on Email Accounts
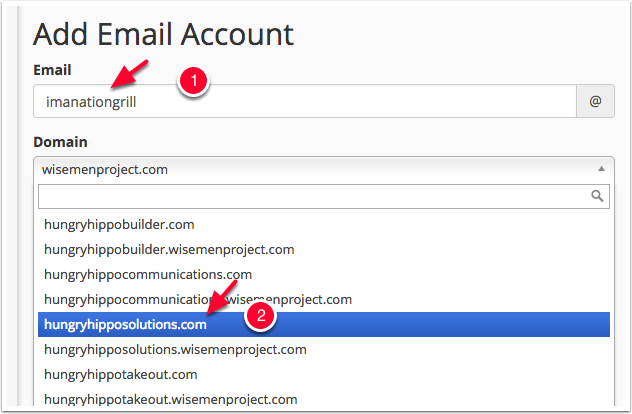
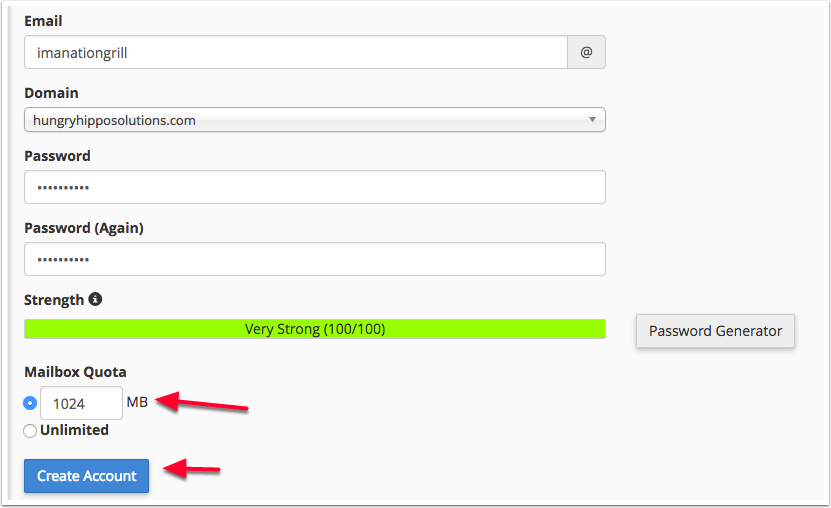
4. You will see the form to Add Email Account at the top - enter the domain name for the email address. 5. Select the domain hungryhipposolutions.com from the dropdown lost
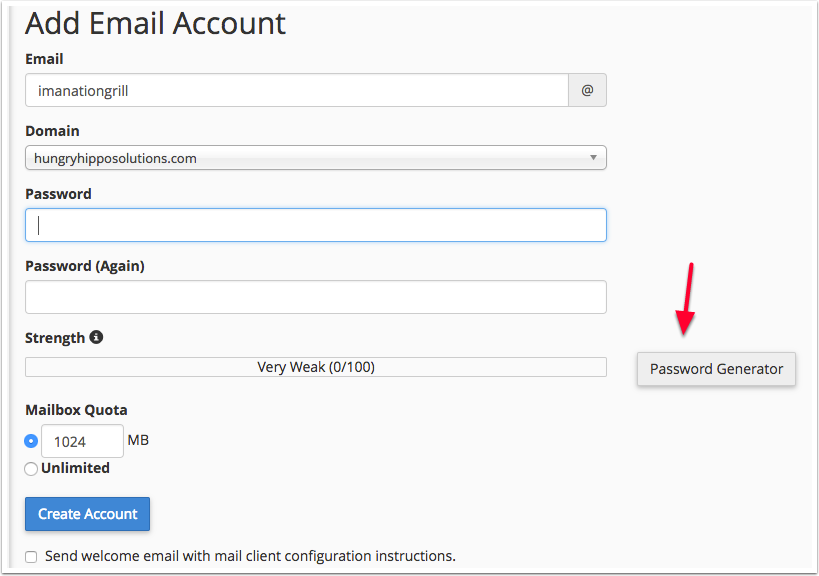
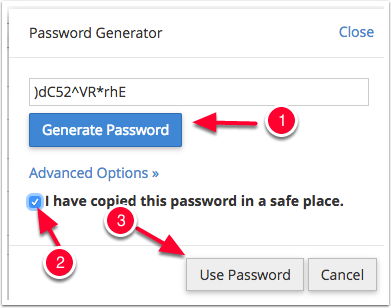
6. Click the Password Generator button
7. Click the blue Generate Password button 8. Copy and Paste the password into the Google Sheet you have access too. Paste the password into the Password field of Sheet 1 on that Sheet. 9. Check the box for I have copied the password in a safe place 10. Press the Use Password button
11. Leave the Mailbox Quota as 1024 MB 12. Press the blue Create Account button
You are done - creating the users email account
1
Create Email Account
2
Note Password in Google Sheet
Please note the email and password in the form below
Now that we have an email account - it's time to create a Godaddy account on behalf of the client.
You will be using the email you create in the first step to create the Godaddy account along with their contact information located in the google sheet you have access too
Client Godaddy Account Creation
Please visit Godaddy.com
Click on the Sign In button at the top right of the page
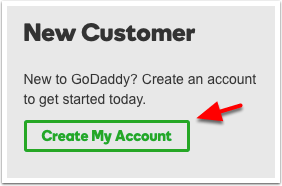
3. Click on Create My Account
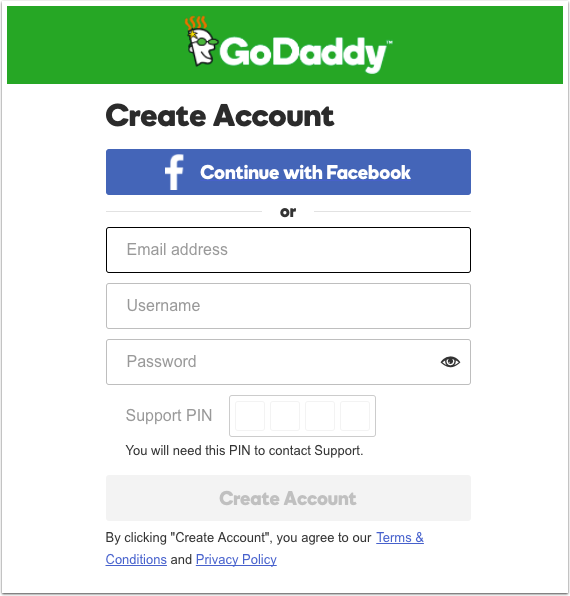
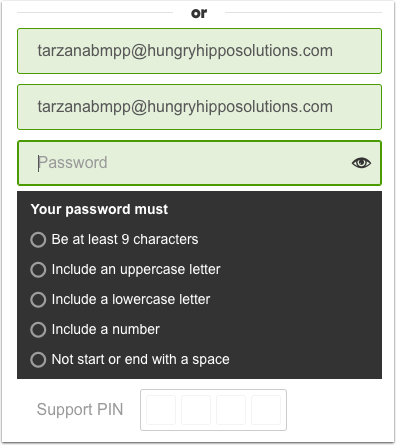
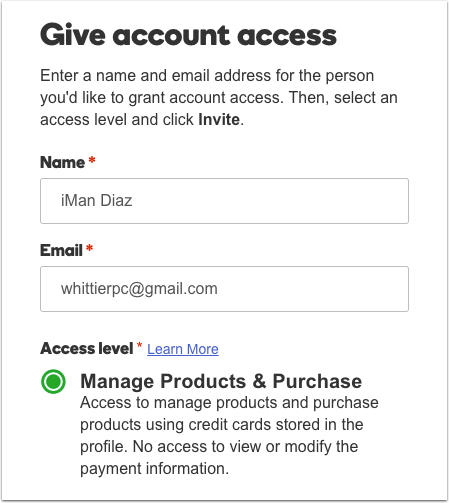
4. Fill in the form below. A few things to note though: A. Use the create email in step one for the email and username B. Use the same password you generated for the email, however you will likely have to add a character to it like a number, special character, etc to make it compliant with Godaddy's password requirements C. Pick a Security Pin - four digits - whatever you'd like D. Please note the password and pin in the Google Sheet you previously used.
This is just to show you what the form would look like. Below is an image showing you the password requirements
Here is the same form filled in with username and email - no password yet just to show you the password requirements
1
Make note of the chosen password in the Google Sheet you have access too
2
Make note of the chosen Support Pin in the Google Sheet you have access too
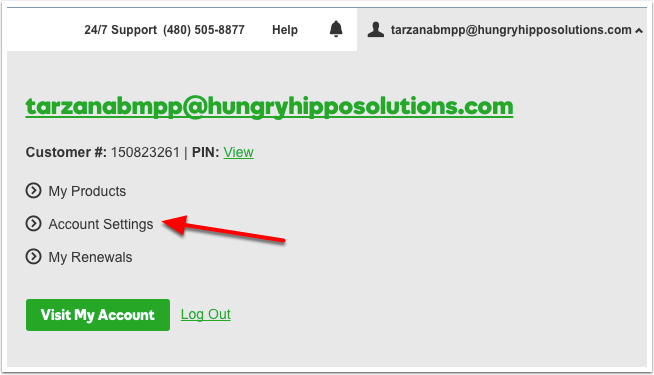
5. After pressing Submit - you will be taken back to a what looks like the home page - but look in the top right and you will see a Customer Number.
1
Make note of the assigned Google Customer Number in the Google Sheet you have access too
6. Click on the Customer Number / Username at the top right of the page (image shown above) when you do you will see a menu pop up
7. Click on the Account Settings menu option that appears
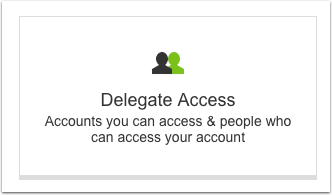
8. Click on the Delegate Access button that appears in the options after scrolling down the page a bit (should be in the middle)
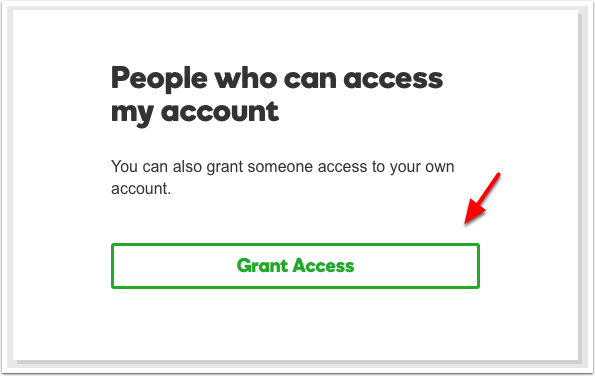
9. Click on the Grant Access button that appears on the right side of the page after you clicked Delegate Access
Please note - I will need to accept the invitation to access BEFORE the clients account will appear in the Godaddy Pro section.
10. Fill in the information with my name and email and select Manage Products & Purchases as shown in the image above.
This will be the final screen you will see - at this point I will get an email and confirm the invitation.
Godaddy Pro:
Now in this step - you will login to my company Godaddy account to utilize something called Godaddy Pro.
Godaddy Pro allows us to manage products and services on behalf of a client. In this case we will be using my Godaddy Pro account to shop for the created Godaddy account and use my payment method to buy the domain but place it into the customers Godaddy account.
This way it's their account with their product (domain name) but we have access to update the domain or make any needed changes.
Domain Purchase
1. Go to http://pro.godaddy.com and make sure you are logged out of any accounts at the moment.
2. Login using the following information: Godaddy Username: whittierpc Godaddy Password: -wygxqU)5nb9'p
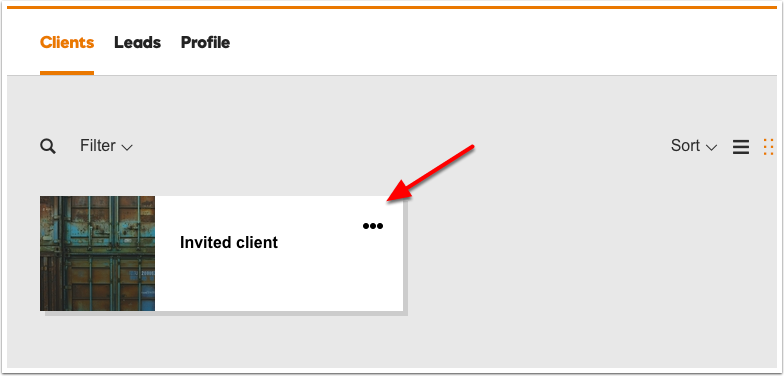
3. Locate the desired account we are going to do some shopping for
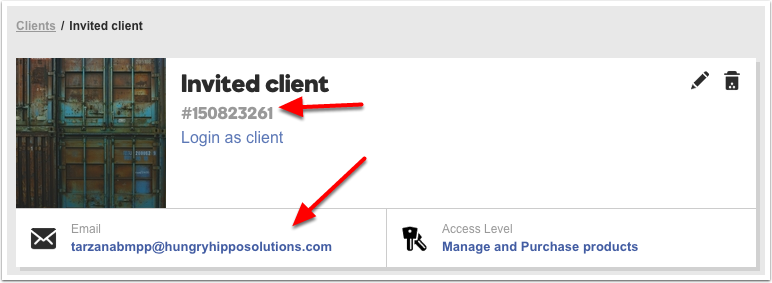
When you click on any account under Clients - you will see the email & customer number associated with that account to verify you have selected the right Godaddy customer account.
Please always verify you have selected the right account by verifying the customer # and email address
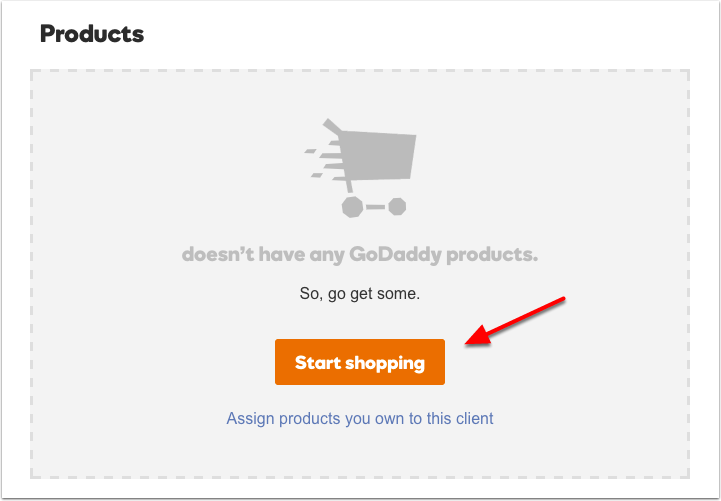
4. Scroll down and you will see the following box below the one you used to verify the customer # and email address
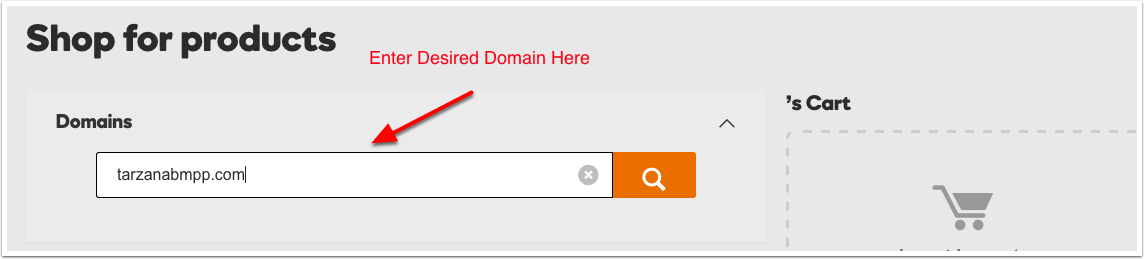
5. Click on Start Shopping
6. Enter the desired domain in the search box - as shown above.
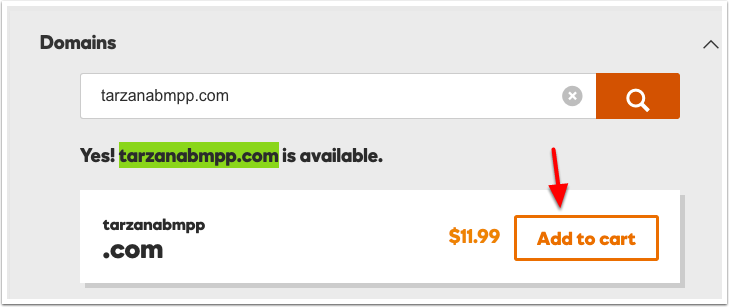
7. After searching for the domain - if it's available, click Add to Cart
8. Once you click Add to Cart - the chosen domain will go into the shopping cart. Click Continue
9. Please verify that the My Card option is selected and click Continue to Checkout
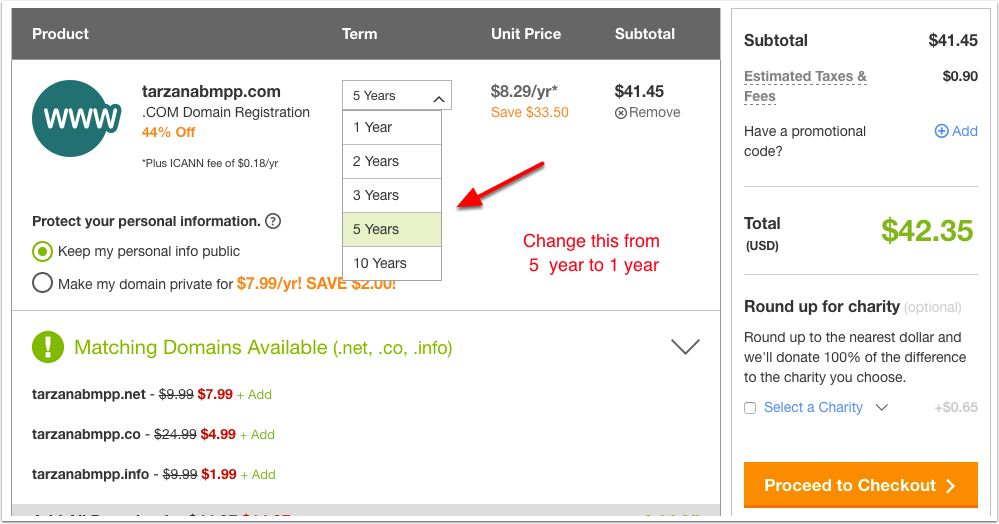
10. When you press Continue to Check Out - you'll be taken to the screen shown below and the default is 5 years. Please change that to 1 year.
Always register a domain for 1 year
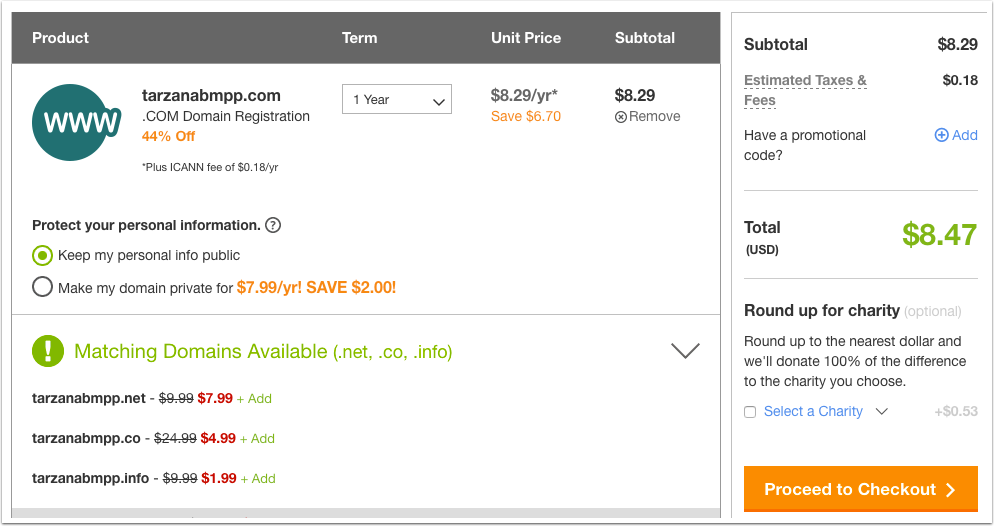
11. This next part isn't really a step - just included it to show you what a 1 year domain registration screen should look like. Now you can press Proceed to Check Out
12. On this screen please make sure you click on the Use Alternative registrant contact information. This way all domains are always registered using the clients contact information and never mine. A lot of company's / professionals who do this line of work register domains to themselves and clients never even know they technically don't own the domain because it isn't in their own name.
You can always leave the Payment method as Visa ending in 9606
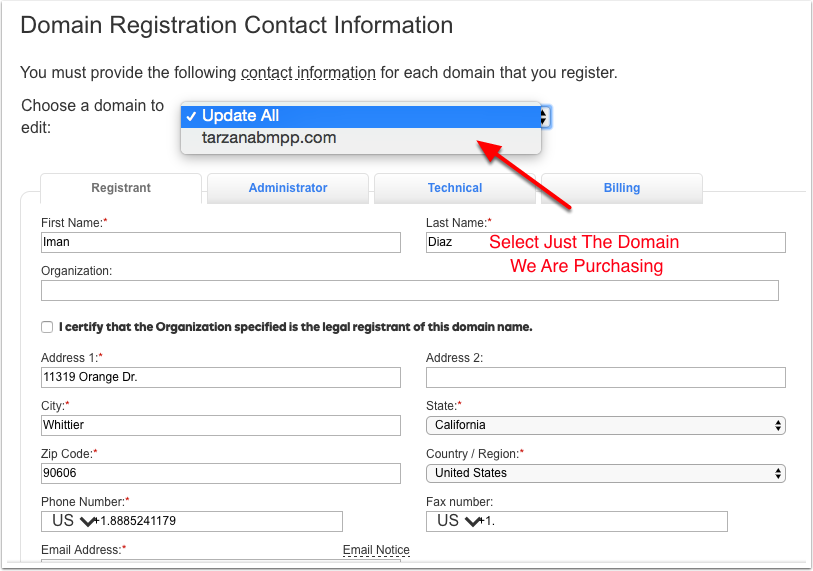
13. Under choose a domain to edit: Be sure to select just the domain name we are purchasing and not Update All - if you selected Update All - this would change the contact information for every domain in my account. We just want to update the clients domain we are purchasing
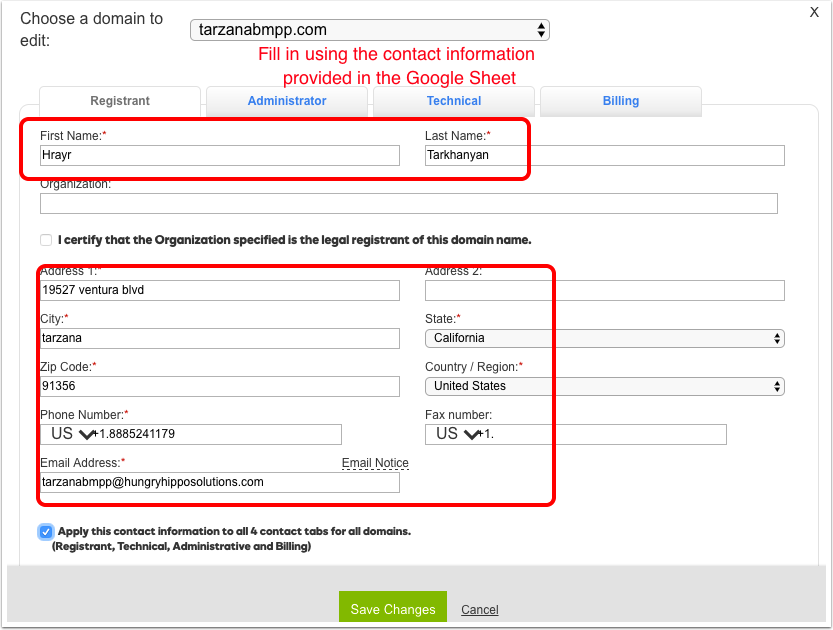
14. Update the fields shown below using the contact information that was shown in the Google Sheet you have access too. For phone number you can leave it as the listed 888-524-1179 phone number. Every other field would be using the information provided in the Google Sheet. After you are done, please click the lime green button labeled Save Changes
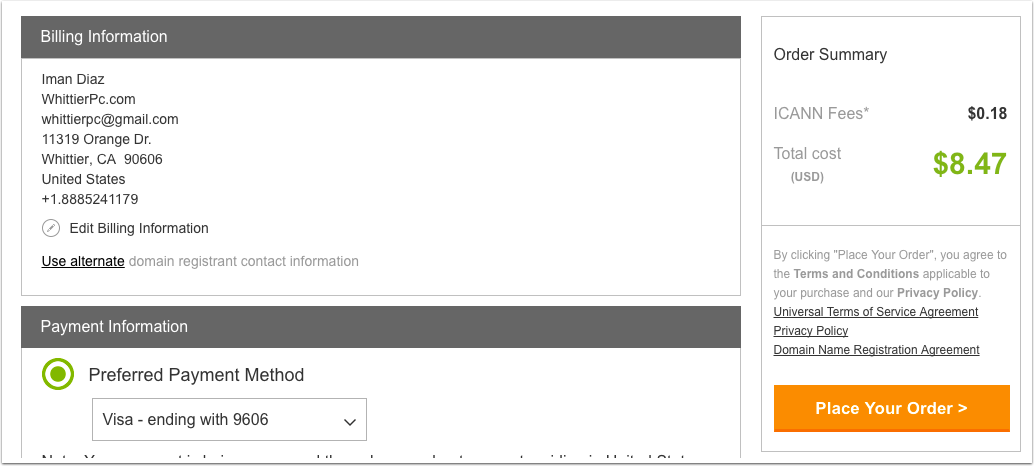
15. You will be directed back to the previous screen - the Billing Information can remain as shown in the image below. Now you can click the orange Place Your Order button at the bottom right of the screen.
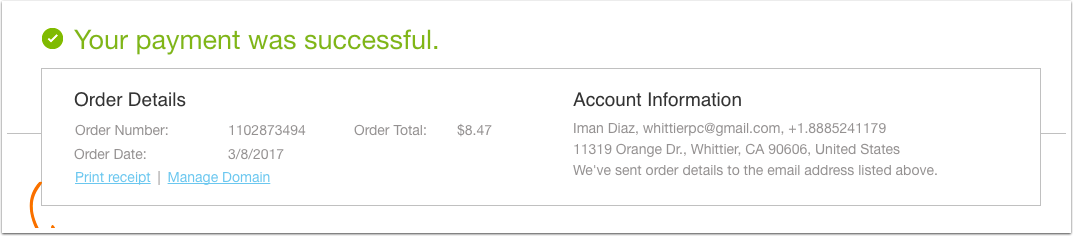
16. Now the domain has been ordered! You are done with this step of purchasing the domain.
1
Purchase Domain Using Godaddy Pro account for client
Email Confirmation
1. Now that the domain has been purchased - a few emails have been sent to the email we created earlier for the client. Now it's time to check that email address and confirm anything we've been sent from Godaddy.
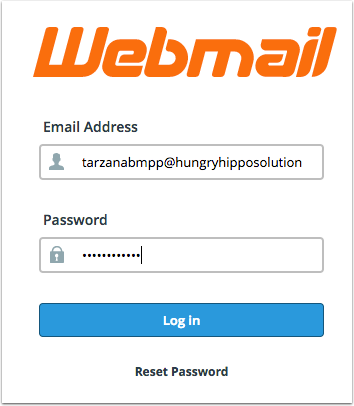
Click on the following link to be taken directly to the login page for the email we created in step 2. of this checklist
Login using the email and password you noted in the Google Sheet in Step 2
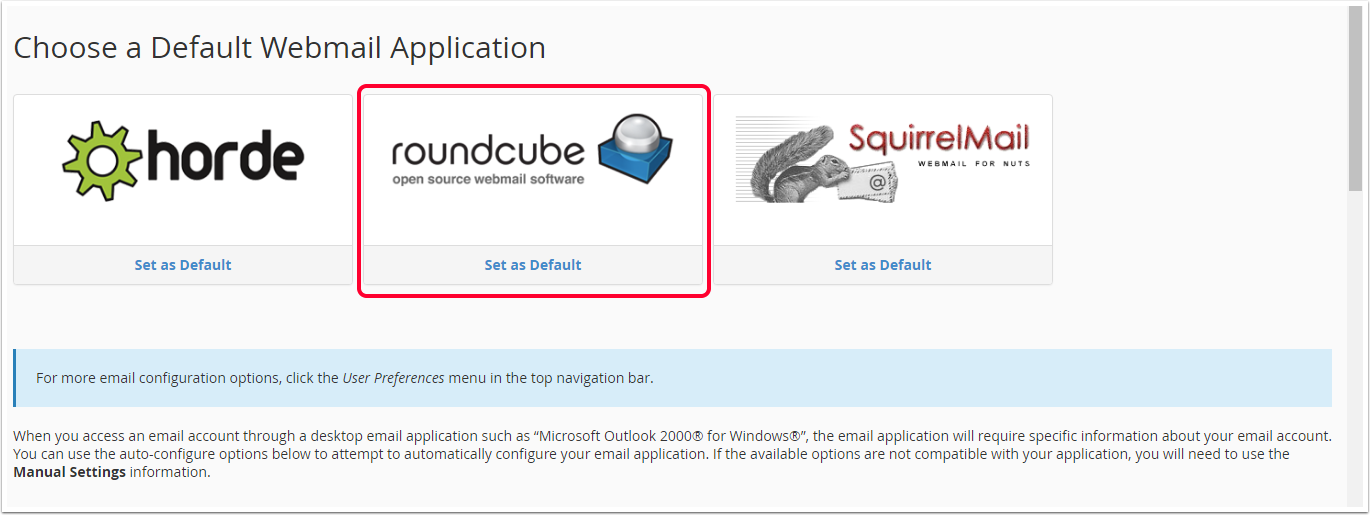
2. Click Set as Default under RoundCube - you will then see your inbox.
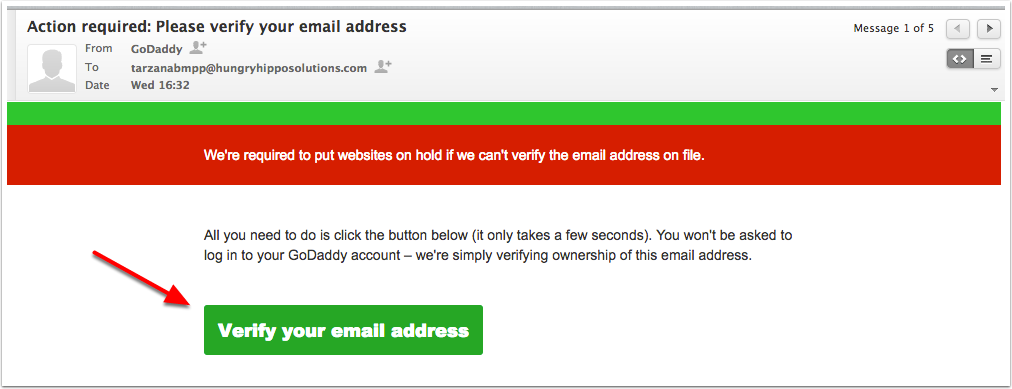
3. Once you login - we are looking for an Action required: Please verify your email address from Godaddy. Double click on that email from Godaddy please
4. Click on the green Verify your email address button
5. You are done! You will be taken to a Godaddy page - confirmation that the email address has been verified. You are done with this step
1
Verify Email from Godaddy for Clients Created Godaddy Account
Domain Transfer
Now we need to transfer the domain from my Godaddy account into the clients created Godaddy account.
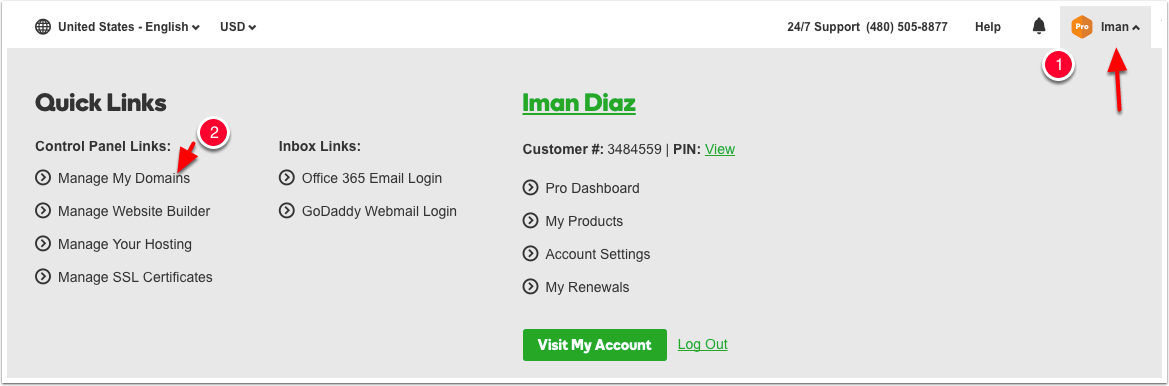
1. Login to My Godaddy account https://sso.godaddy.com/ (use the login information I provided you for my account - not the clients) 2. Click on the username at the top right Iman 3. Then click on the Manage My Domains
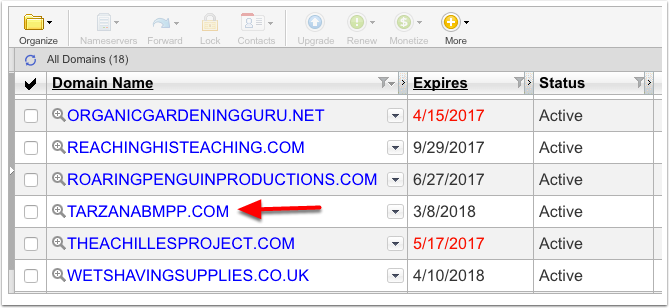
4. Find the domain name in the list - in this case it would be tarzanabmpp.com and click on the domain name we just purchased to see it's options.
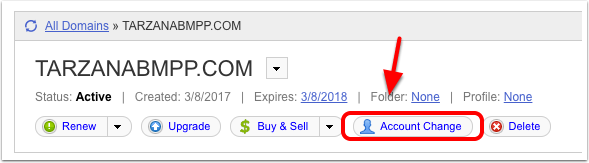
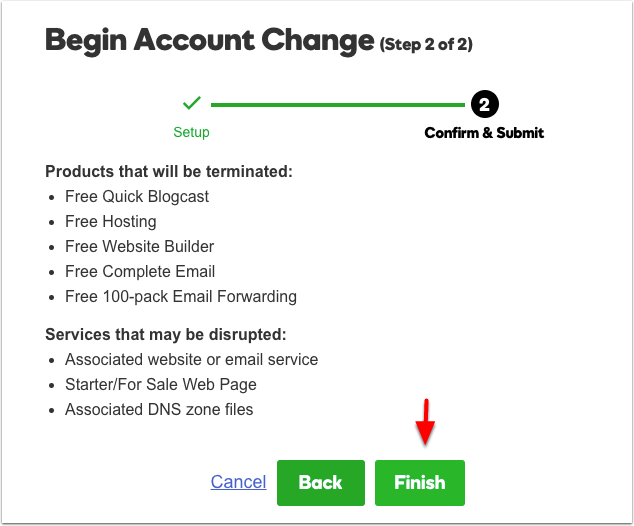
5. Click on the Account Change button that appears under the options for the selected domain - like in the image shown below
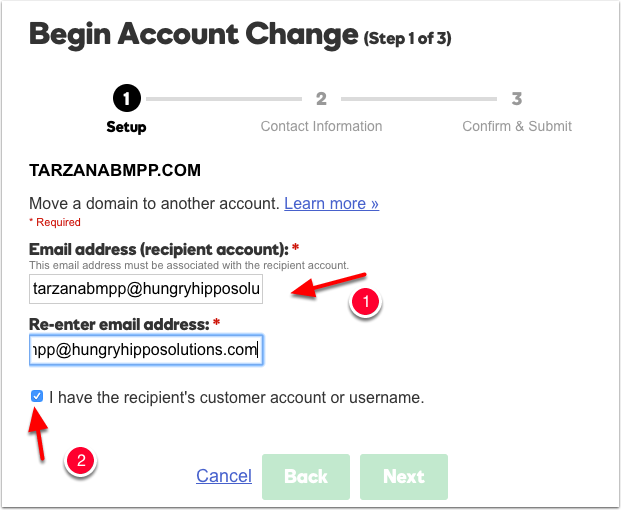
6. Fill in the customers Godaddy email twice (this is the email address you made note of in the Google Sheet you have access too) 7. Check the box indicating you have the customers Godaddy customer number. 8. Scroll further down as there are more options below the check for you just checked in step 7 - see image below this image
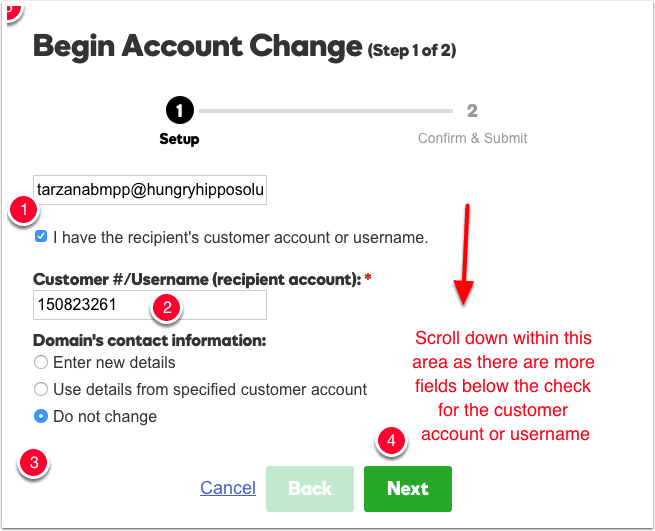
9. Fill in the customers Godaddy account number - you noted it in the Google Sheet you have access too 10. Select Do not change (as shown in the image above) 11. Press the green Next button
12. Click the green Finish button
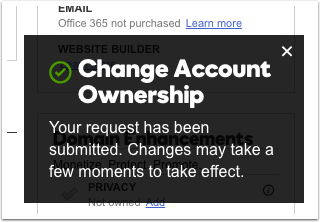
Once you press Finish - you will be taken back to the list of domain names to select and see this message at the right side of your screen.
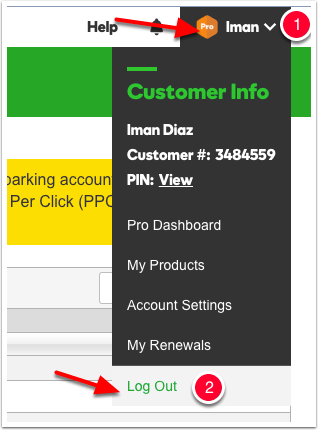
13. Now you need to logout of my Godaddy account. 14. Click on the username Iman at the top right 15. Click on the Log Out option at the bottom of the list that appears (as shown in the image below)
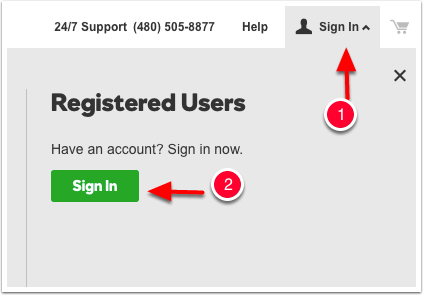
16. Click the Sign In button at the top right of the screen 17. Click the green Sign In button that appears (as shown in the image below)
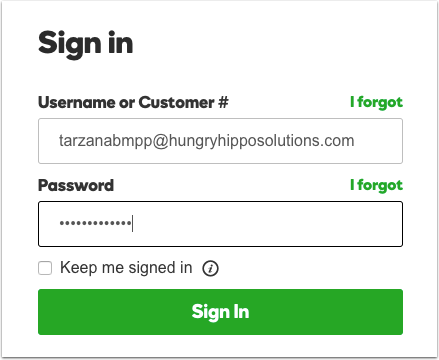
18. Sign In as using the customers Godaddy account information - you noted the Godaddy username / email and password in the Google Sheet
19. Once you are logged in you won't see any domains in the account but you will see a green Manage button at the top right of where domains should be listed. Click on the green Manage button
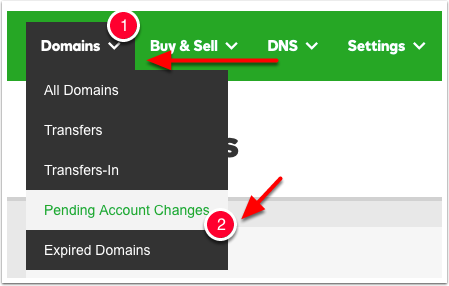
20. Click on the Domains menu option at the top left under the Godaddy logo - to the left of the Buy & Sell menu option (as shown in the image below) 21. Click on the Pending Account Changes submenu section
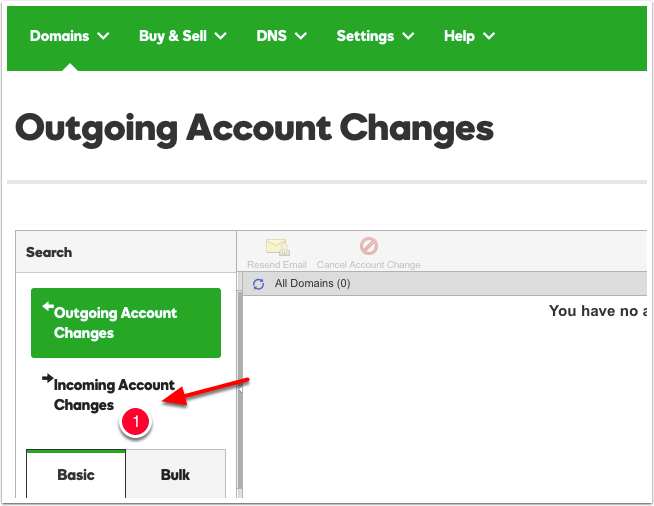
22. Once you arrive at the pending account changes screen - you will by default be looking at the Outgoing Pending Account changes. Click on the Incoming Account Changes menu option - as shown in the image below.
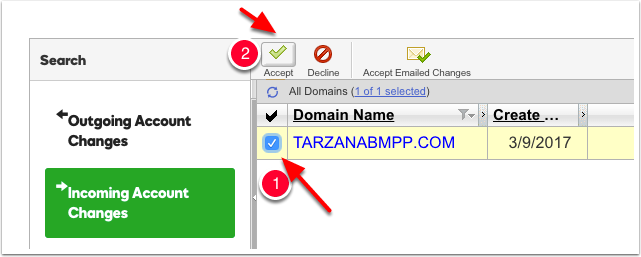
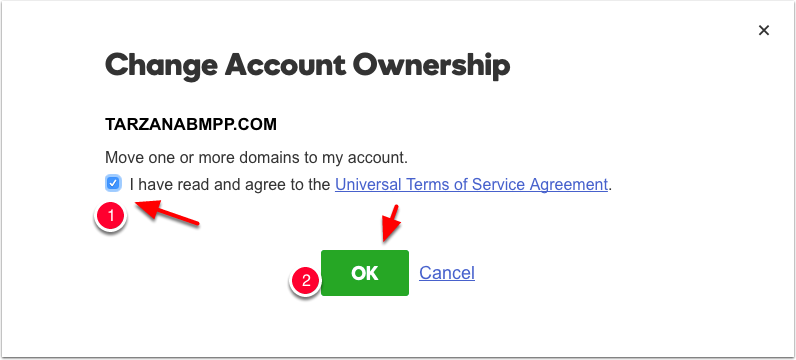
23. Check the box next to the domain we are transferring into this customers Godaddy account. 24. Click Accept
25. Check the box to confirm you have read the Universal Terms of Service Agreement 26. Press the green OK button
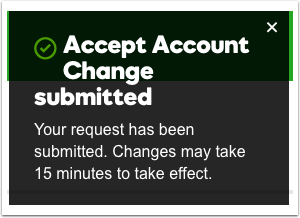
Once you have accepted the incoming account change - you will see the message at the top right of your browser window. That completed the transfer - give it about 5-10 min before you proceed to the last step.
1
Transfer domain from my Godaddy account into customers created Godaddy account
Domain Configuration
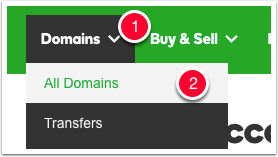
1. Click on Domains 2. Click on All Domains
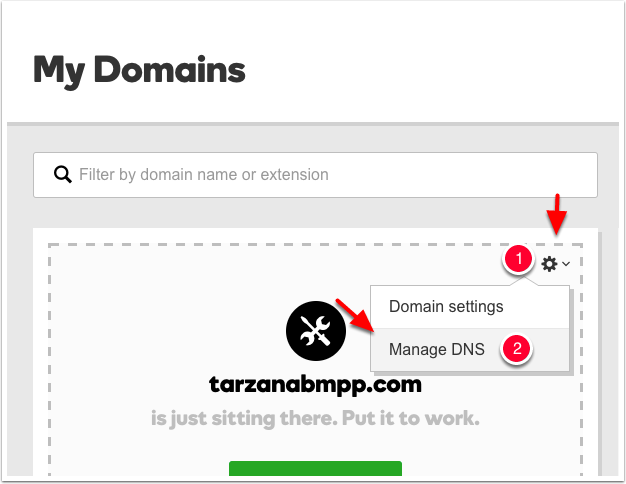
3. Click on the gear icon at the top right of the domain you need to edit 4. Click on Manage DNS (as shown in the image below)
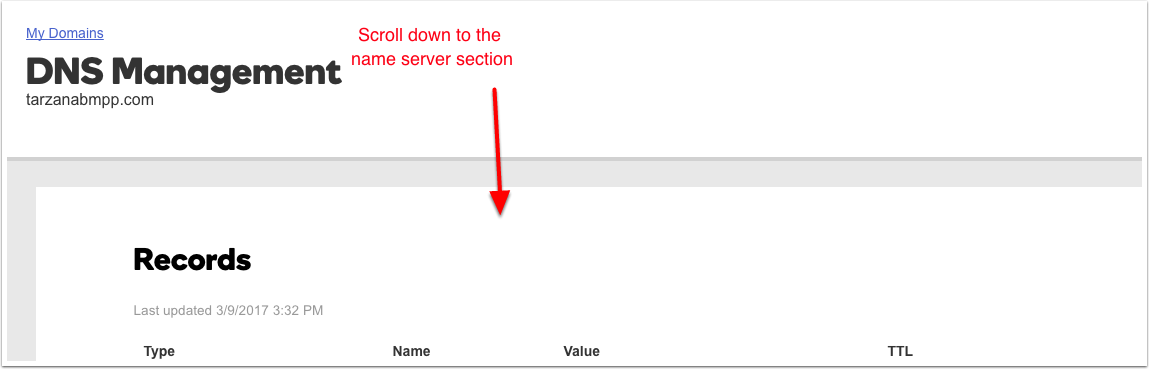
5. Scroll all the way down to the NameServer section - moving past the records section
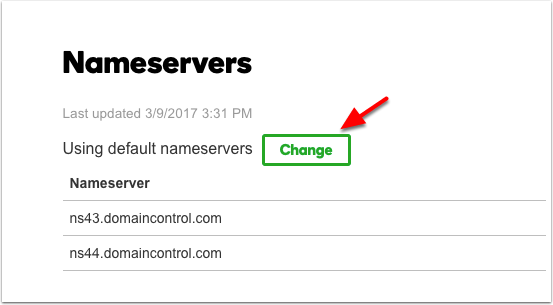
6. Click on the Change button
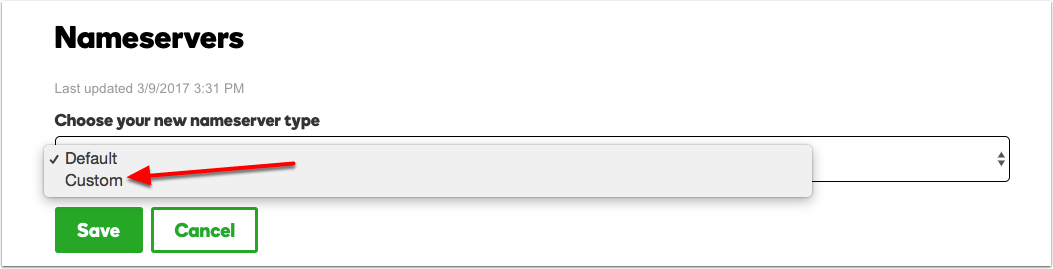
7. The default will be Default - click on the drop down and select Custom
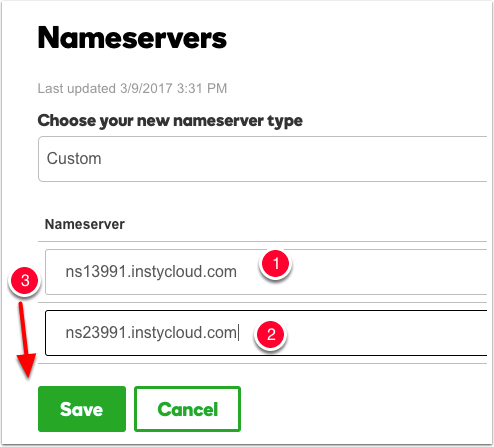
8. Enter the following two Nameservers into the provided two fields 9. Then press the green Save button
10. Once you press Save - you will see this message at the top of the browser window. You are done with the domain setup. Now this customers domain is pointing to our web server so we can build a website for it.
1
Update NameServers for customers domain to point to our web server