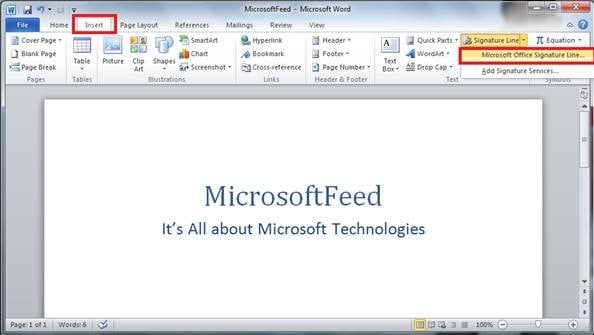
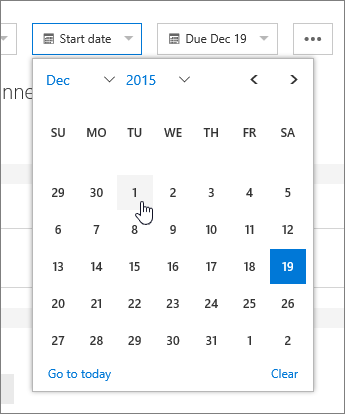
Get started
What is word?
Your best work begins with an idea.
And we’ll show you how Word brings your ideas to life with collaboration, editing tools, and design.
Start composing in your own words, and then format text with Themes.
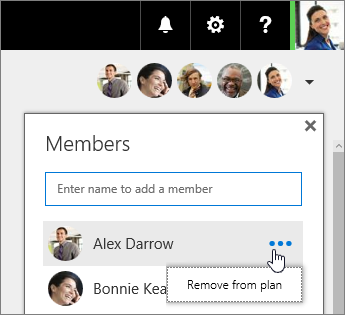
If you’d like to collaborate, share your document on OneDrive with a click.
Then chat, comment, and co-author documents to work with others at the same time.
You can even make Skype calls from your document to brainstorm on the spot,
while review and Track Changes keep everyone on the same page.
Polish your words with powerful proofing tools and style suggestions from Editor.
And with a web browser or the Word Mobile app, you can view and edit docs from wherever—and whenever a thought strikes.
Learn how to bring out your best writing with Word.
Let's get started.
User Word on a Mobile device
Just because you’re not in front of your computer doesn’t mean you can’t get things done in Word.
Wherever you are, reach for your iPhone, iPad, Android, or Windows device, and use the Word app to work with documents.
To get started, go to the App Store, Google Play, or the Microsoft Store and download the Word app to your phone or tablet.
Here you see Word on my Android tablet. If you’re using a different device, the icons will look a little different but you can do many of the same things.
For specifics, search at Support.Office.com for your device, like “Word for iPhone,” “Word for Android tablet,” and so on.
The first time you open the Word app, sign in with the account you use for Office 365. To use Word’s basic editing features on devices smaller than 10.1 inches, you don’t need an Office 365 subscription. However, with my Office 365 for Business subscription, I can use Word on a tablet and I get the full set of features on my phone.
Now I’m ready whenever inspiration strikes.
I can flesh out a great idea on the spot without waiting to get back to my computer.
Start a new document and create it in OneDrive.
Select Blank document and I’m off and running.
To format text, I show the ribbon and select Home.
Here’s a heading. I select Styles and then Heading 1.
To make sure I can easily find this document later, I’m giving it a descriptive name. Select File, Save, and then Rename this file.
I change the name here.
Or, to save the file to a different location, select Save As.
As I work, Word saves changes automatically.
When I’m ready for others on the team to chime in, I share the document with them by tapping Share.
For many of us, our phones transform what used to be downtime into productive time. If an important document comes in after I’ve left the office, I can take a quick look on my phone.
Open the attachment in the email.
Make some changes.
Format some text.
Add a note to a coworker.
Like before, I don’t need to worry about saving changes. Word does that automatically.
So you see that wherever I am, I can use the Word app on almost any mobile device to quickly capture ideas and get going on documents.
Create documents: Create a document, use templates, and save
And we're going to go up to the File tab to access backstage view, and select New.
We can create a new, blank document. Believe it or not, that uses a template.
A template that has nothing on it, but does set up things like your margins, your paper size, and so on.
So, by default you'd be working with an 8 1/2 by 11 sheet of paper with one inch margins.
Now, if you wanted to create a new document, but get some help, there are a number of different templates to choose from.
You're going to see featured templates selected by default, which includes our new, blank document.
As you scroll down you'll see blog posts, resumes.
You can see some cool formatting like for a business flyer, or a student report, event planners.
All kinds of cool featured templates. But you'll also notice you have categories across the top.
Now, featured is different from personal.
Let's click Personal to see there's really only one option showing up for me here. Certificate of completion.
But under the categories of Business, Personal, you can get access to templates online, and you can even search for them.
For example, if I wanted to do a fancy memo instead of that new, blank document, I could type in memo right here.
And when I press return I'll be searching for all the templates online with regards to memos, or memorandums.
And as you can see, there are a number to choose from.
We also get to see the categories over here on the right-hand side.
If we go to memos we'll see just the memos category for creating memos, but if you want business related ones you can click business to see the business related memos.
We could go to this template here. Interoffice memo, professional design. Give it a click.
Gives us a little bit of information about it so we can see in the thumbnail here what it's going to look like.
And you can see the definition.
Let's click Create to create this new document. And that's much fancier than what we started on our own.
All you do with template is fill in the blanks like Company Name, for example.
When you click there it's not actually text. It's a placeholder.
So, you could type in Landon hotel, for example.
And then down below, recipients, CCs, dates.
You might see your own name in there if you're logged in.
It's going to use your own information.
So, that the benefit of using a template.
Now, when you create these documents, obviously, you need to save them.
As you continue to create your new documents, as you look to the title bar, you'll probably just see the word document and a number after it.
And the number appearing after it just depends on how many new documents you've been creating.
I'm looking at document five, for example. And that tells me I have not saved my document to this point.
So, I could be in danger of losing it if I closed it up without saving.
Now, when you go to close a file you have not saved you'll be prompted to save it, but it's best to do it yourself.
When you go to the File tab you'll see Save, and Save As.
Save is going to update your changes if you've already saved it.
If you haven't, clicking save is going to take you directly to save as.
And, in fact, if we click the Back button here, and just go to the Save button, which also uses the keyboard shortcut control + S, because we haven't saved this initially, clicking the save button here is going to take us to save as.
Give it a click.
You can see how it takes us to backstage view, same as clicking the File tab, and Save As is selected.
Now we have a number of options to choose from starting with where we're going to save this.
You can see the default location, and this is something that Microsoft is pushing, saving to the Cloud.
You'll probably see your own personal OneDrive selected or if you have multiple OneDrives, like a company OneDrive, you could select it as well.
But Microsoft wants you to start using the Cloud, and every Microsoft account, even your free Hotmail or Windows Live accounts, come with some free storage space.
Other options include selecting your own PC, navigating the PC.
That's similar to choosing browse, but browse let's us browse our own PC, network drives, maybe you have a share point access.
You might see that on the list here as well.
Or, what I really like about Word 2016 now is we can go to recently used folders.
You can see there's my OneDrive, my documents folder on OneDrive.
And there's my other OneDrive as well.
So, I can select these folders if I wanted to go back to them quickly.
Older folders that I've been working with also appear on this list so I can go back into them quickly.
That's a nice feature.
Saves me from clicking browse.
But if I don't see the location I want to use on that list I can go to the Browse button, and that opens up the Save As dialogue box.
I'd like to go right to my desktop where it's easy to locate.
There's nothing there yet. No actual files, just folders.
So, the name is going to appear, by default, as Landon Hotel.
Whatever you typed in that company field in the template.
That doesn't make sense.
So, we can click anywhere in there to type over that. I'm going to type in something like elevator maintenance memo.
That's more descriptive.
Down below you can see the author is my name, and that's why my name appeared in the from field as coming from me.
I want to leave that there, but I can click in here if I want to add additional authors, and their names would appear in there as well.
I'm going to leave it as just my name, though.
Click anywhere outside.
The Save as type drop down allows us to choose formats.
Click the drop down, you'll see the default is a Word document.
And that means it has the extension of docx.
That's the newest format. And as you can see, older formats.
Let's leave it at Word document and click Save.
And once you've saved your document you'll know it's been saved because the name now appears up top on the title bar.