Templates /
Ubuntu Server Setup Process

Ubuntu Server Setup Process

Run this checklist to set up a new server running Ubuntu.
1
Introduction:
2
Getting started:
3
Record server setup details
4
Initial setup:
5
Download Ubuntu Server
6
Prepare a bootable Ubuntu USB on a Windows system
7
Prepare a bootable Ubuntu USB on a macOS System
8
Prepare a bootable Ubuntu USB on a Linux Ubuntu system
9
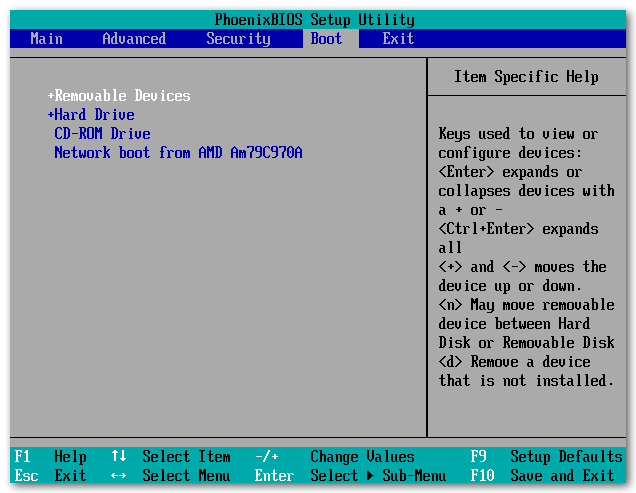
Change the computer's boot order in Windows
10
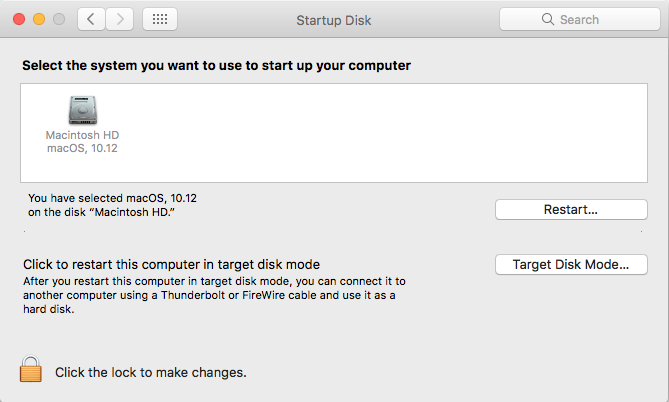
Change the computer's boot order in macOS
11
Change the computer's boot order in Linux
12
Boot up the Ubuntu installer
13
Restart the checklist
14
Install Ubuntu Server
15
Ubuntu server setup:
16
Unlock the root user
17
Create a new user account
18
Give the new account root privileges
19
Linux, Apache, MySQL, PHP (LAMP):
20
Install Apache
21
Install MySQL
22
Set up MySQL
23
Install PHP
24
Restart the Apache server
25
Install any optional PHP packages
26
Sources:
27
Related checklists:

Introduction:

Big business and small startups alike, servers form the core infrastructure of any tech company. If you’re setting up those servers yourself, you’ll want to make sure you’re doing it right.

Linux systems form the backbone of the world’s server computers, and a good portion of those machines are running on Ubuntu (or some kind of custom variant). 

It might be the first server of many in a growing database or an additional workhorse being set up to work as part of an existing infrastructure; whatever the case, there are a number of important points to consider to make sure you get the most out of your servers, and that you’ve covered all your bases for best practice setup protocol.

We’ve built this checklist to carry you through the server setup process and make your life a lot easier. Just follow the instructions in each task and rest assured that most of the hard work has already been done for you.

Let’s get started!

Getting started:

Record server setup details

Before you busy yourself with the installation specifics, take some time to record a few basic details about the setup process.

These logs are useful in the future in case you ever need to check accountability, and some fields even trigger conditional logic further on in the checklist to make your job that little bit easier.

Fill in all of the form fields before moving on to the next task.


Initial setup:

Download Ubuntu Server

To start things off, you’ll need to get yourself a copy of a bootable ISO image to load onto a USB stick in the upcoming tasks.

Go to the official Ubuntu download directory and grab the latest version of Ubuntu Server.

There are a number of options available, and the right one will depend on your needs, but we recommend the long-term support (LTS) version of Ubuntu Server for the sake of stability and reliability.

Prepare a bootable Ubuntu USB on a Windows system

Now that you have the ISO image, you need to prepare a USB stick for boot installation.

On Windows, you can use Rufus to create USB installation media from bootable ISOs.

Complete the sub-checklist below to get your USB configured for Ubuntu Server installation.

  • 1

    Download the latest version of Rufus
  • 2

    Insert a flash drive of at least 8GB size into your computer
  • 3

    Run the Rufus tool

Bear in mind that all data will be erased from the USB stick – if you understand that, proceed with the tasks.

  • 1

    Click “Select” on the right hand side of the Rufus windows
  • 2

    Choose the Ubuntu Server ISO you downloaded
  • 3

    Click “Start” at the bottom of the Rufus window
  • 4

    Wait for the process to complete

Prepare a bootable Ubuntu USB on a macOS System

To write the ISO file to the USB stick, there’s a handy free and open source tool called Etcher. Download this and install/run the application.

Etcher will configure and write to your USB device in three stages, each of which needs to be selected in turn:

  • 1

    Select the Ubuntu Server ISO image in the “Select Image” prompt
  • 2

    Target your USB drive in the “Select Drive” prompt (at least 8GB size)
  • 3

    Flash the drive
  • 4

    Grant relevant permissions and input password to complete the process

Prepare a bootable Ubuntu USB on a Linux Ubuntu system

Check out this video for a complete guide to preparing a bootable Ubuntu image on a computer already installed with Ubuntu.

The steps are outlined here; make sure you check each of them off before proceeding:

  • 1

    Insert the USB drive (minimum size 8GB) into the computer
  • 2

    Go to the Dash
  • 3

    Type “Startup Disk Creator” and open it
  • 4

    Check the correct USB is selected
  • 5

    Check the correct ISO image file is selected
  • 6

    Erase the data on the USB drive
  • 7

    Check “Discard on Shutdown”
  • 8

    Click “Make Startup Disk”

Change the computer’s boot order in Windows

  • 1

    Locate the computer’s BIOS key
  • 2

    Insert the newly prepared USB drive into the computer
  • 3

    Restart the computer
  • 4

    Repeatedly press the BIOS key during startup
  • 5

    Locate the “Boot Order” section
  • 6

    Locate the USB drive’s name
  • 7

    Move the USB drive to the top of the list
  • 8

    Save and exit

Change the computer’s boot order in macOS

Preparing a bootable medium in macOS is simple – you won’t even need to perform any special access commands.

Simply follow the steps outlined in the sub-checklist below and proceed.

  • 1

    Open System Preferences
  • 2

    Click “Startup Disk”
  • 3

    Choose the bootable volume you want to use

Change the computer’s boot order in Linux

With the USB drive prepared it’s time to change the grub default boot entry to force the system to load the Ubuntu Server installation image file.

This can be done from the terminal without having to install any additional tools; however, it won’t actually change the order in the list but it will allow a different OS to boot by default.

First, make a backup copy of /etc/default/grub. In case something goes wrong, you can easily revert to the known-good copy:

sudo cp /etc/default/grub /etc/default/grub.bak

  • 1

    Backup made of default grub configuration

Then edit the file using the “gedit” command or whatever text editor you use:

sudo gedit /etc/default/grub

Once inside, find this parameter:

GRUB_DEFAULT=0

and change it to:

GRUB_DEFAULT=x

where “x” is the index number of grub menu item to which you would like to boot to by default, starting at 0 (first item).

If you forgot the order of the items, take a look at /boot/grub/grub.cfg.

menuentry 'Ubuntu Server 16.8' [options] {

You can also chose the default by the name instead of index, e.g.:

GRUB_DEFAULT='Ubuntu Server 16.8'

if there was a menuentry 'Ubuntu' line on /boot/grub/grub.cfg.

FInally, build the updated grub menu and you should be ready to restart into the installer:

sudo update-grub

Boot up the Ubuntu installer

If you did everything correctly up to this point, the next task should be as easy as restarting your computer and watching the boot medium load up the installer.


Restart the checklist

Since the bootable medium didn’t work, something went wrong during the process of configuring the USB drive.

Try restarting this checklist with another ISO image or USB drive; or perhaps try preparing the bootable USB from a different operating system.

Install Ubuntu Server

Installing Ubuntu Server is now as simple as following through the installer menu’s choices. Follow the steps in the sub-checklist below to make sure that everything’s set up correctly.

  • 1

    Check “Download updates while installing”
  • 2

    Check “Install third-party software”
  • 3

    Erase everything else and install Ubuntu
  • 4

    Enter your user details
  • 5

    Wait for the install to complete

Ubuntu server setup:

Unlock the root user

Open the terminal window and run the following command, inputting your user password when prompted:

sudo passwd root

You will then be prompted to create a new password for the root user account. Once you’ve entered that twice, type this command into the terminal:

su -

and input your new password as requested.

You should now have access to the root account, and will be able to grant root privileges to newly created user accounts.

Create a new user account

This new account will be granted with root powers privileges via sudo command and will be used to perform administrative tasks in the system. Make sure you setup a strong password to protect this account. Follow the adduser prompt to setup the user details and password.

sudo adduser ubuntu_user

By default, as a security measure, the root account is completely disabled in Ubuntu. In order to create a new account on the system, log in to the system with the account user with root privileges and create a new account with the below command.

For now, the new added user cannot perform administrative tasks via sudo utility. To grant this new user account with administrative privileges you should add the user to “sudo” system group by issuing the below command.

sudo usermod -a -G sudo ubuntu_user

By default, all users belonging to the “sudo” group are allowed to execute commands with root privileges via sudo utility. Sudo command must be used before writing the command needed for execution, as shown in the below example.

sudo apt install package_name

Test if the new user has the root privileges granted, by logging in to the system and run the apt update command prefixed with sudo.

su - ubuntu_user
sudo apt update

Give the new account root privileges

Next it is a good idea to give the new account admin privileges. This essentially means that the new user will be able to enter commands with admin privileges by putting “sudo” before the command.

As the root user, enter the following command, once again with “username” replaced with the name of the new user:

# gpasswd -a username sudo

This will save you a huge amount of time and effort in the long run, as you will now not have to log back into the root user account to perform administrative commands.

Linux, Apache, MySQL, PHP (LAMP):

Install Apache

We’re getting somewhere! It’s time to install the first of the web server softwares; Apache.

There’s a reason that Apache is the most popular web server in the world, and so it’s time to join the ranks by installing Apache onto our server. Start off by entering the following commands:

sudo apt-get update
sudo apt-get install apache2

You will be asked to verify your user’s password, which you should obviously oblige with. Now do a spot check by entering the following address into your web browser.

http://your_server_IP_address

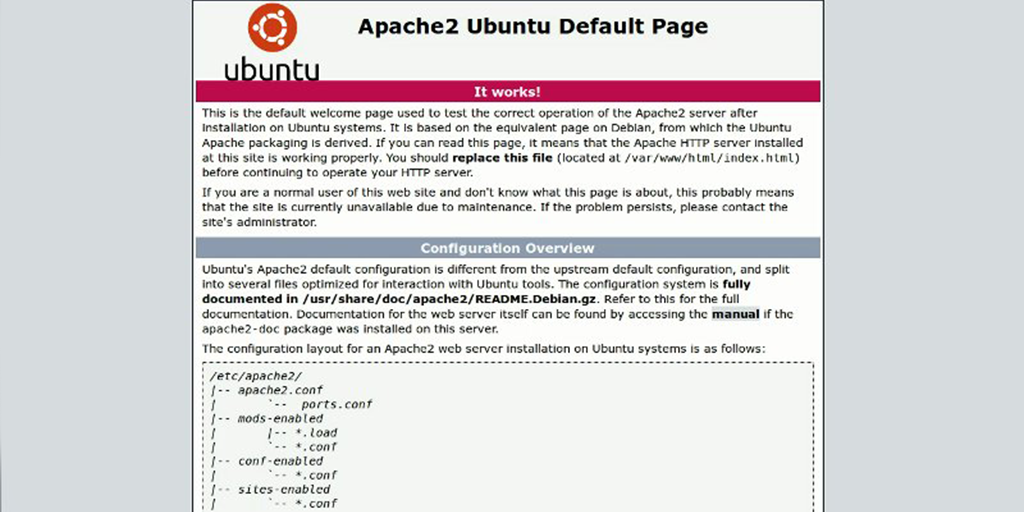
Once again “your_server_IP_address” should be replaced with the actual IP address, and if you see the default Ubuntu Apache web page (above), then congratulations! The installation succeeded.

Install MySQL

Now it’s time to set up your server with a database management system, which is where MySQL comes in.

Once again, you need to enter a command to get the installation going, this time being:

sudo apt-get install mysql-server php5-mysql

You will also need to select and confirm a password to be used for the MySQL root user – for obvious reasons, it shouldn’t be the same password as your server’s root user. This will essentially be a second root user account on the server, but it will be specific to MySQL.

Set up MySQL

Now that it has been downloaded and installed, you need to enter some additional commands to set up the MySQL environment securely.

First, you need to create a database directory structure where MySQL will store its information, and then run a security script to tighten up access. This can be achieved with the following commands:

sudo mysql_install_db
sudo mysql_secure_installation

Enter the password you just selected for your MySQL account and hit “n” to decline the offer to change it. All other prompts should be cycled through by hitting “Enter“.

Install PHP

You’re on the final package of LAMP installation now; you need to install PHP. This will perform a number of incredibly useful tasks, such as processing code and passing it to your web server to display.

You guessed it; time for more commands! Much like with the MySQL command, we’ve included some really nifty helper packages, so don’t worry about setting up a server with limited resources.

This time, the command is as follows:

sudo apt-get install php5 libapache2-mod-php5 php5-mcrypt

Whilst we’re here, you also need to integrate PHP into the Apache server so that PHP files will be prioritized. To do this, first open “dir.conf” in your text editor with this command:

sudo nano /etc/apache2/mods-enabled/dir.conf

The resulting file should look like this:

<IfModule mod_dir.c>
    DirectoryIndex index.html index.cgi index.pl index.php index.xhtml index.htm
</IfModule>

Edit the text so that the “index.php” file is the first in the queue, which will look like this:

<IfModule mod_dir.c>
    DirectoryIndex index.php index.html index.cgi index.pl index.xhtml index.htm
</IfModule>

Save your changes and exit the editor (remember to also confirm the save once the document is closed).

Restart the Apache server

Due to the PHP configuration with your Apache server, you now need to restart the server to ensure that the changes take effect.

Nothing convoluted or complicated in this step; all you need to do is enter this command:

sudo service apache2 restart

Install any optional PHP packages

PHP is installed and ready to use; the next step is to take a look at the additional PHP modules and install any that take your fancy.

To start off, you’ll need a list of all of the optional components for PHP which you can install. You can get this up by entering (surprise, surprise) the following command:

apt-cache search php5-

The list returned to you will include all of the modules’ names and a brief description. Use this command to focus down on a particular component:

apt-cache show package_name

You will need to replace “package_name” with the name of the package you want to examine, such as “php5-cli”. Amongst the mass of data returned to you when examining a component, the in-depth description will appear under the “Description-en” field.

If, after doing a little research you want to install a module, enter the following command:

sudo apt-get install package1

Replace “package1” with the name of the module you wish to install, and if you want to install multiple, just put a space between each module name.

Sources:

Take control of your workflows today.