Before diving in, it's crucial to begin with the 5-Step Planning Process so you have a clear picture of the entire map! Remember! There are just 5 easy steps: Dream it, Map it, Book it, Chunk it & Do it!
I put the following process together to show you how you CAN "process-cize" getting coaching clients. I am a huge fan of creating LEVERAGED OFFERS, and working with one on-one coaching clients is NOT the best use of your time, and it's not the most effective way to get results for your students (see the Mastermind Process for that!), but, getting high-paying coaching clients IS a great way to receive new revenue quickly.
As you'll see in the following 5-Step Planning Process, getting high-paying clients is EASY with this process! You simply open up a few coaching spots, send your prospective clients to an application, have a phone call and close!
First, it's important to set your goals and what you want out of this process.
To do this, set your goal of the revenue you want to generate.
Revenue Generated: _____________
When you follow the process below and get to the phone call step, it is a good goal to aim to close 50-75% of all calls.
With your goal setting, there are also a few key performance indicators for you to track during this process, as seen below.
PERFORMANCE INDICATORS:
Applications Received: ___________
Phone Calls Taken: _______________
The process map above shows the lifecycle of potential coaching clients, ending with payment collection and an optional follow-up step.
Entry points for prospective clients could be a webinar (see webinar launch HERE), your website, an email, a Facebook post, etc.
This is tricky, because getting coaching clients doesn't HAVE to be run as a launch... but it can!
If you do decide to run this as a launch, there should be a deadline for applicants.
And, the phone calls should be SCHEDULED (i.e. someone reach out to book the call) within 24-48 hours.
This would all be done in the application phase on the process map in Step #2.
The "Chunked" Projects For Your Get Coaching Clients (PDF Version / Excel Sheet Version):
You will begin with creating your coaching client offer followed by choosing an entry point, creating an application and checkout page, and closing your offer with a phone call.
Before we can jump into this process, we must first take a look YOUR OFFER. How do you creating a Coaching "Package" and how much do you charge?
My biggest suggestion is to remove any type of "hourly" rate and move to a "PACKAGE" that offers your services for a set time.
You'll want to look at the RESULT you are promising, and how long it will take to reach that result (ex: 90 Days). (Note: I highly recommend your "coaching package" offers a clear START and END date).
Then, you'll want to look at WHAT it's going to take to reach that result. How much time and effort will it take from YOU to help your client achieve that result?
When Crafting Your Coaching Offer, you'll want to keep the Three "P's" in mind:
Promise:
The Result, Goal or Outcome You Are Working Towards
Process:
Price:
How much? What's the PRICE of this package? Remember, working with coaching clients is NOT scalable. Don't price yourself too low that it's not sustainable.
As seen on the process map in Step #2: Map It, there must be an "entry point" for your application. This entry point is where the applicants are coming from BEFORE they apply. This could be a webinar, email series, or even from your BLOG!
Offering a free webinar can be a great way to source applicants. This is an opportunity for you to share valuable, free information as well as your offer.
Your webinar will direct attendees to your application page.
If you'd like to host a free webinar to get coaching client applicants, follow the Webinar Launch process HERE.
You can also utilize your email list to gain coaching clients.
Below is an example of an email we sent for my BBD: Next Level group coaching program:
With traffic coming into your blog, this is a great place to share your content and offer! Attract potential applicants by articulating the RESULT your readers would receive.
A blog can be a great place for applicants, because if they're coming to your blog for content, they may want MORE of you (which is what they can get from a coaching program)!
You'll want to have your applicants fill out an application to determine if it's a good fit for both of you.
After determining your entry point, use the steps below to create an application page.
Your application can be creating using a basic survey form like Survey Monkey. Our process for creating a survey is HERE.
Additionally, here is the application we used for BBD Next Level members:
Next Level Application
Create a simple Thank You Page to let your applicants know what to expect now.
Our process for creating a Thank You Page is HERE. You can use this Webinar Thank You Page process to build out your Application Thank You Page the same way, including the elements below.
On your thank you page for your "what to expect now" either have your applicants SCHEDULE a call with you (using Calendly, for example), OR... give them a link to a refundable deposit page).
In Step #4, you'll create a Checkout Page for deposits (in step 3.2 you'll notice the option to add a Checkout Page link to your Thank You Page, if applicable).
The Checkout Page for deposits is an OPTIONAL page for those who have a larger list with higher demand for coaching. The deposit will help to filter out those who aren't as serious or committed.
Our process for creating a Checkout Page is HERE.
Important: be sure to be CLEAR on your Checkout Page that this deposit is REFUNDABLE!!!
There are three vital and essential roles your Checkout Page needs to play:
#1. Sell Your Offer
#2. Eliminate Risk
#3. Make Action Easy
Similar to your application Thank You Page, your Confirmation Page will have the "what do expect next" information and how to schedule your call.
I recommend signing up for the Calendly service, so you can easily direct applicants to schedule a call based on your availability.
See step 4.3 on how to set up your Calendly event.
Sign-up for a Calendly account HERE.
Once you are in your account, to set-up an event simply click "Event Types" on the header and "Add Event Type."
Select one-on-one for your applicant calls.
As a final step, fill out the form, and be sure to create a custom link. This is the link you will include on your Thank You Page and Checkout Page.
In this step, you'll have the call with your applicant.
Here's a breakdown on the structure of your calls:
Your calls with applicants should be about 30 min long. The call is an opportunity to see "if we are a right fit" and "if you can be of service to the client."
Format of the call:
I. Set the Frame:
a. Thank the applicant for applying and setting up a call
b. Acknowledgement of taking action
c. Frame: "I just want to ask a few questions to see what you need the most and to see if I can help with that, then at the end, I'll share what I've got and how it works, and at that time if you have any questions, you just let me know, sound good?"
II. Identify the Problem:
Use a serious of questions to understand what the client is struggling with and what they need.
a. "What is it that made you invest the time to speak with me today?"
b. "What are your biggest goals right now? What are you up to?"
c. "Why is that important to you?"
d. "What's getting in the way of that right now?"
e. "Why is that a problem for you?"
III. Recap And Summarize
It's good to CLARIFY and CONDENSE the answers that your applicant has shared so you can offer a clear picture of where they are at, and where they want to go.
IV. Offer Details
After you summarize and confirm that you've effectively summarized their problem, you can lead with a simple question such as "Would you like help with that?"
At this point (if it's a "yes") you can get into the DETAILS of your offer. But, don't talk too much. Let the applicant ask YOU about what details they are most interested in and you can answer those questions directly.
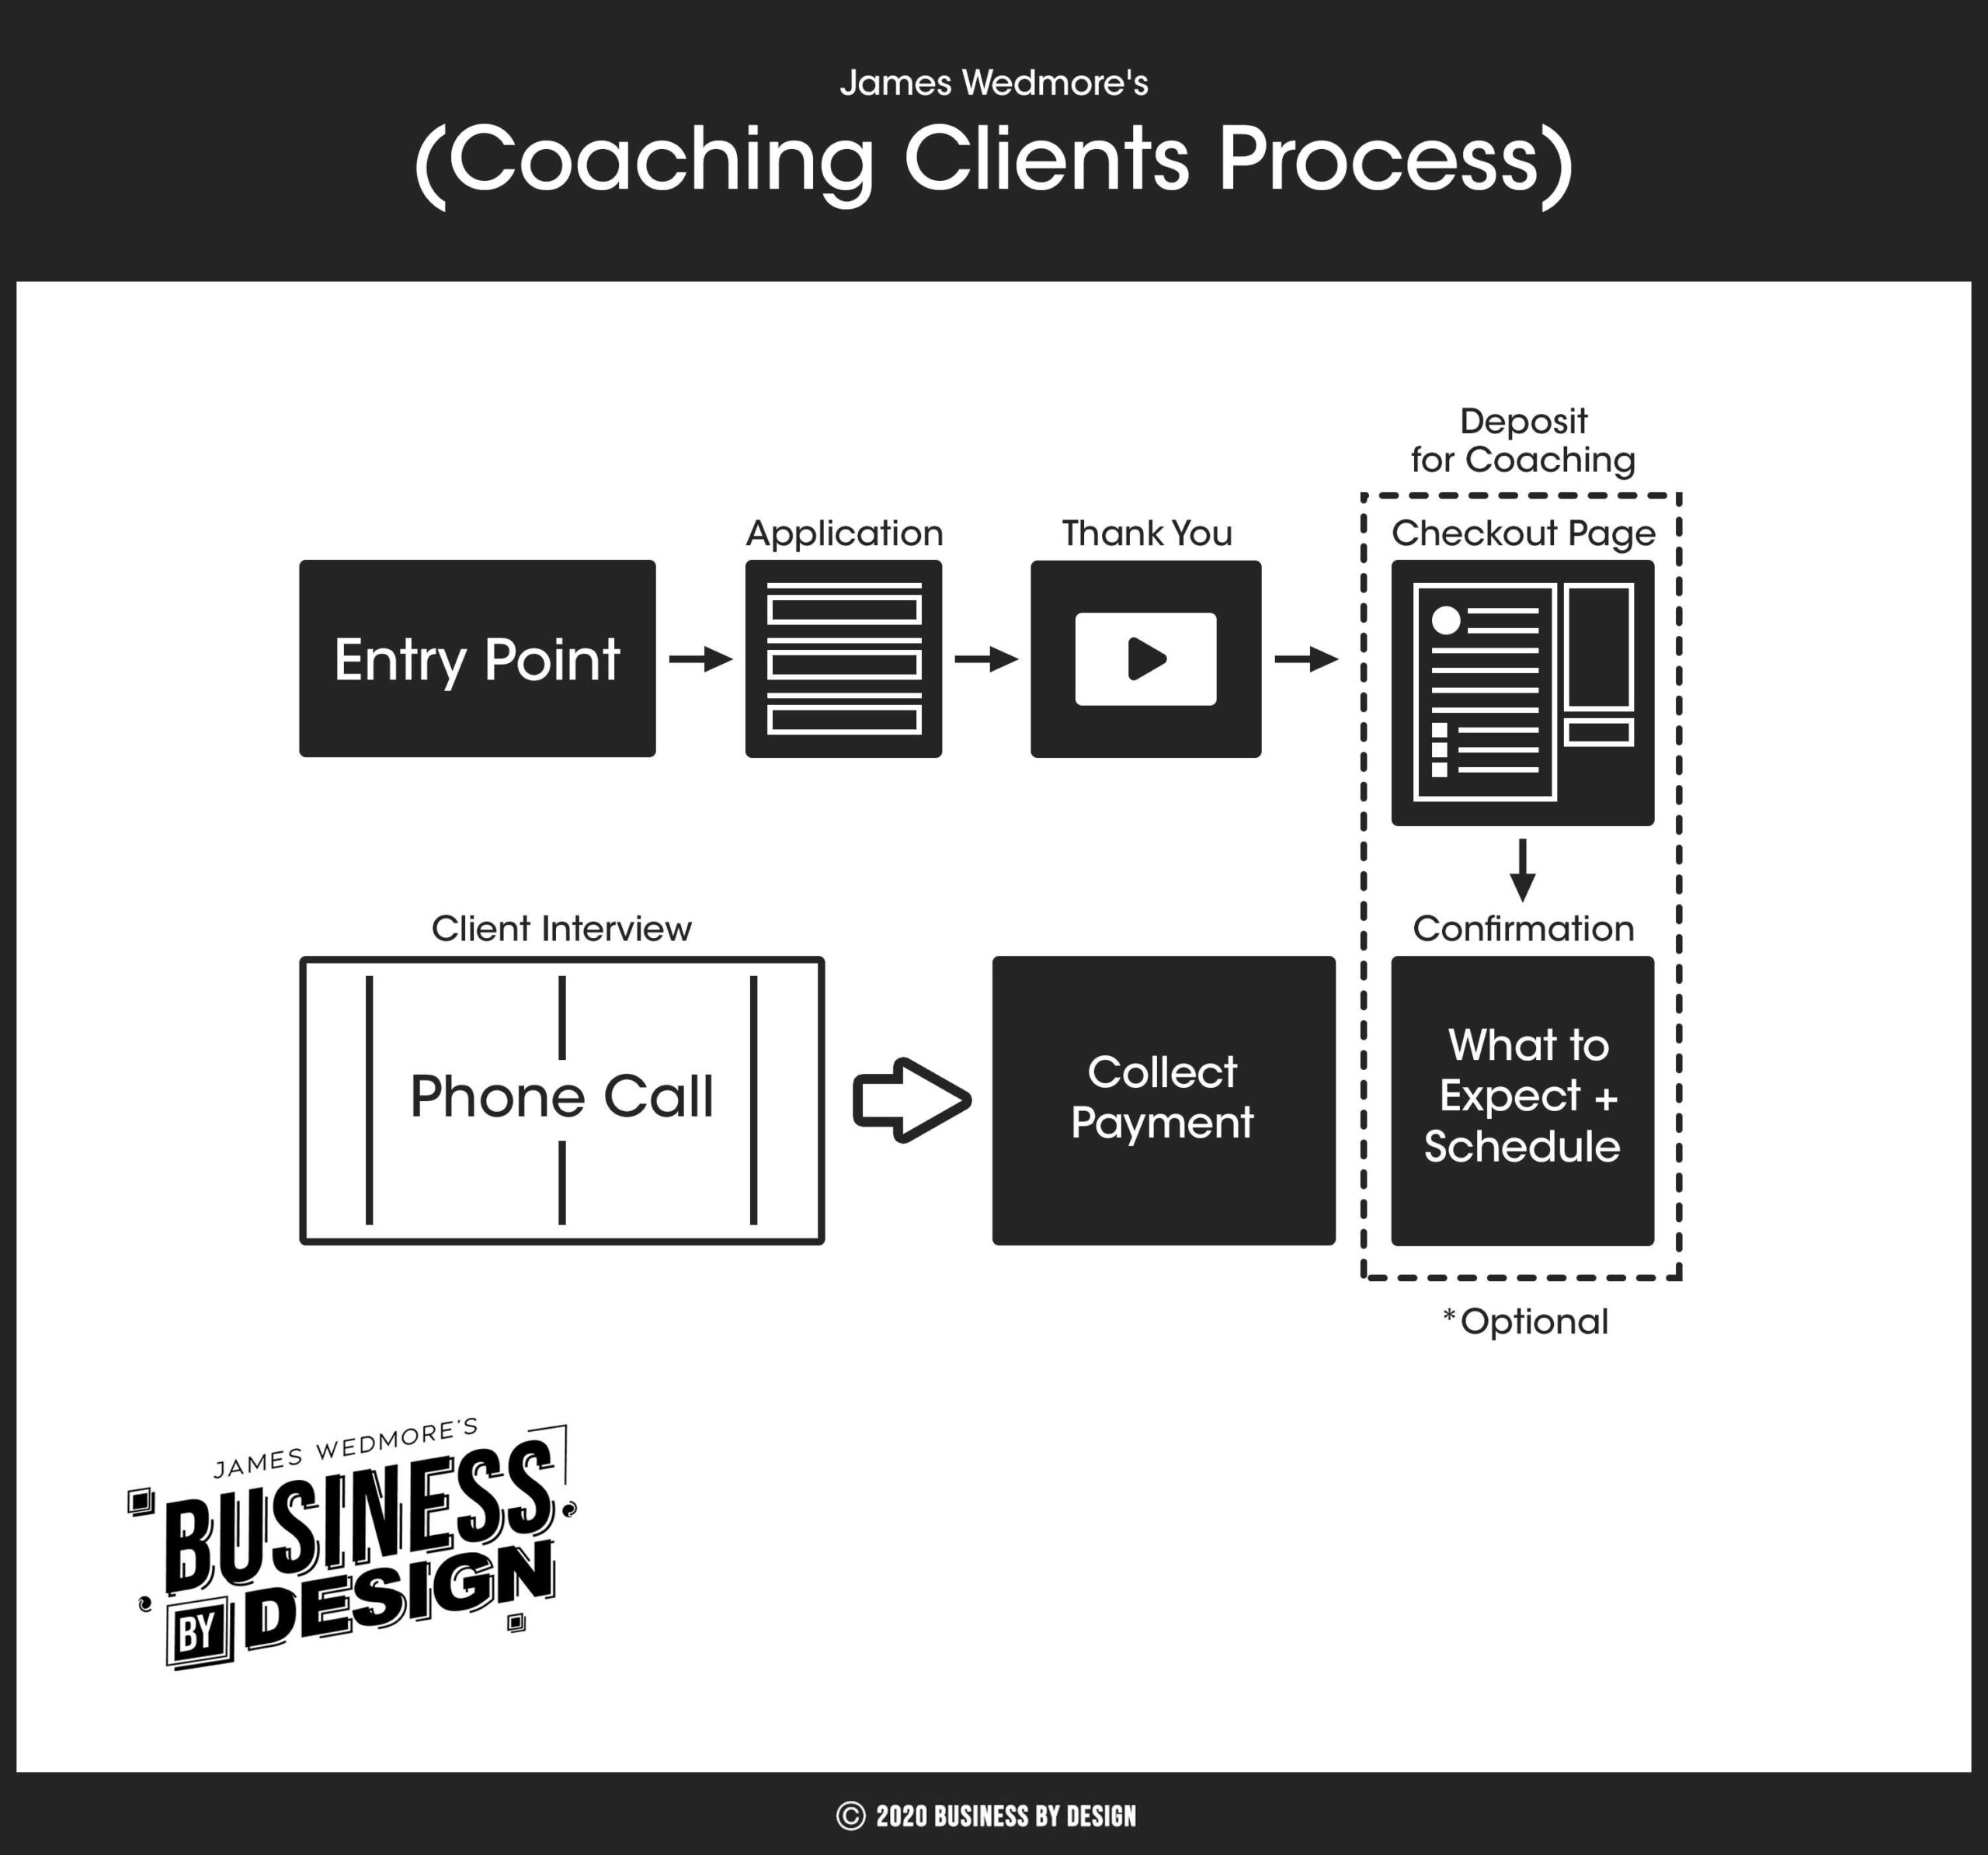
It would be best to collect payment over the phone, but you can always follow-up with payment after the call, just make sure you offer a deadline.
To collect payment, create a Checkout Page following the same process as you did to collect deposits (Checkout Page Process is HERE).
Determine ahead of time if you will be collecting one full payment, or if you will be offering a payment plan.