Templates /
UX Design Process

UX Design Process

Run the UX Design Process when starting a new project and follow the steps to carry out the right research and deliver the materials your client needs.
1
Introduction to UX Design Process
2
Record client details
3
Conduct your user research:
4
Hold a meeting with the client/company
5
Host a series of interviews
6
Run an online survey
7
Create a persona
8
Design your initial flows:
9
Define the information architecture
10
Begin wireframing
11
Prepare these wireframes for presentation
12
Put your initial designs into testing:
13
Determine what you are testing
14
Revisit your former interviewees to discuss wireframes
15
Make iterations to your wireframes based on testing results
16
Run A/B usability testing of the iterations
17
Assist with the implementation of the designs:
18
Hand over design files to the UI designer
19
Schedule a meeting with the UI designer to discuss the files
20
Prepare a report for the company/client outlining your work
21
Explain how they can track and optimize the UX over time
22
Finalize the project:
23
Generate invoice
24
Ask for feedback from the company
25
Related Checklists:
26
Sources:

Introduction to UX Design Process

UX Design Process

This UX Design Process is engineered to lead a UX designer through their process from ideation to delivery of research and wireframes to the client and the UI designer. 

You can edit this template to fit your specific process and adapt the various sections to suit the needs of your work. 

UX design is an area of product development which has gained increasing recognition and justifies considerable time and research in order to lay the foundations for great products to be built.

If you want to check out how other UX designers approach their processes, check out some of the videos below!


What the Heck is UX Design – UX Mastery

What is UX Design? Defining User Experience Design & Explaining the Process – The Futur

Why You’re Over-Thinking Your UI/UX with Rohan Puri – Harvard Innovation Labs

Record client details

Use this space to record important contact information for future reference.


Conduct your user research:

Hold a meeting with the client/company

The initial meeting with the client to determine how the project will move forward is a crucial moment in the process. 

This is where you want to create a clear understanding of the project and what will be required. 

In the subchecklist below, you’ll find an agenda to follow which covers the core areas you need to discuss in the meeting. 

Beneath the subchecklist, you will find form fields where you can record this information.

  • 1

    Understand the scope of the project
  • 2

    Determine the business goals
  • 3

    Learn about the business operations
  • 4

    Ask for access to existing clients
  • 5

    Gather information on key demographics


Host a series of interviews

One useful thing to have as a user experience designer is a testing group. 

Hopefully, the client has existing customers whom you can reach out to in order to run these interviews. If not, you can attempt to gather a testing group of people who fit the target demographic of the company. 

Arrange a series of interviews with the members of your group and use the points in the subchecklist to guide your discussion.

  • 1

    Ask about the problem
  • 2

    Find out how they normally solve the problem
  • 3

    Discuss the pain points they face
  • 4

    What relevant solution do they like?
  • 5

    What would they recommend in an ideal world?

You could use Process Street to gather this research. You could create what we at Process Street call the "run link".

The run link is a link which when clicked automatically runs a new checklist from a predetermined template. You could use this text space to store that run link so that every time you run an interview you simply click the link and you’re provided with a space to store that information. 

The end result would be that all the information gathered from all the interviews is stored in the overview tab of the new template you create.

Run an online survey

To see if you can gather some extra data to back up your initial investigations, consider creating an online survey. 

It’s a simple process, but one which can be very effective for anyone who has access to an existing email list or space within which to promote. 

  • 1

    Select your 10 most pressing questions
  • 2

    Build your survey
  • 3

    Send your survey to an email list or promote it to your key demographic

This is another use case where you can consider using the checklist run link we mentioned in task 5. 

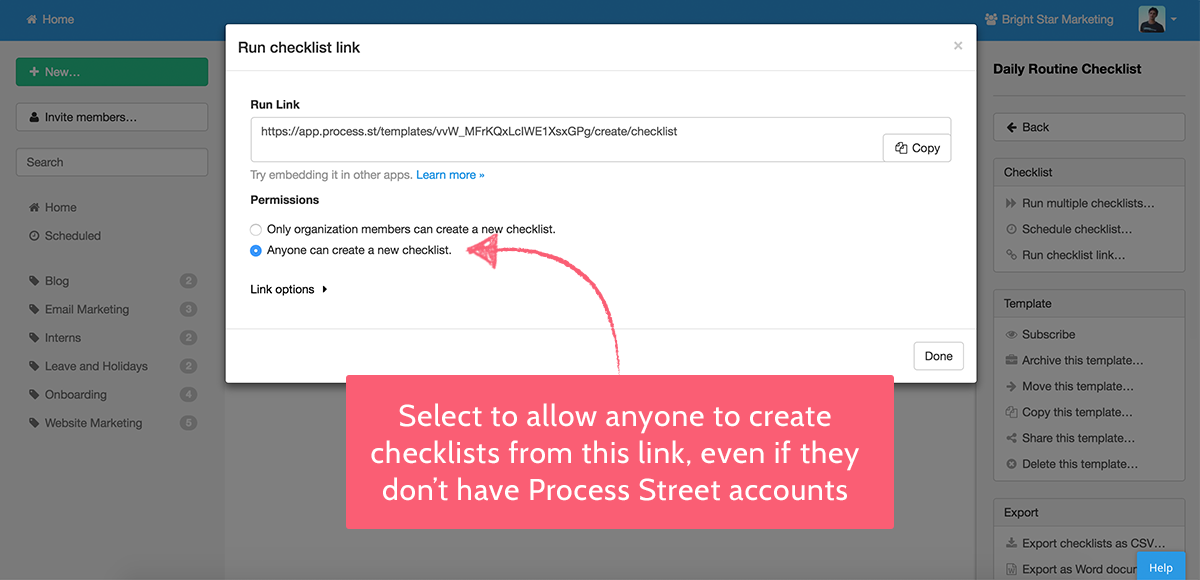
The difference with using the run link for widely taken online surveys – which may include people who do not have Process Street accounts – is that you should make them open to anyone with the link. 

When you choose the option to create the run link, select "Anyone can create a new checklist" as shown below:

Create a persona

One popular technique when developing a UX strategy is creating a persona to guide and direct your thoughts. 

This is something which Rohan Puri explores in detail in the Harvard lecture video included in task 1. 

If you want to learn more about the potential benefits of creating a customer persona to characterize your core potential userbase, check out this exploration of personas from UX Booth.

You can use this subchecklist to help guide the important considerations when creating a persona to assist with user experience research and design. 

  • 1

    Define their place within demographics
  • 2

    Understand what they like and don’t like
  • 3

    Describe their motivations
  • 4

    Show how they interact with existing services

Watch this 3-minute video below for an illustrated overview of creating UX personas.

How to Create UX Personas – UX Mastery

Design your initial flows:

Define the information architecture

Information architecture is a term which conjures up a sense of ownership in both designers and developers. 

The important thing to remember for a UX designer is that your role in the information architecture process is to help users find what they are looking for and to make that process as easy as possible. 

Many other people may claim access or dominion over other areas of information architecture, but ultimately the responsibility for things being quick to locate for the user rests on your shoulders. 

If you want to read more about information architecture in UX design, then check out this complete guide from UX Booth.

Very simply, the subchecklist below demonstrates the key duties.

  • 1

    Name things consistently
  • 2

    Understand how different sections relate to others
  • 3

    Draw a structural map to represent this visually

Begin wireframing

Wireframes are the key deliverable most people think of when they imagine the work of a UX designer. 

Now is the time to begin creating yours. 

Use the subchecklist below to factor in different considerations when building your wireframes. 

  • 1

    Define how space will be allocated
  • 2

    Think about the role of imagery in your designs
  • 3

    Determine how certain content will be prioritized
  • 4

    Understand what functions are available and how they are accessed
  • 5

    Map out example user journeys through the platform

Check out these videos below for an illustrated idea of how the wireframing process works for other designers. 

Wireframing for UX: What is it and how to get better at it – UX Mastery

Wireframes and Prototype – Naimus Studio

Prepare these wireframes for presentation

There are multiple ways you can develop your wireframes for presentation to potential customers and testing.

You can make clickable prototypes using platforms like Invision

This allows you to link your images together and allow the user to interact with the screens as if they were live.

Alternatively, you could present the screens to testers in different formats.

Use the form field or the website field to upload or link to your prepared initial wireframes. 

Put your initial designs into testing:

Determine what you are testing

Before you begin testing your wireframes on your research group, you need to formulate your research properly. 

Sit down and work out exactly how you are going to approach the research. Use the considerations in the subchecklist below to help guide you.

  • 1

    Utilize the user journeys from the wireframing
  • 2

    Construct tasks which require the user to navigate these journeys
  • 3

    Define the parameters for success and failure of the tests

Revisit your former interviewees to discuss wireframes

From the basis of your deliberations in task 13, carry out your research on your testing group.

The example subchecklist below is constructed to test user flows. A user is given a task and to complete that task they need to follow one of the user flows you have designed. If well designed, the user should intuitively follow that flow and complete the assigned task without difficulty. 

You can monitor the performance and the decisions of your users to inform your future changes.

  • 1

    Describe the tasks to the interviewees
  • 2

    Present them with a clickable prototype they can follow through
  • 3

    Time how long it takes them to perform the tasks
  • 4

    Note how they approached the tasks
  • 5

    Ask them questions about their experience of the task
  • 6

    Describe to them a second set of tasks if necessary and repeat the process

Much like previous research tasks, you could create a new template for this research and include a checklist run link instead of this text. 

Make iterations to your wireframes based on testing results

Analyze your research and try to understand the pain points from the testing. 

Use this new understanding to improve the wireframes. Try to create two iterations of improved wireframes to test alternative solutions to the now identified obstacles. 

Use the form field below to upload these files.

Run A/B usability testing of the iterations

Now for the final testing before settling on the agreed wireframes. 

Take the two iterations of improved wireframes and prepare them ready for presentation. This A/B testing can help you determine which set of designs are more effective.

Follow the subchecklist below to finalize the testing. 

  • 1

    Segment new interviewees into groups
  • 2

    Assign each of the groups one set of the iterated wireframes
  • 3

    Run the usability research with them again

Again, you can use the checklist run link to manage this research gathering process.

Once the research has been gathered, make any needed final tweaks to the designs which performed best.

Assist with the implementation of the designs:

Hand over design files to the UI designer

Great.

The designs are done and you can hand them over to the UI designer to take them further!

Upload the final files below for reference.

You can use the email widget to pass this onto the next stage of the process. 

UX Process – App Design

Schedule a meeting with the UI designer to discuss the files

Once the UI designer has had the chance to review the wireframes, it can be helpful to find the time to sit down with them and talk through your deliverables and the thought process and research behind them.

Prepare a report for the company/client outlining your work

Most of the time, a client will want a report of some description which explains your thought process and acts as reference materials for future. Your research in formulating the UX designs is valuable.

For larger companies, a report like this may be necessary in order to pass to higher management and to adhere to transparency standards within the organization. 

Draw up a PDF and upload it in the form field below.

Explain how they can track and optimize the UX over time

One extra helpful step you can add on to your delivery to both add extra value and increase the chance of upselling, is to provide a brief guide to how the client can optimize their UX over time. 

You can upload that document in the form field below.

Finalize the project:

Generate invoice

Congratulations on a successful design project. 

The designer can use the Process Street invoice generator template to send their invoice to the client. 

This invoice can be sent automatically from this checklist by clicking to complete the task. 

You can use Zapier to connect this task in this template to your invoice so that you can automate the sending process. 

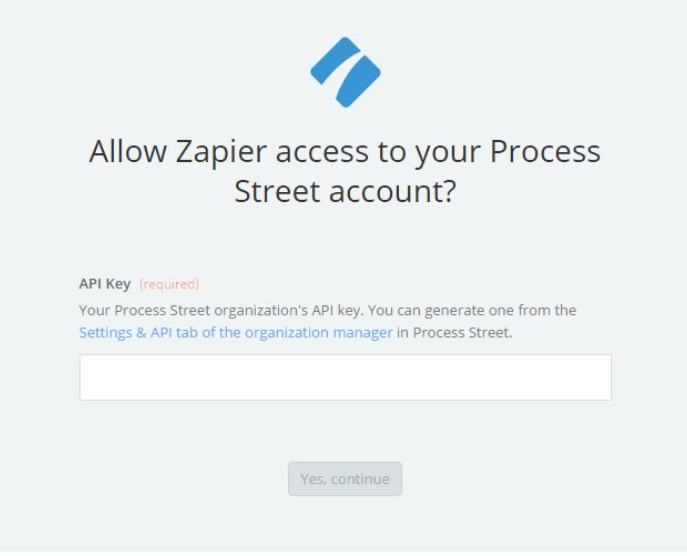
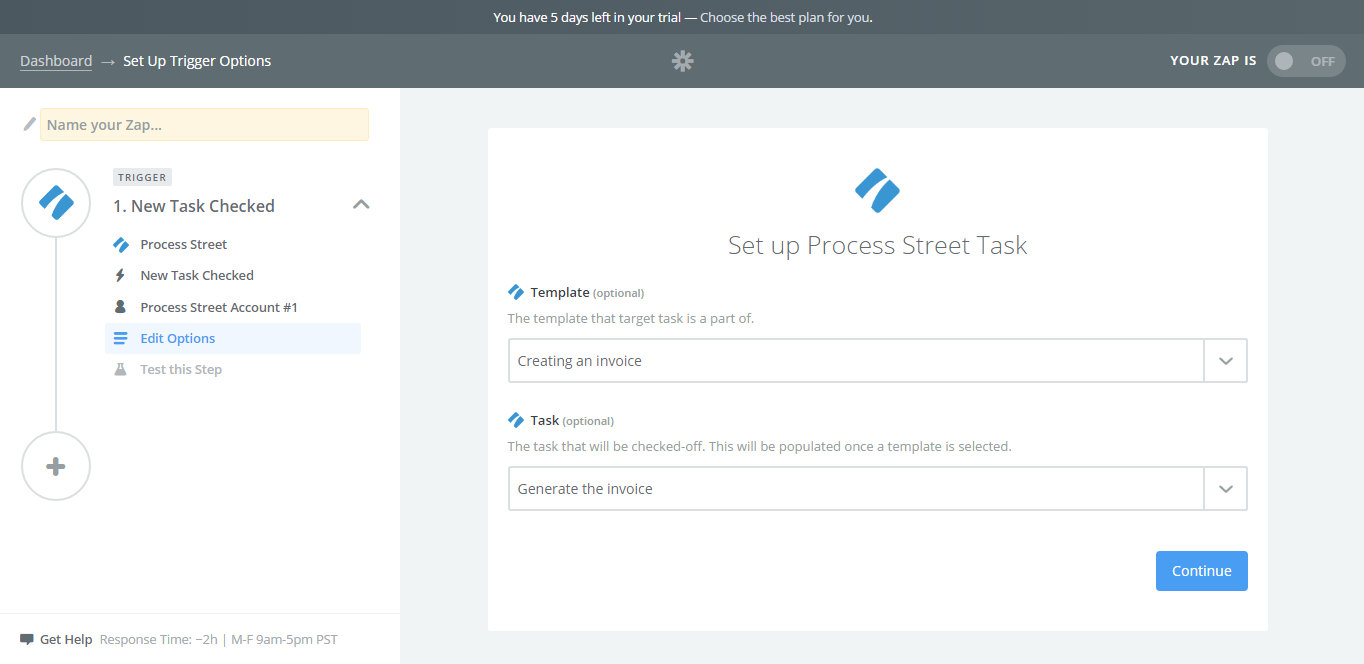
In Zapier, select "Make a Zap" and search for Process Street. It will prompt you to create a trigger – select "New Task Checked". It should then prompt you to connect your Process Street account to your Zapier one. You simply follow the link Settings & API tab of the organization manager on the pop-up.

Follow the steps provided by Zapier and it should connect the two accounts together. From here it will let you search for the template you want to run the Zap from, and choose the task you want to hook it up to. 

After you’ve selected those options you can test that step and your trigger should be set. 

Next, you can create the action to be initiated by your trigger. You can use a third party system like WebMerge or you can use Zapier’s built-in email service to generate HTML emails. Either of these solutions can be used to generate and send your invoice.

To read more about these steps and how to create the invoice check out this article

Ask for feedback from the company

It’s always best to send a friendly email at the end of a project. 

Confirm that you have sent your invoice and ask for any feedback on the project. 

You can use the email widget below.

Sources:

Take control of your workflows today.