A “Workflow Run Link” is a link that, when clicked runs your Workflow.
This allows you, or another person to quickly run a workflow from anywhere you have shared the link.
Run links can also be used to help integrate your Workflow runs with other apps.
Users: In order to create Workflow Run Links, you must be an Administrator or a Builder who has been given ‘edit’ access by your Administrator.
Note: Run links are available only on the paid plans. If you’re unable to create a run link, please contact our support team.
To generate a Workflow run link, first navigate to the Workflow you want the create the run link for in your library.
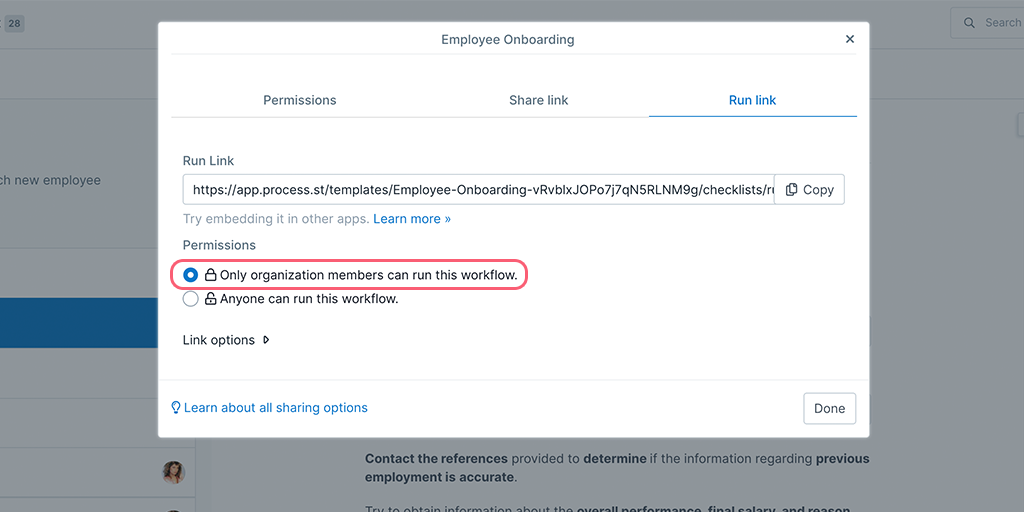
Click the three dots (…) next to your Workflow’s name, then select “Workflow Run Link” and check the appropriate permission for sharing.
In the example above, we’ve chosen the permission “Anyone can run this Workflow” (learn more about permissions below).
Copy your run link and click “Done” when you’re finished.
Pro tip: You can also click on the Permission Icons next to your Workflow name to open the share options directly.
![]()
You can now add this run link into another Workflow (which effectively links your processes together) into a document, your CRM, your support center, or anywhere else you need it.
A new Workflow run will be created every time the link is clicked. If you’d like to pre-fill data in your Workflow run each time the link is clicked, you can do that too via an integration.
You can also copy a run link when you manually run it from viewing the Workflow, as shown below.
The permission for who can use the run link depends on what you have set in the run link sharing options.
You can add Workflow widgets into your Pages to allow your team to efficiently run Workflows at the point they’re needed.
For example, your paid time off policy page could have a run link to your PTO approval Workflow, or your remote work policy could have a run link to your Remote work approval process, as shown below.

To insert the Workflow widget into your Page, click on the + icon. Then from the list of options, click Workflow. You can enter the Workflow name in the search box and when you select the desired Workflow, it will get added.
You can test the widget by clicking on the Run button once the Workflow has been added to the Page, as shown below.
As with many other aspects of Process Street, integrating your Workflow run links with other apps makes them even more powerful.
For example, you could integrate the run link with your CRM in order to automatically populate the new run with data, such as your client’s name, company, or email address. This saves valuable time and prevents data entry errors since when you run the Workflow, some of the form fields in your run will already be filled out with your data.
To set this up, you’re going to need to add variables into your run link, but before we get to variables, let’s first check you have some form fields in your Workflow.
If you are using a premade Workflow template, chances are there will already be a number of form fields in your Workflow. If not, or if you don’t have the right fields set up already, you’re going to need to add some.
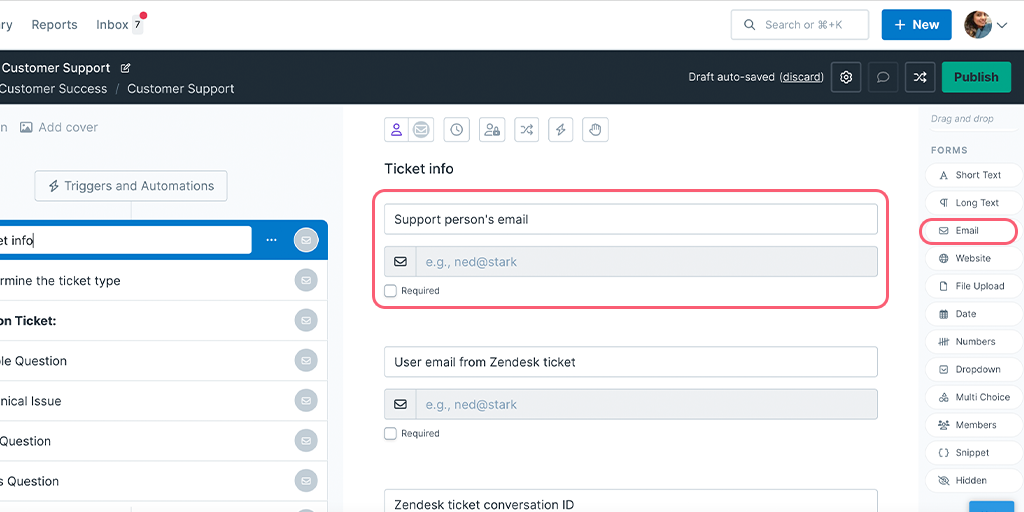
Form fields such as email addresses, names or ID numbers can be added to your Workflows to allow you to use them as variables in your run link.
Edit your Workflow and drag and drop the required form fields into the relevant task/s. Give the form fields a label, for example, “Employee name” or “Project start date” or “Client website”.
Note: Make sure that your form field labels are unique from one another, as this will enable you to find the correct one later when looking for and adding variables. For example, don’t just use “name” in various form fields, try using “client name” or “employee name” or manager name” for each different label.
Add as many form fields as you need in your Workflow and click “Publish” when you’re finished.
Now that you’ve saved changes to your Workflow, you can start adding variables into your run link.
Click the three dots (…) next to your Workflow’s name and from the dropdown menu, click “Workflow Run Link” to open the run link menu.

Next, click “Link options” and then “+ Add variable“. A dropdown list appears with your choice of variables, as shown above.
Select the variables you want to use in your run link, one at a time. You can add as many as you require in your run link. Each time you add a variable, your run link starts to build.
Note: “Run_name” is always a variable option, and any variable with the prefix “form.” are the form fields you added to your Workflow earlier.
For example, if you add the variable “run_name“, this will be added to your run link: “run_name=XXX” or if you add the variable “form.New_Hire_First_Name” then this will be added to your run link: “form.New_Hire_First_Name=XXX”
Once you’ve finished adding variables, Copy your run link and click “Done” to finish.
To populate variables with information when your Workflow runs, you need to change the “XXX” entries in your run link to match the data you want to pass into your new Workflow run.
In the example below, we’re creating the run link in another Workflow, inside a text field.
Start by pasting your run link into the text field so you can see it in full.
Highlight one of the places where you have “XXX” and then click the magic wand icon to search for the fields to populate the “XXX” entries with. In the example above, we’re using the candidate’s name and email address.
The resulting run link will look something like this (with variables in bold):
https://app.process.st/workflows/Customer-Support-ulawzIgw_vJtjafWK_dCPQ/run-link?form.Jira_ticket_number=XXX&run_name=XXX
Once you have changed all the XXX’s in your run link to variables, you can hyperlink the run link into your text.
Select and cut the whole run link, ready to paste. Next, highlight the text you’d like to link to, and click the link icon. Paste the run link into the URL field. Click OK to finish and publish your Workflow (the gif above shows you how to do this).
This creates a nice-looking, clickable link in your Workflow and Workflow runs.
You can add two variable fields together in a run link. For example, if you want to put both the candidate’s name and their ID number into the new Workflow run’s name, this is possible. Add a + symbol between the two fields in your run link and this will add both fields to your Workflow run’s name when it is created.
For example: …run_name={{form.Intern_full_name}}+{{form.Intern_ID_number}}…
Note that you can only push data into a Workflow run name or the following form fields:
You cannot use date fields in Workflow run links, due to issues with passing through date formatting. However, you can work around this by using a short text field and enter the date there manually instead.
Multi-choice fields cannot be used in run links.
Special characters: Note that some special characters will not work in run links, for example $ £ ! @ % ^ & * / |. You can use # in run links, however.
Run link size: We recommend a maximum URL character limit of 2000 characters, to allow your run links to work. If your run links are over that size we cannot guarantee they will work.
Data Sets: Data Set variables are not supported in run links.
You can control who can use your run links and run your Workflows, by setting the permissions.
Admins and Builders can run this Workflow from a run link when you use this permission setting.
This permission setting does not allow guests to create run links, so you need to use the permission setting shown below for them or other external users.
If you choose this permission setting, all runs created from this link will automatically be shared, and anyone with the link will be able to run the Workflow and interact with it. They don’t even need a Process Street account.

This is a great way to run surveys or collect information from customers, leads, or even new hires before they start their first day.
Note: Anyone using a run link with this permission set, will appear as an anonymous user.
Integrating Workflow runs and their run links can be confusing at first, so let’s run through two examples of how this can be done.
See our full help article on integrating Close.io and Process Street.
Let’s say that you have a sales qualification process, and have created a run link with variables for your customer’s email and their name.
After setting up the run link, you would need to go into your CRM (in this case we’re using Close.io) and add a new integration link.
Paste your run link into the new integration link field, make sure that the “type” of link is correct (in our case, this could be a “Contact” link) and take note of where the variables (eg, “Customer_Email=XXX”) in that link are.
You now need to replace the “XXX” entries with the correct code for those variables, as shown by your CRM.
In our case, “Customer_Email=XXX” needs to be changed to “Customer_Email=[[contact.primary_email]]”, and “Customer_Name=XXX” becomes “Customer_Name=[[contact.name]].
This will give you a new run link which, when clicked while you’re viewing a customer in your CRM, will run the Workflow and automatically pass over the data in the variables that you’ve set.
You can include a run link in emails sent using tools such as Mailchimp to allow the recipient to run the Workflow, but by including variables in your link, they can save time by not having to fill out details like their name and email address.
The run link can be pasted or anchored to text just like any other hyperlink, but to populate your variables (your “XXX”s) you’ll need to use your tool’s merge tags.
For example, Mailchimp’s merge tabs for the recipient’s first name and email address are |FNAME| and |EMAIL|, respectively.
Once you have these merge tags, replace the “XXX”s in your Workflow run link with the correct ones and then your link is ready to go. Anyone clicking that link from your email will run the workflow, with their information automatically added in for them.
To learn more, see our articles on variables, global variables and running Workflows.
Help us improve this help center.


