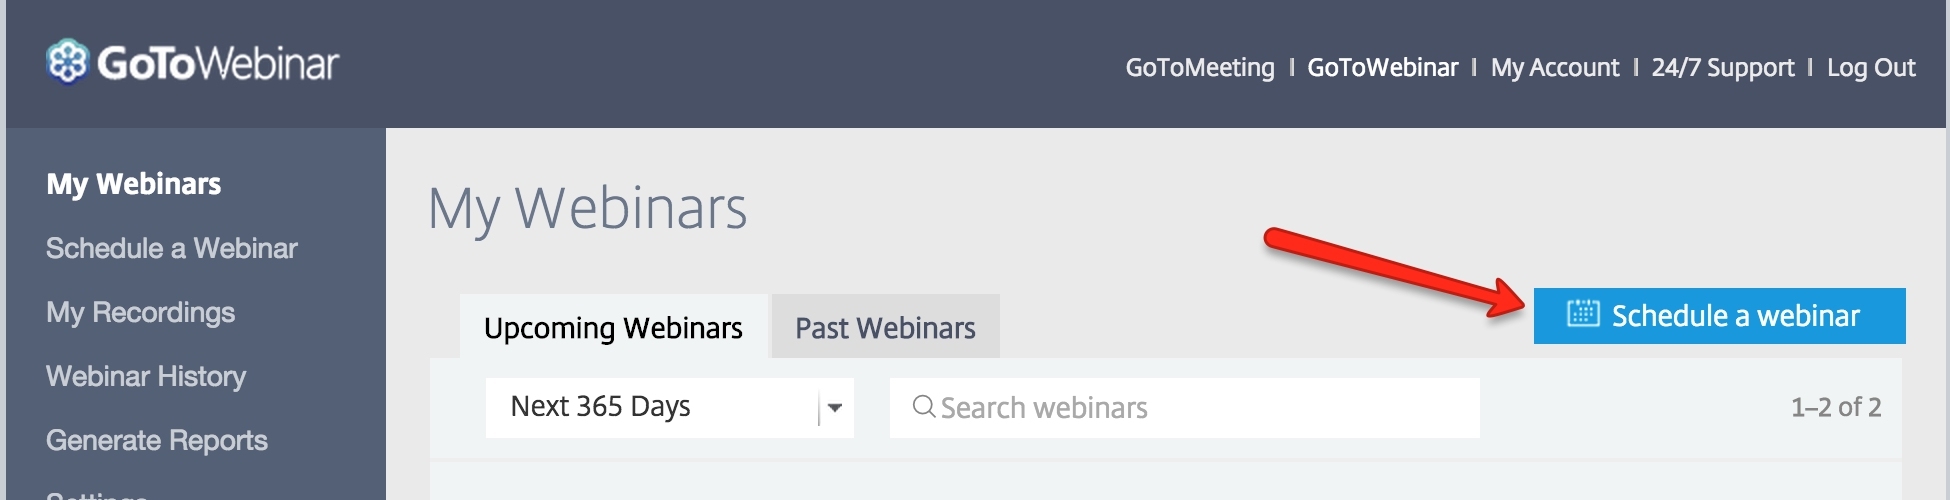
2.1 a. GoToWebinar Event Setup
In 2.1, we'll walk you through the process of setting up your Webinar Event inside Zoom and GoToWebinar. Make sure you KNOW the date of your webinar, and it's set for at LEAST 10 days out from today!
1. Log in to GoToWebinar
GoToWebinar
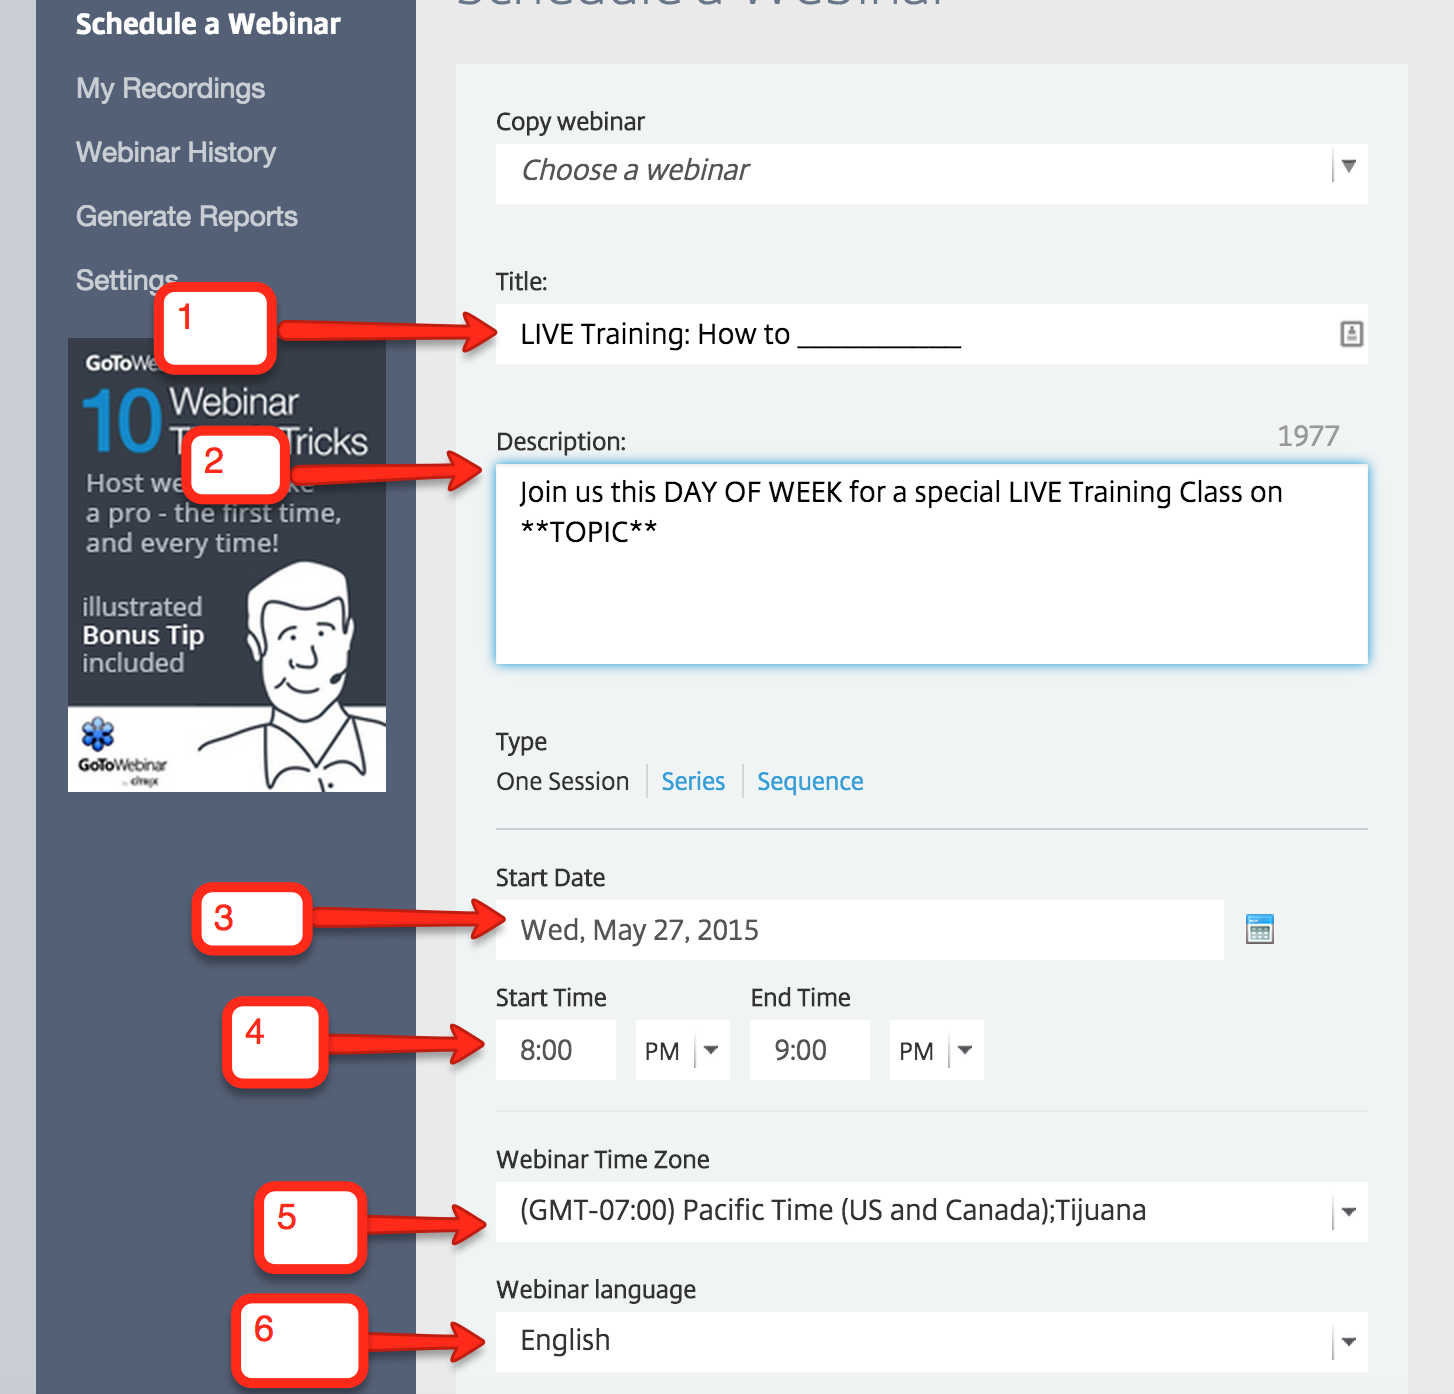
2. Select the "Schedule a Webinar" Button
3. Fill Out the Following Forms for the Webinar
1. The Webinar Title
2. Add a Description
3. Add Start Date
4. Add Start Time
5. Webinar Time Zone (Pacific)
6: Language: English
4. Select the "Schedule" Button to SAVE
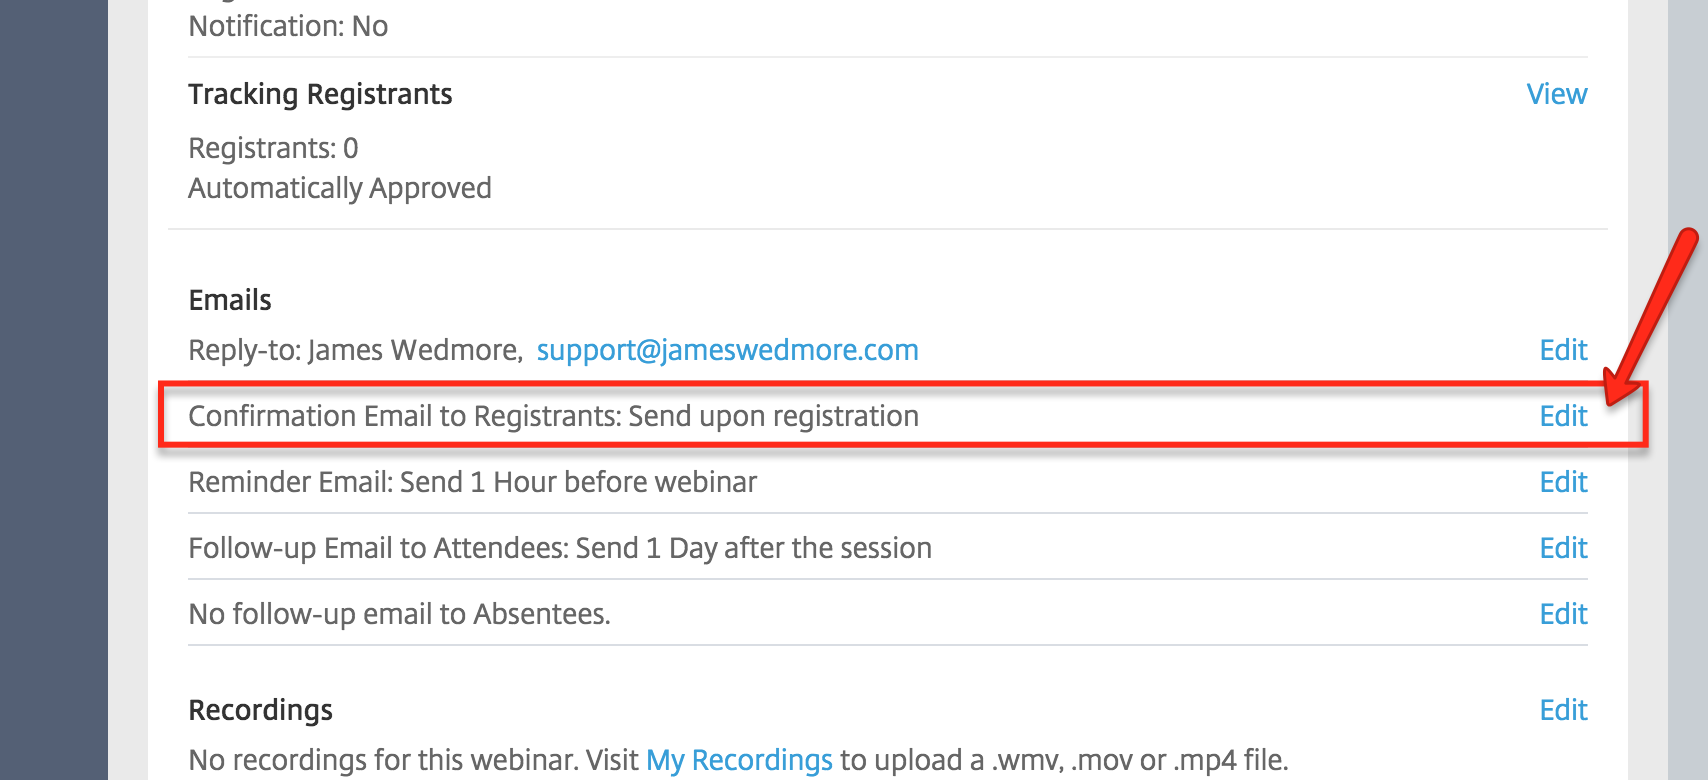
5. Click the "EDIT" button to Edit the Confirmation Email
From the "Manage Webinar" Page, simply scroll down to the EMAILS Section and select the "EDIT" button next to "Confirmation Email to Registrants."
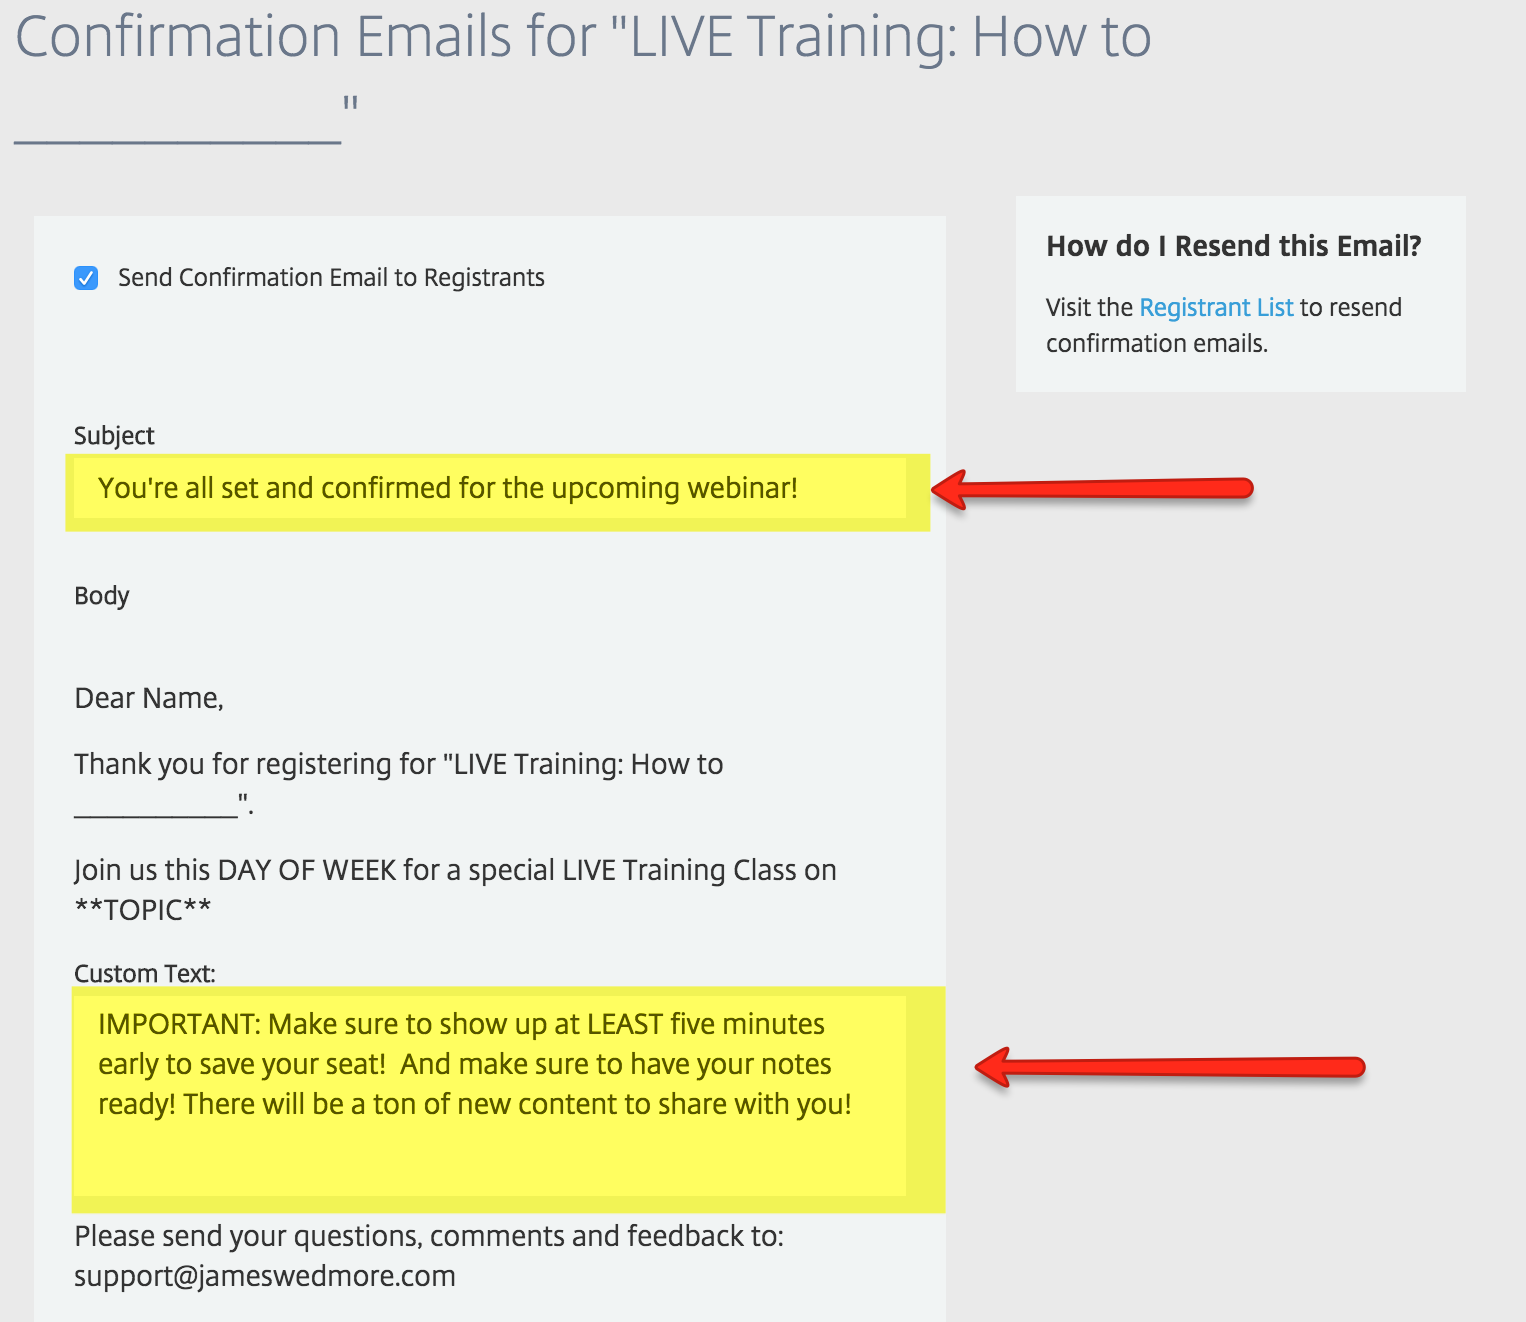
6. Add the EXACT Text to Subject Line and Email Body As Seen In Image
Add the EXACT subject line and "custom text" as seen in the image below
7. Click "Save" to Save the Email Template
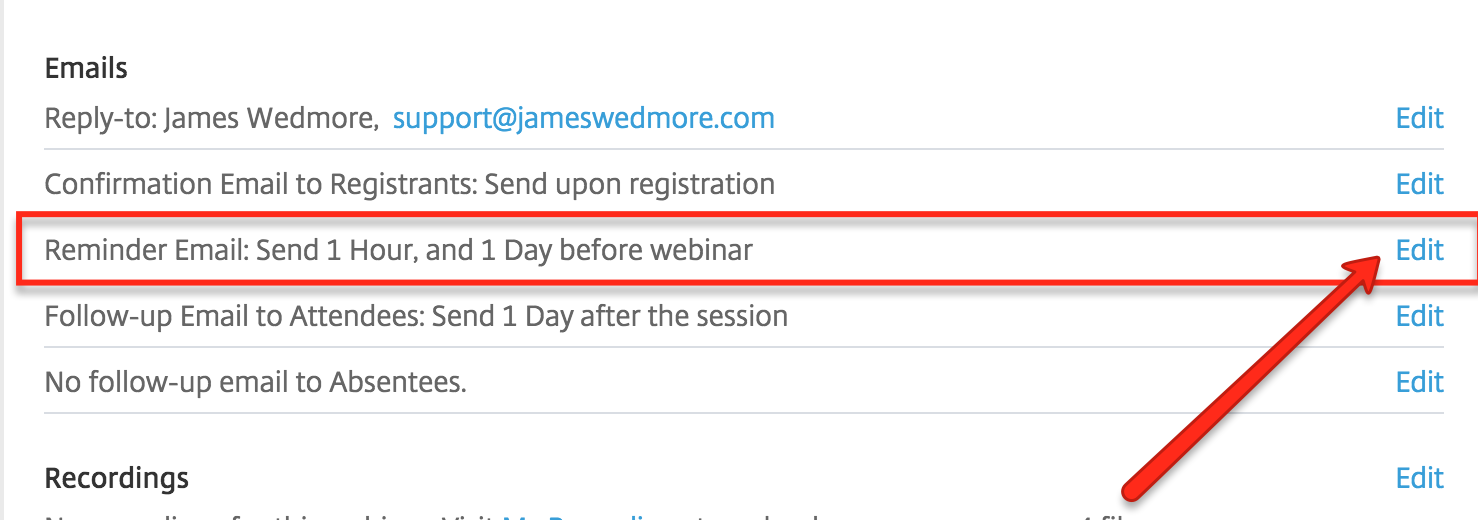
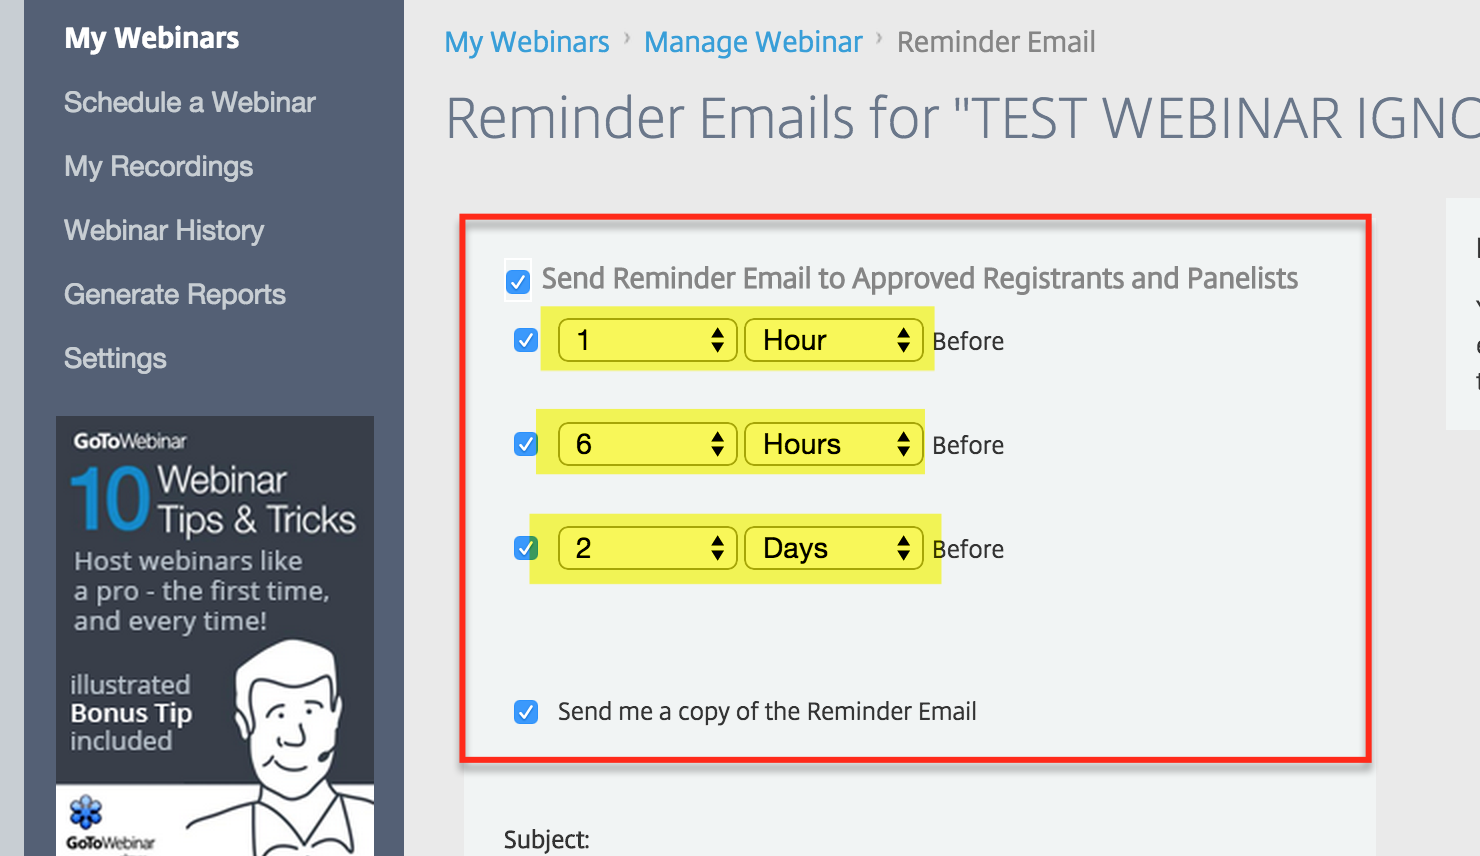
8. Click "EDIT" to Edit the REMINDER EMAILS
9. Set the Following Reminder Schedule
Use the image below to replicate our exact reminder schedule.
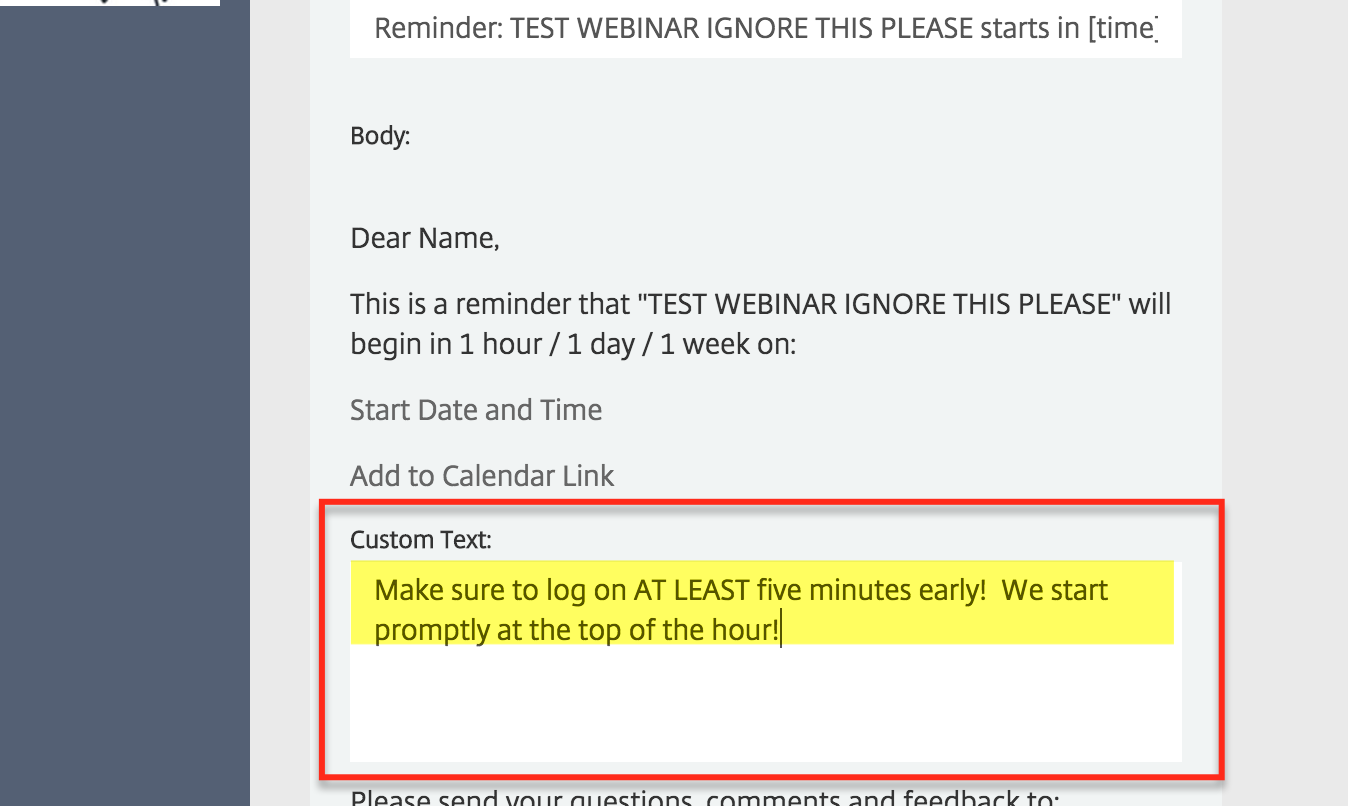
10. Add the Following "Custom Text" to the Reminder Emails
Please refer to the image below...
11. Save the Email Templates by Clicking the "SAVE" Button
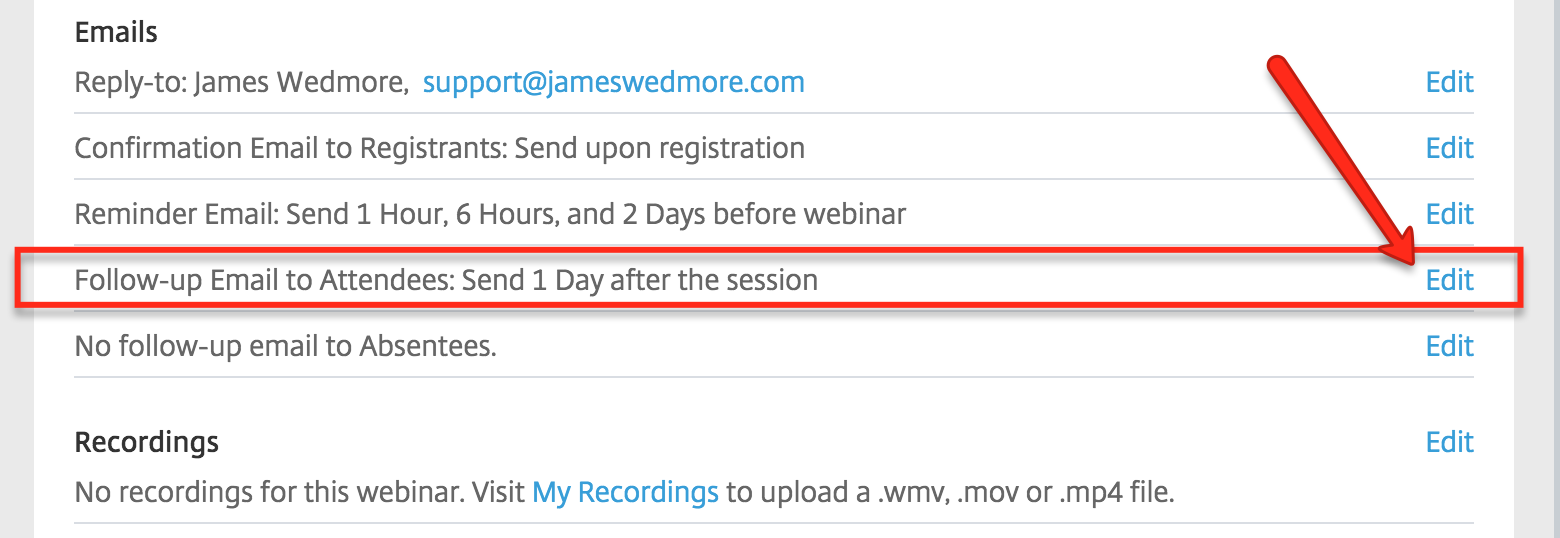
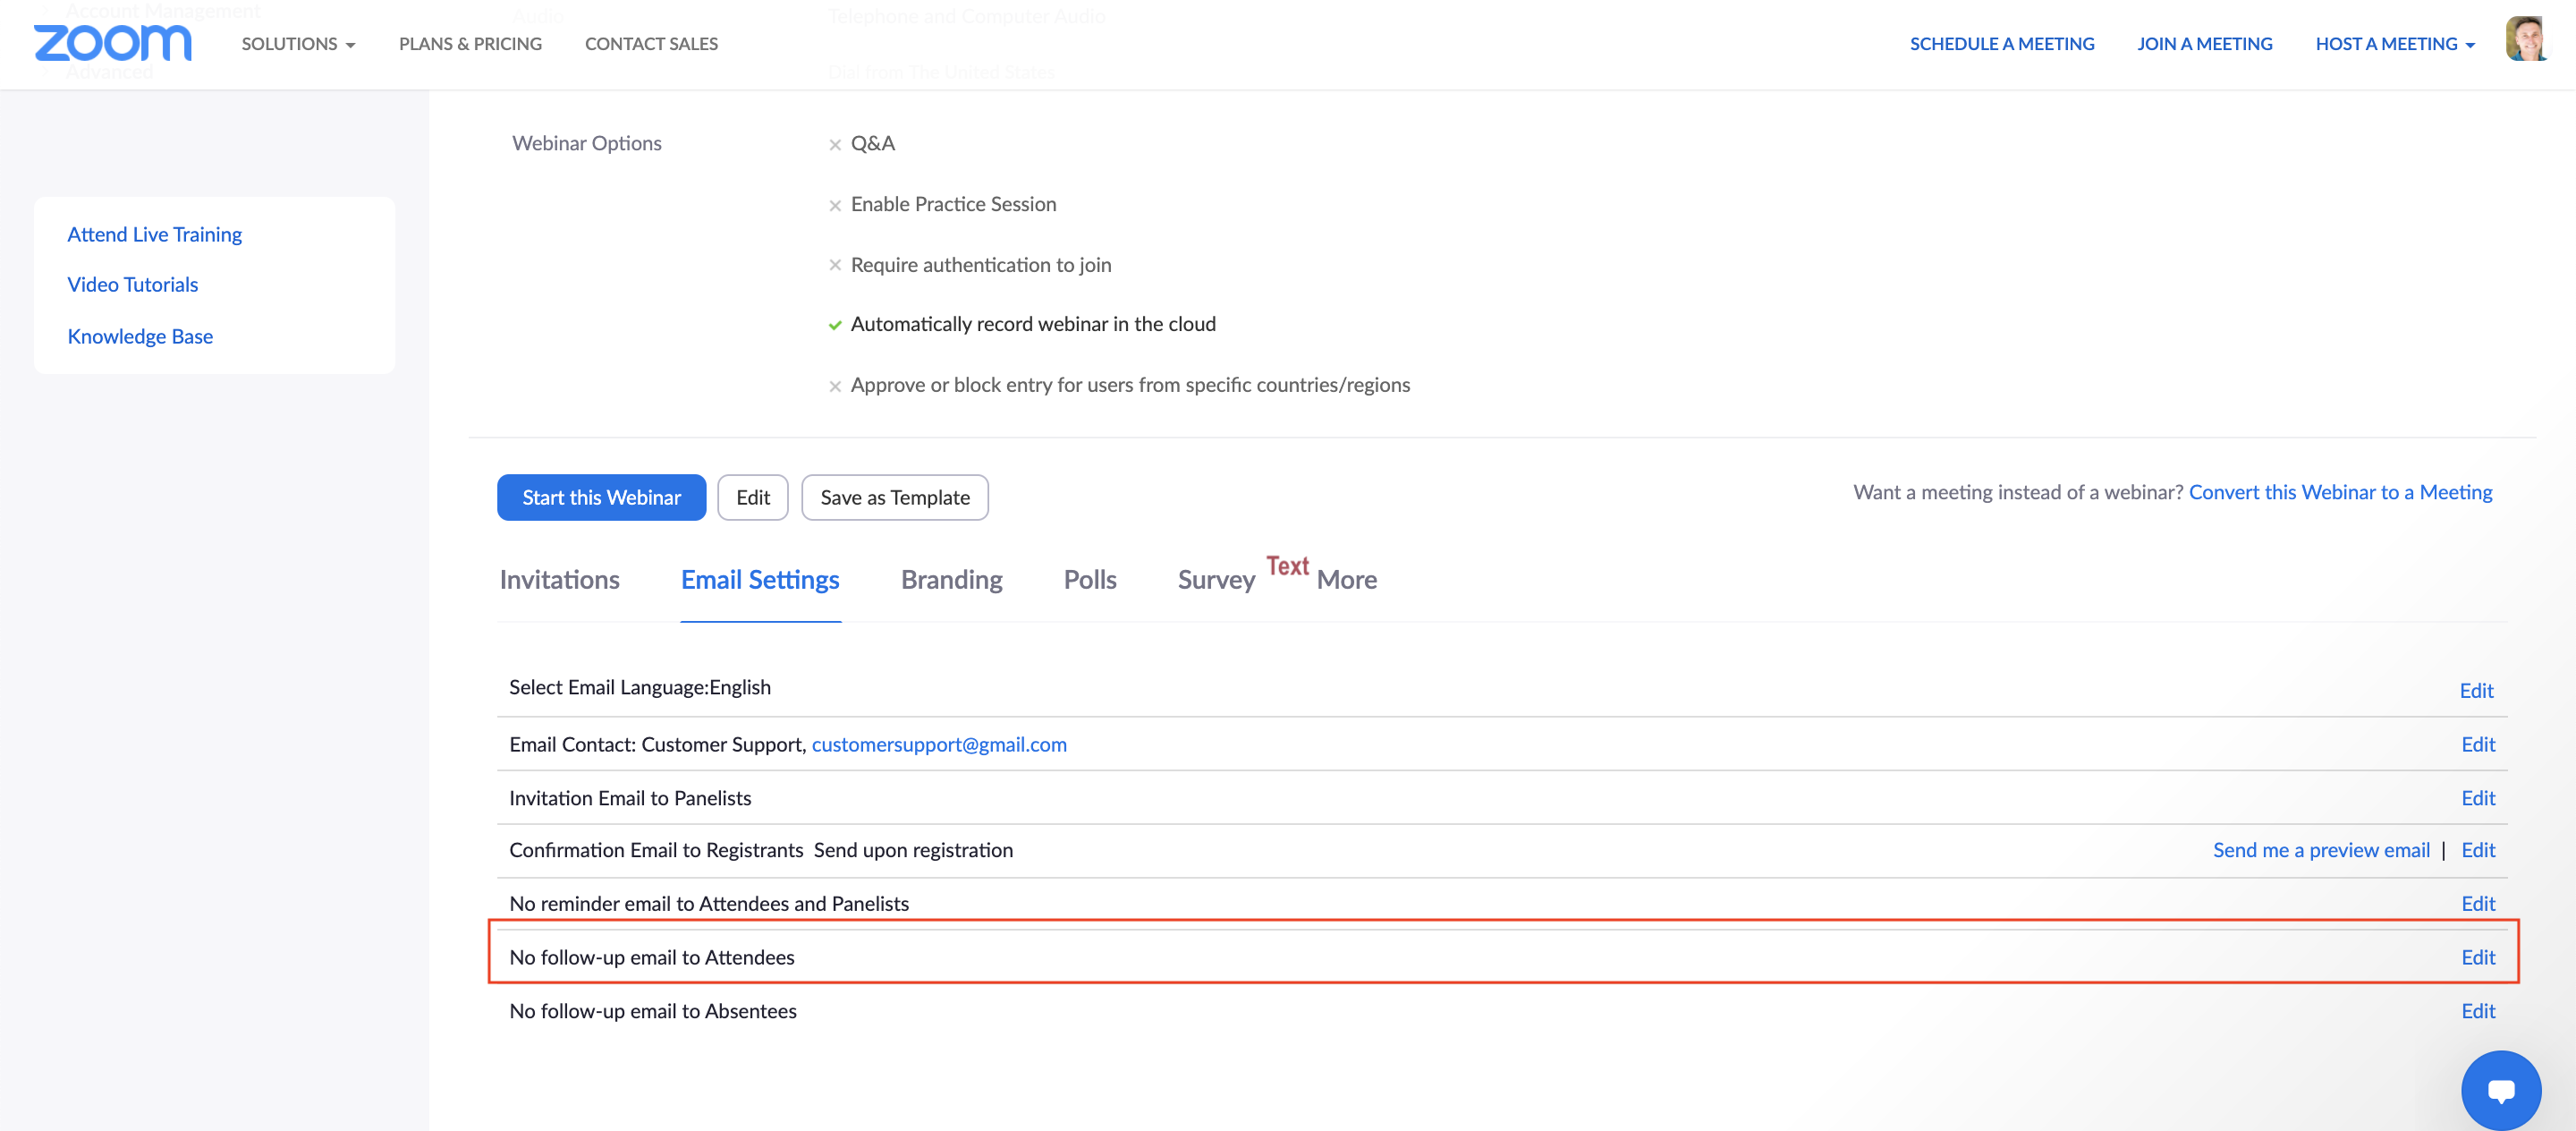
12. Click "EDIT" to Edit the Follow-Up Email for Attendees
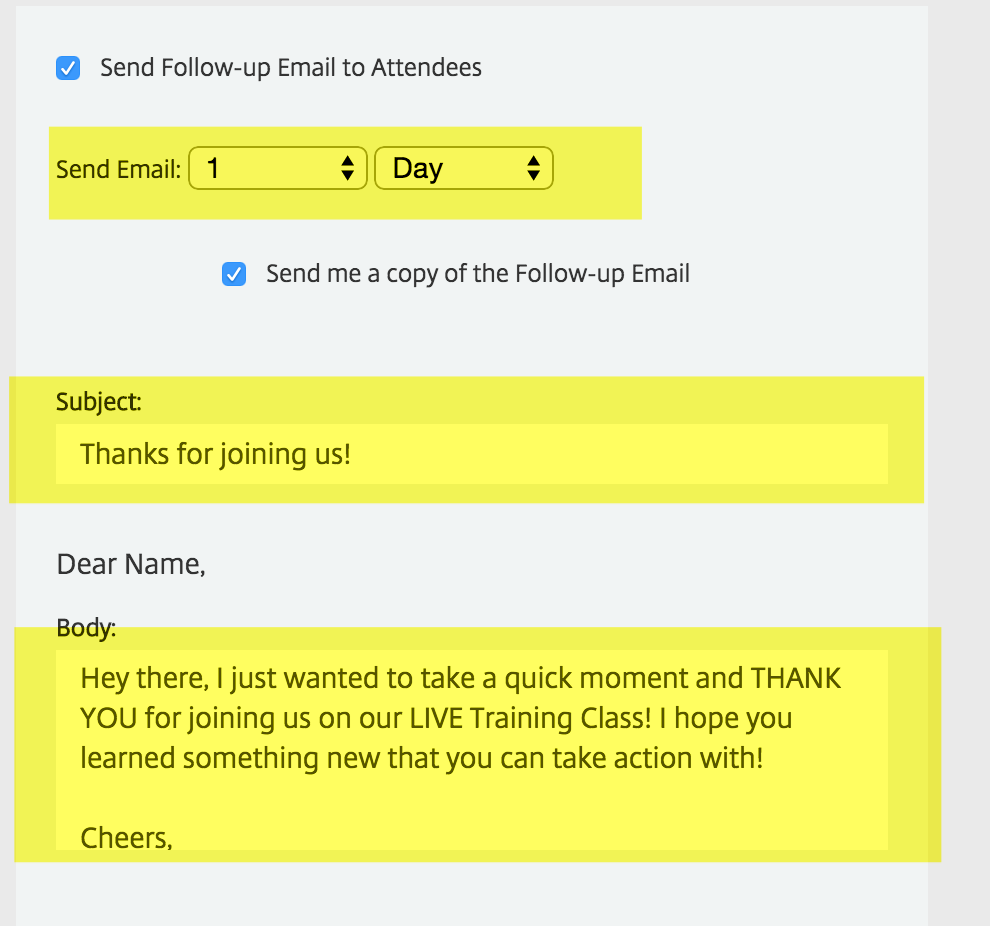
13. Edit the Follow-Up Email
Edit the Subject and email body copy
============================================
EMAIL BODY COPY:
Hey there, I just wanted to take a quick moment and THANK YOU for joining us on our LIVE Training Class! I hope you learned something new that you can take action with!
Cheers,
James Wedmore
============================================
14. Save Your Changes by Clicking the "SAVE" Button
15. DONE! That is it!
That is the final step of the GoToWebinar Webinar Event Creation Process.
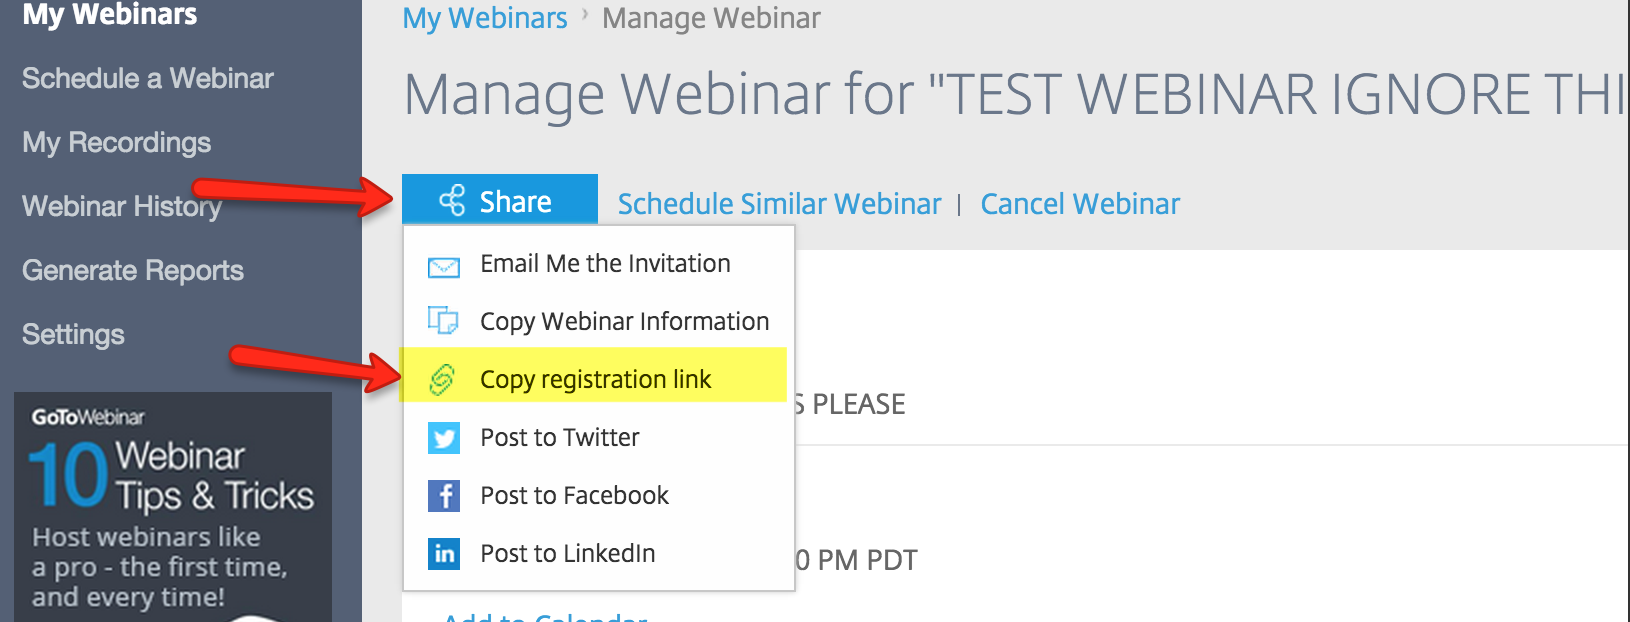
If you need to grab the "Registration URL" you can grab it from the Event Page as listed in the image below.
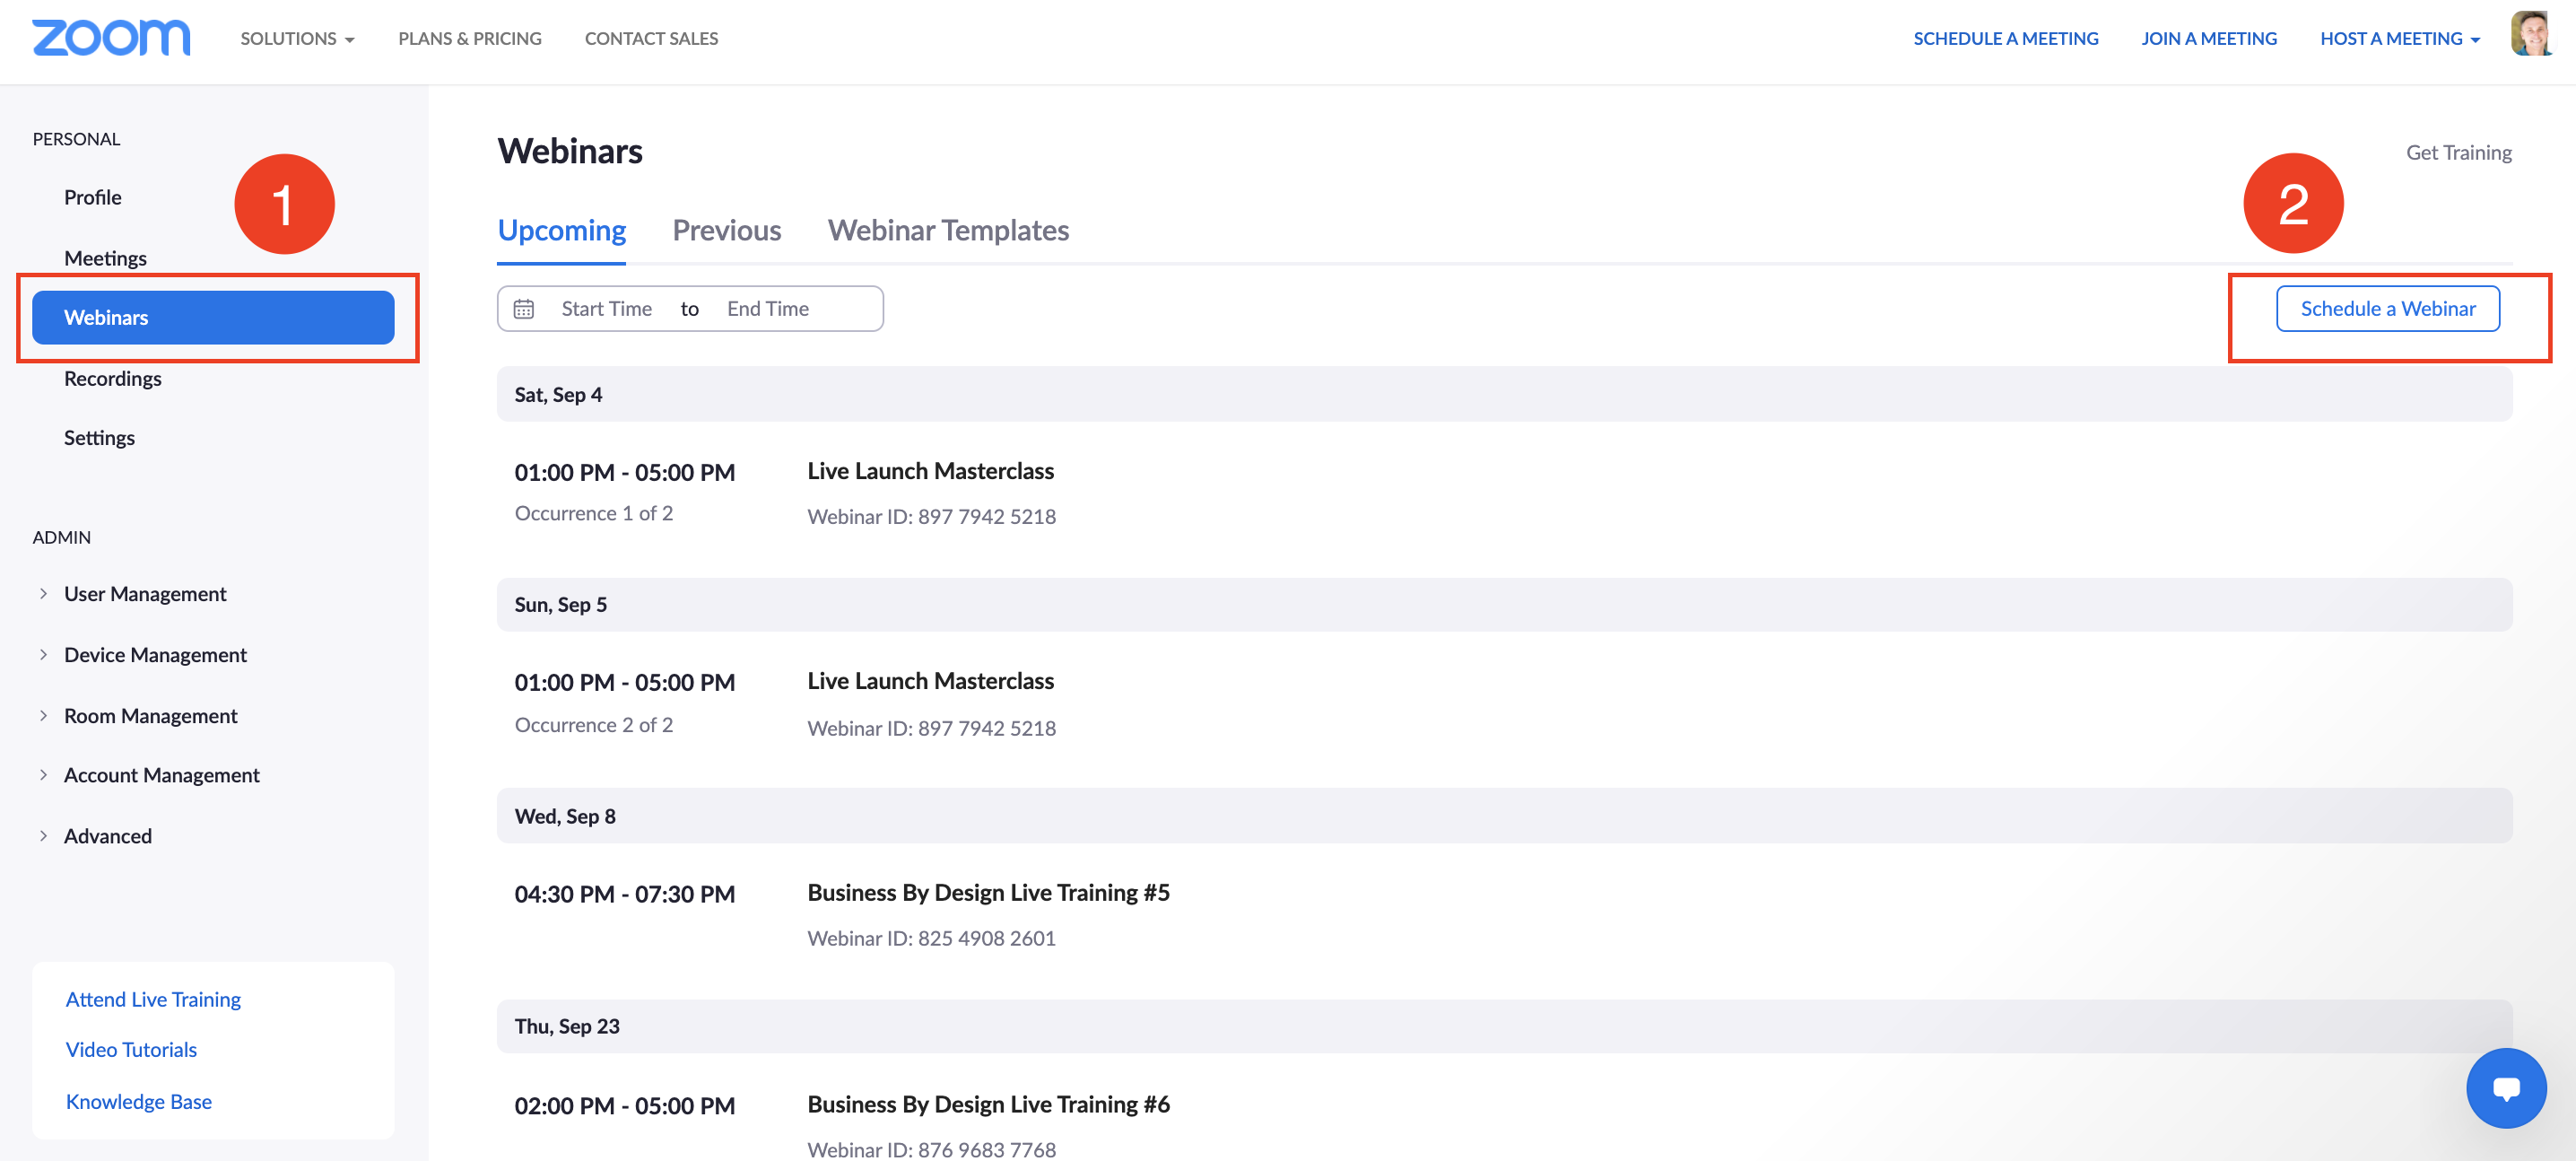
2.1 b. Zoom Event Setup
2. Select the "Webinars" Tab and then the "Schedule a Webinar" Button
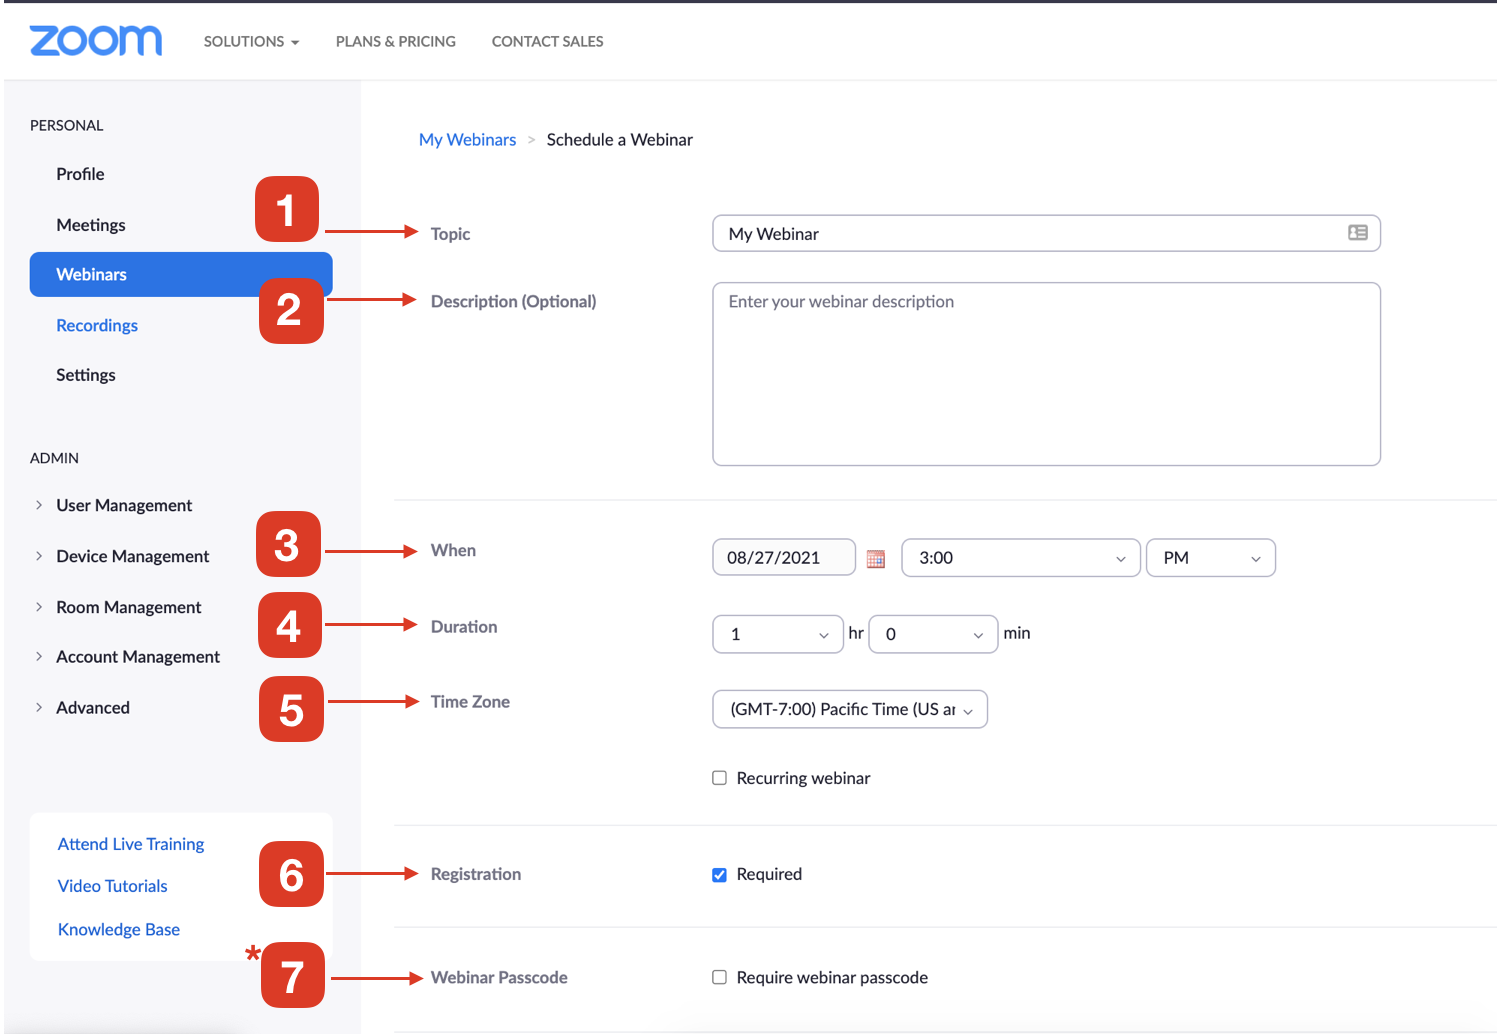
3. Fill Out the Following Forms for the Webinar
1. The Webinar Topic. This will be your Webinar Title.
2. Add a Description
3. Add Start Date and Time
4. Add the duration you think the webinar will be.
5. Webinar Time Zone (Pacific)
6: Require Registration
* 7: Optional - create a passcode to access the webinar
4. Select the "Schedule" Button at the bottom to SAVE
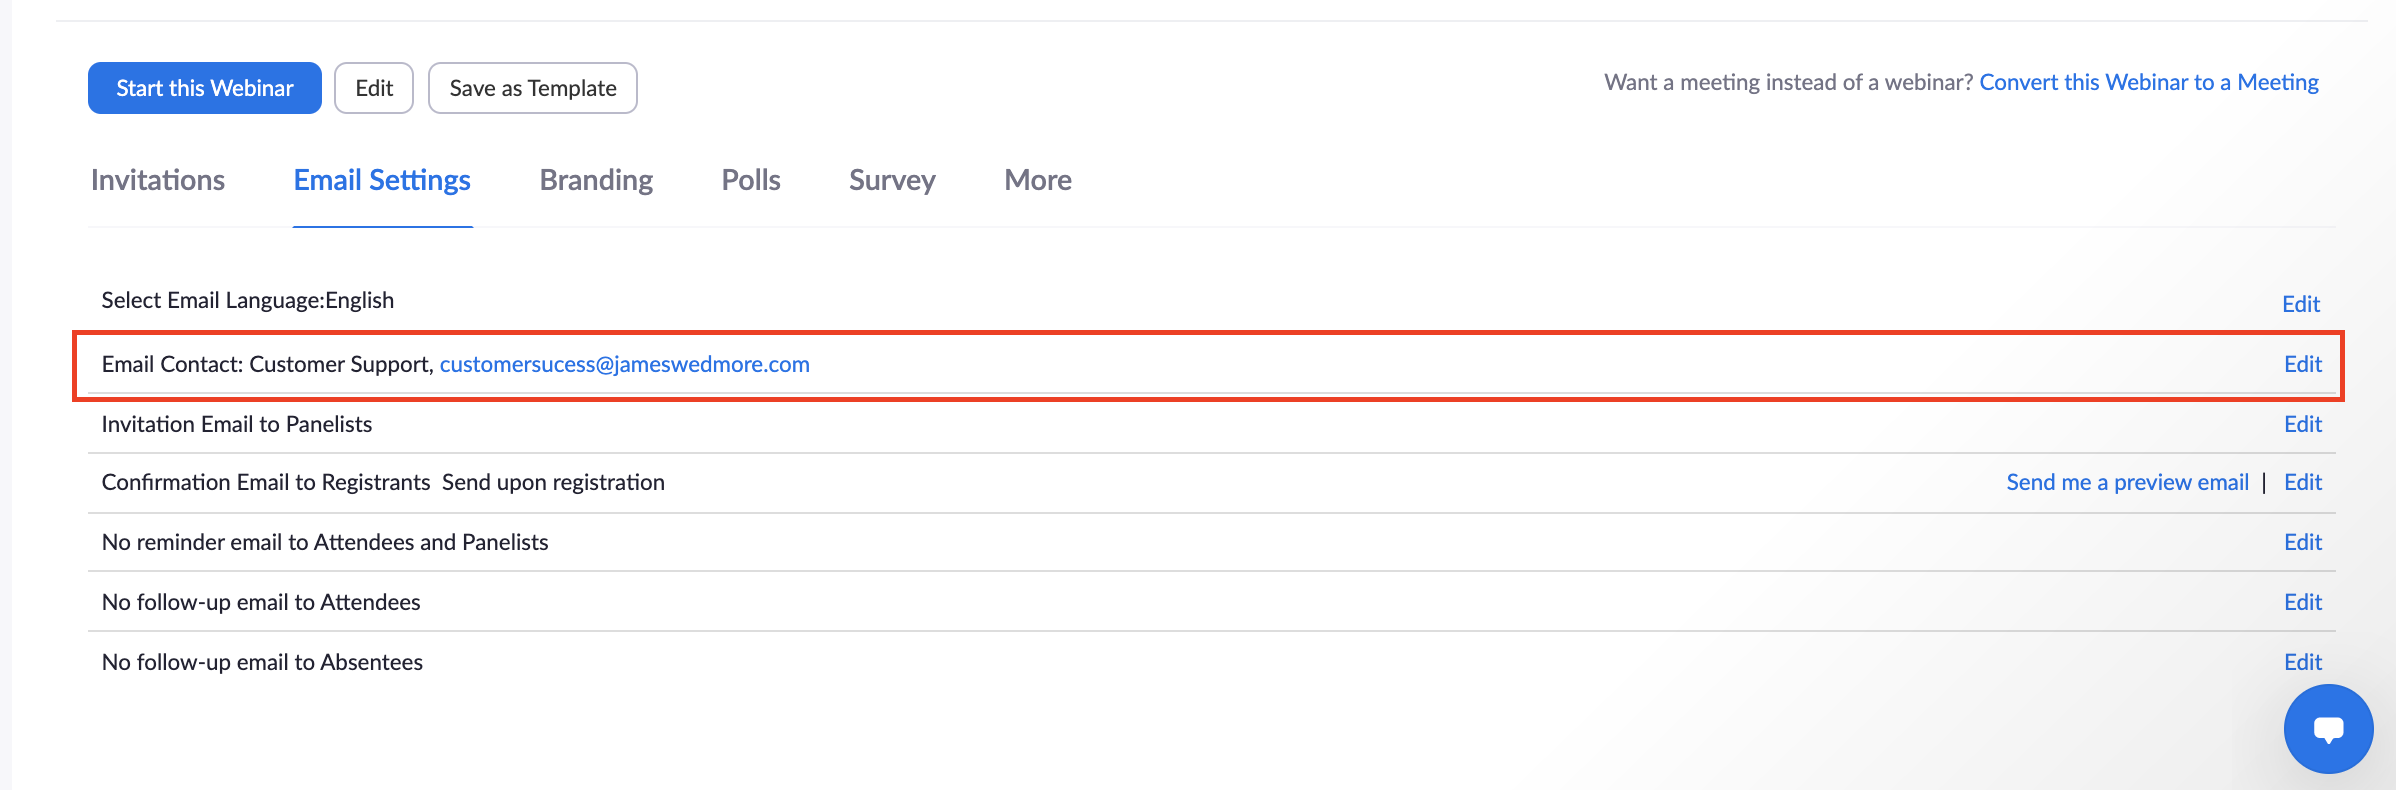
5. Click the "EDIT" button to Edit the Contact Email Address
From the "Manage Webinar" Page, simply scroll down to the EMAILS Section and select the "EDIT" button next to "Email Contact."
If your zoom account is linked to a personal email, the contact email will default to your account email address. If you are like me, you do not want your webinar registrants emailing your personal email if they have a question. You will want to ensure to edit this email address to your business or support email.
6. Click the "EDIT" button to Edit the Confirmation Email
From the "Manage Webinar" Page, simply scroll down to the EMAILS Section and select the "EDIT" button next to "Confirmation Email to Registrants."
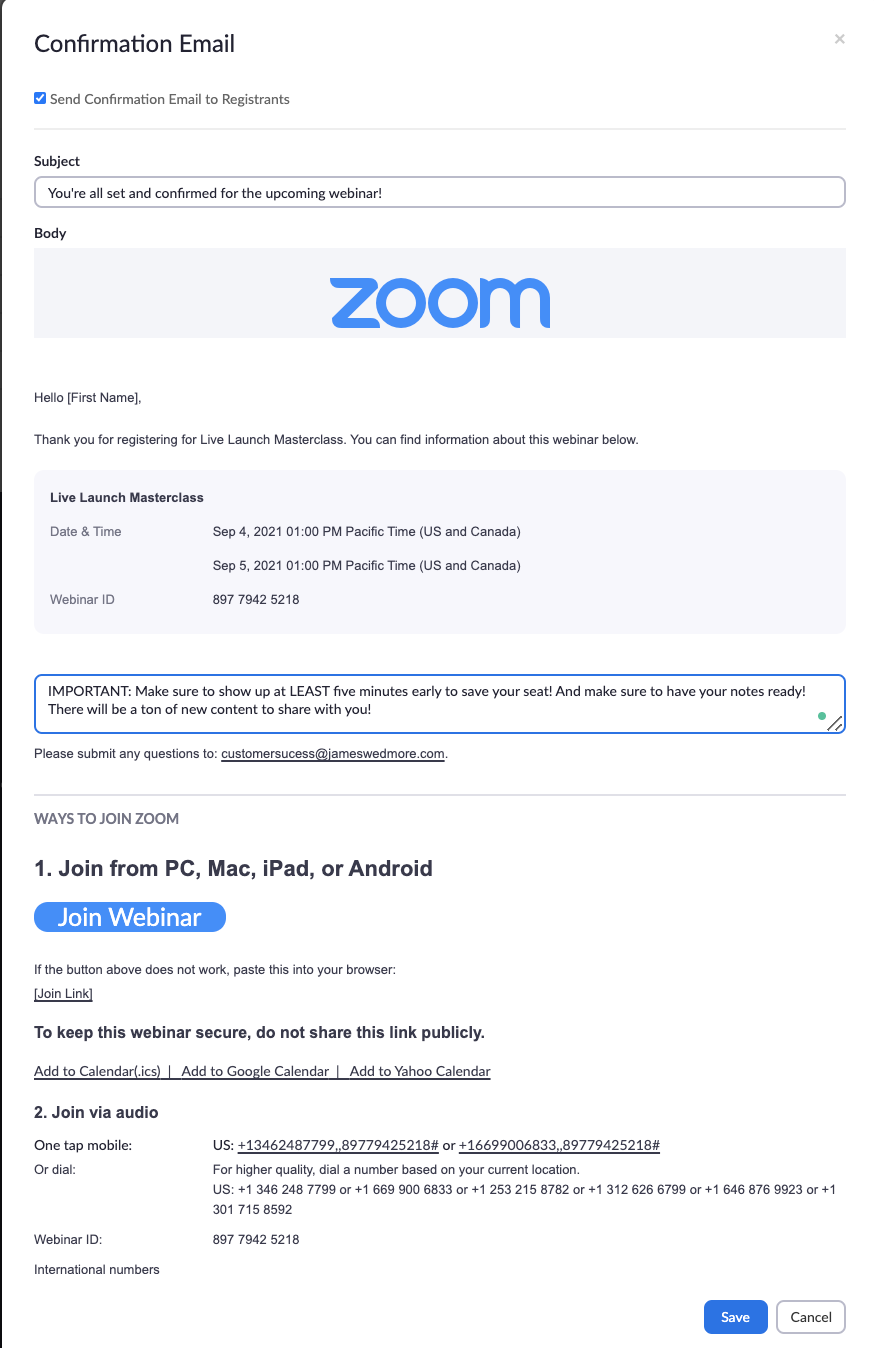
7. Add the EXACT Text to Subject Line and Email Body As Seen In Image
Add the EXACT subject line and "custom text" as seen in the image below
8. Click "Save" to Save the Email Template
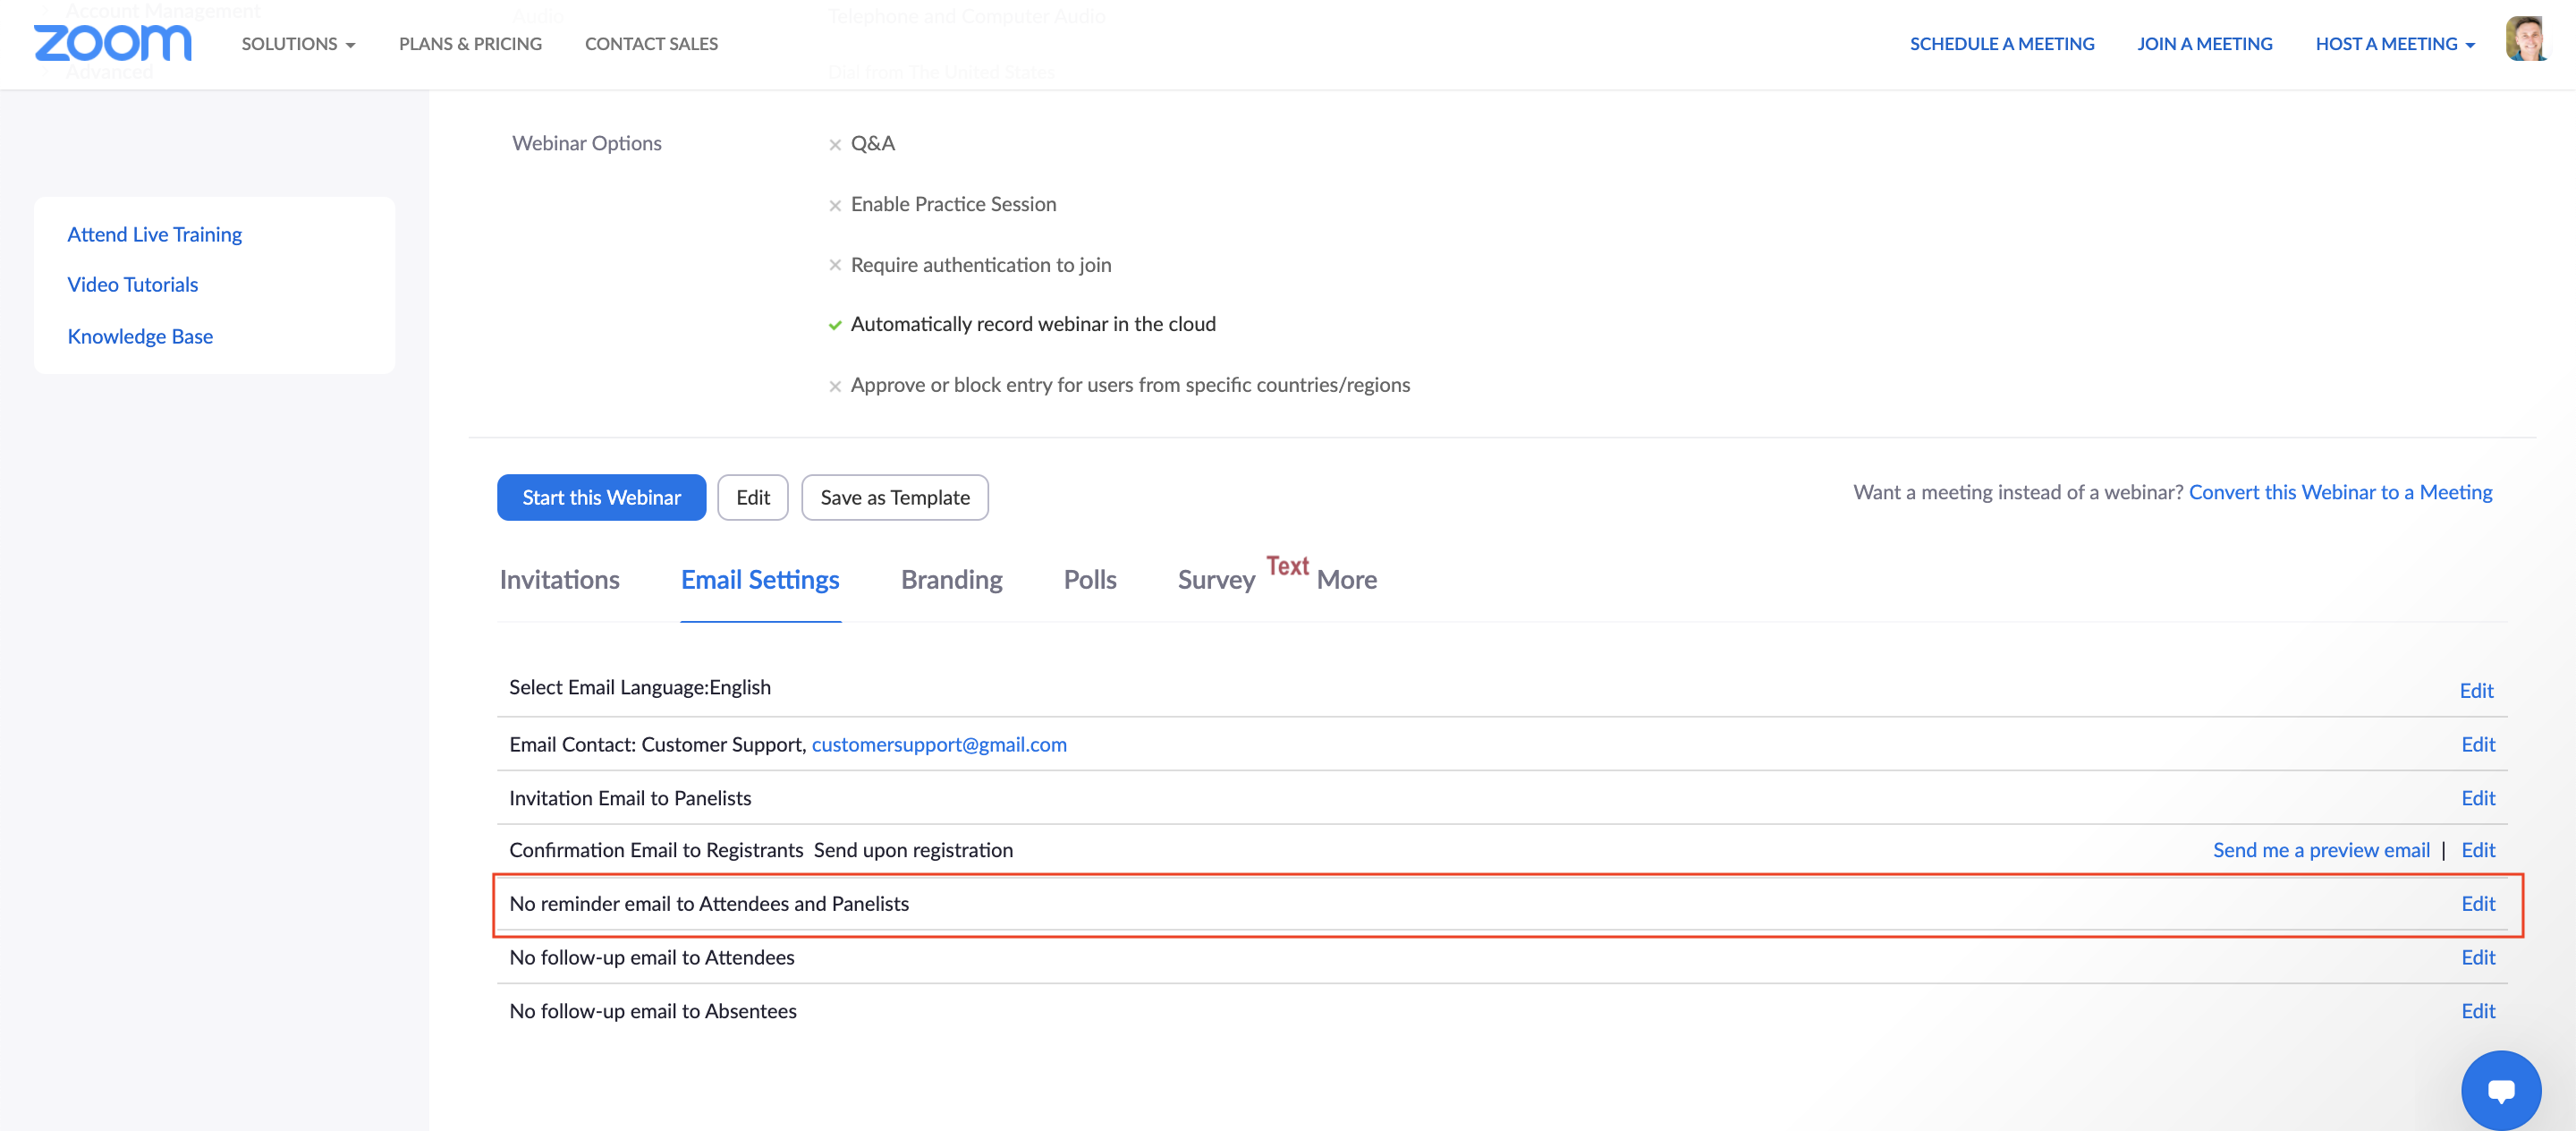
9. Click "EDIT" to Edit the REMINDER EMAILS
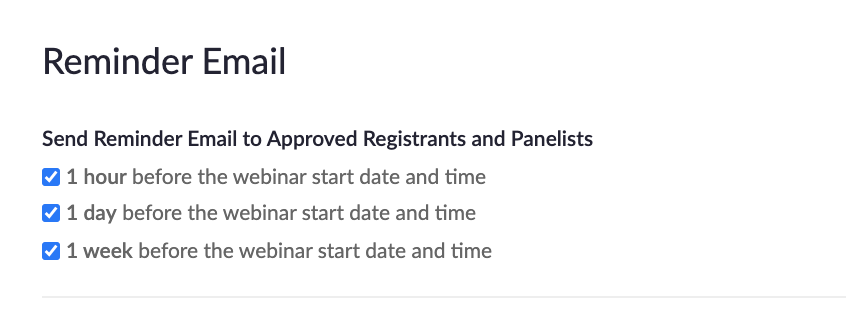
10. Set the Following Reminder Schedule
Use the image below to replicate our exact reminder schedule.
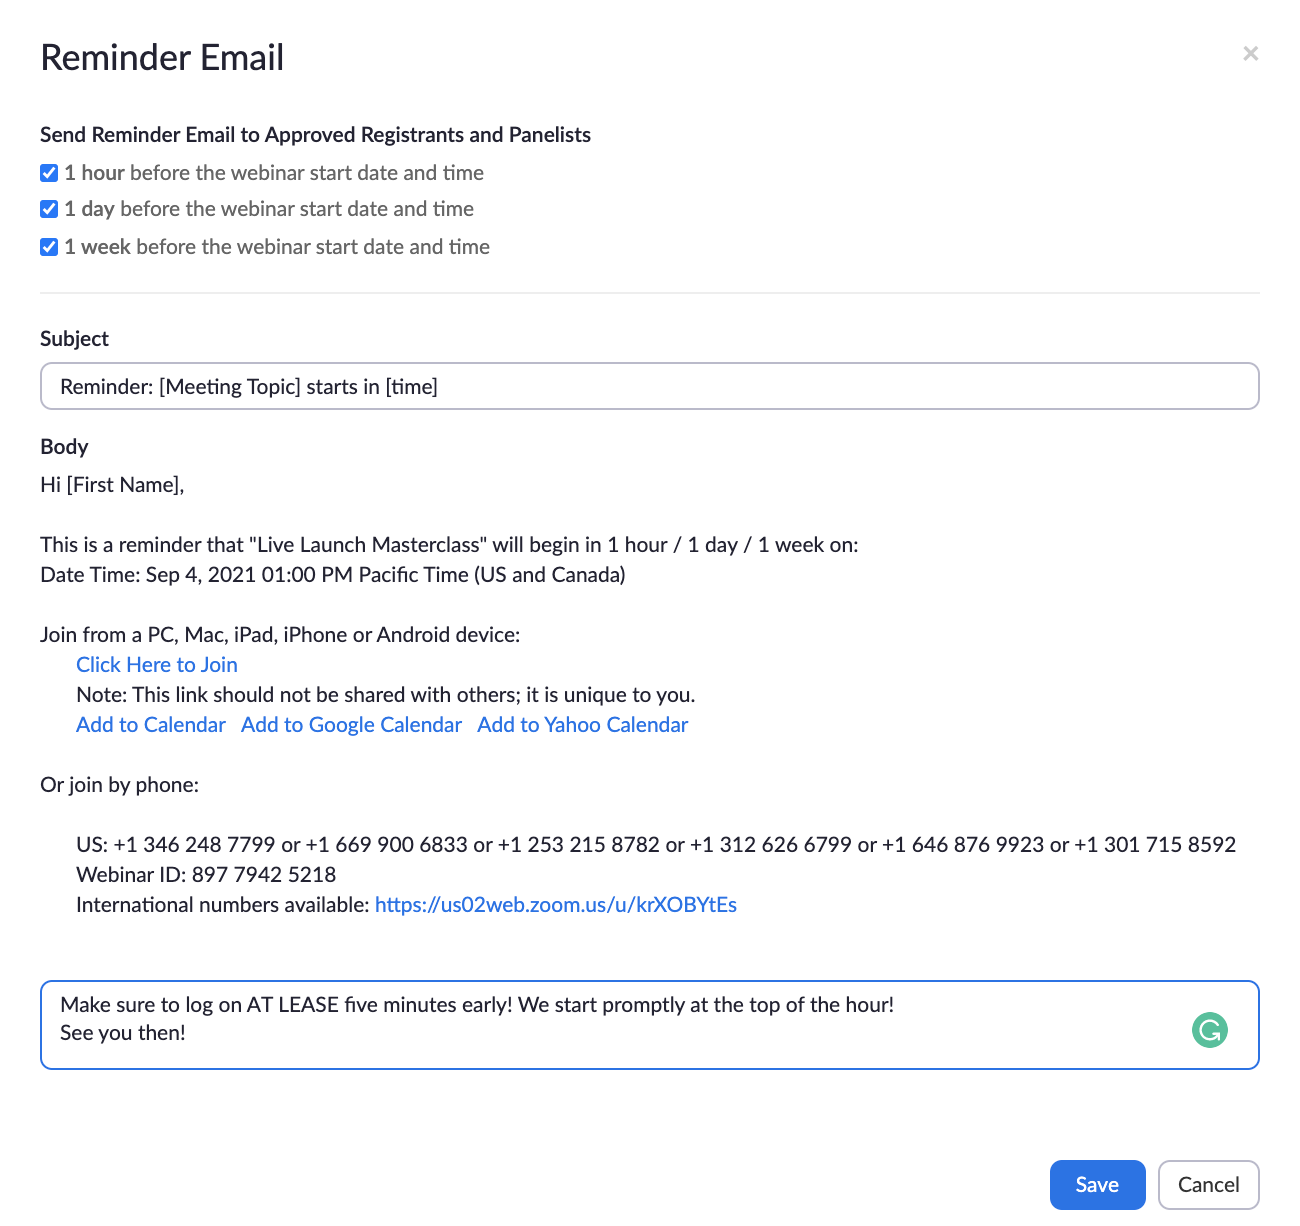
11. Add the Following "Custom Text" to the Reminder Emails
Please refer to the image below...
12. Save the Email Templates by Clicking the "SAVE" Button
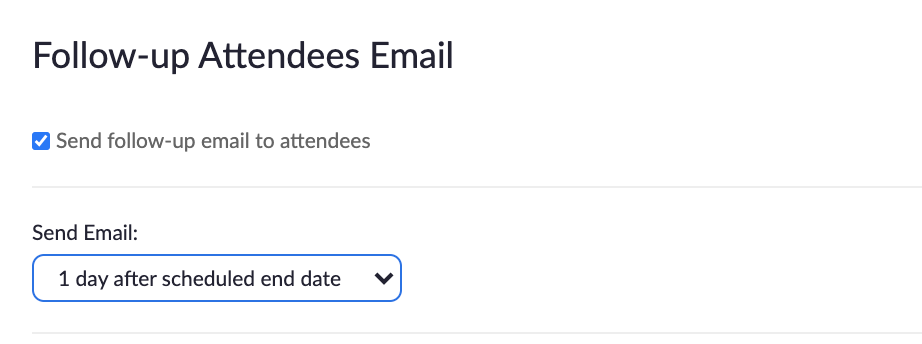
13. Click "EDIT" to Edit the Follow-Up Email for Attendees
Set the followup email to send out 1 day after the scheduled webinar.
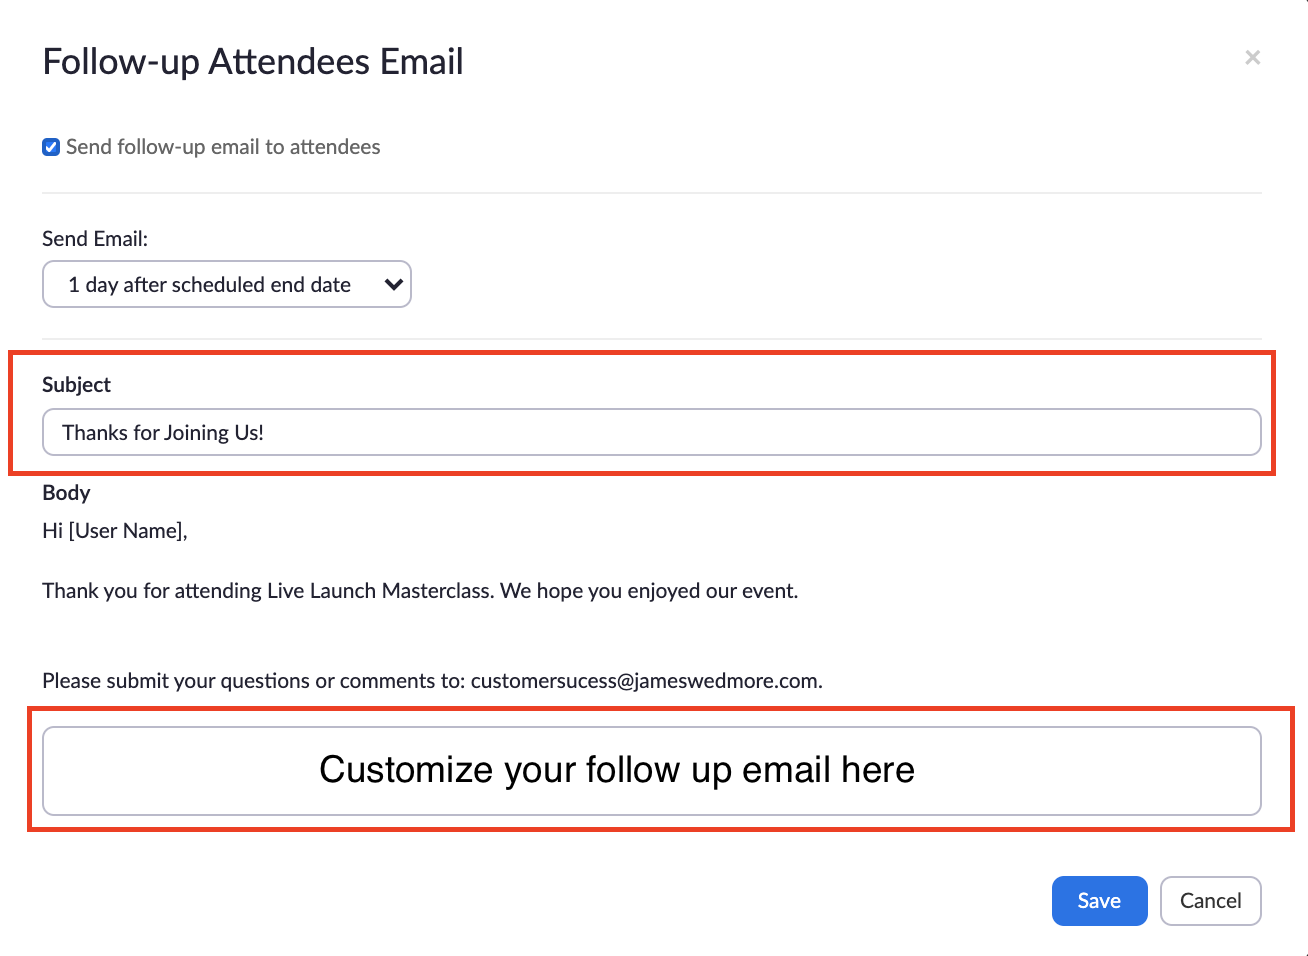
14. Edit the Follow-Up Email
Edit the Subject and email body copy
============================================
EMAIL BODY COPY:
I just wanted to take a quick moment and THANK YOU for joining us on our LIVE Training Class! I hope you learned something new that you can take action with!
Cheers,
James Wedmore
============================================
15. Save Your Changes by Clicking the "SAVE" Button
16. DONE! That is it!
That is the final step of the Zoom Webinar Event Creation Process.
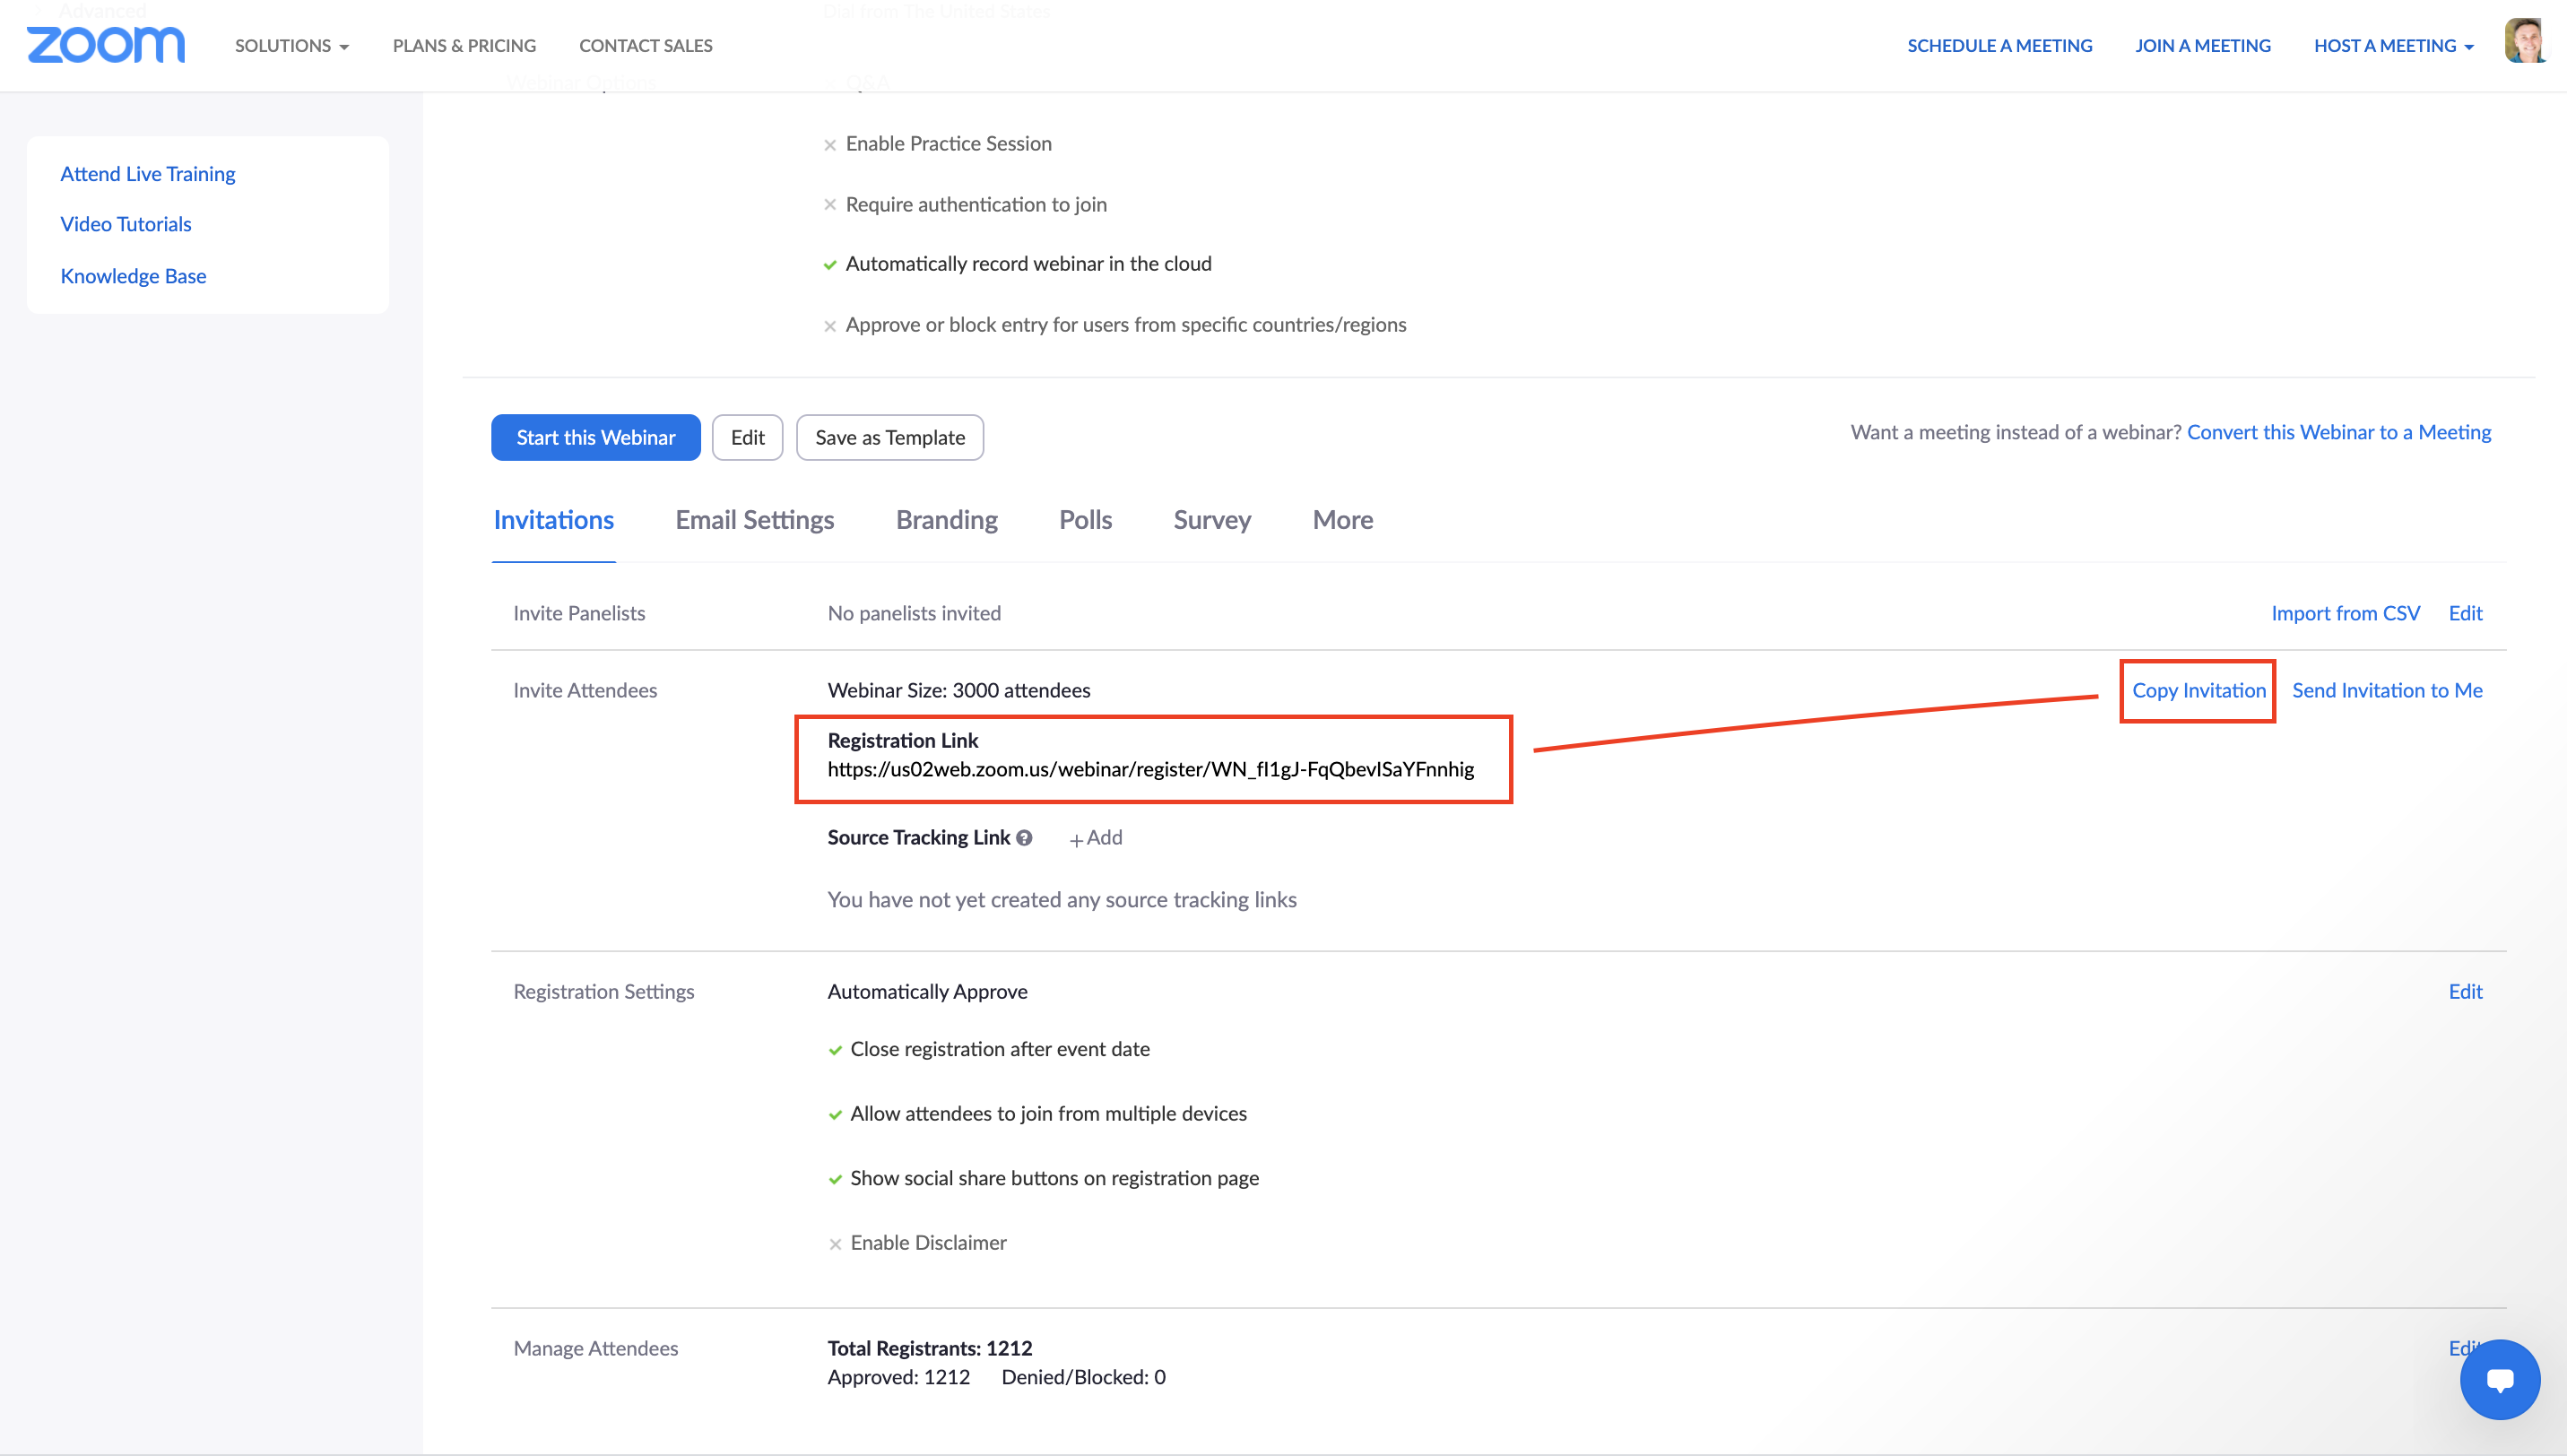
If you need to grab the "Registration URL" you can grab it from the Event Page as listed in the image below.
2.2 The Webinar Registration Page
In 2.2, you're actually going to CREATE your Webinar Registration Page using Instapage. We have included some basic steps here, but please refer to Instapage' for any updates and changes to their software.
This process can be done on any page building software of your choice, like Kajabi, for example.
Example of Completed Webinar Registration Page:
Your Registration Page will need the following ingredients:
-
A Clear, Concise, and Attention-Getting Headline
-
A Picture of You (the Presenter)
-
The Words "LIVE"
-
The Date/Time with Time Zones
-
A Call To Action Button (above the fold!)
-
Countdown Timer to Webinar Start Date
1.Log into Instapage
Instapage
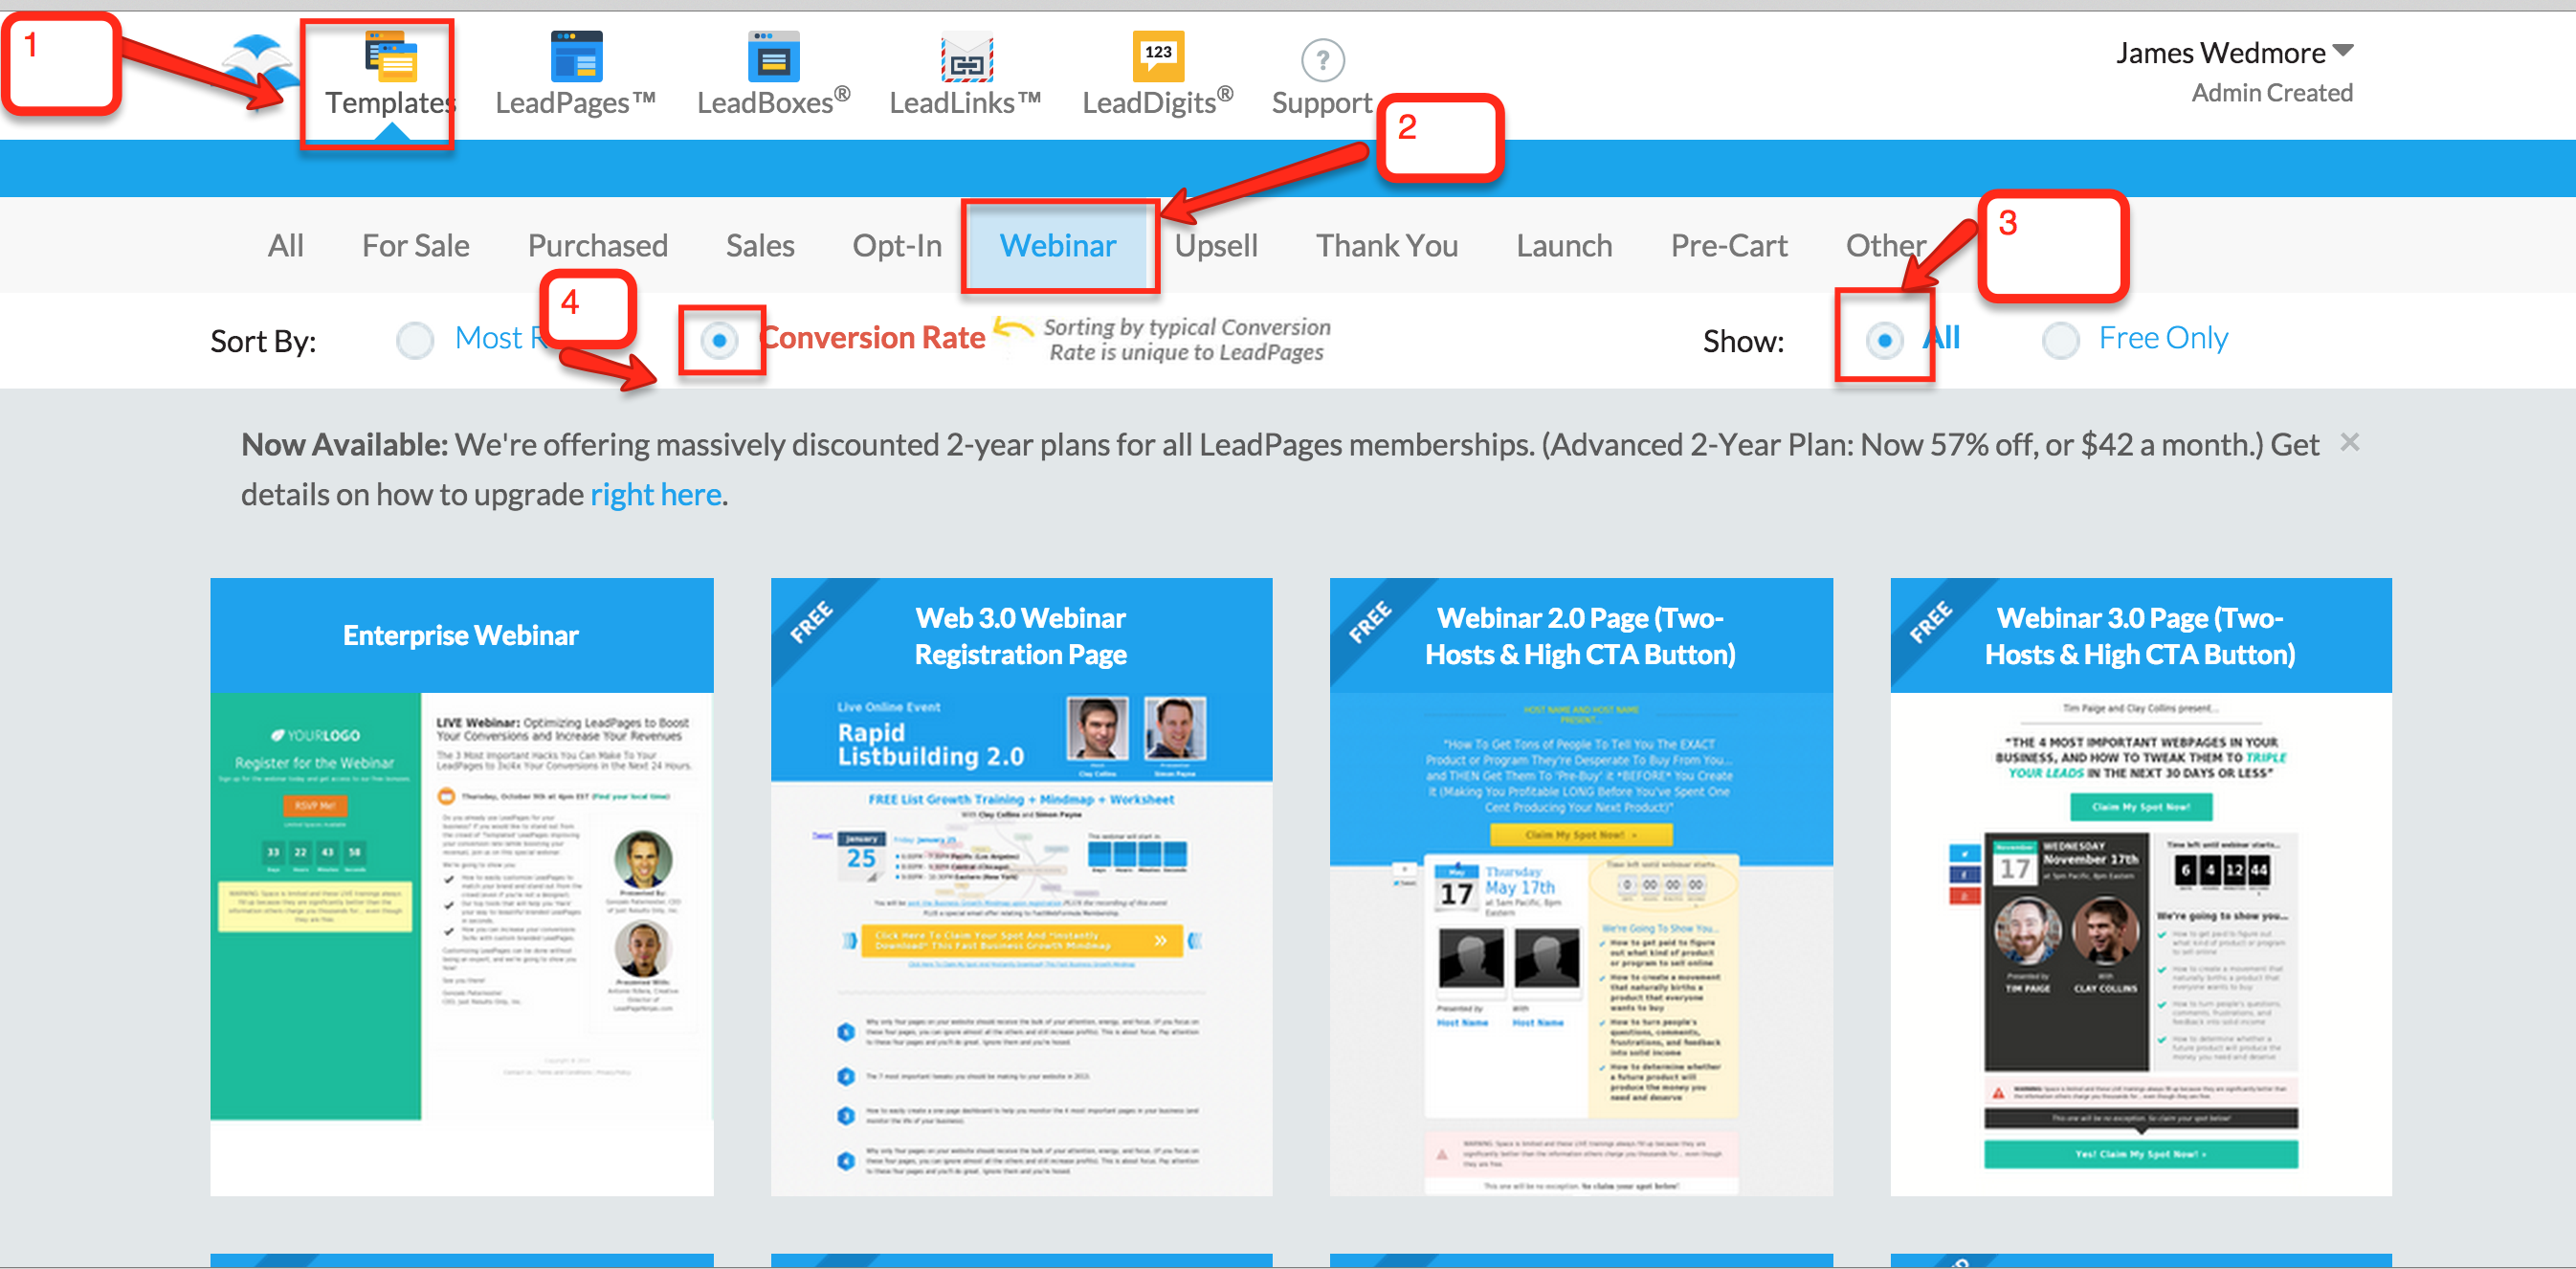
2. Sort Templates by Highest-Converting Webinar REG. Pages
Follow the 4 Steps in the graphic below to sort by the BEST Templates for Webinar Registration Pages inside LeadPages.
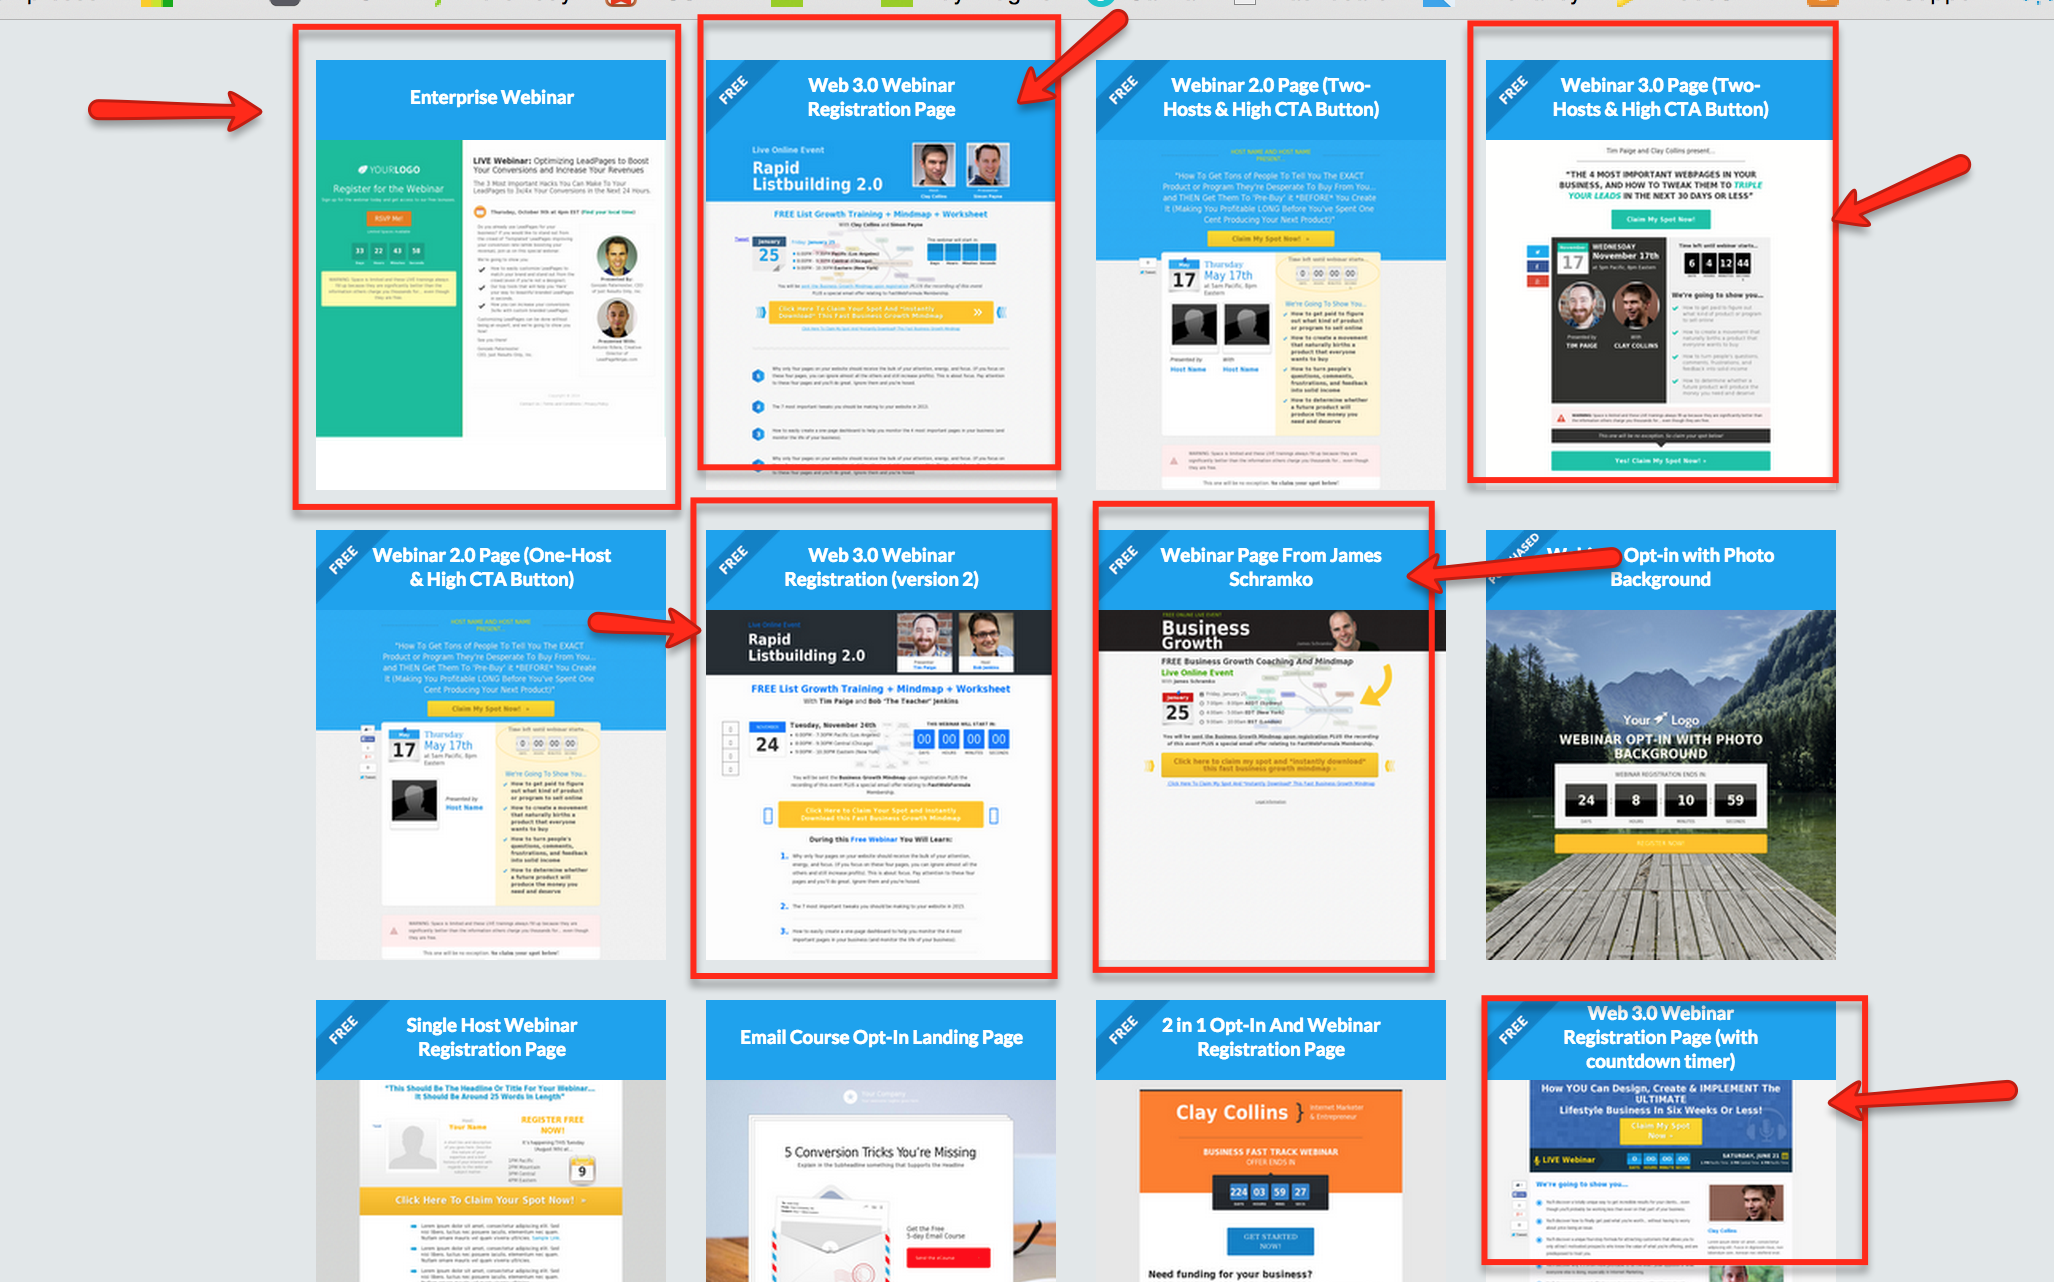
3. Select an Appropriate Template for the Webinar Registration Page
Select an appropriate template... I've pointed out a few I like.
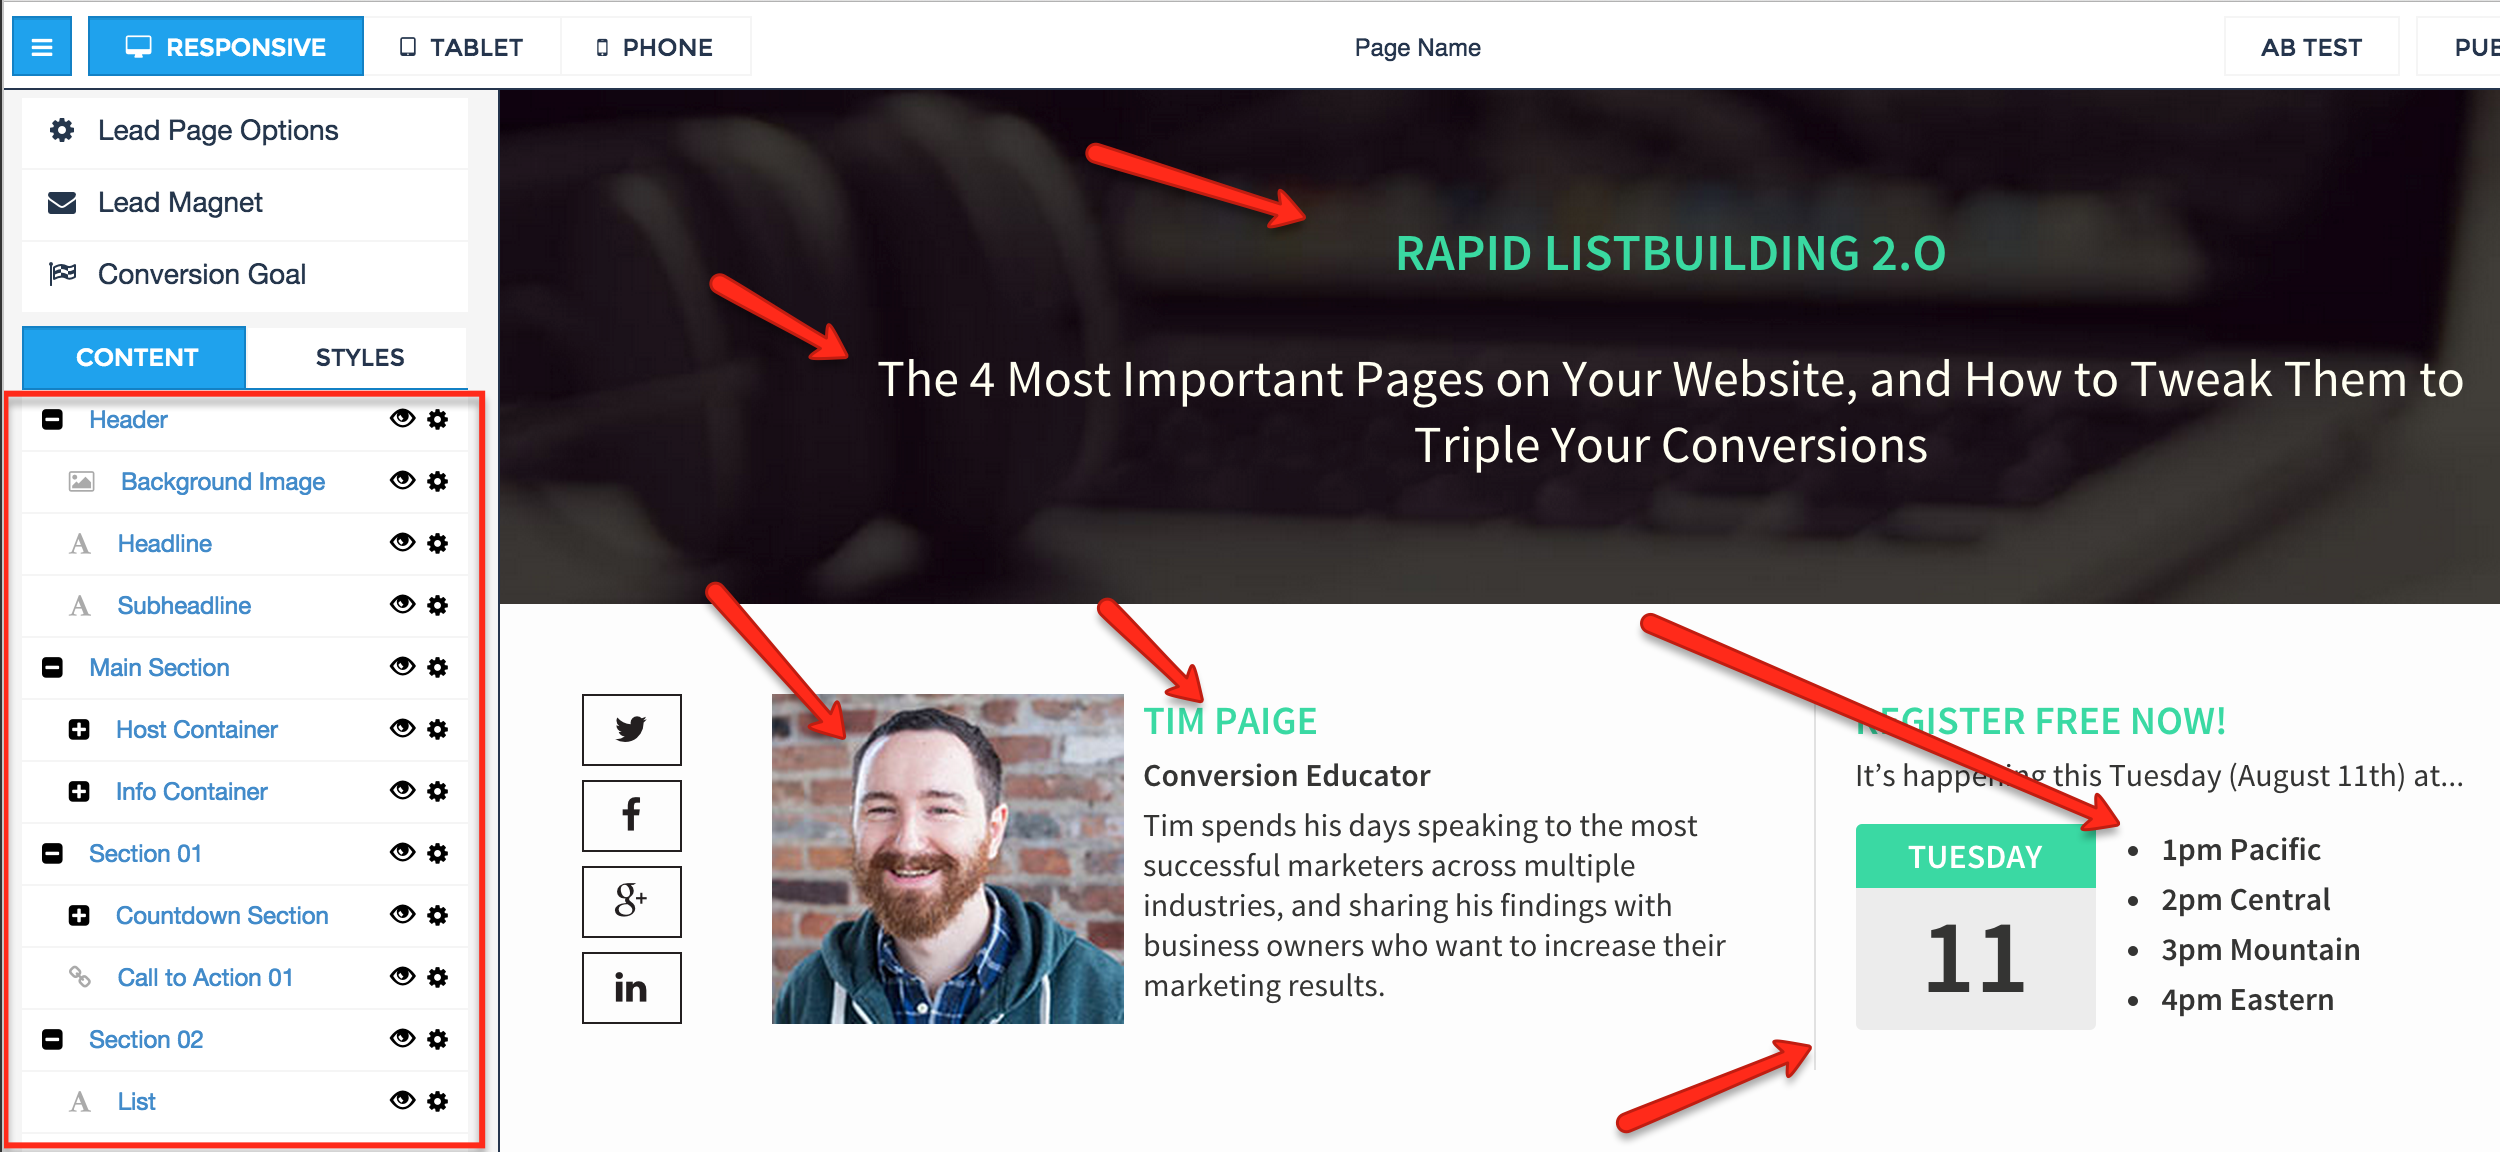
4. Edit and Customize the Copy/Text/Images
Do your best to customize and edit the copy:
1. Make sure any date/time info is 100% accurate.
2. Add any relevant images if needed.
3. Include a Countdown Timer.
...and anything else that you think needs editing/adjusting
Note: Don't try to change the formatting/colors, etc.
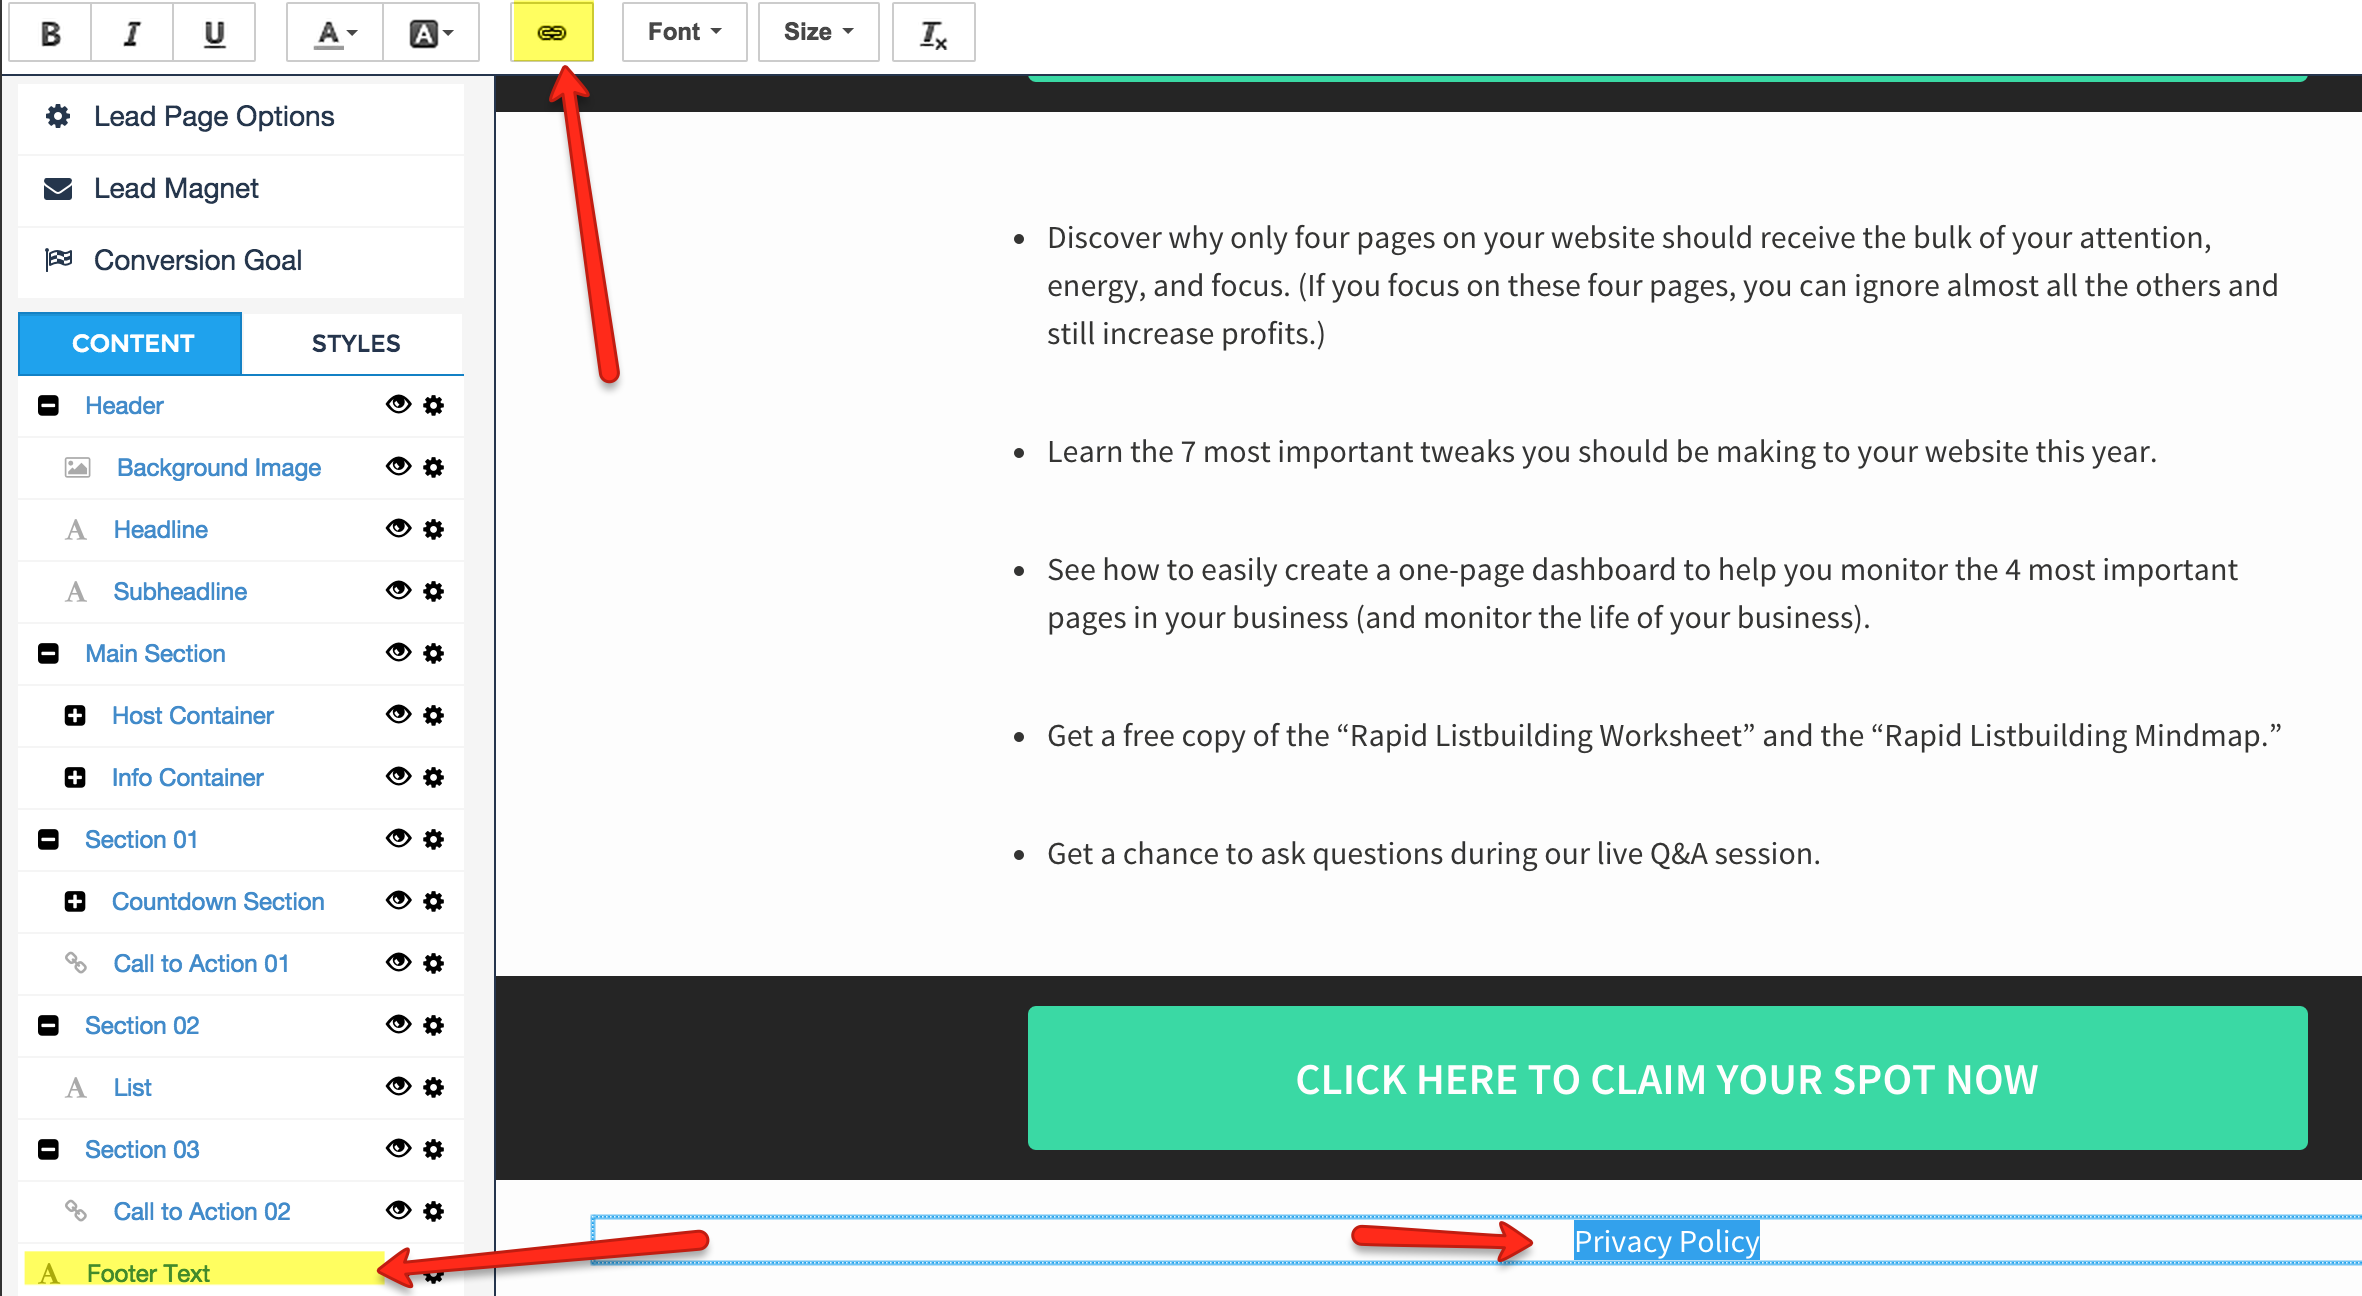
5. Insert Your Privacy Policy LINK in the Footer
Make sure your Privacy Policy has been added as a Clickable Link in the Footer.
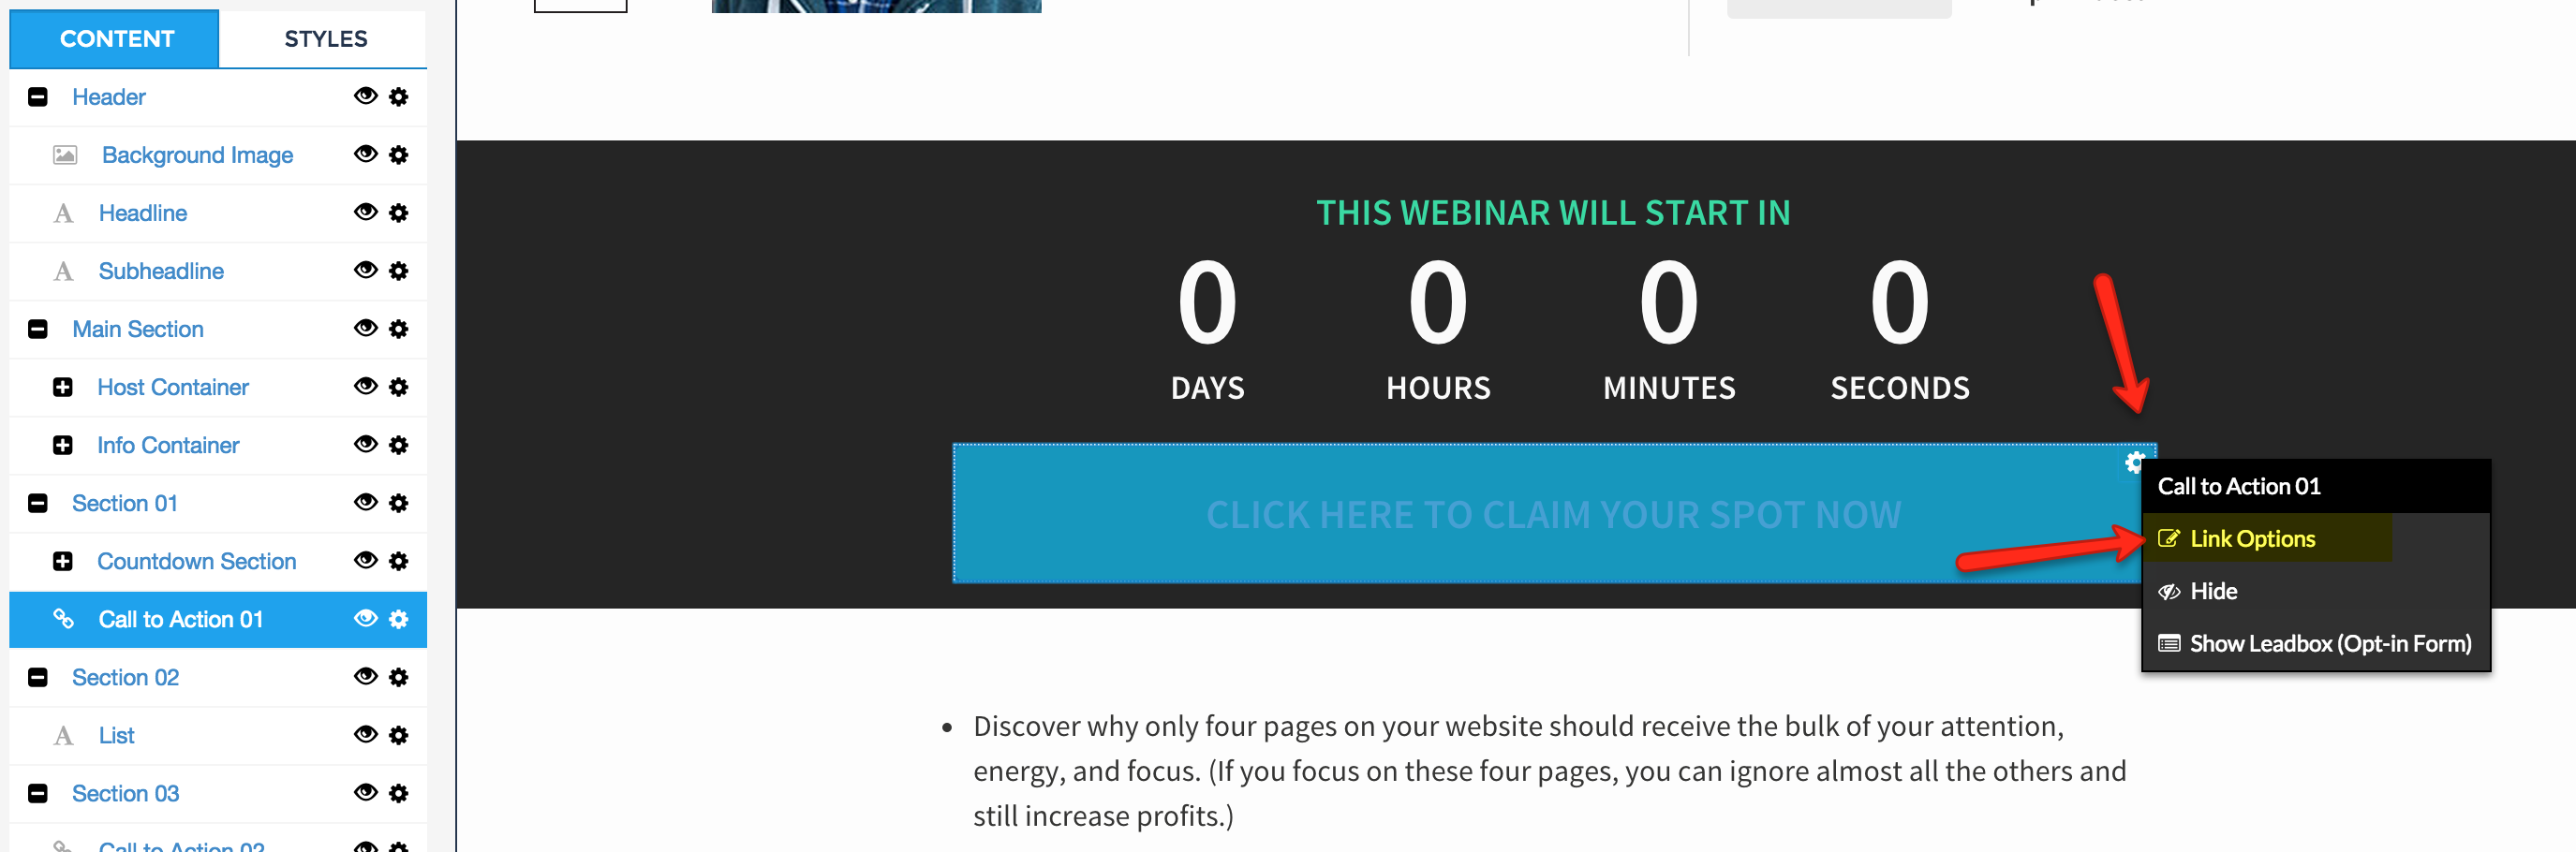
6. Click the "Link Options" Button from the GEAR WHEEL on the Call To Action Button
Every page will have a big Call To Action button. Hover your mouse over the button to display the small gear wheel in the upper right hand corner.
Click the gear wheel to display a dropdown menu and select the "Link Options" button.
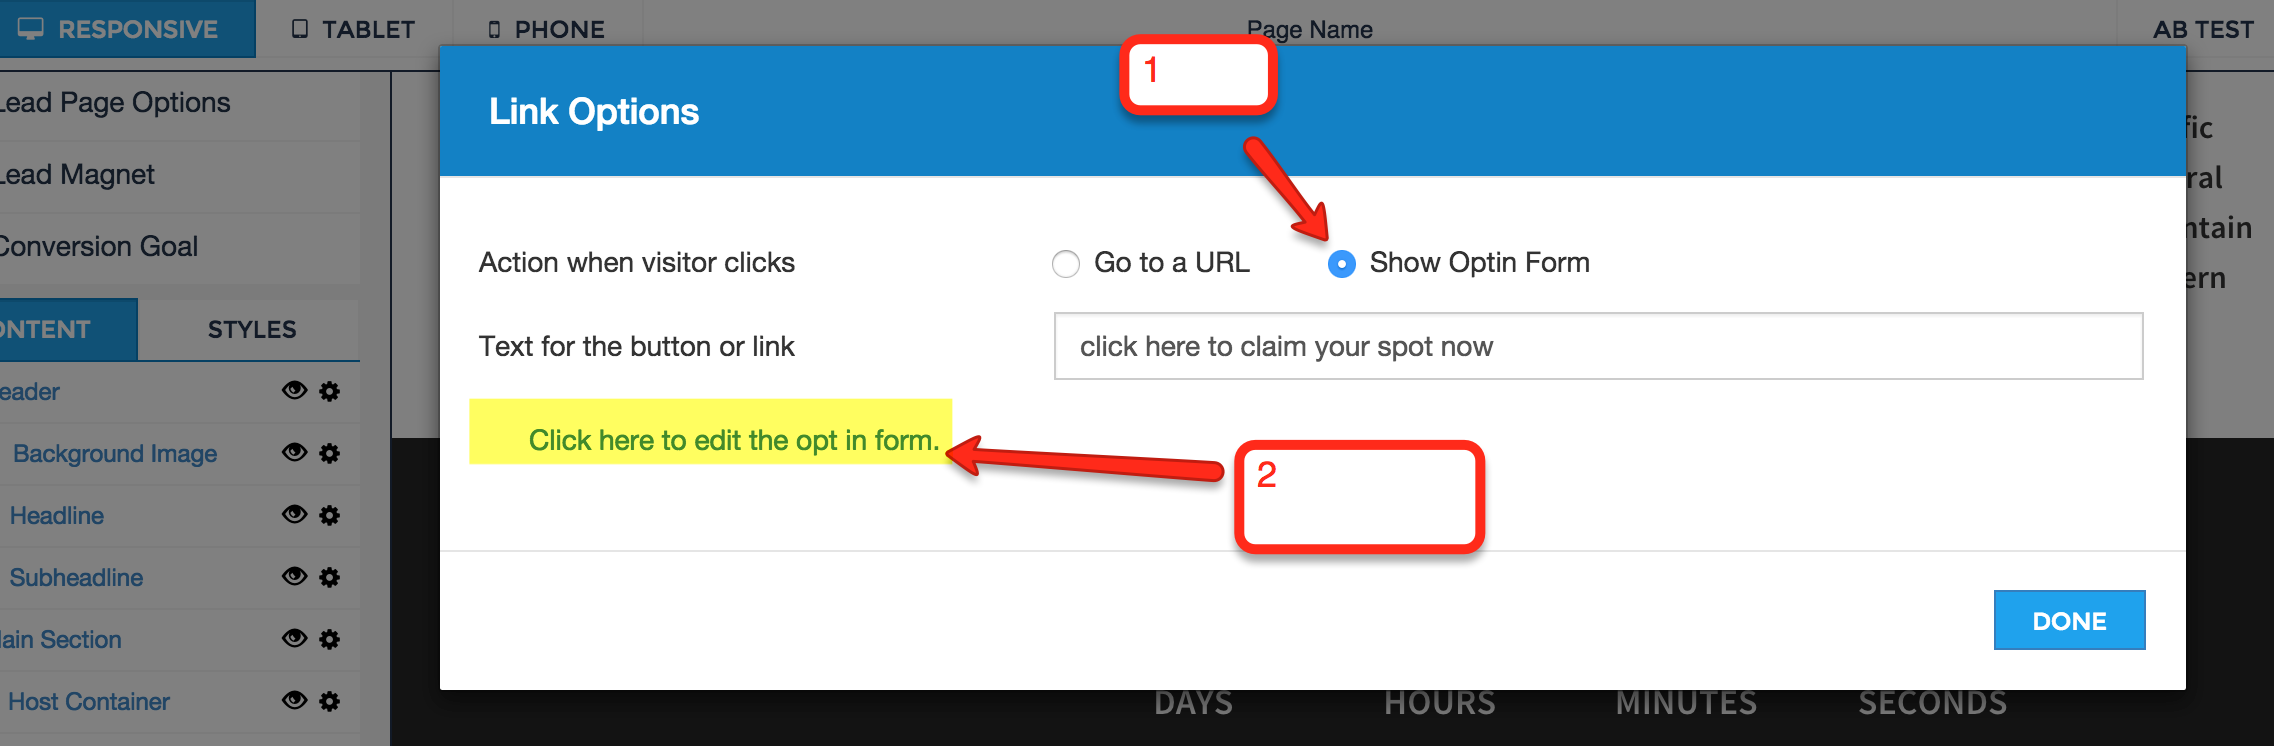
7. Edit the Opt-In Form Integration Settings
From the Lightbox...
1. Make sure "Show Opt-In Form" is selected
2. Click on the link: "Click Here to edit the opt in form"
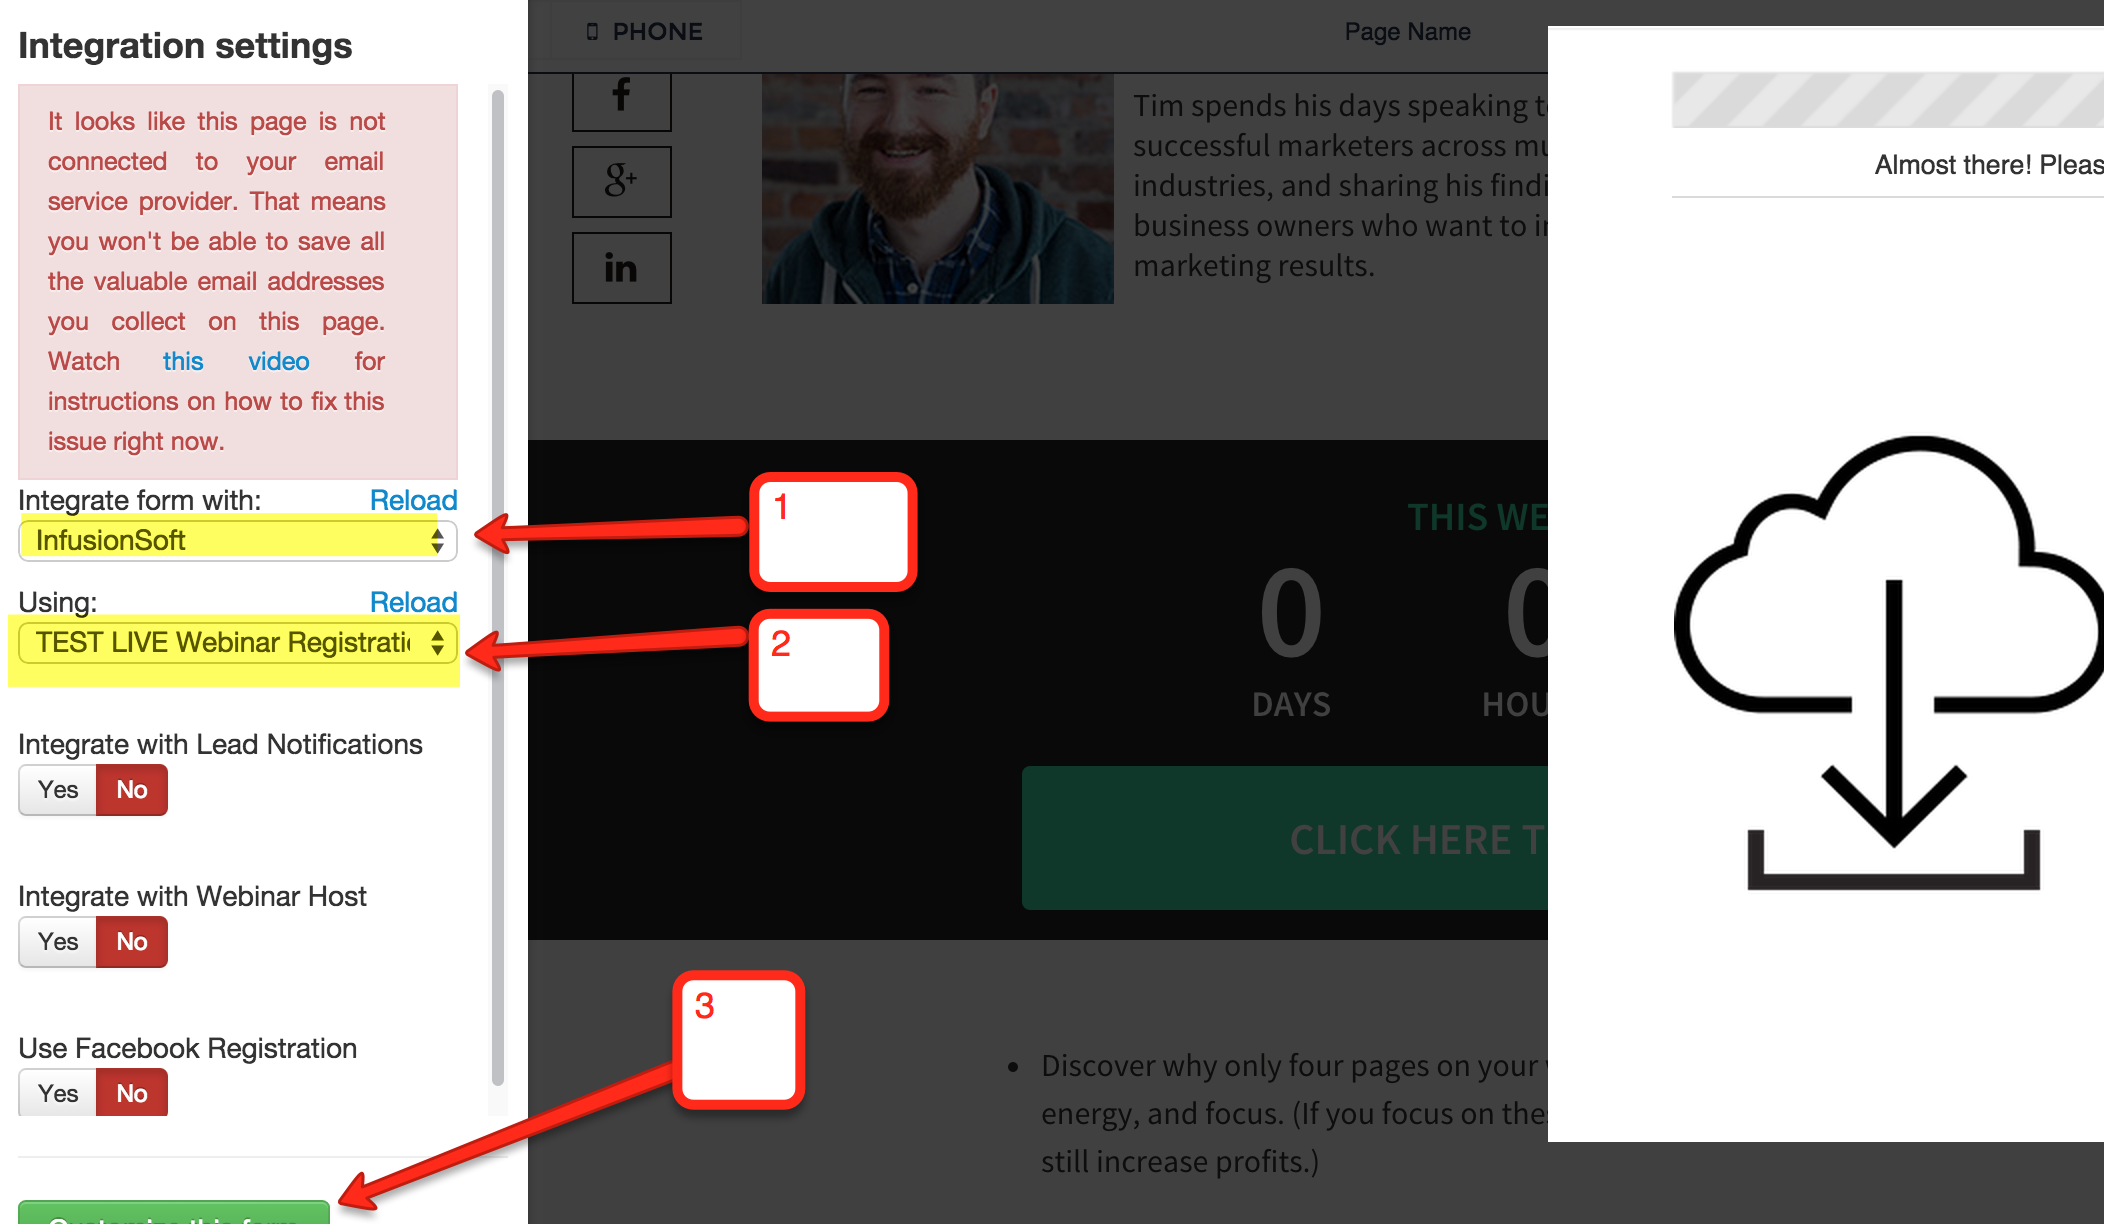
8. Integrate Your Page with Infusionsoft & Your Web Form
1. Select Infusionsoft from the first dropdown menu.
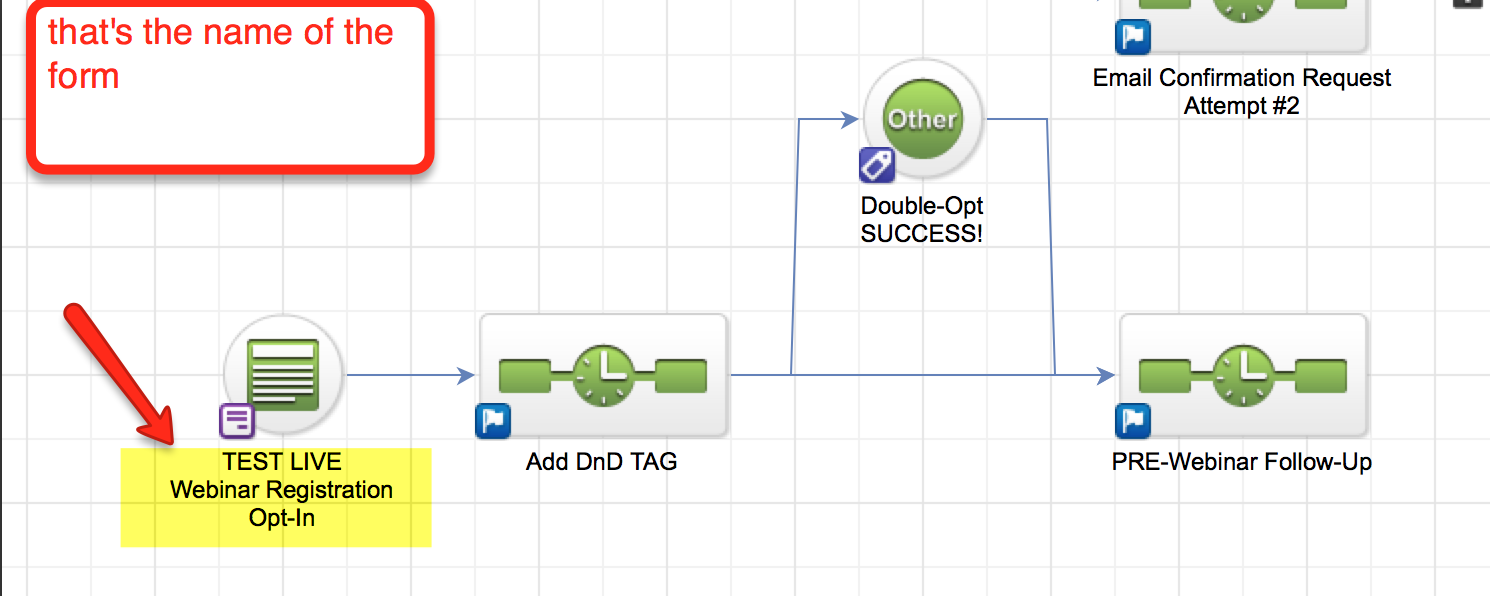
2. Select the name of the WEB FORM you created inside Infusionsoft's Campaign Builder
Note: If you can't find the Webform, click the "reload" button first!
3. Click the GREEN "Customize This Form" button.
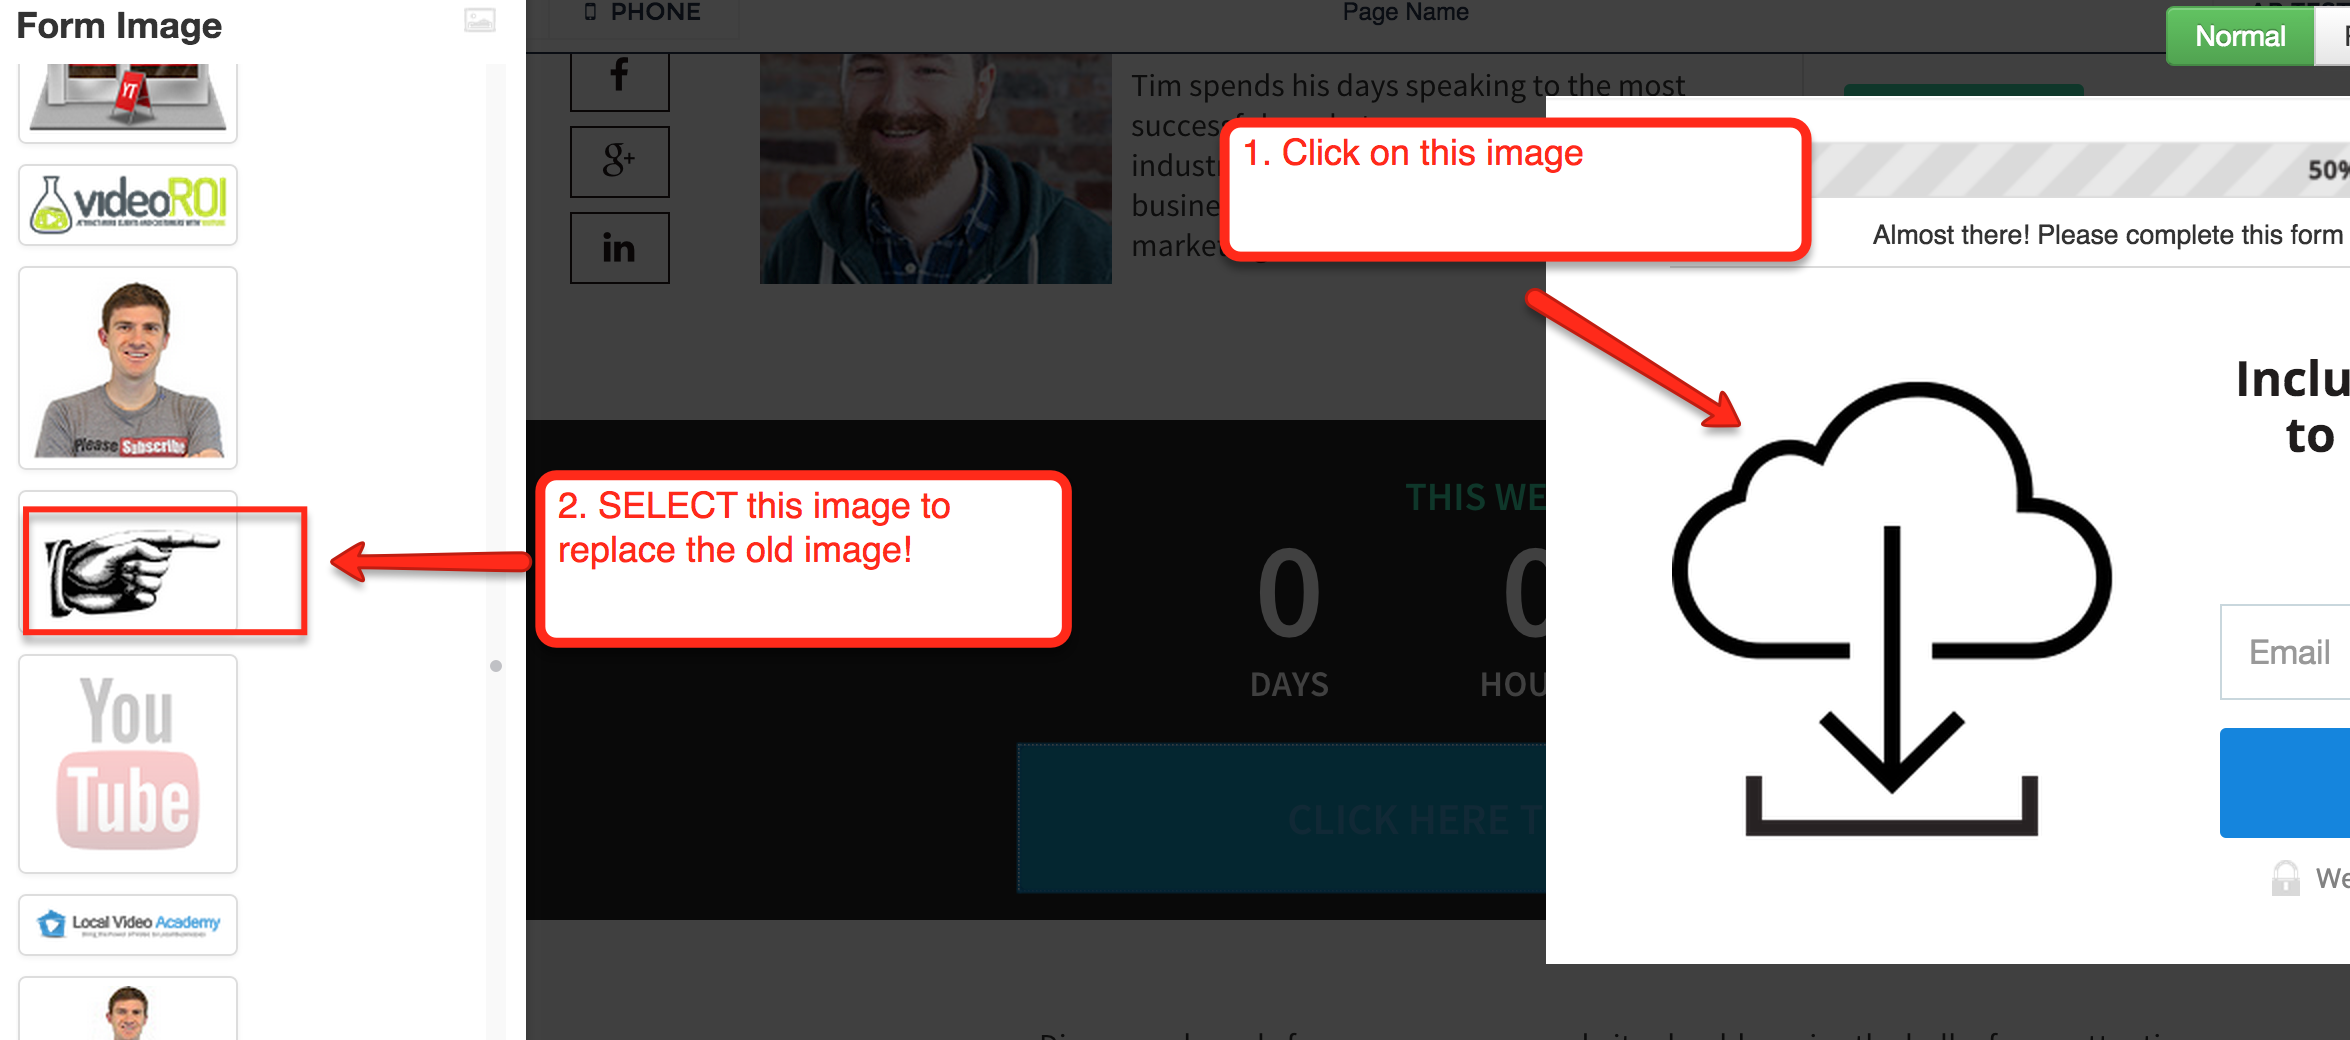
9. Select a New Lead Box IMAGE
Follow the steps to select the image for the Lead Box.
Make sure to SAVE your changes!
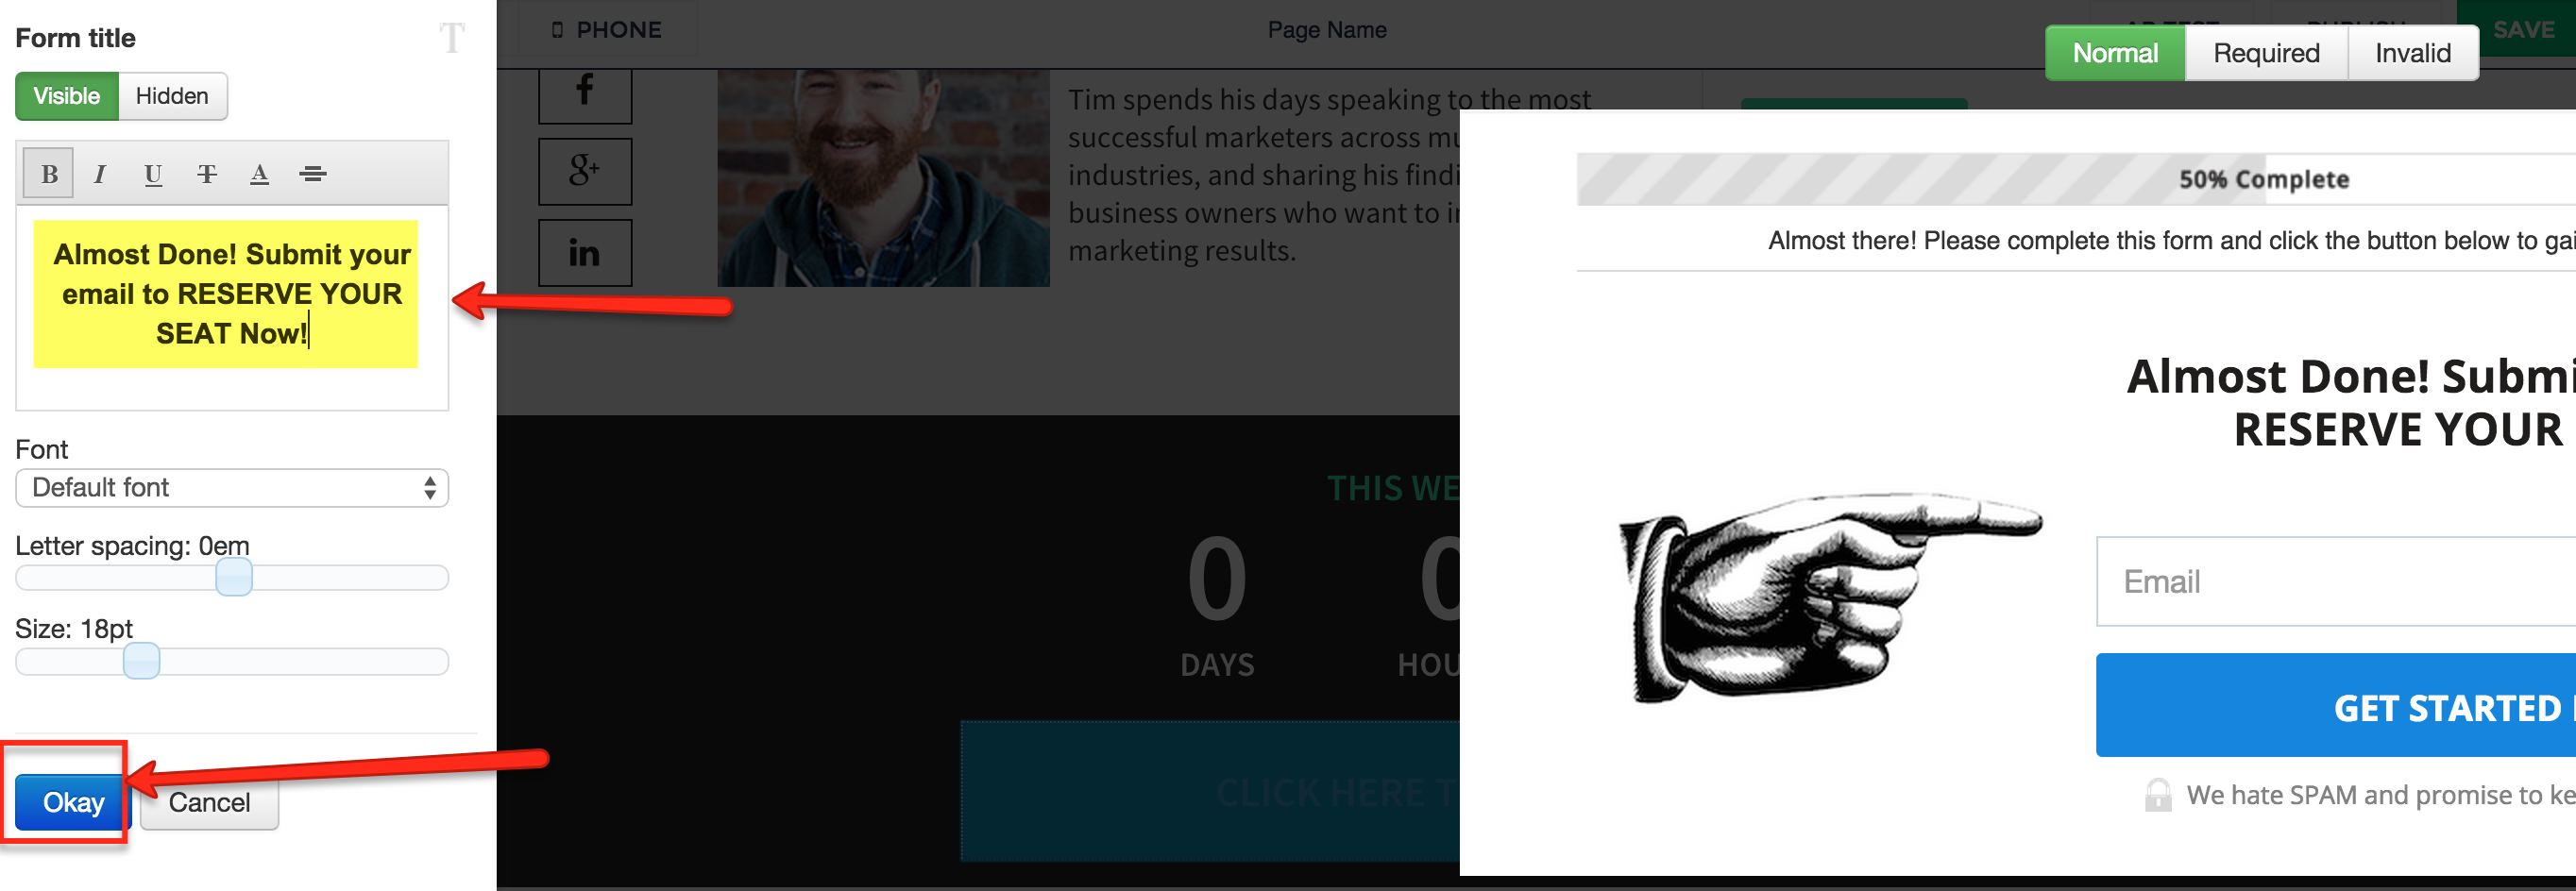
10. Replace the Lead Box Headline Copy
Use the EXACT copy used in the image below and SAVE.
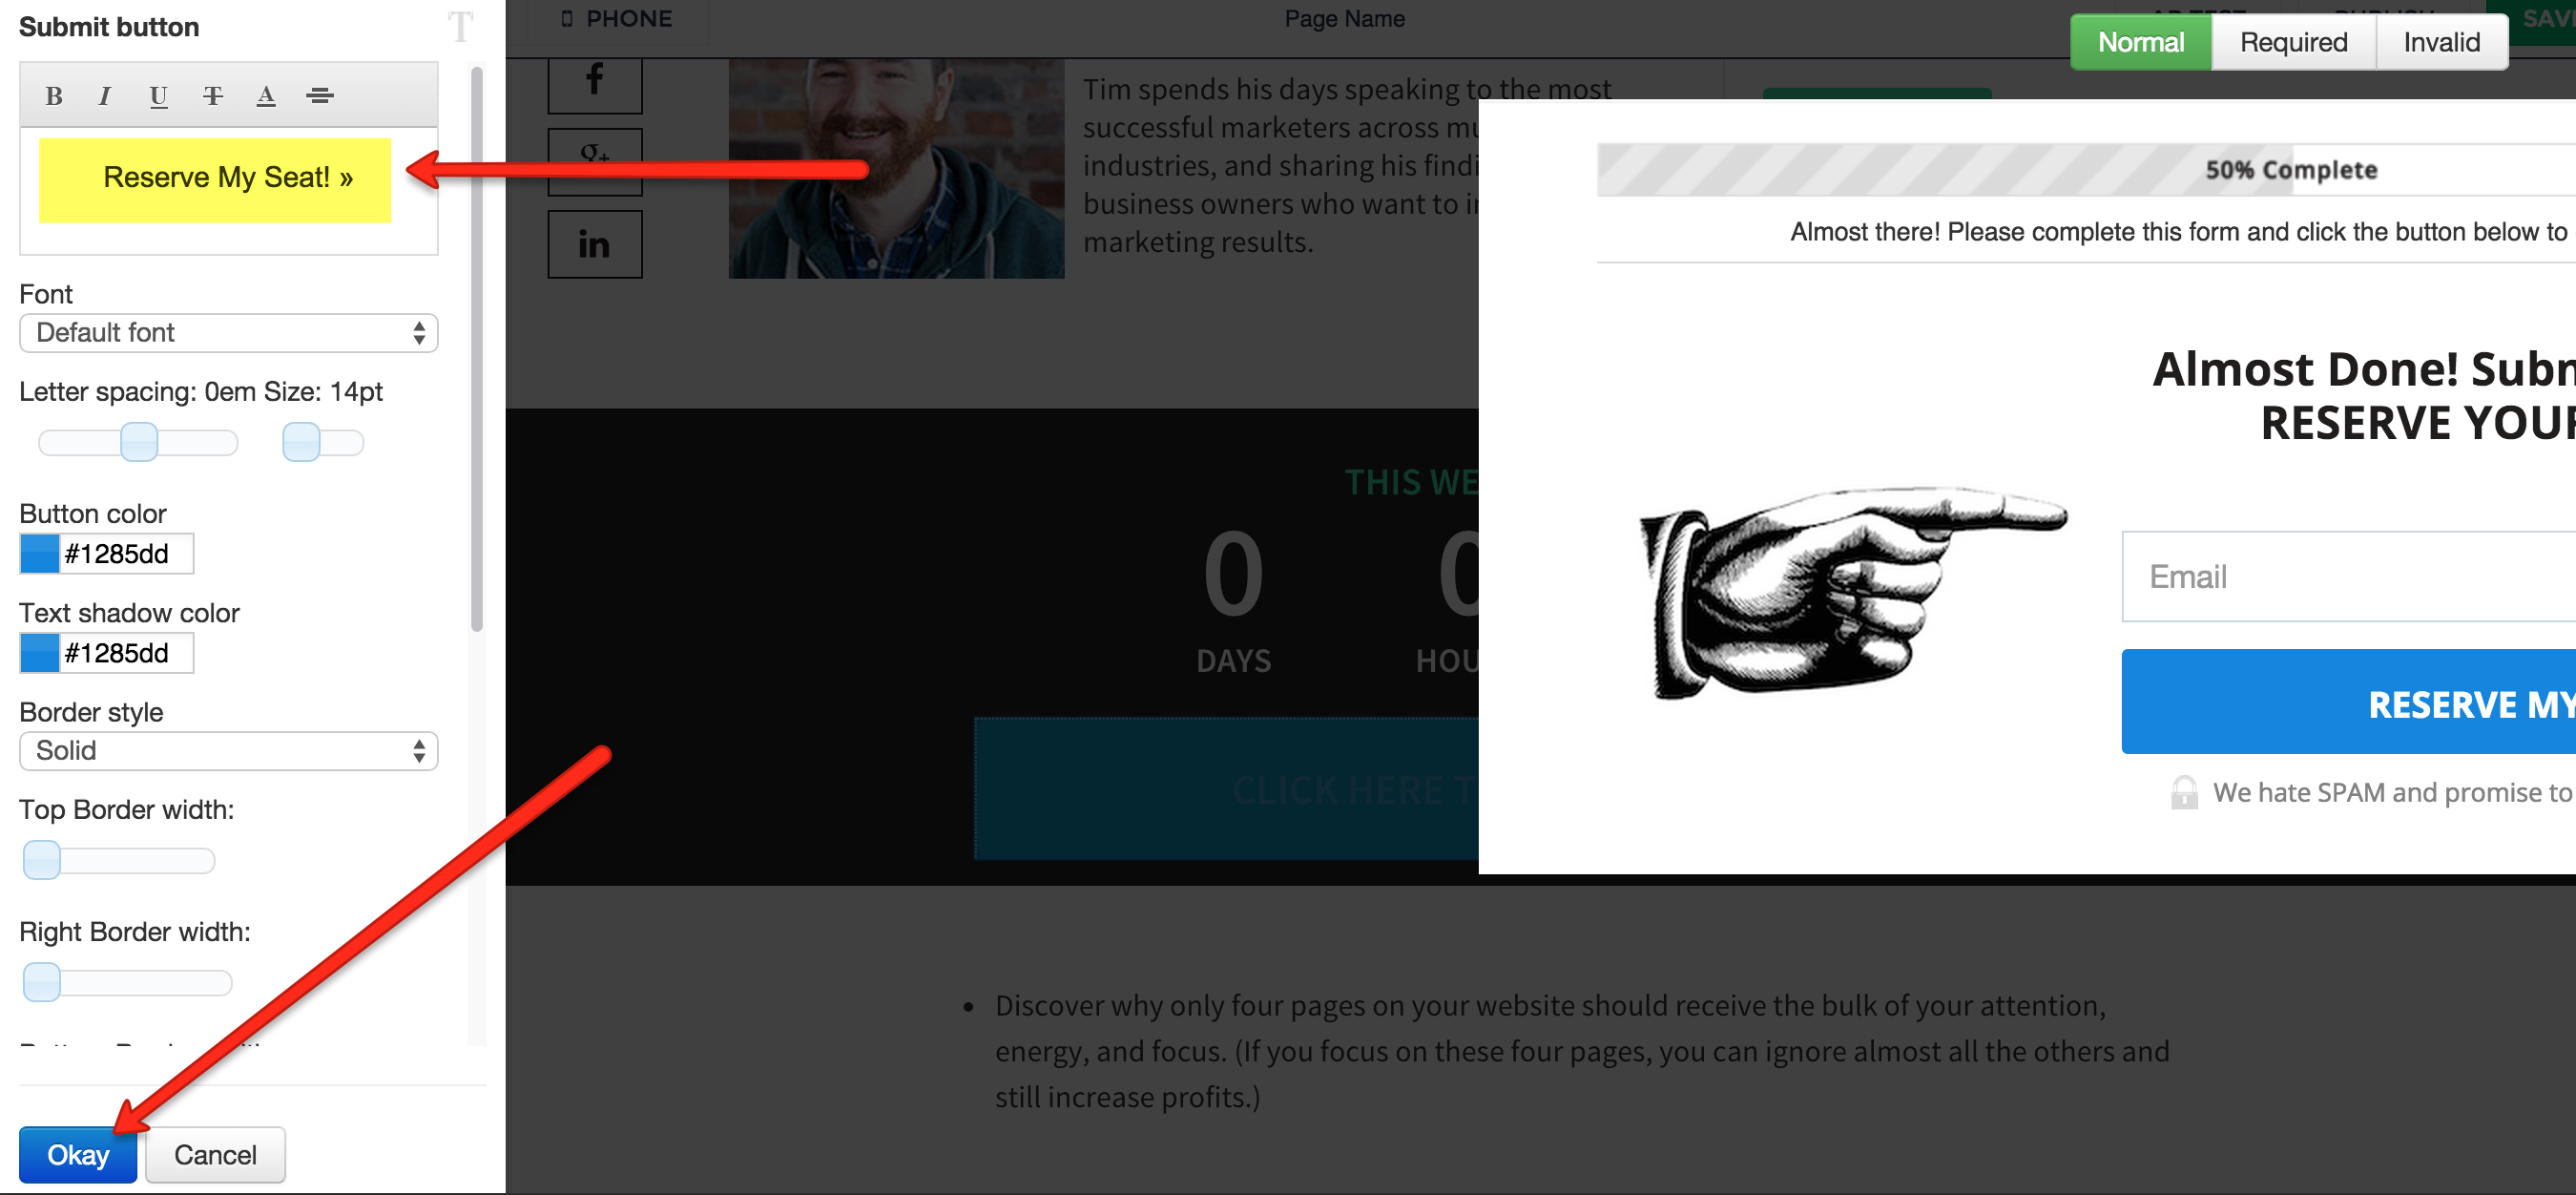
11. Replace the Button Copy
Use the EXACT copy as given in the image below.
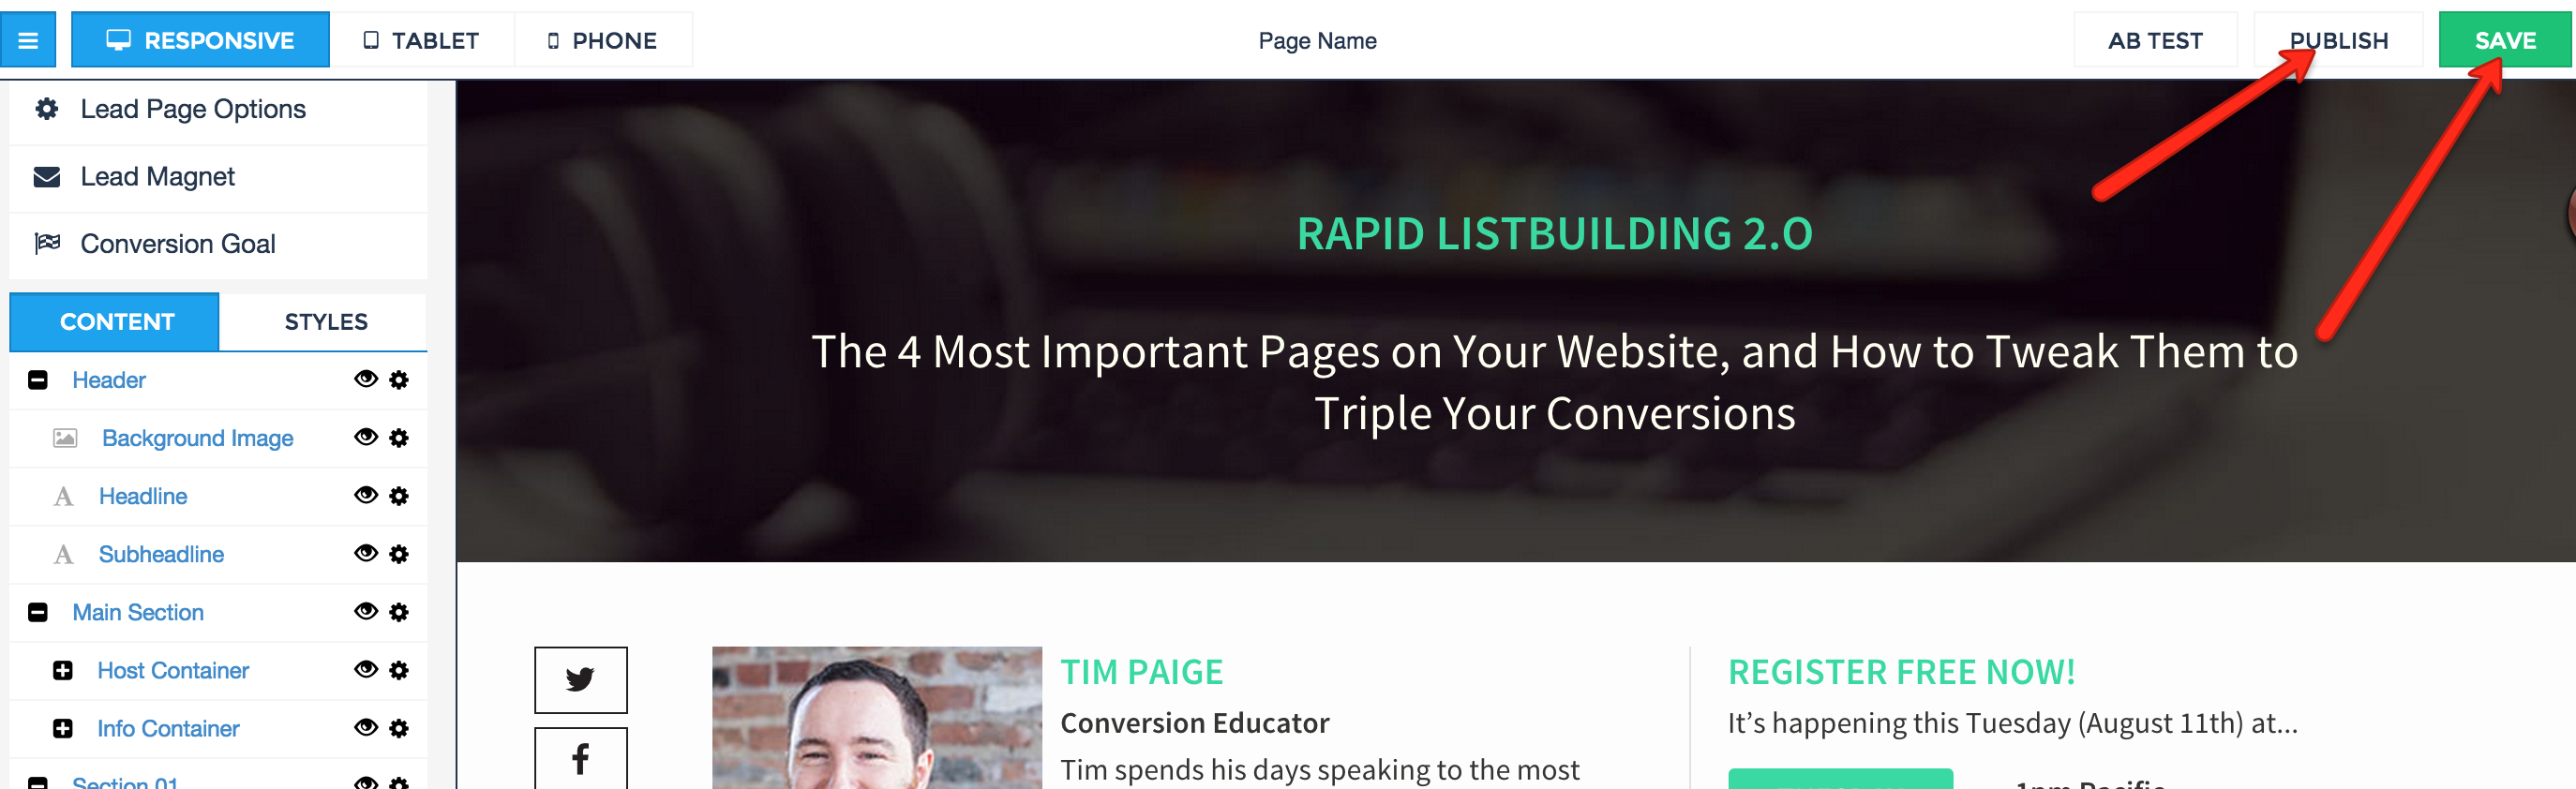
12. Save All Changes to the Page and PUBLISH
Click the "SAVE" button to save changes...
Note: The Page Name should labeled something clear and simple...
Example: YouTube Webinar May 15th
13. PUBLISH!
2.3 Webinar Thank You (Confirmation) Page
In 2.3, we'll create your Webinar Confirmation Page. This is the page your Registrants will be directed to AFTER they submit their contact details!
Example of Webinar Registration Confirmation Page:
Business By Design Webinar Registration Confirmation Page
That page will need the following:
-
A Headline that Confirms they are Registered
-
A Video that Autoplays
-
The Ability to Add Date/Time to Calendar
-
Webinar Workbook .PDF (optional)
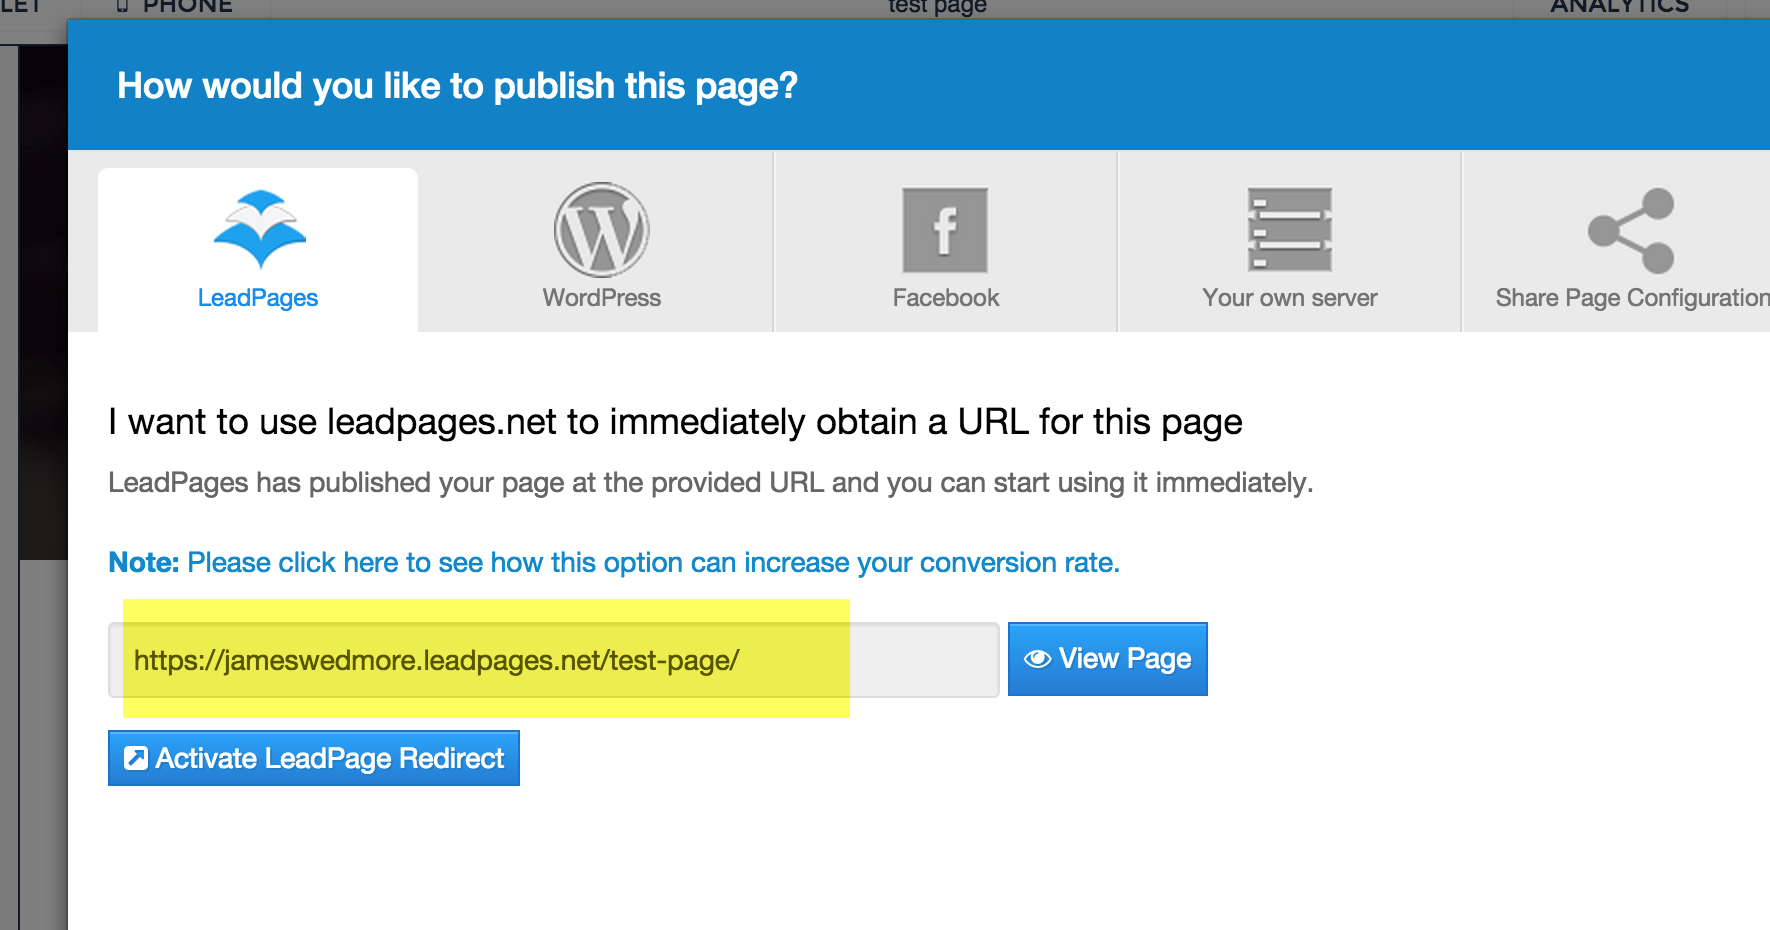
1. Log In to LeadPages.net
LeadPages
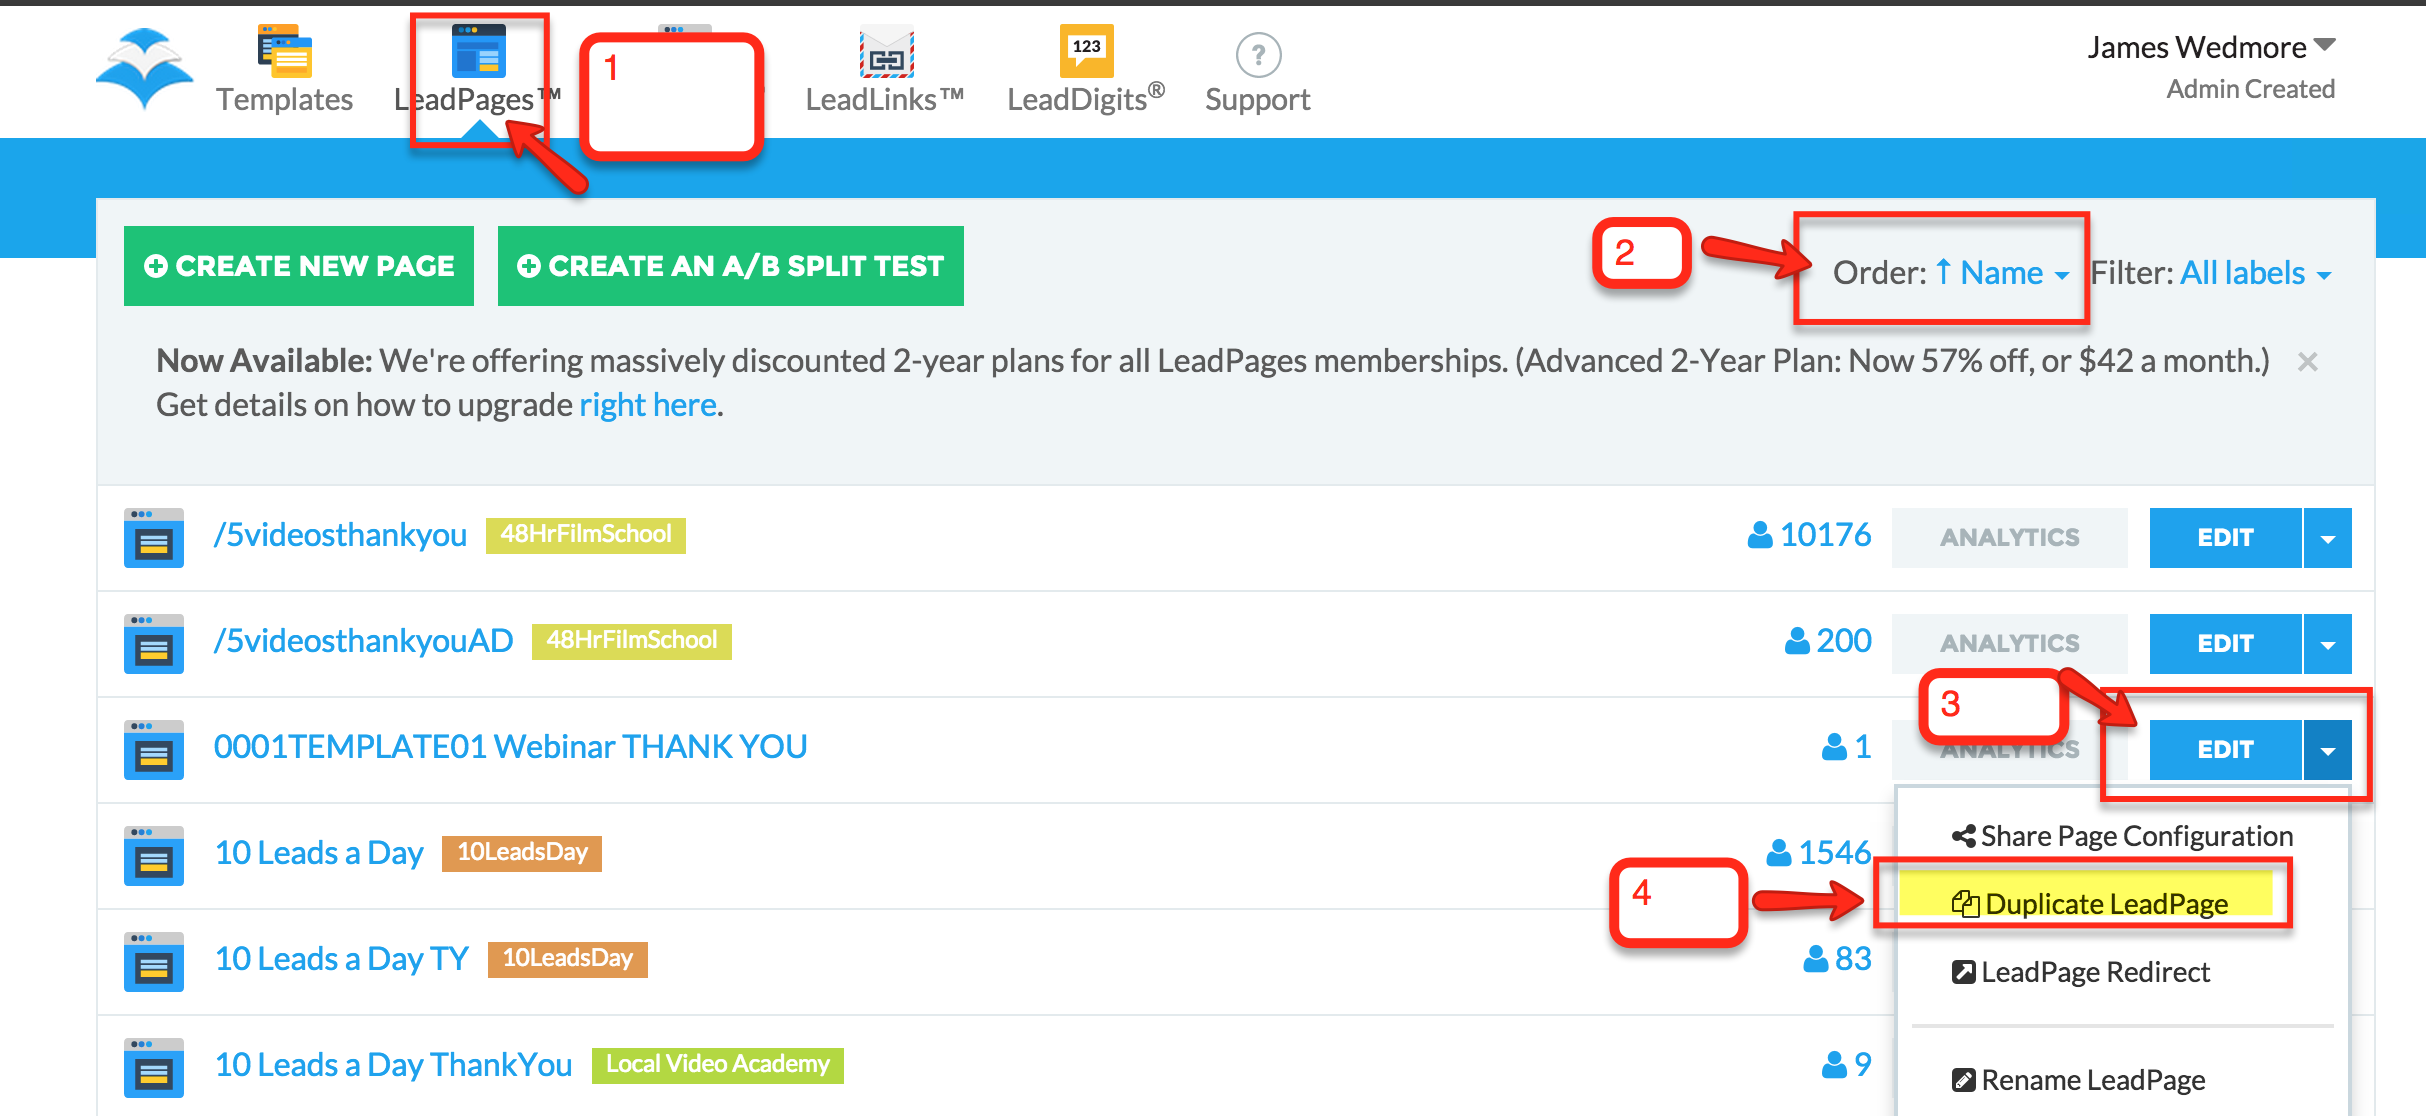
2. Duplicate the Existing "Thank You Page" Template
Follow the steps below to DUPLICATE the existing template.
Note: Do not edit or change the original template. You must DUPLICATE the page and edit the new page you create.
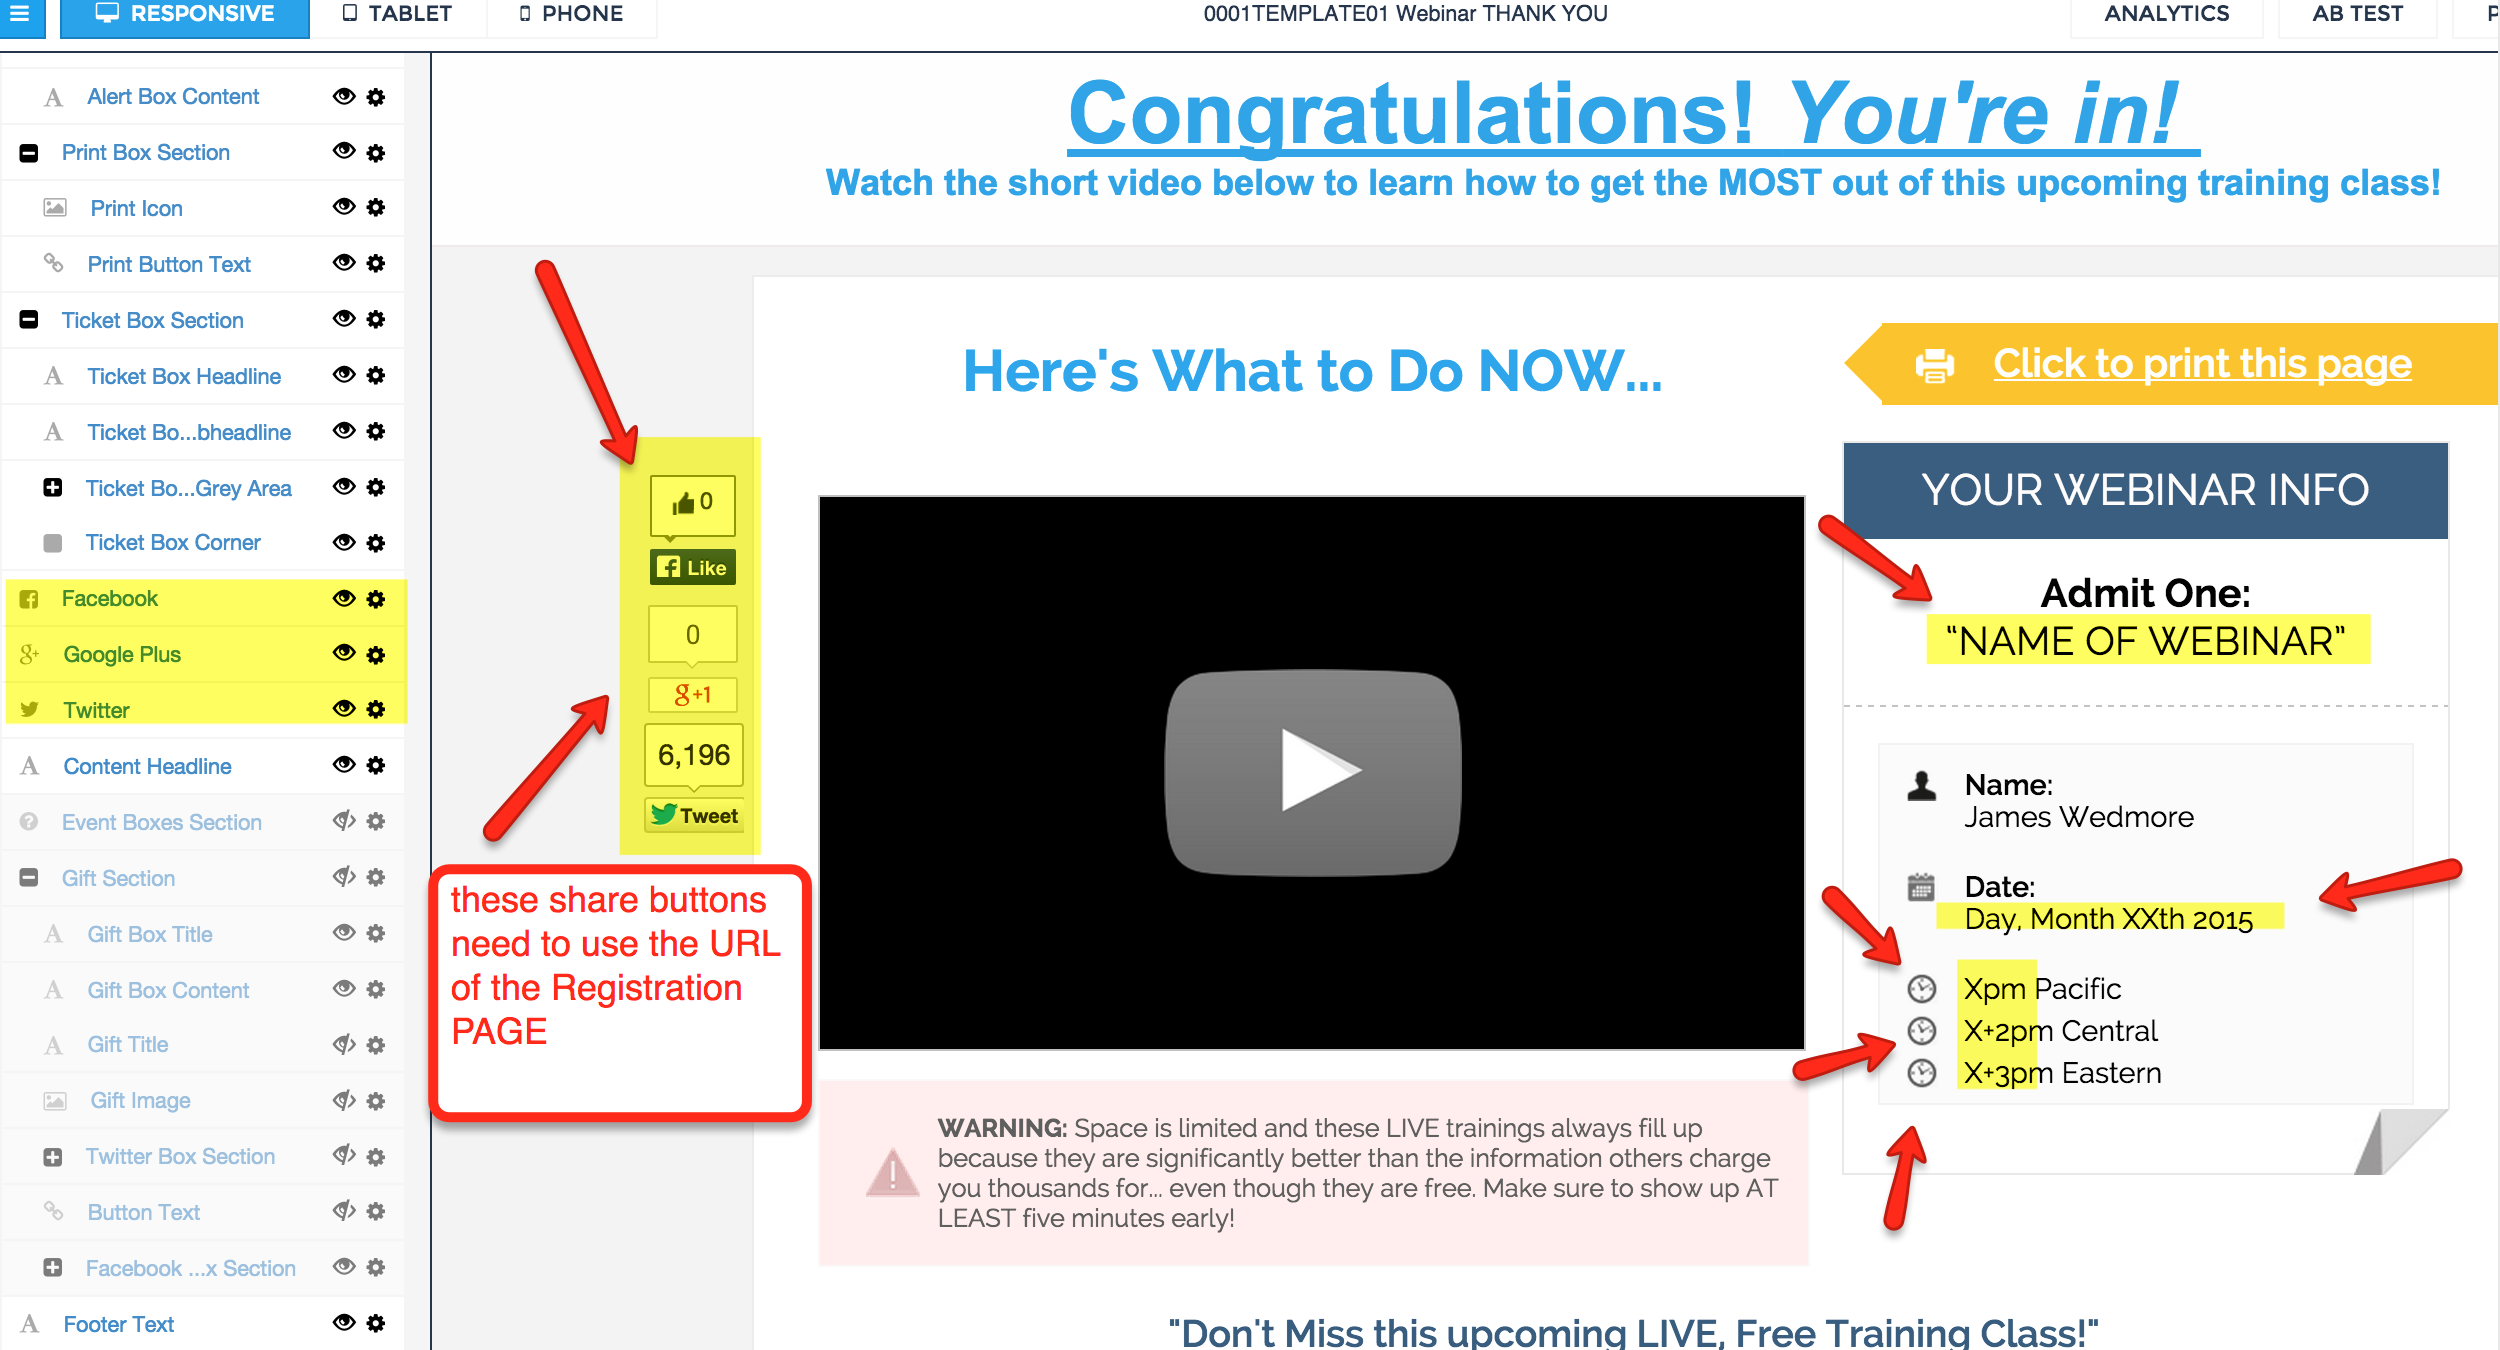
3. Make Changes to NEW Thank You Page
Use the image below to make changes to everything highlighted in yellow.
4. Save the Page
Click the green SAVE button to save the page.
You'll need to create a page name and URL...
The best practice is to use the name:
"Confirmed-Date-Topic"
For example:
"Confirmed-May18-YouTube"
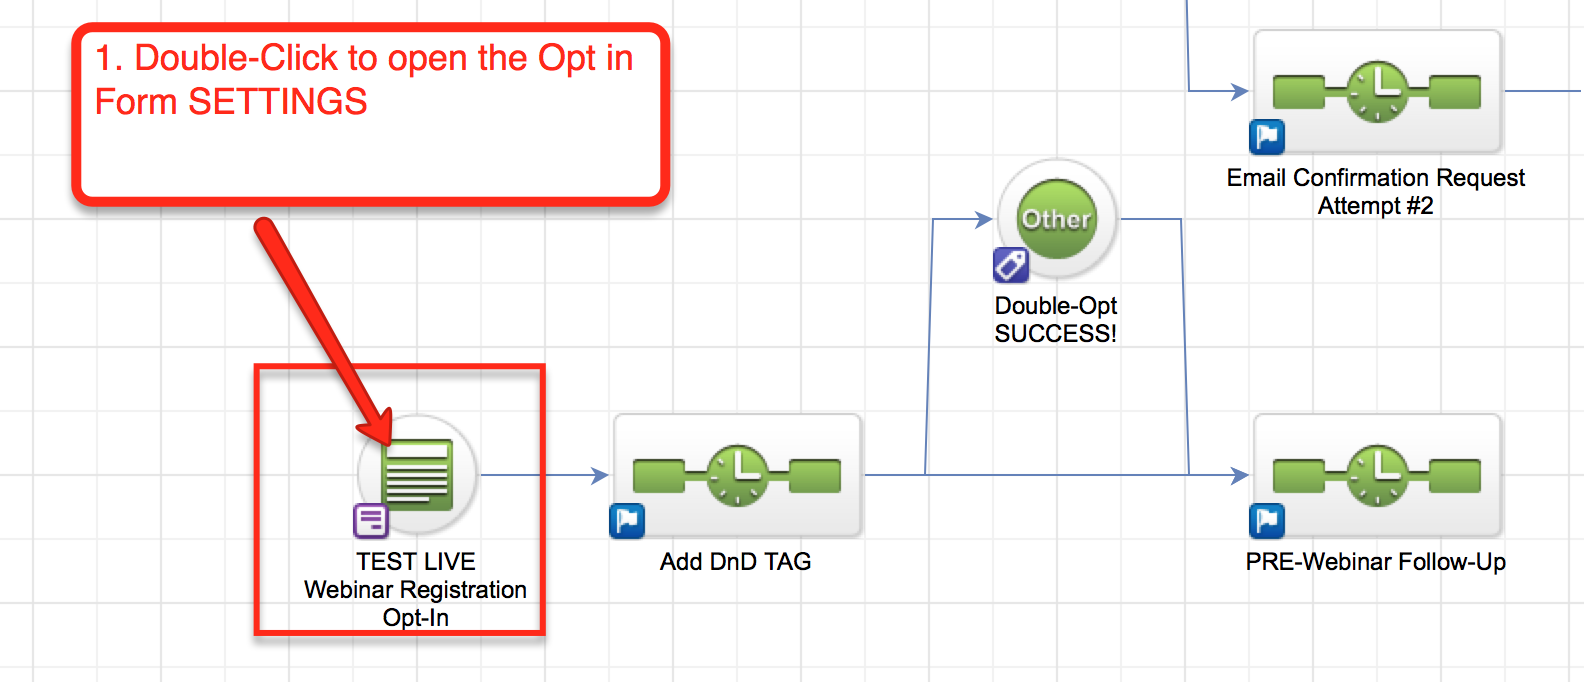
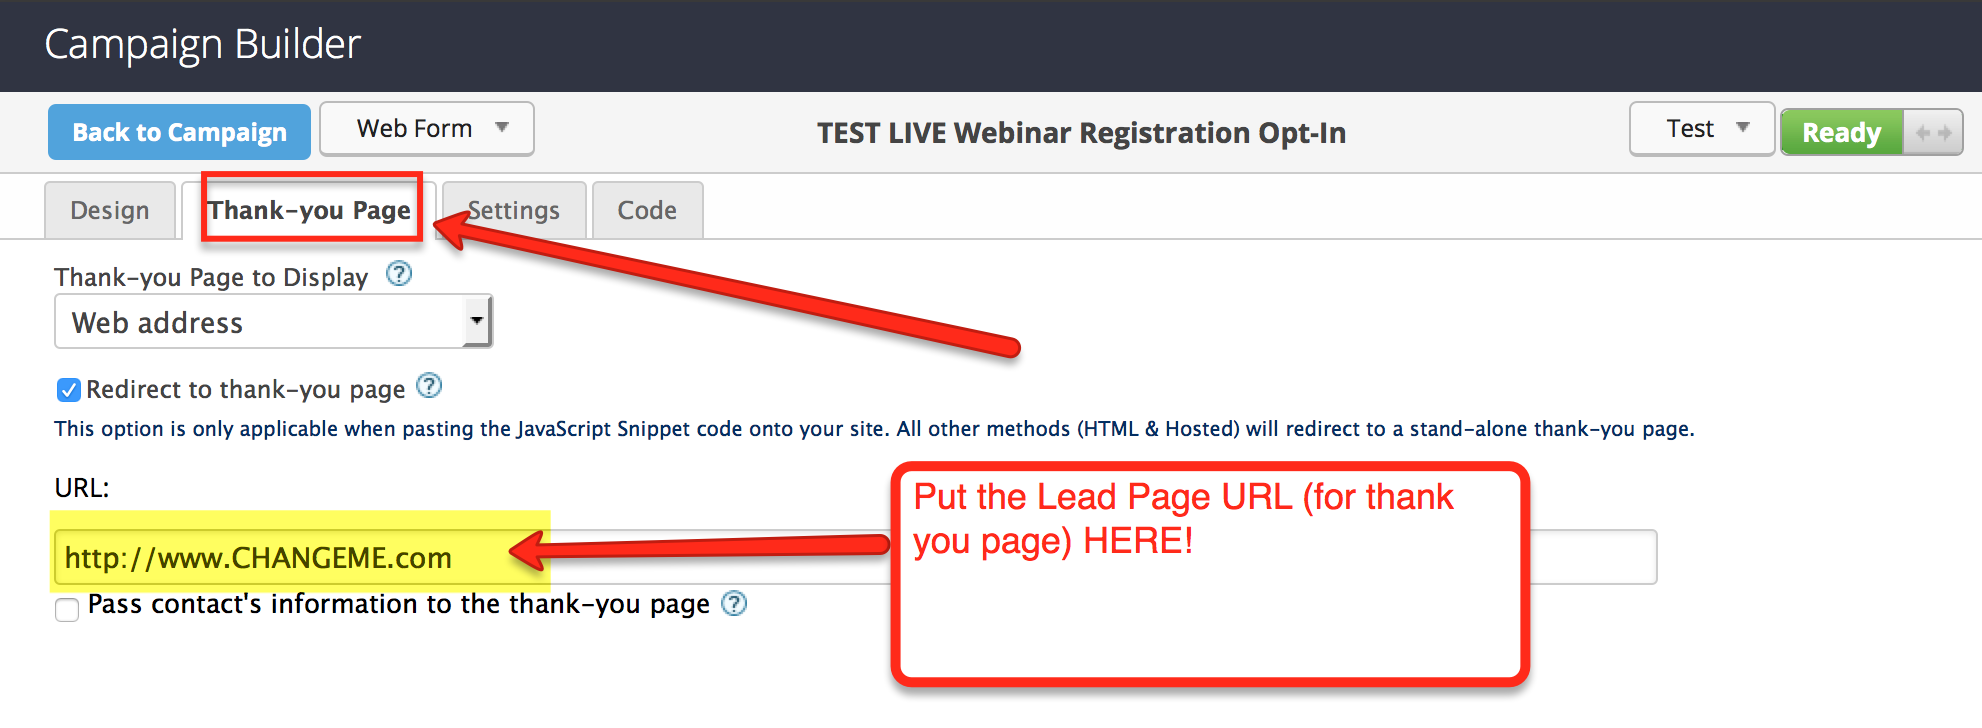
5. Sync Page with Infusionsoft Campaign
In this Step, you'll need to return to your Infusionsoft Campaign (inside Campaign Builder) in order to add the Thank You Page.
6. Publish the Campaign
Make sure to hit the blue "PUBLISH" button to Publish the Campaign and update it!
2.4 Integration With Email Software
In 2.4, you'll need to INTEGRATE your Registration Page with your Email Marketing Software. Unfortunately, because there are several different services, you'll have to create your own process here. We've included our own personal process for using Infusionsoft in the steps below.
Here are the "Essentials" You'll need to make sure this step is completed properly:
1. Log in to Infusionsoft
Infusionsoft
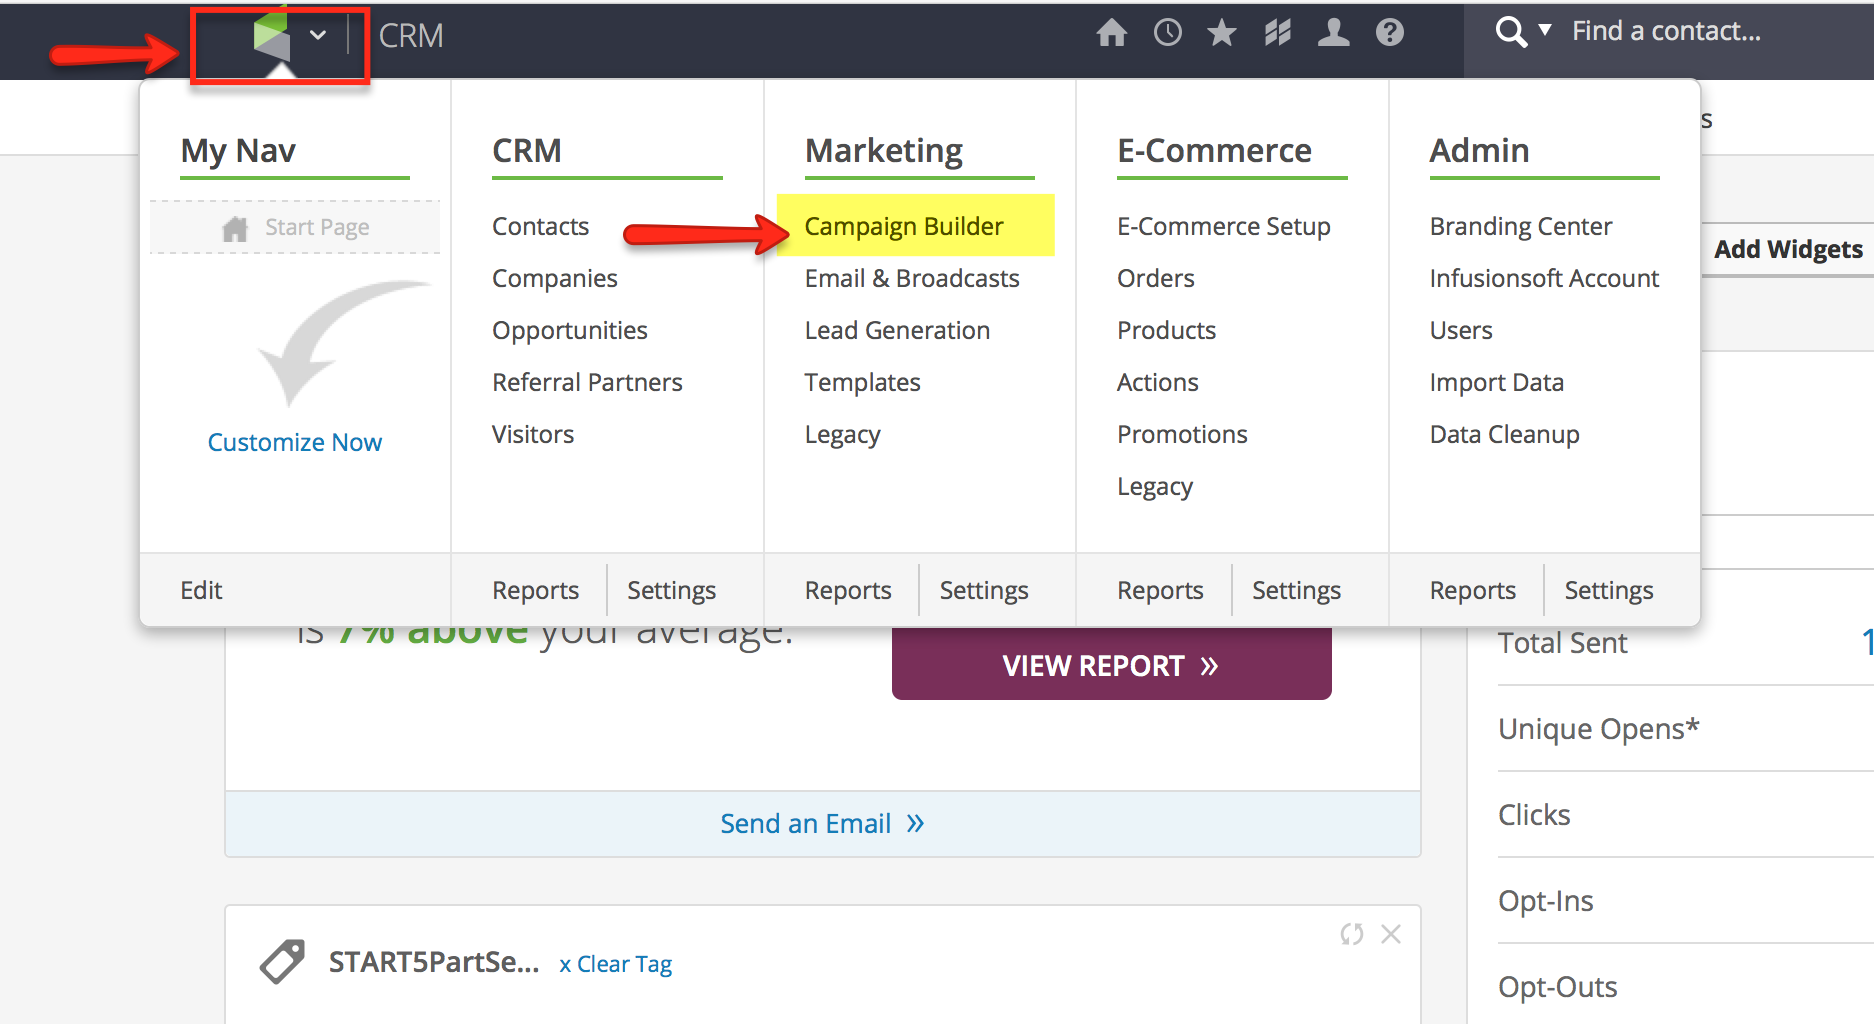
2. From the Main NAV Dropdown, Select "Campaign Builder"
Open up Campaign Builder.
1. Select the Infusionsoft Logo in the upper left corner
2. Visit the "Marketing" Column
3. Select "Campaign Builder"
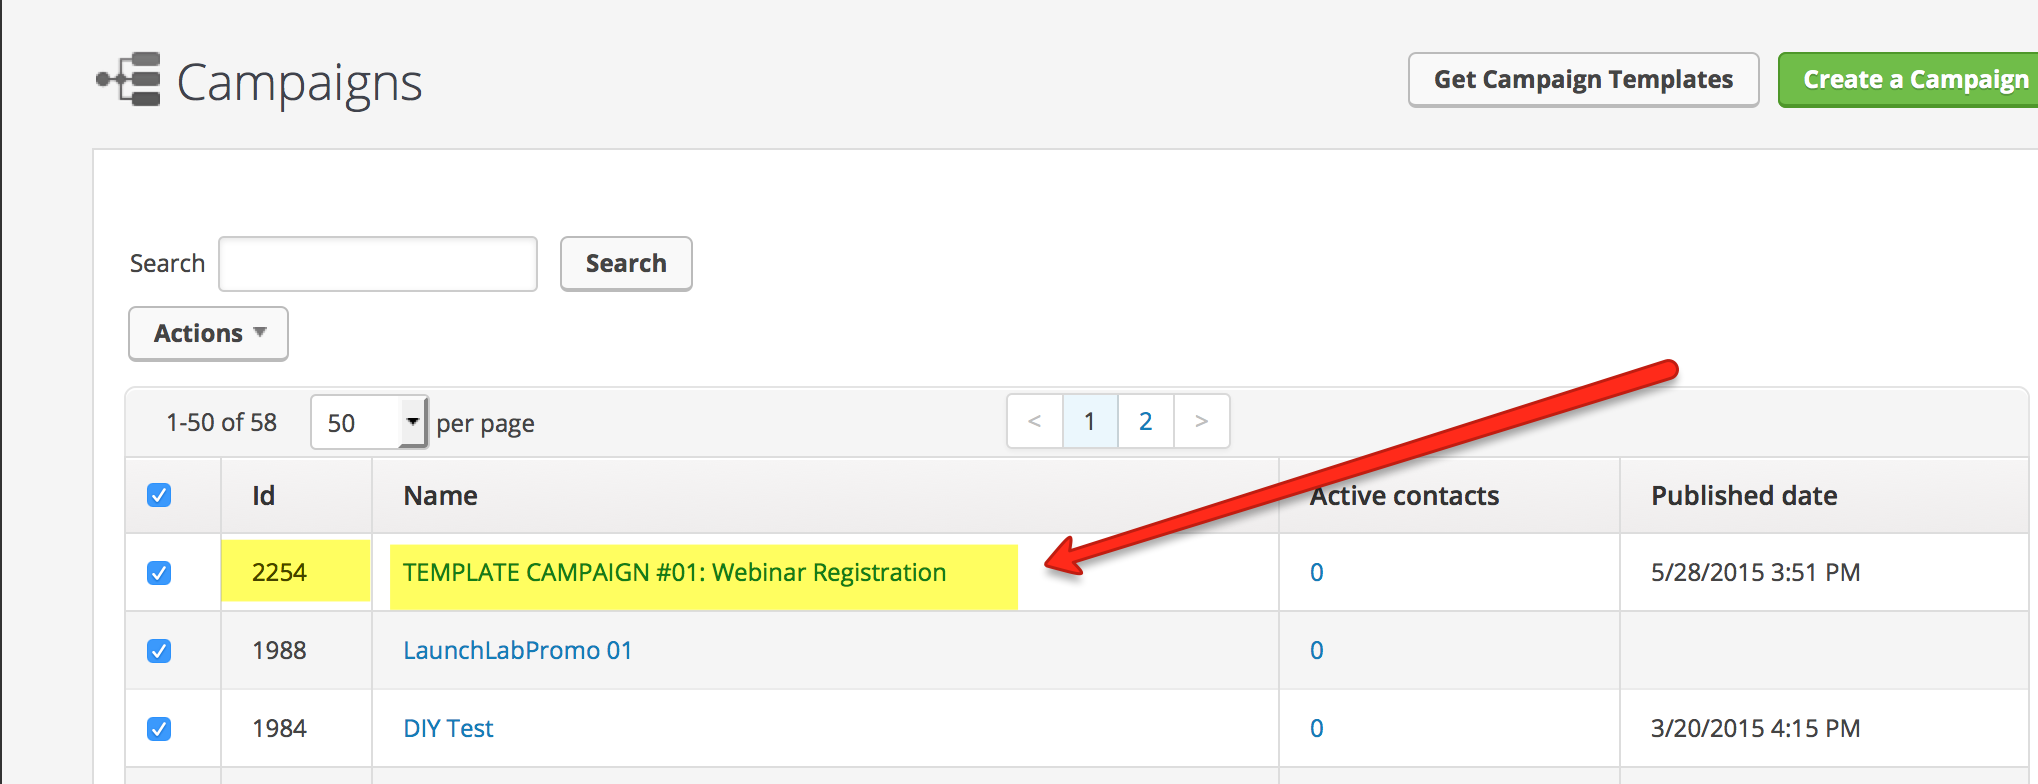
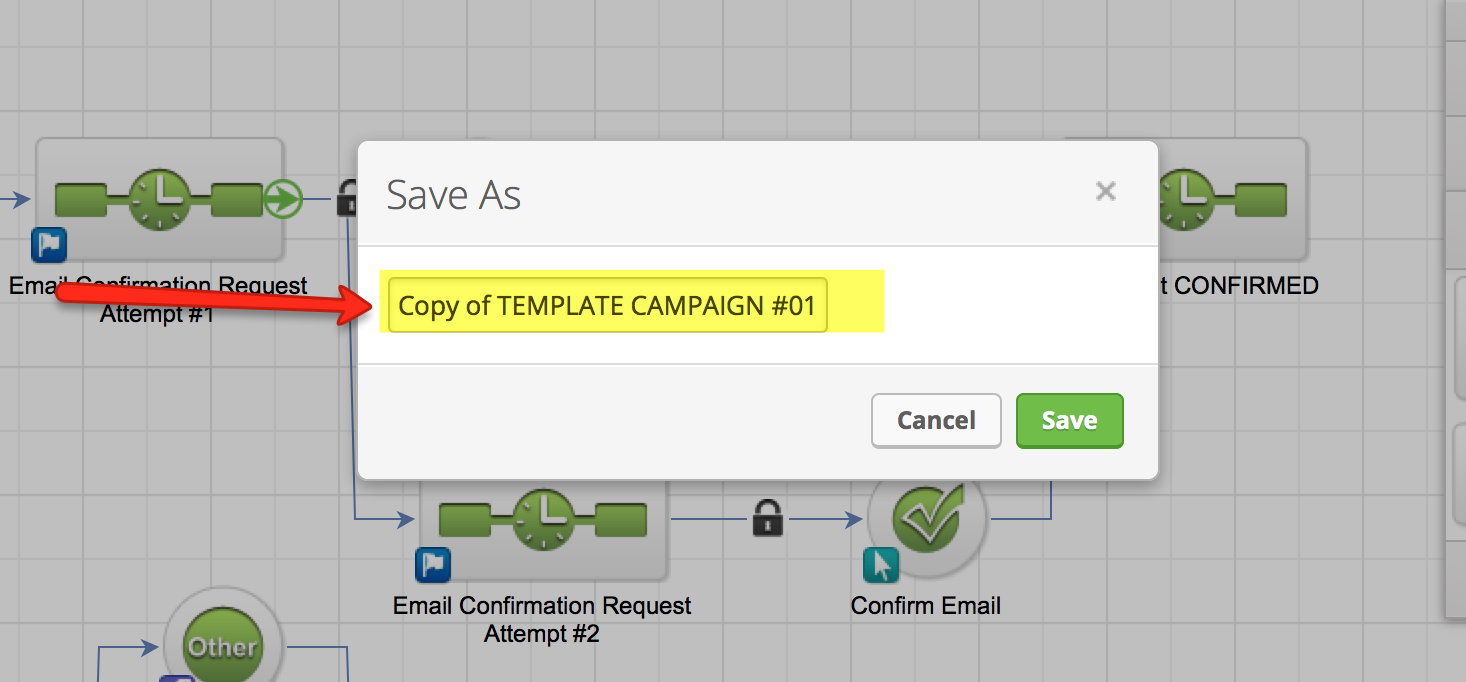
3. Find & Select Campaign ID: 2254 "TEMPLATE CAMPAIGN #01: Webinar Registration"
Select and Open Campaign ID: #2254 (TEMPLATE CAMPAIGN #01: Webinar Registration)
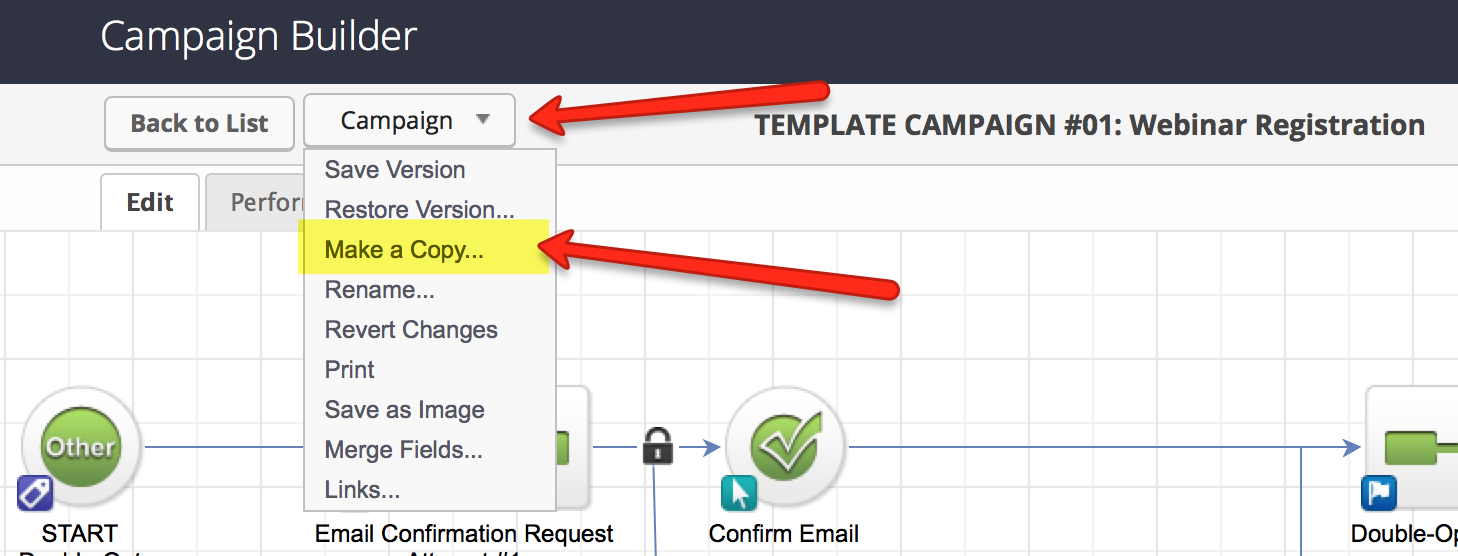
4. Duplicate the Template Campaign
Inside the Campaign Builder, select the "CAMPAIGN" dropdown and click on "Make a Copy"
5. Name Your Campaign Accordingly
The name of your campaign should reflect the name of the product/promotion or webinar being hosted.
For example: VideoROI Live Webinar (May, 2015)
...and click the green SAVE button.
6. Activate & Publish The CAMPAIGN
Watch this video for the specific step by step instructions...
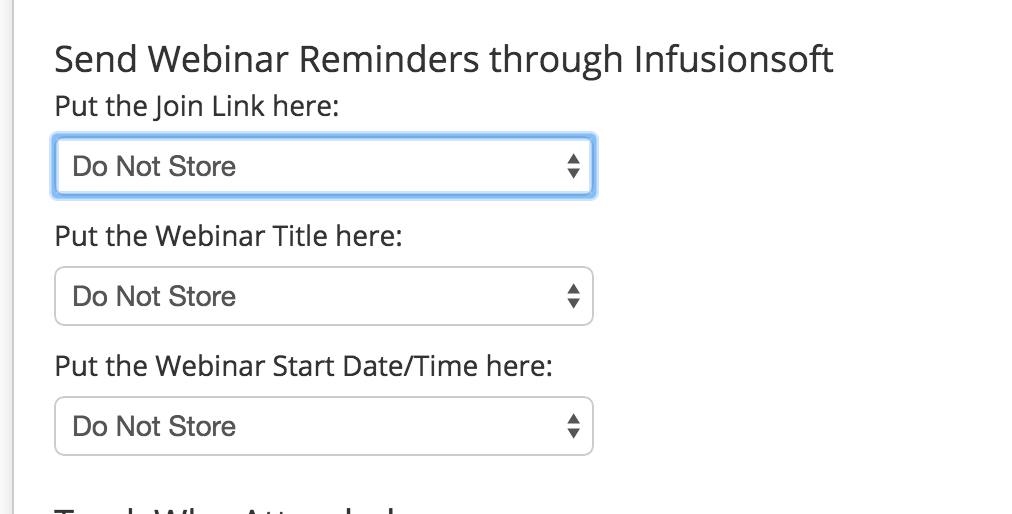
2.6 Integration With PlusThis
2.6 is an OPTIONAL (and advanced!) step for those using Infusionsoft and who would like to SEGMENT their Registrants into two categories (Attended and Didn't Attend). This process walks you through how to integrate PlusThis (software) with Infusionsoft.
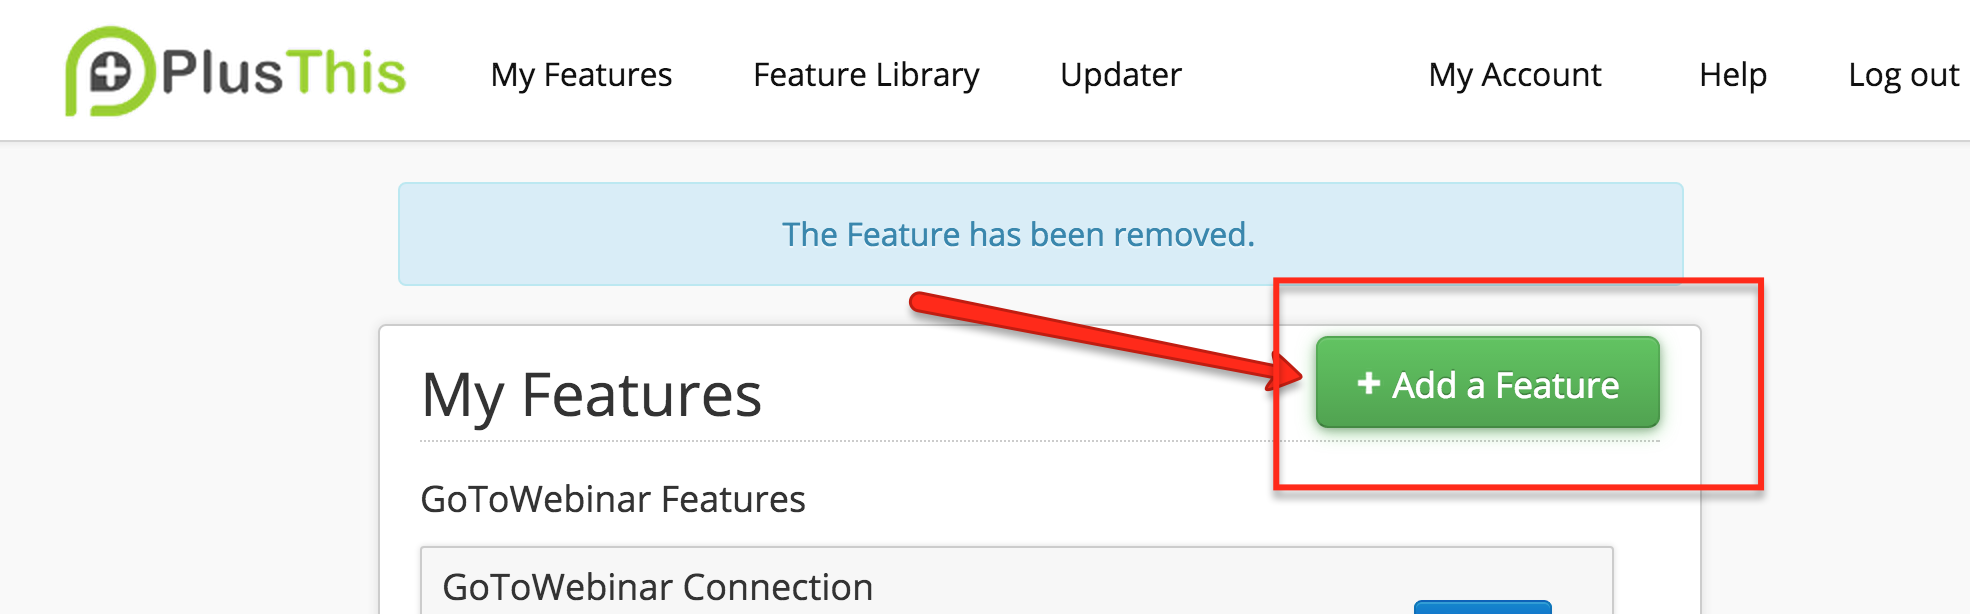
1. Log in to PlusThis
2. Select the "Add Feature" Button
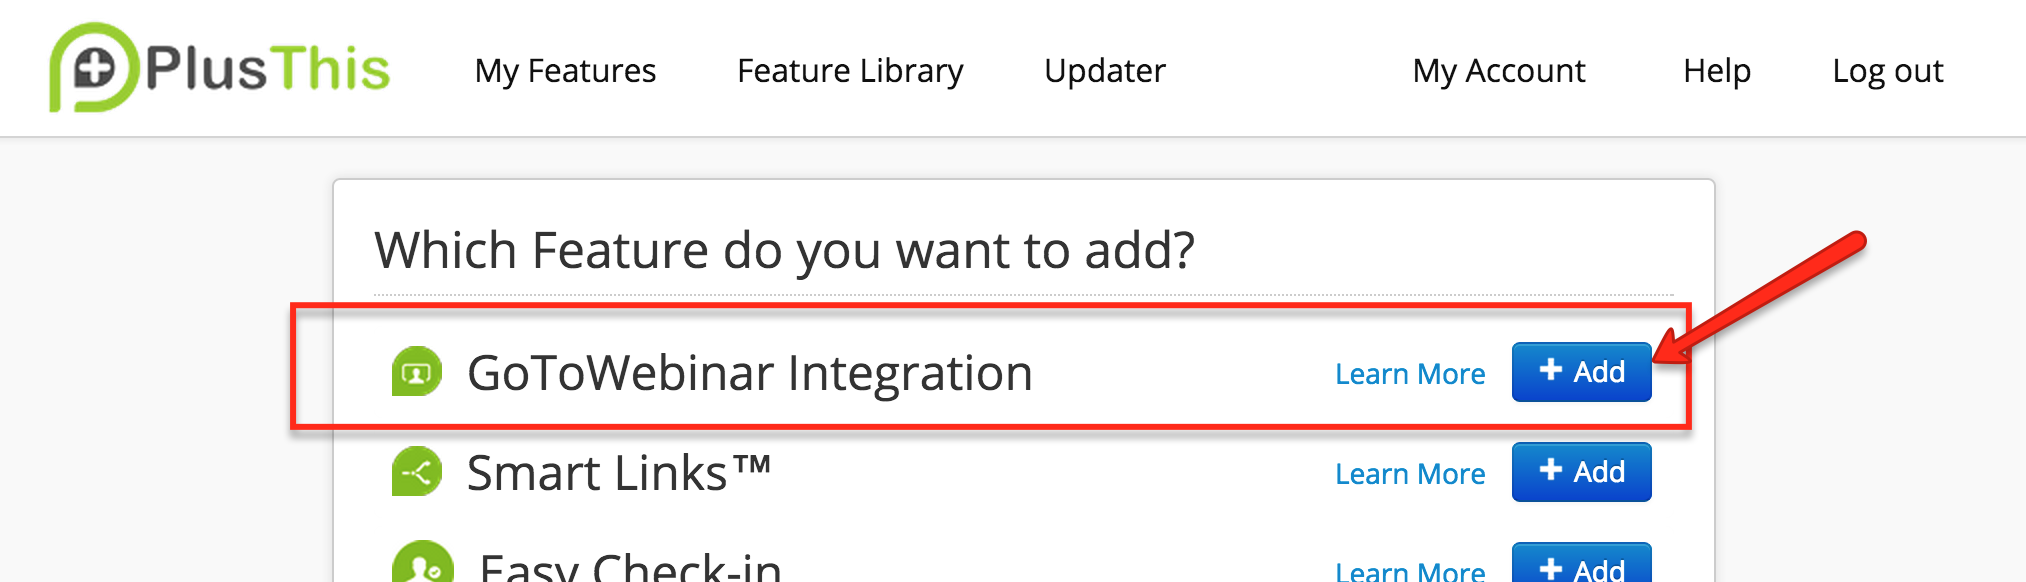
3. Add a GoToWebinar Integration
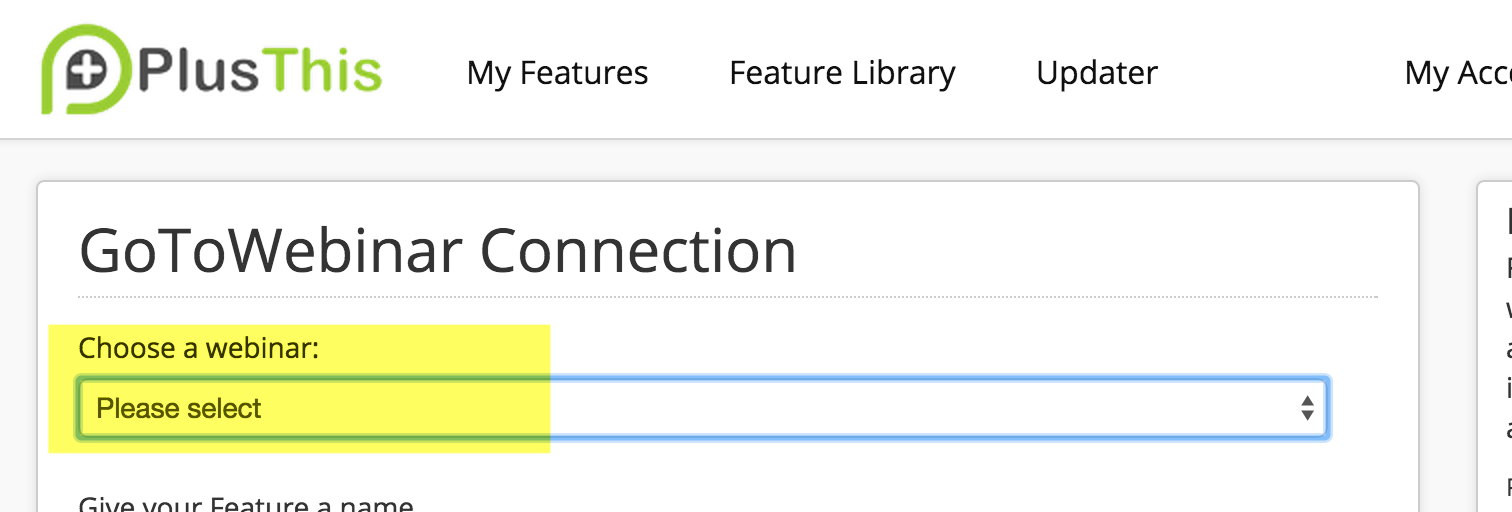
4. Choose the Appropriate Webinar from the Dropdown
From the dropdown, find the GoToWebinar Event you created in Step #1 of the Webinar Process.
5. Ignore the Webinar Reminders Section
You can ignore the "Webinar Reminders" section.
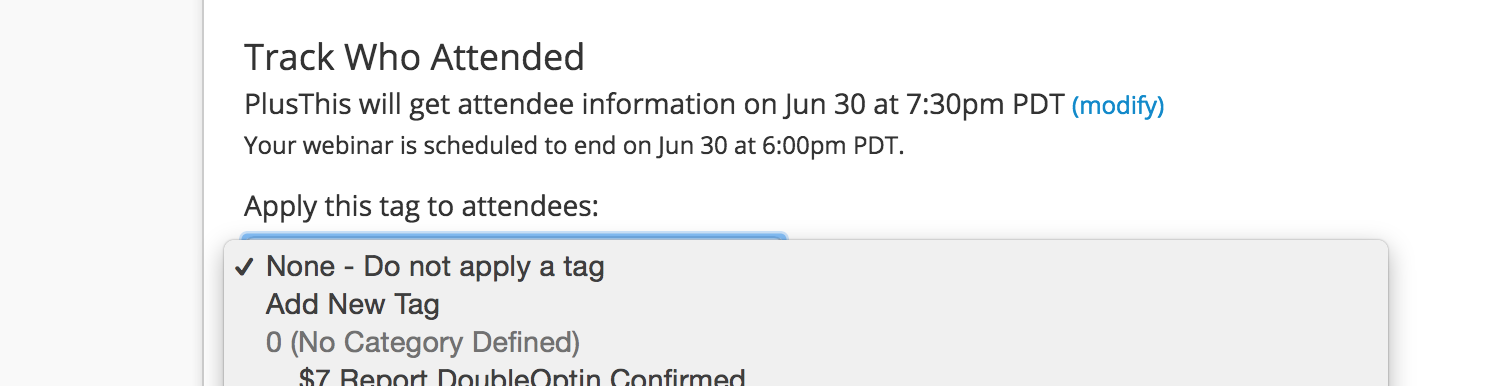
6. Create a NEW Tag for Attendees
You must create and select a NEW Infusionsoft Tag for Webinar Attendees.
Use the following tag format:
WebinarNameDate ATTENDED
Example:
YouTubeWebinarJune15 ATTENDED
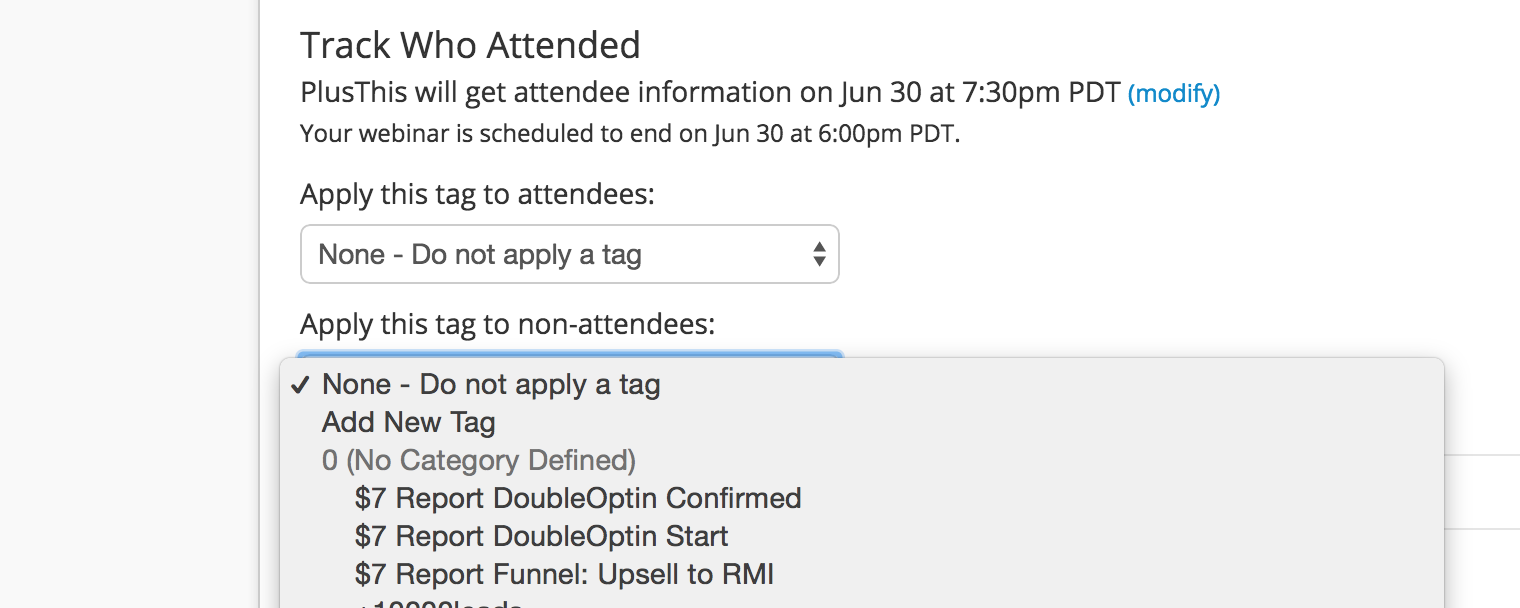
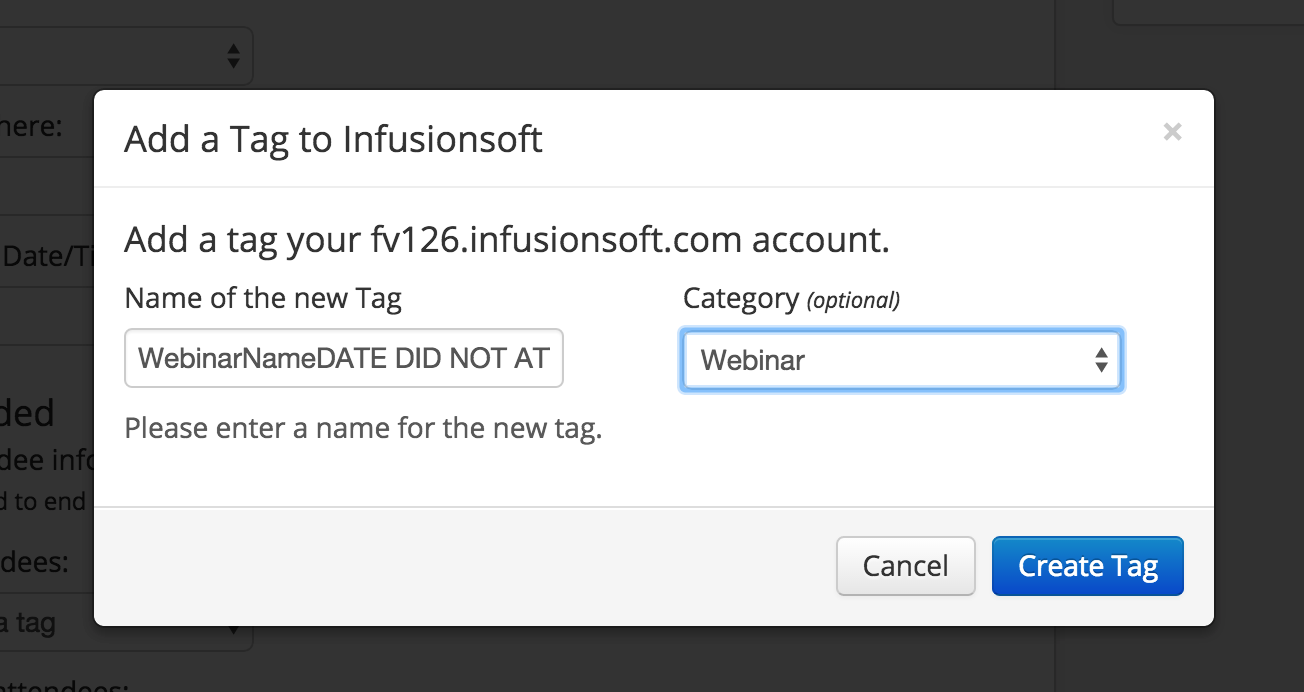
7. Create a NEW Tag for Non-Attendees
You must create and select a NEW Infusionsoft Tag for Webinar NON-Attendees.
Use the following tag format:
WebinarNameDate DID NOT ATTEND
Example:
YouTubeWebinarJune15 DID NOT ATTEND
8. Name & Save Your PlusThis Feature
Clearly name your PlusThis Feature and save it by clicking the green ADD FEATURE button
9. Copy the URL PlusThis Gives You
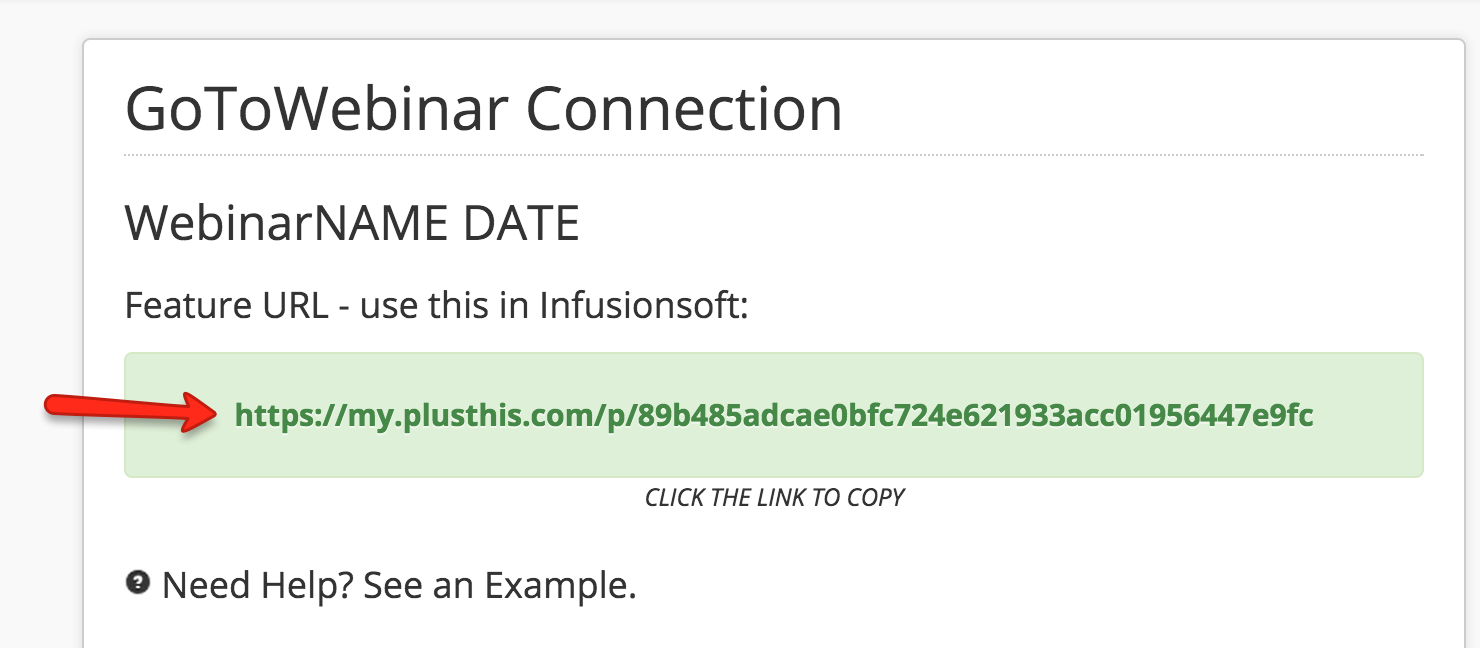
On the next page, PlusThis should give you a special URL. Copy this URL.
10. Add the link to Campaign Builder (HTTP POST)
Follow the simple video to see how to add the link to Infusionsoft and the Campaign.
11. Add the Attend/Didn't Attend TAGS
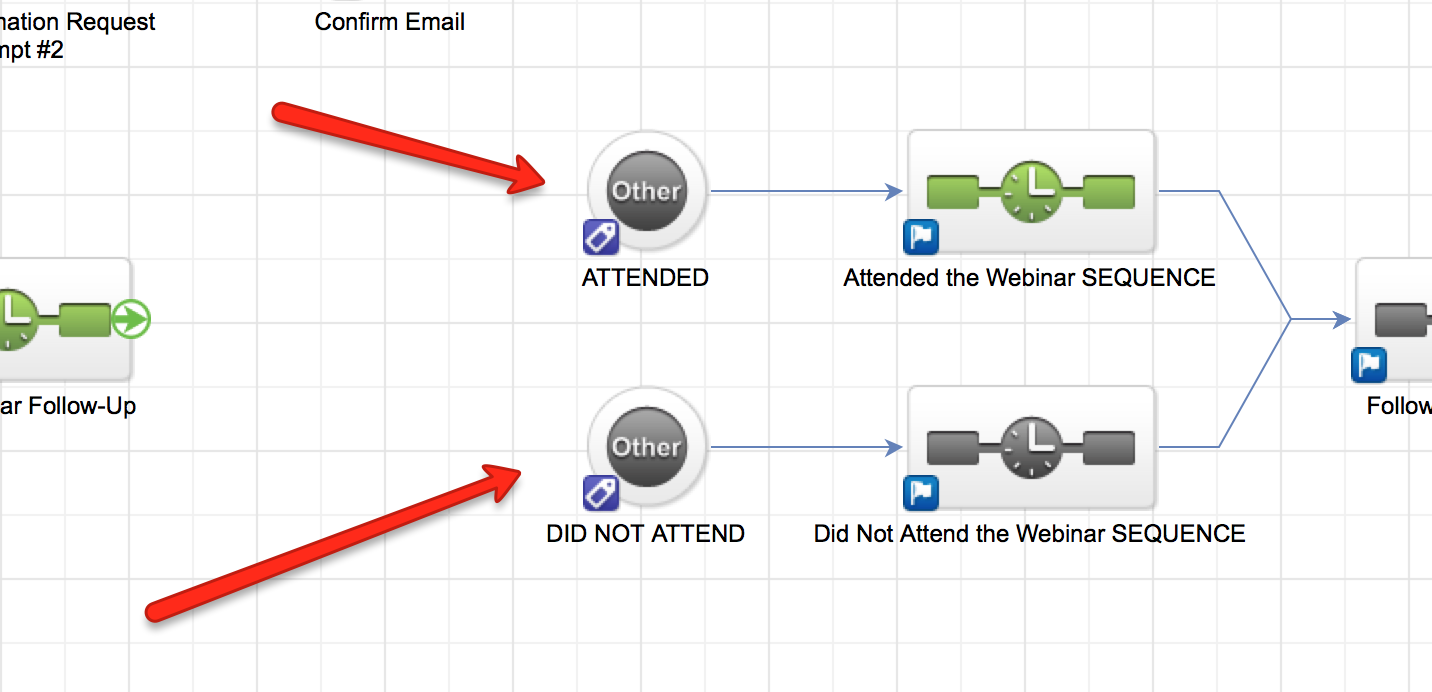
Make sure that the EXACT TAGS you created inside PlusThis (Steps 6 & 7) are now added to the Campaign CANVAS. Refer to the image below for WHERE to add the TAGS, and make sure to PUBLISH the CAMPAIGN after adding the tags.
12. Test the ENTIRE Process
Proceed to the FINAL Phase, which is to TEST that the entire Webinar Funnel works.
2.7 Test the System
In 2.7, you'll simple double (or triple!) check your entire Webinar Registration Process to make sure EVERYTHING is working correctly!
1. Register for a Webinar with a TEST EMAIL
Visit the Webinar REGISTRATION PAGE URL and submit a TEST email. Use the following steps to confirm that EVERYTHING IS WORKING CORRECTLY.
2. After Registering, you are redirected to the Thank You Page
3. Your Test Email has been added to GotoWebinar
Login to GoToWebinar and double check that your TEST EMAIL has been added as a REGISTRANT for the GotoWebinar Event.
4. A "Registered" Tag has been applied in Infusionsoft
Log in to Infusionsoft and SEARCH for the Test Email. Make sure the correct "REGISTERED" Tag has been applied.
5. The TEST EMAIL is inside the CAMPAIGN (in Campaign Builder)
Open up the Campaign from Campaign Builder and double check that this new contact/test email has been added to the correct campaign.
4.7 Facebook Retargeting
4.7 is where you can deploy your Retargeting Strategy. Although this is beyond the scope of this training, I couldn't possibly let you ignore the power of retargeting. So here are a few Retargeting Strategies you can deploy during your next Webinar Launch!
Retargeting Strategy #1: Didn't Register
In this Campaign, you can target all visitors who SAW your Webinar Registration Page but did not "Register." You can then target them with a NEW ad that uses a different angle or copy to get them to register.
Retargeting Strategy #2: Webinar Reminder
In this Campaign, you can target all visitors who landed on the Webinar Confirmation Page and send them an ad that reminds them of the date, time, and location of your Webinar so you can increase your Attendance Rates!
Retargeting Strategy #3: Post-Webinar Offer Ad
In this Campaign, you can send an ad to all visitors who landed on the Webinar Confirmation Page AFTER the Webinar ends to notify them about the product you're selling and how much time is left before the doors close.
6.1 Map Out the Follow-Up Strategy
It's important to have a CLEAR vision of your Follow-Up Strategy BEFORE your Webinar ends so you're not scrambling around at the last minute.
For starters, you must realize that with a Webinar, you actually have THREE unique segments once that Webinar ends:
- People who REGISTERED But Didn't Attend
- People who Registered and ATTENDED and BOUGHT
- People who Registered and ATTENDED and DIDN'T BUY
Note: We use PlusThis to identify these segments, but GotoWebinar can also give you this data manually inside their reporting feature.
I message these three segments differently.
Segment #1: REGISTERED But Didn't Attend
With Segment #1, you must realize that they have NOT seen the webinar (no value) and they haven't been presented with the Offer. With that in mind, the only thing I do here is RE-INVITE them to an ENCORE Presentation, Evergreen Webinar, or the Replay. I do not send them any emails about the product or the fact it's coming down soon.
Segment #2: REGISTERED, ATTENDED & BOUGHT
These are your customers. They don't need to see ANY Follow-Up. They should immediately be added to a Customer Onboarding Sequence.
Segment #3: ATTENDED But Didn't BUY
This is your most important segment during the Follow-Up. They have SEEN the Webinar (value!), and they have seen the Offer, but they haven't made their decision yet. Your goal is to help them make the right decision as easily as possible.
Please use my Follow-Up Process to create YOUR Follow-Up Process.
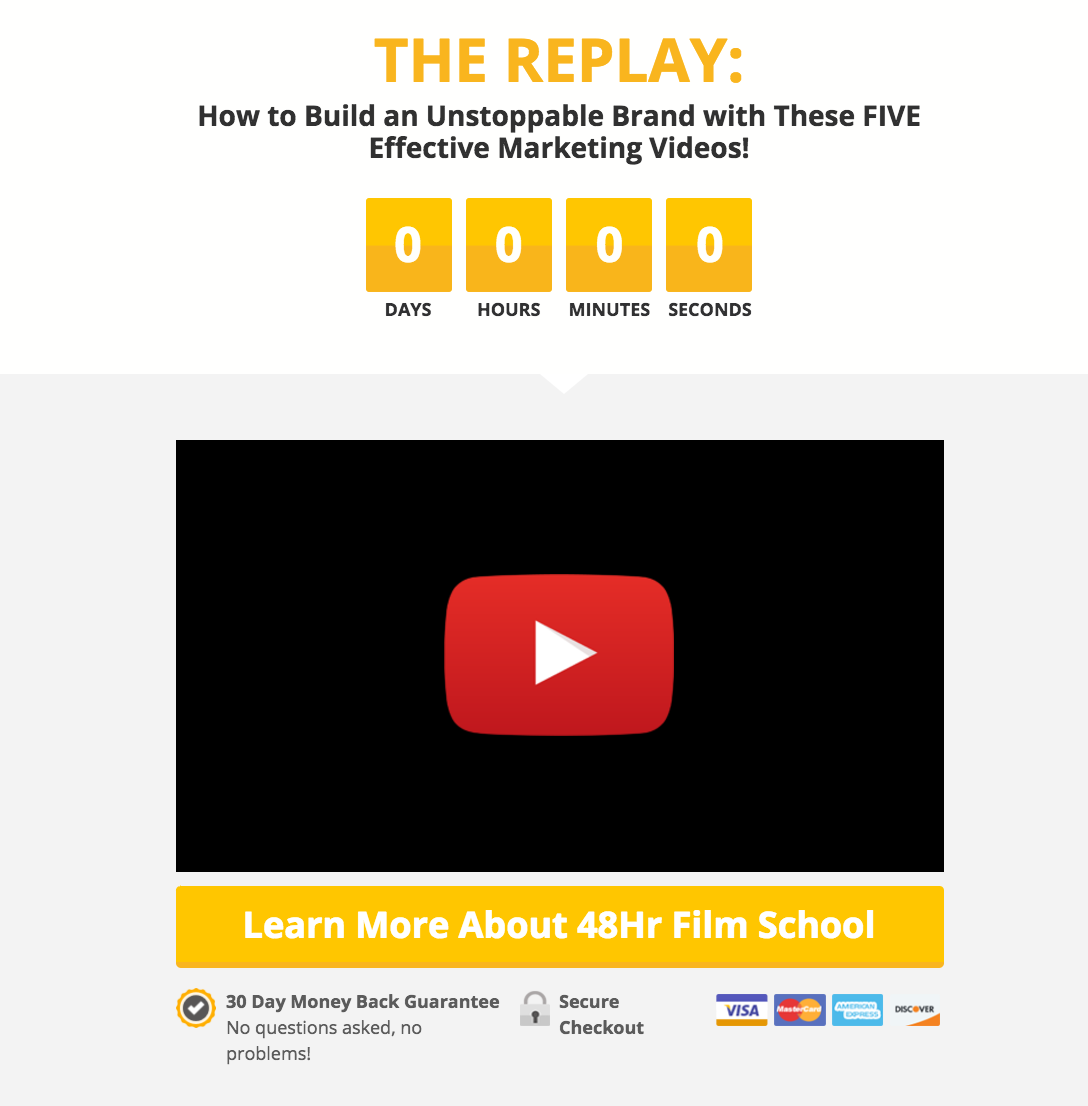
6.2 Webinar Replay Page
In 6.2, you have the optional step of creating a Webinar Replay Page for those who were not able to attend your Webinar. Frankly, I don't recommend this. Most people don't watch replays, and worse, it trains your audience to not show up live (no bueno).
Either way, I've included a simple process for creating your Replay Page using Instapage or Kajabi page.
1. Create A Basic Leadpages Template For Your Webinar Replay
Include a Heading, short Description, Countdown Timer (optional), embedded Video Replay (all above the fold), and a Call To Action button.
2. CTA Button
Your Call To Action button should link directly to your Sales Page.
3. Product Details
Include product details such as a Guarantee and Checkout Options.
7. The Sales Page:
In Step #7, you'll create your Sales Page. However, for a Webinar Launch, you can actually skip this step completely! IF this is your FIRST Webinar Launch, I highly recommend NOT having a Sales Page, and simply sending your Attendees to your Checkout Page. (The Webinar Pitch IS the Sales Page).
However, if you would like to create a Sales Page, please follow our Sales Page Process.
7.1 Follow The Sales Page Creation Process
To create your Sales Page, please follow our Sales Page Creation Process.
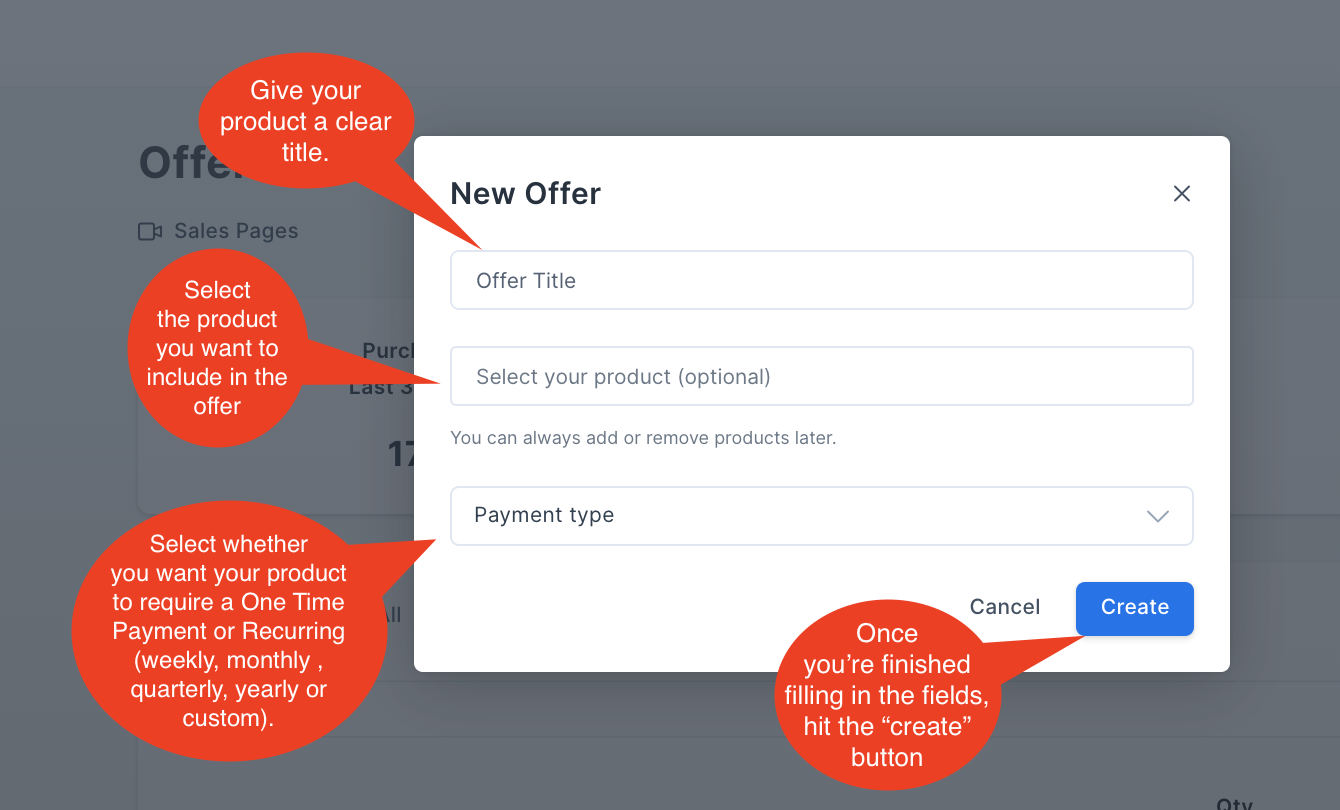
8.2 Design Checkout Page (Graphics & Copy)
4. Checkout Page Design.
1. After creating your offer, you will be able to further customize the details of the sale and the look of the checkout page.
2. Add in any description of your product.
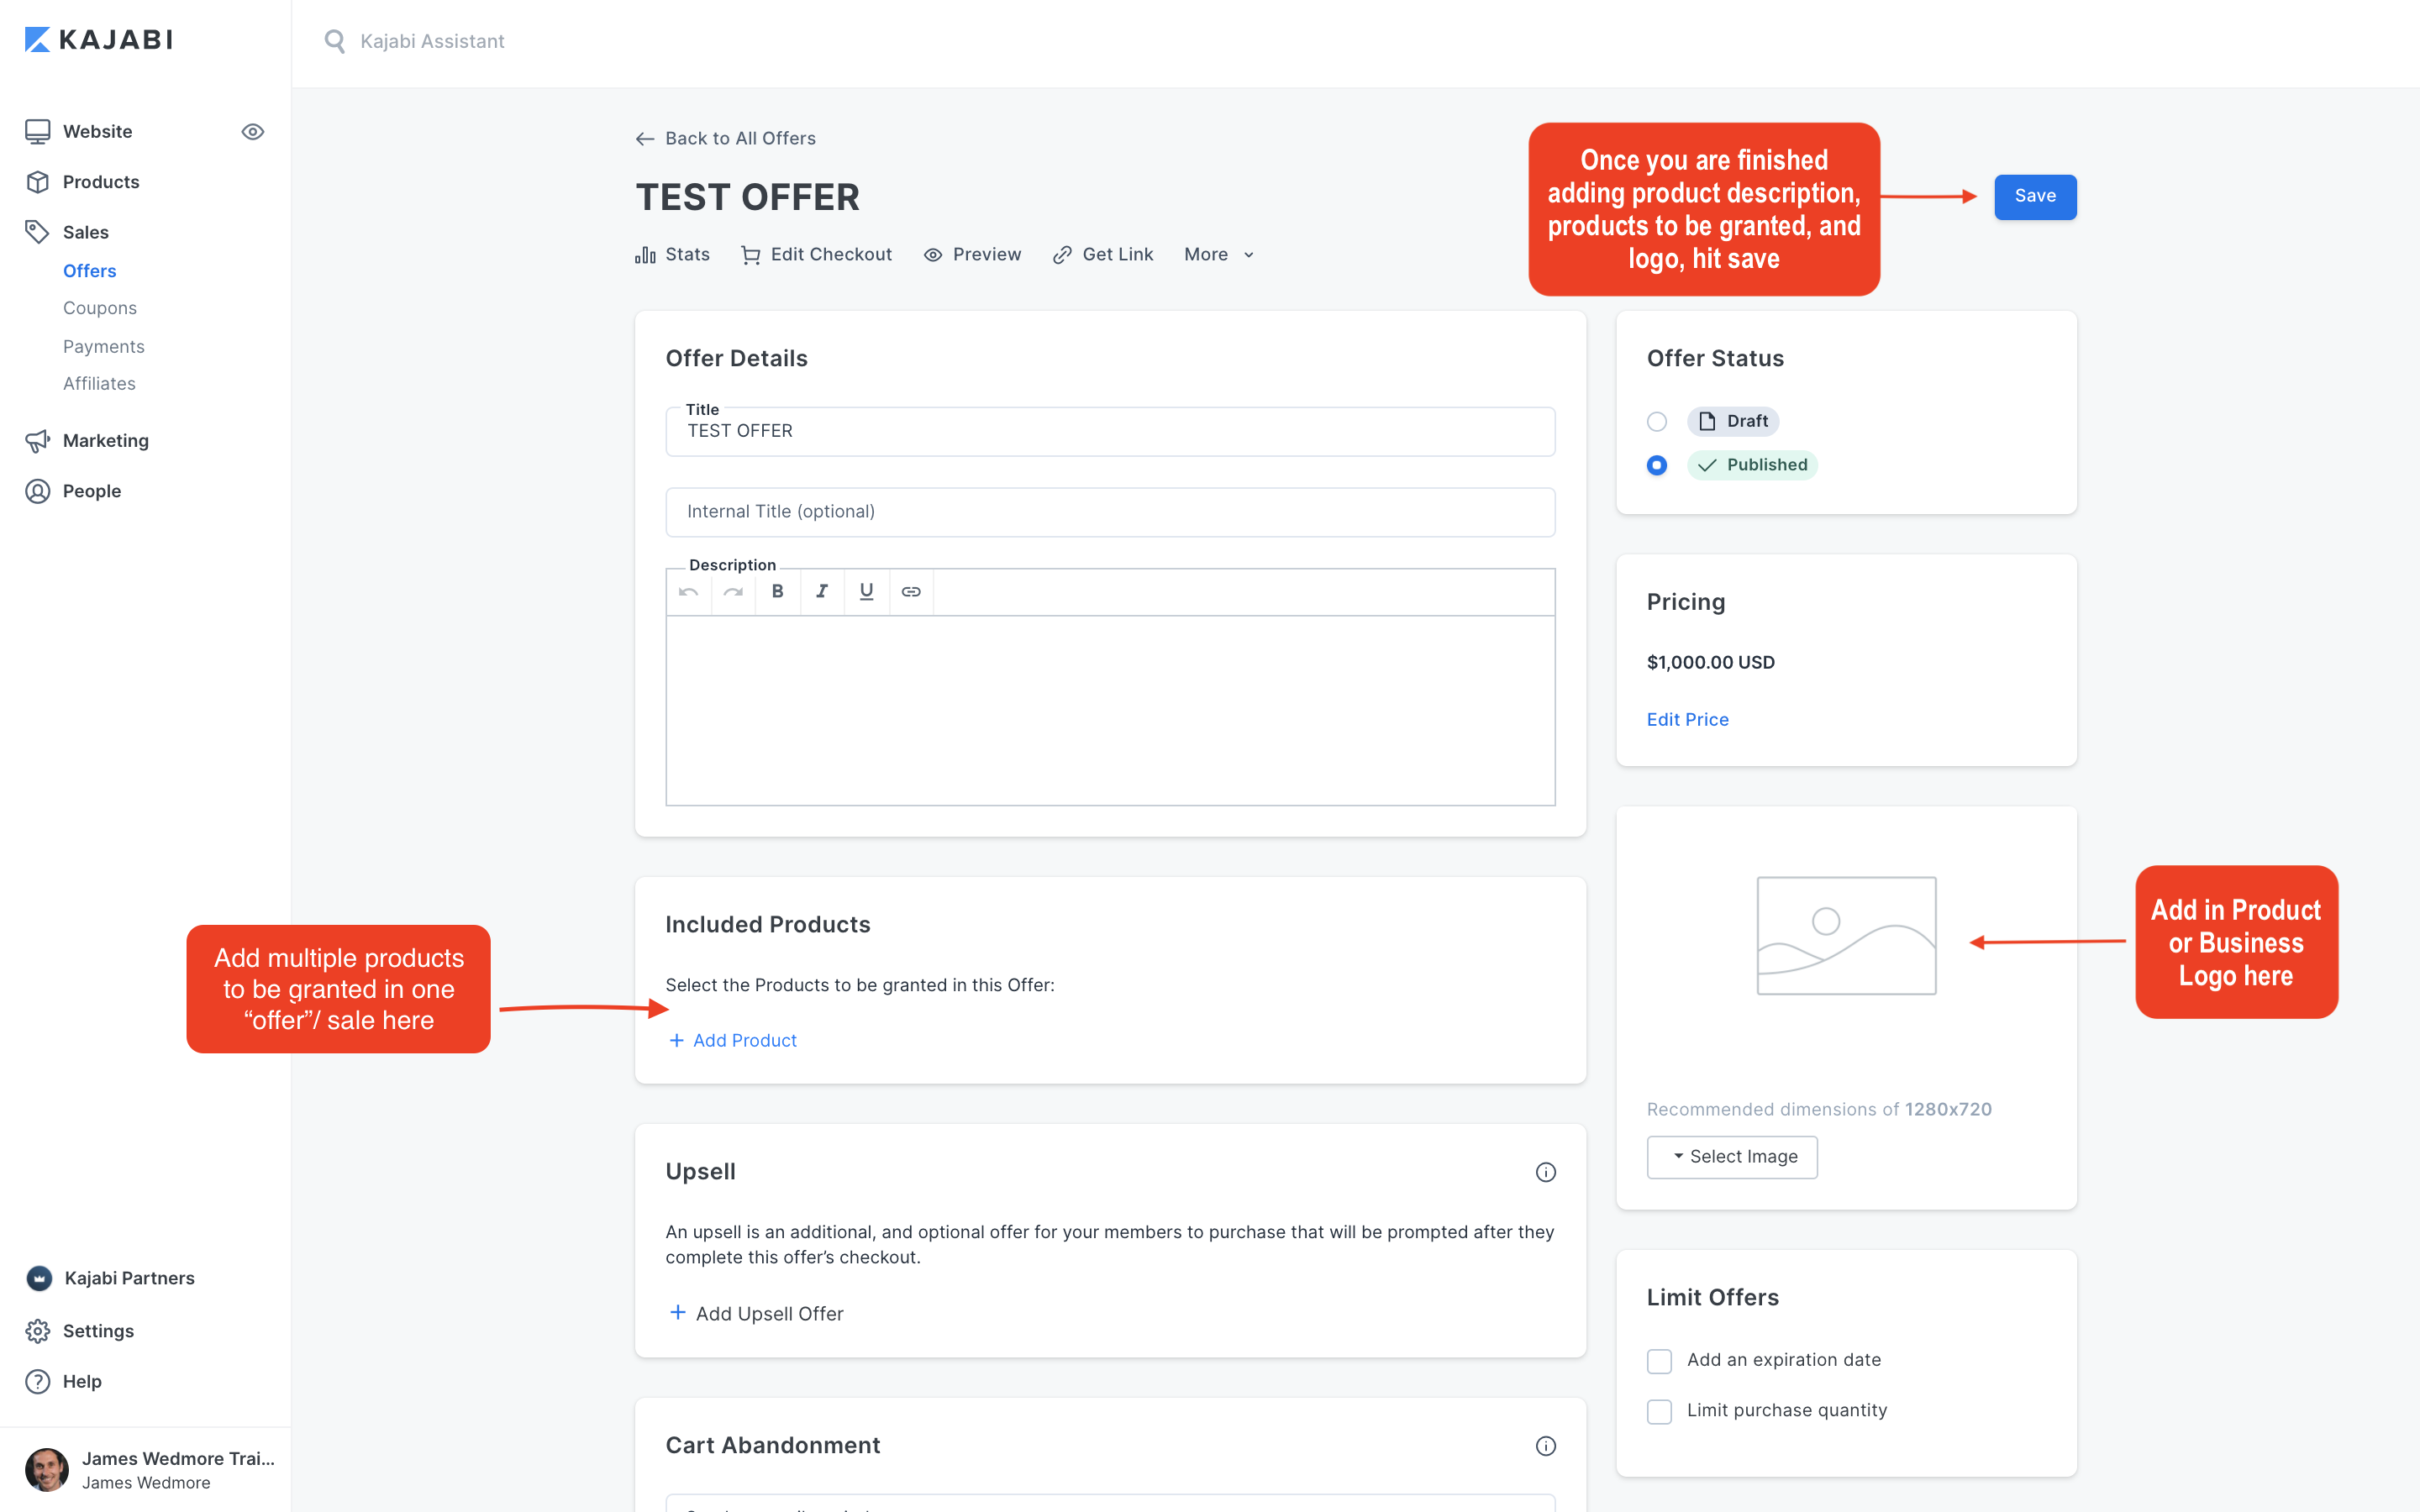
3. Add in all the products you want to have granted to your buyer at the time of purchase.
4. Lastly, upload the appropriate Logo.
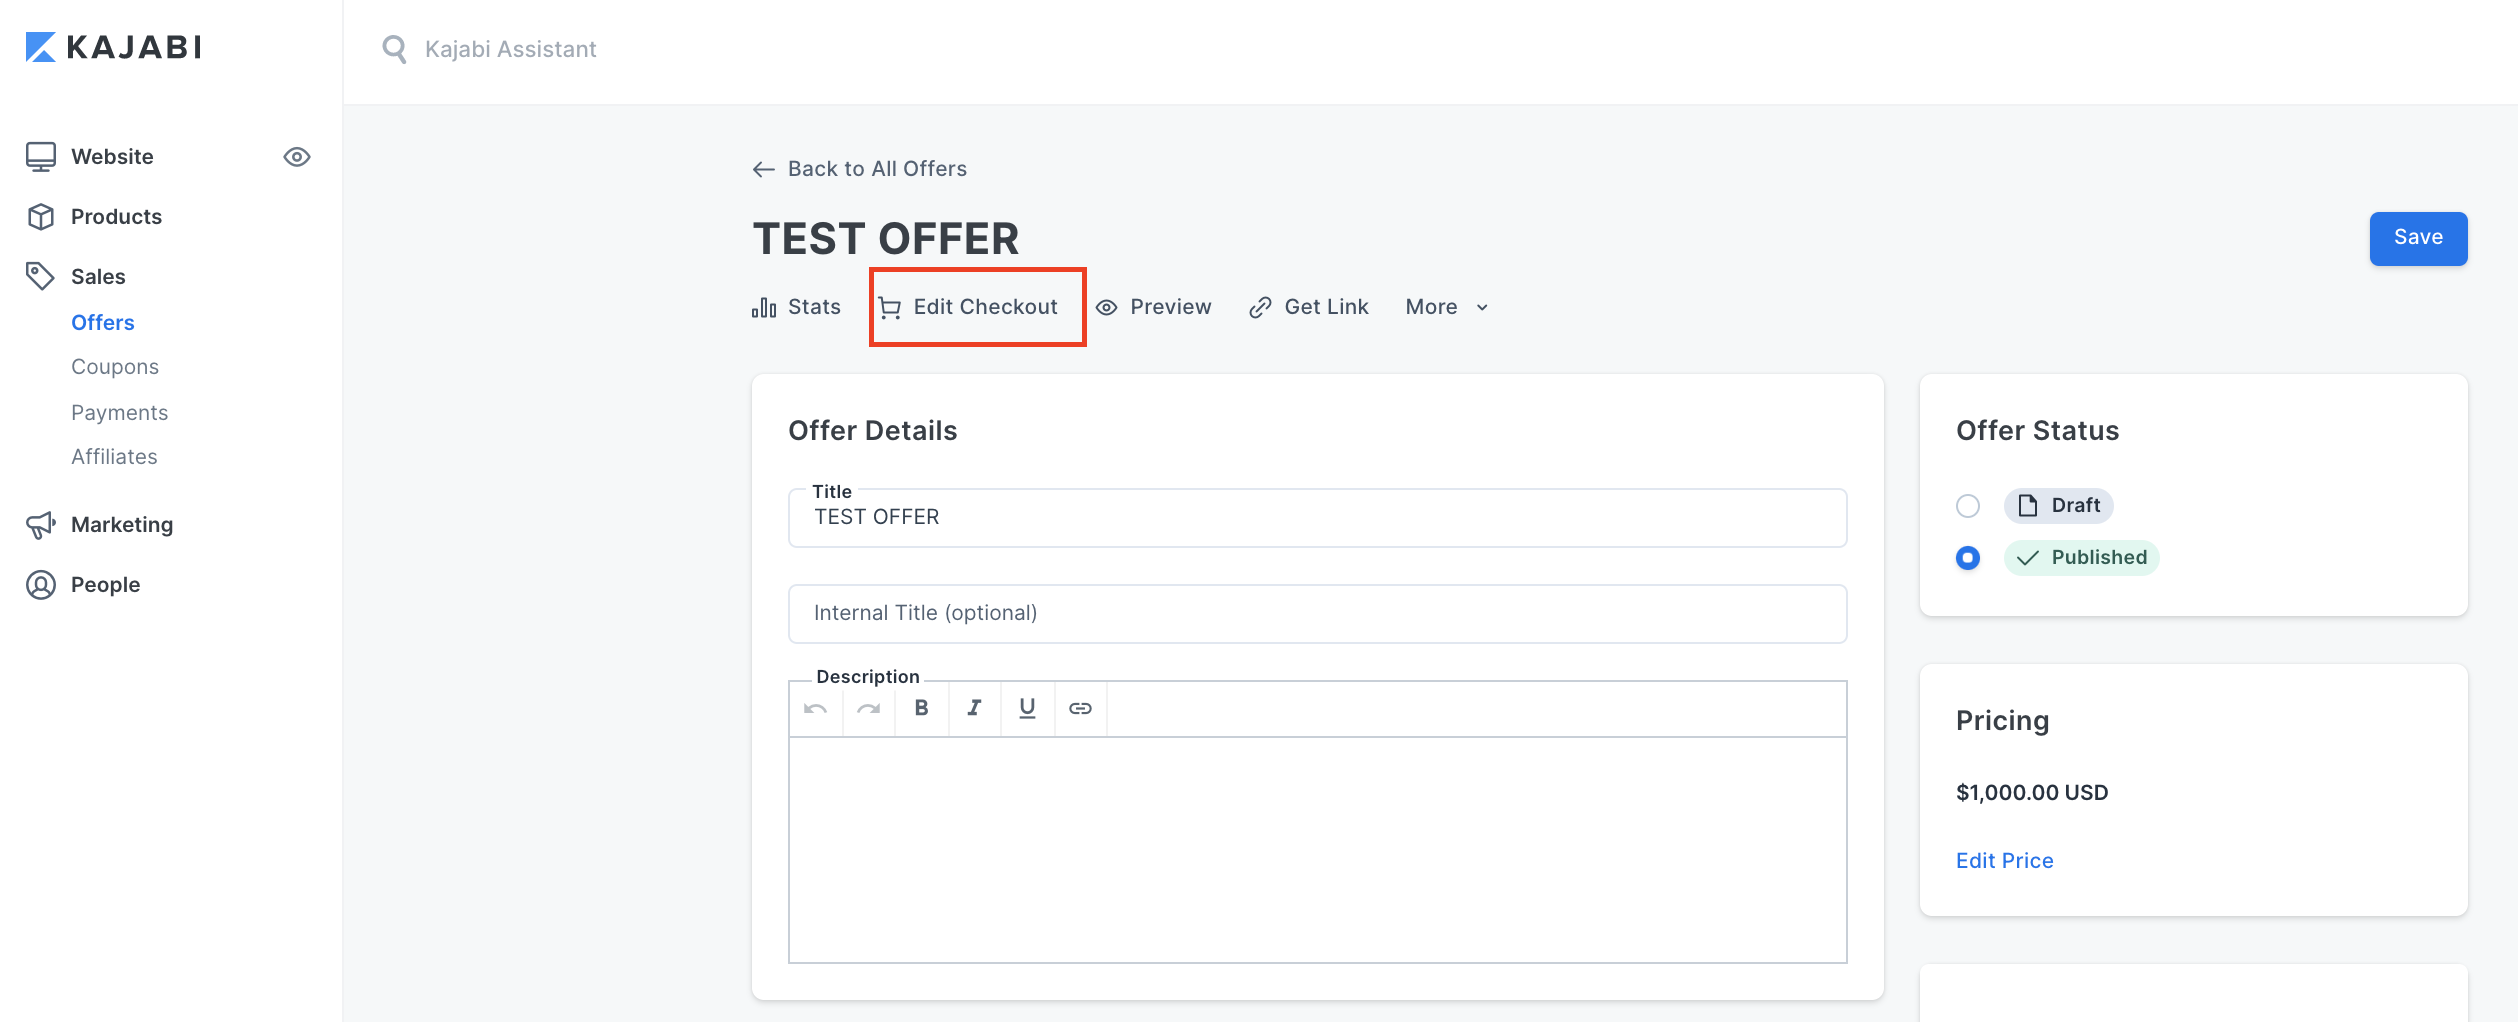
5. Edit Fields and Details of Checkout Page
At the top of the offer page, click on "Edit Checkout"
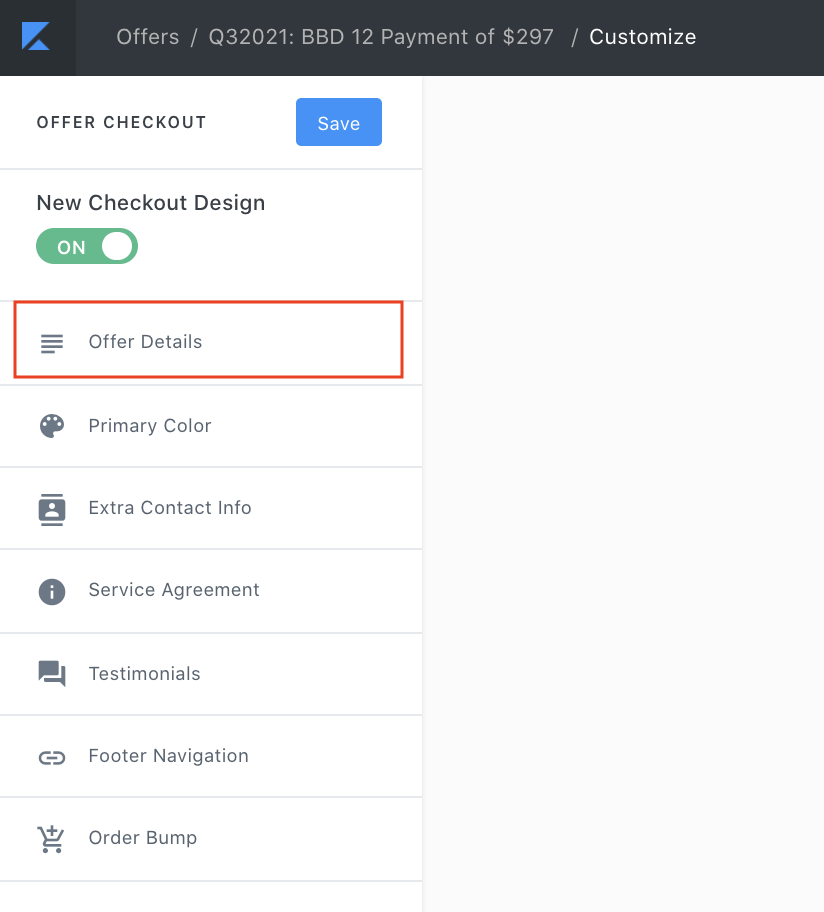
1. Edit the "Offer Details".
A. Select "New Checkout Design".
B. Click on "Offer Details" on the left-hand side.
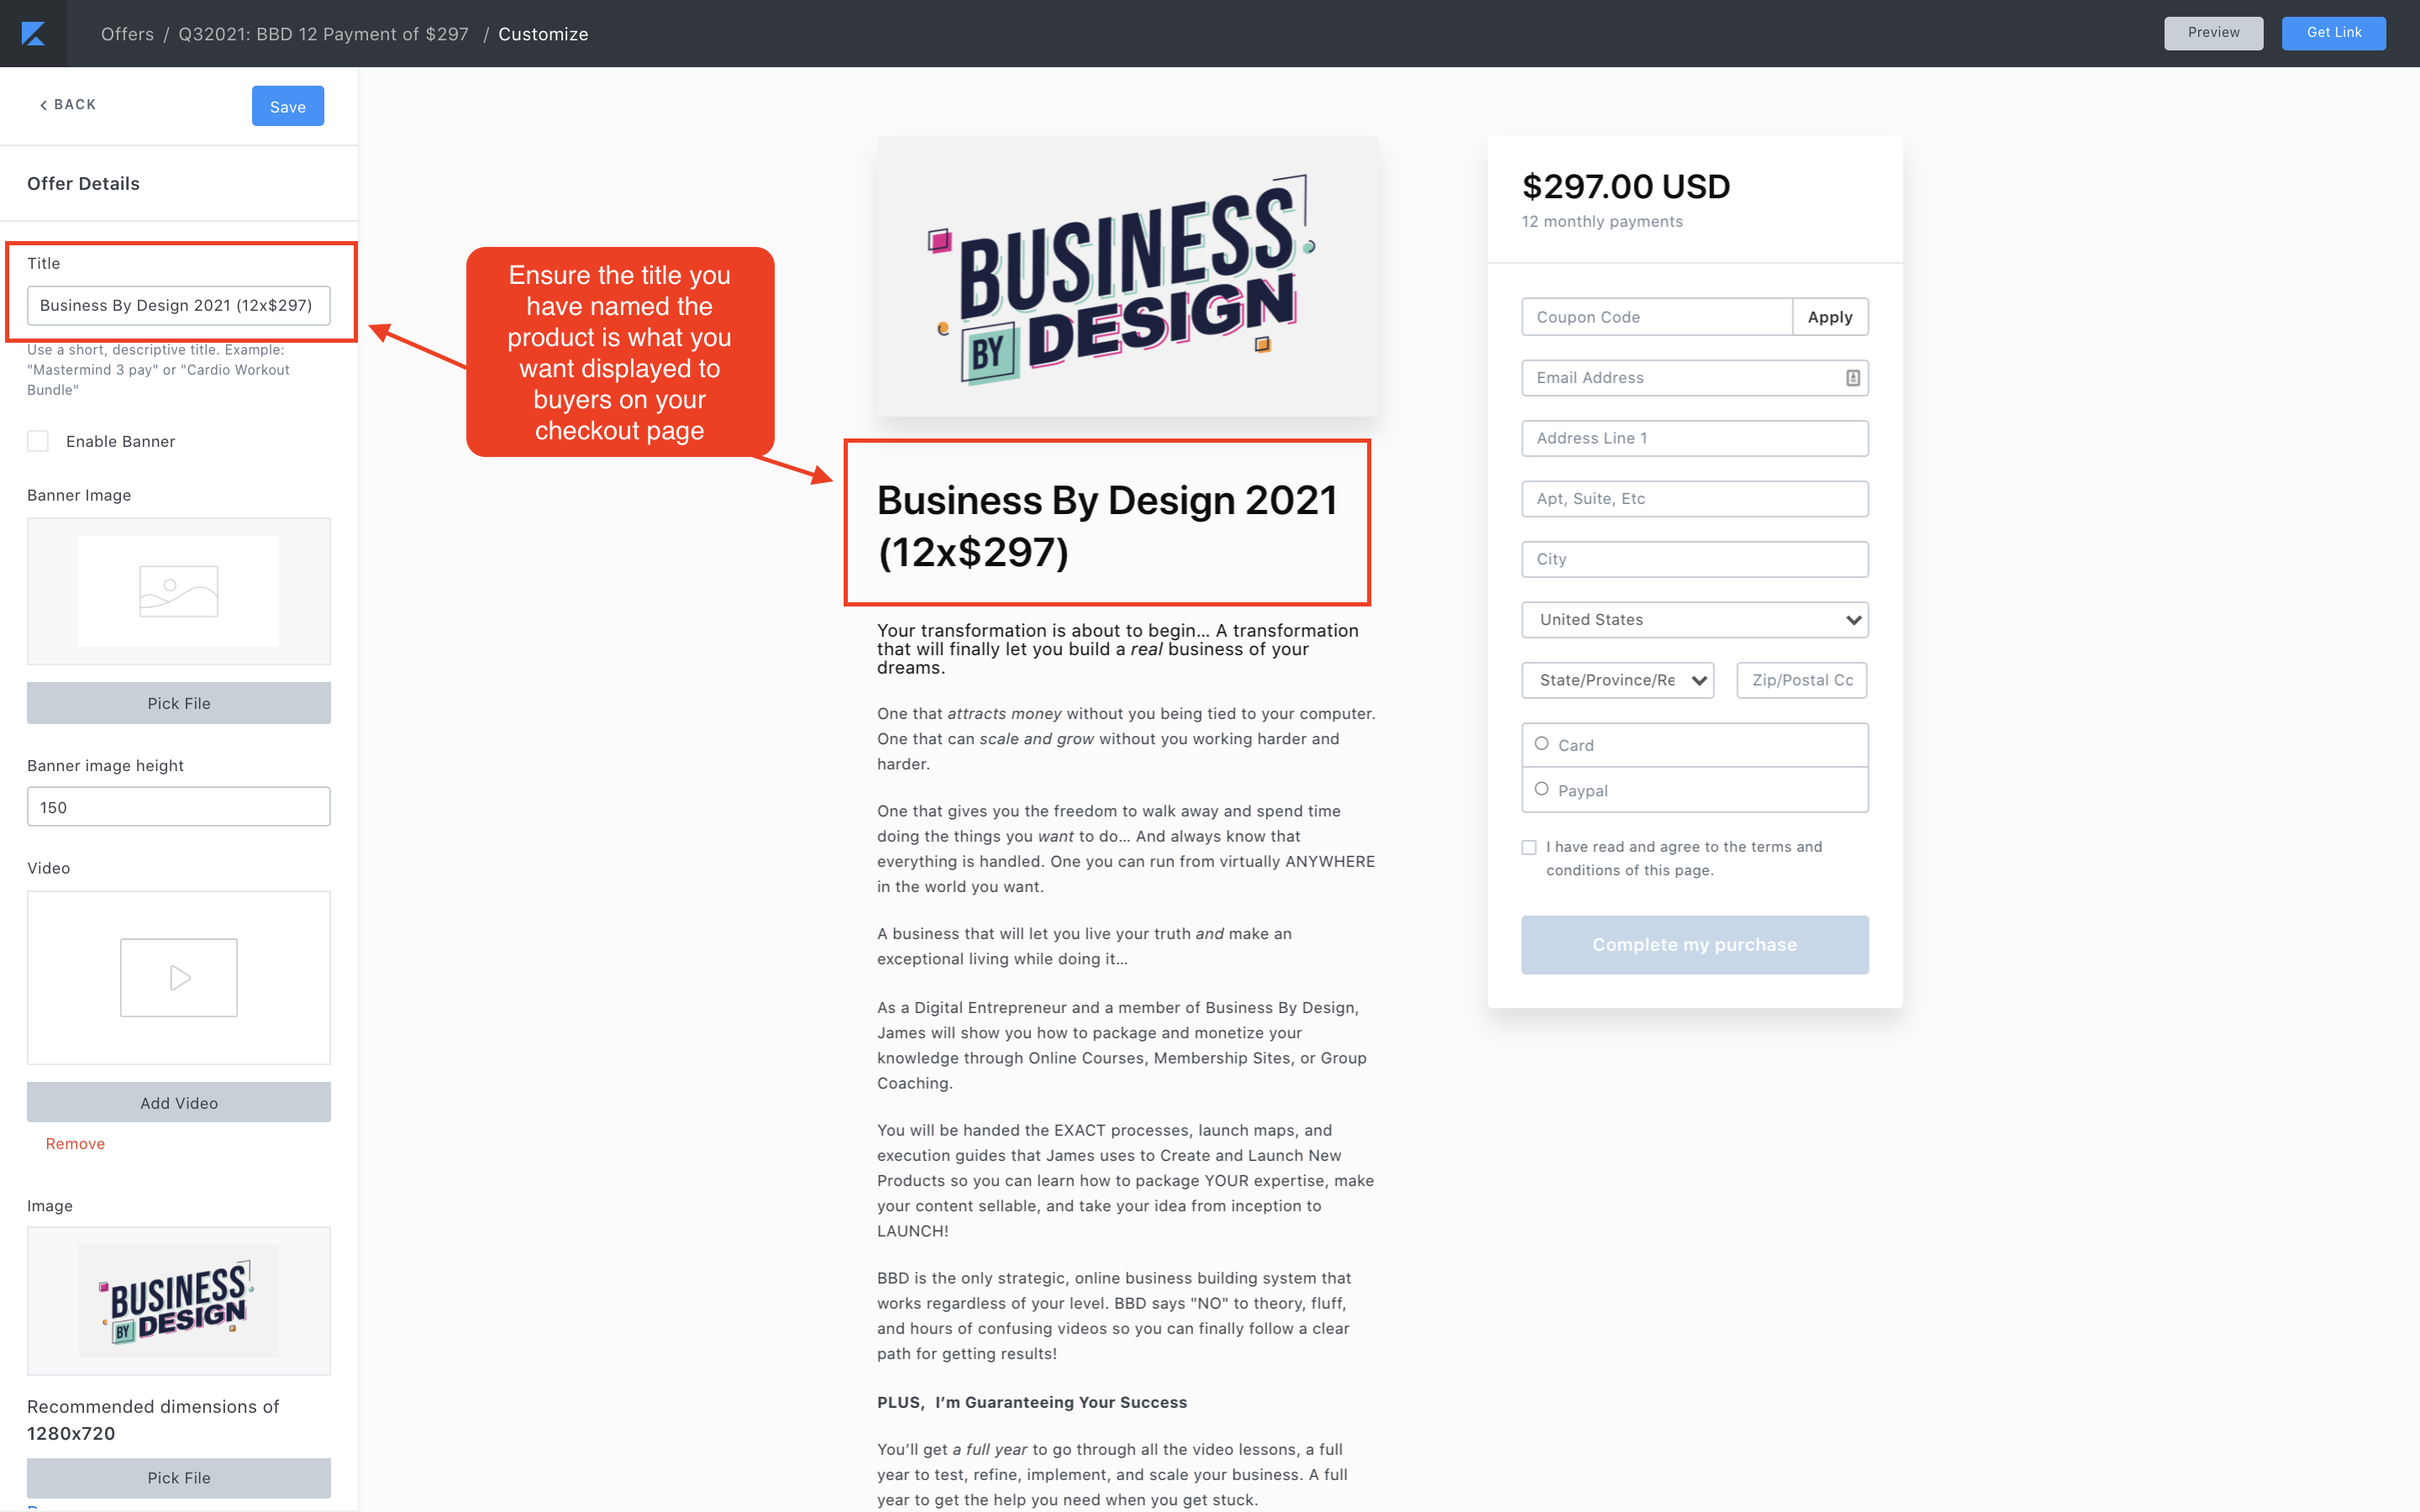
C. Ensure the title you have given your offer is the title you want to be displayed on your checkout page.
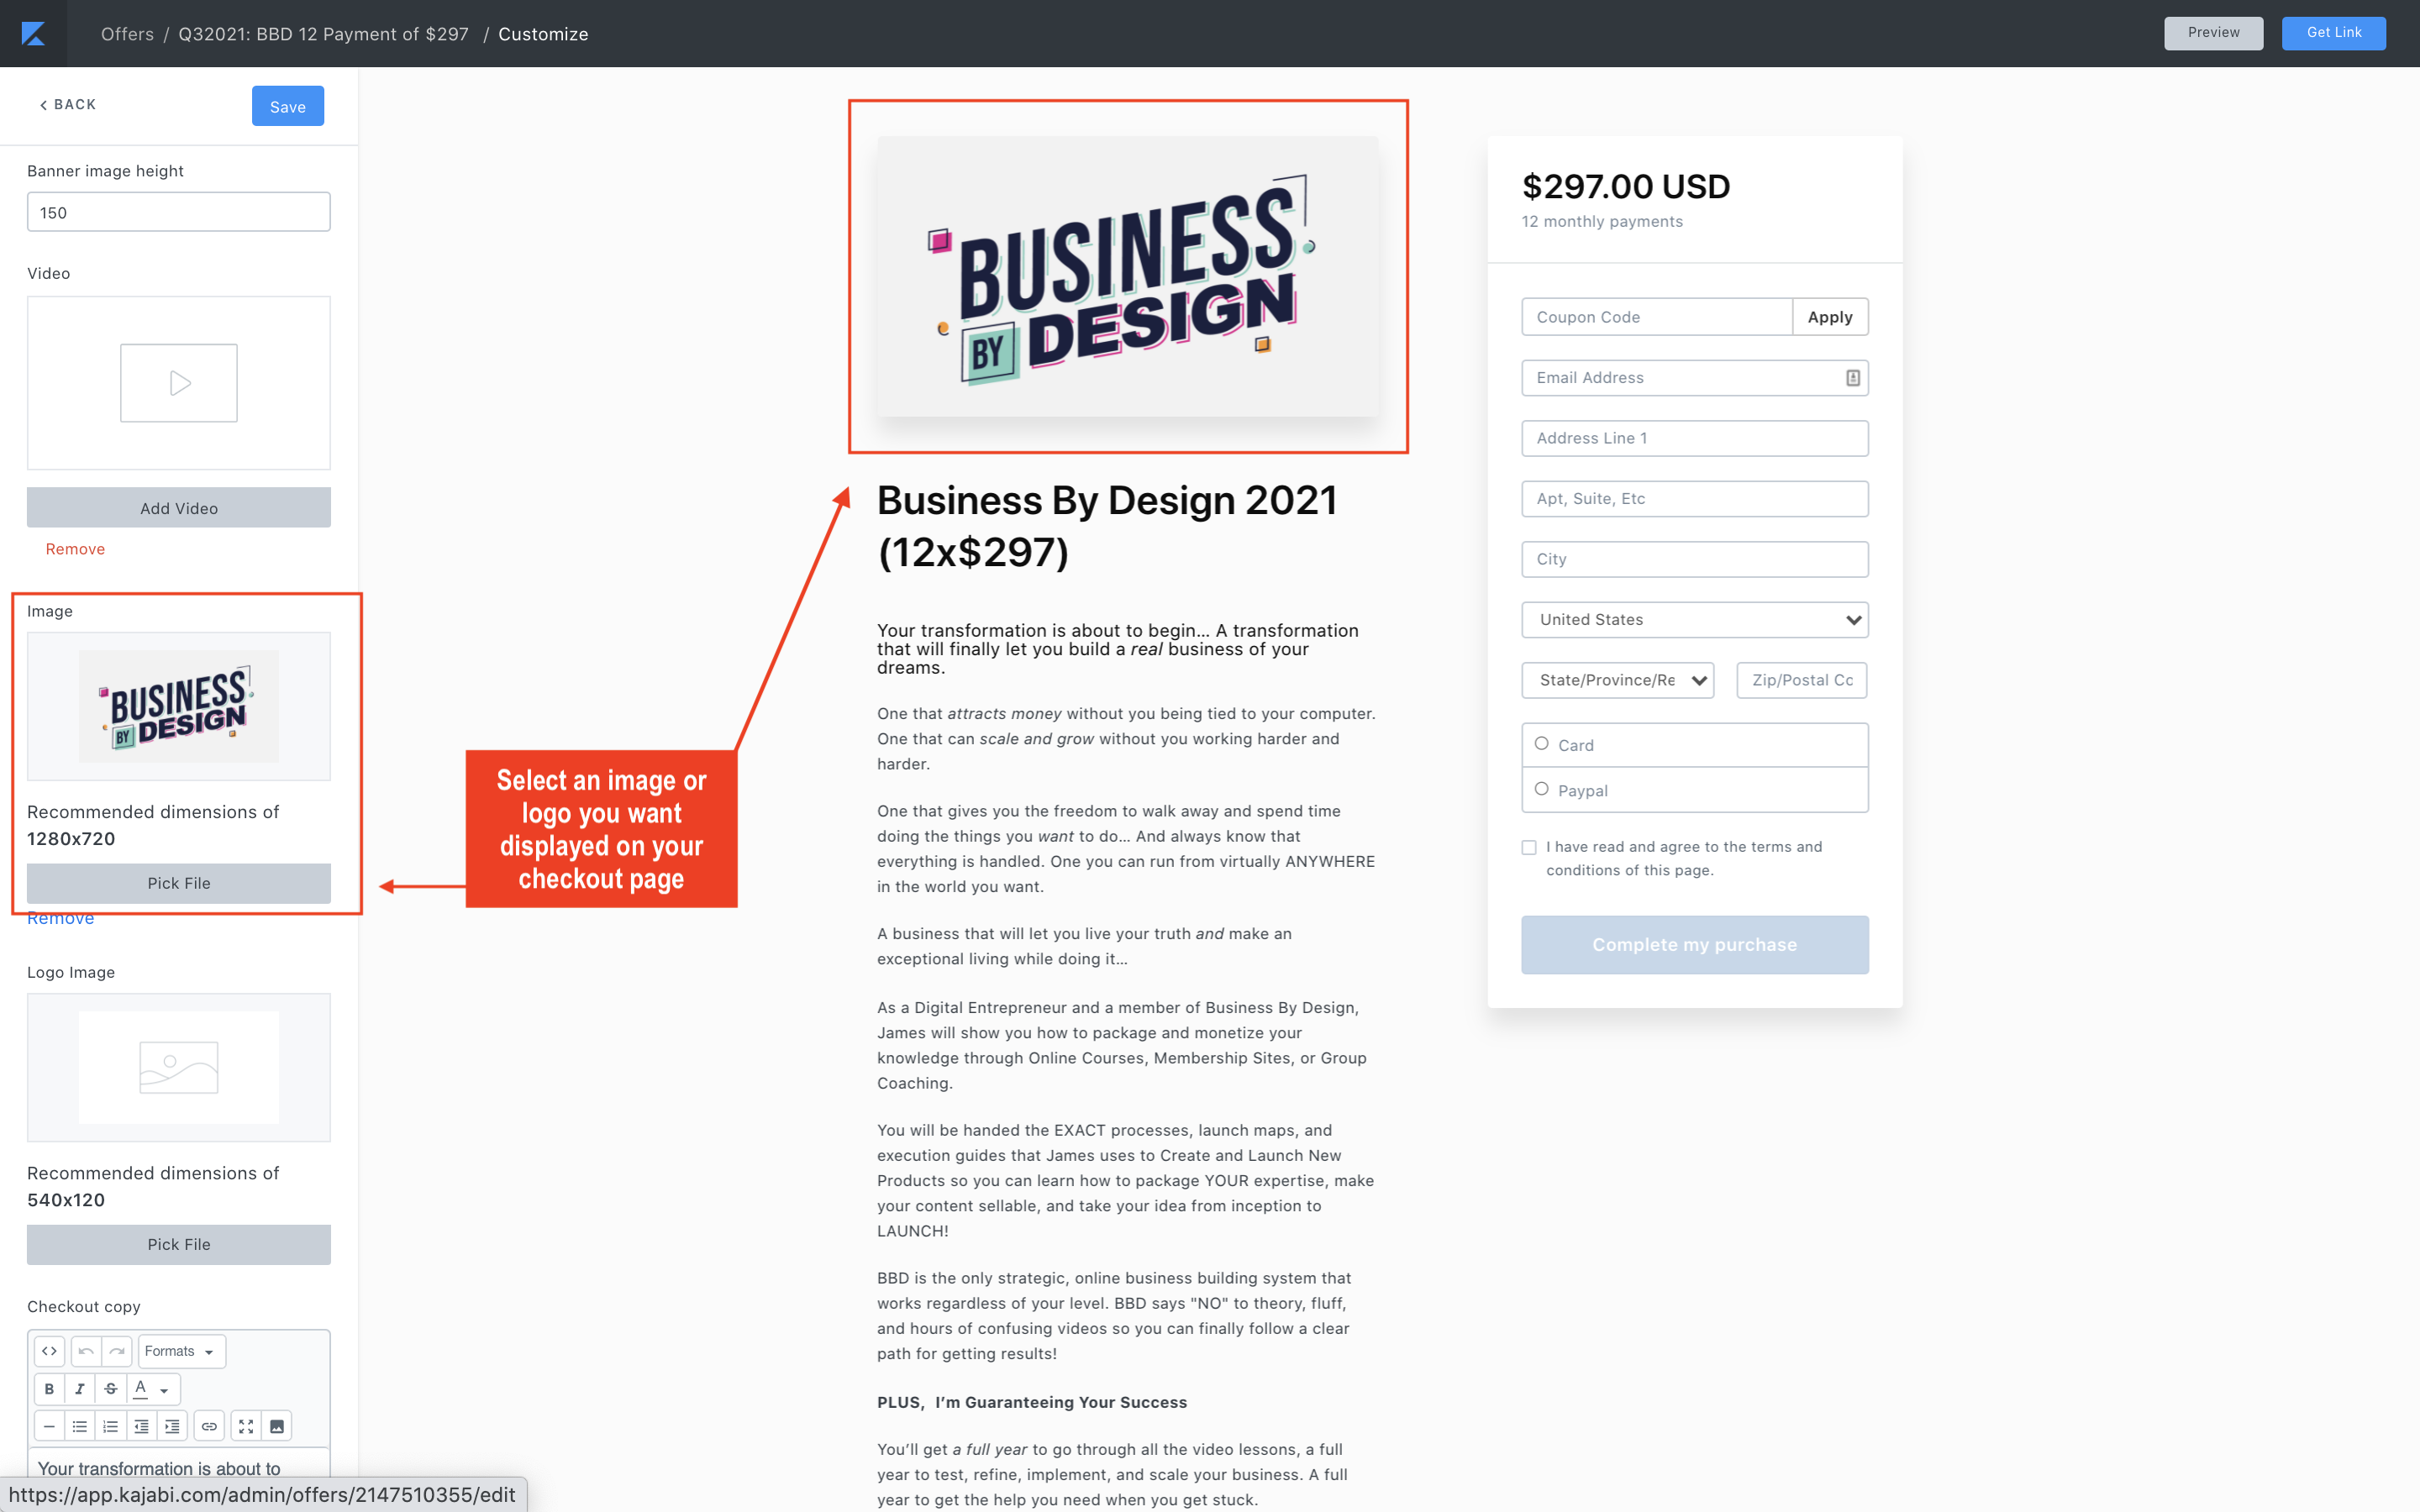
D. Scrolling down on the "offer details" section, upload an image or logo that you want to be displayed on your checkout page.
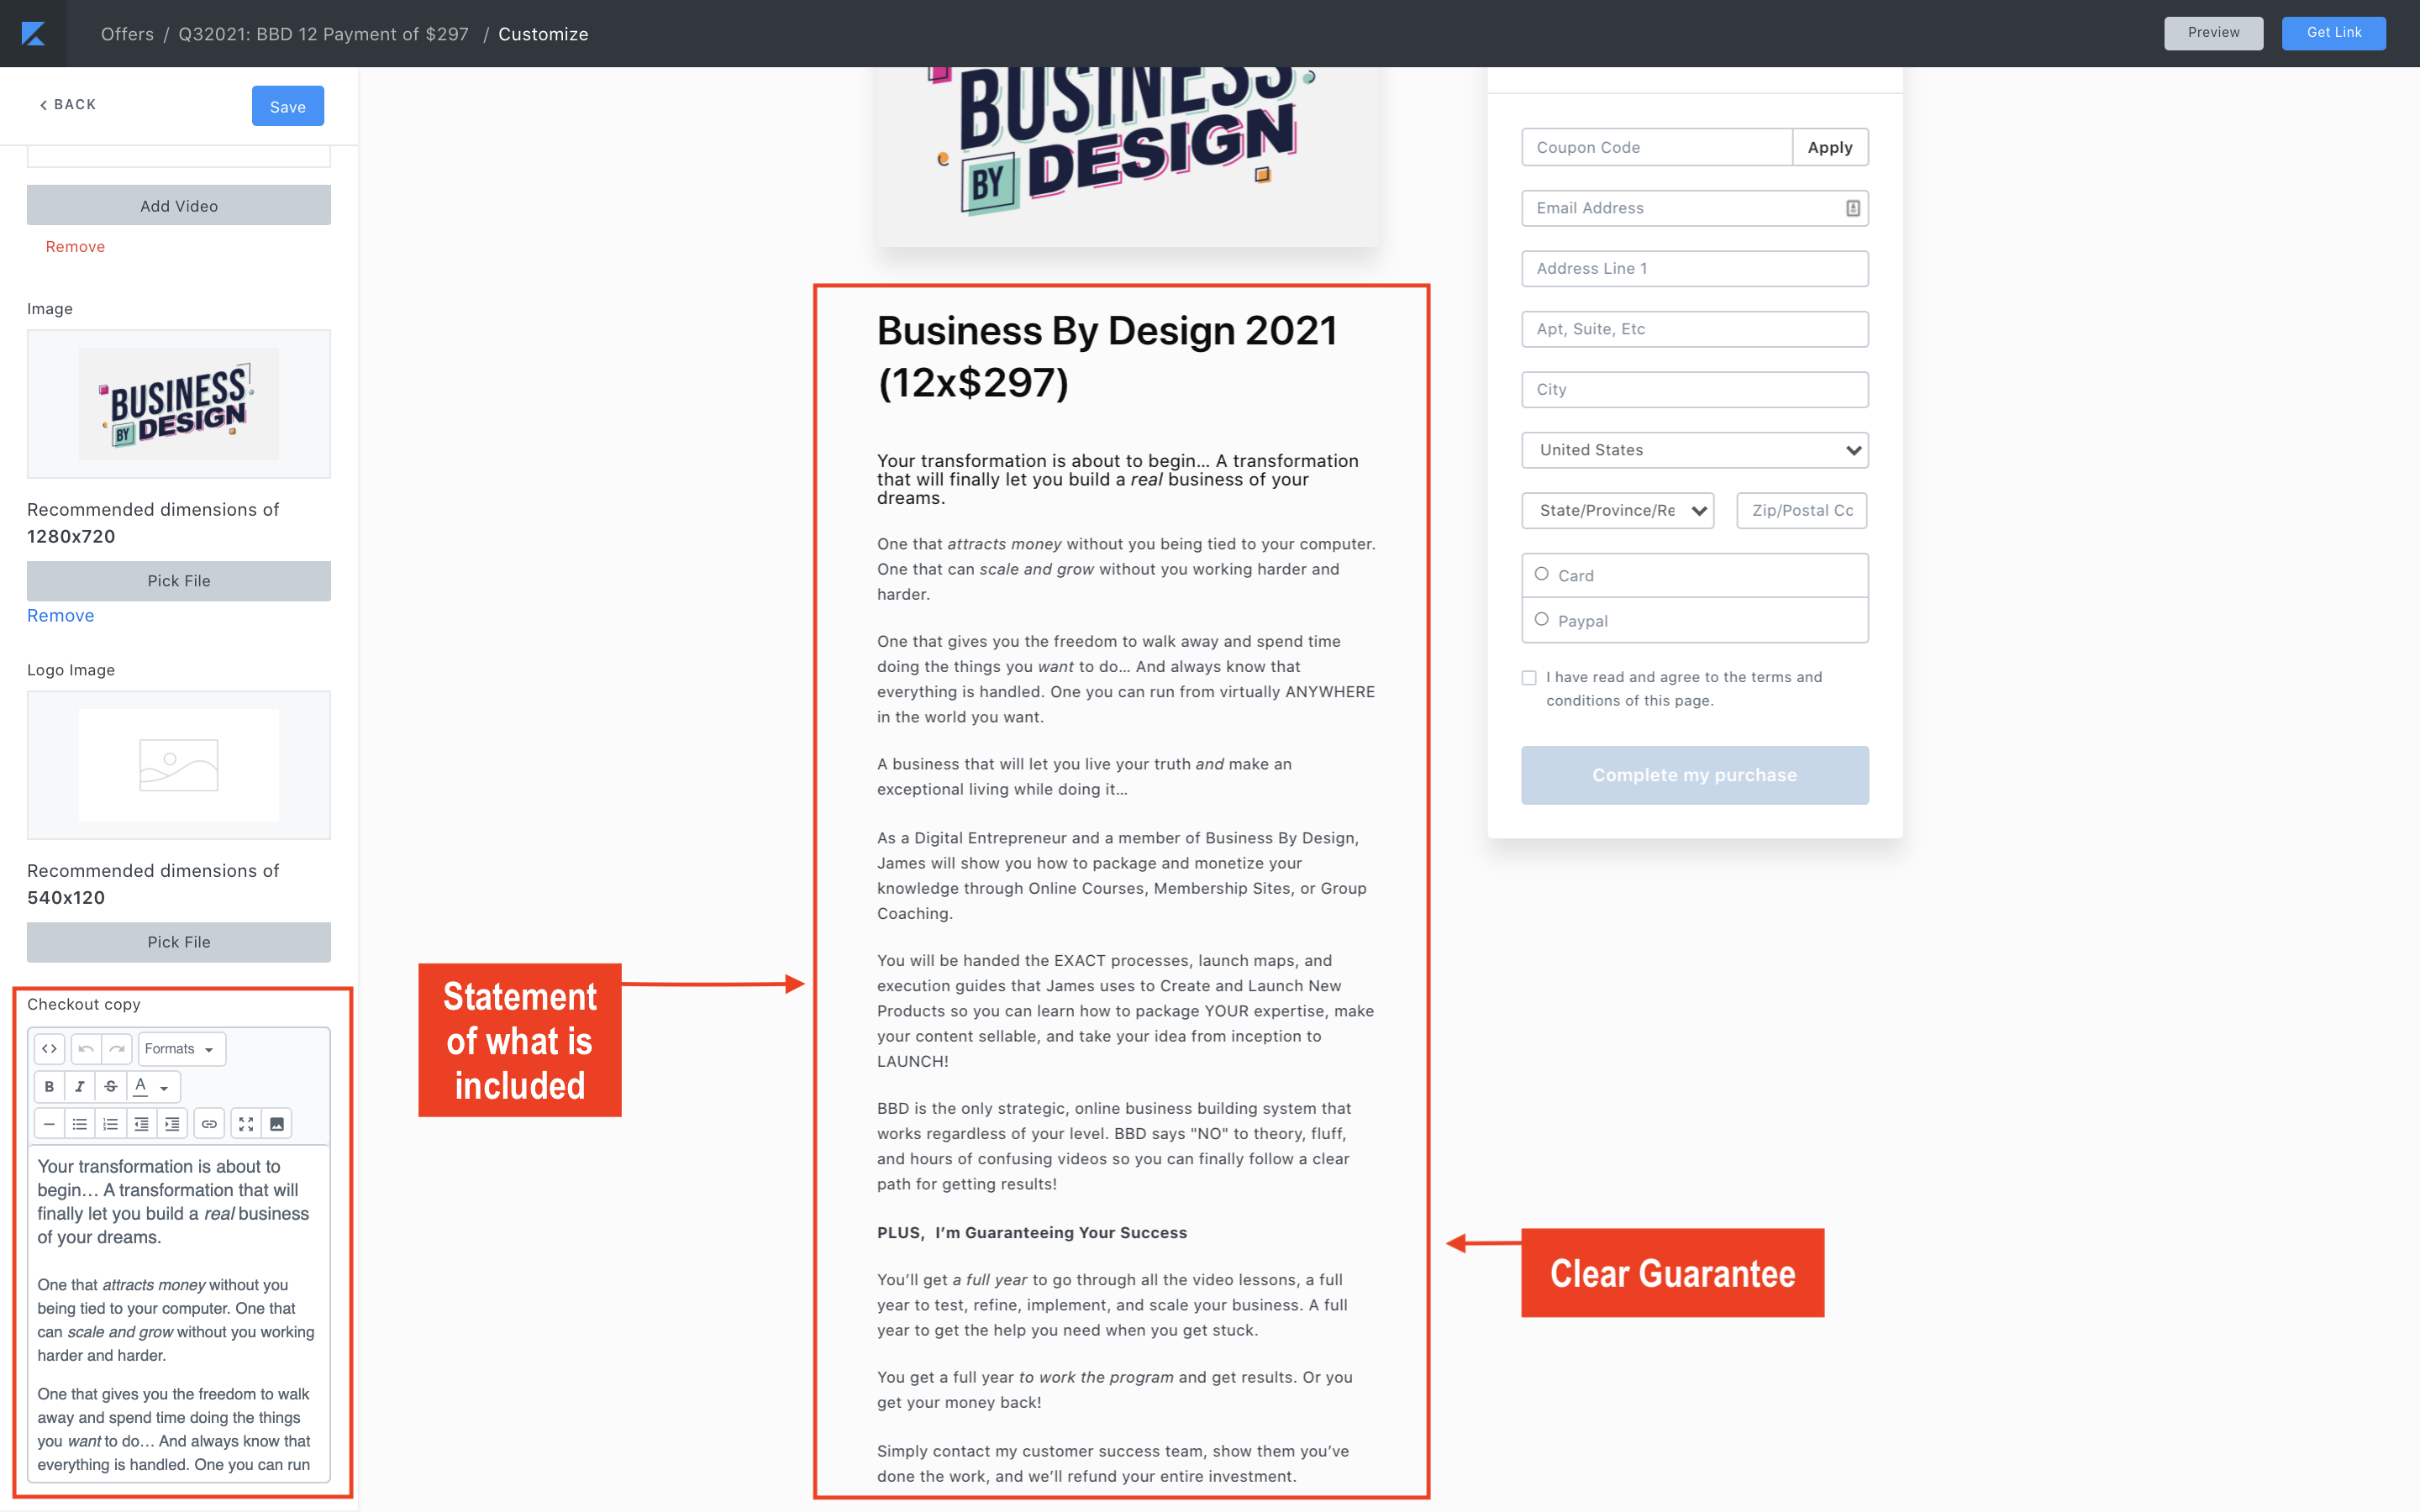
F. At the bottom of the "Offer Details" section you will see a text box where you will need to include some things for the checkout copy.
1. A description of what the customer is getting.
2. The promise or transformation of the product.
3. The Guarantee "30-Day 100% Satisfaction Guarantee" (or guarantee you perfer)
For the Guarantee Text: "If within 30 days you haven't seen any results, but you've completed the course, we will happily return the investment that you've made in yourself." (unless prefer otherwise)
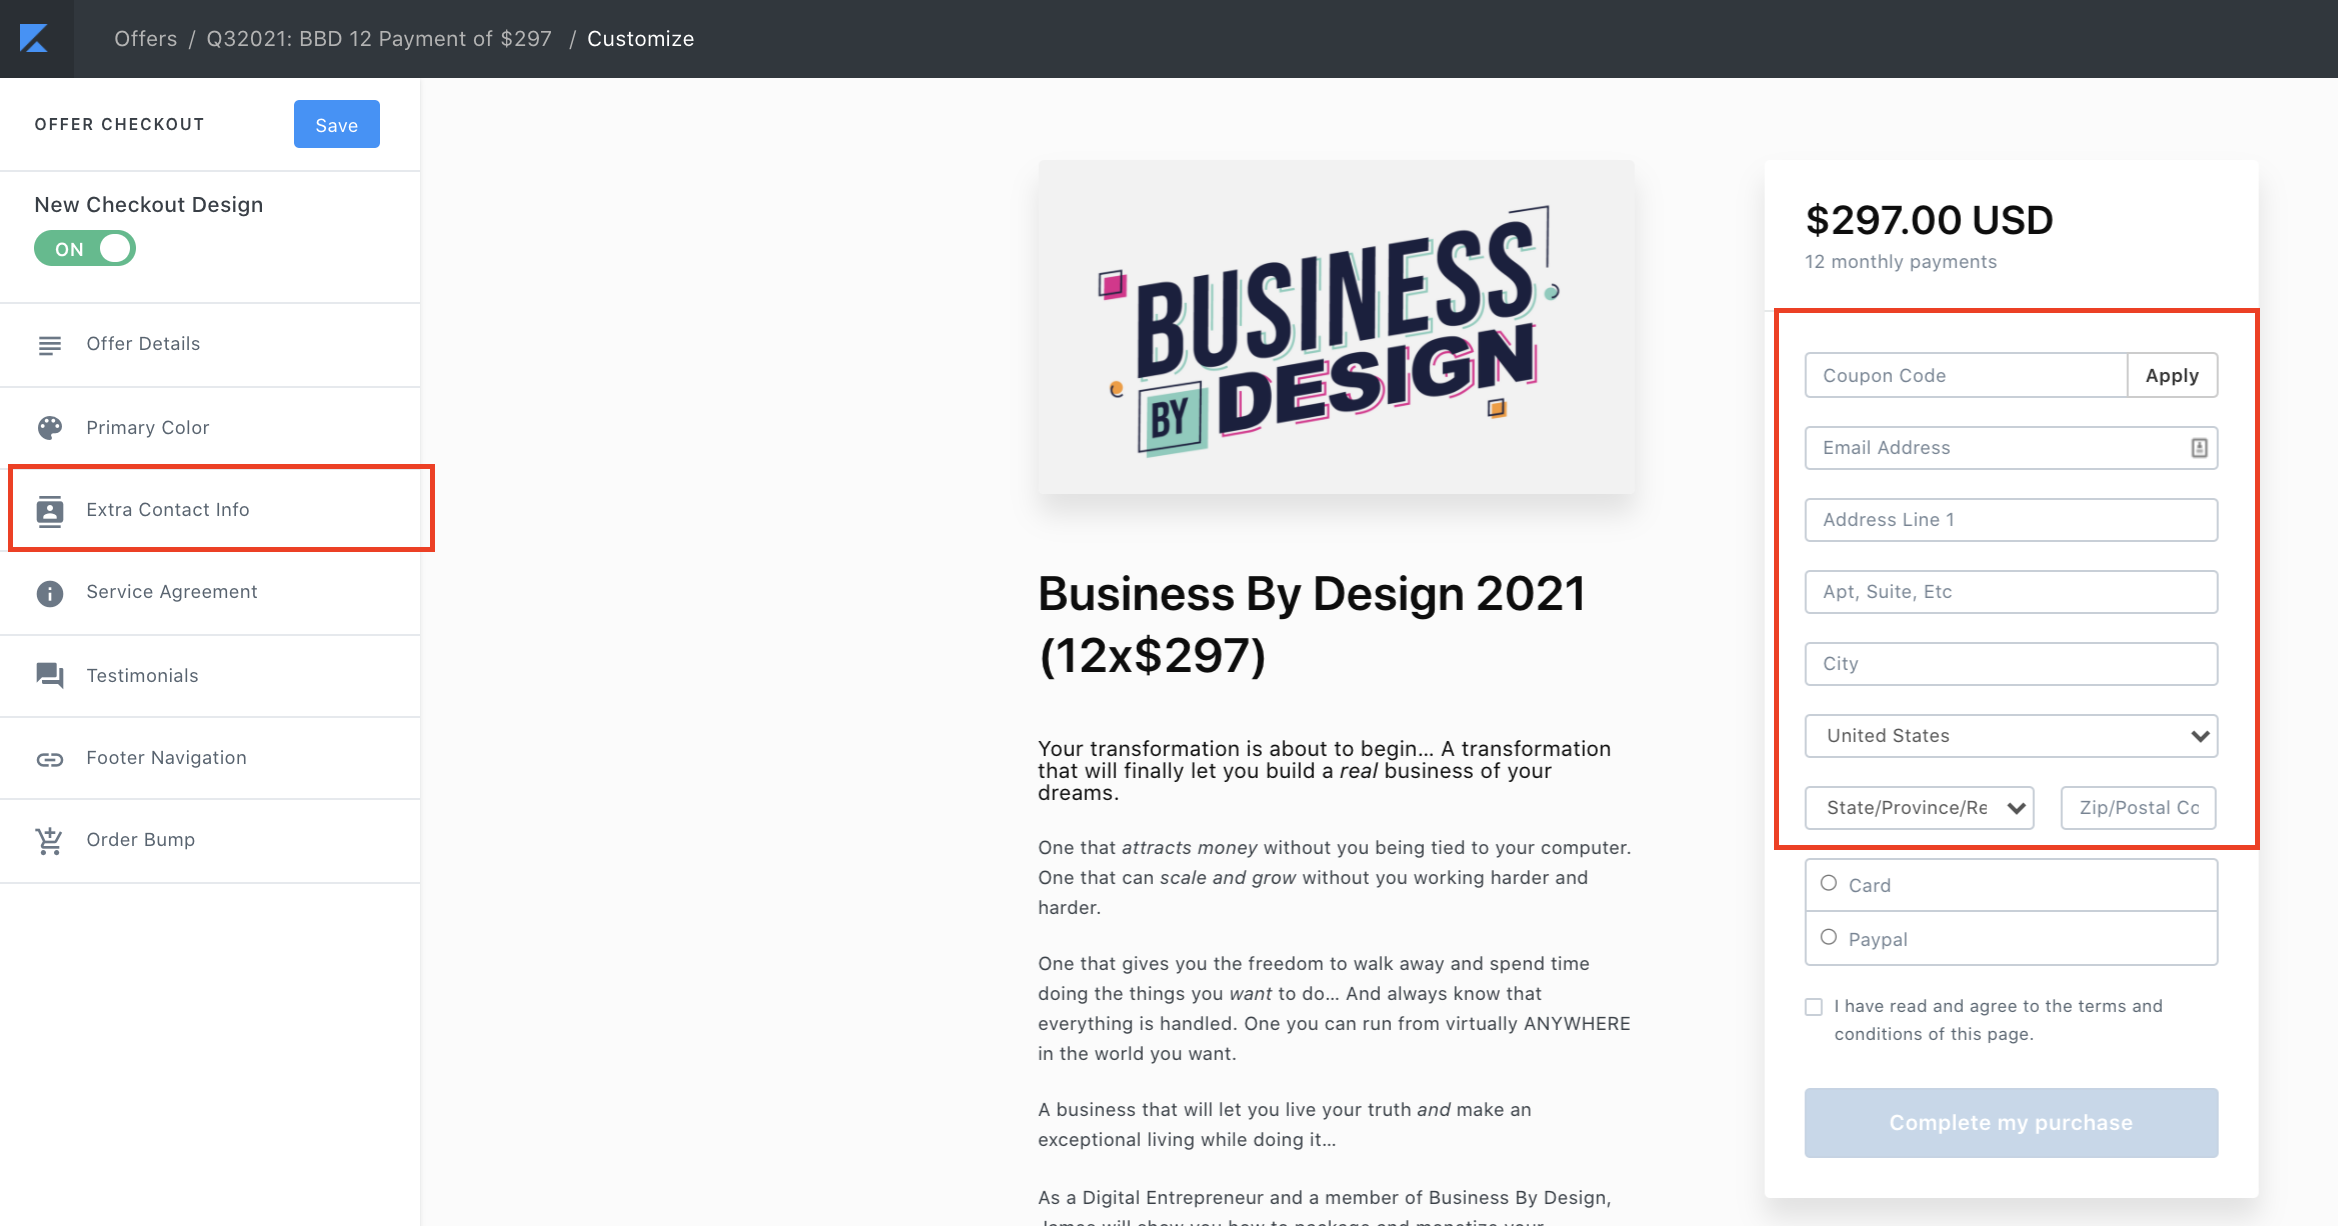
2. Select the "Extra Contact Information" to select additional fields to be collected in the checkout process.
Select which fields we need for the purchase: Phone Number and Billing Address.
Note: For higher-priced products, we also require the shipping address.
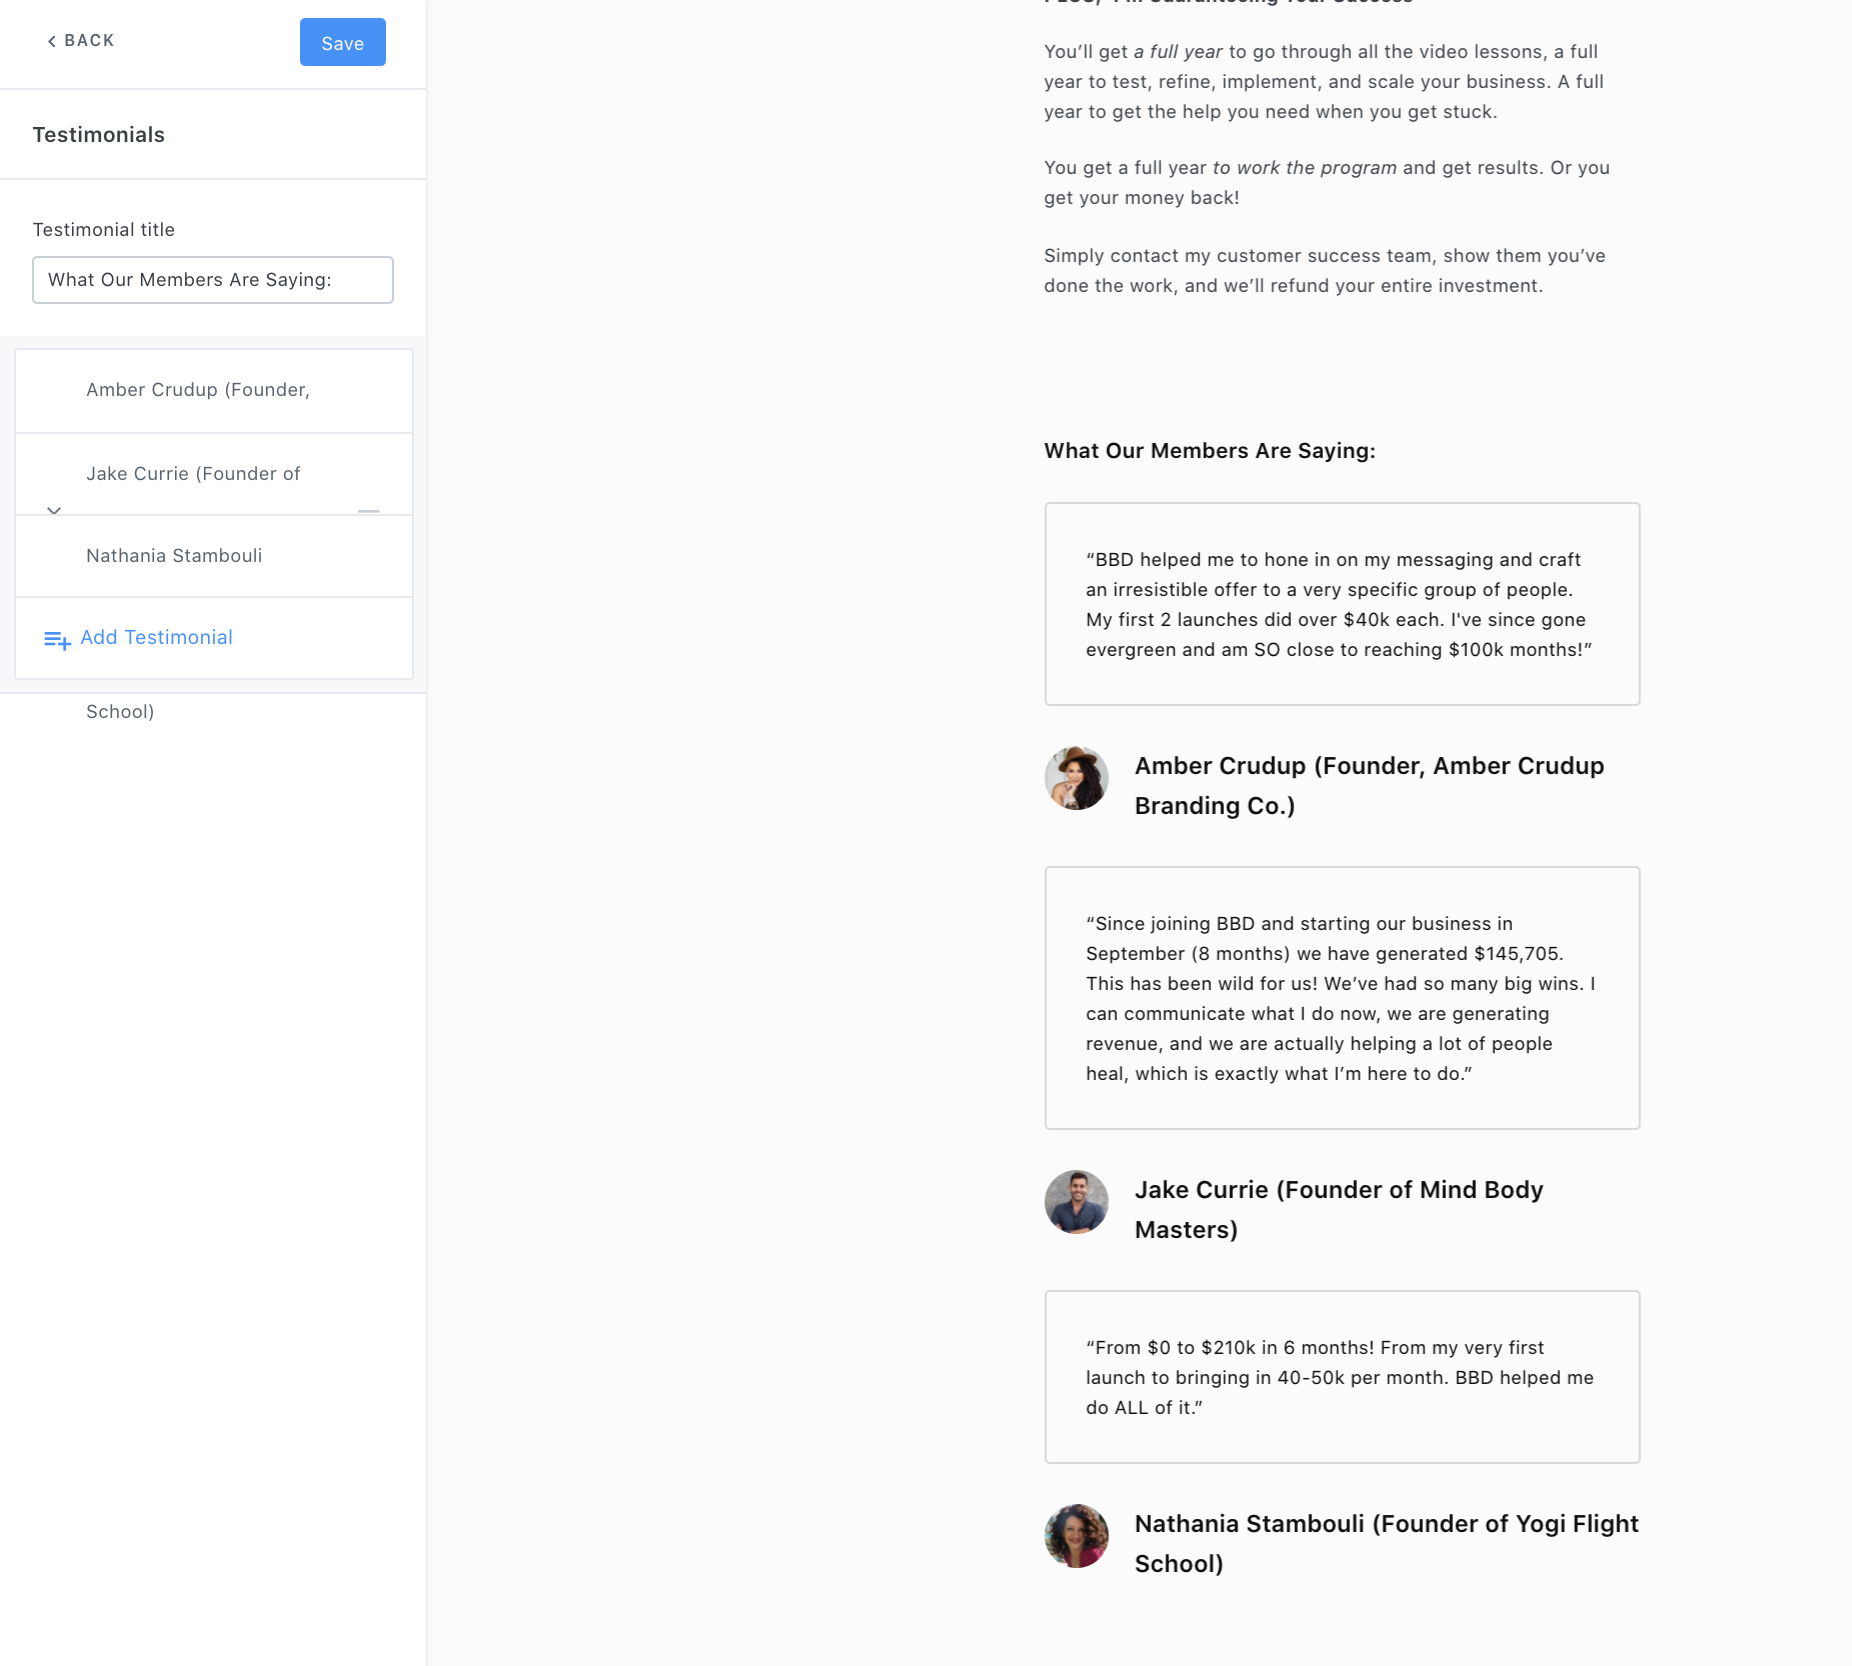
6. Testimonials
1. Label Testimonials Title: "Success Stories" or "What Our Members Are Saying"
2. Upload Photos using the UPLOAD PHOTO button and add corresponding testimonials using + ADD TESTIMONIAL button at bottom of the box on the left-hand side.
**Note: Add AT LEAST two Testimonials.
7. Product/Pricing Info & Order Bump
1. Double check that your Product Name and Description are formatted the way you want.
2. Adjust the URL if instructed to do so.
3. Upload the Product Image Logo if you haven't already.
4. If you'd like to include an Order Bump, select that here and include all given details.
**Note: As opposed to an Upsell, an Order Bump is something added to the purchase before checkout.
5. Lastly, make sure Credit Card Payments and PayPal Payments are switched to say "Yes." Scroll down.
8.4 Purchase Confirmation Page
10. Thank You Page
While editing your offer in Kajabi, you will see an option for a custom Thank You Page URL on the bottom right side.
You also have the option to select a Confirmation Page Theme from Kajabi that Customers will see after purchasing.
See image below: