Templates /
Email Scrubbing Template

Email Scrubbing Template

Use this Email Scrubbing Template to build a healthy email subscriber list.
1
Introduction:
2
Record checklist details
3
Pre-scrub tasks:
4
Review your email marketing statistics
5
Decide which email lists you should scrub
6
Work out why your emails have bounced
7
Correct bounces
8
Re-engage subscribers
9
Create a new campaign:
10
Select your campaign type
11
Customize your campaign
12
Set up lead magnet delivery
13
Create a shareable MonsterLink
14
Email list cleanup:
15
Decide who to remove
16
How to clean your list using MailChimp:
17
Remove inactive subscribers
18
Remove small segments of subscribers
19
Determine how you wish to archive your subscribers
20
Segment and archive by campaign activity
21
Segment and archive by contact rating
22
How to clean your list via a service:
23
Consider email scrubbing services
24
Clean list management:
25
Manage your newly cleaned list
26
Sources:
27
Related Checklists:

Introduction:

Use this Email Scrubbing Template to remove unengaged subscribers from your email list.

Log into Process Street and work through this template any time you need to refine your email subscriber list to contain active subscribers only. 

Email list decay is a common phenomenon, with an average decline rate of 22% each year.

In addition to this, the average open rate for an email campaign ranges from around 15-23% only, depending on the industry. The average click-through rate is around 1.19% on the search network and 0.35% on the display network. 

Based on these statistics, it is clear that obtaining an email subscriber list of engaged users, and consequently high open and click-through rates, is difficult.

However, the benefits of putting both effort and time to do so are numerous. By refining your email subscriber list to contain active and engaged users only, you can obtain:  

  1. Better open and click rates
  2. Fewer spam complaints 
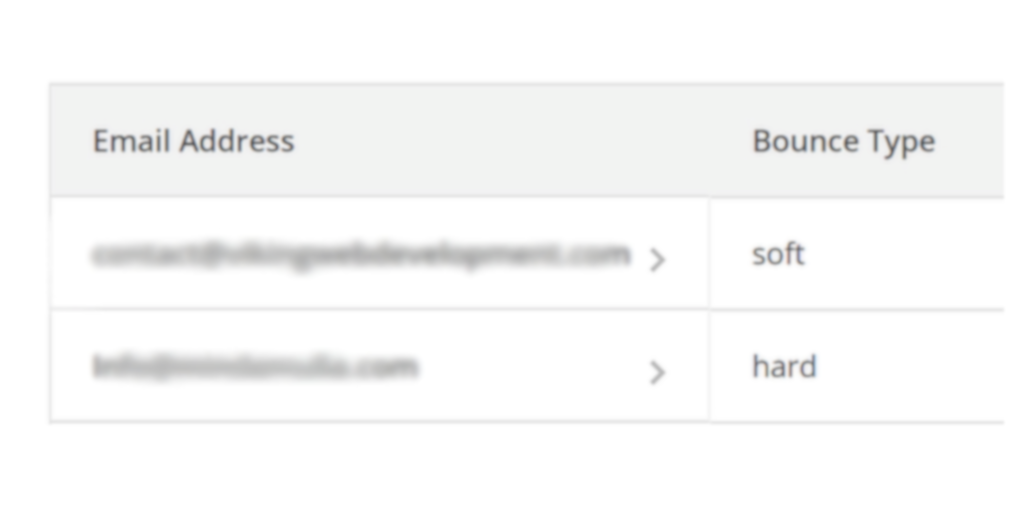
  3. Fewer bounces 
  4. Reduced cost 
  5. Better reporting 

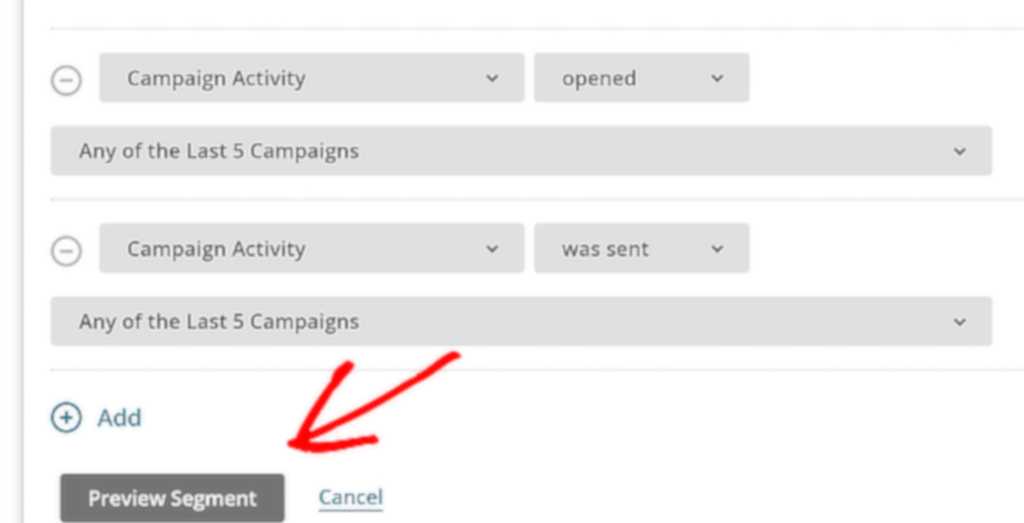
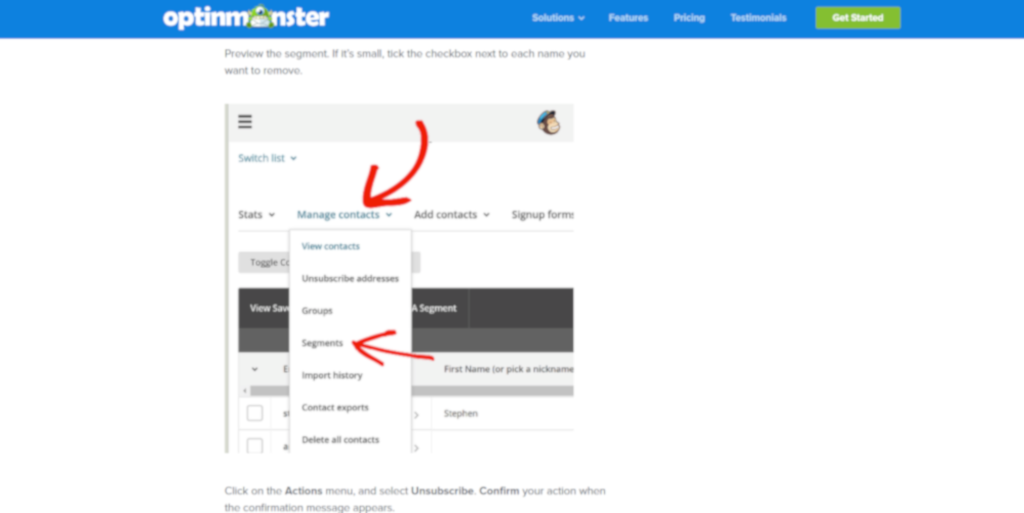
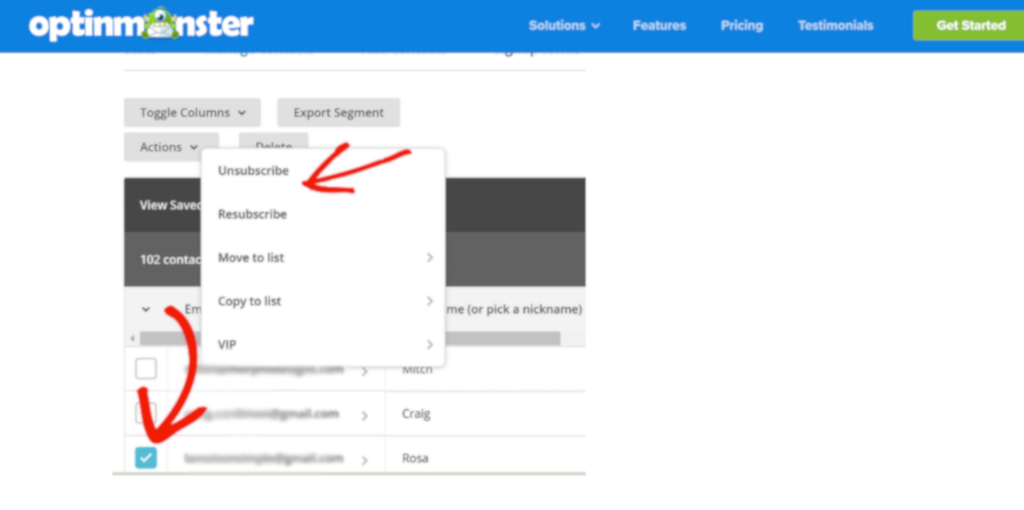
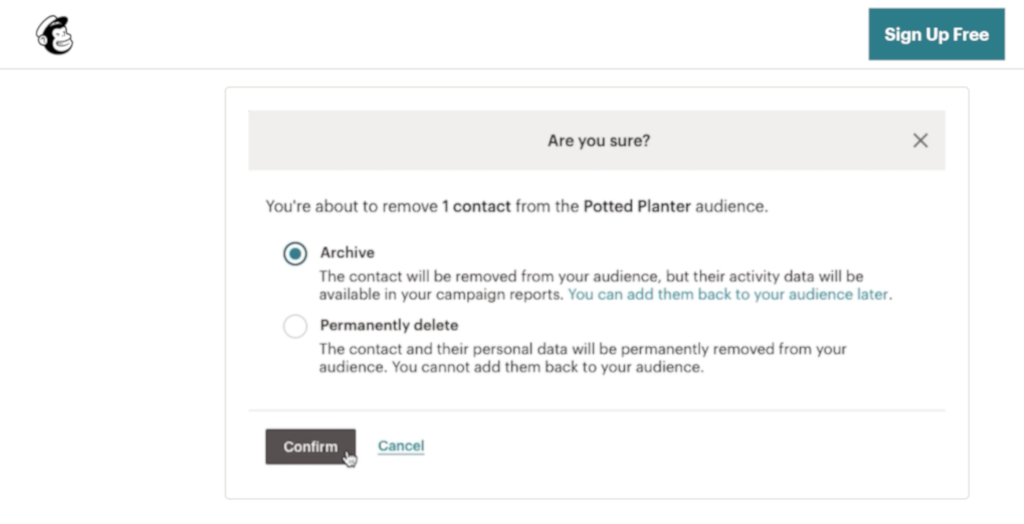
As a business owner or marketer, you can use this Email Scrubbing Template to access your email subscriber list to see if this list needs scrubbing. You can then identify which email subscribers need to be removed and remove them.

Refining and improving your email list is a key marketing process, that will help you obtain business success. 

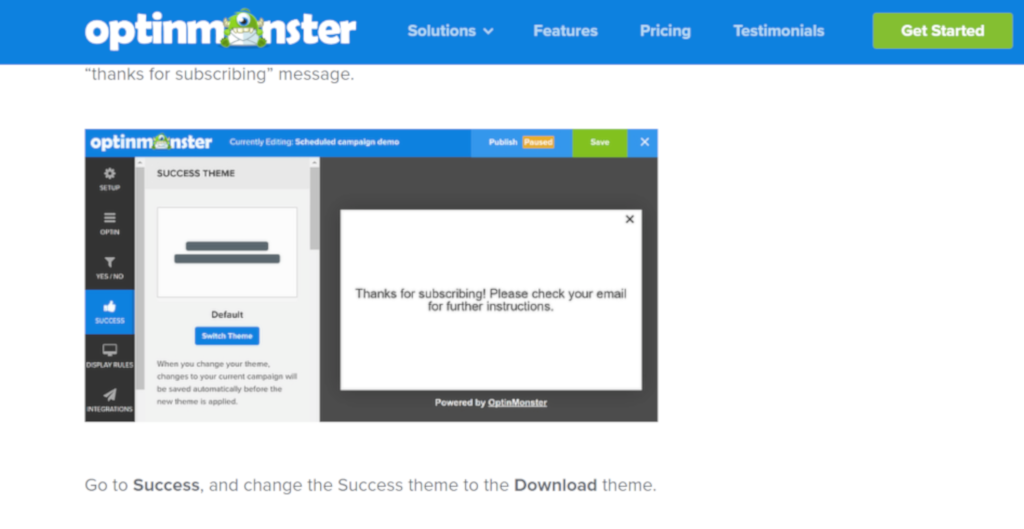
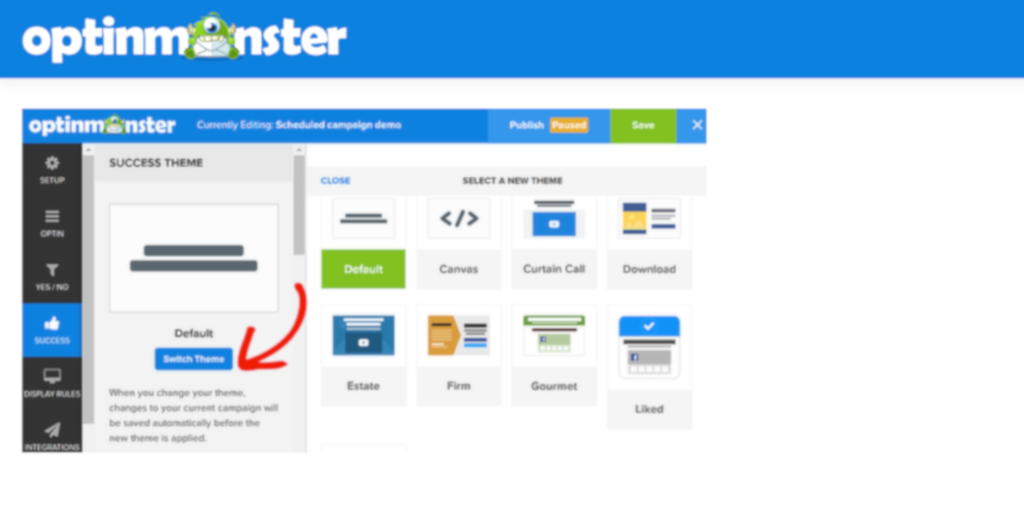
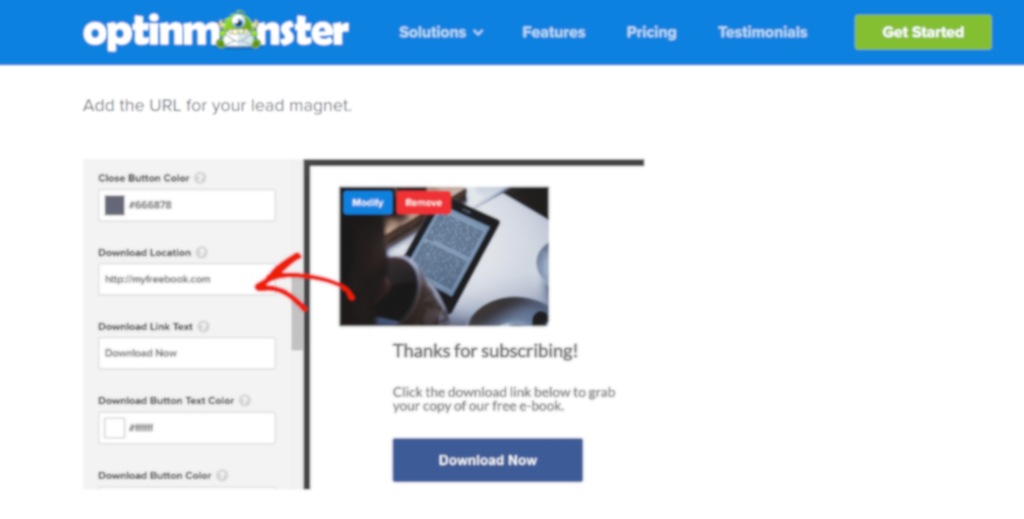
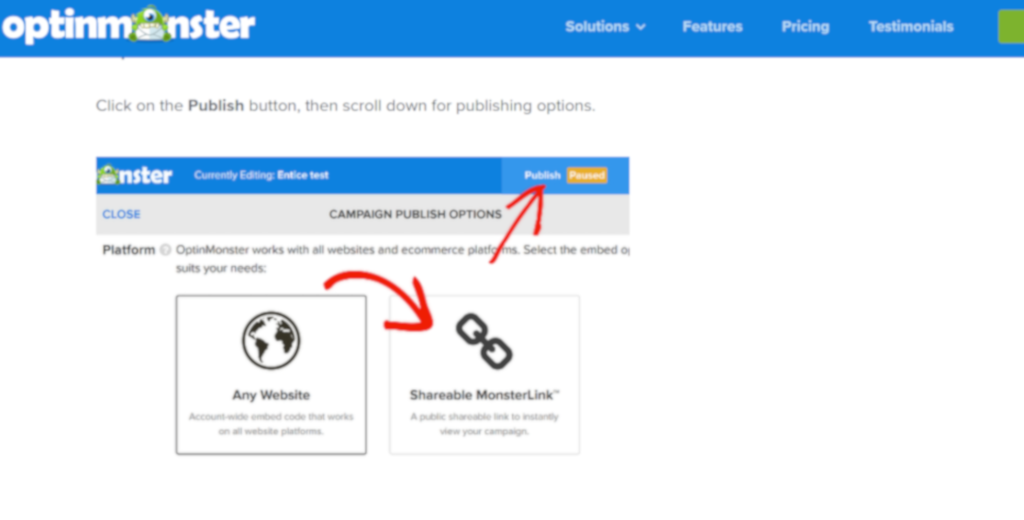
To get the most use out of this template, make sure you have MailChimp and OptinMonster accounts. The process in this template has been adapted from OptinMonster‘s ‘Email Scrubbing: Why and How to Clean Your Email List (Step by Step)‘ post. 

In this Email Scrubbing Template, you will be presented with form fields, such as long text form fields and multiple-choice questions. You will be required to populate each form field with your specific data.

More information on how to use each form field is provided on the ‘Enter Checklist Details’ task.

You will also be presented with:

  • Process Street’s Stop tasks that ensure task order.
  • Process Street’s Conditional logic to create a dynamic template which caters to your specific needs.

Record checklist details

To begin the Email Scrubbing Template, enter the required details into the form fields below.


These are all examples of form fields, which are fields of information which can be filled in by a user working through a checklist from this template.

More information is provided for each form field via our help pages:

This is a stop task, which means you cannot progress in this template until the required form fields are complete.

Pre-scrub tasks:

Review your email marketing statistics

Start analyzing your statistics by working through the sub-checklist below.

  • 1

    View the trends in your open and click-through rates over the last few email campaigns
  • 2

    Identify campaigns where the open and click-through rates are declining significantly
  • 3

    View the unsubscribe and spam complaint rate for campaigns of concern

Once you have identified the campaigns of concern, list these campaigns below in the long text form field presented. These are now the target campaigns. Campaigns for which the subscriber list needs to be scrubbed.


There are four main reasons to clean your email list. Summarize the identified reasons using the multiple-choice form field presented.


  • 1

    Reduced open rate
  • 2

    Reduced click-through rate
  • 3

    More unsubscribes
  • 4

    More spam complaints

Your email marketing statistics are very useful. By viewing these statistics, you can usually see the first warning signs that your email list needs to be scrubbed of unengaged subscribers. 

Your email marketing app should have these statistics available for you to view. Open and click-through rates are the main statistics that need to be considered. 

Open rate is defined as the percentage of the total number of subscribers who opened an email campaign. 

Click-through rate is the average number of click-throughs per hundred ad impressions, expressed as a percentage.

Decide which email lists you should scrub

A common question when it comes to scrubbing email lists is deciding which email list to scrub. 

Work through the sub-checklist below, which provides tips on which email lists to scrub.

  • 1

    Start with the most active email lists, these are the lists driving the conversions, leads, and sales
  • 2

    Pay attention to older lists, as unengaged subscribers on these lists may still count as part of the total
  • 3

    By the end, you should have gone through all of your lists

Even if your email list is new, there is no point emailing uninterested users. 

Work out why your emails have bounced

Now you need to work out why your emails have bounced.

Let’s have a look at MailChimp as an example (if you use a different service then edit this process template to provide the correct instructions). To view the bounce rate of emails in MailChimp, carry out the following steps:

  • 1

    Go to ‘view report’. This tab should be to the right of every campaign name
  • 2

    Scroll down to the stats, and click on ‘Bounced’
  • 3

    The Bounce type is given as ‘hard’ or ‘soft’ bounces
You can view the bounce type in MailChimp.

There are plenty of reasons why emails may bounce. You can use your email server to state whether the bounced emails are ‘hard’ bounces or ‘soft’ bounces

Hard bounces represent a permanent reason to why an email cannot be delivered.

Hard bounces happen because: 

  1. The domain name doesn’t exist.
  2. The email address doesn’t exist.
  3. Delivery is blocked by the email server.

Soft bounces indicate temporary delivery issues causing an email not to be delivered. 

Soft bounces happen because: 

  1. The recipient’s mailbox is full 
  2. The recipient’s email server is down or offline 
  3. The email message is too large

If soft bounces that happen regularly, they will become hard bounces!

Main reasons why emails bounce

  1. Increasingly aggressive spam filters 

  2. Individual server administrators 

  3. Natural database decay

  4. Temporary un-deliverables 

  5. Invalid addresses 

  6. Sender reputation

  7. Blacklisted IP ranges

  8. Evolving industry standards


Correct bounces

Some bounces happen because of errors that can easily be fixed your end. For example, typo errors. Check your sent emails for the following:

  • 1

    Misspelling the name of the mailbox provider. For example, writing Gmial rather than Gmail
  • 2

    Omitting or adding letters to a company name-based email address

To correct these errors, in MailChimp as an example, follow the following steps:

  • 1

    Click on the name of the bounced subscribers
  • 2

    Scroll down to subscriber details
  • 3

    Click ‘edit’
  • 4

    Fix the email address, and then click ‘save’
You can easily edit the subscriber email using MailChimp.

Next time you attempt to send the email to the given recipient, there shouldn’t be any issues. 

Re-engage subscribers

There is one final step to complete before you begin to clean your email lists. That is, to try and re-engage inactive subscribers. As these individuals have already signed up, you could adopt a fresh approach to recapture interest. 

You can identify inactive subscribers. Follow the below steps to identify inactive subscribers in MailChimp. 

Choose your list 

  • 1

    Click on ‘Lists’ in your MailChimp dashboard
  • 2

    Select the list that you wish to work with
  • 3

    Navigate to ‘Manage Contacts’ > ‘Segments’
  • 4

    Select ‘Create A Segment’
In MailChimp go to ‘Create A Segment’.

Set your conditions

  • 1

    Go to ‘Campaign Activity’ and set your first condition
In MailChimp go to Campaign Activity.

You can choose subscribers who did not open: 

  1. All of the last 5 campaigns 
  2. Any of the last 5 campaigns 
  3. All recent campaigns 
  • 1

    Set your conditions using the ‘Add’ button
Set your first condition in MailChimp.

  • 1

    ‘Preview’ your segment
You can preview your segment in MailChimp.

  • 1

    ‘Save’ your set conditions so you can target those inactive subscribers with an email campaign

When you are targeting these inactive subscribers with your campaign, it is good to figure out why the subscribers have been inactive. The best way to do this is to ask. 

You can then offer the inactive subscribers additional incentives to connect, such as a special offer, or a discount coupon or a lead magnet.

The next stage of this Email Scrubbing Template runs through the steps of delivering a lead magnet to inactive subscribers. To deliver a lead magnet we will use OptinMonster.

Create a new campaign:

Select your campaign type

To proceed in these next steps of creating a lead magnet, you must ensure that you have an OptinMonster account.

Once you have set up an account, you can create your campaign.

  • 1

    Create your campaign
  • 2

    Select your campaign type
Select ‘Create a New Campaign’ in Optinmonster.

  • 1

    Select a template
  • 2

    Name your campaign, and select ‘Start Building’
Name your campaign, and then start building.

Customize your campaign

You can edit the sample campaign to meet your needs. For example, you can change the headline, body text, call to action and the image, etc. 

  • 1

    Click to select the headline, and type your text as preferred
You can edit your headline as required.

  • 1

    Click to select the main text, edit the text as required
You can edit the body text as required.

  • 1

    Change the default image to one relevant to you
  • 2

    Edit the Call to Action as required

When writing your headline, think of a key benefit you can offer the subscribers you are trying to re-engage.

Set up lead magnet delivery

The next stage is to set up lead magnet delivery. For delivery of the lead magnet, follow the below steps:

  • 1

    Go to the ‘Success’ tab
From going to the ‘Success’ tab you will see the default ‘thanks for subscribing’ message.

  • 1

    Change the ‘Success’ theme to the ‘Download’ theme
You can switch your theme from the default.

  • 1

    Add the URL for your lead magnet
You can add the URL for your lead magnet.

Email list cleanup:

Decide who to remove

We begin to scrub your email list by making sure all hard bounces have been removed.

  • 1

    Confirm that all ‘hard’ bounces have been removed

In addition to these ‘hard’ bounces, there are other email addresses that need to be removed. Make sure that the below are also removed:

  • 1

    Spam email addresses
  • 2

    Email addresses of individuals who have unsubscribed
  • 3

    Bought emails
  • 4

    Duplicate email addresses
  • 5

    Duplicate email addresses under the same name

Once you have removed the above, the next stage would be to target inactive subscribers.

Spam email addresses can be spotted by strange letter or number combinations. 

How to clean your list using MailChimp:

Remove inactive subscribers

To run through how you clean your email list, we will work with the example mailing platform, MailChimp

You should have already identified inactive subscribers from the steps previously carried out: 

  • Step 1: Choose your list 
  • Step 2: Set your conditions 

Follow these next steps to continue to clean your list. 

You are presented with our dropdown form field. Selecting ‘Yes’ or ‘No’ from this form field will direct you to the relevant stage in this checklist utilizing our conditional logic feature. 

  • 1

    Preview the segment
Go to segment in MailChimp.


Remove small segments of subscribers

If your segment is small, you can carry out the following steps: 

  • 1

    Tick the small checkbox next to each name that you want to remove
  • 2

    Click on the ‘Actions’ menu
  • 3

    From this menu, select ‘Unsubscribe’
  • 4

    ‘Confirm’ your action when the confirmation message appears
You can easily remove small segments of subscribers in MailChimp.

Determine how you wish to archive your subscribers

You can archive your subscribers by first segmenting by campaign activity or by considering the contact rating. Select how you wish to archive your subscribers. 

You are presented with our dropdown form field. Select the required option from this form field to be directed to the relevant stage in this process.


If you have a lot of inactive subscribers, it is good practice to archive them. By archiving subscribers you are removing subscribers from your marketing audience without losing any of their data.

Segment and archive by campaign activity

Follow the steps below to ‘remove’ your inactive subscribers by archiving them.

  • 1

    Navigate to the audience tab
  • 2

    If you have more than one audience, select ‘Current Audience’ drop-down and choose the audience that you wish to work with
  • 3

    Click ‘View Contacts’
  • 4

    Click ‘New Segment’
  • 5

    Choose all from the Contacts match drop-down menu
You can choose your audience from the dropdown menu.

  • 1

    For the first condition, set the drop-down menus to Campaign Activity > did not open
  • 2

    In the third drop-down menu, choose from the list of ‘Aggregates Campaigns’
  • 3

    Click ‘Add’ to create a new condition, and set the drop-down menu to ‘Campaign Activity’ > ‘was sent’
  • 4

    In the third drop-down menu, choose from the list of ‘Aggregate Campaigns’. This allows you to target subscribers who have been sent the campaigns but have not opened them
  • 5

    Click ‘Preview Segment’
  • 6

    Check the box next to each contact you want to archive
  • 7

    Click the ‘Actions’ drop-down menu and then choose ‘Remove Contacts’
  • 8

    For the ‘Are You Sure?’ pop-up modal, choose ‘Archive’ and then ‘Confirm’
Click to Archive subscriber lists.

You can view your archived contacts by following the below step: 

  • 1

    Click on the ‘Manage Contacts’ drop-down and choose the ‘View Archived Contacts’

Make sure you do not archive new subscribers. To do this, follow the steps below:

  • 1

    Set the second condition to Date Added > Is Before > A Specific Date
  • 2

    Choose a date that was before your last campaign or a couple of campaigns ago. This will protect any new contacts who haven’t received a campaign yet

Segment and archive by contact rating

Contact ratings measure the overall engagement of your emails. MailChimp recalculates them each time a campaign is sent.

Follow the below steps to segment and archive contacts with a low contact rating: 

  • 1

    Navigate to the audience tab
  • 2

    If you have more than one audience, click on the ‘Current Audience’ drop-down and choose the audience that you wish to work with
  • 3

    Click ‘View Contacts’
  • 4

    Click the ‘New Segment’
  • 5

    Choose any from the ‘Contacts Match’ drop-down menu
  • 6

    For the first condition, set the drop-down menus to ‘Contact Rating > Is Less Than > 2 Stars’. This segments contacts, with a one-star rating, considered a negative rating
  • 7

    Click ‘Preview Segment’
  • 8

    Check the box to each contact you want to archive
  • 9

    Click the ‘Actions’ drop-down menu and choose ‘Remove Contacts’
  • 10

    In the ‘Are Your Sure’ pop up, choose ‘Archive’ and then select ‘Confirm’
Confirm your contacts to be Archived.

How to clean your list via a service:

Consider email scrubbing services

There are ways to clean your email list without having to do this yourself. There are plenty of email scrubbing services out there. These services work well for companies that have large email lists.

Email scrubbing services include features like: 

  • Email list validation.
  • Fixing typos in email addresses.
  • Bulk email list verification.
  • Check for emails from disposable email address providers. 
  • Blocking fake email addresses. 

Some email scrubbing services to consider include: 

Clean list management:

Manage your newly cleaned list

Once you have worked to clean your email list, it is a good idea to keep it that way. 

By maintaining a healthy list, you can improve the quality of your new email signups. You can maintain a healthy email list by carrying out the below:

  • 1

    Showing only relevant campaigns to your website visitors. Use OptinMonster’s page level targeting to do this
  • 2

    Send Welcome emails to new signups
  • 3

    Put subscribers in control of their email settings, allowing them to opt down or opt-out

Sources:

Take control of your workflows today.