Form fields are a fantastic way to collect or store important data in your workflow runs such as files and documents, names, email addresses, notes, and URLs.
When someone enters data into form fields in your workflow runs, all that data is stored so that you can refer back to it at any time. It doesn’t matter whether a new hire enters their personal information into your onboarding workflow run, or a new client gives you a brief for a project you’re working on together, or a freelance writer gives you suggestions for their latest blog post. It’s all there in your workflow run.
Form fields also allow you to pass and receive data from one part of your workflow run to another, as well as from one app to another when you use workflow run links or automations. This is possible when you use form fields as variables.
For example:
Users: In order to add or edit form fields in workflows, you must be an Administrator or a Member who has been given ‘edit’ access by your Administrator.
Start in your library and select the workflow you wish to edit. Click the “Edit” button at the top of your screen.
Select the task you wish to add form fields into, then look for the form field/s you’d like to use from the right side of your screen.
Drag and drop the required form fields into place in the center of your screen.
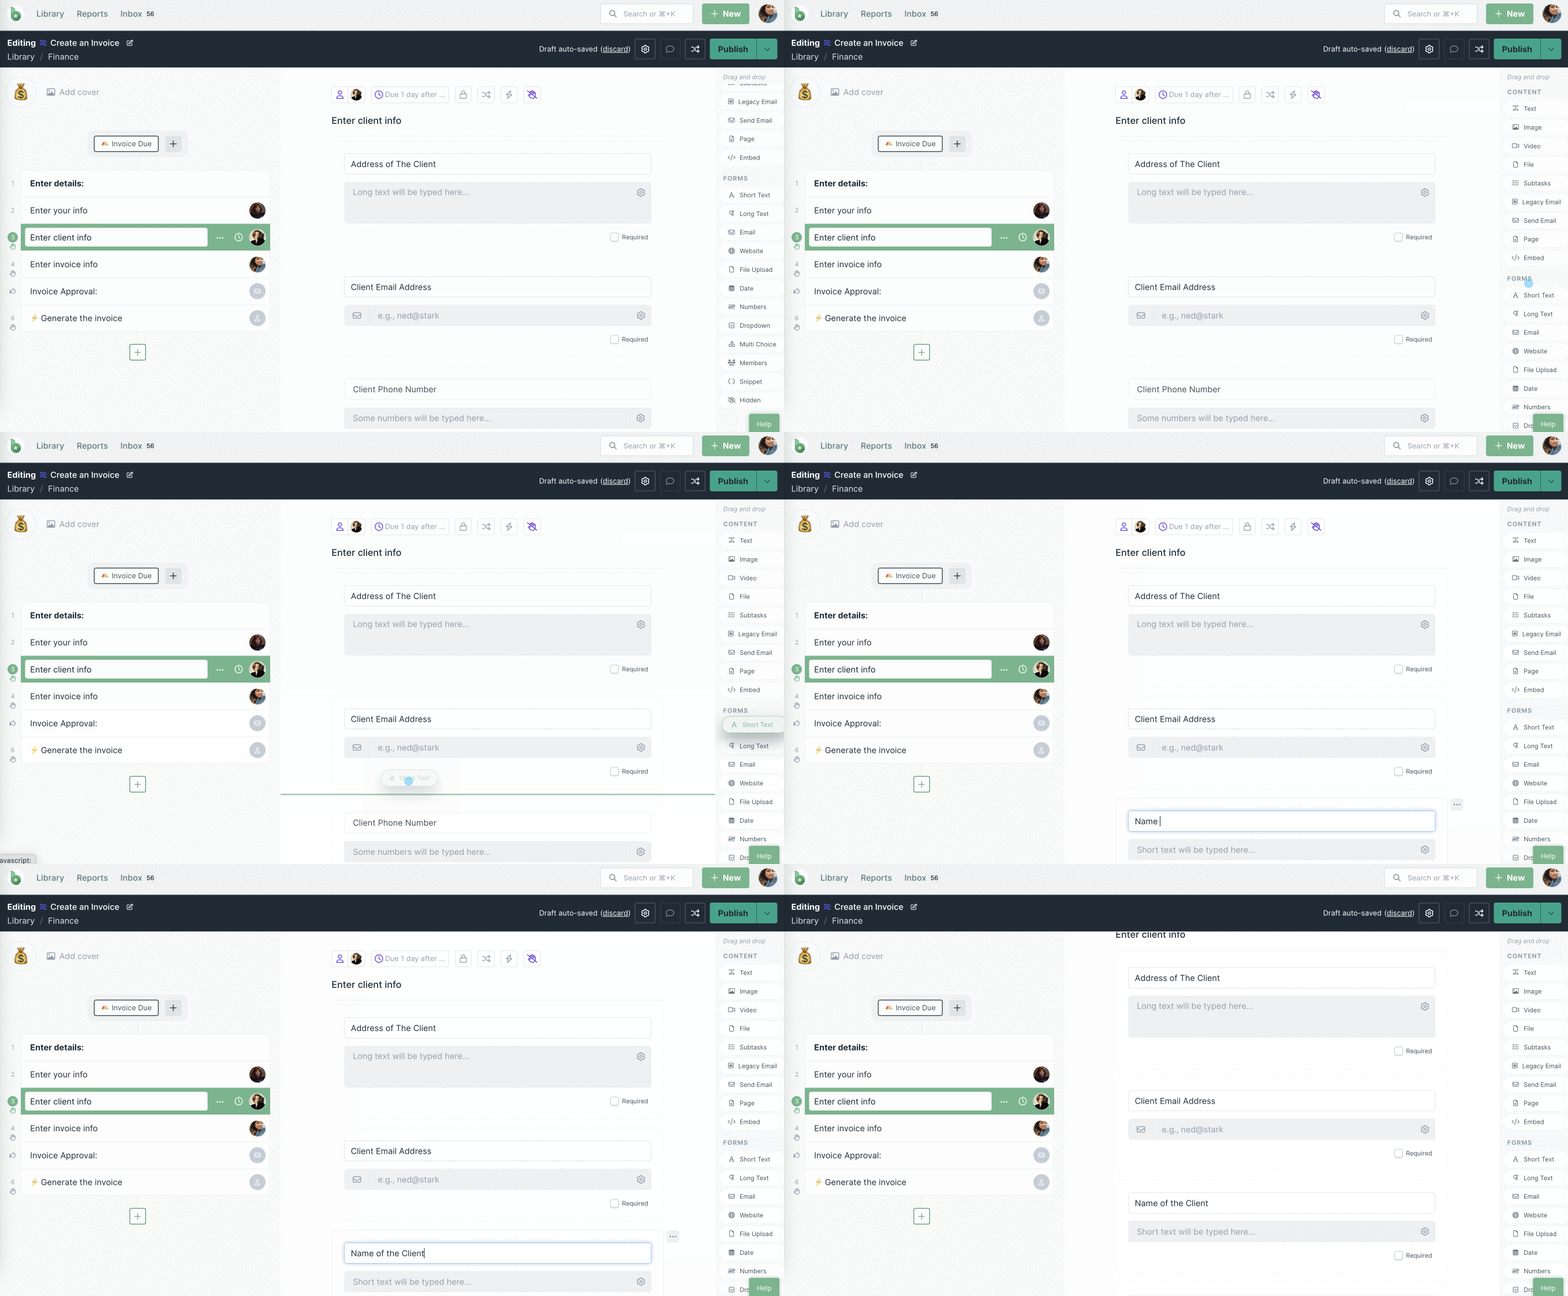
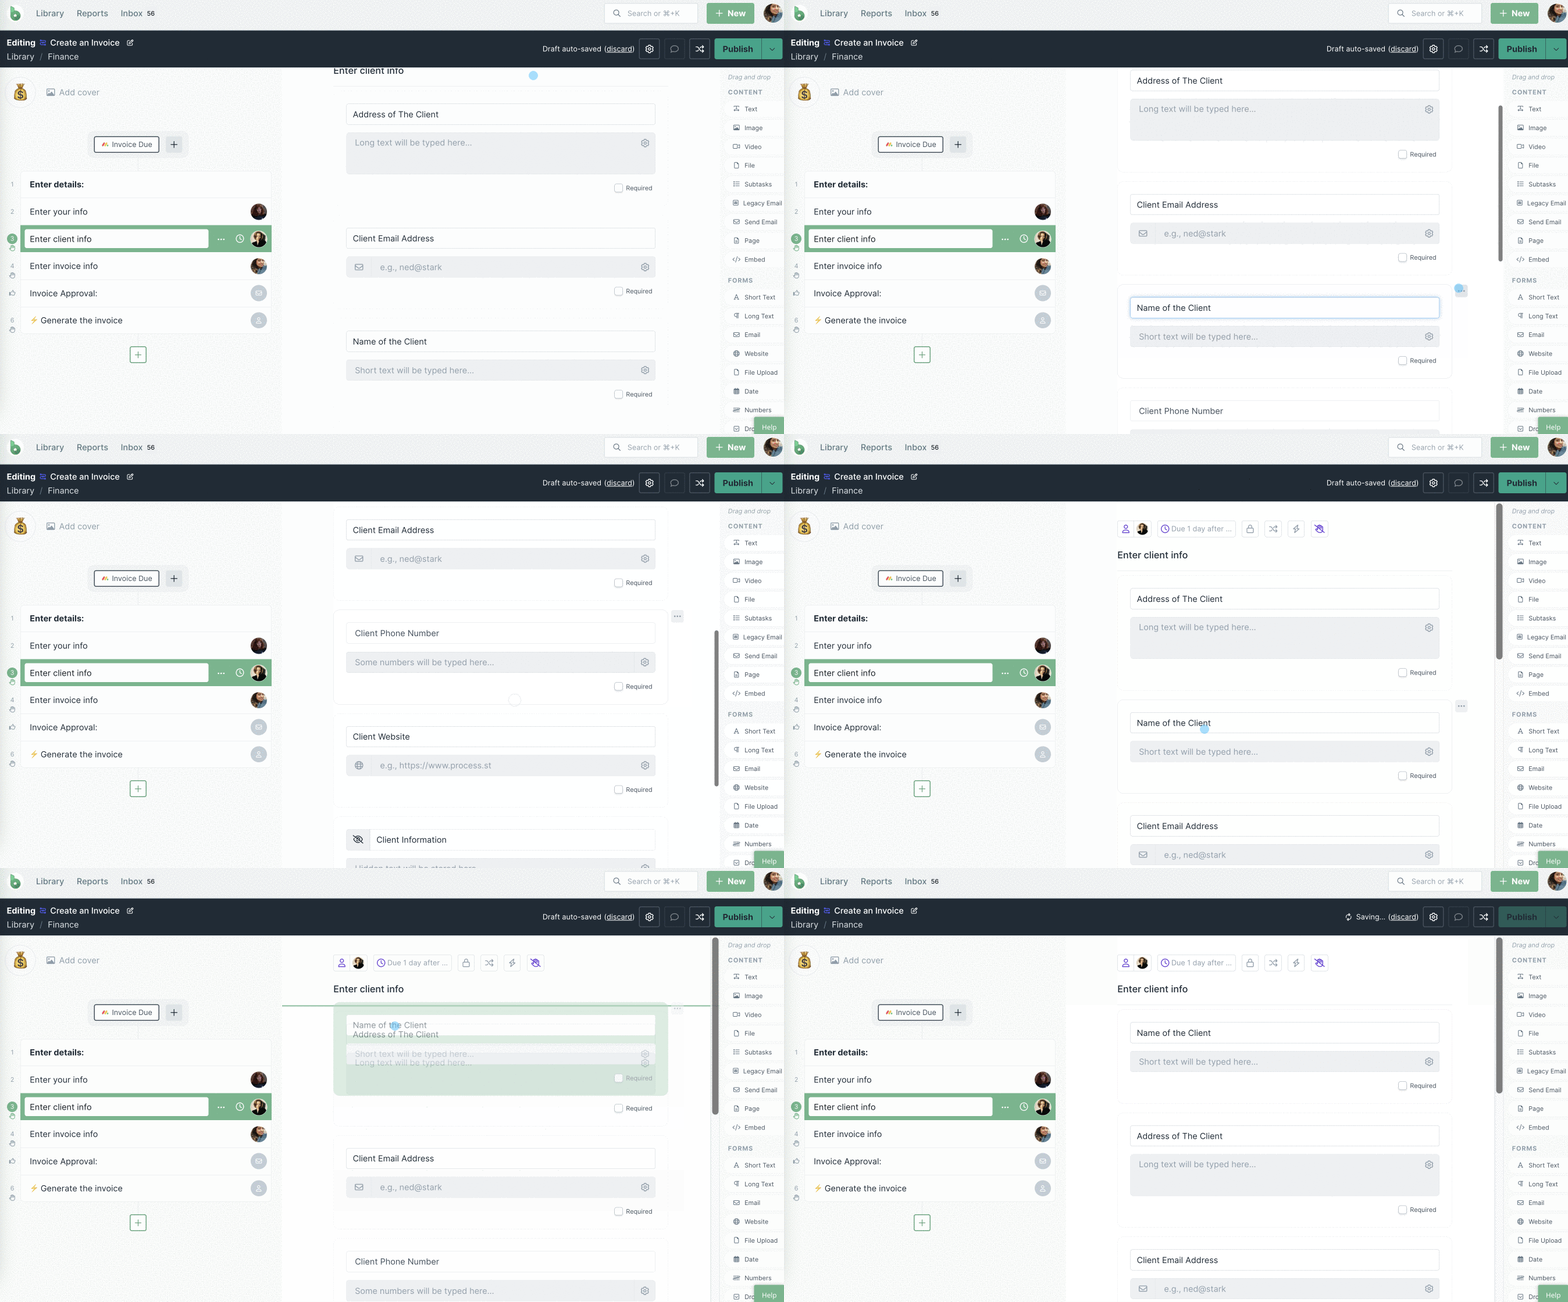
You can also click on the desired form field to insert it into the task. This would place the form field at the bottom. To change its placement, you can drag and move it to the desired place or use its three-dot menu to move it around.
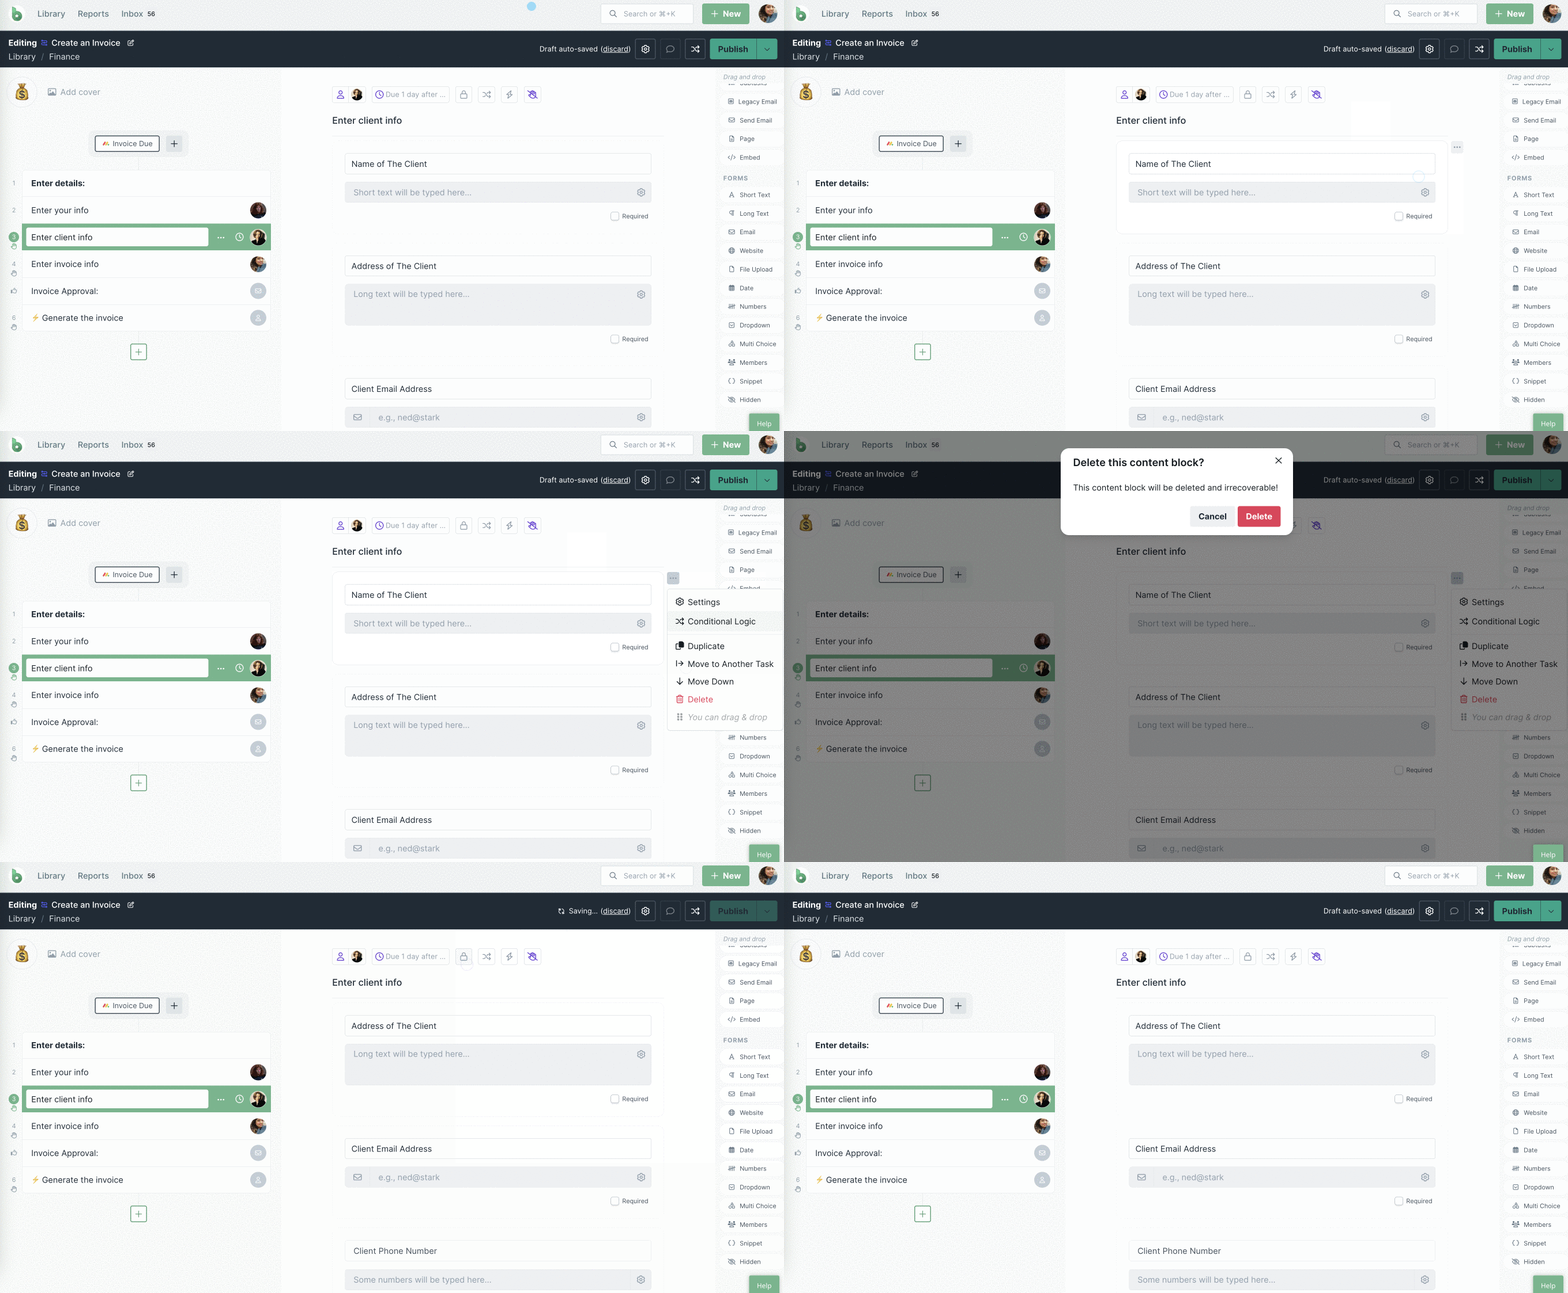
To delete a form field, you can click the three-dot menu in the top right corner of the field.
You can also move a form field from one task to another. Click the three-dot menu in the top right corner of the field and select Move to Another Task. Then select the task to which you want to move the field. Once the form field has moved, you can drag and move it to the desired place.
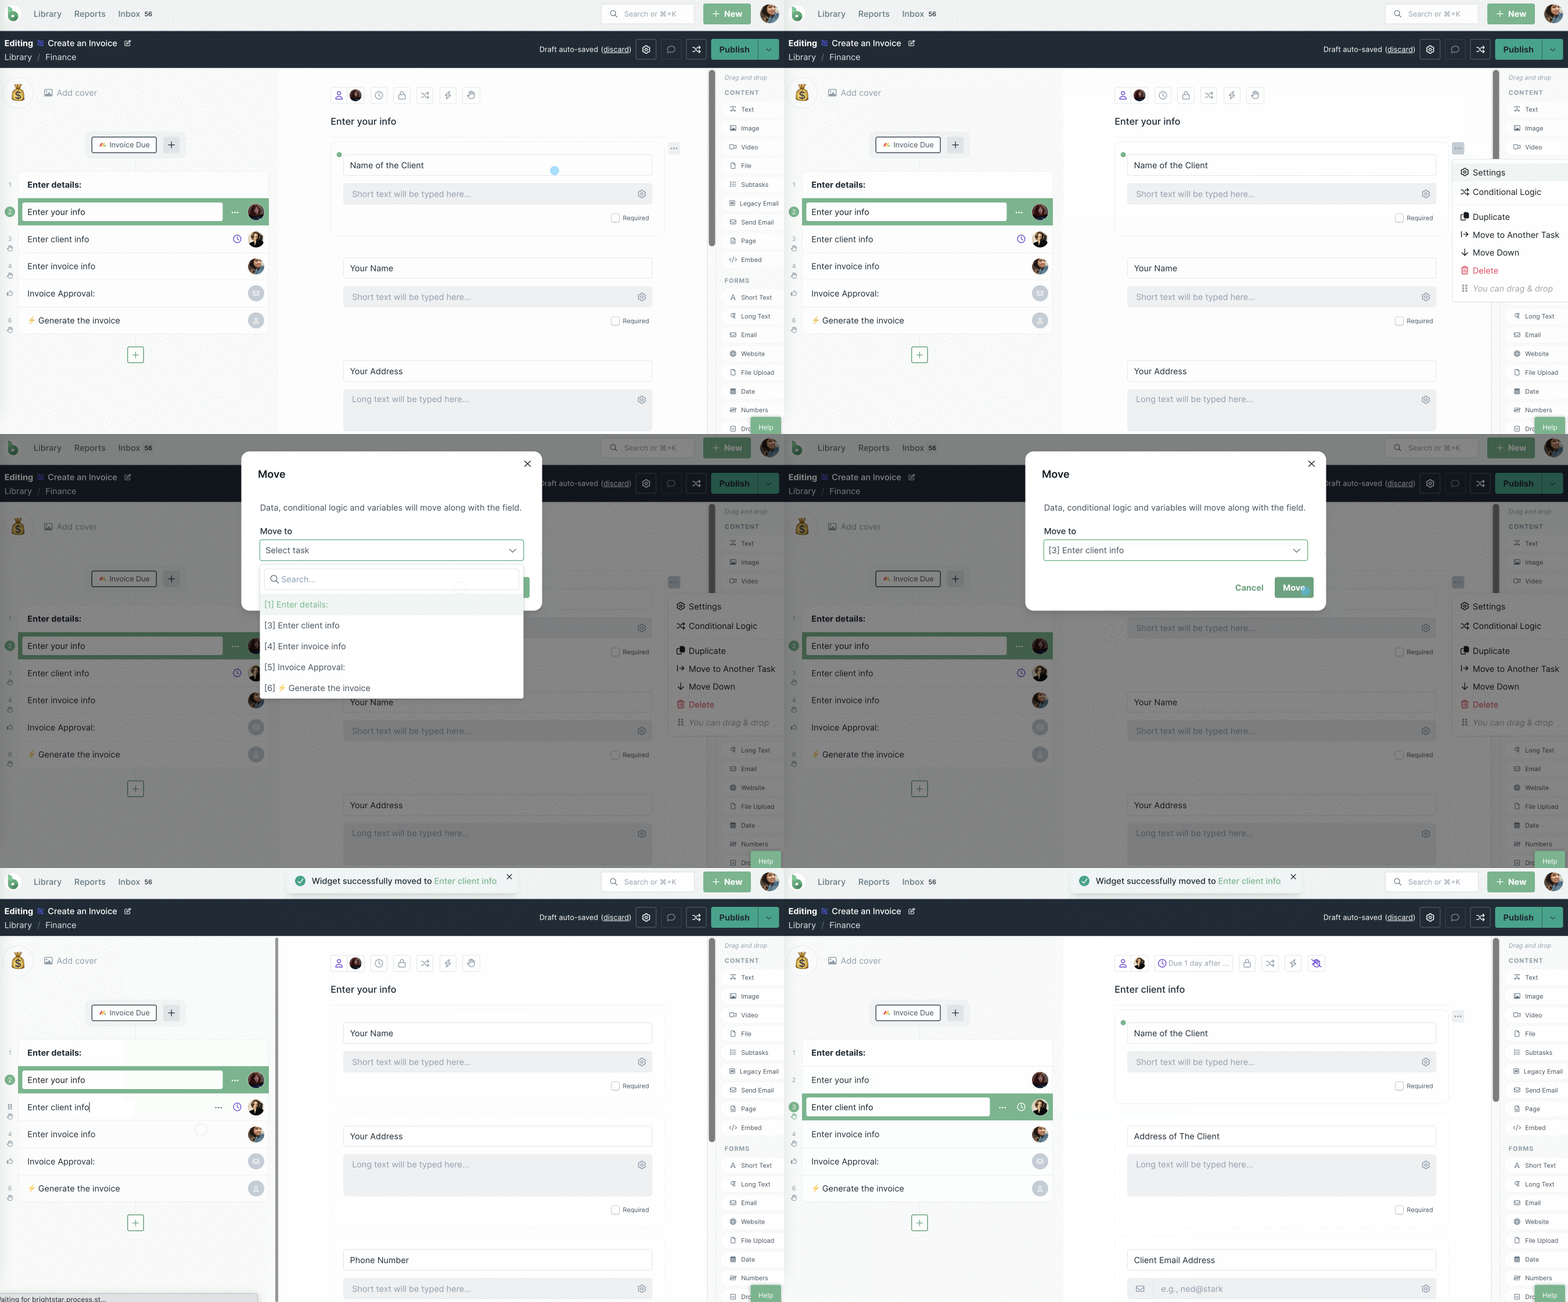
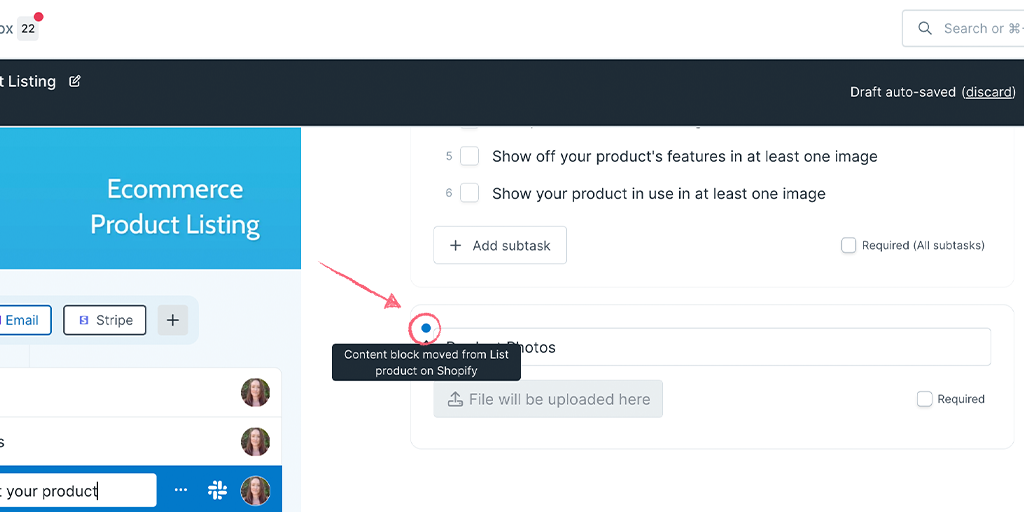
The dot in the top left corner of the form field indicates that it has been moved from another task. Once you publish your workflow, the dot will disappear.
Want more information about how to automate your workflow runs? Check out our e-book on how to use Zapier to automate tasks.
Form fields available are:
When you add a form field, you must give it a name or a label. This allows you to identify different forms when using them as variables, in run links, in Automations or in Conditional Logic rules.
Pro tip: Don’t name all your form fields (variables) in a similar way, for example, don’t use ‘Meeting date’ for all date fields that you add. Instead, try naming form fields in a specific way, for example: ‘Sales Meeting date’ or ‘Project Meeting date’. For names use ‘Client first name’ and ‘Client last name’. This will allow you to identify the correct one you want to use when searching for them.
The short text field is best suited for recording aspects such as employee or company names – any data that is guaranteed to be no more than a couple of words. The character count in short text fields is 254 characters.
This form field can be used as a variable, in subtasks, workflow run links, in Automations and in Conditional Logic.
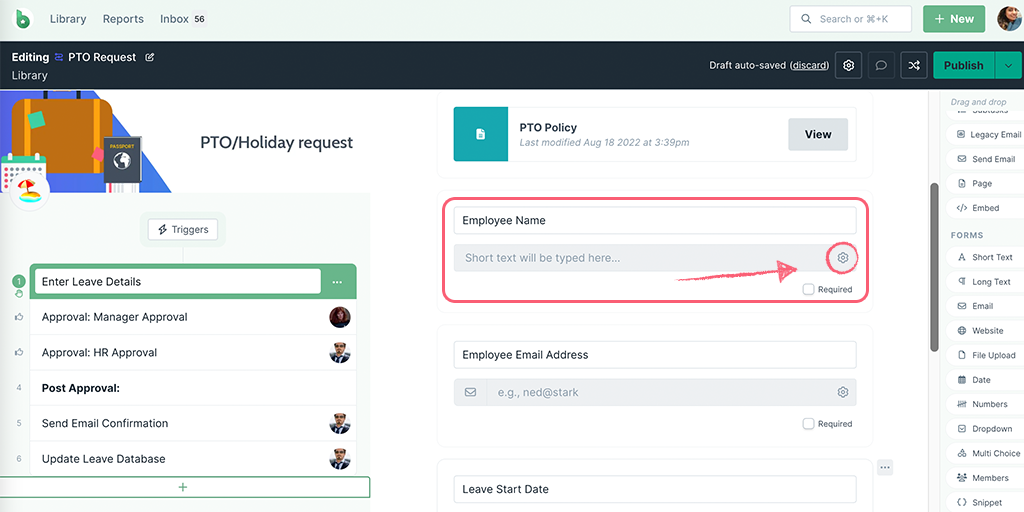
Short text field validations
Once you’ve added the field in the workflow editor, you’ll see the Settings cog on the right side of the response field. Click on it to open the validation settings. From here, set the minimum or maximum number of characters you want to allow and add a note into the placeholder to reflect the validations that have been set. You can also set a default value to auto-fill this form field. Click Apply to save the validation settings.
The long text field is best utilized for extra details or any information that is likely to go beyond 3 to 4 words. For example, you could record additional inspection or meeting notes, a support conversation, or an address. Using long text fields allows you to use more character or word count than a short text field.
This form field can be used as a variable, in workflow run links, in Automations and in Conditional Logic.
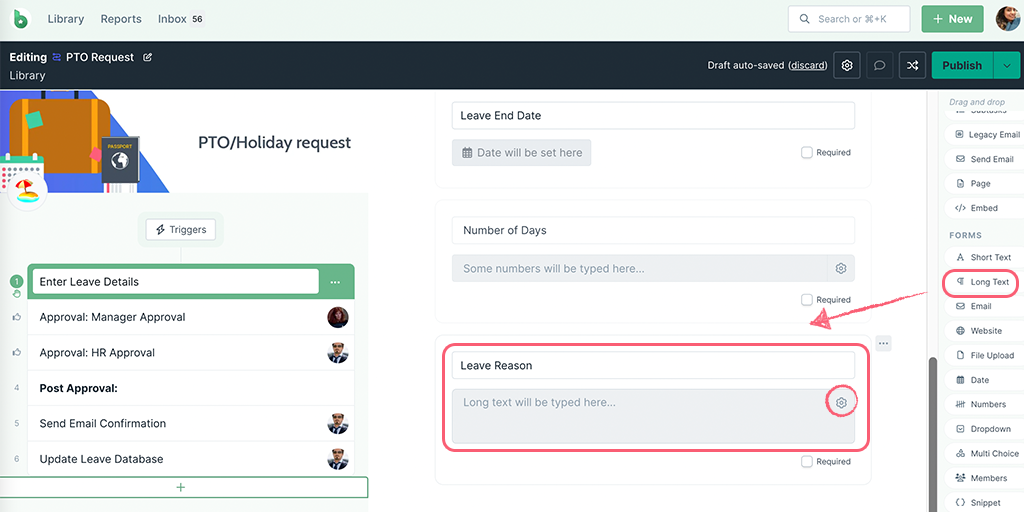
Long text field validations
Once you’ve added the field in the workflow editor, you’ll see the Settings cog on the right side of the response field. Click on it to open the validation settings. From here, set the minimum or maximum number of characters you want to allow and add a note into the placeholder to reflect the validations that have been set. You can also set a default value to auto-fill this form field. Click Apply to save the validation settings.
Email fields do exactly what they say on the tin; they store email addresses. Using these instead of the standard single-line fields will allow you to quickly differentiate between email addresses and other information, as the symbol is unmistakable. It will also allow you to use that email address in a Role Assignment.
Storing email addresses in these fields also makes it easier to integrate your workflow run with another app to send emails automatically. The information is separate and so easier to locate.
This form field can be used as a variable, in workflow run links, in Automations and in Conditional Logic.
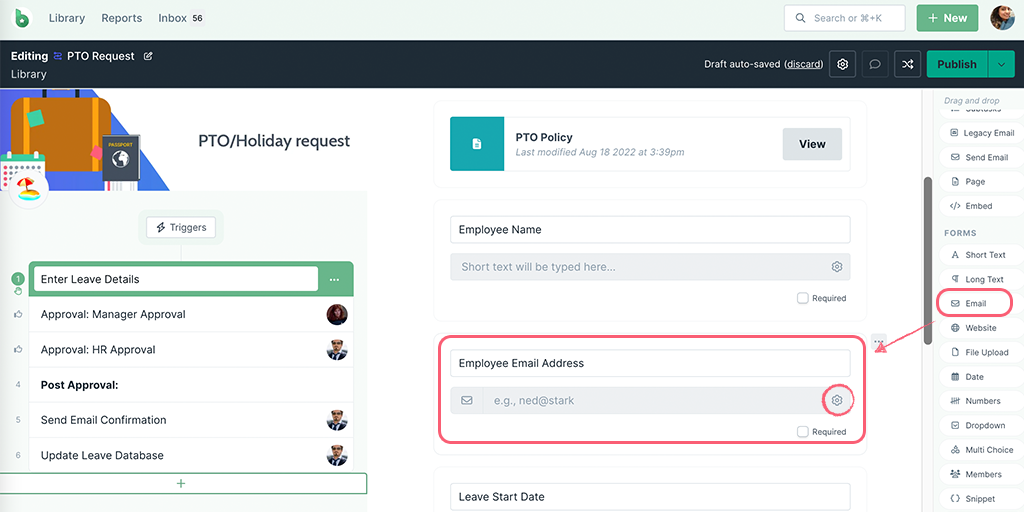
Email field validations
Once you’ve added the field in the workflow editor, you’ll see the Settings cog on the right side of the response field. Click on it to open the validation settings. From here, set which email domains you’d like to allow or block, and add a note into the placeholder to reflect the validations that have been set. You can also set a default value to auto-fill this form field. Click Apply to save the validation settings.
Website fields are specifically designed for storing URLs. Much like email address form fields, it is easier to distinguish them from single-line field data, but also to make integrations a cinch.
This form field can be used as a variable, in workflow run links, in Automations and in Conditional Logic.
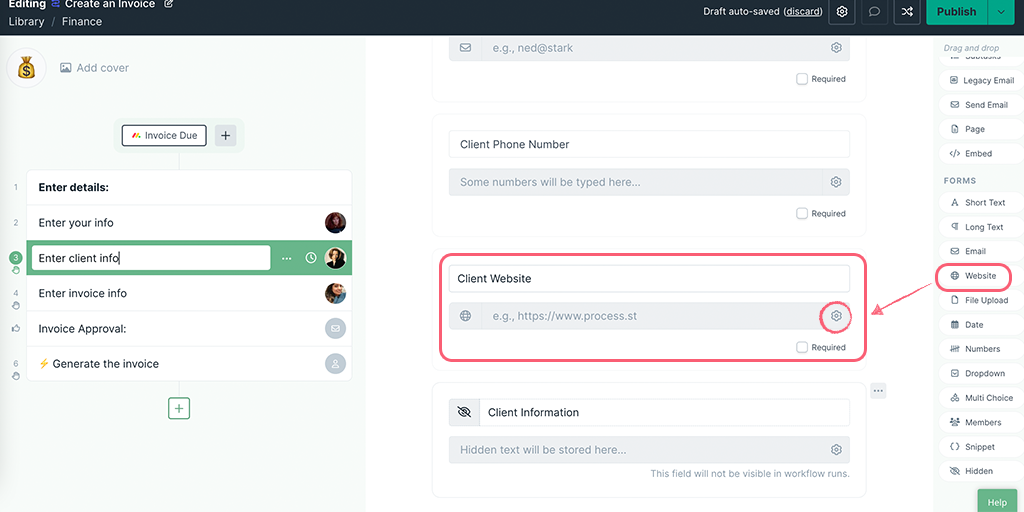
Website field validations
Once you’ve added the field in the workflow editor, you’ll see the Settings cog on the right side of the response field. Click on it to open the validation settings. From here, set which website would you like to show as a default value to auto-fill this form field. Click Apply to save the validation settings.
The file upload field allows the user working on a workflow run to upload any important file of their choice into it. For example, if an important document needs to be signed, a copy of the signed version can be scanned and then uploaded to your workflow run for safekeeping. See file upload limits.
This form field can be used as a variable, but not in Conditional Logic or workflow run links.
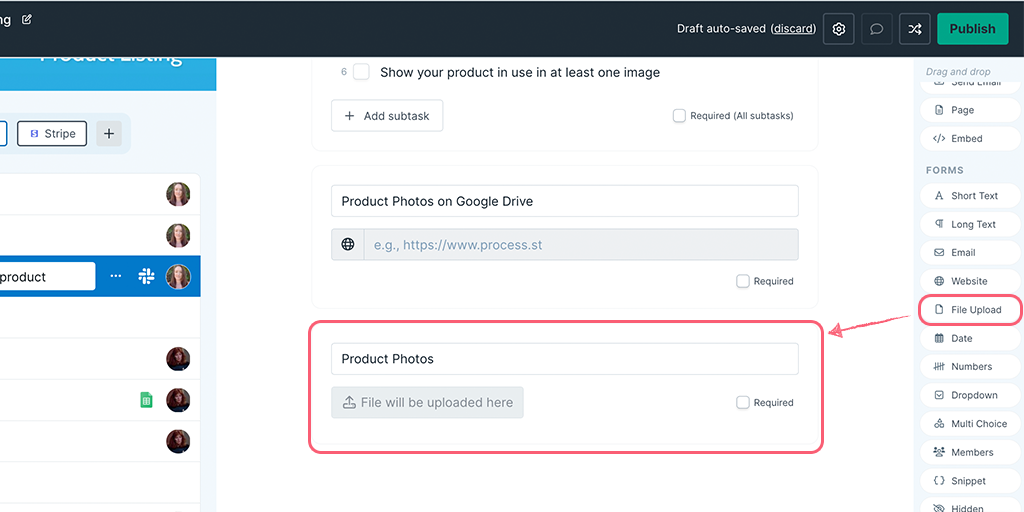
File upload field validations
Once you’ve added the field in the workflow editor, hover over it and you’ll see a three-dot menu in the top-right corner of the field. Click here and select Settings to open the validation settings. From here, set which document types you would like to allow (e.g. PDF, jpeg etc) and add a note into the placeholder to reflect the validations that have been set. Click Apply to save the validation settings.
Date fields are perfect for just that – dates. Whether you’re recording the date that workflow run was started, a due date for a particular task, the time of a support conversation, or even the start and end of an upcoming holiday, any and all important dates (and times) can be set in stone.
This form field can be used as a variable, in Automations and in Conditional Logic, however, you cannot use it in workflow run links.
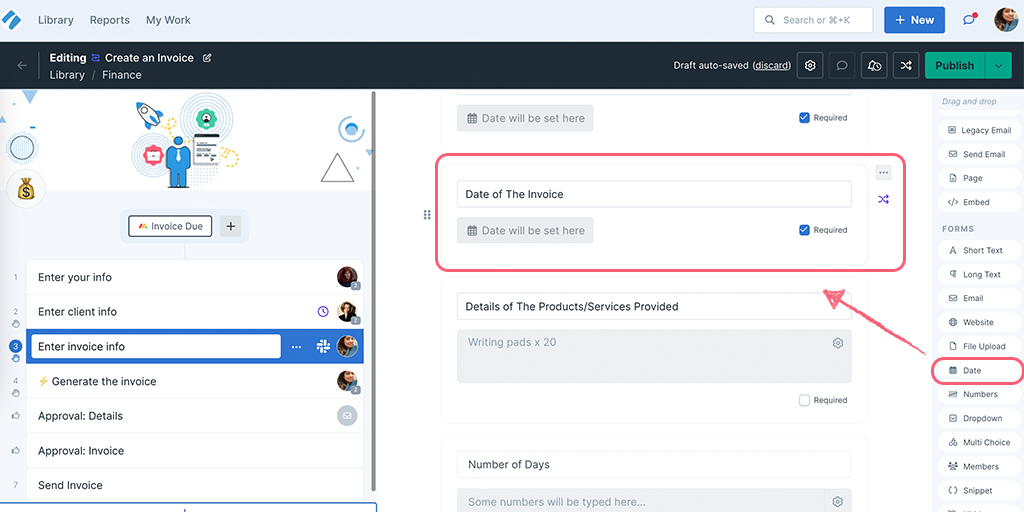
Date field validations
Once you’ve added the field in the workflow editor, hover over it and you’ll see a three-dot menu in the top-right corner of the field. Click here and select Settings to open the validation settings. Click Add rule to set whether the due date should be before or after a specific date or a dynamic date from the workflow. Click Save to save the validation settings.
Note: You can create a maximum of two rules to set date validation before and after certain dates.
Date fields can be used in Conditional Logic and can be used to set Dynamic Due Dates. If you have a workflow run with a date form field in it, you can select a date (adding a time is optional).
For any automations or dynamic due dates where you haven’t set a time, the default time will always be 8 AM in your Organization timezone.

Note: To strip out the time from a date field in automations or to alter the date/time formatting, you can use Zapier formatter. Learn more about managing time zones in Process Street.
Numbers fields allow you to collect specific numbers in your workflow runs, either a percentage, numbers with a set count of digits, a pre-determined value or negative numbers.
You can use keyboard prefixes or suffixes, or copy/paste emojis to denote which number you’re looking to capture.
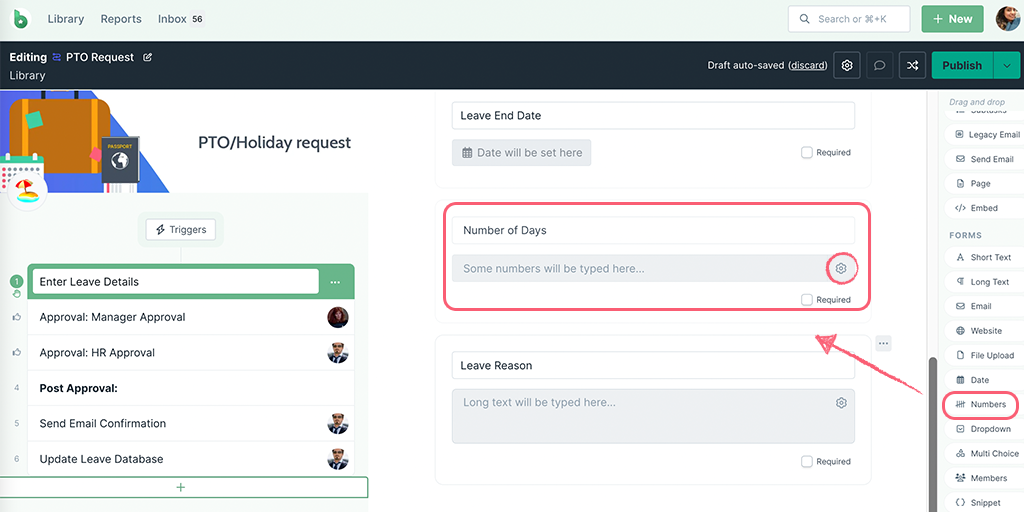
Number field validations
Once you’ve added the field in the workflow editor, you’ll see the Settings cog on the right side of the response field. Click on it to open the validation settings. From here, set the number of minimum or maximum digits or value, the symbol (currency, emoji, or % for example) or if you’d like to accept negative numbers. Add a note into the placeholder to reflect the validations that have been set. You can also set a default value to auto-fill this form field. Click Apply to save the validation settings.
This form field can be used as a variable, in Automations and in Conditional Logic and in workflow run links.
Dropdowns are a fantastic way to add choices into your workflow runs. They allow users to select a single option from a dropdown list that you have predetermined.
For example, a potential drop-down could be “Project Status”, and the options could be “Incomplete”, “Awaiting Review” and “Complete”.
This form field can be used as a variable, in workflow run links, in Automations and in Conditional Logic.
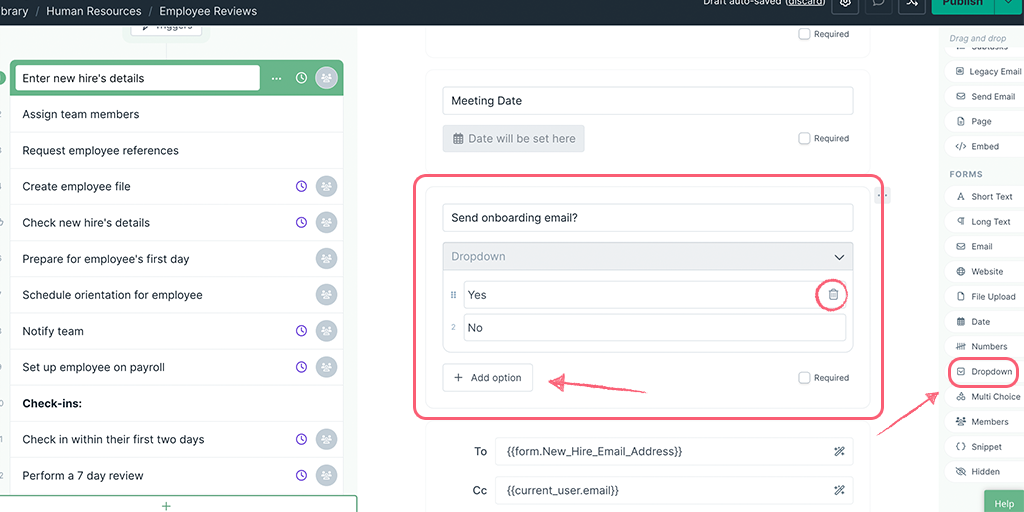
Pro tip: To delete a dropdown field, use the backspace key or trashcan icon next to the field. To add more fields as options hit the enter key or click + Add option.
You can also connect a Data Set to the dropdown field and auto-populate the dropdown options.
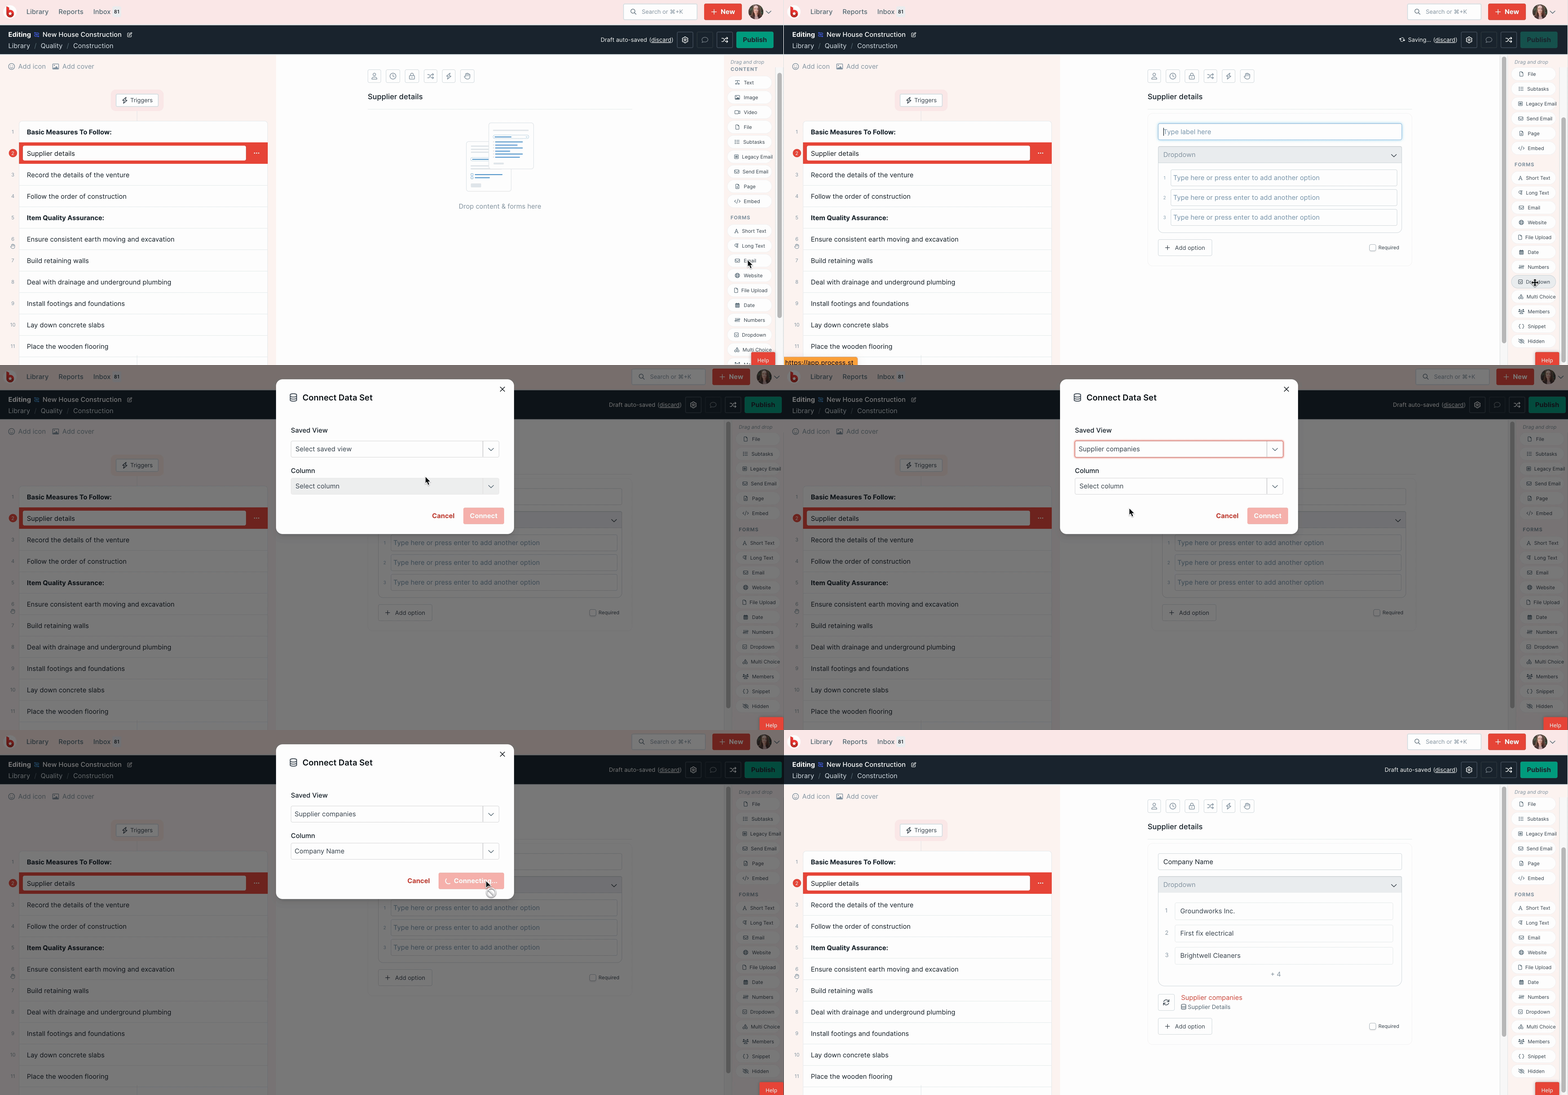
The multi-choice field is similar to the dropdown field, except that multiple options can be chosen at once instead of only one.
For example, you could have multiple options that you can include in a package for a client. Package A, B, C, D, E, and F. With the multi-choice field you can select all of the relevant options that the client may want, so you could select all or some of the choices.
This form field can be used as a variable, in Automations and in Conditional Logic, however, you cannot use it in workflow run links.
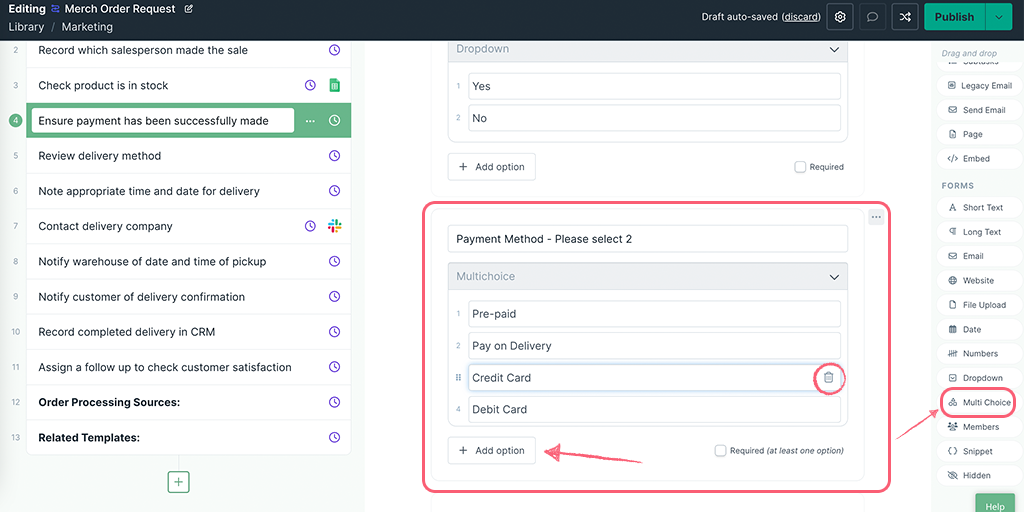
Pro tip: To delete a dropdown field, use the backspace key or trashcan icon next to the field. To add more fields as options hit the enter key or click + Add option.
The member’s field displays a list of users from your Process Street account. You can also limit the list to only display users in a certain group.
This is a useful field when you are organizing work. For example, in an employee review, you might want an employee to choose their manager from a group of managers. Or for New Client Onboarding, you could specify who is the client’s Account Manager.
This form field can be used as a variable, in conditional logic, and in Automations, but not in workflow run links.
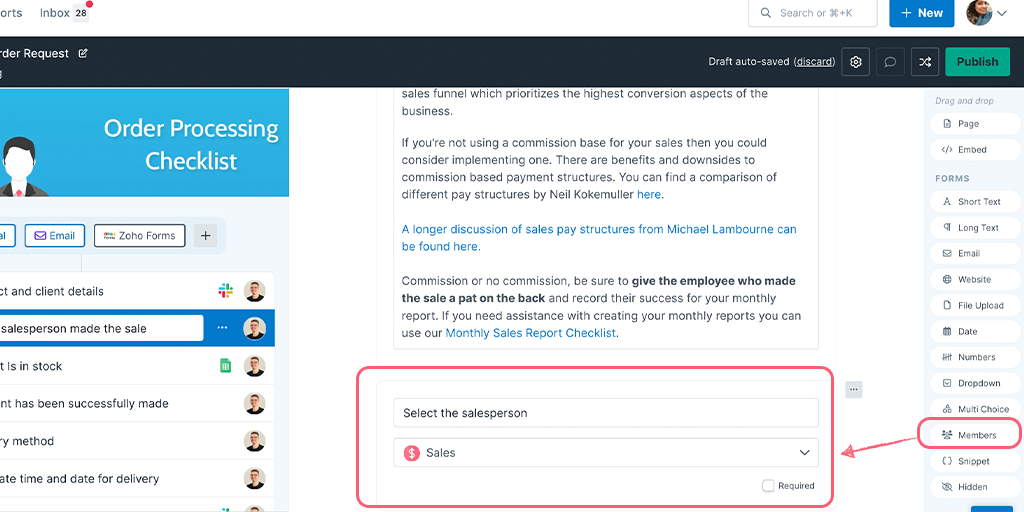
Note: You can only assign Members via the Members field. This does not include Guests (Internal) or (External).
A snippet field can only be seen when editing a workflow and is used for passing text or variable data (or both) into Process Street’s automations. This field can only be used with Process Street Automations.
Give your snippet a name or label, so that you can identify it easily when setting up automations. Next, start typing your text and use the magic wand icon to add any variable data fields into your message that you need.
For example, you can create a custom message in a workflow, which you use to send out, via an automation, to your team’s Slack channel. Learn more about how to create automations for Slack and other apps.
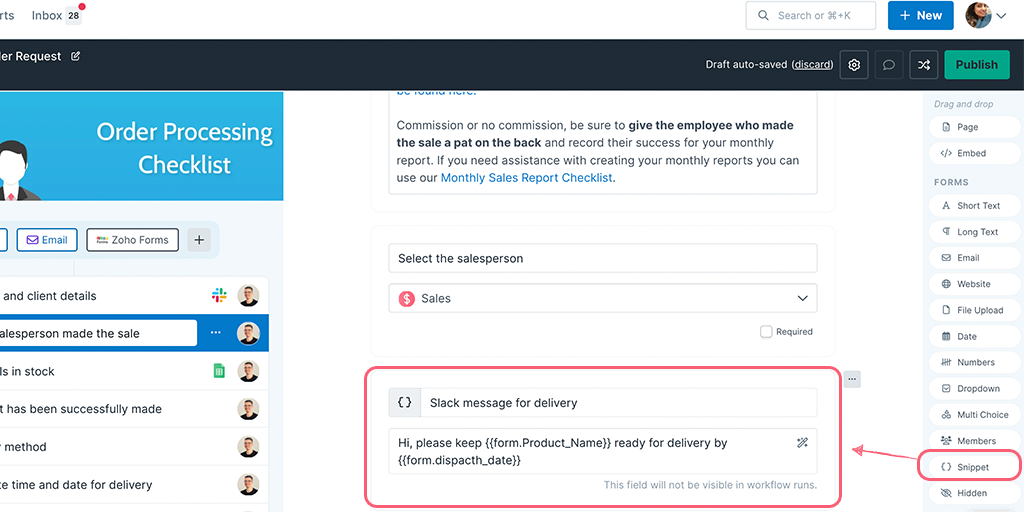
You can also use a snippet field without variables, to pass data into another app via an integration, for example, a picklist in Salesforce.
A hidden field can only be seen when editing a workflow and can be filled in by populating the field with data using integrations. This field is best suited for recording vital information that will never change and is unique.
For example, an email could change, so it’s best stored in an email field. However, a customer ID from your CRM will never change; this, along with any other kind of ID, is the main use for hidden fields.
This form field can only be used as a variable or in Automations and Integrations.
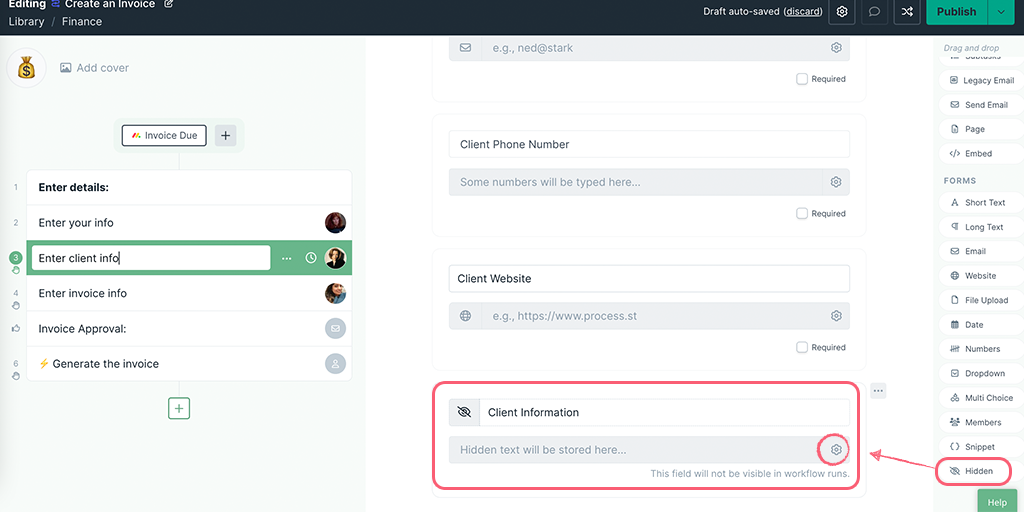
Type your label in so that you can identify the correct field when using it as a variable or in integrations.
Hidden field validations
Once you’ve added the field in the workflow editor, you’ll see the Settings cog on the right side of the response field. Click on it to open the validation settings. From here, set a default value to auto-fill this form field. Click Apply to save the validation settings.
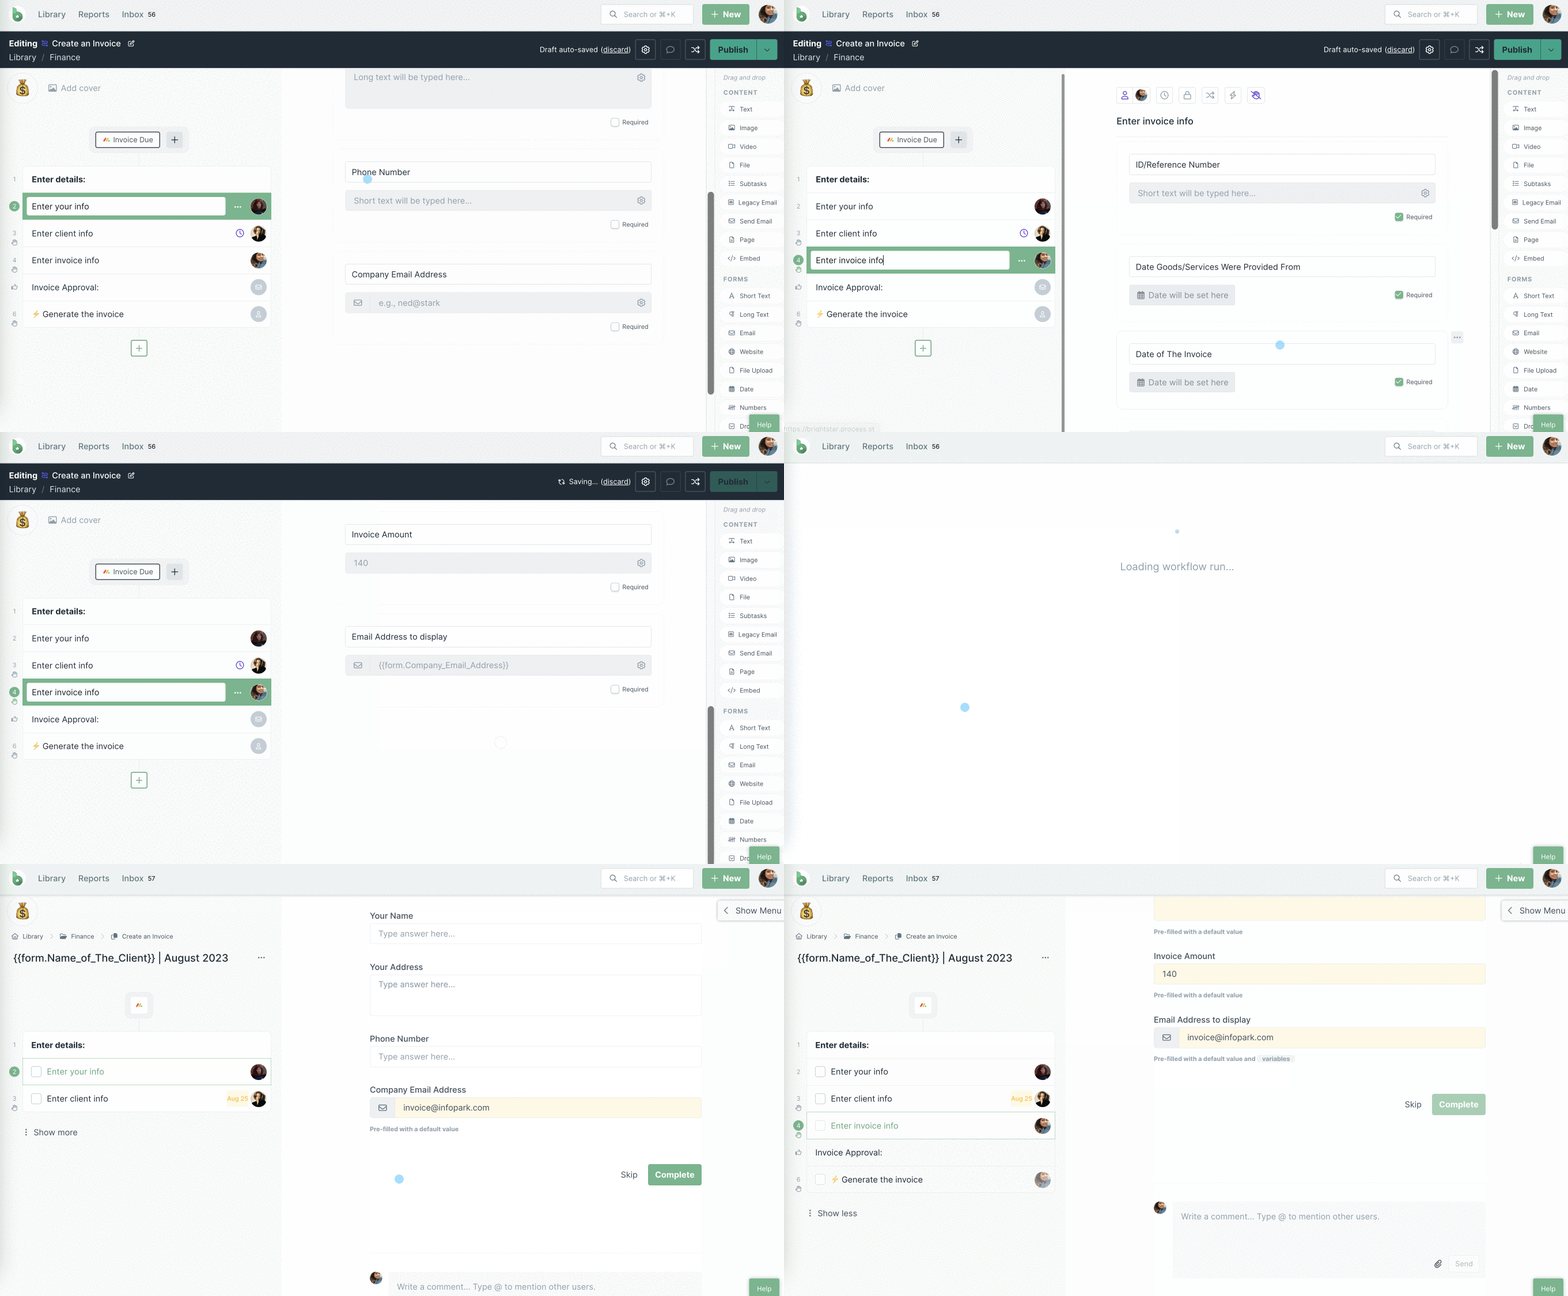
You can auto-fill your form fields with a default value or a form field variable that would populate as soon as your workflow runs. You can also use a variable as the default value, as shown below.
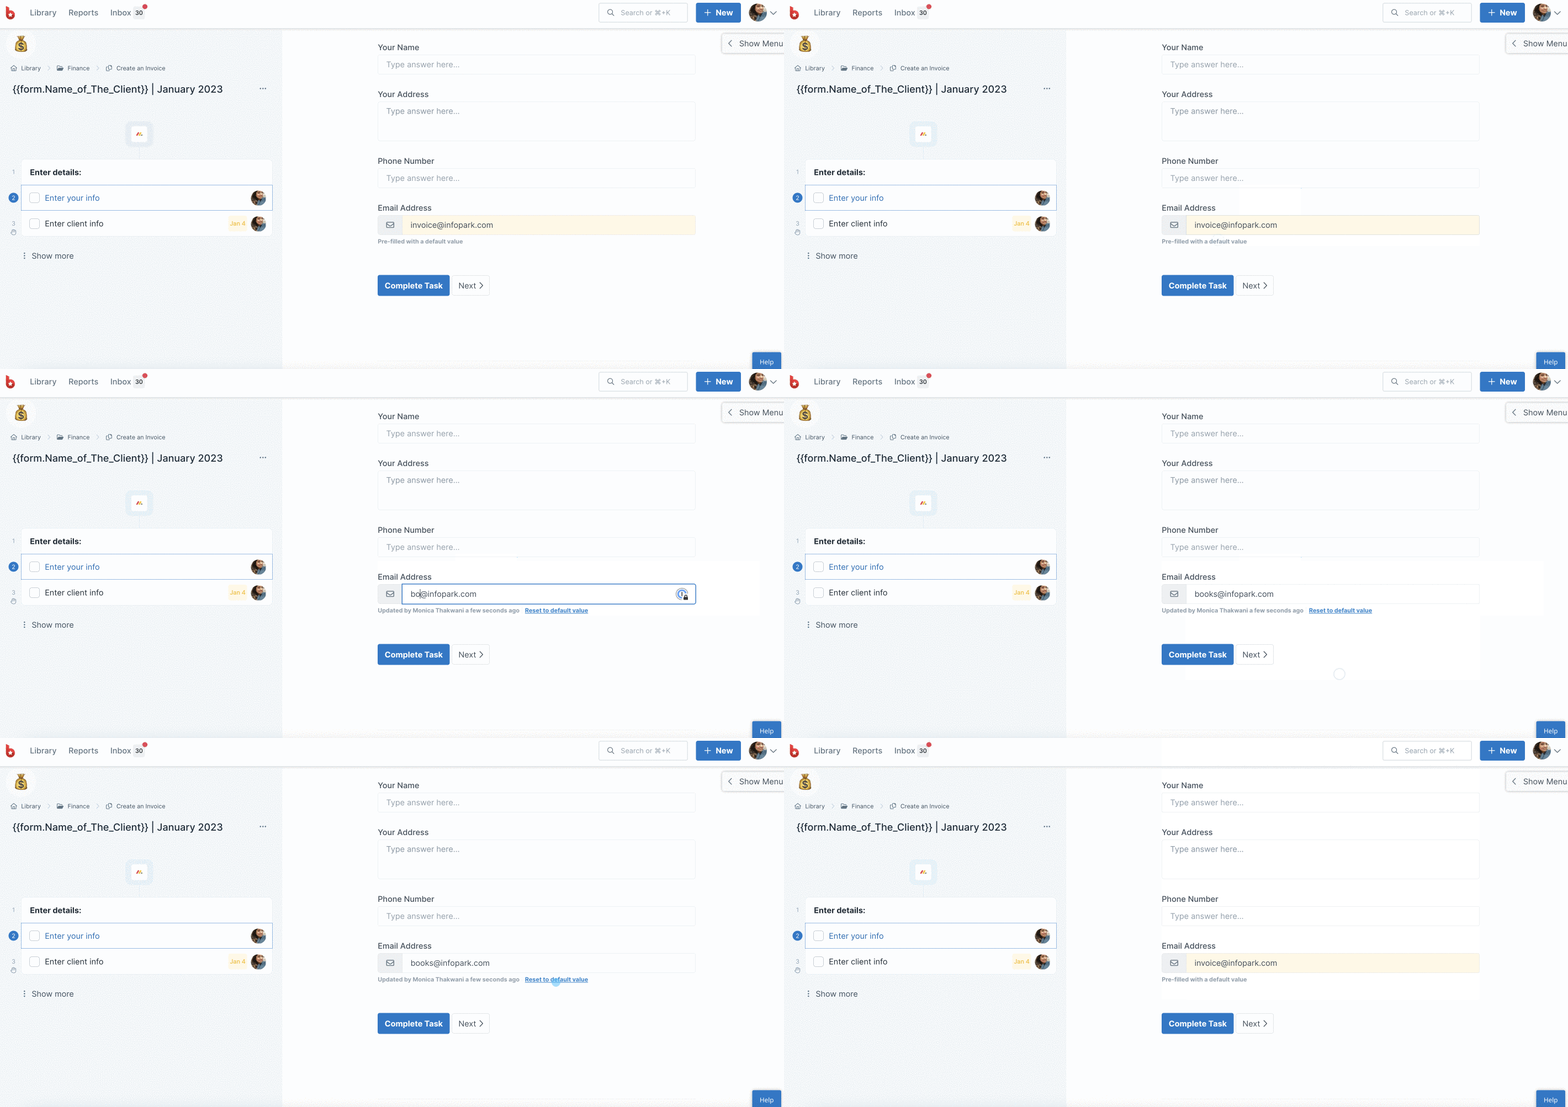
Once the workflow runs, you can also override the default value or reset the overridden value back to default.
When a form field is filled out, you can see who updated it along with a timestamp of when it was updated.
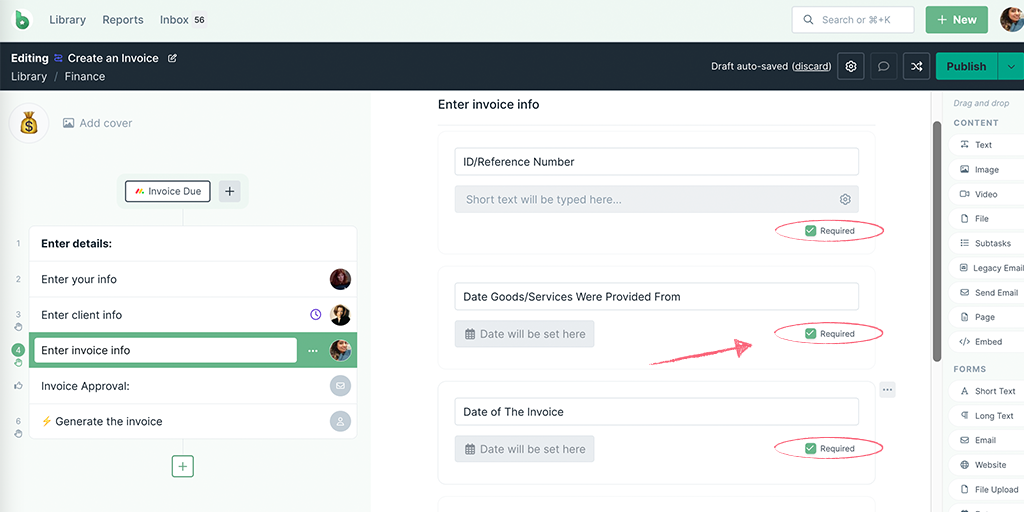
You can set form fields to be required fields so that when someone is filling out your workflow run, they can’t complete that task (or the workflow run overall) before they have filled out the required data.
To make a field required, edit your workflow and check the “Required” checkbox underneath the fields you’d like to make mandatory.
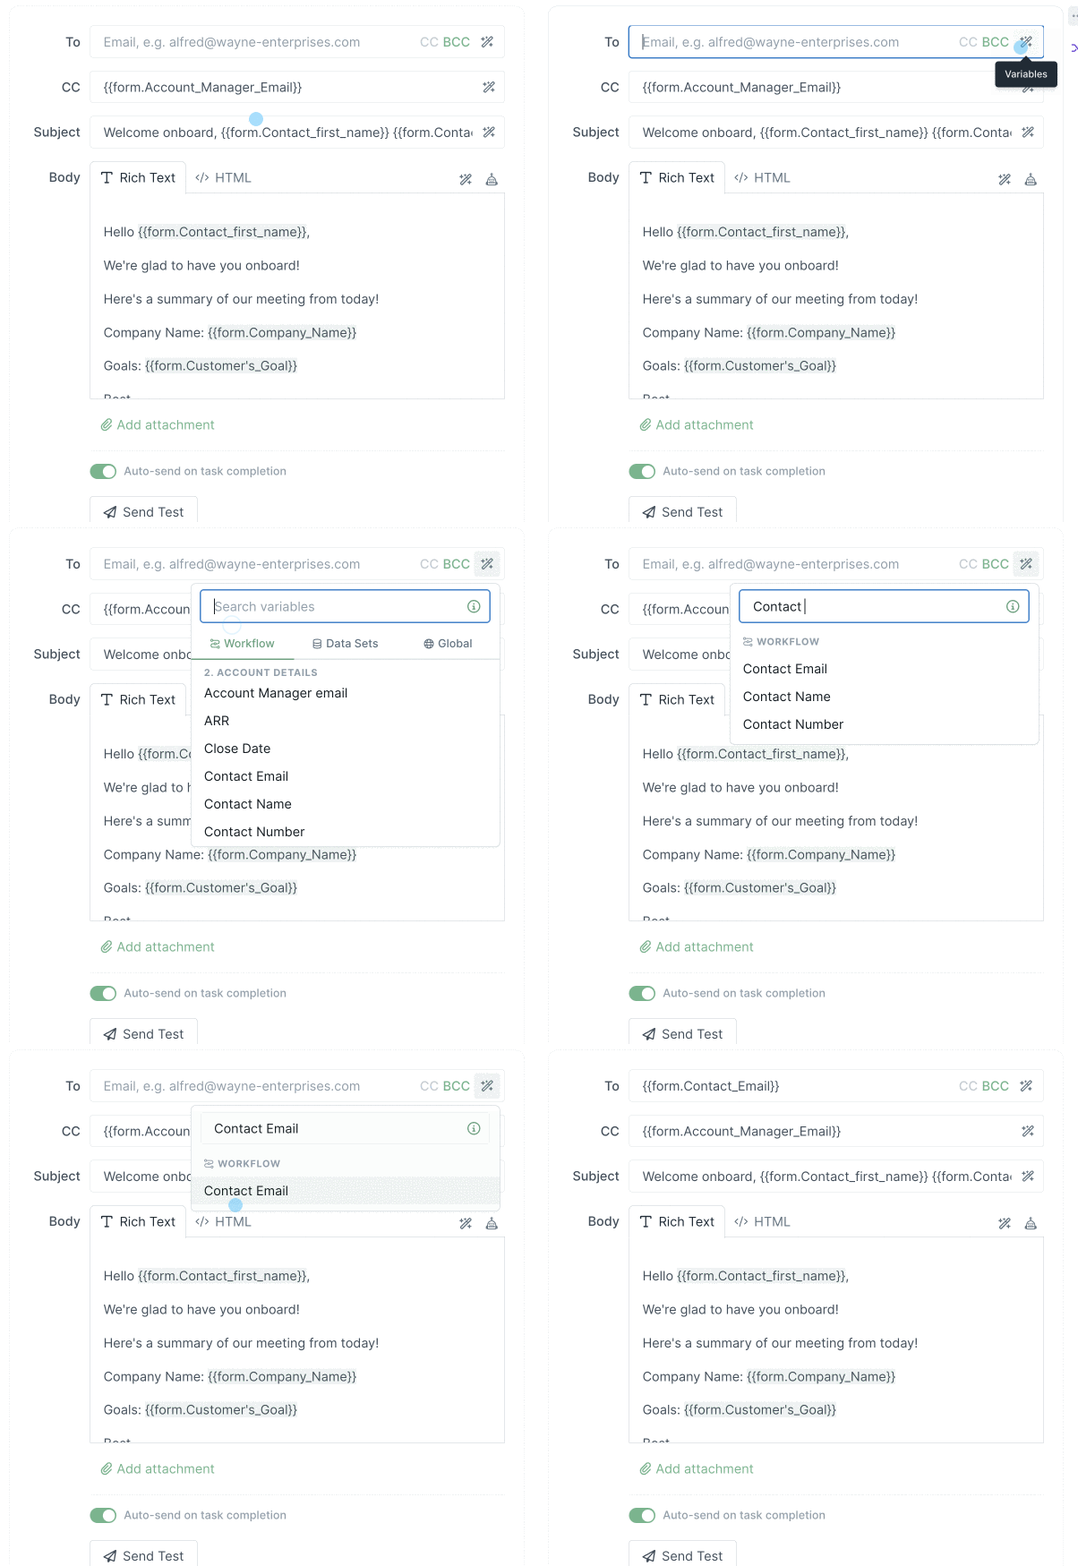
The information in form fields can also be pushed into other text, email widgets or embed widgets in your workflow run, or even into other apps using integration links, automations or workflow run links.
For example, you could set up an email address form field to capture an employee’s email address. Then, when the form field is filled out, that information can be pushed into a text, email widget or embed widget without having to manually copy and paste.
You can also fill a snippet field with variables to pass information to other apps via automations. However, this field will remain hidden in a workflow run.

You can connect Data Sets with workflows to populate your form fields with dynamic information from that data set.
Follow the steps here to use data sets as variables in your workflows.
Learn how to add content into your workflows with these content widgets: