Templates /
HubSpot Email Tracking Template

HubSpot Email Tracking Template

This HubSpot Email Tracking Template has been designed to guide you through the process of using Hubspot's email tracking chrome extension.
1
Introduction:
2
Record checklist
3
Getting started:
4
Understand what a tracked email is
5
Download HubSpot chrome extension
6
Connect your account:
7
Determine who hosts your email
8
Ask your IT department
9
Determine your host using MX Lookup
10
Connect your Gmail account
11
Connect your Office 365 account
12
Tracking emails:
13
Track your emails in Gmail
14
Determine how you are using Office 365
15
Track your emails in Office 365 using outlook desktop on PC or MAC
16
Track your emails in Office 365 using web account or outlook.com account
17
Setting up your sales notifications and activity feed:
18
View your sales notifications
19
Set up real-time notifications
20
Use your activity feed
21
Follow up with a contact
22
Learn more in regards to your activity feed
23
Check your email
24
Sources:
25
Related Checklists:

Introduction:

This HubSpot Email Tracking Template has been designed to guide you through the process of using Hubspot’s email tracking chrome extension.

Process Street’s HubSpot Email Tracking Template walks you through the process of tracking and logging your emails using HubSpot by organizing this process under the following headings:

HubSpot is a marketing, sales, and service software, designed to help your business grow with no compromise.

Powerful, persuasive and practical marketing is built from four key process steps; attract, capture, track, and close.

That is, you need to attract potential customers. Capture those potential customers by providing more details in regard to your product/service. Track your customers for continual feedback and review, and finally close qualified leads as they move from awareness to purchase.

Process Street’s HubSpot Email Tracking Template focuses on one stage, that is, the tracking stage.

77% of customers choose email over other online marketing channels, considering it as the most trusted source. With such a large attentive audience, it makes sense to implement both time and effort into your email marketing campaigns.

A well-executed email campaign can:

  1. Increase sales
  2. Increase client loyalty
  3. Generate leads
  4. Produce additional repeat business
  5. Reduce marketing costs

To produce such a well-executed email campaign you need to know if your email marketing campaign is working?

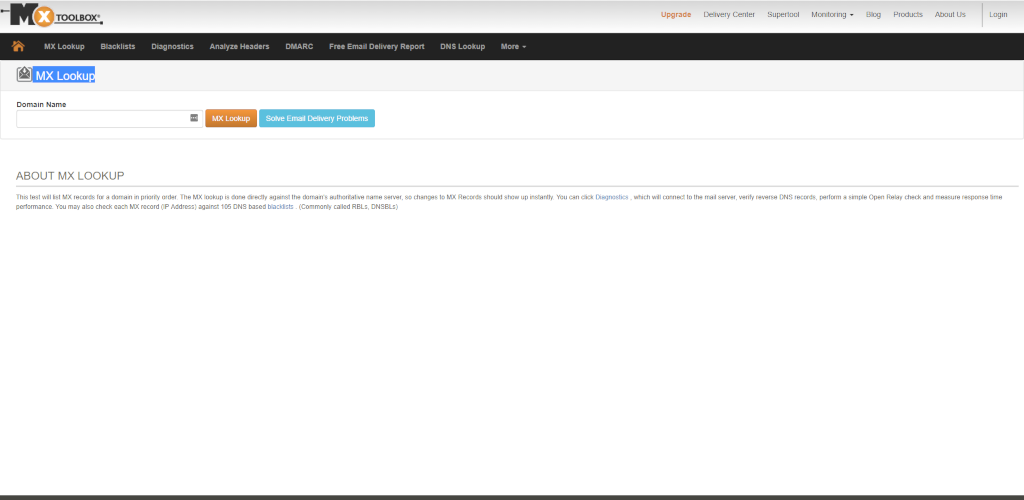
‘Clickthrough rate’, ‘open rate’ and ‘delivery rate’ are considered the top email marketing performance indicators.

The Clickthrough rate is defined as the proportion of users who click on any links within a particular email.

The Open rate is defined as the percentage of the total number of subscribers who opened the email campaign.

The delivery rate is defined as the percentage of emails that were delivered to the recipients.

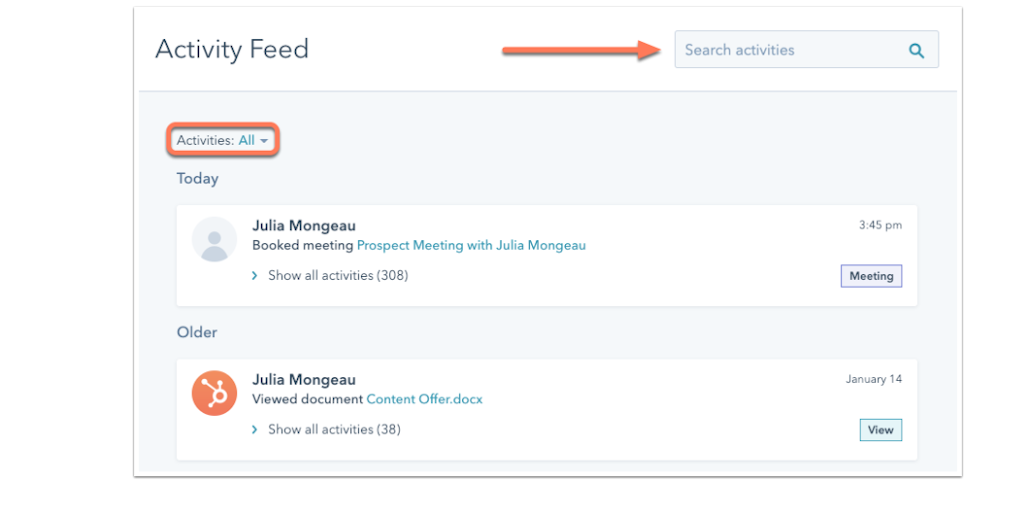
Obtaining information in regards to the ‘click-through rate’, ‘open rate’ and the ‘delivery rate’  will provide you with vital information so you can review, adapt and improve your email marketing campaign.
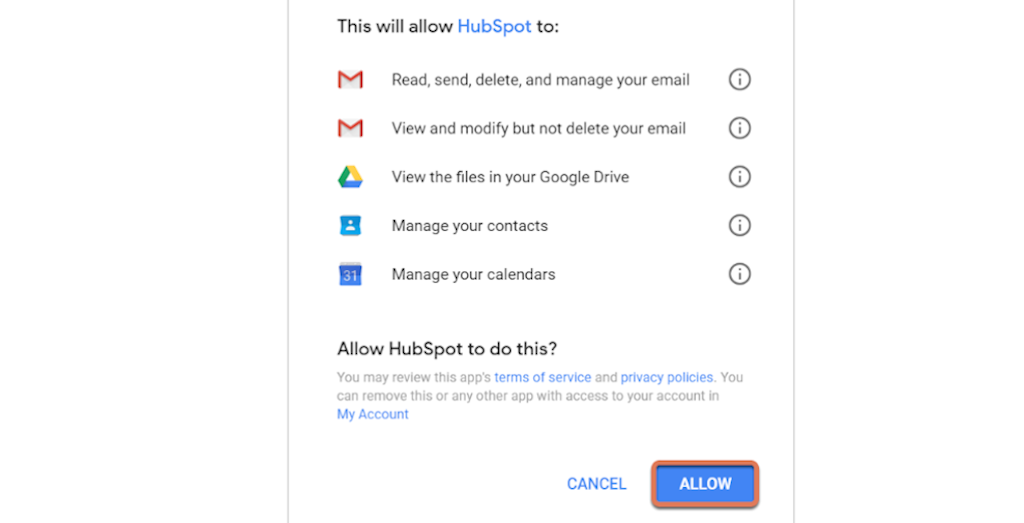
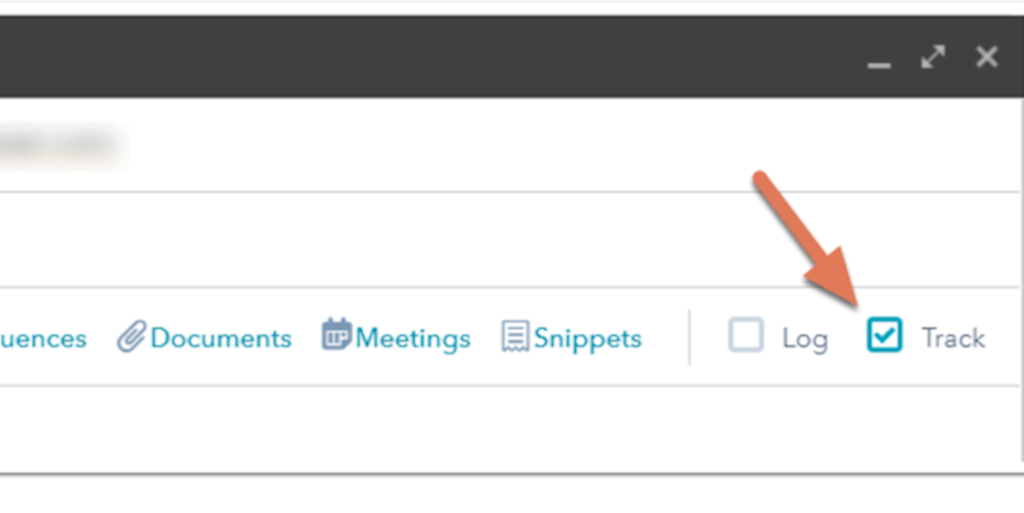
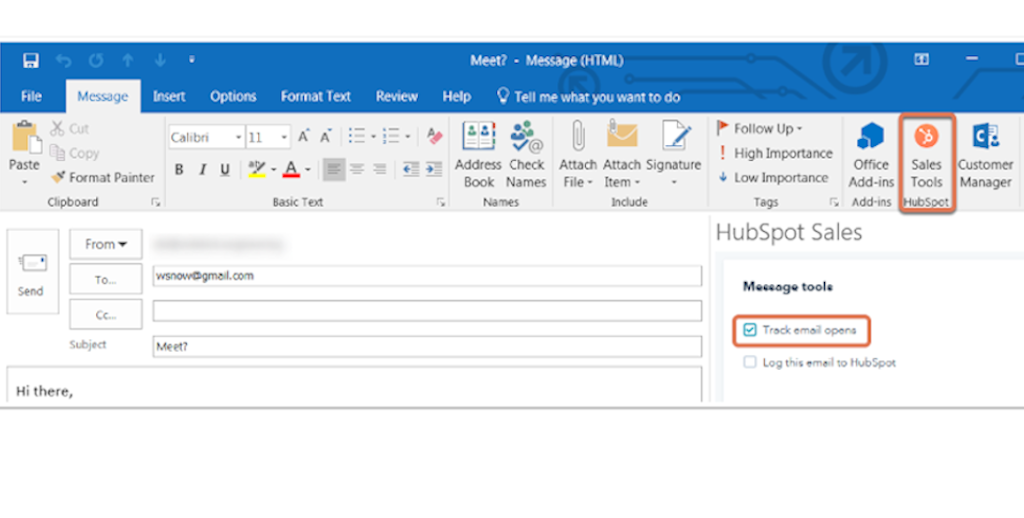
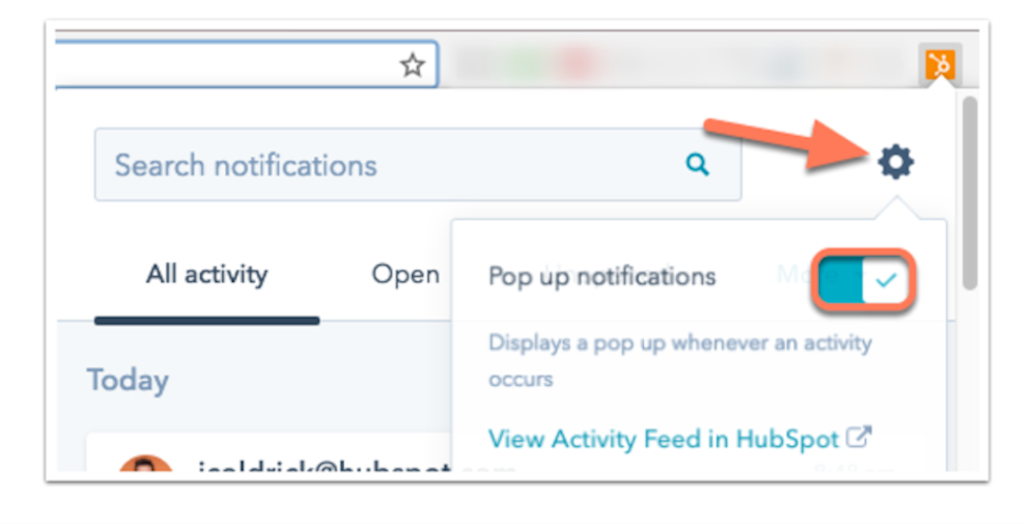
HubSpot’s email tracking chrome extension provides you with this key information. This HubSpot Email Tracking Template will aid you through the process of tracking your email campaign.

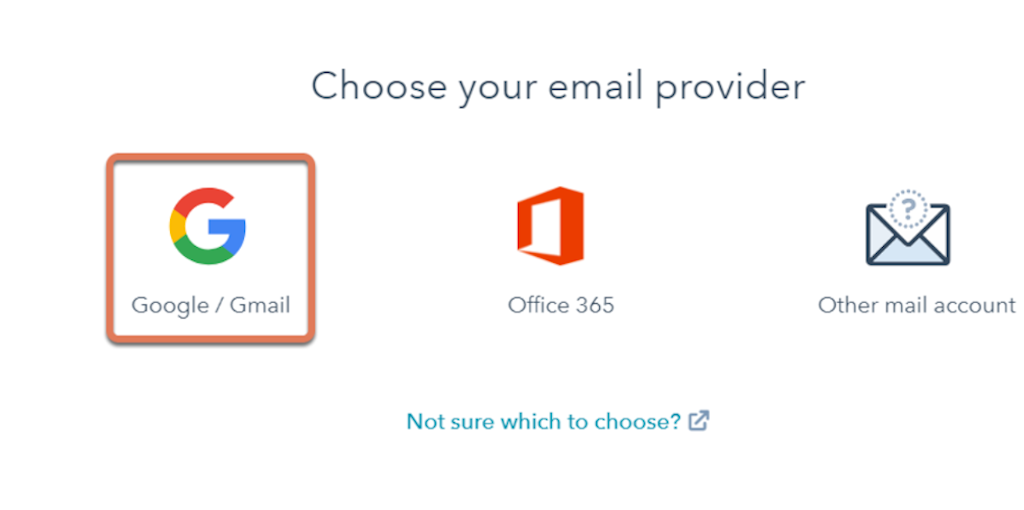
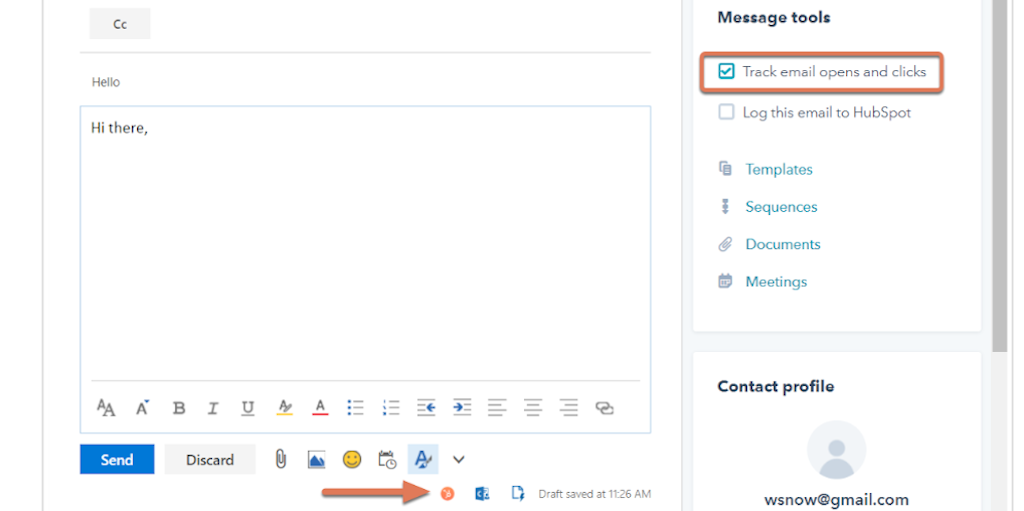
As a manager, you will begin this template and assign tasks to the relevant employee. Tasks assigned to the employee will walk the employee through the process of tracking emails in either Office 365 or Gmail.

By using Process Street’s HubSpot’s Email Tracking Template the relevant employee will quickly get to grips with HubSpot’s email tracking feature, with minimal effort from your end.

In this HubSpot’s Email Tracking Template, you will be presented with form fields, such as long text form fields and multiple choice questions. You will be required to populate each form field with your specific data.

More information on how to use each form field is provided on the ‘Enter Checklist Details’ task.

You will also be presented with:

  • Process Street’s stop tasks that ensure task order.
  • Process Street’s conditional logic to create a dynamic template which caters to your specific needs.
  • Process Street’s role assignment feature, to assign tasks to the relevant employee.

Record checklist

To begin this HubSpot Email Tracking Template, enter the required details into the form fields below.


You can use our role assignment feature to assign the relevant employee to the tasks as required.


These are all examples of form fields, which are fields of information which can be filled in by a user working through a checklist from this template.

More information is provided for each form field via our help pages:

This is a stop task, which means you cannot progress in this template until the required form fields are complete.

Getting started:

Understand what a tracked email is

Using the HubSpot’s Sales Chrome extension you can track your emails.

It is important to understand what a tracked email is. Consider the below definition before moving forward in this template. 

Tracked Email 

Tracking emails gives insight into how the recipient is interacting with the email. You will be notified when the contact opens the email. Paid Sales Hub users will also be notified when the recipient clicks a link in the email as well.

Download HubSpot chrome extension

Make sure you have a HubSpot Sales account and that you have added HubSpot as a chrome extension.

Work through the subtask checklist below.

  • 1

    Make an account with HubSpot’s sales hub
  • 2

    Add HubSpot’s Email Tracking and Sales CRM for Gmail extension

You can turn on or off GDPR functionality in your HubSpot account as required, on a message by message basis or for more general purposes. Existing contacts who have not granted a lawful basis for data processing will be tracked anonymously. It is best to consult your legal team for this. 

Connect your account:

Determine who hosts your email

Before you can use HubSpot’s email tracking feature, you need to know the host for your email. Your email host operates your email servers. 

To find out who hosts your email, you can ask your IT department or you can use online tools such as MxToolbox.

You are presented with our dropdown form field below. The response selected will determine which stage in this HubSpot Email Tracking Template you will be directed to using our Conditional Logic feature. 


Ask your IT department

Ask you IT department to determine you host email. This department will most likley know.

  • 1

    Ask your IT department who hosts your email

  • 1

    Connect your Gmail account
  • 2

    Connect your Office 365 account

HubSpot does not support a connection with ActiveSync, but if you use ActiveSync in your email client, connect your account using HubSpot-Exchange connection.

If your email service provider is something other than Google Apps, Exchange or Office 365, then you can connect your account via IMAP.

Determine your host using MX Lookup

You can use the MX Lookup tool to determine your email host. 

Click here to access this tool.

  • 1

    Enter your email domain in the ‘Domain Name’ field

The Domain Name is the part after the @ symbol in your email address.

You can use MX Lookup to identify your server.

  • 1

    After entering your email domain, click MX Lookup
  • 2

    On the screen, you will see your email service provider

  • 1

    Connect your Gmail account
  • 2

    Connect your Office 365 account
  • If your email provider is Google Apps, you will be connecting a Gmail account.

  • If your email provider is Office 365, you will be connecting an Office 365 account.

Connect your Gmail account

Follow the steps below to connect your Gmail account with HubSpot.

  • 1

    Enter your HubSpot account
  • 2

    Click the setting icon in the main navigation bar
  • 3

    Click ‘connect an inbox’
  • 4

    Select Google/Gmail
Select Google/Gmail to connect HubSpot with your Gmail inbox.

  • 1

    Read through ‘what to expect when you connect your Gmail inbox to HubSpot’, then click ‘continue’.
  • 2

    Log in to the Gmail account you want to use/connect with.
  • 3

    Review the required permissions.
  • 4

    Click ‘Allow’.
  • 5

    You are redirected back to your settings, and a dialog box will appear to inform you that your Google inbox is now connected to HubSpot.
Select ‘Allow’ to connect your Gmail inbox with HubSpot.

If your Gmail account has an alias set up, that alias will show up automatically from the dropdown menu in the email composer. The alias must be set up in your Gmail account before you connect your inbox. 

Connect your Office 365 account

Follow the steps below to connect your Office 365 account with HubSpot.

  • 1

    Enter your HubSpot account
  • 2

    Click the setting icon in the main navigation bar
  • 3

    Click ‘connect an inbox’
  • 4

    Select Office 365
  • 5

    Enter the email of the Office 365 account that you want to use
  • 6

    You are redirected back to your settings, and a dialog box will appear to inform you that your Office 365 account is now connected to HubSpot
Select office 365 to connect with your Office 365 inbox.

Tracking emails:

Track your emails in Gmail

To track your emails from your Gmail account, you must first send a tracked email from your account. 

Complete the tasks below.

  • 1

    Log into your Gmail account
  • 2

    Compose a news email
  • 3

    Enter the email recipient, the subject line and then the email body
  • 4

    Select the ‘Track’ checkbox
  • 5

    Click ‘Send’
Select the track checkbox to track the email sent from your Gmail account.

Determine how you are using Office 365

Select how you are using your Office 365 account to continue to the next relevant stage of this template.


A slightly different proces is needed to track emails in Office 365 depending on whether you are logged into Office 365 from your outlook desktop on PC or MAC, or you are logged in using a web account on Outlook.com.

Track your emails in Office 365 using outlook desktop on PC or MAC

To track your emails from your Office 365 account on a desktop on a MAC or PC, you must send a tracked email from your account. 

Complete the tasks below.

  • 1

    Log into your Outlook account
  • 2

    Compose a new email
  • 3

    Enter the email recipient, subject line and email body
  • 4

    In the message window, click ‘Sales Tools’
  • 5

    In the right-hand side panel, select ‘Track Email Options’ checkbox. (Please note that Sales Hub Starter, Professional and Enterprise users will see ‘Track Email Opens and Clicks’)
  • 6

    Keep the HubSpot Sales panel open in your inbox
  • 7

    Select ‘Send’
Select the checkbox ‘track email opens’ to begin to track your emails in Office 365.

Track your emails in Office 365 using web account or outlook.com account

To track your emails from your Office 365 account from an Outlook on the web account or an Outlook.com account, you must send a tracked email from your account. 

Complete the tasks below.

  • 1

    Log into your outlook account
  • 2

    Compose a new email
  • 3

    Enter the email recipient, subject line, and email body
  • 4

    At the bottom right-hand corner of your email composition window, click the HubSpot sprocket icon
  • 5

    Select the ‘Track email opens’ checkbox which will be on the right-hand side panel
  • 6

    Keep the HubSpot sales panel open with this checkbox ticked and then click send
Use the HubSpot sales panel to track emails in Office 365 web or Outlook.com account.

Setting up your sales notifications and activity feed:

View your sales notifications

You can enable notifications to be triggered when your tracked email is opened or clicked, a shared document is viewed or a meeting is booked. 

You can be notified in real-time, or you can view and manage from your activity feed in HubSpot. 


  • 1

    Real-time notifications
  • 2

    Use your activity feed

Please note that free users will only receive 200 notifications per month. Past this 200 limit, you can send tracked emails, but your activity feed will not reset until the start of the next month.

Set up real-time notifications

Follow the steps below to turn these notifications off or on.

  • 1

    In the upper right, click the HubSpot sprocket icon
  • 2

    Click the gear icon
  • 3

    Click to toggle the ‘Pop up notification’ which can be turned off or on
Click the gear icon, and then turn on pop-up notifications.

Real-time notifications can then be silenced in the tray application.

  • 1

    Go to your tray application
  • 2

    Click ‘pause notifications’
Go to your tray icon and select ‘pause notifications’ to turn off notifications.

With the HubSpot Sales Chrome extension, you can view real-time notifications in the upper right of your Chrome browser

You have full control over when you receive these notifications and when to silence the notifications. 

Use your activity feed

You can view your recent activity all in one place in your activity feed. 

All activities are grouped by contact. Activities are unique to the account you are signed into.

Follow the steps below to use your activity feed.

  • 1

    Go to your HubSpot account
  • 2

    Navigate to ‘Contacts > Activity Feed’
  • 3

    Use the ‘Search bar’ to search for a specific activity

Filter Your Activity Feed

You can filter your activity feed by specific activity types. To do this, go the ‘Activities’ dropdown menu and filter your feed by specific activity types. 

You can filter your activity feed as below.

Email Opens 

View all recent email opens. You can use HubSpot to identify open locations. You may also see multiple opens for the same email.

Email Clicks 

View when the recipient clicks on your emails. 

Sent Emails

View all emails that are successfully sent.

Document views 

See how many sales documents have been viewed by recipients. 

Lead visits 

You can view all recent lead visits notifications. 

Form

View all recent form submissions.

Meetings 

View all recent meetings booked with a HubSpot meetings link.

  • 1

    To view all of a contact’s recent activities, click ‘Show all activities (number of activities)’.
You can navigate to the search bar to filter activities as you require.


Email tracking activity included in your activity feed is specific to the emails you have sent. No one else, but you, can view this information. 

Follow up with a contact

In your activity feed, you can follow up with a contact over the phone or in an email, or to create a follow-up task.

To do this, complete the tasks below.

  • 1

    Hover over the activity, and select ‘Call’, ‘Email’ or ‘Create Task’

Learn more in regards to your activity feed

Once the recipient opens the email, you will receive a real-time, pop-up notification.

Once you receive this notification, you can navigate back to your activity feed where you will then see this email information. In this case, the email will be marked as ‘open’. 

You can view important information from this activity feed, such as the below: 

  1. When the recipient opened your email. 
  2. Where the recipient is located.
  3. The history of the contacts activities.

If you want to create a note, log an activity, schedule a meeting, or mute a notification, click the ‘More’ dropdown menu and select an activity.

Check your email

To log an email using your HubSpot CRM account, the email address you send emails from must be one of the following

  • 1

    A user in your account
  • 2

    One of your connected email addresses
  • 3

    An alias in your email client (either an alias that has been configured in your connected account or an alias added to your Profile and Preferences)
  • To exclude recipients from CRM email logging, click here

  • To add email addresses and domains in your Chrome extension, click here.

Sources:

Take control of your workflows today.