Templates /
Google Analytics Audit

Google Analytics Audit

Run this checklist whenever you need to perform a Google Analytics audit.
1
Introduction:
2
Preparation:
3
Collect some data about the Google Analytics profile
4
Property configuration:
5
Check referral exclusion settings
6
Check AdWords integration
7
View configuration:
8
Check basic View Settings are configured correctly
9
Make sure Views are organized logically
10
Check default URL is set up correctly
11
Check Goals are configured correctly
12
Filters:
13
Make sure exclude filters are set up correctly
14
Tracking:
15
Troubleshoot basic tracking issues
16
Check tracking snippet formatting
17
Check for pages missing Google Analytics code
18
Check for different data in your shopping cart tool
19
Tag Manager:
20
Check Cross-Domain Tracking
21
Check Tag Manager is filtering out spam traffic
22
Check tag firing
23
Attribution:
24
Log attribution model
25
Finishing up:
26
Make sure Google Analytics email reports are set up
27
Forward completed audit report
28
Approval:
29
Sources:
30
Related checklists:

Introduction:

Google Analytics is not a magical fountain of quality data – it’s a tool, and like all tools, you have to know how to use it properly. It’s entirely possible to receive bad data from Google analytics – not because it’s broken; because it could be badly configured.

This is precisely why regular Google Analytics audits are an absolute necessity; to make sure your data is complete and up-to-date so that the algorithm can perform optimally and give you the best, most accurate insight into your company’s performance as possible.

There are problems with out-of-the-box setups, as well as problems that result from poorly maintained setups. Either way, enforcing quality control through a regular, well-thought-out process can hugely improve the quality of your Google Analytics data.

We built this guide to simplify the whole process, so all you have to do is run it and follow each task laid out in front of you (and if you need to customize any of the fields to suit your needs, you can). This comprehensive checklist template will run you through the whole process and leave you with a handy audit report, automatically filled in as you complete the checklist.

Let’s get started!

Preparation:

Collect some data about the Google Analytics profile

Before you begin the audit you’ll want to gather some basic data, such as which version of Google Analytics is being used, and when the audit was performed.

Input the data into the form fields in this task.


The final Google Analytics Audit report will need to be reviewed and approved by the relevant personnel. Please fill in the details for reviewal and subsequent approval below.


Property configuration:

Check referral exclusion settings

When you use a 3rd party payment gateway service (like PayPal), the transactions made through these channels will show up in your referral traffic, with the report erroneously giving them credit for the transaction instead of the original traffic source.

So, it’s best practice to check and make sure that your referral exclusion settings are properly configured to block these noisy results.

  • 1

    Navigate to the Admin panel
  • 2

    Click “Property Tracking Info”
  • 3

    Click “Referral Exclusion List”
  • 4

    Add the domains of the payment gateway services

Check AdWords integration

Linking a Google Analytics property to your Google Ads account can help you analyze customer activity on your website after an ad click or impression. Setting this up may be a simple one-time job, but the key to a successful integration is a thorough and regular maintenance process.

Use the sub-tasks below to check for common pitfalls in how your Google Analytics account is configured to work with Google AdWords and mark each of them off as you go.

  • 1

    Correct AdWords account is synced
  • 2

    Time zones of both AdWords and Google Analytics match up
  • 3

    Turn on AdWords auto-tagging
  • 4

    AdWords integration is set up correctly
  • 5

    PPC data is showing in Google Analytics
  • 6

    Clicks and sessions are being recorded properly

View configuration:

Check basic View Settings are configured correctly

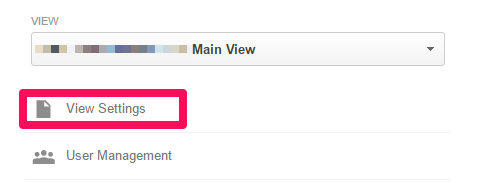
Next, click “View Settings” within Google Analytics. These checks are all pretty simple and can be done within the Settings menu, but even the most basic assumptions should not be left unchecked.

Make sure each of the following sub-tasks is marked as complete before continuing on with the next task.

  • 1

    Set the correct time zone
  • 2

    Set the correct currency
  • 3

    Enable bot filtering
  • 4

    Enable site search
  • 5

    Link AdWords account
  • 6

    Link Google Search Console

Make sure Views are organized logically

For a well-structured and organized Views panel, data should be organized clearly and logically. It is good practice to maintain multiple duplicate Views alongside the raw, unfiltered out-of-the-box View; for example, a testing View and a reporting View.

Having more than one view enables you to look at the data available for your domain from a variety of different perspectives (filters), each with their own unique insights.

Follow the sub-checklist below to ensure your Views are adequately organized.

  • 1

    Un-edited master view
  • 2

    Filtered report-style view
  • 3

    Testing view

These suggested Views above are just that – suggestions for a best practice arrangement of your GA Views. It’s likely that you’ll want to include your own guidelines for maintaining your Views – if that’s the case, just edit this checklist template to suit your needs.


Check default URL is set up correctly

Since Google Analytics tracks www.example.com/ and www.example.com/index.html as two separate pages by default, it may be useful to set the default URL field to force Analytics to treat them both as the same location in the reports.

Bear in mind, that this won’t affect the data collection; just the way the data is presented in the reports. Nonetheless, it can still be useful to check that this field is set up correctly. If in doubt, leave the field blank.

  • 1

    Find the “Default Page” field in View Settings
  • 2

    Make sure the field is set to the default page for this domain
  • 3

    Click “Apply”

Check Goals are configured correctly

Goals provide insight into specific user interactions across your domain by tracking events like form submissions, file downloads, and clicks (to name a few).

Using Goals, you can define certain actions to represent conversions and derive a customized picture of success from your website.

Check which Goals are active for each View across the Google Analytics account being audited, and record your findings below.

  • 1

    Check to see which goals are active

Filters:

Make sure exclude filters are set up correctly

Filters in Google Analytics are used to clean up data and gain more clarity about where that data is coming from. This task is focused on checking that some of the most elementary filters are set up and working correctly.

Using the sub-checklist below, make sure the following filter settings are applied:

  • 1

    Exclude staging traffic
  • 2

    Exclude traffic from developers
  • 3

    Exclude log spam
  • 4

    Exclude referral spam
  • 5

    Exclude URL query parameters
  • 6

    Exclude internal IP addresses
  • 7

    Exclude self-referrals

If anything is missing from the list above, add new filters by doing the following:

  1. Go to the Admin panel
  2. Click on “All Filters”
  3. Click “New Filter”
  4. Apply the missing filter
  • 1

    Add new filters as needed

Tracking:

Troubleshoot basic tracking issues

To begin with tracking checks, it’s a good idea to start with the most common issues Google Analytics users face. Below is a sub-checklist containing the most frequently encountered problems which can be quickly and easily dealt with.

Just fill in the form fields with information about what tracking code version is in use and answer a few simple questions about your tracking configuration.


Check tracking snippet formatting

Tracking snippets require precise formatting in order to work; even something as simple as an extra space accidentally added to the end of a line during a word-editor copy & paste can break the code.

Especially if you are making customizations,, you should be careful about things such as extra whitespace, case-sensitivity, and rogue formatting errors.

  • 1

    Check for extra whitespace
  • 2

    Casing is correct (case-sensitive function names)
  • 3

    Boolean operators are not enclosed in quotes

Check for pages missing Google Analytics code

Run the Google Analytics Checker tool to see which pages on your domain are missing code for Google Analytics tracking. This will verify the presence of a tracking ID (number beginning with the characters “UA”), track pageview calls and the presence of a variety of javascript files used by Google Analytics.

Just go to the link above and input your domain.


  • 1

    Each page listed has Google Analytics code added
  • 2

    Configure Google Analytics to load asynchronously

Check for different data in your shopping cart tool

Those in eCommerce space using any kind of shopping cart tool will want to know that the data attached to these tools will appear as expected in Google Analytics.

Unfortunately, there are a number of common issues with this setup, namely:

  • Time settings. Timezones should be the same between Google Analytics and your shopping cart tool.
  • Canceled transactions. Whilst they might appear in your shopping cart tool, cancelled transactions as well as transactions with a value of $0 will not appear in Google Analytics.

It’s also possible that Google Analytics eCommerce Tracking was not installed properly. Refer to the official guide and check if everything was done properly – it may be necessary to perform a re-install.


Tag Manager:

Check Cross-Domain Tracking

Cross-Domain Tracking is used when multiple domains are part of a single buyer funnel. You can check that CDT is set up by going into the Cross Domain Tracking menu in the Tag Manager.

  • 1

    Click on the “Tags” panel in the Tag Manager
  • 2

    Select the Universal Analytics tag for editing
  • 3

    Open “More Settings”
  • 4

    Select “Cross Domain Tracking”
  • 5

    Inspect the comma separated list of domains

Check Tag Manager is filtering out spam traffic

One of the most effective ways to prevent spam traffic in Google Analytics is to use Google Tag Manager to set up a first party cookie that filters out data that doesn’t meet specific tagging criteria.

Basically, by setting an arbitrary value in a customized HTTP cookie created with a simple HTML script in Tag Manager, Google Analytics will be able to check whether or not a hit to the site is a real session.

Follow the sub-tasks below to make sure Tag Manager and Google Analytics are working together as they should be to prevent spam traffic. 

  • 1

    Create a custom first party cookie in Google Tag Manager

The HTML code might look something like this:

<script>
function setCookie(name, value, days) {
var expires = "";
if (days) {
var date = new Date();
date.setTime(date.getTime() + (days*24*60*60*1000));
expires = "; expires=" + date.toUTCString();
}
document.cookie = name + "=" + (value || "") + expires + "; path=/";
}

setCookie('RealHitVerifier', 'CookieVerified', '31')

</script>

Bear in mind that this is just an example, and the exact configuration of the cookie will vary depending on what each situation requires.

Once the cookie script is ready, jump back into Google Analytics and continue the integration:

  • 1

    Set up a new Custom Dimension in Google Analytics
  • 2

    Set the Google Analytics tag in Google Tag Manager to send data in the cookie to our new Custom Dimension
  • 3

    Set Google Analytics to only record hits from traffic that includes the correct value in that Custom Dimension

Check tag firing

Sometimes tags won’t fire as they’re expected to, and it can leave big holes in your data. There are many reasons why a tag might not be firing as you expect; here’s a list of some of the most common causes of tags not firing.

Make your way through this list and check off each sub-task as you go.

  • 1

    All containers are published
  • 2

    Conditions for a specific trigger are actually present
  • 3

    Triggers are not too specific
  • 4

    Tag Manager is deployed alongside a data layer
  • 5

    Make sure there aren’t too many HTTP requests
  • 6

    Tag Manager container snippets are installed correctly
  • 7

    Users aren’t leaving the page before the tag is firing

Attribution:

Log attribution model

Attribution modeling requires deep insight into the business model driving the data, and misinformed decisions about which Attribution Model is best for any given company can lead to a lot of bad data, and a lot of money wasted on poor marketing and advertising decisions.

This video from LovesData breaks down the seven standard Attribution Models within Google Analytics:

Use the drop-down form field below to log the Attribution model currently in use, and go on to provide your suggestion as to which Attribution Model you believe is the best fit for the company at this time.


Finishing up:

Make sure Google Analytics email reports are set up

Regular email reports can be set up for each of the different report categories within Google Analytics. You’ll want to make sure that regular reports are set up for each of the different categories in the navigation panel.

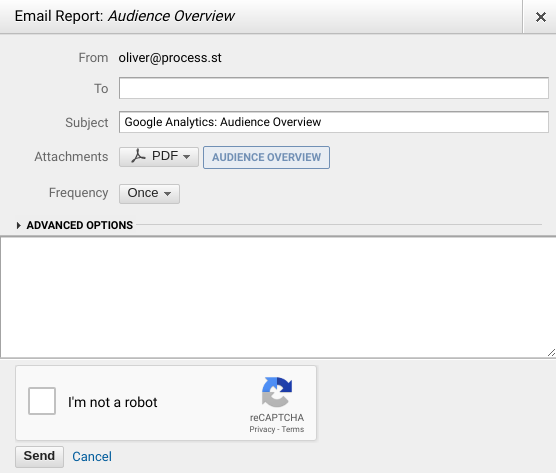
Below is an example of how to check that a report email is scheduled:

  • 1

    Open the Audience side-menu
  • 2

    Click “Overview”
  • 3

    Click the “Share” button

From here, you can determine how often reports are sent out with the “Frequency” drop-down option.

The Advanced Options menu hides a field that allows you to set a duration for how long you want to receive the scheduled emails, so make sure this setting is taken into consideration.

  • 1

    Check Advanced Options for email report scheduling

Following this, make sure that scheduling is active for all of the side panel categories:

  • 1

    Audience reports are scheduled
  • 2

    Acquisition reports are scheduled
  • 3

    Behaviour reports are scheduled
  • 4

    Conversions reports are scheduled

Forward completed audit report

You now have a report containing all of the information filled out in this checklist – it’s been auto-filled in the Send Email widget below.

This handy human-readable report is ready to be sent off to your client or management for a run-down of the Google Analytics audit, with information about what checks were performed, information gathered during the audit and suggestions for improvements to the current Google Analytics setup.

Go ahead and check that all of the information contained within the email is accurate.

Before you hit ‘send’ the audit results need to be reviewed and approved by the relevant personnel in your team.

Approval:

Will be submitted for approval:

  • Forward completed audit report

    Will be submitted

Sources:

Take control of your workflows today.