Templates /
WooCommerce Setup

WooCommerce Setup

Run this checklist to set up your own WooCommerce store
1
Introduction:
2
WooCommerce Setup:
3
Log into WordPress
4
Install the WooCommerce plugin
5
Provide store setup details
6
Choose whether to allow usage tracking
7
Set up payment options
8
Record shipping details
9
Select relevant extras
10
Post-store setup:
11
Create your first product(s)
12
Sources:
13
Relevant checklists:

Introduction:

WooCommerce is the most popular eCommerce platform in the world, with over 40% of online stores utilizing it to power their sites. It’s easy to use, free to set up, and is a great way to break into your own online niche.

However, if you’re new to the practice it can be confusing to get started. The options provided by WooCommerce allow for a wide range of customization, but it’s not always easy to tell what they will actually change.

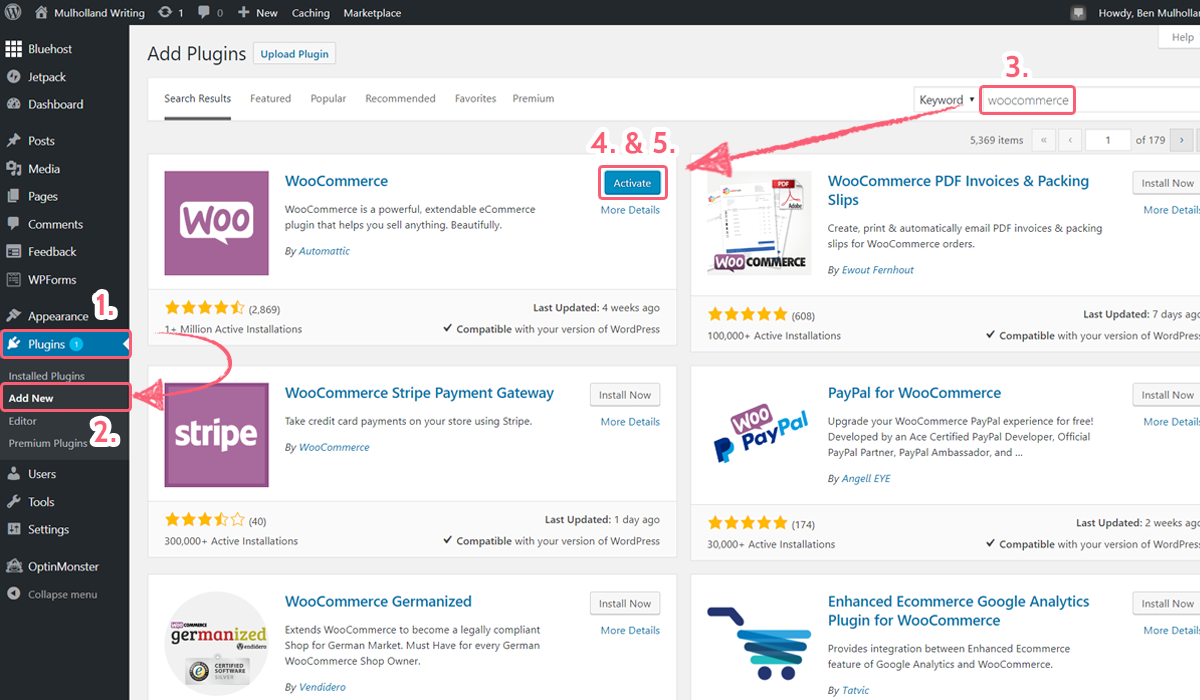
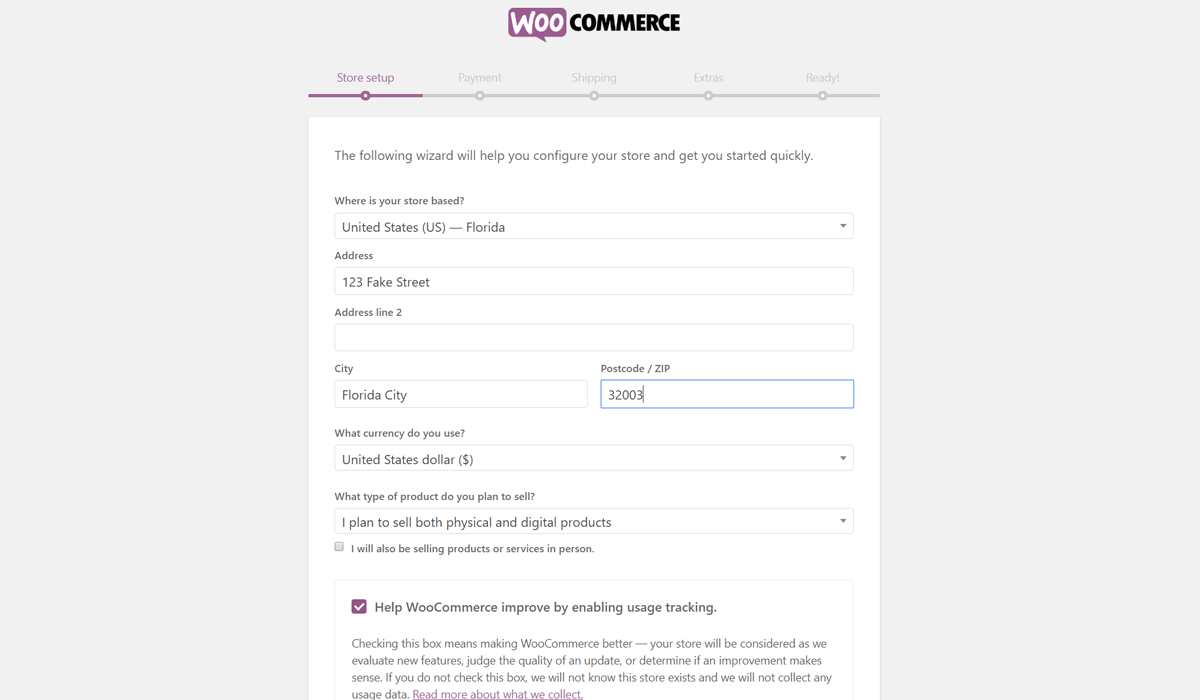
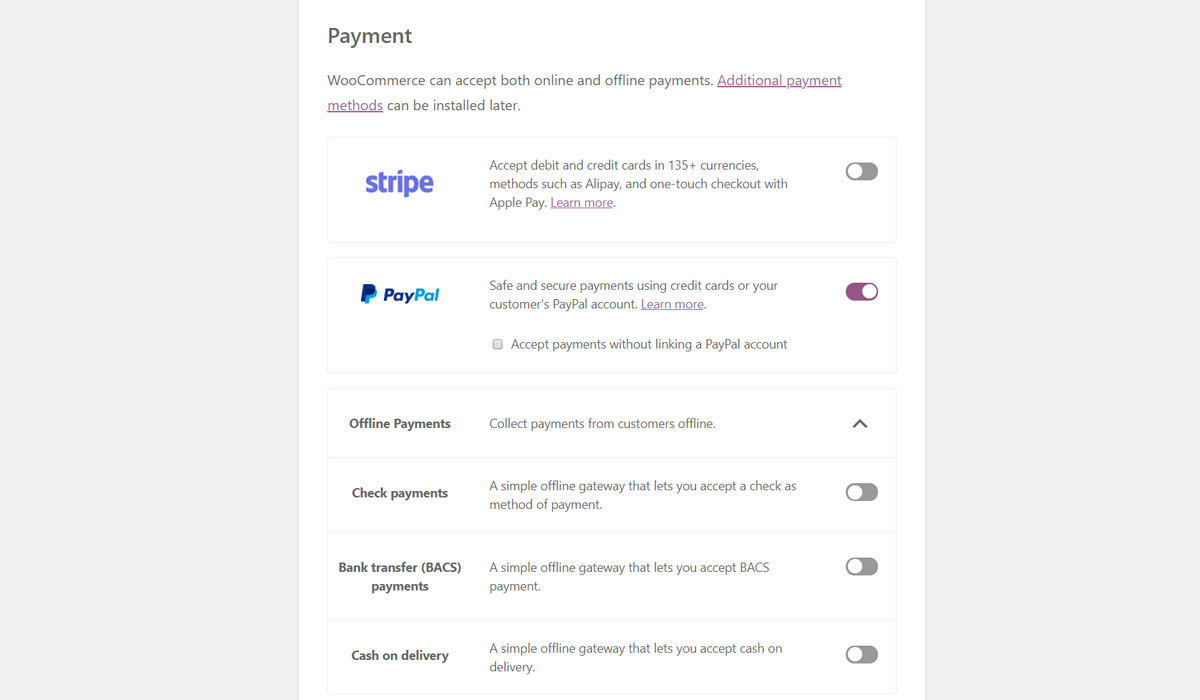
Running this WooCommerce setup checklist will solve that problem, as each step will guide you through the process of downloading, activating, and creating your online store.

What are you waiting for? It’s time to start selling!

WooCommerce Setup:

Log into WordPress

First up, you need to log into WordPress. This is required as WooCommerce is primarily a plugin for WordPress sites – it’s not an entirely independent service.

Record the site which you are using in the website form field below.

If you don’t own a WordPress site already, sign up for one before continuing.

Install the WooCommerce plugin

Next you need to find, download, and activate the WooCommerce plugin, This will allow you to set up your online store and host it on the website you’re logged into.

To do this, follow (and record your progress using) the sub-checklist below.

  • 1

    Go to the Plugins menu
  • 2

    Click "Add New"
  • 3

    Search for WooCommerce
  • 4

    Click "Install Now"
  • 5

    Click "Activate"

Provide store setup details

Continue by filling in your store’s setup details. Record a copy of these details using the form fields below to make sure that you can easily view what was originally entered.

These details include:

  • The country (or state) your store is in
  • The street address
  • Postcode or ZIP
  • Native store currency
  • What kinds of products will be sold


Choose whether to allow usage tracking

Shortly before moving on, you need to decide whether to allow WooCommerce to track your usage of their platform. This data does not include personal information of you or your customers and is only used to evaluate new features, judge the quality of updates, and so on, but the choice is entirely up to you.

The full list of data collected (should you choose to allow it) is:

  • Site URL
  • Admin email address
  • Active payment gateways
  • Active shipping methods
  • Activated plugins in list form
  • MySQL version
  • PHP version
  • PHP Settings, such as maximum post size, maximum input vars, if suhosin is enabled, if cURL, SOAP and fSock are enabled
  • Template overrides
  • Theme
  • Total number of customers
  • Total number of products
  • Total number of orders
  • Web server software and version
  • WordPress version
  • WordPress locale
  • WordPress debug mode
  • WordPress memory limit
  • WooCommerce settings

This option can be changed at a later date, so don’t worry about it too much, but in reality there’s little to no downside to your business in allowing this data to be collected.

Either way, record your choice using the dropdown form field below.


Set up payment options

Now it’s time to set up your payment options. These will depend on your previous details and choices (namely your location and choice whether to sell products and services in person or not), but a simple guide to the potential combinations is below.

  • If you’re not selling in person, the options will include between Stripe and PayPal
  • If you’re selling in person and you’re located in the U.S., Canada, Australia, Japan or the UK, the options will be Square, PayPal, or Stripe
  • If you’re selling in person and in Austria, Denmark, Finland, Germany, the Netherlands, Norway, Sweden, or the UK, then Klarna will also be one of your options
  • Offline payment methods are also compatible, including checks, bank transfer (BACS) payments, and cash on delivery

Multiple payment options can be selected and additional payment options can be installed later, so there’s no major pressure to account for every possibility this early on. Simply select the options which you know for definite will be used, record your choices using the multi-choice form field below, then move on.


  • 1

    Stripe
  • 2

    PayPal
  • 3

    Square
  • 4

    Klarna
  • 5

    Checks
  • 6

    Bank transfers (BACS)
  • 7

    Cash on delivery

Information on payment options:

  • Klarna allows you to take payments, if your store is located in Austria, Denmark, Finland, Germany, the Netherlands, Norway, Sweden, or the U.S. and UK. More at: Klarna Payments.
  • PayPal Express Checkout is active in 200+ countries, and also offers PayPal Credit for U.S. stores. More at: PayPal Express Checkout.
  • Square is a payment system for store owners who also have a physical store and/or want to sell goods and services in person. More at: WooCommerce Square.
  • Stripe supports 25+ countries and automatic recurring payments for WooCommerce Subscriptions products. The Wizard helps you sign up for a new Stripe account, if you need one. More at: Stripe for WooCommerce.

Also, if you’re going to be accepting payments in multiple currencies, you’ll also need to download the WooCommerce Multi-Currency plugin.

Record shipping details

Next you need to record the shipping details for your products. This includes the rates for your shipping to various locations (eg, inside and outside the US) and the measurement units for your shipping.

While you can select to charge a flat rate or provide free shipping on purchases, it’s recommended to use the default "Live Rates" option in order to get accurate projections in all cases unless you know that you’ll be charging a specific rate for all products (or providing shipping for free).

The weight and measurement units are used to calculate your shipping rates

Record your options using the form fields below.


Select relevant extras

You’re almost done! Now it’s time to select any extras you want to apply to your store.

The options here will vary depending on the settings your website has, but the single consistent choice you’ll need to make is whether to automatically have your tax rates calculated when a customer checks out.

If you don’t already have a tax solution figured out, be sure to enable this feature before moving on.

Other options are largely up to personal preference, but should be noted down using the form field below. For example, if your website doesn’t currently have a theme, you’ll have the option of using the default WooCommerce Storefront theme. This is a great starting point for your online store, and can always be swapped out later if needs be.


Post-store setup:

Create your first product(s)

Congratulations – your store is set up! However, before you finish, you’ll need to set up at least one product. After all, nobody can spend money at a shop with nothing to sell.

To create a single new product, click the "Create a product" button. Your product’s page will be set out in the same manner as a regular WordPress blog post, making it easy to transfer from one to the other.

Alternatively, you can upload a CSV to set up multiple products at once. If you’re taking this route, upload a copy of the CSV to the file upload field below.

Sources:

Relevant checklists:

Take control of your workflows today.