
Turn every policy into automated workflows with built-in enforcement and audit-ready proof.
Process Mapping Template: Guide, Examples, and Best Practices

A process mapping template gives you a reusable way to see how work actually moves through your team. It turns a vague process into named steps, decisions, owners, handoffs, inputs, outputs, and exceptions.
That matters because most workflow problems hide in the gaps between steps. A process can look simple in a meeting and still break down when a request waits for approval, a customer record is missing, or two teams think the other team owns the next action.
Use this guide to build a practical process mapping template, choose the right process map format, and turn the finished map into a repeatable workflow your team can run in Process Street.
- What is a process mapping template?
- Why use a process mapping template?
- How do you create a process mapping template?
- Which process map should you use?
- What should a process mapping template include?
- Process mapping best practices
- How do you turn a process map into a workflow?
- Process mapping FAQs
What is a process mapping template?
A process mapping template is a reusable framework for documenting how a process works. It gives the team a consistent place to capture the process boundary, the sequence of steps, decision points, roles, handoffs, inputs, outputs, and improvement ideas.
A simple template can be a flowchart. A more detailed one can be a swim lane diagram, value stream map, SIPOC view, or BPMN-style diagram. The format matters less than the discipline: the map should make the real workflow visible enough that people can agree on what happens, where it slows down, and what should change.
The American Society for Quality describes flowcharts as process maps that use symbols and arrows to show sequence, decisions, inputs, outputs, people involved, duration, and measurements. That is the core idea behind any useful process mapping template.
The best templates do not stop at the drawing. They also make space for the operating details that determine whether the process works in practice: who owns each task, what information is required, what can go wrong, and how the team knows the work is complete.
Why use a process mapping template?
A process mapping template helps teams make work observable. Without a map, the process lives in scattered habits, Slack threads, spreadsheets, individual memory, and undocumented exceptions. With a map, the team has a shared object to inspect.
Clarify how the work really happens
Process mapping gives employees, managers, and stakeholders a shared view of the workflow. The map shows the order of work, but it also reveals where a process depends on another team, another system, or a missing decision.
Find bottlenecks and wasted motion
Bottlenecks are often invisible until the process is mapped. A request might spend most of the workflow waiting for review. A team might collect the same information twice. A manager might approve work after the customer has already moved on. A good process map makes those delays easier to discuss and fix.
Standardize recurring work
A process map becomes more valuable when it becomes a standard. Once the team agrees on the correct flow, the map can guide process documentation, onboarding, training, quality checks, and workflow automation.
Improve accountability
Maps that include owners and handoffs help reduce ambiguity. If every step has a responsible role, the team can see who should act, who should approve, and when the next person receives the work.
Support continuous improvement
A process map is not a trophy document. It is a baseline. Teams can compare the mapped process against actual performance, then improve it through continuous improvement cycles.
How do you create a process mapping template?
Start with the work, not the diagramming tool. The strongest process maps are built with the people who perform the process, because they know the informal workarounds, delays, and exceptions that never appear in a clean manager-level summary.
Define the process boundary
Write one sentence that explains where the process starts and where it ends. For example: “The process starts when a customer submits an implementation request and ends when the implementation handoff is accepted by support.”
A clear boundary prevents the map from expanding into the whole business. It also helps you decide what belongs in scope, what belongs in another process, and where subprocesses should be linked instead of forced into one overloaded diagram.
Gather the people who do the work
Include the people who execute the process, approve the work, receive the output, and maintain the systems involved. If only one person maps the workflow from memory, the result usually misses handoffs, exceptions, and system dependencies.
Map the current process before designing the ideal one
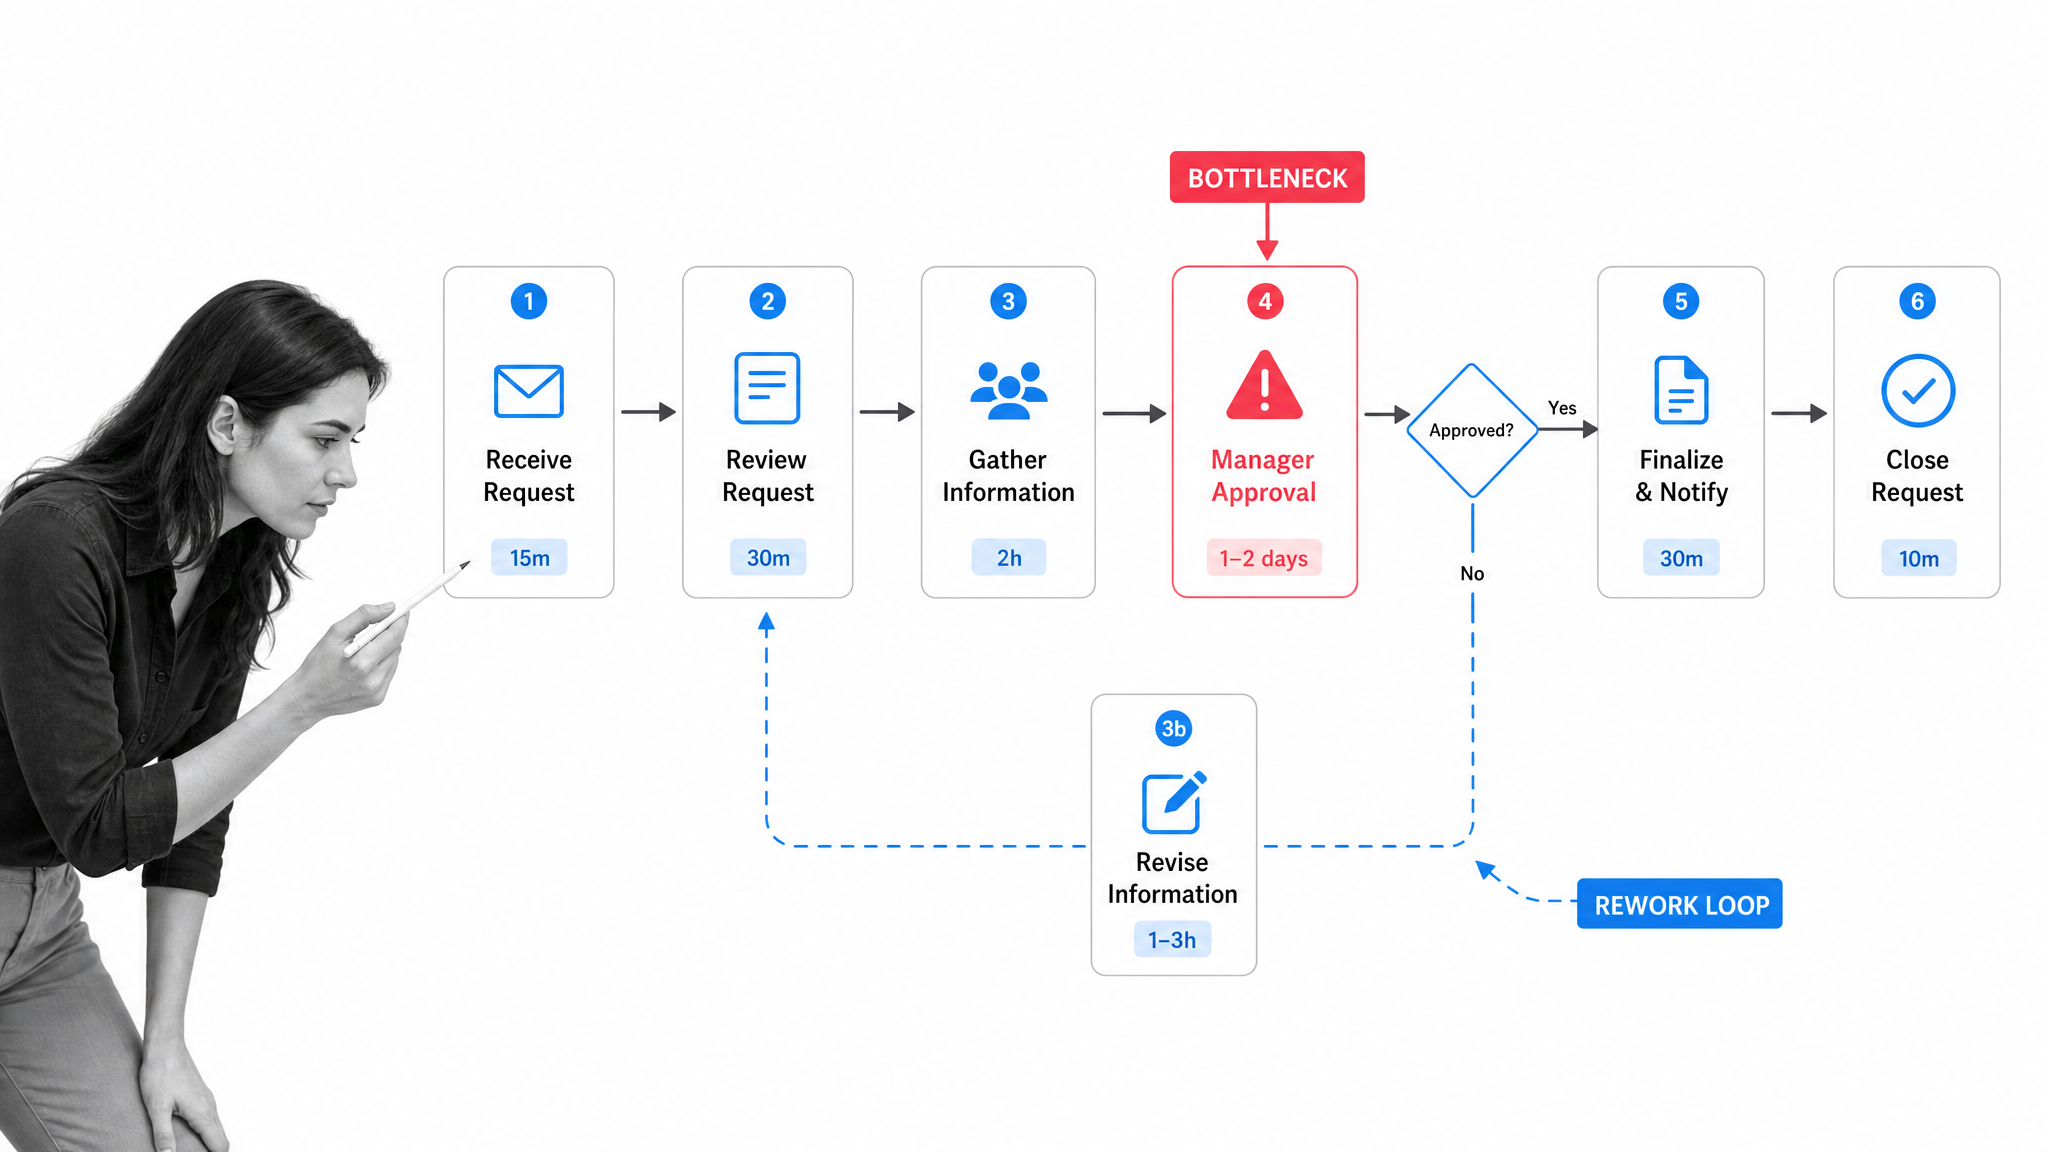
Draw the current state first. Capture what happens today, including the steps everyone wishes did not exist. Mark rework loops, waiting periods, duplicate data entry, approvals, manual checks, and points where people leave the main process path.
Do not clean the process while you are still discovering it. If the team jumps straight to the ideal workflow, the map can hide the real causes of delay. The current-state map is where the useful friction appears.
Use standard symbols, but do not let notation become the work
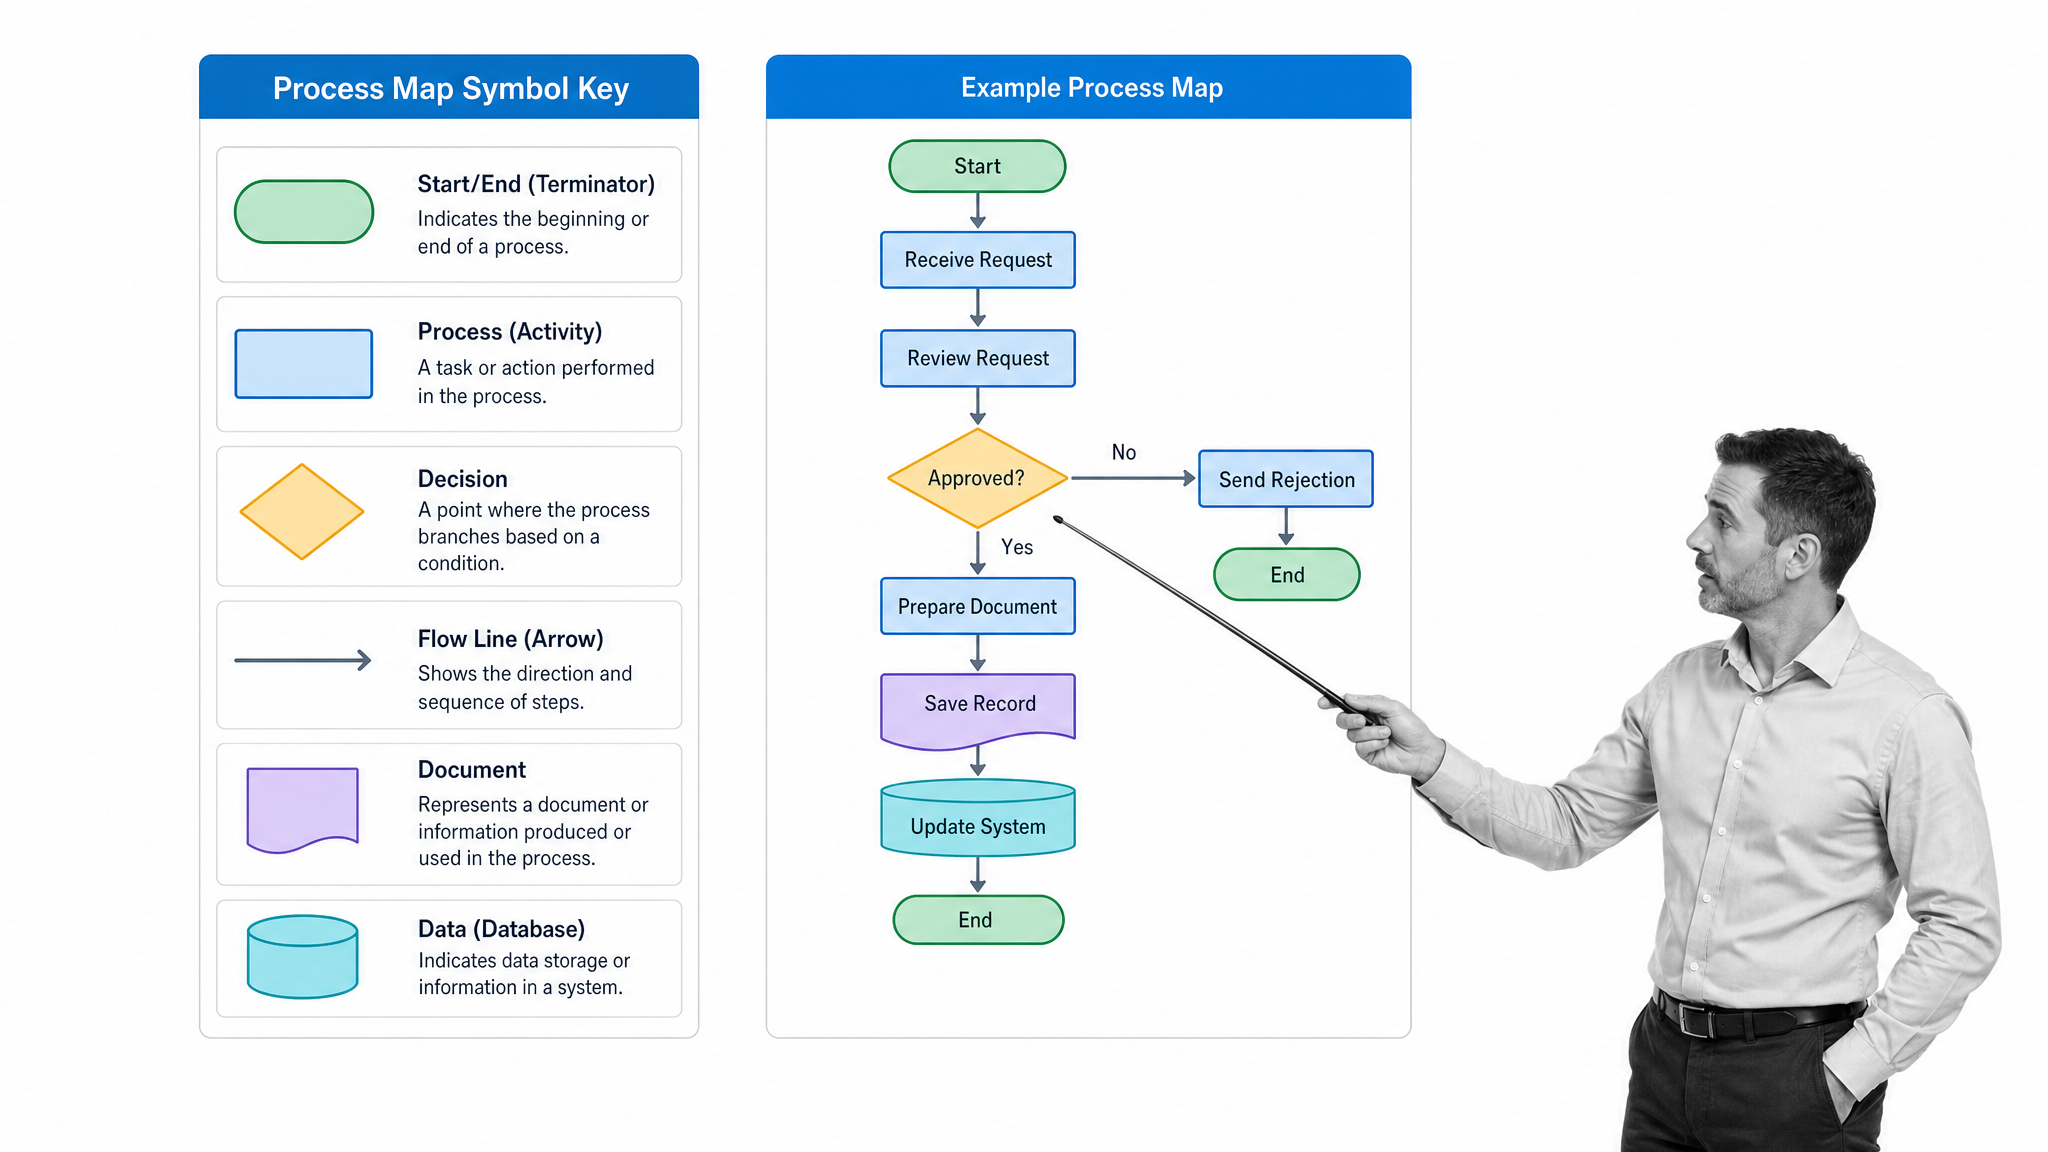
Use rectangles for steps, diamonds for decisions, arrows for flow, ovals for start and end points, and document symbols when a step creates or uses a document. Standard symbols make the map easier to scan, especially when multiple teams will use it.
For complex cross-functional processes, you may choose a formal notation. The Object Management Group BPMN specification provides a standard language for business process models. Most teams do not need every BPMN element, but the discipline is useful when the process involves events, gateways, subprocesses, and multiple participants.
Add owners, inputs, outputs, and exceptions
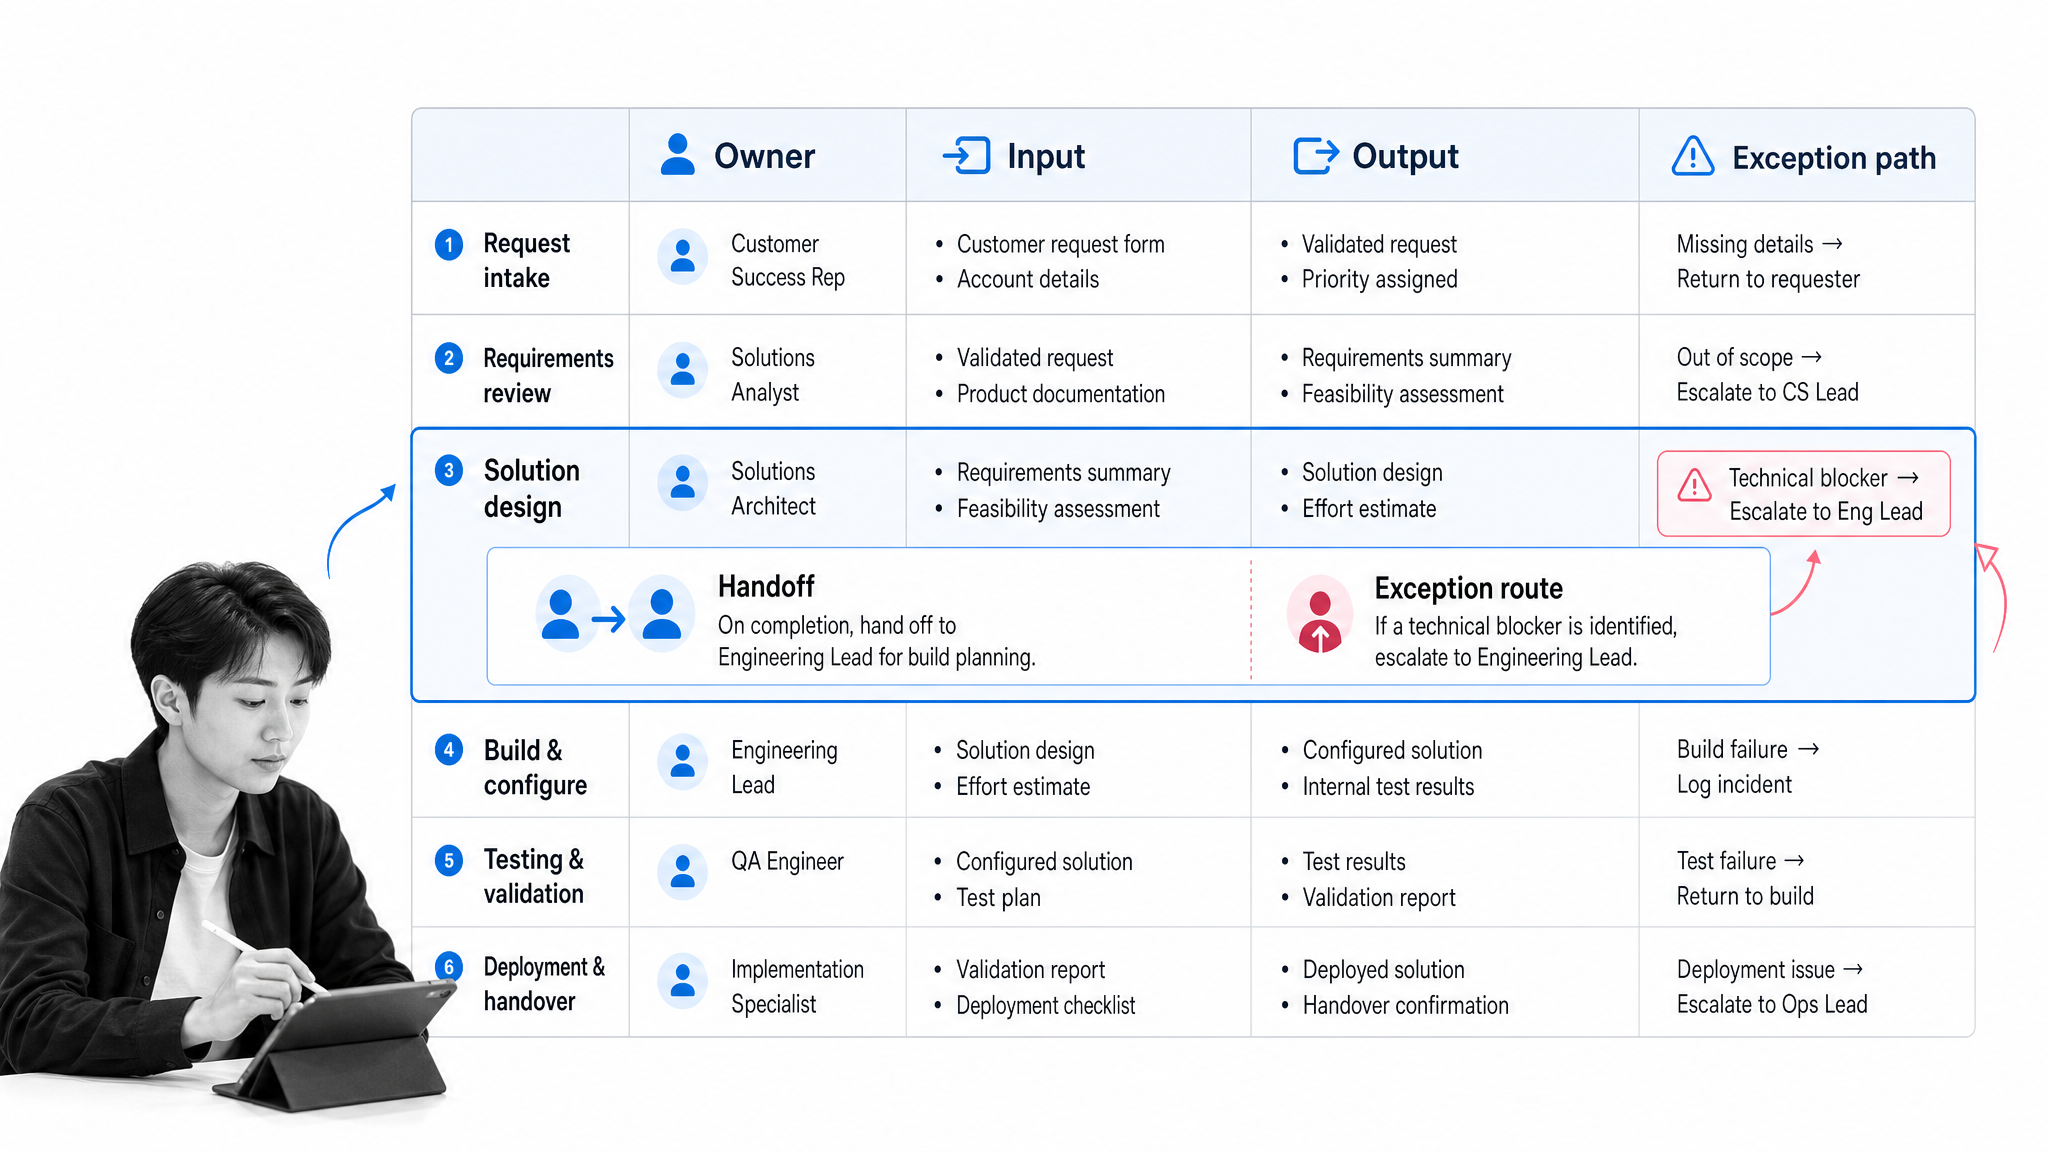
A process map should answer more than “what happens next?” Add the role responsible for each step, the information required to complete it, the output produced, and the most common exception path.
This is where a generic diagram becomes an operational template. A map that includes owners and inputs can become a checklist, SOP, workflow run, or audit trail. A map without those details often remains a poster that people stop using.
Review the map with stakeholders
Walk through the map with the people who perform the process. Ask them to challenge the order, missing steps, unclear decisions, and exceptions. Then ask downstream teams whether the mapped output is actually enough for them to do their work.
Turn improvements into controlled changes
Once the map is accurate, identify the few changes that will remove the most friction. Do not redesign everything at once. Prioritize the bottleneck, the riskiest handoff, the repeated rework loop, or the step with the weakest owner.
Which process map should you use?
Choose the map type based on the problem you are trying to solve. A simple approval flow does not need the same level of notation as a regulated cross-functional process. A process mapping template should make the process clearer, not more theatrical.
Basic flowchart
Use a basic flowchart when the process is linear and the main question is sequence. This is the easiest format for onboarding, internal checklists, and straightforward administrative workflows.
Swim lane diagram
Use a swim lane diagram when ownership matters. Lanes show which team, role, or system owns each step, making cross-functional handoffs easier to spot.
Value stream map
Use a value stream map when you need to see how work, information, and waiting periods move through a broader system. The Lean Enterprise Institute describes value stream mapping as a way to see and improve the flow of work and information through the value stream.
SIPOC map
Use SIPOC when you need a high-level supplier, input, process, output, and customer view before drawing a detailed map. SIPOC is especially useful at the start of a process improvement project because it clarifies boundaries and stakeholders.
Detailed process map
Use a detailed process map when the team needs to analyze decision logic, controls, data requirements, or exception paths. This format is helpful for compliance, quality, finance, operations, customer onboarding, and other workflows where missing a step creates risk.
Workflow diagram
Use a workflow diagram when the goal is execution. A workflow diagram should show the path from trigger to completion, then translate cleanly into assigned work.
What should a process mapping template include?
A good process mapping template combines visual structure with operational detail. The map should be clear enough for a new teammate to understand and specific enough for an experienced teammate to use.
- Process name: The exact workflow being mapped.
- Purpose: The outcome the process exists to produce.
- Start and end points: The trigger and the completion condition.
- Scope: What is included, what is excluded, and which subprocesses are linked elsewhere.
- Steps: The work activities in the order they happen.
- Decision points: Questions that route the process down different paths.
- Roles and owners: The person, role, team, or system responsible for each step.
- Inputs: The information, request, approval, file, or data needed to complete a step.
- Outputs: The artifact or state produced by each step.
- Handoffs: The transfer point between roles, teams, tools, or systems.
- Exceptions: Common failure paths, rework loops, escalations, and alternate routes.
- Metrics: Cycle duration, waiting duration, error rate, rework rate, SLA, or quality checks.
- Map owner: The person responsible for keeping the map accurate.
Process mapping best practices
Keep the first map simple
The first map should help the team agree on reality. Do not overload it with every system field, validation rule, and edge case. Create the map at a level where people can see the whole process, then add detail where the risk is highest.
Separate current state from future state
Current-state mapping shows what actually happens. Future-state mapping shows what should happen after improvement. Mixing the two creates confusion because people cannot tell whether the diagram is documentation, aspiration, or instruction.
Name the handoffs clearly
Many process failures happen between teams, not inside a single task. Mark the handoff trigger, the receiving owner, and what information must be complete before the next person starts. If the handoff is vague, the process will depend on reminders and heroics.
Capture exceptions instead of pretending they are rare
Most recurring workflows have exceptions: missing files, incomplete requests, failed approvals, unavailable reviewers, customer changes, vendor delays, or system mismatches. Add the common exception paths to the template so the team knows what to do when the happy path breaks.
Use the map to remove work, not just document it
The goal is not a prettier diagram. The goal is a better process. Look for duplicate approvals, unnecessary data entry, low-value waiting, avoidable rework, and tasks that could be standardized, automated, or removed.
Assign an owner for maintenance
A process map decays when nobody owns it. Assign a process owner who reviews it after major workflow changes, after incidents, and on a recurring schedule. If the map is important enough to guide work, it is important enough to maintain.
How do you turn a process map into a workflow?
A process map explains the work. A workflow runs the work. Once the map is accurate, convert each step into a task, each decision into routing logic, and each handoff into an assignment or notification.
Turn the map into a runnable workflow
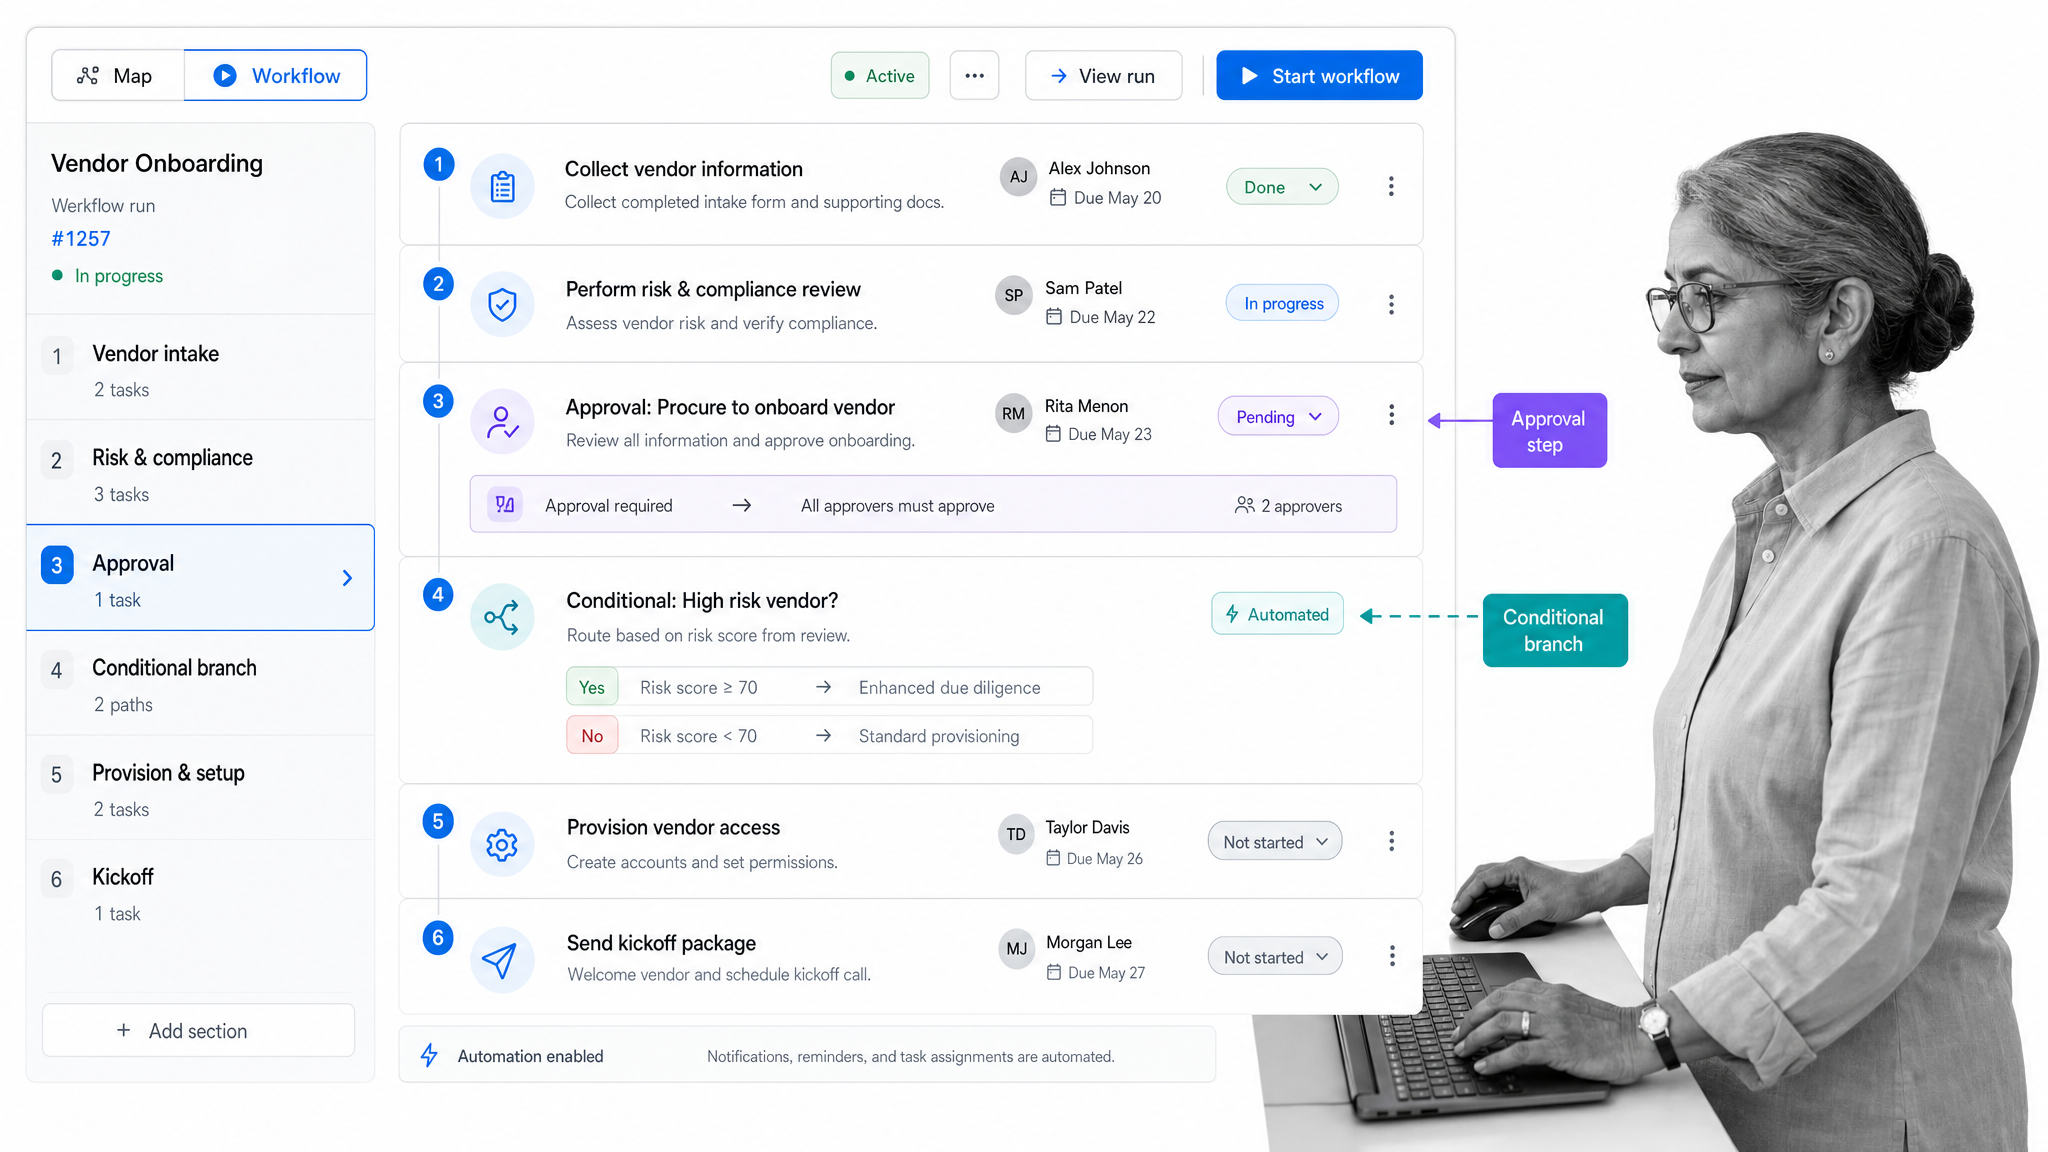
In Process Street, workflows are the master blueprint for recurring work, and workflow runs are the dynamic instances launched from that blueprint. That distinction is useful when translating a process map: the map becomes the workflow structure, and each real case becomes a workflow run.
Start with the steps and owners from the map. Add task assignments so the right person or group is responsible for each action. Use due dates for timing, stop tasks when a step must be completed before the next step proceeds, and approvals when a manager or reviewer needs to sign off.
For mapped processes that branch, use conditional logic to show the right tasks based on earlier information. For mapped processes that depend on other tools, use automations to move data or trigger work without manual copying.
You can also connect the map to broader process management: documentation in Pages, repeatable workflow runs, assignment rules, approvals, and improvement reviews. That is how a static map becomes a living operating system for the process.
Process mapping template example
Here is a practical structure you can copy for a customer onboarding process, hiring process, finance approval process, or internal request workflow.
- Process: Customer implementation request.
- Trigger: Sales marks the account ready for implementation.
- Start: Implementation manager receives the handoff packet.
- Step: Check required customer details and contract scope.
- Decision: Is the handoff packet complete?
- If no: Return to sales with missing fields listed.
- If yes: Assign implementation owner and create kickoff plan.
- Step: Schedule kickoff and collect customer requirements.
- Step: Configure initial workspace and prepare success plan.
- Approval: Implementation manager reviews plan before customer delivery.
- End: Customer accepts kickoff plan and implementation work begins.
- Metric: Duration from sales handoff to accepted kickoff plan.
This template is intentionally plain. Once the team agrees on the flow, you can add swim lanes, exception paths, due dates, forms, approval rules, and automation triggers.
Process mapping FAQs
What is a process mapping template?
A process mapping template is a reusable structure for documenting a workflow from start to finish. It usually includes the process boundary, steps, decision points, owners, inputs, outputs, exceptions, and review ideas so the team can understand and improve the work.
How do you create a process mapping template?
Start by defining the process scope, gathering the people who perform the work, mapping the current state, adding roles and handoffs, marking decisions and exceptions, then reviewing the map with stakeholders before using it as a workflow standard.
What symbols are used in a process map?
Common process map symbols include rectangles for steps, diamonds for decisions, arrows for flow direction, ovals for start and end points, parallelograms for inputs or outputs, and document symbols when a step creates or uses a document.
What is the difference between a process map and a workflow?
A process map explains how work moves through steps, decisions, and handoffs. A workflow turns that mapped process into repeatable execution, with assigned tasks, due dates, approvals, data collection, and automation where needed.
When should you use a swim lane process map?
Use a swim lane process map when the work crosses teams, departments, systems, or vendors. The lanes make ownership and handoffs visible, which helps teams find delays, duplicate work, unclear responsibility, and approval gaps.
How often should a process map be updated?
Update a process map whenever the real workflow changes, when recurring problems appear, or during a scheduled process review. A map that is not maintained will quickly stop matching the work people actually perform.
