Recruitee is a piece of collaborative hiring software that boosts your candidate sourcing, starts to automate your hiring, and helps you evaluate candidates effectively. However, you can supercharge your use of it by integrating Process Street and Recruitee to further automate your hiring and onboarding process. For example, as soon as a candidate application is received in Recruitee, it could trigger a Workflow Run in Process Street.
You can integrate Recruitee with Process Street via Webhooks or Zapier.
A Webhook integration can bring information from Recruitee that would trigger a new workflow run in your Process Street account. Webhooks are automated messages or payloads sent from apps as a trigger to cause an action in a receiving app.
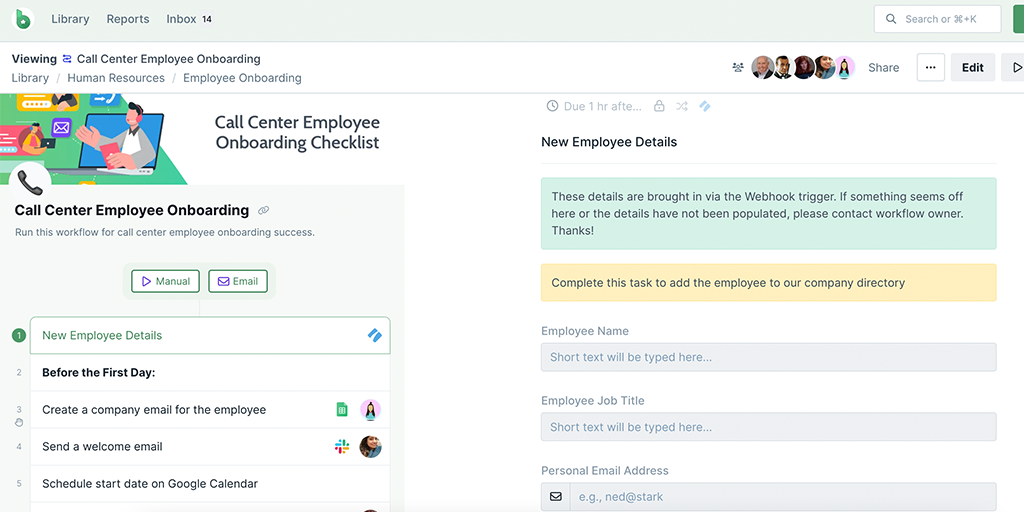
In this example, we will create a Webhook that runs the Call Center Employee Onboarding Workflow when a candidate is Hired for an open position in Recruitee.
Now, let’s jump into the integration.
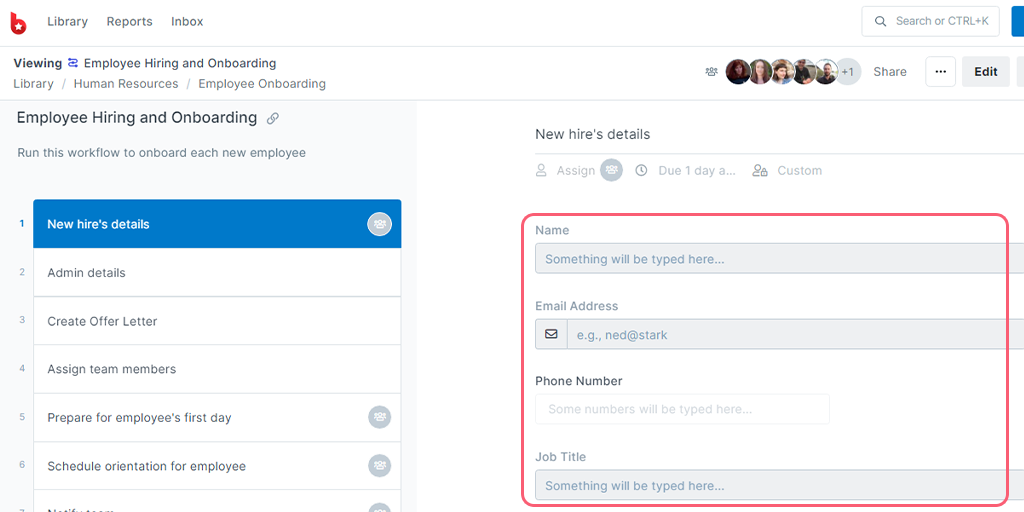
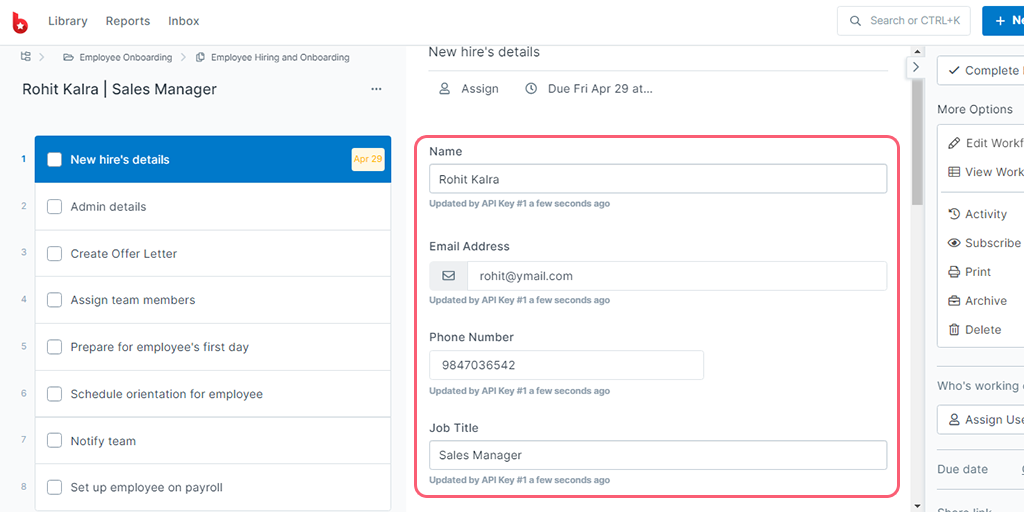
First, create a Workflow in Process Street and ensure to add form fields that are the same as the data fields in Recruitee. This will help you to map the information from Recruitee to Process Street.
Their information is stored in Recruitee while creating a new candidate for an open position. So, we need to create form fields in our workflow to push that information through to Process Street. These form fields should include the candidate’s name (short text field), email address (email field), phone number (number field), and so on.
This will mean that whoever is onboarding the candidate won’t have to look up their information in Recruitee, but can instead see everything in Process Street along with their instructions.
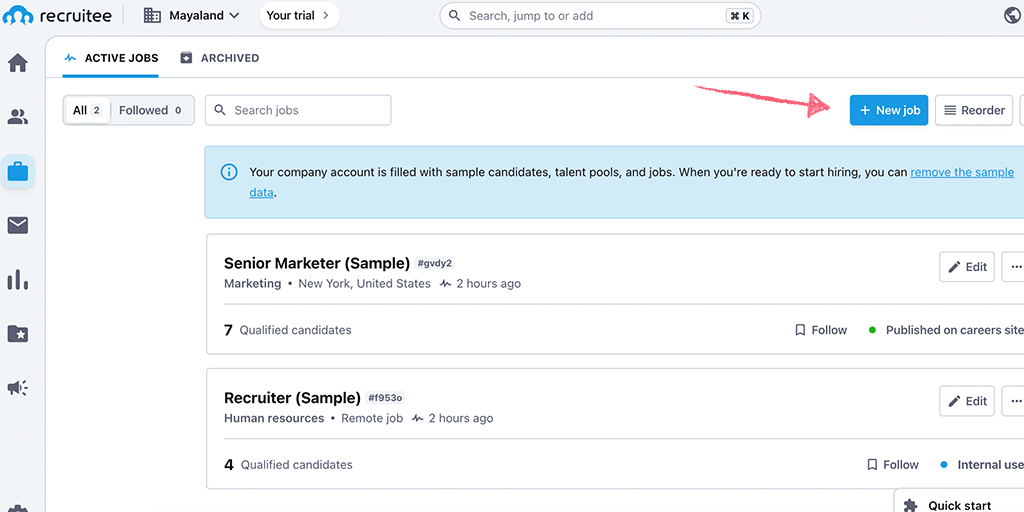
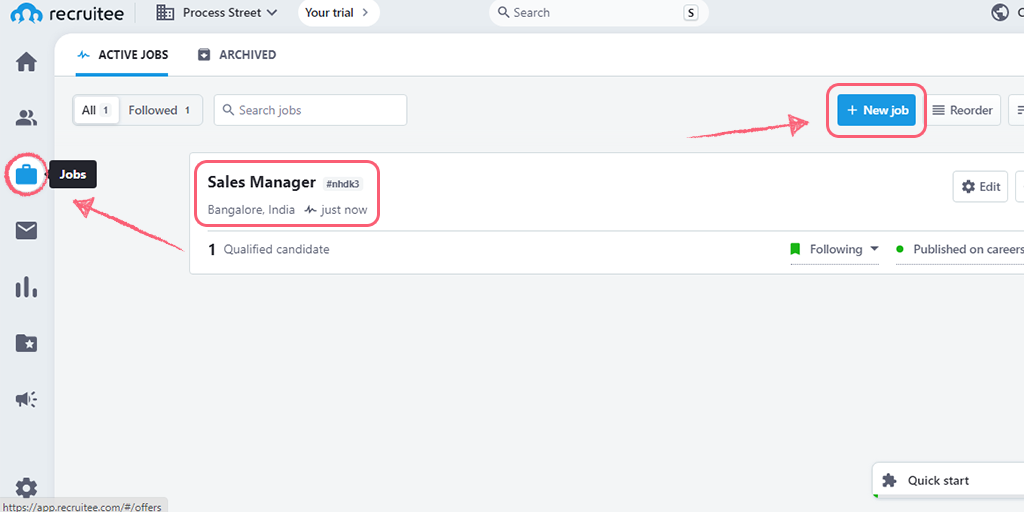
Log into your Recruitee account or create a new account. Then click on + New job in the top-right corner.
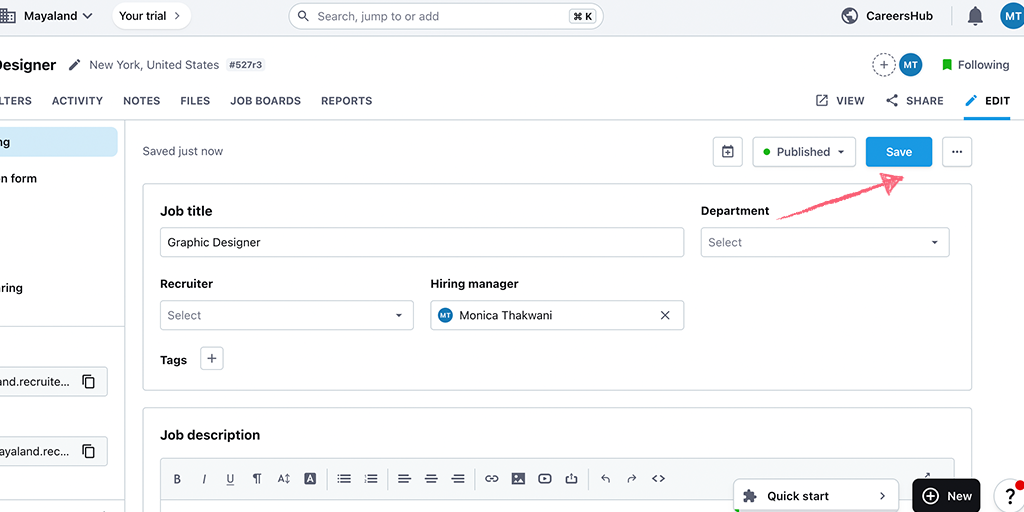
Enter your job details and click Save in the top right corner.
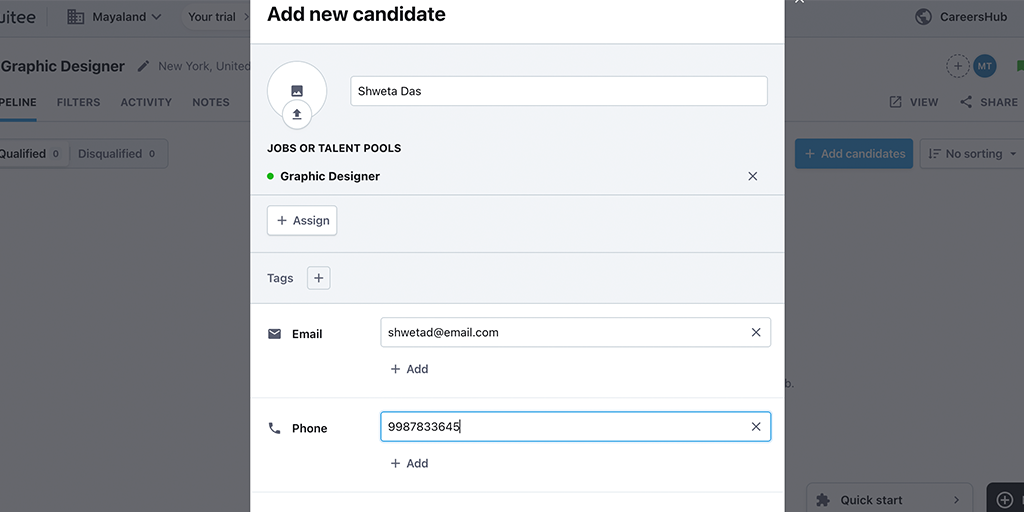
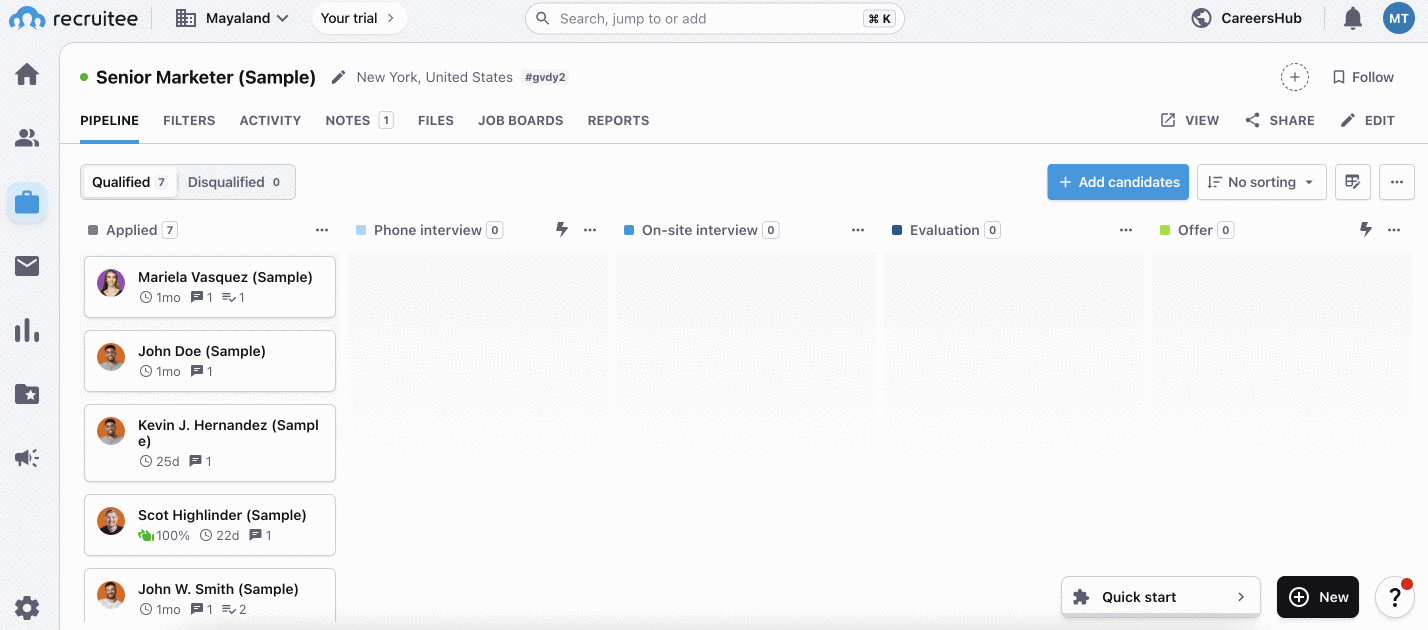
Once your job listing is up, click + Add candidates to add a candidate for that job. We have added the candidate manually but you can choose your preferred method.
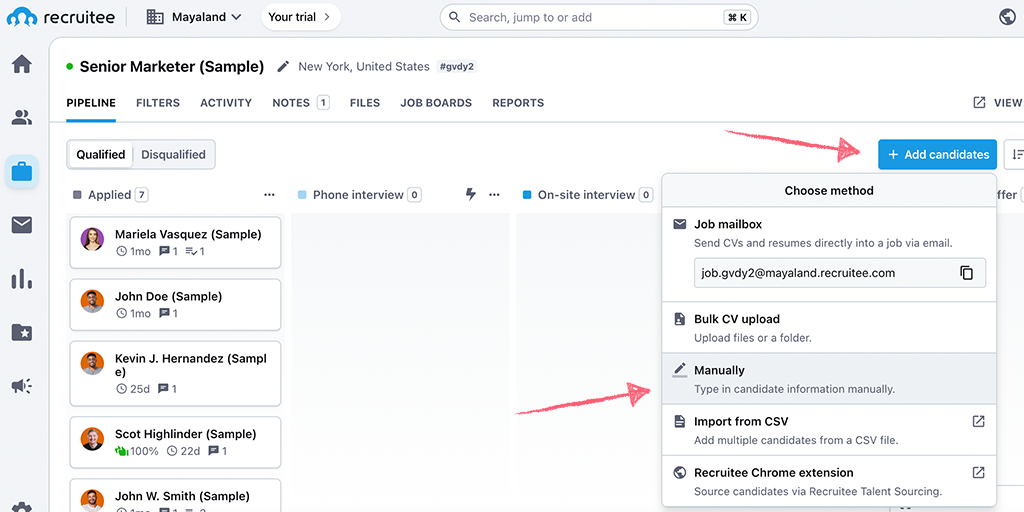
If you already have a job listing in Recruitee, you can use the same one to set up this webhook. You can also use your existing list of candidates or create new ones for an existing position.
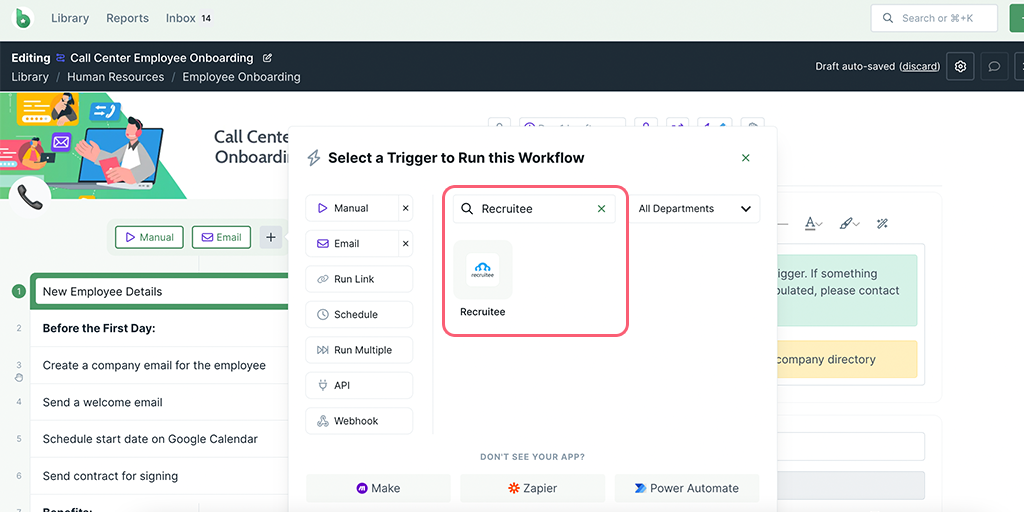
To get the webhook URL from Process Street, when you’re editing your workflow, click “Triggers” above your task list on the left or click the + icon next to your existing triggers as shown below.
Here, you can look for Recruitee as a Trigger to Run this workflow.
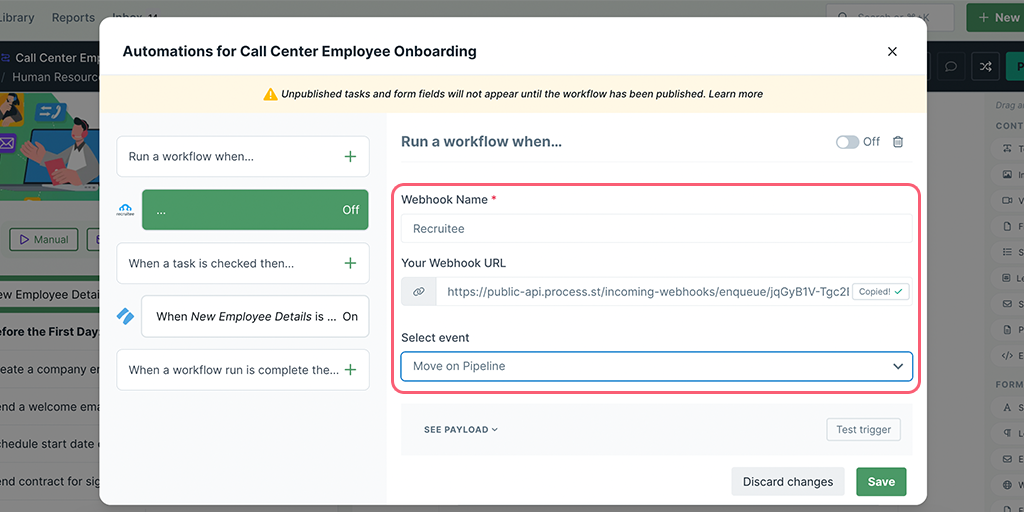
You can name your webhook as the app name or any phrase that helps you identify the Trigger. Then copy your Webhook URL for later. You can also select the event at this point. In our example, we have chosen Move on Pipeline.
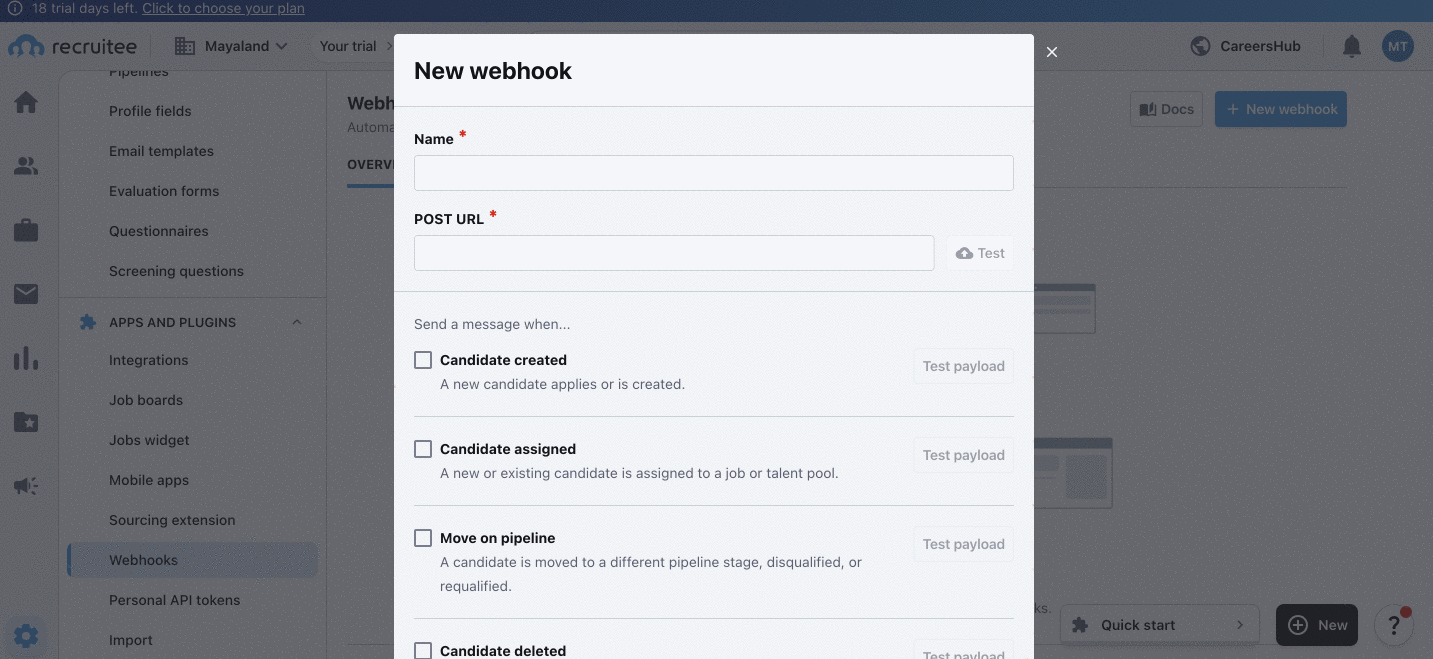
Click on the Settings cog in the bottom left corner and select Webhooks under Apps and Plugins. Then click + New Webhook in the top right corner.
Name your webhook and paste the URL you copied from Process Street above. Click Test to make sure that the webhook has been created successfully. Then click Verify and Create.
Now come back to Process Street and test your trigger. Your payload should return as a success but if it doesn’t, you want to go back to Recruitee and ensure you move a candidate to the Hired stage.
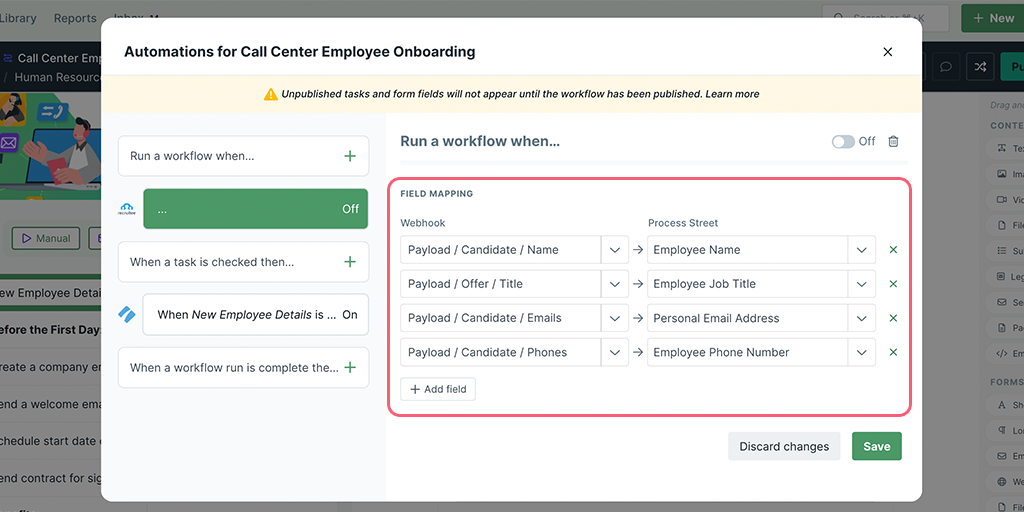
When your test returns successful, you can proceed to map your fields from Recruitee’s properties to your Process Street form fields.
Lastly, turn your webhook On and Save it. Then Publish your workflow and you’re all set!
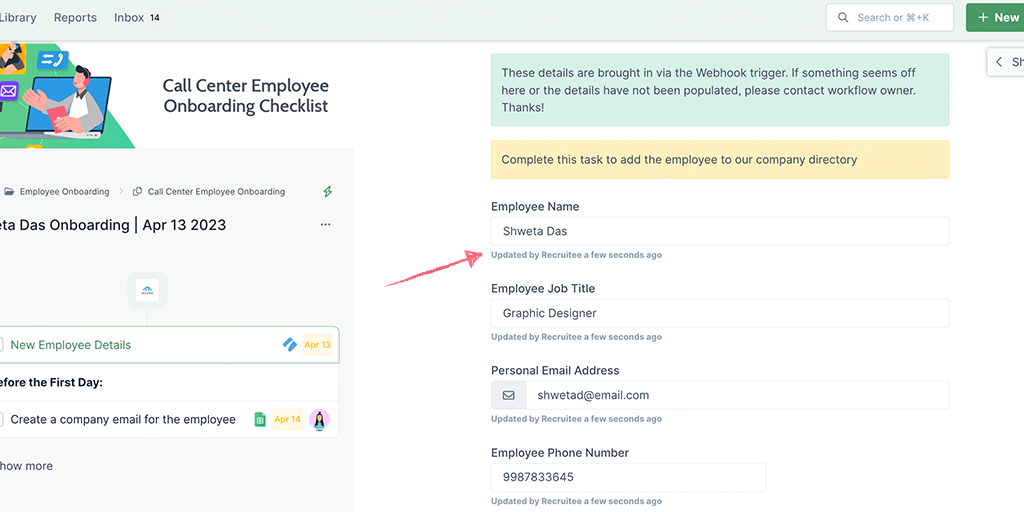
As an extra step, you can go to Recruitee, move a candidate to Hired then come back to Process Street in the Reports Dashboard to confirm a new workflow is run with the information filled by the webhook.
Zapier is an integration platform that connects over 2000 different apps. An action in any of the supported apps (like forwarding an email or adding an attachment to a task) can trigger another app’s features automatically. Zapier integrates with both Recruitee and Process Street. The whole “recipe” sequence (“if X happens, do Y”) is known as a Zap.
In this example, we’ll be walking you through how to set up a Zap that connects Recruitee and Process Street.
Users: In order to create an API key for integrations, you must be an Administrator.
Let’s look at how you can do this.
First, create a Workflow in Process Street and ensure to add form fields that are the same as the data fields in Recruitee. This will help you to map the relevant information from Recruitee to Process Street.
In this example, we are triggering the Employee Hiring and Onboarding workflow when a new candidate application is submitted for an open position.
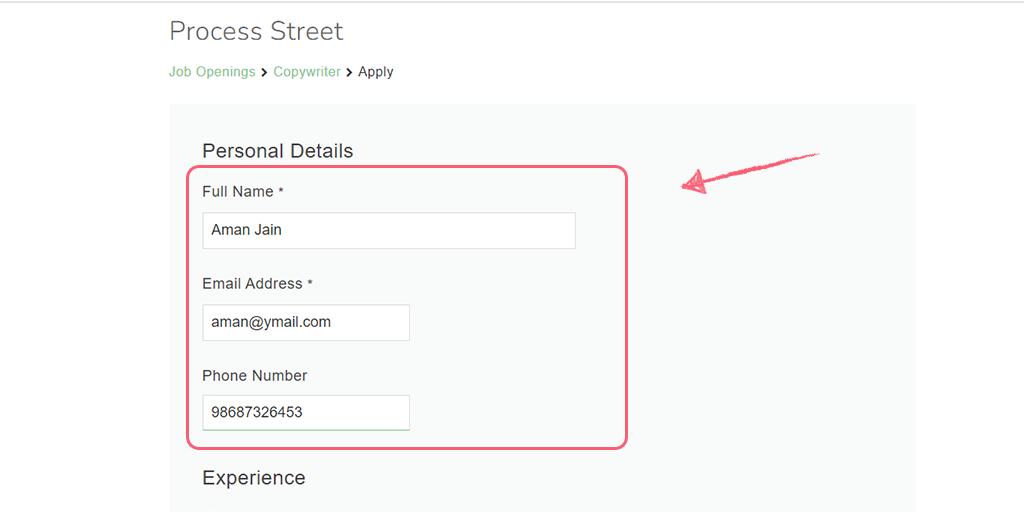
Their information is stored in Recruitee via a form that the candidate has filled in while applying for the job. So, we need to create relevant form fields in our workflow to push that information through to Process Street. These form fields should include the candidate’s first and last names (short text fields), email addresses (email field), phone numbers (number field), and so on.
This will mean that whoever is onboarding the candidate won’t have to look up their information in Recruitee, but can instead see everything in Process Street along with their instructions.
Log into your Recruitee account or create a new account. Then click on Jobs in the left panel. Next, click on + New job, fill in the details like job title, description, etc., then publish your job. This will enable you to apply as a candidate to have some dummy candidates for your Zap.
Next, you want to apply for the job you created to have at least one candidate application for the open position. Make sure to fill in the first name, last name, and email address since we will require that data to create the Zap.
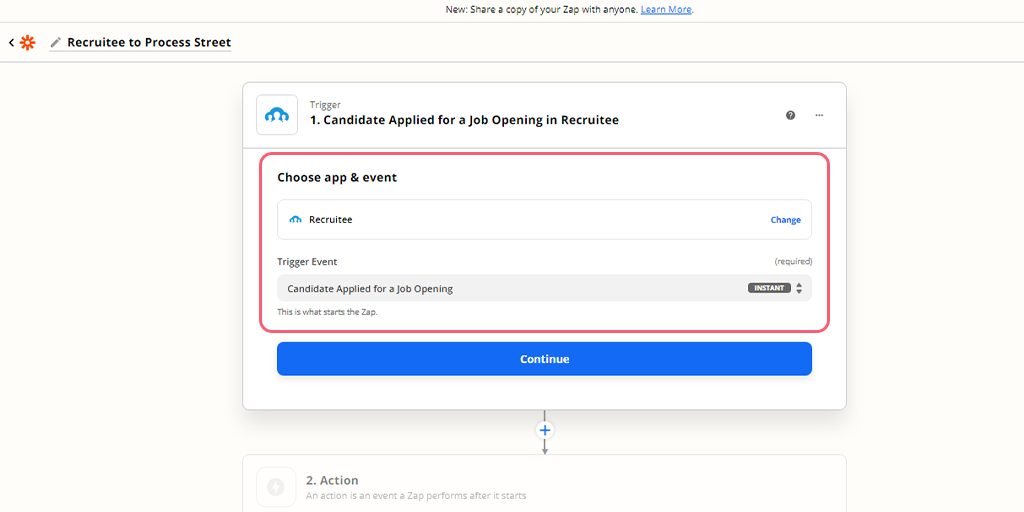
Log into Zapier or create an account, then click “Create Zap“. This will be your Zap to automatically run a new workflow when a new candidate application comes in.
Here, choose Recruitee as the Trigger and Candidate Applied for a Job Opening as the Trigger Event.
Choose or connect your Recruitee account, then set up your Trigger by selecting your Company Account and Job Opening. In our example, we’re selecting the Company Account as Process Street and Job Opening as Sales Manager, which we created as the setup above for this Zap.

Proceed to test your Trigger to make sure you have connected the right account. A successful test should return with a candidate you’ve recently added to your Recruitee account.
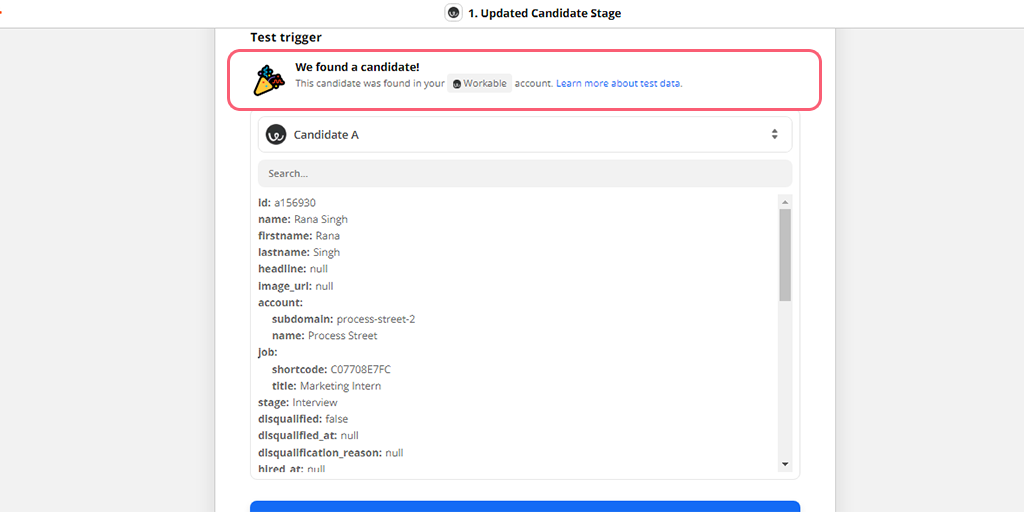
If the test fails to pick up any data, go back into your Recruitee account and set up a new candidate for the job opening, then try again.
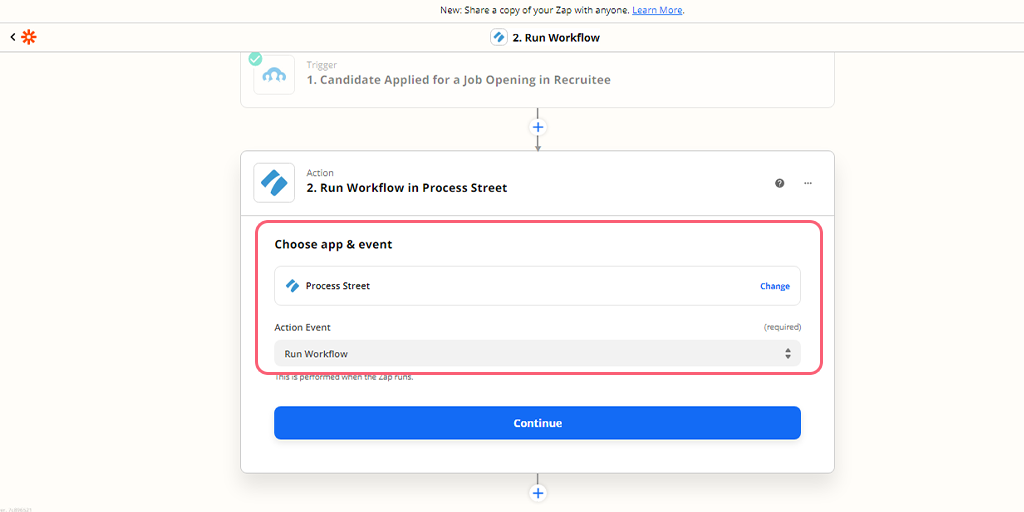
Once the test comes back successfully, set up the Action by choosing Process Street as the Action app. Next, select Run Workflow. This will make your Zap run a workflow in Process Street when the Trigger is detected.
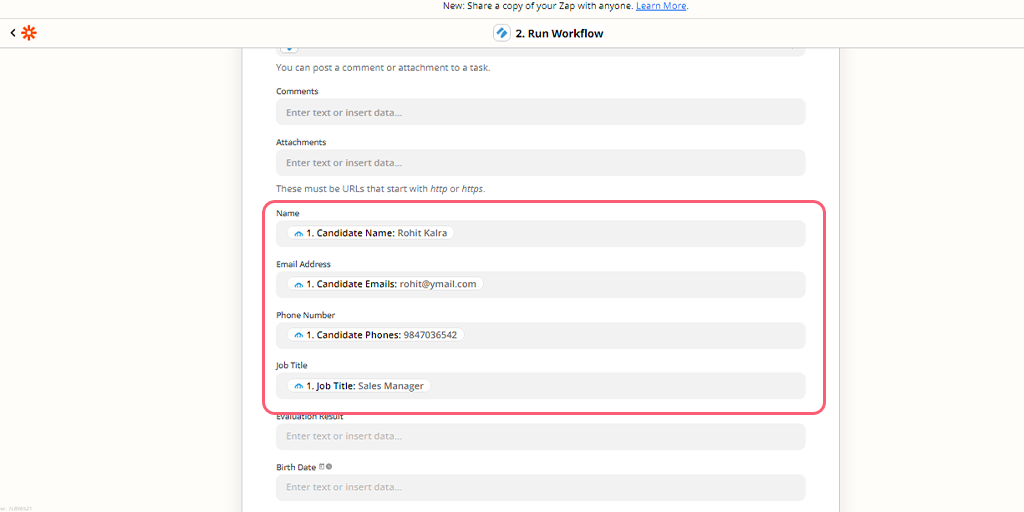
Select or connect your Process Street account, then set up the Action by choosing the Employee Hiring and Onboarding workflow. Next, you want to map the fields from Recruitee to those in your workflow.
For example, you can see below that we’ve mapped the Form Fields in the Workflow to the fields in the job application in Recruitee to store information like their first name, last name, email address, and so on.
Click Continue to test your Zap. A successful test should look something like in the image below. You can also preview the information here and verify if you have your data mapped correctly.
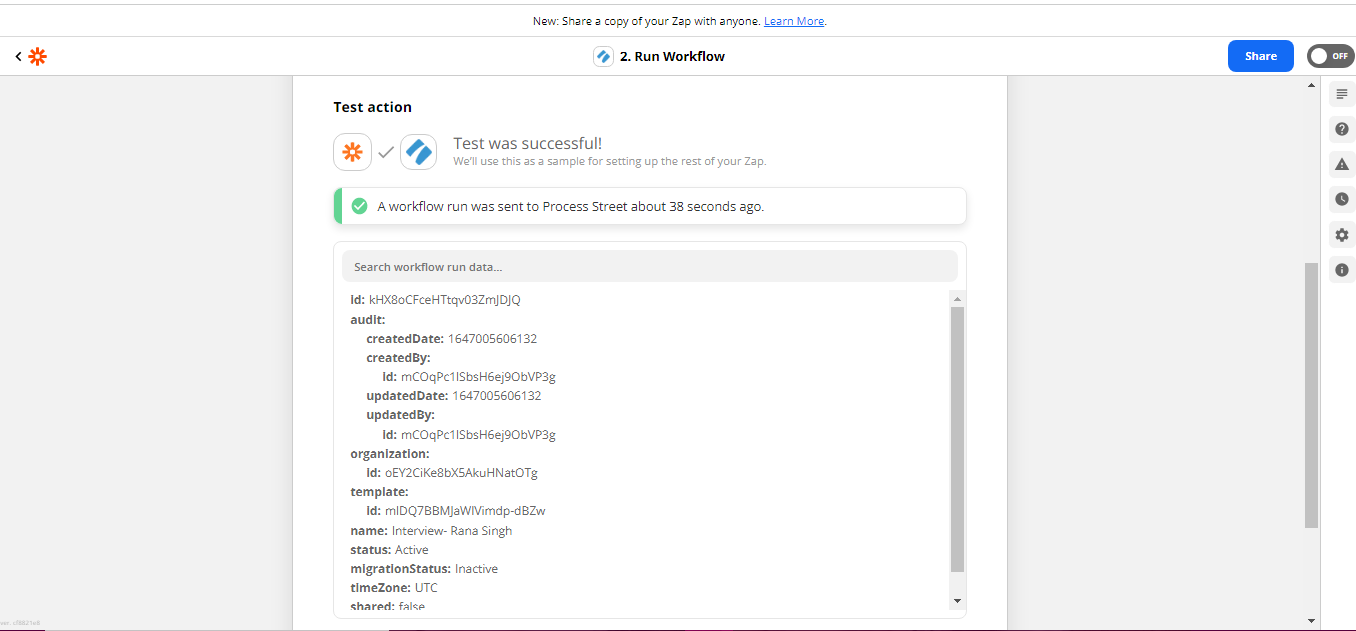
When your test returns successfully, you should also check the new workflow run via your Reports dashboard in Process Street. This should contain the information from the new candidate in Recruitee.
Remember to give your Zap a name, then turn it on.
Congratulations, you’ve now automated your data transfer and workflow creation process!
Zaps allow you to automate the busy work in your workflows, whether they’re HR-related or not. Try testing out the different Triggers and Actions yourself with Process Street and other apps to see what work you can wave goodbye to!
Help us improve this help center.


