


Turn every policy into automated workflows with built-in enforcement and audit-ready proof.



How to Create a Workflow in Excel

You can create a workflow in Excel by turning each step into a row, then adding columns for the owner, status, due date, dependencies, inputs, outputs, and notes. Data validation keeps entries consistent, formulas calculate progress, and conditional formatting makes stalled or overdue work easy to spot.
This approach works best when the process is simple, the team already uses Excel, and the workbook is mainly a shared tracker. The guide below shows how to create a workflow in Excel from a blank workbook, test it with a real process, and recognize when the process needs dedicated workflow management.
In brief
- Choose one repeatable process with a clear start and finish.
- Map the trigger, steps, decisions, owners, inputs, outputs, and completion rule.
- Build one Excel table with controlled status values and clear ownership.
- Add formulas, validation, and conditional formatting only after the workflow works manually.
- Run one real case through the workbook before sharing it with the team.
- Move to workflow software when you need enforced handoffs, approvals, reminders, audit trails, or reliable automation.
Contents
- What is an Excel workflow?
- How to create a workflow in Excel
- What should an Excel workflow include?
- How do you maintain an Excel workflow?
- Which workflows work well in Excel?
- When should you move from Excel to workflow software?
- Excel workflow FAQs
What is an Excel workflow?
An Excel workflow is a workbook that represents how work moves from a trigger to a defined result. Each row usually represents a task or case. The columns hold the information required to move that work forward, such as the owner, current status, due date, dependency, decision, and completion evidence.
Excel does not turn a process into an enforced workflow by itself. It gives you a flexible grid for documenting and tracking the process. That distinction matters. A good workbook can make the work visible and consistent, but the team still has to open it, keep it current, follow the handoffs, and act on overdue items.
The strongest Excel workflows are designed as tables rather than loose cells. Microsoft explains that an Excel table can be filtered and sorted, which makes it much easier to view work by owner, status, date, or priority. One row should mean one thing throughout the workbook. Mixing task rows, summary rows, instructions, and calculations in the same table makes the tracker fragile.
How to create a workflow in Excel
Start with the process, not the spreadsheet. If you build columns before you understand the work, the workbook will capture whatever is easy to type rather than what the workflow actually needs.
Step 1: Choose one repeatable workflow
Pick a process that happens often enough to justify a tracker and is stable enough to describe. Good first candidates include purchase requests, content reviews, hiring requests, equipment inspections, invoice checks, and simple client onboarding.
Write one outcome sentence before opening Excel: “This workflow is complete when…” If the completion condition is unclear, the workbook will fill up with work that never reaches a clean end state.
Step 2: Map the trigger, steps, and decisions
List the event that starts the workflow, every action that follows, and every decision that changes the path. Keep each step as a verb plus an object, such as “Review request,” “Confirm budget,” or “Approve supplier.”
For each step, identify the owner, required input, expected output, dependency, target timing, and evidence of completion. If two people are jointly responsible, choose one accountable owner and record the other person as a contributor. Shared ownership often becomes no ownership.
Step 3: Build the workflow table
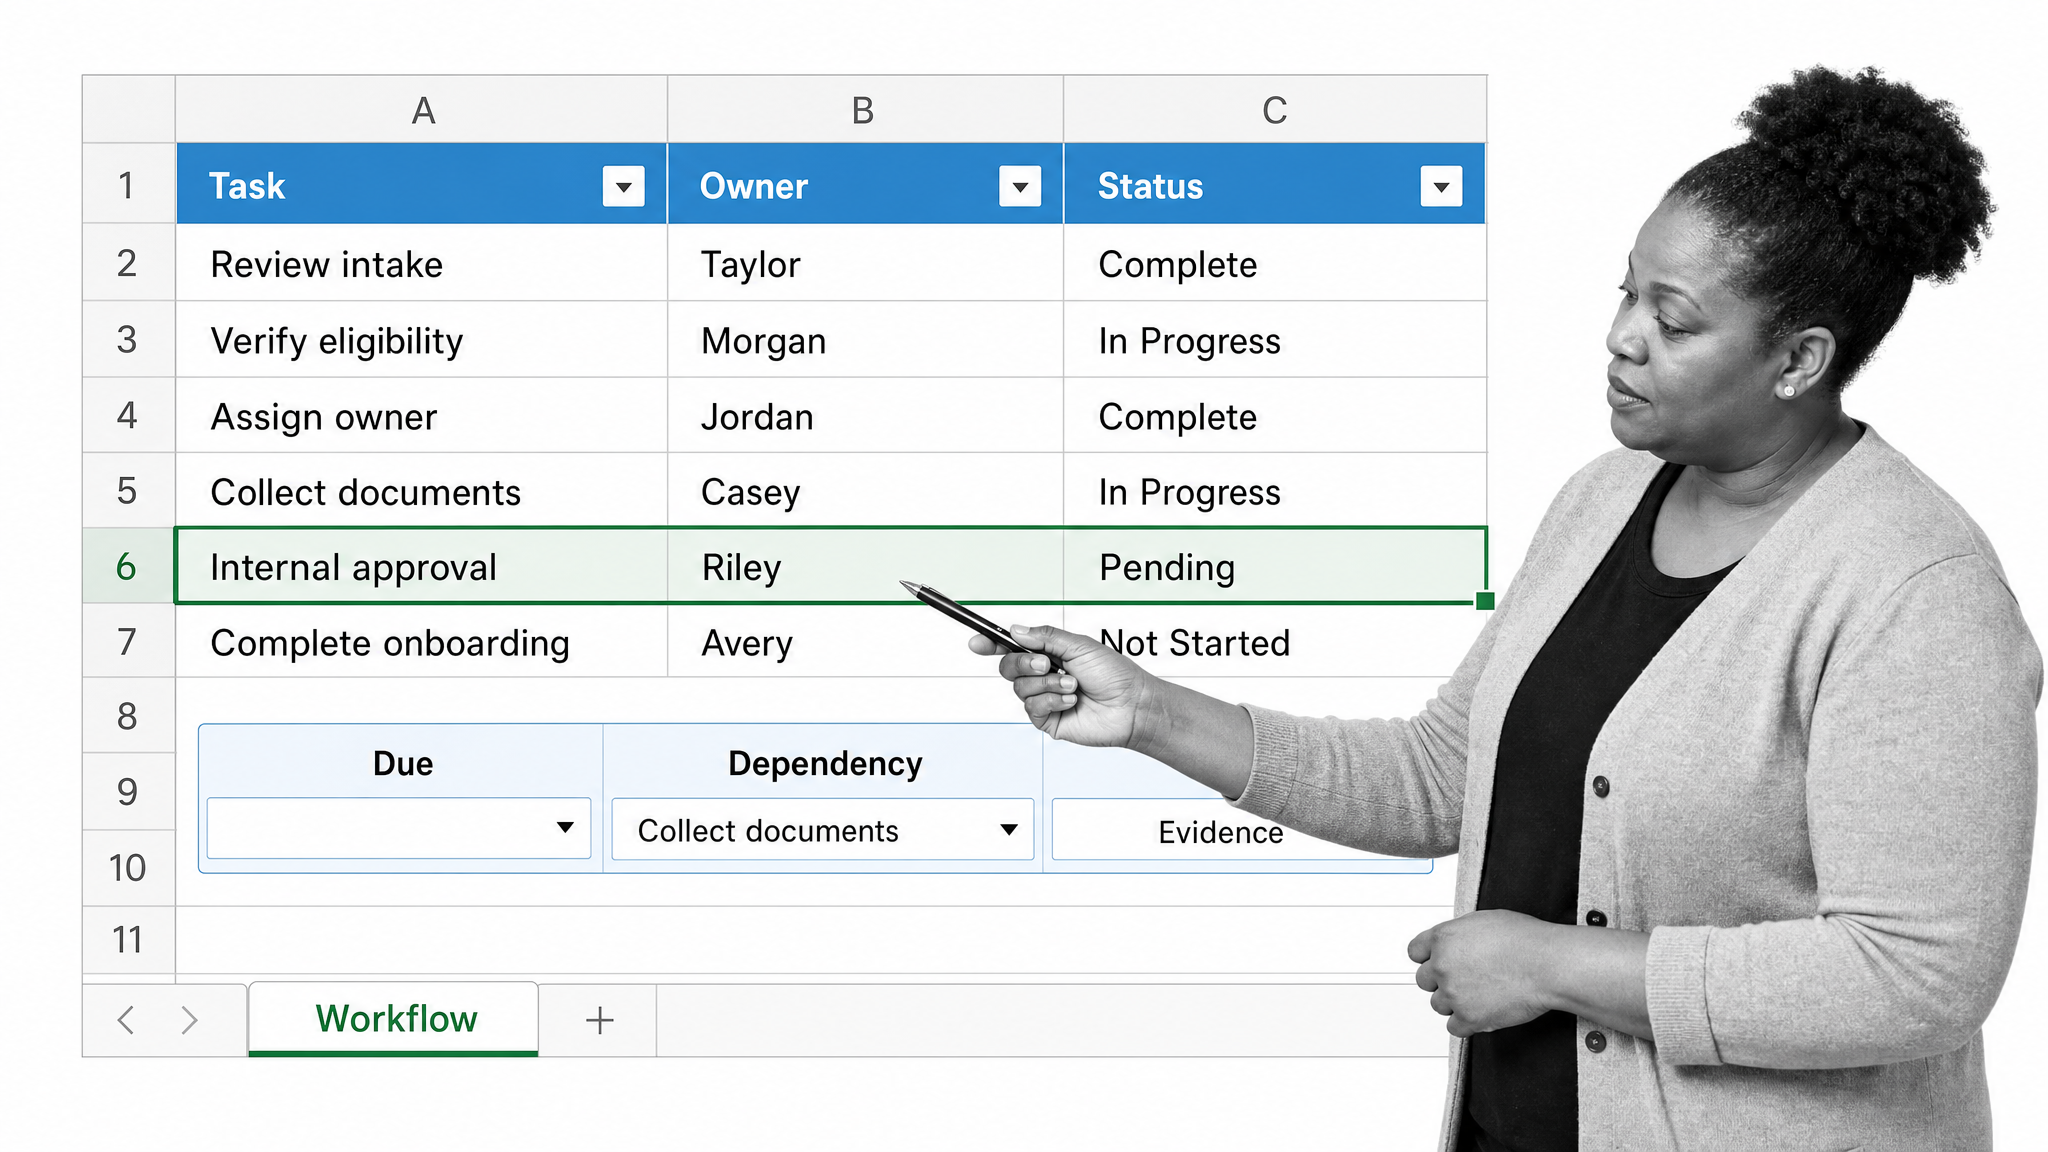
Create a new worksheet named Workflow. Add a header row, then use Insert > Table so Excel treats the range as one structured dataset. A practical starting set of columns is:
- Workflow ID
- Step number
- Task
- Owner
- Status
- Start date
- Due date
- Dependency
- Input or link
- Completion evidence
- Notes
Keep calculation cells separate from manual input cells where possible. Freeze the header row, use short column names, and avoid merged cells inside the table. The goal is a dataset that can be filtered and maintained, not a presentation slide.
Step 4: Create controlled status values
Create a second worksheet named Lists. Add the allowed values for Status, Priority, Team, and any other field that needs consistent language. A simple status set is Not started, In progress, Waiting, Blocked, and Complete.
Apply Data Validation to the Status column and point it to the approved list. Microsoft documents that data validation can restrict entries to predefined choices. This prevents small variations such as “In progress,” “In-progress,” and “Working” from breaking filters and reports.
Step 5: Add validation and visual controls
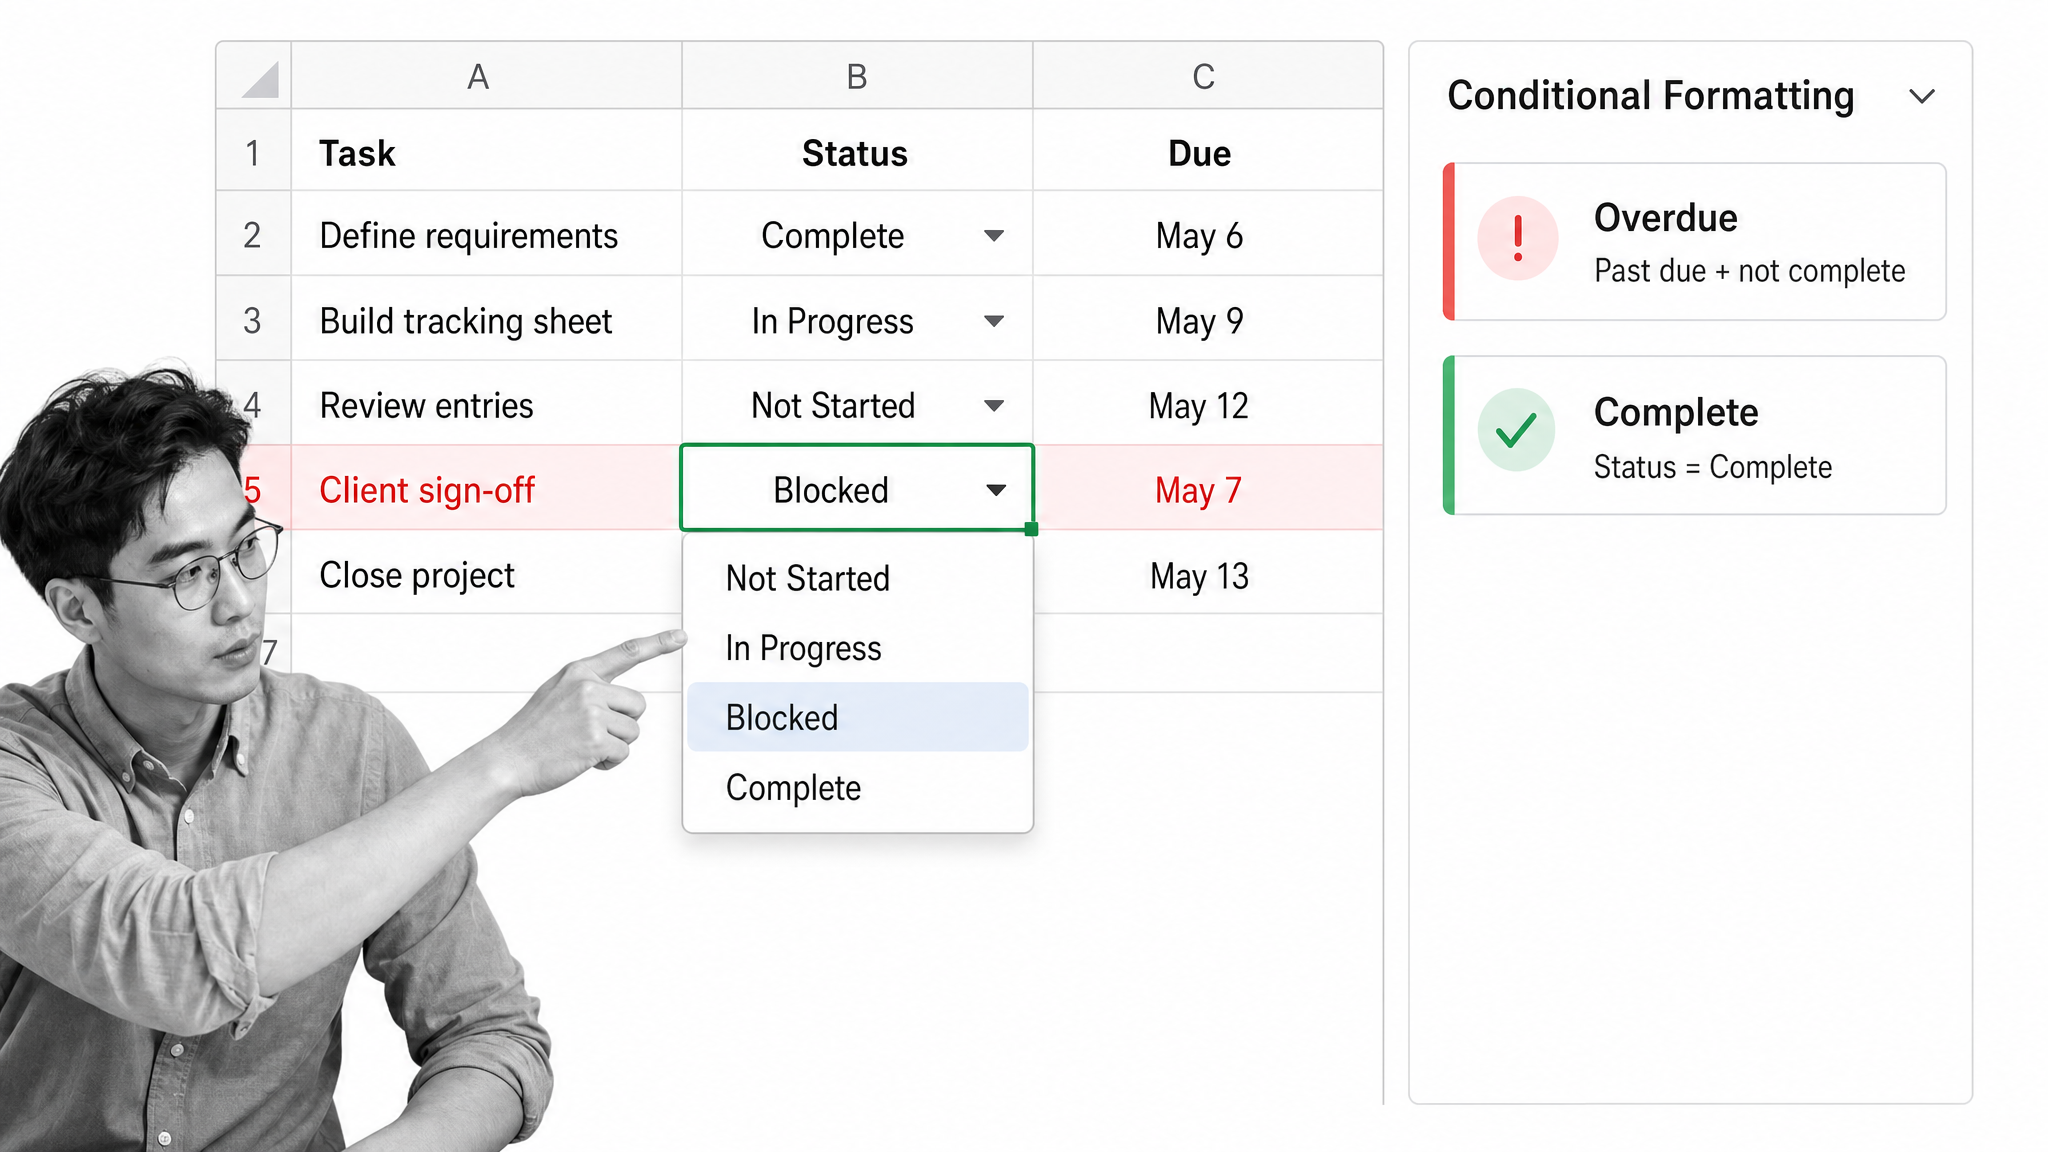
Add validation rules for dates, owners, required fields, and numeric limits. Use input messages to explain what belongs in a field and error alerts to stop invalid entries. Validation should protect the few inputs that can damage the workflow, not interrupt every edit.
Then use conditional formatting to make exceptions visible. Microsoft describes conditional formatting as rules that change a cell’s format based on its value. Useful rules include red for overdue open tasks, amber for tasks due soon, blue for waiting items, and green for completed work. Keep the color system small enough that people can understand it without a legend.
Link the rule to the status as well as the date. A completed task should not turn red simply because its due date is in the past. Microsoft’s conditional formatting guidance also explains how rules can apply to Excel tables and ranges.
Step 6: Add formulas for progress and exceptions
Use formulas for signals that help someone act. For example, calculate days remaining, count open tasks, flag missing owners, and show the percentage of steps complete. Prefer structured table references so formulas extend when new rows are added.
A useful exception column can return “Overdue” when the due date is earlier than today and the status is not Complete. Another can return “Ready” when the dependency is complete. Keep the logic readable. If a formula needs several nested decisions, document it on a Notes worksheet and test each branch.
Step 7: Add a dashboard view
Create a separate Summary worksheet for the numbers that help the workflow owner decide what to do next. Useful measures include open items by status, overdue tasks by owner, work due this week, and average completion time.
Use PivotTables or simple formulas to calculate the summary. Add charts only when they make an operational pattern clearer. The dashboard should point people toward blocked work and upcoming deadlines, not restate every row in a more colorful format.
Step 8: Test the workflow with a real run
Run one real request from start to finish. Ask a person who did not build the workbook to complete the process using only the instructions in the file. Watch for ambiguous statuses, missing owners, hidden dependencies, unclear evidence fields, and steps that happen outside the workbook.
Test edge cases too. What happens when a request is rejected? What if the owner is away? Can a step return to an earlier stage? Does the workbook distinguish waiting from blocked? A workflow is not ready because the happy path works once.
Step 9: Protect formulas and instructions
Lock cells that contain formulas, validation lists, and fixed instructions. Leave only the input cells editable, then protect the worksheet. This reduces accidental changes without turning the workbook into a maze of passwords and permissions.
Add a short Read Me worksheet that states the workflow purpose, owner, status definitions, update expectations, and change process. Record where the master file lives and who can approve structural changes.
Step 10: Share the workbook and assign ownership
Store the workbook in a controlled cloud location rather than sending copies by email. Microsoft supports simultaneous Excel coauthoring when the workbook, account, file format, storage location, and app meet its requirements. Its Excel coauthoring guide explains the supported setup, including OneDrive or SharePoint Online storage for desktop collaboration.
Name one workflow owner. That person is responsible for field definitions, formula integrity, access, periodic review, and archiving. Every open row also needs an accountable task owner. The workbook owner maintains the system; task owners move the work.
Step 11: Document the operating rhythm
Decide when people update the workbook and when the workflow owner reviews it. A lightweight process might require an update whenever a task changes status and a weekly review of blocked or overdue items.
Document how completed cases are archived, how new fields are requested, and how errors are corrected. A stable operating rhythm matters more than a sophisticated dashboard that nobody maintains.
What should an Excel workflow include?
A useful Excel workflow should answer seven questions without forcing the reader to inspect formulas or search through notes:
- What starts the process?
- What work must happen?
- Who owns each step?
- What must happen first?
- When is the work due?
- What decision or evidence completes the step?
- What proves the whole workflow is complete?
Do not add a field simply because Excel makes it easy. Every field creates maintenance work. If a value will not change a decision, trigger an action, support an audit, or improve the next run, it probably does not belong in the main table.
How do you maintain an Excel workflow?
A workflow workbook needs an owner, a review rhythm, and a controlled way to change its structure. Without those three things, the file gradually collects duplicate statuses, broken formulas, abandoned rows, and local copies that disagree with the master.
Assign a workbook steward
The steward maintains the Lists and Read Me worksheets, protects formula cells, reviews access, and decides whether a requested field belongs in the table. This role is different from the owner of an individual task. The steward protects the workflow system while task owners complete the work inside it.
Review exceptions on a schedule
Use a saved filter or Summary view to review overdue, blocked, waiting, and ownerless items. Resolve the work first, then fix the workbook if the exception exposed a design problem. A repeated “Waiting” state may mean the workflow is missing a dependency, approval, or escalation rule.
Control structural changes
Test new columns, formulas, validation rules, and formatting in a copy before changing the master. Record the purpose of the change, the person who approved it, and the date it took effect. After the change, test an existing case and a new case so you know both paths still work.
Archive completed work
Move completed cases out of the active view on a defined schedule. You can keep them in the same table and filter them out, or move them to a protected archive worksheet. Preserve the workflow ID so you can trace a completed case without crowding the active queue.
Which workflows work well in Excel?
Excel is a practical choice when the process is primarily data tracking and the team needs a fast, familiar structure. Good examples include:
- Small project task trackers with one owner per task
- Simple inventory checks and reorder reviews
- Budget review and reconciliation checklists
- Content calendars with clear stages
- Basic request logs with a single reviewer
- Early process design before the final workflow is automated
The pattern is consistent: the workflow has limited branching, modest volume, few handoffs, and low risk if someone updates a row late. Excel is especially useful while you are learning what the process needs. It lets you change the structure quickly before you encode the workflow in a more controlled system.
Before choosing Excel, estimate how many active cases, owners, handoffs, and decisions the workflow will carry. Then ask what happens if a row is stale for a day. If the answer is a minor reporting delay, a spreadsheet may be proportionate. If the answer is a missed approval, customer delay, control failure, or untraceable decision, design the process in workflow software from the start.
When should you move from Excel to workflow software?
Move beyond Excel when the process depends on people doing the next thing at the right time, not merely recording what happened. The more the workbook acts like an application, the more maintenance, governance, and failure risk your team takes on.
Keep Excel for lightweight tracking
Excel is often enough when one team owns the process, the path is mostly linear, the consequences of a missed update are limited, and a person can review exceptions manually. Keep the workbook simple and use it as a tracker with clear operating rules.
Move to Process Street when execution needs control
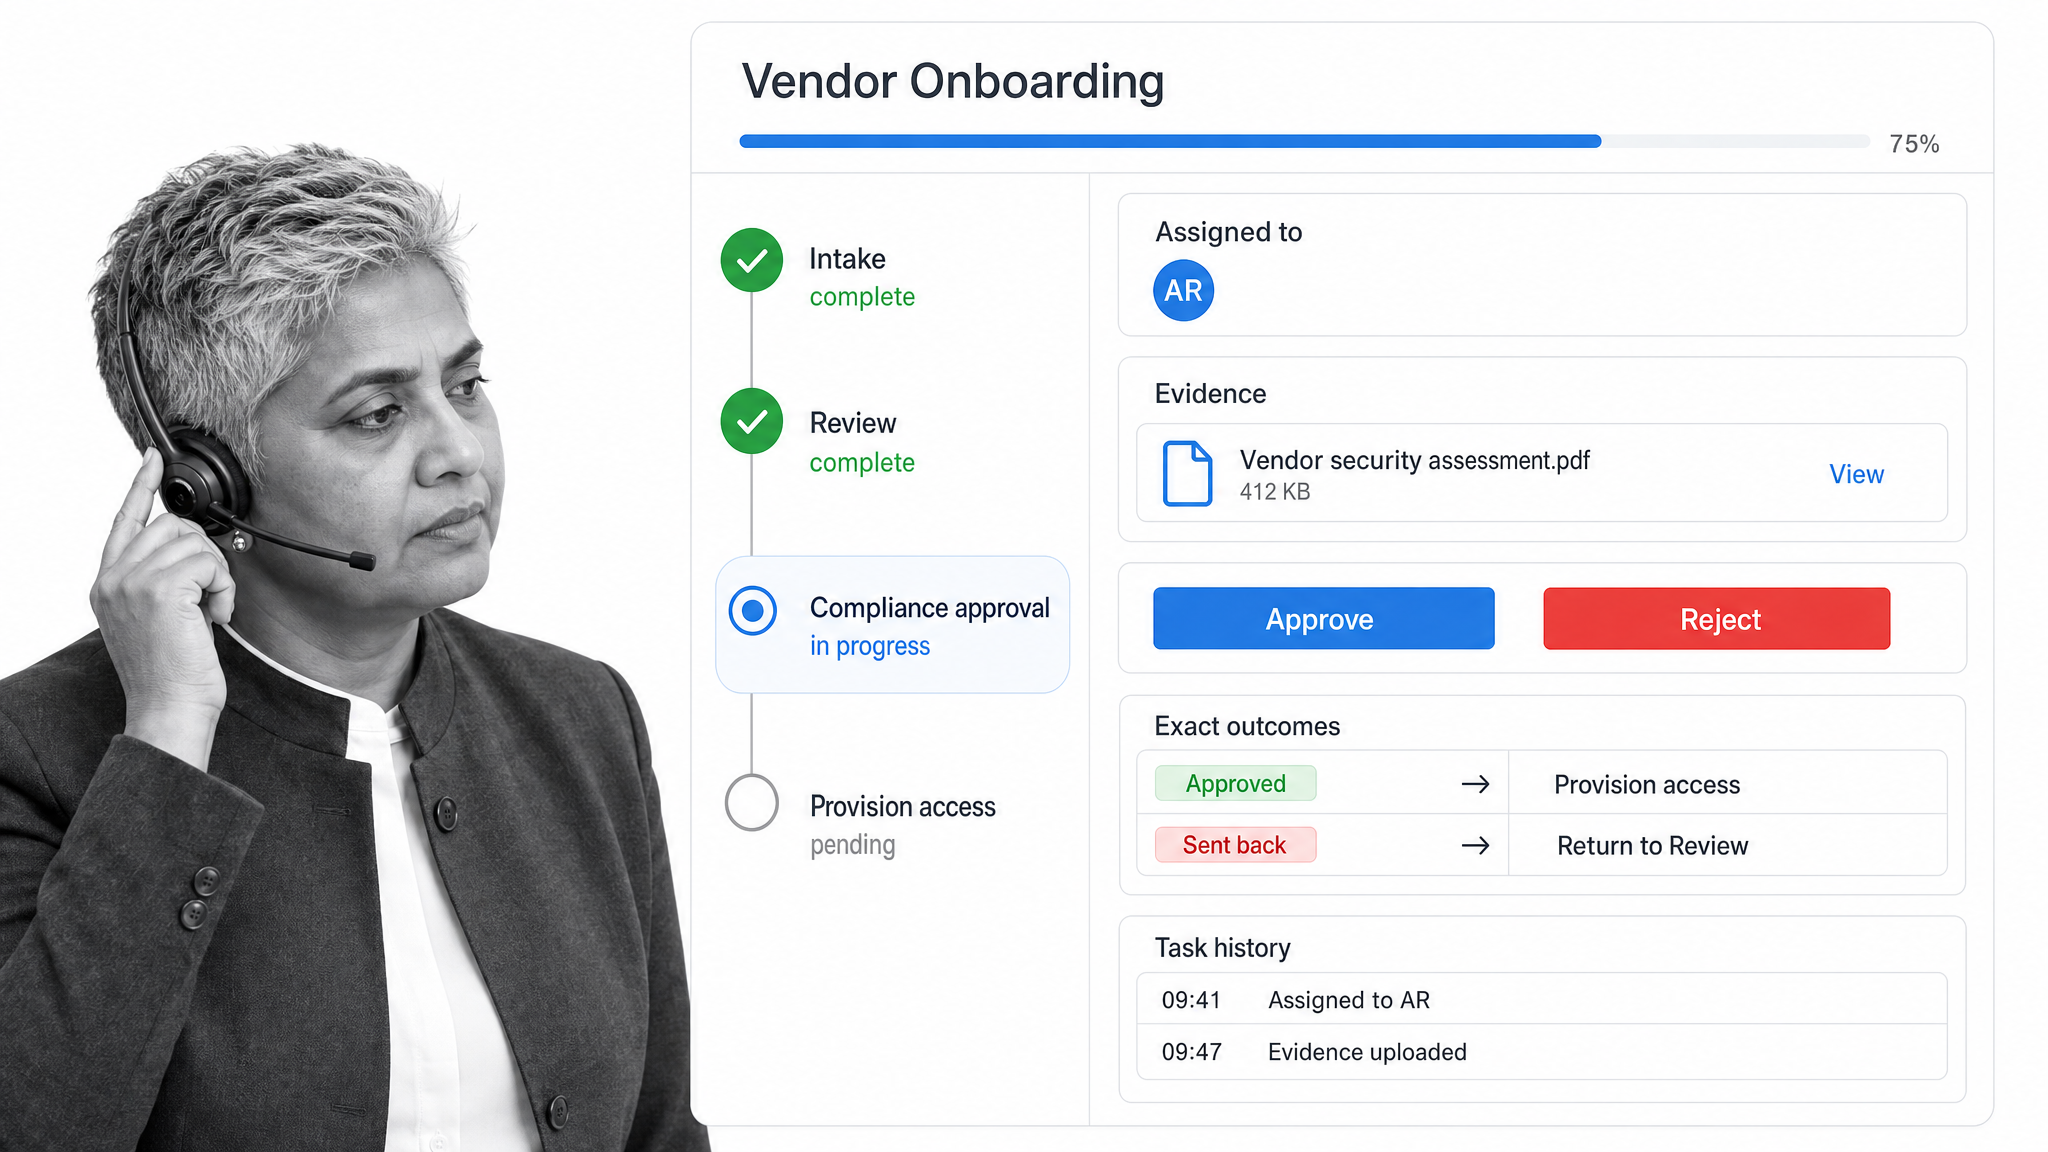
Use a dedicated system when work needs assigned tasks, conditional paths, approvals, reminders, controlled handoffs, and a reliable history of what happened. Process Street turns the process into a workflow run instead of asking the team to keep a spreadsheet synchronized.
In Process Street, conditional logic can show or hide tasks based on workflow data, while approval tasks route decisions to reviewers. Automations can connect workflow runs and structured data so that completed work triggers the next controlled action. That makes Process Street a better fit for recurring, cross functional, compliance sensitive, or high consequence processes.
You do not need to discard the analysis you completed in Excel. The workbook can become the process discovery artifact. Use its columns, statuses, owners, exceptions, and test cases as the specification for a controlled workflow in the Process Street Compliance Operations Platform. See how Process Street runs the work.
Excel workflow FAQs
Can you create a workflow in Excel?
Yes. Create a table where each row represents a task or case, then add columns for the owner, status, dates, dependencies, inputs, outputs, and notes. Use validation, formulas, filters, and conditional formatting to keep the tracker consistent and highlight exceptions.
What columns should an Excel workflow have?
Start with workflow ID, step number, task, owner, status, start date, due date, dependency, input or link, completion evidence, and notes. Add fields only when they change a decision, trigger an action, support proof, or improve reporting.
How do you create a status workflow in Excel?
Create an approved status list on a separate worksheet, apply Data Validation to the Status column, and use conditional formatting to highlight each state. A simple set is Not started, In progress, Waiting, Blocked, and Complete.
Can multiple people use an Excel workflow at the same time?
Yes, when the team uses a supported Excel coauthoring setup. The exact requirements depend on the Microsoft 365 account, Excel version, file format, and storage location. Keep one cloud based master workbook and avoid emailing separate copies.
What is the difference between an Excel workflow and a flowchart?
A flowchart explains how a process should move through steps and decisions. An Excel workflow tracker records actual work, including owners, statuses, dates, dependencies, and evidence. Use a flowchart to design the path and a table to track execution.
When is Excel not enough for workflow management?
Excel becomes a weak fit when the process needs enforced task assignments, branching paths, approvals, reminders, controlled handoffs, or dependable audit evidence. Those requirements are better handled by purpose built workflow software such as Process Street.