

Are you using a messy network of spreadsheets and software to hold reports and get insights on your content marketing?
That kind of setup can leave you in the dark, or constantly spending time updating your records manually. No one wants to waste time on data entry, but everybody wants a place to store their content marketing data for analysis (and tons of cool automations).
So, what if you could compile it all into one database that integrates with over 750 other apps, lets you sort the data into views to generate reports, and acts as the ‘single source of truth’ for your marketing team?
Why we created a content asset database
As our marketing team grew along with our blogging output and backlink count, we found we were losing track of exactly what assets we had.
How many posts had we written for the Process Street blog? How many guest posts did we have on other sites?
Which posts had the most shares and backlinks? Who’s sharing and linking?
Which keywords were we ranking for, and which needed more promotion?
The answers to these questions before we created our Content Asset Tracking (CAT) table in Airtable, was either “no idea” or “let me spend an hour dragging up the report from various sources”.
We used to manage this kind of data inside Google Sheets, or with 50 different Trello boards…
Now, it’s just a case of going into the CAT table, finding the right view or applying the right filters, and getting the data on-screen in seconds.
The results have been amazing. Since using the CAT table in early 2016, we’ve seen key marketing metrics such as referring domain count rapidly:
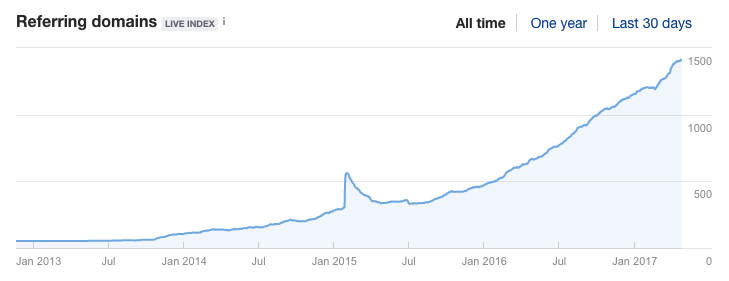
Previously, we found ourselves linking back to whatever random posts we remembered instead of making metrics-driven decisions alongside SEO data and keywords.
And, for blogger outreach, we were just making temporary spreadsheets of contacts and pasting them into our CRM instead of keeping track of who we linked to, where we linked to them, and whether or not we’ve contacted them yet. Before the CAT table, the marketing team’s employee count and output was growing at such a pace that we’d gone off the rails.
In this post, I’m going to explain how we solved our marketing data centralization misery with Airtable, and how you can do the same.
With this method you can:
- Track all your content, guest posts, mentions, search rankings, and organize them by popularity, position, etc.
- Keep a record of everyone who shares your content so you know who your biggest promoters are
- Organize your media contacts into categories to easily get a list of who to pitch your ideas to
- Have a big list of posts to load up into your social media scheduler
- The ability to pull up a list of priority posts and keywords for backlinking
The tools you’ll need for this are:
- Airtable (a cloud-based database app for storing your content data)
- Ahrefs (a tool to track backlinks and shares)
- Zapier (an integration platform to send data between any number of the 700+ apps they integrate with)
All of these tools either have a free version or a free trial, so you can start building out your blog’s content asset database today and start getting smarter about what you write and promote.
Here’s what we’ve ended up with after implementing this system:
A database is ridiculously difficult to show in a gif, but what you’re seeing there is the table that summarizes data from the rest of the base, and can be filtered to show things like post by popularity, post by domain, post by author, and who we linked to inside that post.
To summarize the entire database that I’m about to explain, that’s:
- A ‘post info’ table, with keywords, share count, link count, categories, mentioned contacts, etc.
- A list of everyone we’ve ever mentioned in our content, with a checkbox that fires their info to our CRM
- All tweets that mention us and the handles of people who talk about us on Twitter
- A list of all the keywords we rank for, mapped against the URLs in post info
In this post, I’m going to show you how we do all of this at Process Street, including how we populate the information, how we combine it with automation, and how we filter the records to get insights into our data.
But to start, you need to get all of your posts into Airtable.
Let’s go!
Create a database of all your content
The very basics of this method require you get a list of all your content together — that’s URLs, titles, author, categories, etc. That’s the primary purpose of the database, because it’s a tool you’ll build to track metrics against your published content.
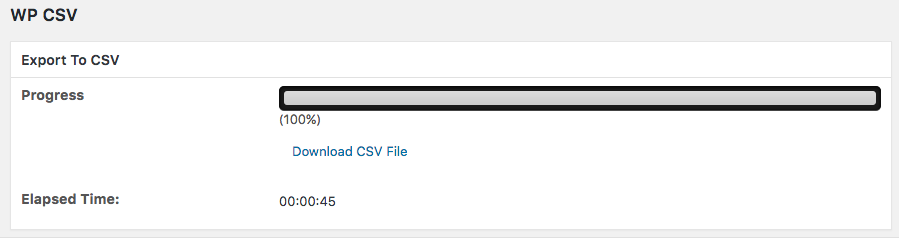
You can do this either by scraping your indexed pages in Google Search console or by exporting your posts as a list from WordPress with the WP CSV plugin.
Since WordPress sites make up the vast majority of blogs, I’ll demonstrate how my methods with WP CSV.
First, you need to install WP CSV on your WordPress site, and then hit export:
Open the file in your spreadsheet tool (probably either Excel or Google Sheets), and tidy it up. Make sure to keep the column with named wp_post_name — this is the slug of your full post’s URL, and you’ll need to create the full URL.
To make slugs into URLs, create another column called domain and fill every row with your domain. Then, make a third column alongside it called URL, and concatenate the two columns to form the full URL using =concat(A2,B2)

You’ll also notice hundreds of columns over to the right that simply aren’t useful information. I tidied mine up to look like this, with the URL as the first column.
And, since the categories and authors aren’t tidy, I used Google Sheets’ find and replace tool to standardize it.
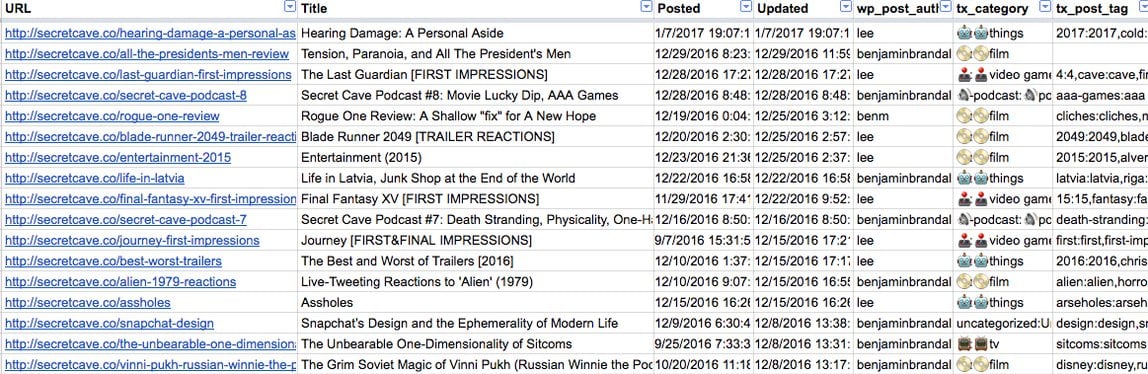
Once your export is whittled down to just the useful information (all in the shot above), you’ll need to export it to CSV and import it into Airtable, which offers plenty of storage space for your records for free.
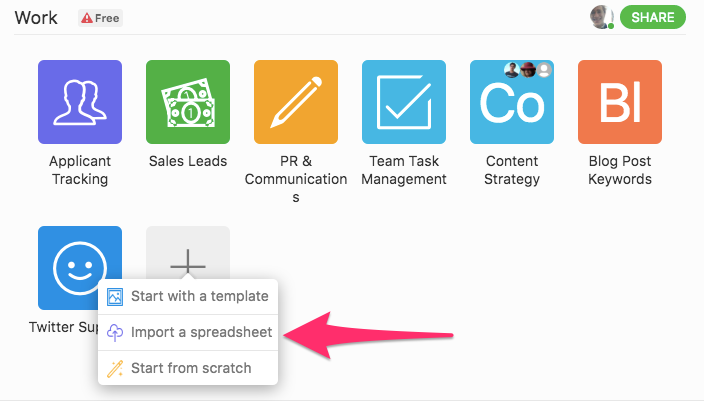
Once you have your account, make a new base using an imported spreadsheet.
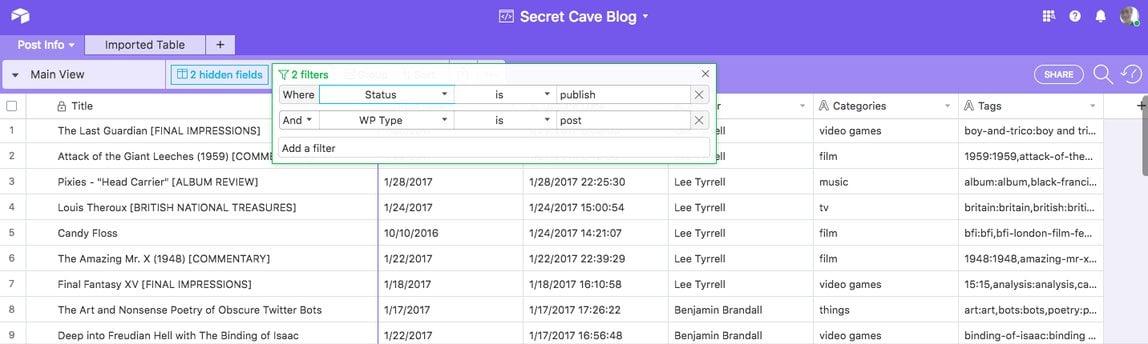
You’ll notice your export isn’t just published posts, but also drafts, revisions, and media uploads. These aren’t necessary for what we’re about to do, so you can just go ahead and use Airtable’s filters to remove them.
And there you have it. Step one is complete, and you’ve got a database of every published post on your blog!
You’ll might also want to export every off-site post (3rd party mention or guest article) and format that into Airtable, too. You can do that by using Ahrefs or BuzzSumo to export every backlink and then filter out duplicates or low-value ones.
Now you have your starting point, I’m going to dive into how exactly each part of our Content Asset Tracking database in Airtable works.
Aggregating a summary of your content alongside useful information: the post info tab
We could only get so far with just a list of URLs and titles. It’s useful for quickly seeing everything with a certain tag or category, or for scheduling out your whole archive on social media, but we need to be able to get deep insight into our organic SEO and social performance, pull up a list of all our guest posts, or filter posts by category…
The post info tab is our single source of truth for all things related to our post’s metadata, social metrics, and SEO information. It uses Airtable’s record linking to pull information from the rest of the table and summarize it neatly. An example use case for this tab would be to get a list of every guest post we’ve ever written, find the names and emails of everyone we linked back to in a specific post, or sort our posts by backlink and share count.
How post info is populated & updated
After the initial dump of information from the exports (explained step-by-step at the start of the article), we set up a zap to automatically add new posts from our RSS feed into Airtable:
This zap grabs as much information as it can from the RSS feed, and adds a new row in the table. Off-site content is detected by BuzzSumo, which generates its own custom RSS feed of detected backlinks and adds them via Zapier to Google Sheets.
Inside Google Sheets, our operations coordinator Kashish picks out the important URLs (based on the quality of the domain, content, and link) and manually updates them in Airtable. This is a weekly task, so can be done quickly manually rather than trying to automate it and end up adding poor quality posts to our database.
As well as updating post info with new posts, it also needs to be maintained with the correct and current number of shares and links. To do this, we use Ahrefs’ Batch Analysis tool and manually update the records.

Aside from this, the table also has a column to tag it as a Process Street blog post, our own guest post, or a 3rd party link, so we can easily filter it.
As I mentioned, a lot of the data inside post info is pulled out of other parts of the database and automatically mapped against the URL. Because of this, it would be better to explain how it’s populated as I go along.
Automations inside post info
Inside post info, we have a checklist column for automatically triggering a content promotion checklist in Process Street. When it’s triggered, the checklist title and form fields are automatically populated with the post’s information from Airtable, the team is assigned to the right tasks, and they’re sent an email letting them know it’s time to start working on promotion like social sharing and repurposing.
Here’s the checklist template we use:
You can use the zap below to run checklists for new Airtable entries, or you can edit it so you only trigger it when you check the box in Airtable:
Views inside post info
Views are a specific set of filters on the main data set that you can quickly apply repeatedly. For example, by creating a new view in post info, naming it ‘public templates’, and applying a filter to show only records where the URL contains ‘/checklist/’, we can collate a list of our public Process Street templates that you can go back to again and again:

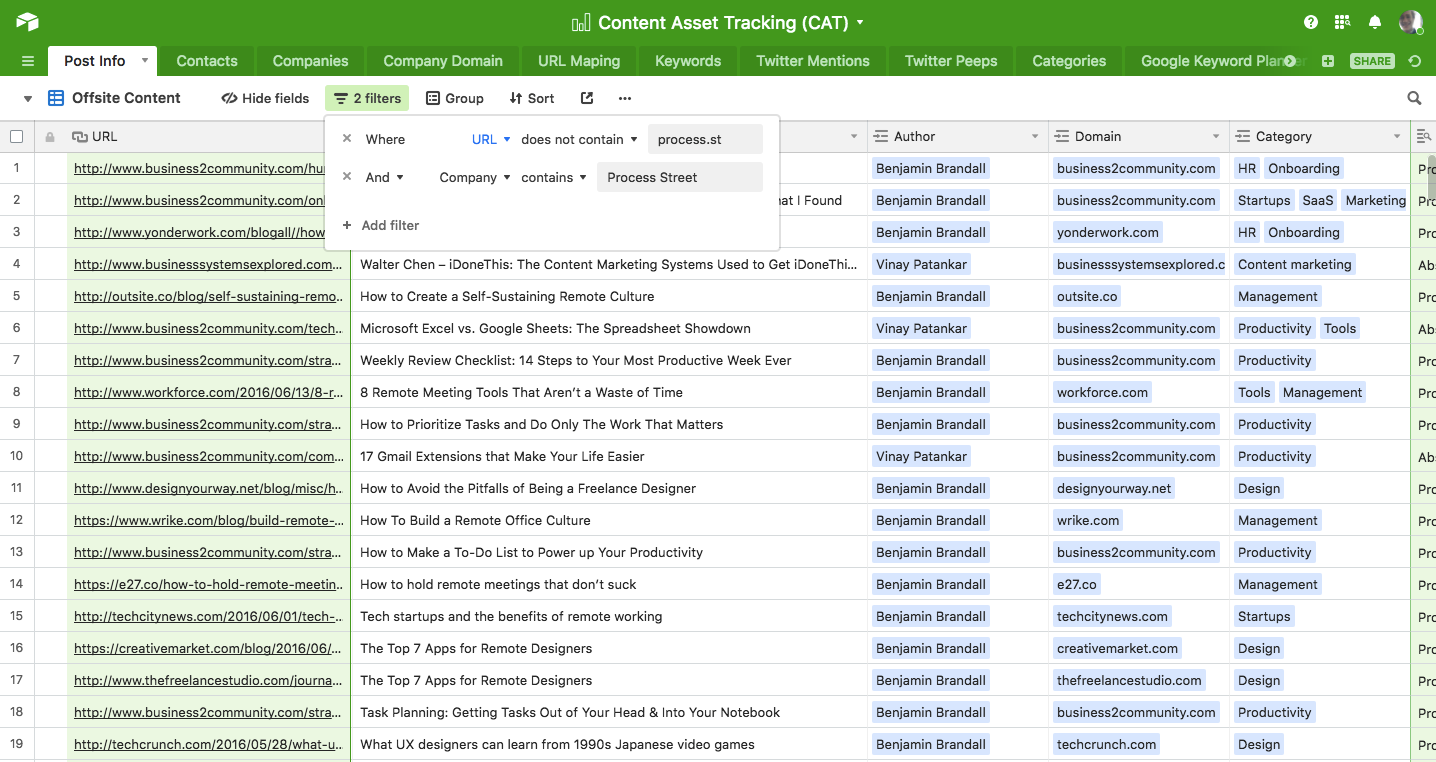
The same applies for seeing all of our guest posts (filter: where URL does not contain ‘process.st’).
To make views easier when using data that isn’t pulled into post info, we also have a tag column, which is just a multi-select dropdown.
One particularly interesting reason for tagging records that I used recently is to mark them as an under-promoted post with potential:
By dumping a list of URLs into Ahrefs and checking for ones that are on page 2 of Google for high-traffic keywords, I was able to then go back into Airtable and create a tag for posts that need optimization/promotion. With that tag, it made it easy for me to filter the records into a view.
No more scattered spreadsheets. If the data exists in part in Airtable, it’s best just to build your database out to be the single resource. That way, you can easily give access to everyone who needs it and cut down on time wasted searching around separate, unlinked files like Google Sheets.
Building a list of contacts mapped against your content: the contacts tab

Whether we need a list of everyone mentioned in a specific post so we can do outreach, a list of media outlets, or a list of friendly people who have linked back to us in the past, we can see it all in the contacts tab.
Previously, we’d use temporary spreadsheets or inconsistently labeled contacts in our CRM.
Now, using the contacts tab, we can automatically add select contacts into our CRM alongside the URL we mentioned them in. Then, in the CRM, we can pull up every contact for a post, and write emails to them showing them the post. This has worked well for us in terms of getting more social exposure and building relationships with other blogs.
How the contacts tab is populated & updated
The contacts tab is maintained manually but uses a series of tools and processes that keep things quite painless.
The first step is to take any new URL added to the post info tab and scrape every link from it using the Link Klipper Chrome extension.
Then while one person manually adds each contact’s name and company domain to the tab, mapped to post info by linking the records, a team of virtual assistants use our email finding process to add in the email address.

You’ll notice we have a column on the right-hand side of the screenshot showing all the posts in our database that the particular contact has authored, too. When you have consistent, linkable records in a database like Airtable, you can pull data in from any part of the table to build out other areas. The blue boxes around the records show that it’s being pulled in or link to from data elsewhere in the database.
Here’s a quick explanation from Airtable:
(And here’s their official guide.)
Since there’s a high margin for error when dealing with people’s names and email addresses, it’d be much harder to reliably automate this part of the database. All contact information is linked to a URL in post info, so when summarizing the data in the post info tab, it’s easy to see which people are linked.
Views inside the contacts tab
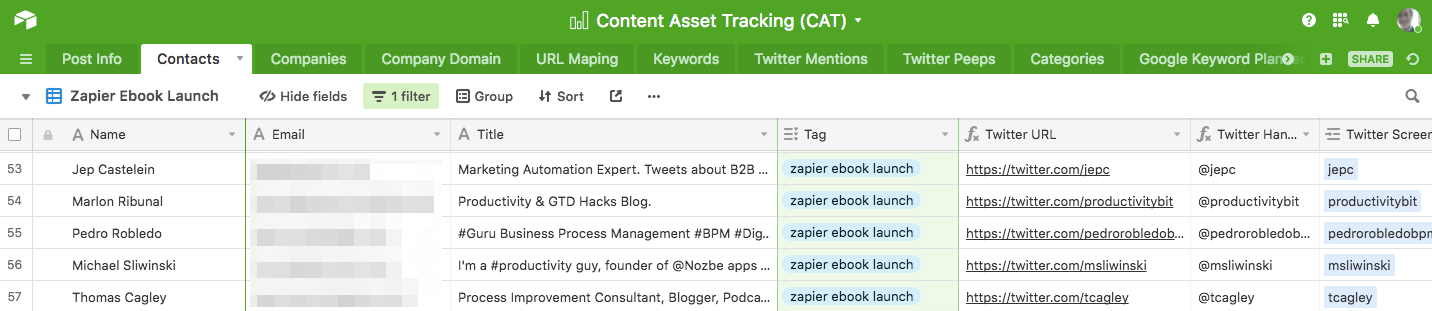
We have thousands of contacts in our database, some of which are added purely for the purpose of outreach for a specific project. For example, our view for our ebook on how to use Zapier had a few hundred people who we thought would be interested in reading a draft and giving feedback.
By scraping the contacts into a Google Sheet using BuzzSumo’s influencer search, it was easy for a VA to come into the sheet, add email addresses, then paste them into Airtable with a unique tag that let me create a view and filter them:
We have similar views for all major outreach projects so we can grab a complete CSV export, import them into our CRM, and track communications from there on (or, to fire that process automatically, as I’m about to explain).
Map post URLs to contacts and companies: the URL mapping tab
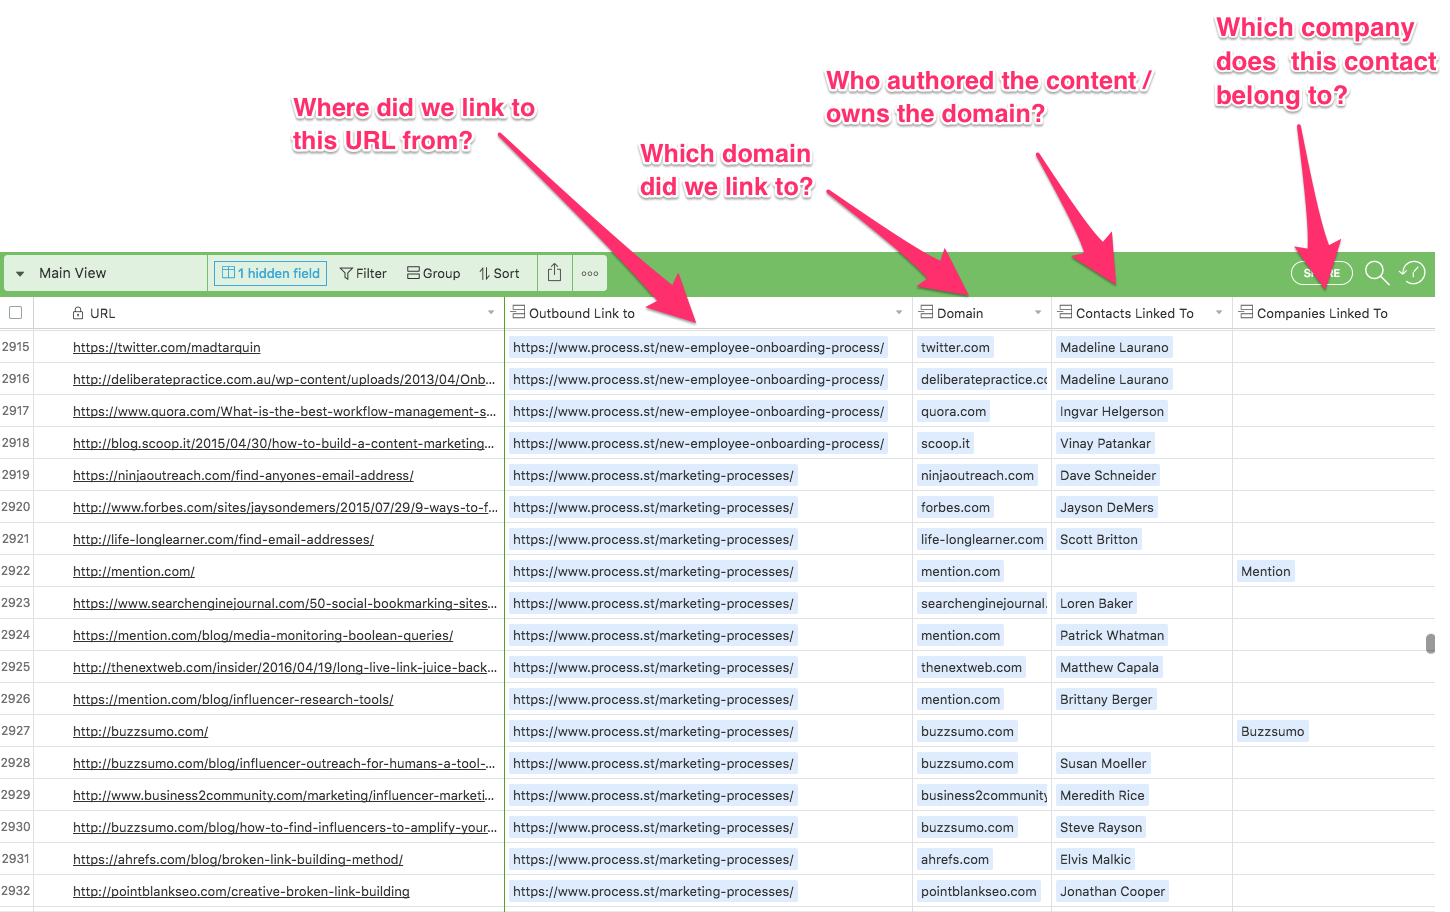
The URL mapping tab is where we paste URLs and then get summaries of the URL’s known information, including where we linked that URL, and which contacts are associated with it.
It allows us to group multiple contacts into one company, and get data on that particular company, not just an individual. Most of all, it’s for the purpose of linking together other bits of the database so they can be better summarized in the post info tab.
How URL mapping is populated & updated
URL mapping is updated manually, but fills in data automatically. Since we already have data on contacts and post URLs, it means we can paste a new URL at the bottom on the table and instantly get a summary of all available information associated with that URL.
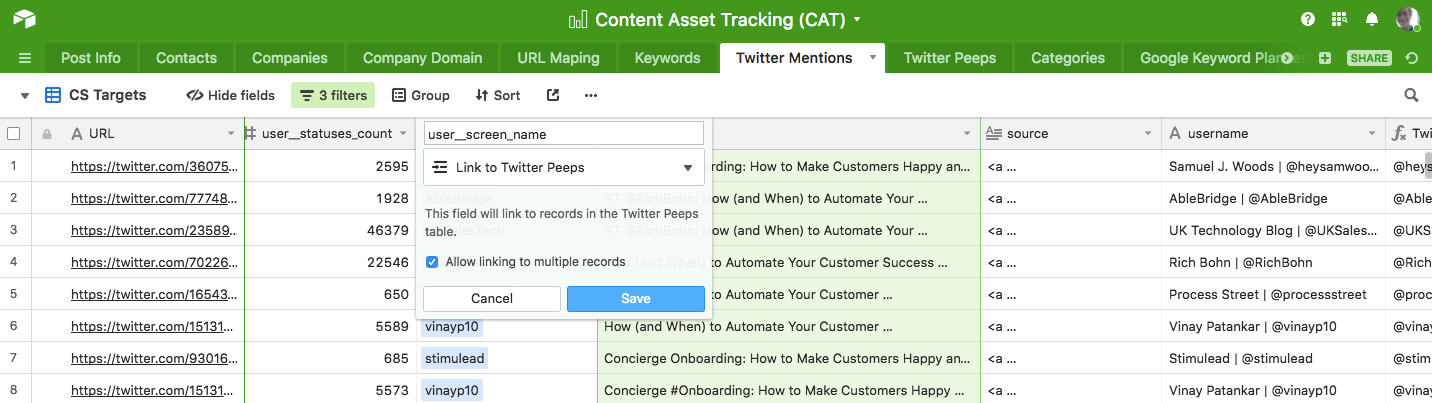
It works by consisting mainly of columns that link to records in other tabs. For example, ‘Outbound link to’ comes from post info, and ‘Contacts linked to’ comes from the contacts tab.
It’s just a case of naming the columns so they match the data you want to link to, and configuring the column to ‘link to another record’.
Automations inside the URL mapping tab
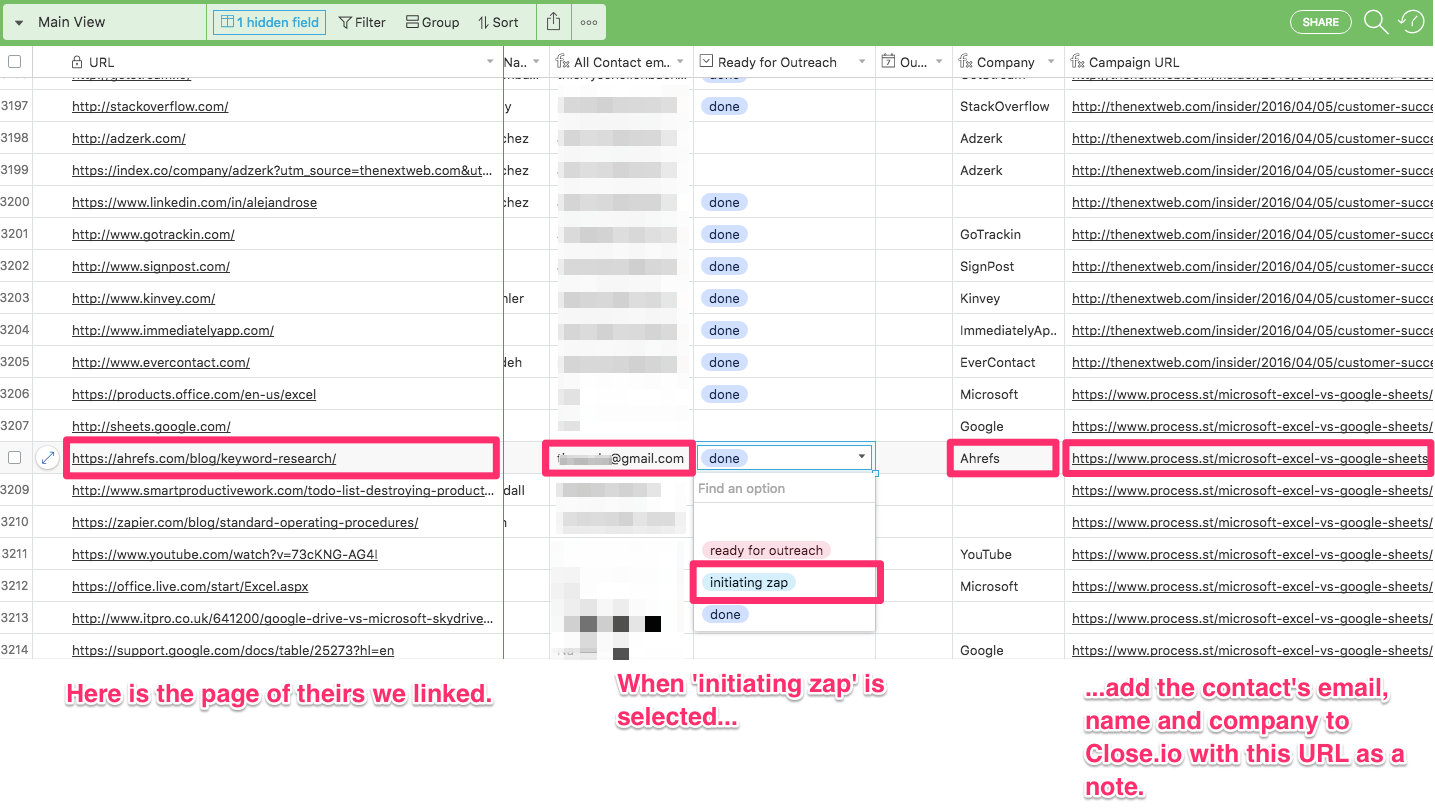
The URL mapping tab is what we use to control outreach automations.
Paste a URL at the bottom of the table, and it will reference other tables, pulling out the company, contacts, and where we mentioned them. Over to the right of the table, there’s a dropdown box linked to Zapier that adds contacts to Close.io for outreach, and it works like this:
The zap we created is quite simple (but unfortunately not part of Zapier’s pre-made library):
When ‘initiating zap’ is selected from a row’s dropdown menu, Zapier grabs the email, company name, contact name, and mentioned link, and maps them into a new lead in Close.io. The URL goes into a note or snippet so you know how to filter the contacts for your emails. This same idea would work with any CRM, not just just Close.io.
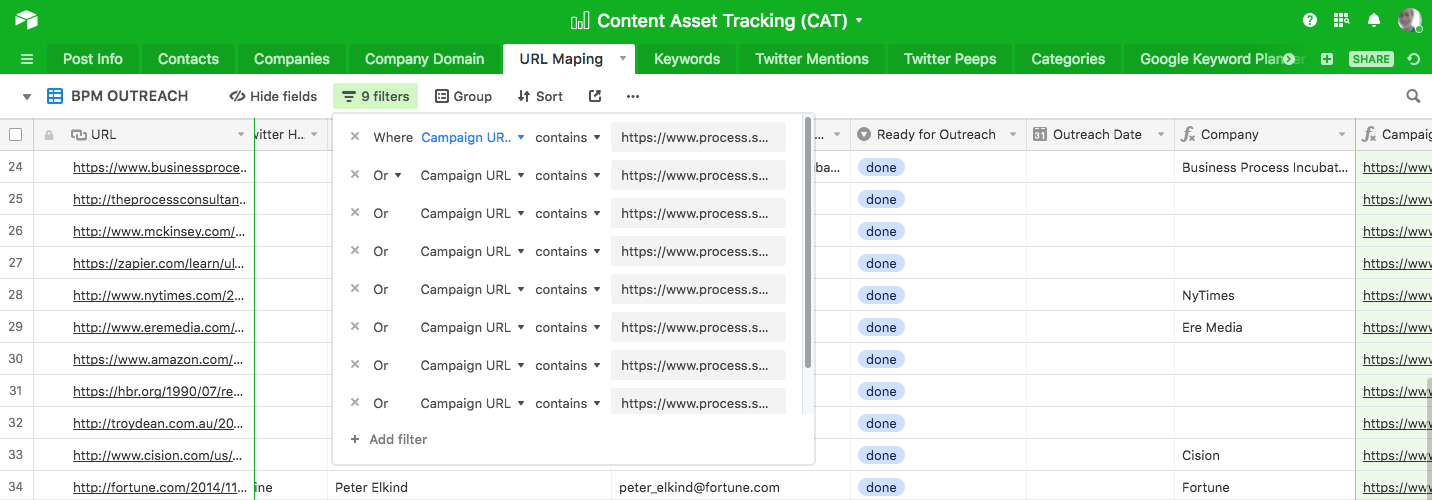
Views inside the URL mapping tab
Since the tab maps contacts to URLs, it makes it simple to create a view to aggregate all contacts that were mentioned in a specific set of URLs. For example, when we released our business process management ebook, we needed a list of everyone who was mentioned in all of the posts that went into the book. When the data is already there, it’s a quick job to create a view:
We also use views to help us build the table out properly. There’s one view in particular — ‘Needs URL mapping’ — that will show every URL that doesn’t have information associated with it. This helps the person in charge of up-keeping the database to see what work is left unfinished.
Grouping contacts by organization: the companies tab
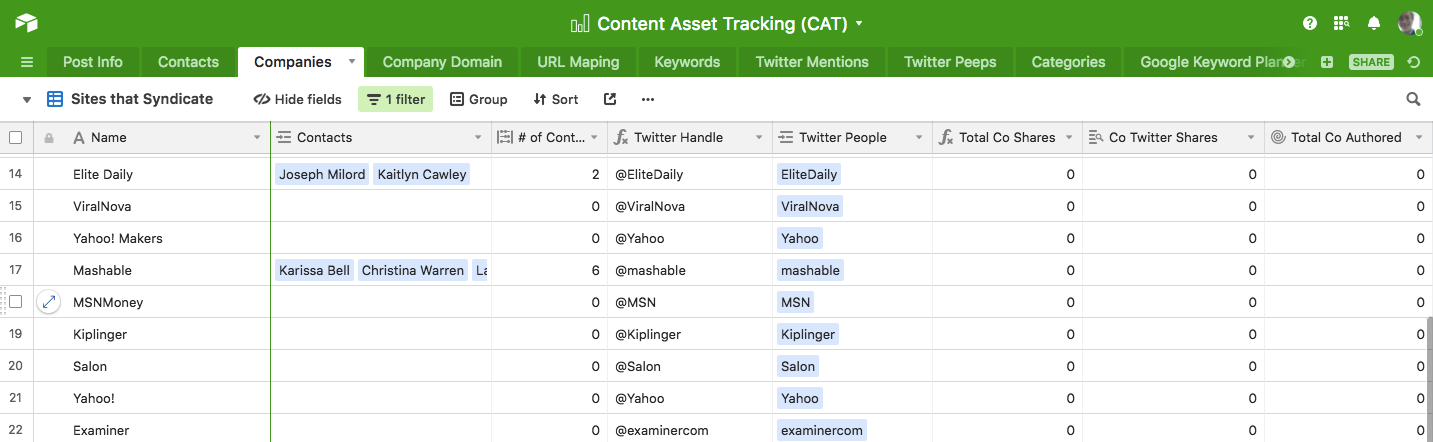
Whenever a company is referenced inside Airtable, it’s being pulled from the companies tab. The companies tab creates one record for every unique company name that appears in the contacts tab, and maps every contact to that company, like shown in the linking records video from Airtable earlier in this article.
The companies tab is a list of companies and the data we know about them, such as how many times employees from that company have linked back to us or shared our content, and which contacts we have at that company for outreach or pitches.
How the companies tab is populated & updated
The URL mapping tab explained above takes raw URLs and formats them into company names. The company names are connected to the URL, and pushed to the companies tab with the company name as the main record.
From there, over to the right hand side of the table, all known information about that company from the contacts tab and others (name, contacts, primary contact, emails) is inserted automatically because it’s all mapped together using linked records.
Tracking SERPs and keywords against content URLs: the keywords tab
The keywords tab is useful when I’m trying to find relevant links for blog posts, or for tracking keywords by priority so we know what to work on promoting.Since it’s always better
Since it’s always better for us (whenever possible) to link back to something we’ve written or links back to us, we can use Airtable’s filters to show only keywords with certain terms, like ‘content’ or ‘software’.
The tab was created by linking the post info keywords column to a new table. Breaking down the information, it lets us see every keyword individually instead of seeing multiple keywords tied to one URL. Both are useful, but for assigning priorities to individual keywords so we know what to try to get more backlinks to, it’s best to get a keyword-by-keyword view.
How the keywords tab is populated & updated
All of our SEO data comes from an Ahrefs export manually pasted into the post info tab, as explained earlier in this article. But, since it’s all summarized by URL, you can easily make it more readable and sortable by creating a new table from the linked record. This video explains how:
Once all of the automated information is filled in, it’s time for an actual human to process the data. After the monthly SEO data update, it’s a team member’s task to come in and assign priority to the new, unprioritized keywords. We do this by deciding how closely related to our product these keywords are, and how much traffic they bring in for us already.
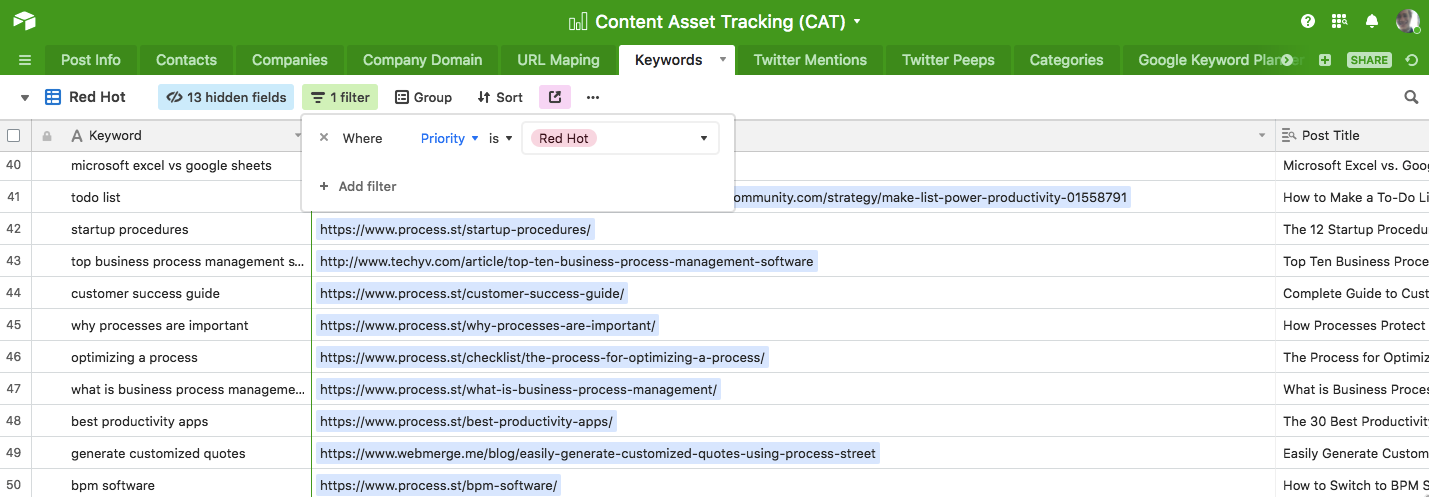
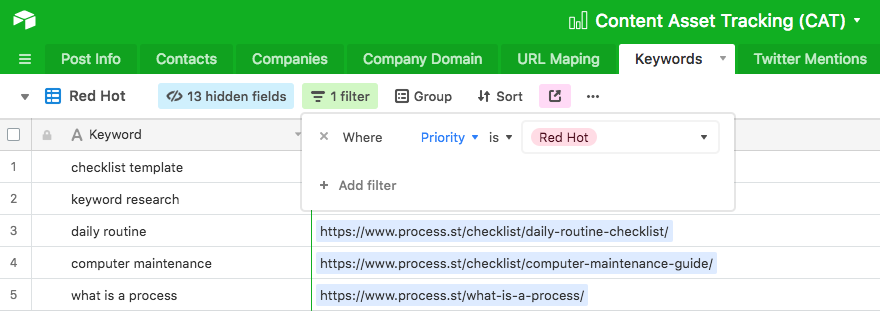
Views inside the keyword tab
As you might expect with all of the Ahrefs analysis we do, we have an unearthly amount of data in this tab. The best way we’ve found to organize it is by creating a dropdown column called ‘priority’, and then filtering the highest priority entries into a view:
And, as well as views for the marketing team’s benefit, we again set up views that help the members assigned to database maintenance track their work. For example, all keywords which haven’t yet been assigned a priority go into one view, making it easy to see the work that needs doing.
Maintaining a list of Twitter mentions: Twitter mentions tab

How the Twitter mentions tab is populated & updated
This tab is fully automated, basically acting as a feed from the Process Street Twitter fed into Airtable by Zapier, which is as easy to connecting your Twitter account mapping the fields to the table columns.
There is no pre-made zap to do this, so you’ll have to make it yourself. Thankfully, it’s quite easy. We just mapped every single available field into a new table with a column for every one:

We found the tweets by querying Twitter through Zapier with the query: @processstreet or "https://www.process.st" — this picks up everyone who mentions us, and also catches tweets that link to us. You could customize the query to include multiple handles, terms, product names, team Twitter handles, or anything else you can think of that would generate reliably useful information.
Mapping Twitter mentions to contacts: Twitter people tab
The Twitter people tab useful for when we want to reach out to a segment of users on Twitter for some reason, like content or product promotion.
The main reason we pull in a feed of tweets into Airtable into the Twitter mentions tab is to use the data to generate a Twitter people tab.
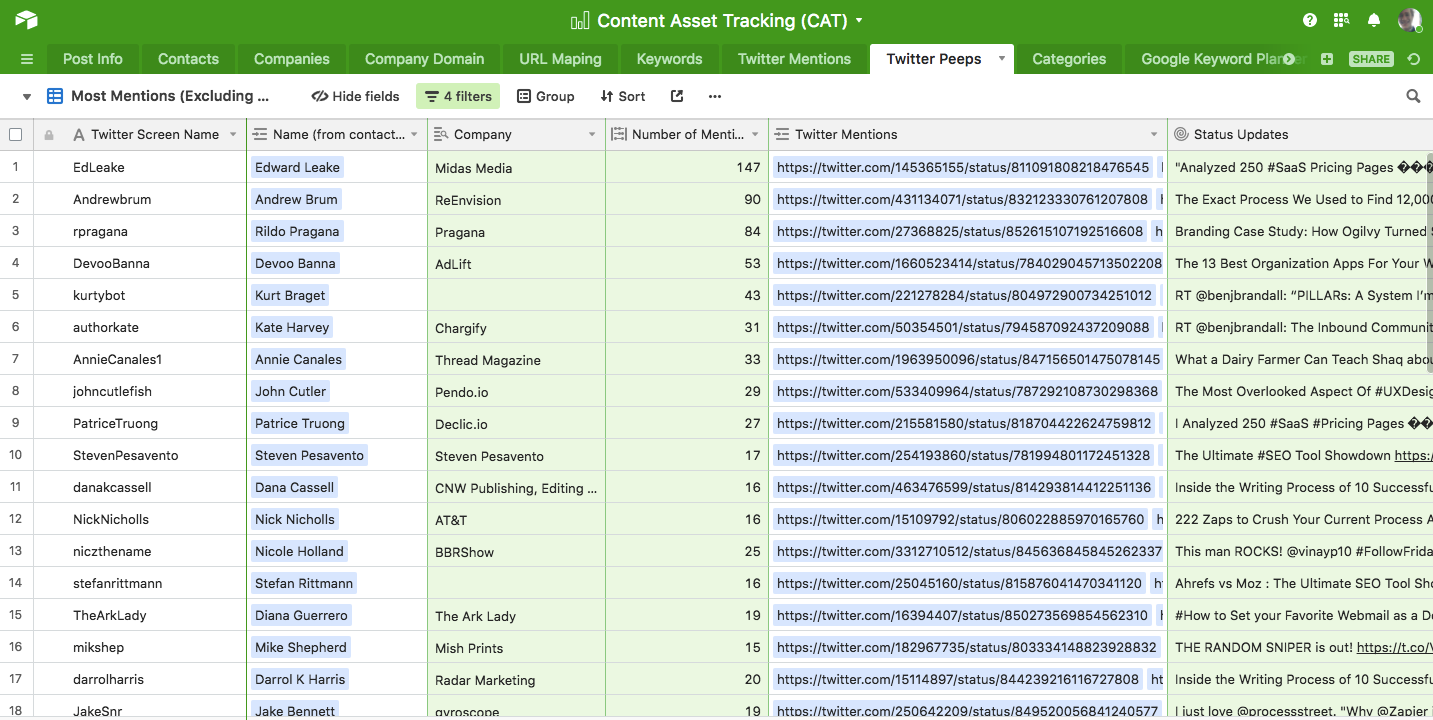
Twitter people is a list of every user who has talked about Process Street in the past. It can be aggregated to show our most active promoters (see the screenshot above).
How the Twitter people tab is populated & updated
Turning a list of freeform tweets into a list of users works exactly the same way we previously turned messy keyword data into individual rows: by linking the column to a new table.
Whenever a tweet with a new username comes into Airtable, the Twitter people tab will map the username into the first column of its table, and pull in the tweet text over to the right.
Views inside the Twitter people tab
Since Twitter people is aggregated from an unstructured list of mentions, it means we can summarize the data alongside mention count. That allows us to create a view of our top promoters, and filter out anyone who has just mentioned us a few times:

Also note how we’ve excluded anyone who works at Process Street from the list; we don’t need to contact ourselves or our own employees!
In conclusion…
Without Airtable, we’d be operating our content marketing in the dark, or with a ton of random spreadsheets that go out of date all the time. If you want to create a single source of truth for everything related to your content marketing, this method is the way to go!
I hope the explanation has put you on the right track to centralizing your data, banishing obsolete spreadsheets, and getting proper insight from your data.
Any questions? Let me know in the comments!