Pipedrive streamlines every action involved in converting a potential deal into a successful sale. You can integrate Pipedrive with Process Street to supercharge your sales pipeline even further and automate your work via Webhooks or Zapier.
A Webhook integration can bring information from Pipedrive that would trigger a new workflow run in your Process Street account. Webhooks are automated messages or payloads sent from apps as a trigger to cause an action in a receiving app.
In this example, we will create a Webhook that runs the Customer Onboarding workflow when a deal in Pipedrive reaches the Closed Won stage.
Now, let’s jump into the integration.
First, create a Workflow in Process Street and ensure to add form fields that are relevant to the data fields in Pipedrive. This will help you to map the relevant information from Pipedrive to Process Street.
This information is stored in Pipedrive when a deal was created. So, we need to create relevant form fields in our workflow to push that information through to Process Street. For our example, these form fields should include the deal name, contact name (short text fields), deal revenue (number field), contact email address (email field), close date (date field), and so on.
This will mean that whoever is onboarding the customer won’t have to look up their information in Pipedrive, but can instead see all their details in Process Street.
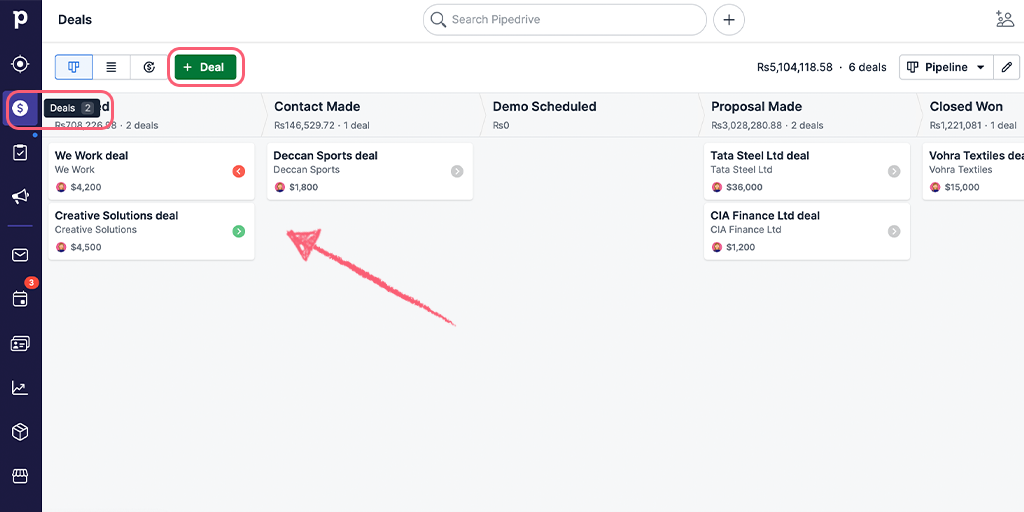
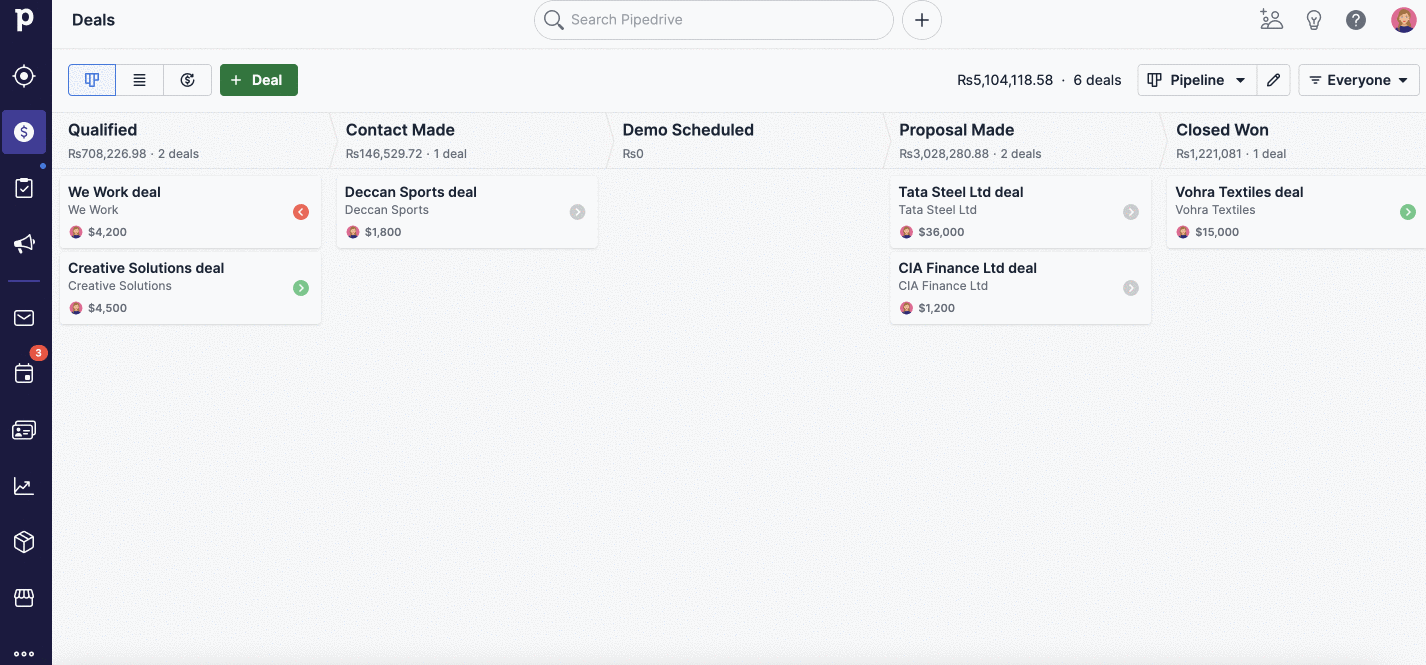
Log into your Pipedrive account or create a new account. Since we want to trigger a new run in Process Street when a sales deal is closed as won, we will be working with the Sales dashboard in Pipedrive. To set this up, click Deals, then + Deal. If you have existing deals in your sales dashboard, you can use that to create your trigger as well.
Note: You want to ensure that the form fields you have in your workflow match the deal properties you have in Pipedrive. If you find any properties missing, you can create custom properties to add to your deals.
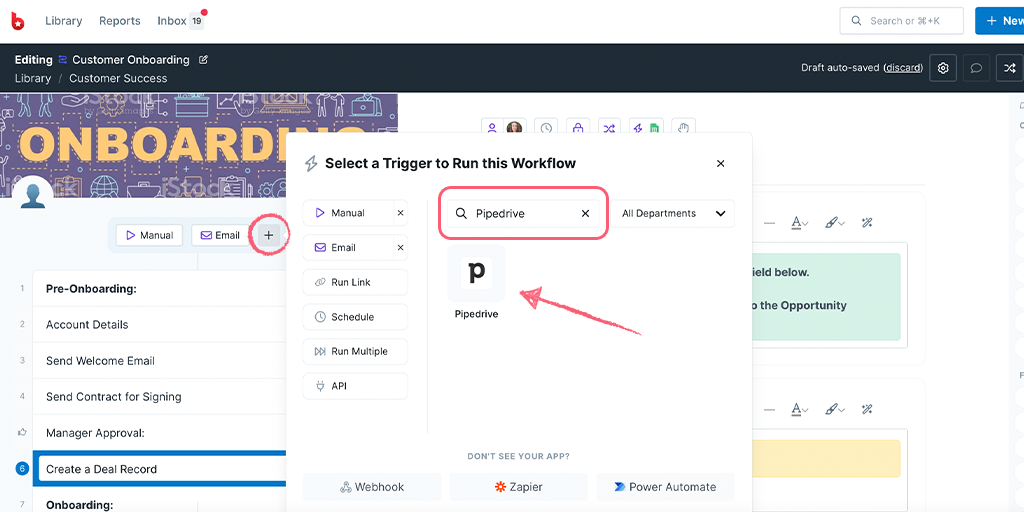
To get the webhook URL from Process Street, when you’re editing your workflow, click the + icon above your task list on the left. Here, you can look for Pipedrive as a Trigger to Run this workflow.
You can name your webhook as the app name or any phrase that helps you identify the Trigger. Then copy your Webhook URL.
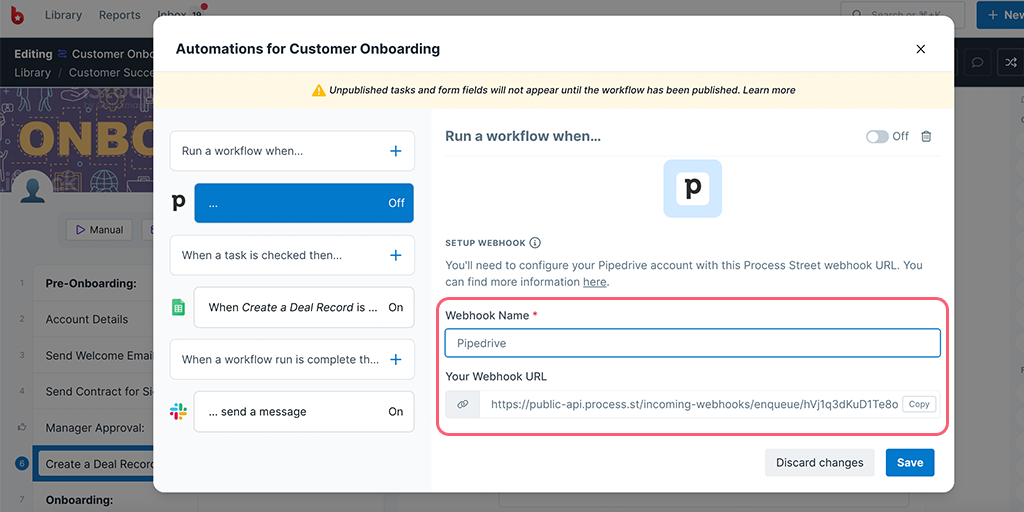
To set up webhooks in your Pipedrive account, click on your profile picture in the top right corner then go to Tools and integrations > Webhooks > Create new webhook
Now, set up the Events in Pipedrive and paste the webhook URL you copied from Process Street, then Save.

If you want to learn more about setting up webhooks in Pipedrive, you can refer to this help doc here.
Now come back to Process Street and test your trigger. Your payload should return as a success but if it doesn’t, you might want to go back to Pipedrive and ensure you have a Deal closed as Won.
When your test returns successful, you can proceed to map your fields from Pipedrive’s properties to your Process Street form fields.
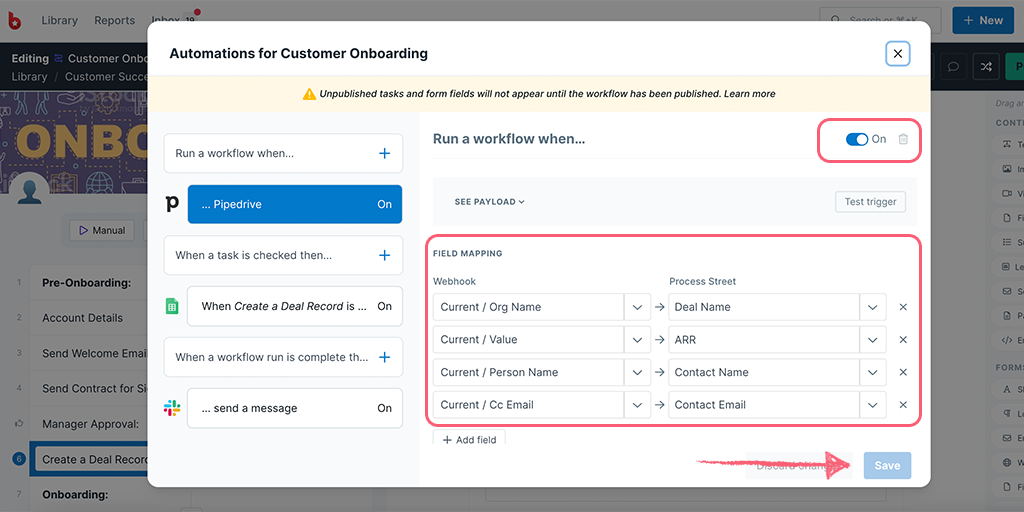
Lastly, turn your webhook On and Save it. Then Publish your workflow and you’re all set!
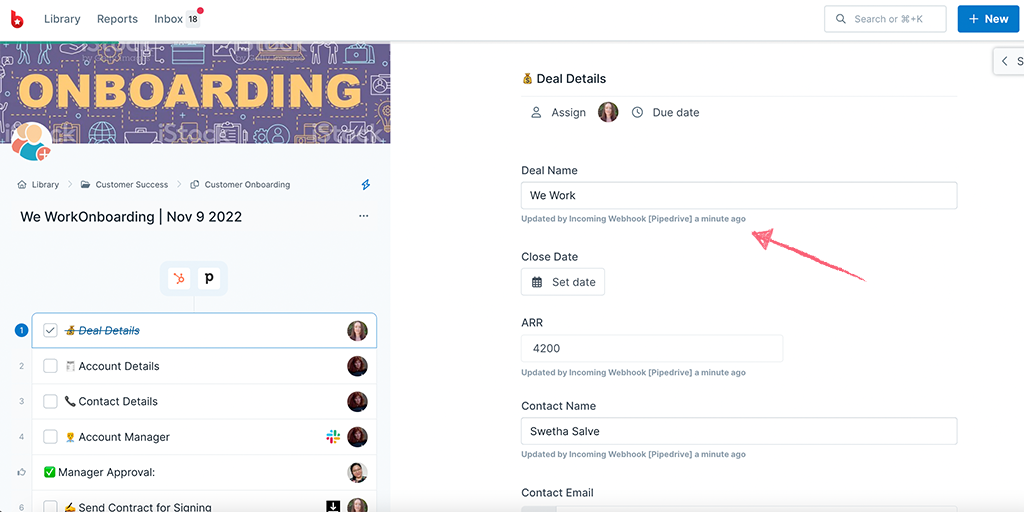
As an extra step, you can go to Pipedrive, update a deal stage to Closed Won then come back to Process Street in the Reports Dashboard to confirm a new workflow is run.
Zapier connects over 1,000 apps together. It’s an “if this, then that” tool, meaning that once a trigger has occurred, an action will then take place. This helps to save you time and effort by automating processes.
In this example, we will look at how you can automatically run your cold calling workflow whenever a new lead is added in Pipedrive. This means that you don’t have to worry about anyone making messy notes, missing key information, forgetting their script, or completely missing the first crucial point of contact.
Not only that but information from the new lead (such as their name and contact details) can be automatically pushed into your workflow run, letting whoever’s handling the call focus on talking to the customer rather than switching between several apps.
This will let your salespeople quickly, reliably, and effectively perform your standardized cold-calling workflow while cutting out all of the horrible data management aspects.
Users: In order to create an API key for integrations, you must be an Administrator.
Let’s look at how you can do this.
First, you need a cold calling workflow set up inside Process Street (if you already have one, skip ahead to the next step). The quickest way to do this is to import our premade workflow template into your own organization.
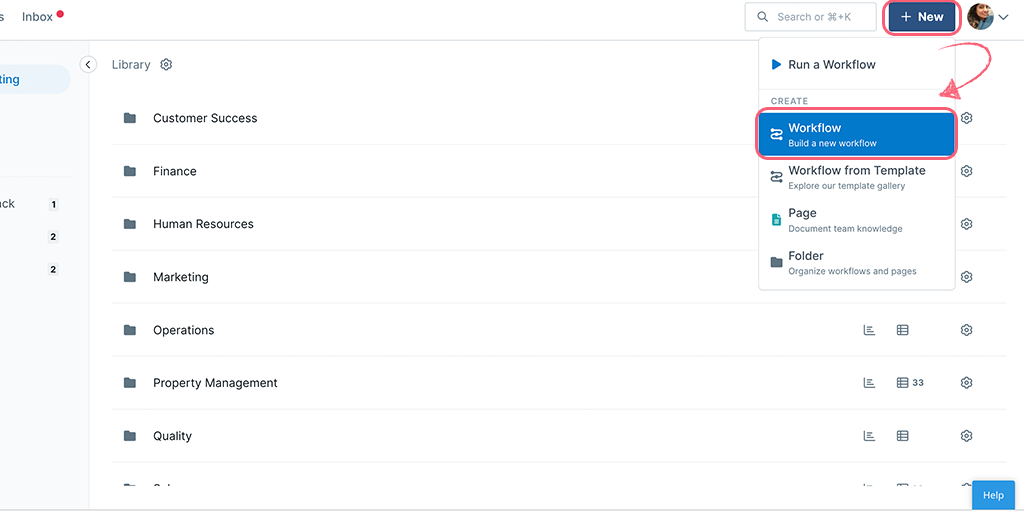
Open Process Street’s dashboard, click “New” in the top left corner of the screen, then click “Workflow”.
Next, enter “cold call” into the search box and click on it to add the workflow to your Process Street account.
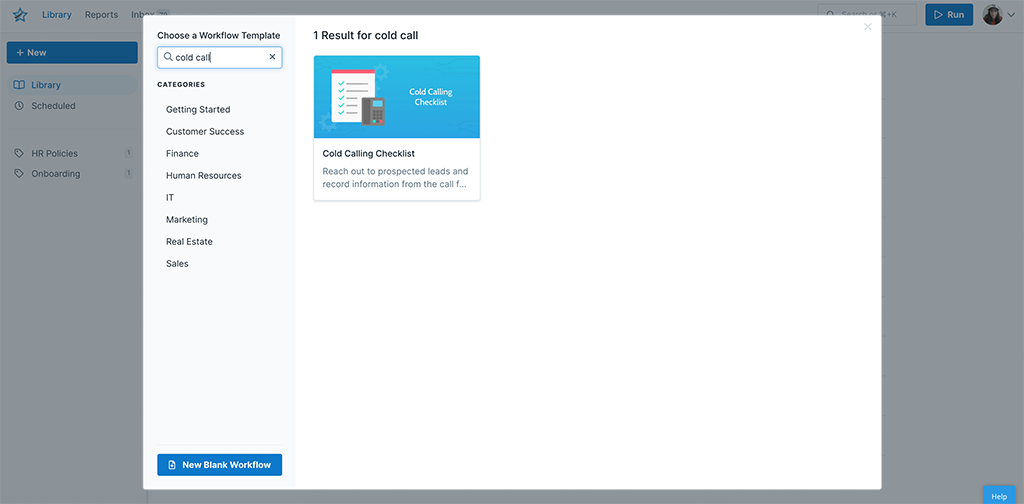
You can then edit this workflow if you want to tailor it more to your needs, but for this example, we’ll take it as it is.
So, with your cold calling workflow set up and ready to follow, next we need to set up the lead in Pipedrive that you’re going to use to test your Zap later on.
Now you need to set up a lead inside Pipedrive so that you can test your Zap to make sure that it’s working correctly. If you have a lead in Pipedrive that’s been recently created and is fully fleshed out (with the client’s name, phone number, and so on), feel free to skip this step.
First, log into your Pipedrive account and click the “Add lead” button.
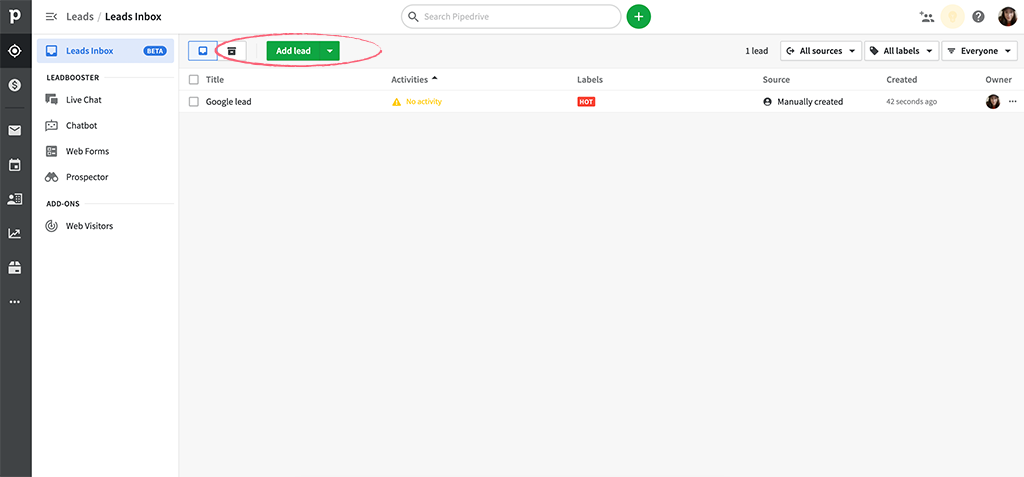
Record the lead details in the box provided, providing as much information as possible. Remember that this lead is only required for testing purposes though – you can make up all of the information just to have something to test.
Now it’s time to link everything together by creating a Zap in Zapier.
The ultimate goal here is to tell Zapier to automatically run our cold calling workflow whenever a new lead is added to Pipedrive. However, I’ll also show you how to set up the Zap to push the lead details into your workflow run and save yourself the trouble of doing that manually.
This is mainly achieved by setting up the two apps as your “Trigger” and “Action” elements inside a new Zap, with a couple of extra options in the Action step to make the lead details transfer over.
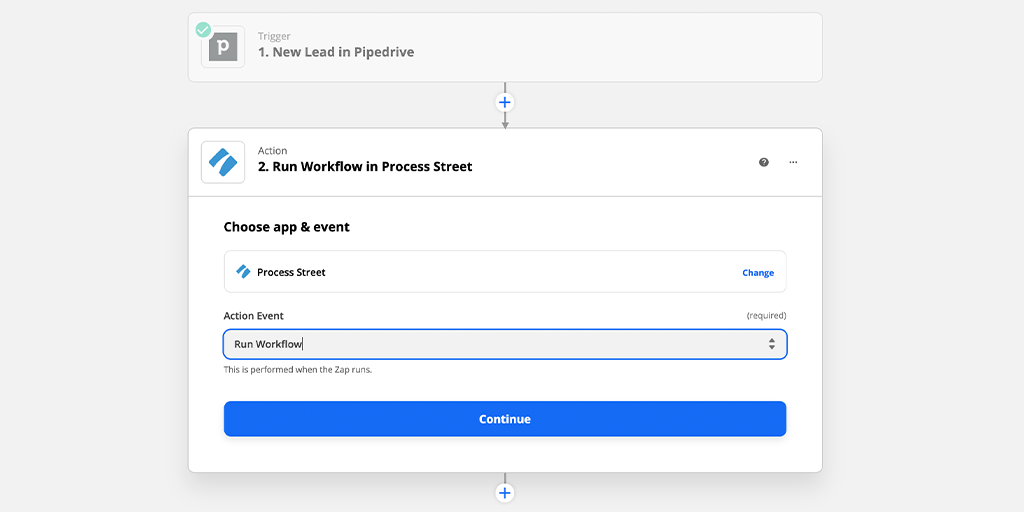
First, log in to Zapier and click “Make a Zap“. Set the Zap’s trigger app to Pipedrive and the trigger as “New Lead“.
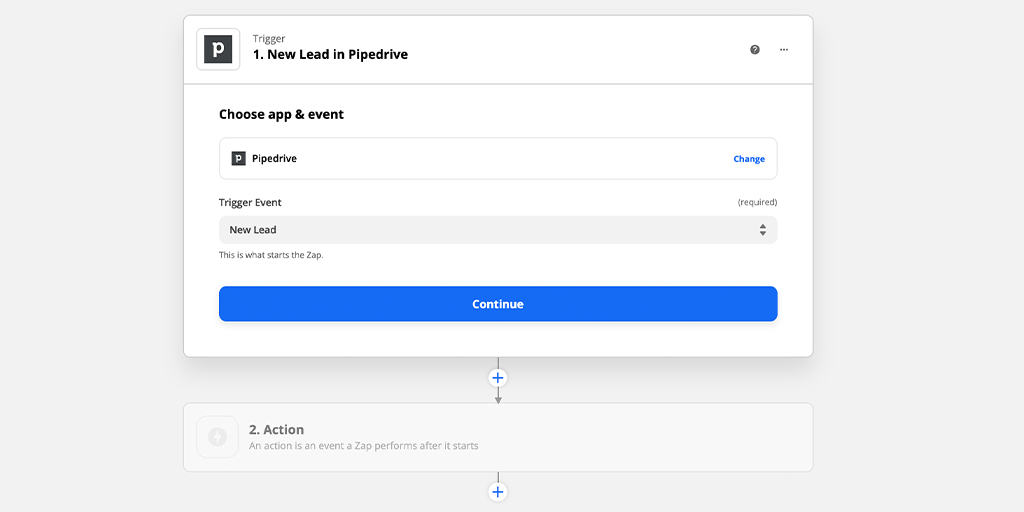
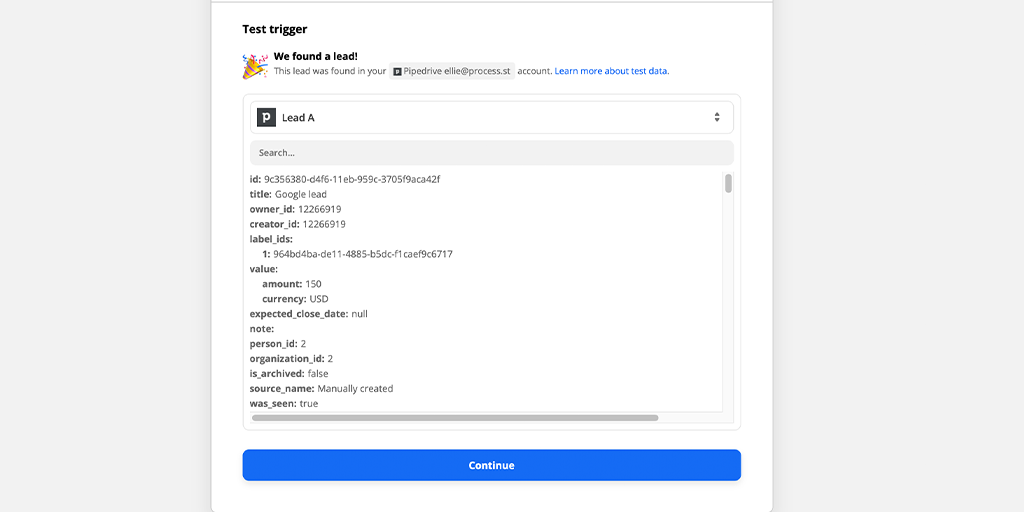
Click “Continue” to connect your Pipedrive account and then continue to test your trigger.
Click “Continue” to move on to setting up your action step.
Choose Process Street as the action app and “Run Workflow” as the action.
Choose your Process Street in the next step and then “Continue” to set up the details of the workflow run that will be created for your lead. You’ll find various open fields corresponding to elements of your workflow run in this view (eg, the workflow it will be based on, the name of your workflow run, and what details will be pulled into it, like contact name and company for example).
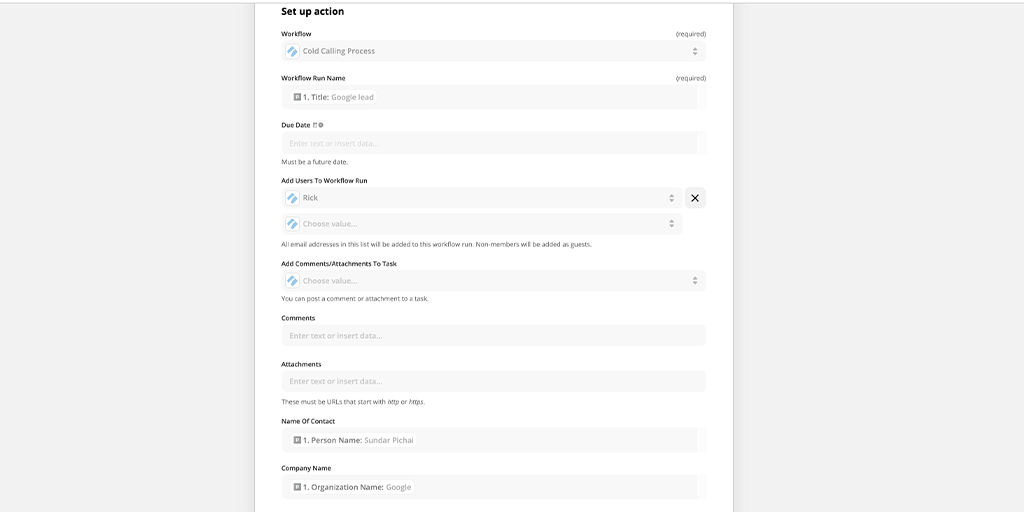
Although all you need to do to set your Zap live is to select your cold calling workflow as the base workflow and something for the title of your individual workflow runs (I’ve chosen “Lead title” to make each workflow run easy to track), try to fill in as many details as you can with elements from your Pipedrive lead.
Test your action step is working correctly and turn on your zap.

While the above is all well and good, you can take full advantage of Zapier by creating a second Zap that pushes the information you capture in your cold call workflow run back into your Pipedrive lead.
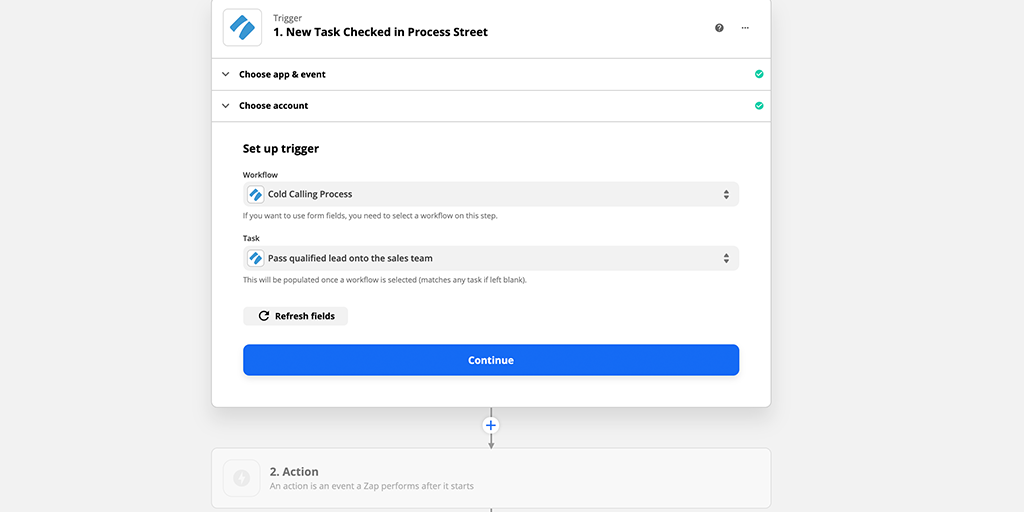
This Zap would follow a similar setup to our previous example, except Process Street would be set as your trigger and Pipedrive would be the action.
Furthermore, the trigger event should be “New Task Checked”, with the workflow set to your cold calling workflow and the task being checked as the last one in your task list. This will let Zapier detect when your workflow run is completed in order to trigger the Zap.
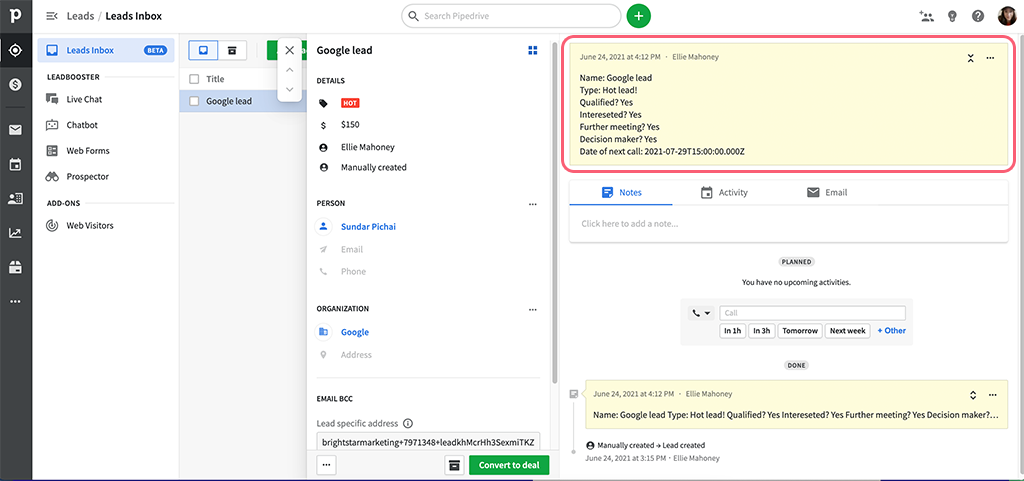
The Pipedrive action should be set to “Create Note“, allowing you to add a note to the original lead that contains all of the information you captured during the call.
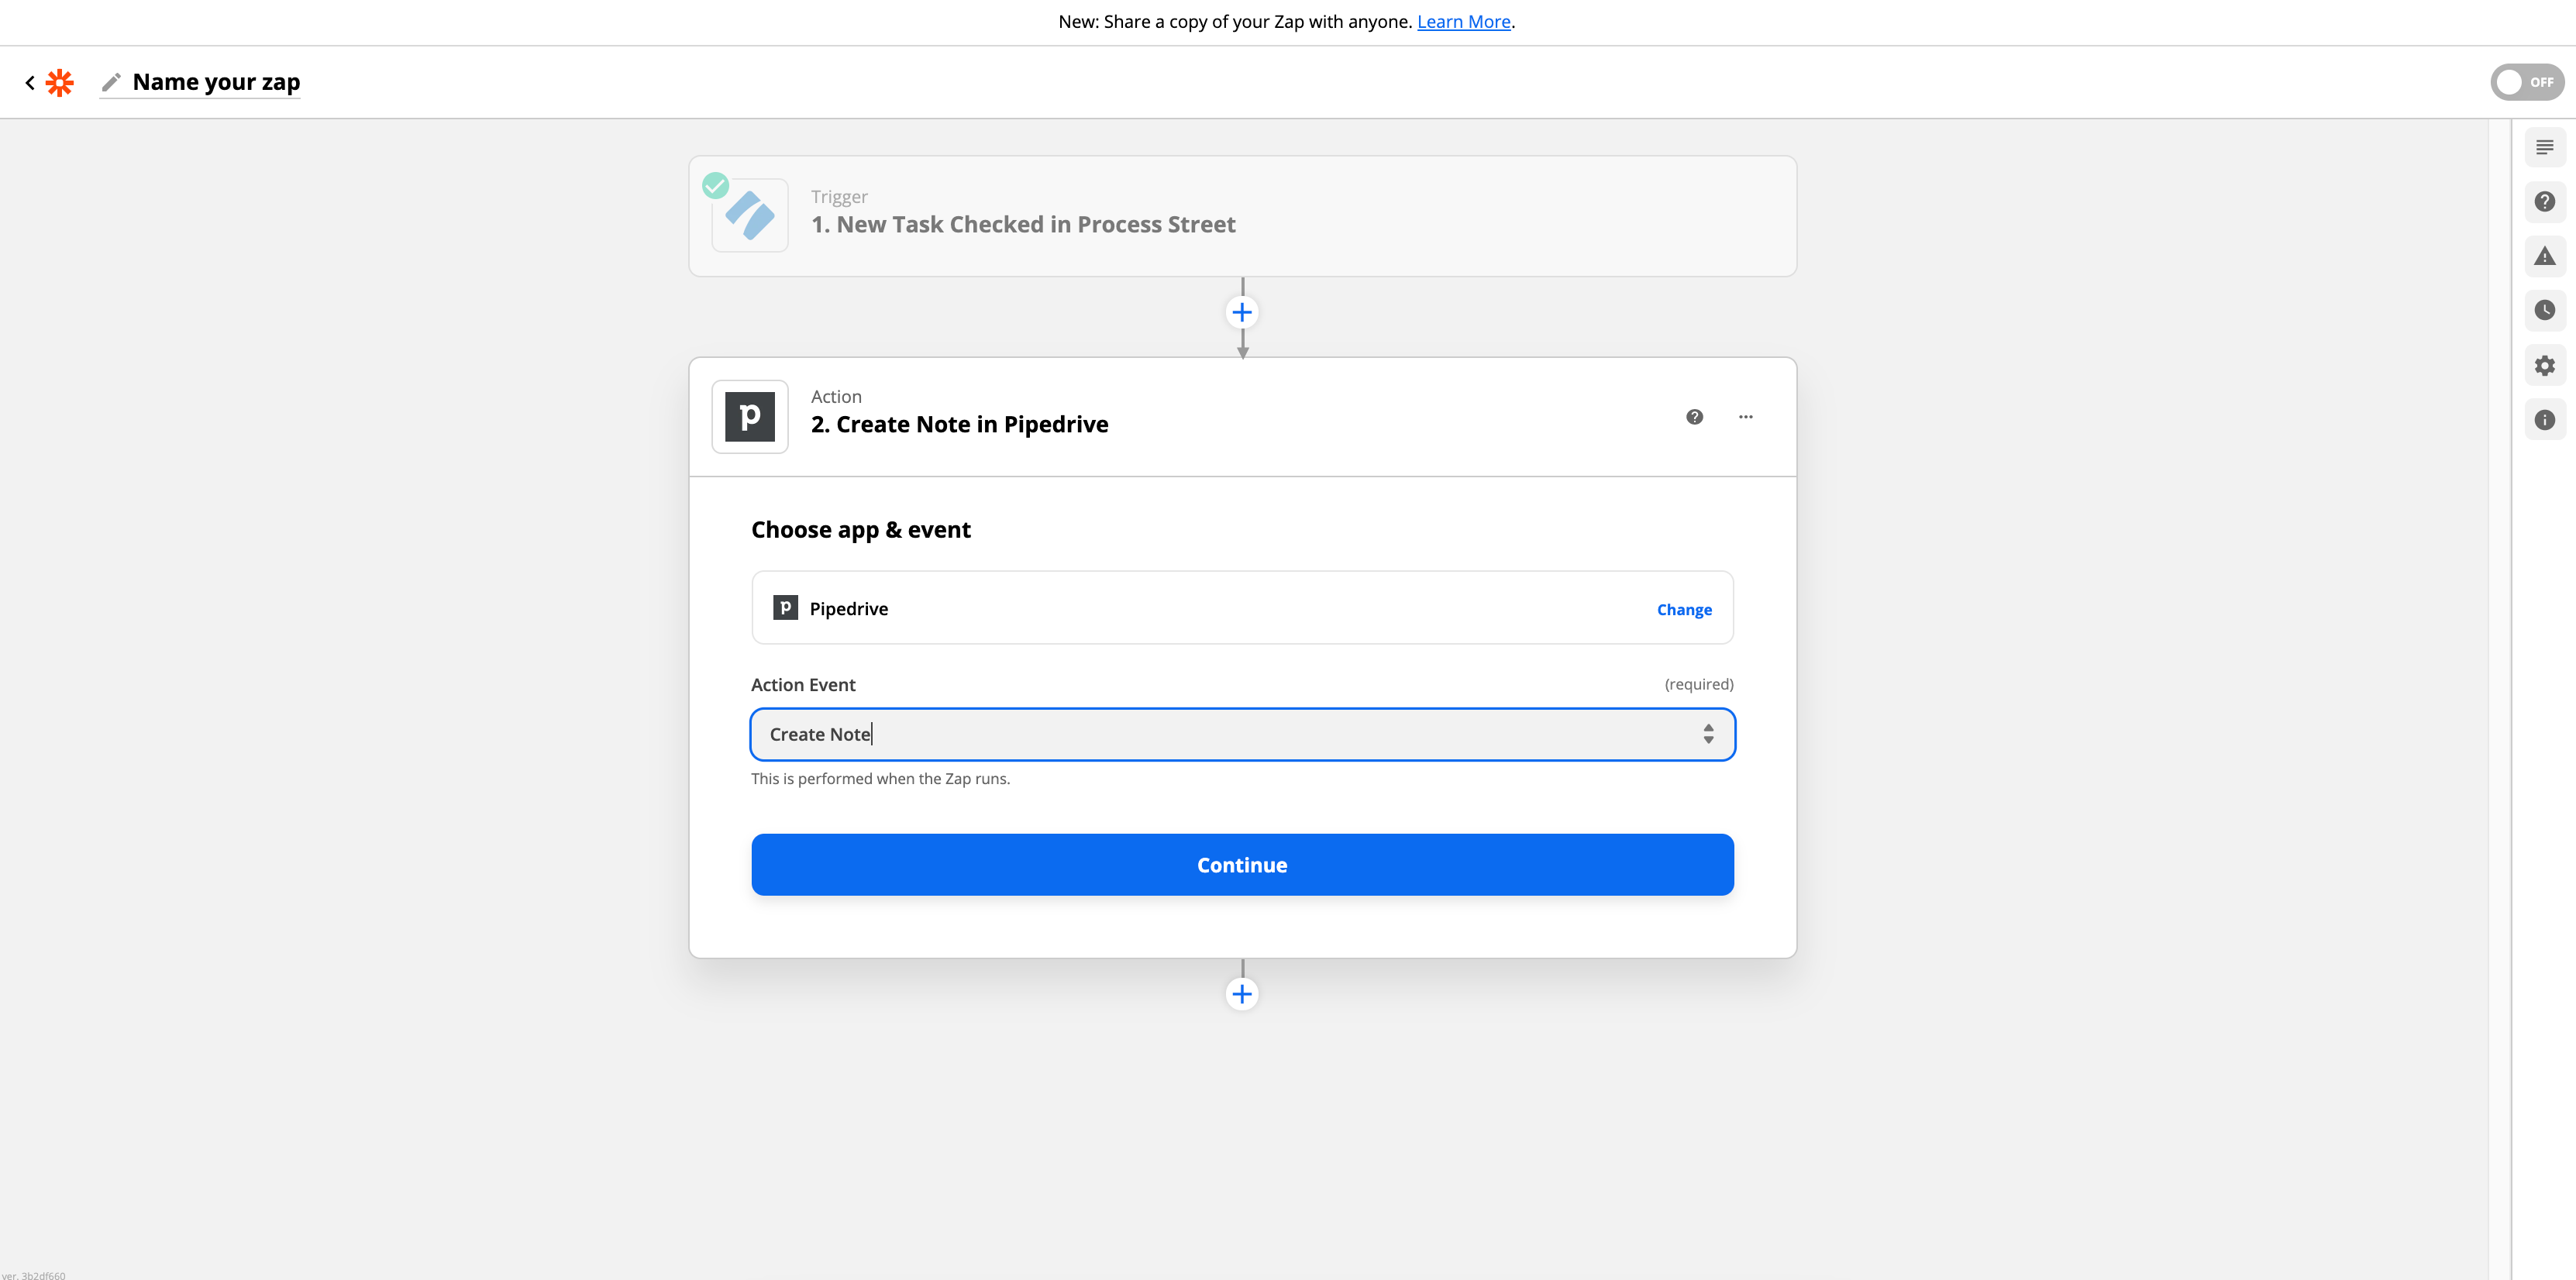
Then, when setting up the workflow for your note, just map the information you want to include into the Note “Content” field by linking the form fields of the Process Street workflow run, as shown below.

Once you’re finished, any information captured in your Process Street workflow run should be pushed back into the appropriate Pipedrive lead as a note like the one below.
Check out our business process automation guide for full details on how to automate the tasks you hate.
Help us improve this help center.


