Set permissions on a workflow-by-workflow basis to control who can access, view, or edit each workflow in your organization.
This ensures that the right people have the right level of access and only to the workflows relevant to them.
Workflow permissions give you granular control. For example:
Users: You must be an Administrator or a Builder who has been given ‘edit’ permission to manage workflow permissions.
View all permission levels by feature.
Start in your Library and click the three dots next to your Workflow’s name to open the dropdown menu. From there click “Share“.
When the pop-up window opens click on the ‘Permissions’ tab.
Pro Tip: You can also click on the permission icons next to your Workflow’s name in the library. This would open the pop-up window in the ‘Permissions’ tab by default.
To invite a new user or group, type their email address or name in the provided field and click their name to add them, as shown below. If they are a new user in your organization, click “Invite” to send an invite to them via email.
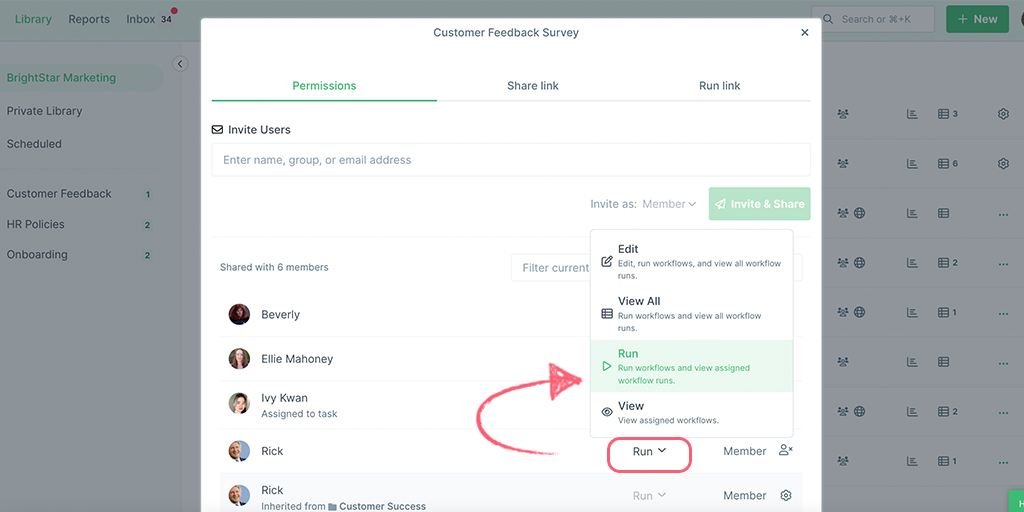
Once a user or group has been added to your Workflow, the default permission setting is “View All”. You can change their permission level by clicking this field and selecting the permission level you would like them to have.
If you move your Workflows into a folder, note that the “All Organization” group is added to each new folder you create by default. This means that all your builders can see the Workflows in that folder unless you remove that group.
If you see that there are folder permissions set in the view shown above, you will be unable to change that from here. You will need to go to the folder to change the assignees and permissions at the folder level.
Learn more about managing folder user permissions.
You can see the Workflow permissions of existing users in the same permissions screen shown above.
To change a user or group’s permission level, click on the current level and select a new one.
You can also remove users from this Workflow, which effectively revokes their access to it. Click the “remove user” icon to the right of their details.
Learn more about managing user permissions, folder permissions, and Workflow run permissions.
Help us improve this help center.


