 Automation has been one of the key emerging trends of the late 2010s, and will likely be a defining characteristic of the 2020s.
It’s something we’ve covered extensively at Process Street, and something we’ve taken huge advantage of internally as well.
The move from companies only providing enterprise-level API access to their software over to commercially available Internet of Things style mass integration has been a dramatic shift in the marketplace. This has opened up huge potential for individuals and small businesses; you can integrate with thousands of services in just a few clicks.
Now, so many services, SaaS products in particular, provide a means to integrate with other platforms that there are very little restrictions on what you can and cannot automate.
Tools like Zapier, Flow, and IFTTT have made these integrations so easy that anyone can set them up.
But they’re not the only ones – new connectors and middlemen are cropping up all the time, helping people without tech skills connect with APIs or Webhooks of their choosing. The No-Code Movement has gone mainstream and it now has a full suite of tools at its disposal.
Even in 2015, according to Chui, Manyika, and Miremadi writing in the Harvard Business Review, not only could a marketing executive be automating activities which account for between 10-15% of their current time using existing technology, but for 60% of existing US jobs, 30% of their time could be reduced by automation.
For those interested in that kind of thing, you should check out Four Fundamentals of Workplace Automation by McKinsey. An illuminating text which is already somewhat out of date!
Here at Process Street, we integrate with thousands of other apps and platforms via Zapier, we have large customers making use of our API, and we’ve now added webhooks to our array of automation options to try to cover the rest of the use cases our customers tell us about.
In this article, we’ll look at:
- What are webhooks?
- What do people use webhooks for?
- What is the difference between webhooks and APIs?
- How do I use webhooks?
- How do Process Street webhooks work?
What are webhooks?
Webhooks are ways for different apps or tech services to send messages to each other, updating information along a defined path. You set one app up to send a message when an event occurs and set the other app up to receive that message and use the information in a certain way.
In short, webhooks are an automated way of getting your different tools to message each other with updates.
Webhooks aren’t as complicated as APIs, but we’ll get to that later.
Loads of different services offer webhooks, and increasingly lots of services exist to help you set webhooks up.
You don’t have to be a tech mastermind to use webhooks. Without assistance from a third-party provider, you might find it difficult to utilize them yourself. But, like so many areas of automation now, these third-party providers have become commonplace and created an opportunity for anyone to make use of webhooks.
In this article, we’ll look at both scenarios but with a particular focus on the low-code options as it just makes it easier for everyone.
What do people use webhooks for?

An easy way to think about this would be to imagine something happening in one of the software products you use that you would like to be notified about.
Let’s say it was a customer filling in a submission form of some kind. You might be using Process Street, Typeform, or Survey Monkey – there are lots of good options. You might want to be notified when this form has been completed; perhaps when the Submit button has been clicked or the last task has been checked off.
Now, these platforms can already give you email notifications and such for these kinds of things. But to beef out this example, let’s assume that you hate having to check your emails and you prefer using a workplace chat app.
Some of these products might integrate with the market leader, Slack. But you use one of the competitors which these big players don’t have native integrations for: Microsoft Teams, Glip, Discord, Fleep, Chanty, or Flock.
So you want to get a notification in your preferred workspace that a customer has submitted a form.
You could set up a webhook in Process Street which fires every time the last task in that template is checked off.
As long as you’ve connected that webhook to your preferred chat app, whether natively or through an intermediary like Zapier, you should receive a notification in your workplace chat app with whatever information you’ve chosen to pass through.
Maybe the information you’ve passed through the webhook includes the customer’s answer to a question about their buying intent? Maybe you’ve set it up to pass through their telephone number too? Maybe you’re going to ring them right away to close that sale?
I don’t know – but you could set that up if you wanted.
Pretty cool, no?
You’ve just built an automation connecting different apps together and you’ve improved your workflow in the process.
Fun aside:
Aside from useful workflow use cases, HackerNoon describe how you could custom make a webhook to turn your smart lights green whenever the price of Bitcoin goes over or below a certain level!
The most popular webhook use cases on Zapier
We can take a look at Zapier’s webhooks feature and see what kind of use cases people are using it for most often.
We have a couple of interesting options to look at connecting some of the biggest websites on the internet.
These use cases are split into two different types:
- Receiving data from a webhook
- Generating a webhook to send data
Receiving data from a webhook
Add info to a Google Sheet from new Webhook POST requests
The first is to receive data from a webhook and to record that data in Google Sheets. This would catch a webhook POST from any source and parse it in the way you determined in the zap set up in order to fill it cleanly into a new row in the Google Sheet.
Turn Webhooks Into Sent Emails
When the generated URL receives data from another webhook, you can parse this data in order to send an email. You can pull whatever information you need out of the webhook and automatically insert it into a new email to be shot off to wherever you need it to go.
Generating a webhook to send data
Send a webhook when an RSS feed is updated
Some people love RSS feeds. There are plenty of people using things like Feedly as their route to curating the internet. With this zap you can set it so that whenever an RSS feed is updated a webhook is also shot out to whatever destination you require.
POST new Facebook Lead Ads to a webhook
If you’re using Facebook for your marketing efforts – running ads and trying to generate leads – then this setup could be useful for you. Whenever a new Facebook lead is gathered, the information is sent out via a webhook. You could connect this with your CRM or have it notify your sales team.
POST new user tweets to a webhook
This one lets you keep an eye on one particular Twitter user (feels a bit creepy but bear with me) and fires whenever that user Tweets. You can then take the information from that Tweet and do whatever you like to it. I assume with enough playing around you could configure a system where your Alexa reads out the Tweet to you whenever that user tweets. Why you would want to do this, I don’t know.
What is the difference between webhooks and APIs?
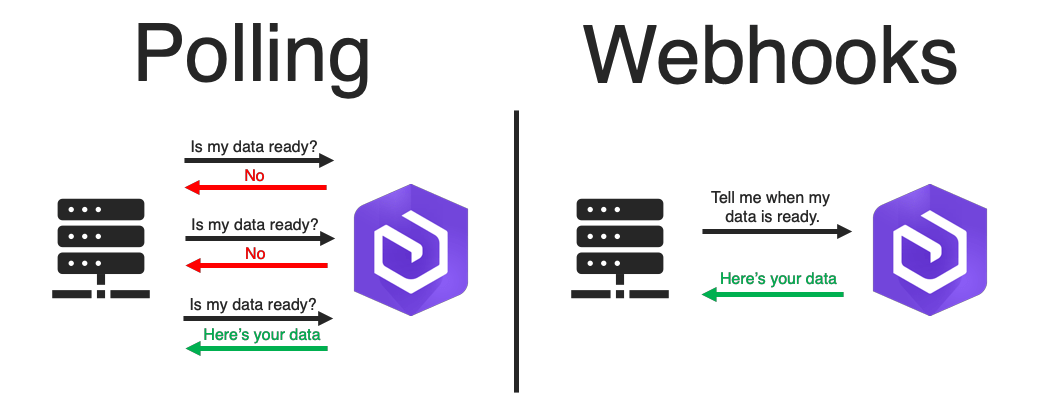
All of this seems functionally quite simple.
Even if you’re not a techie, I’m sure you’re able to understand what’s going on here, what webhooks are, and why they work.
But underneath, it can appear to be a bit more complicated.
We don’t need a super technical breakdown here. The image above pretty much clarifies the key difference we’re working towards. But it’s useful to outline a couple of key things.
What are APIs?
The whole internet is absolutely filled with APIs and they impact on you on a daily basis. More than a daily basis – a minute-ly basis, a second-ly basis.
APIs are the things which connect the sexy designer webpages you look at with the big data centers which crunch the numbers and make things work.
When you click a button on a website (depending on the button) you’re making a request to the server – the engine of the website. The API is the messenger which carries that request.
But that’s the thing with an API, you have to call it. You have to ask it to go get things from the server. You have to give it instructions to go to the server and ask for a specific thing. It might come back and show you exactly what you wanted or it might return empty-handed.
This is why you might prefer to use a webhook for certain things. A webhook notifies you when something happens, rather than continually checking whether that thing has happened.
Webhooks vs APIs
APIs are the backbone of the internet and everything we do on it. Yet APIs are typically quite complicated and are much more of a developer option than a solution for a mass commercial audience.
You can do lots of interesting and complicated things via APIs, but it partly does depend on what kind of API access a software product allows you to have.
Webhooks are simple tools which send prespecified information to help you with a task, update your information, or notify you of something new.
A webhook is sometimes more effective than an API for these small tasks as it’s easy to manage, doesn’t require regular authentication, and only operates when it needs to.
How do I use webhooks?
You ask a good question.
In this section, we’re going to take one of the earlier examples and walk you through step by step how you could set it up via Zapier.
We’re going to build a webhook which shoots information out whenever I tweet anything from my personal account.
If you want to build this too, click on the Zapier embed above to get started – provided you already have a Zapier account.
Then authorize Zapier to connect with your Twitter account. This is as simple as just clicking twice to accept permissions and such.
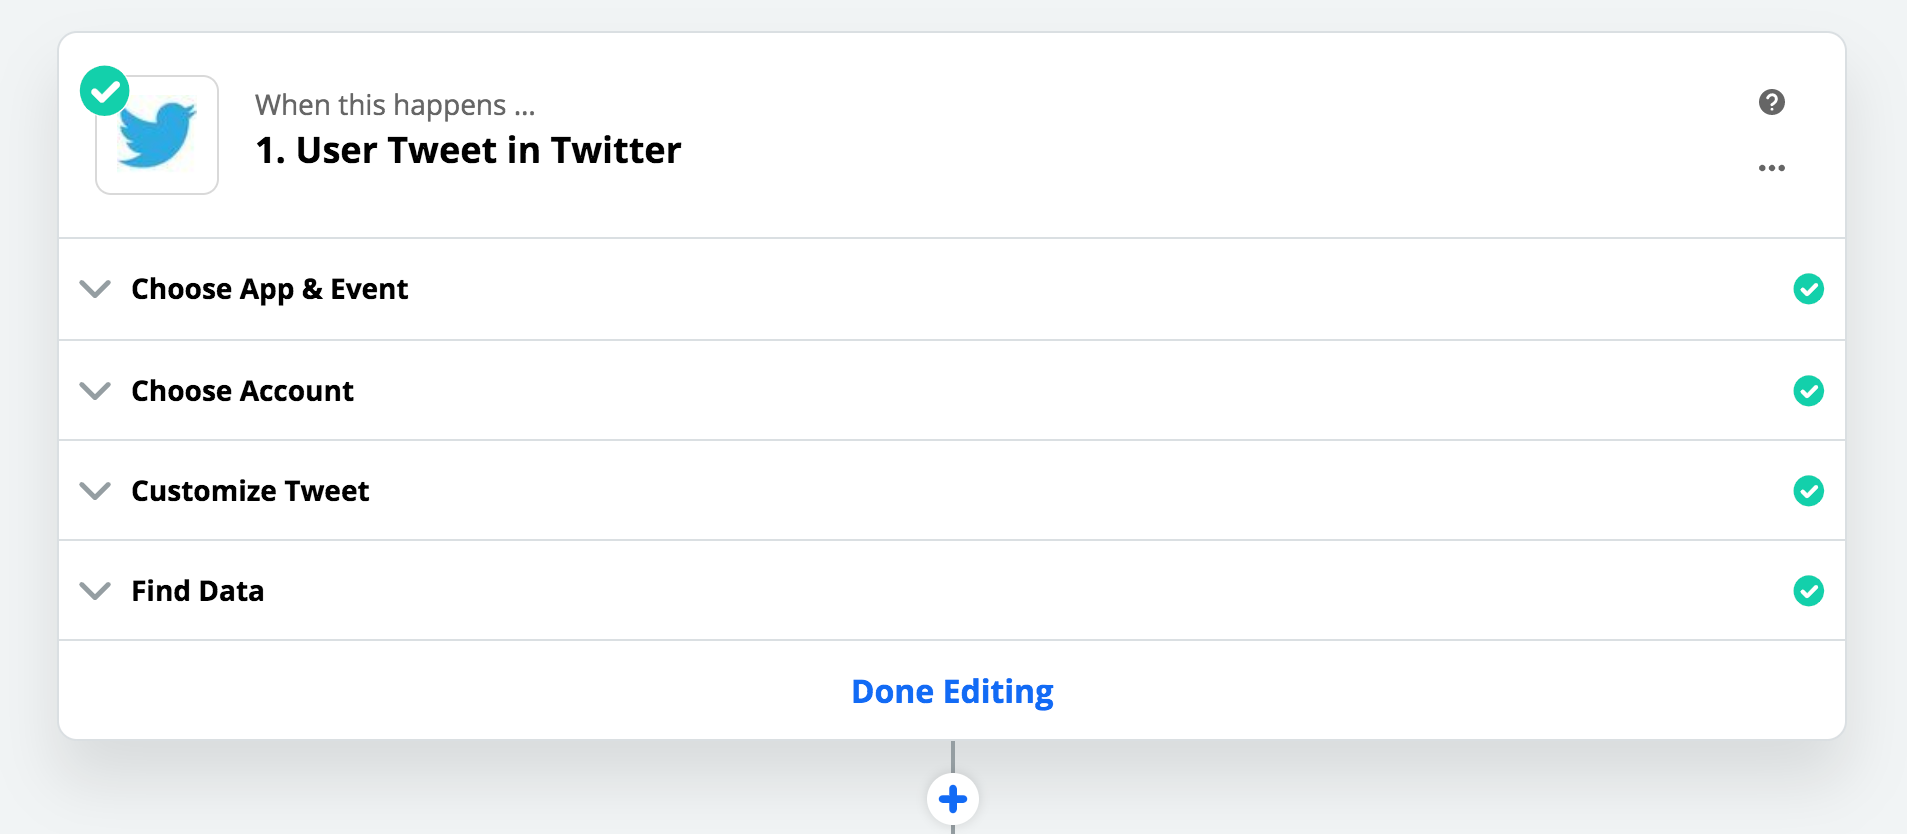
Then you choose the handle of the account you’ll be taking the tweets from and configure what sample data it is you want to pull. You Twitter setup should then look like this:
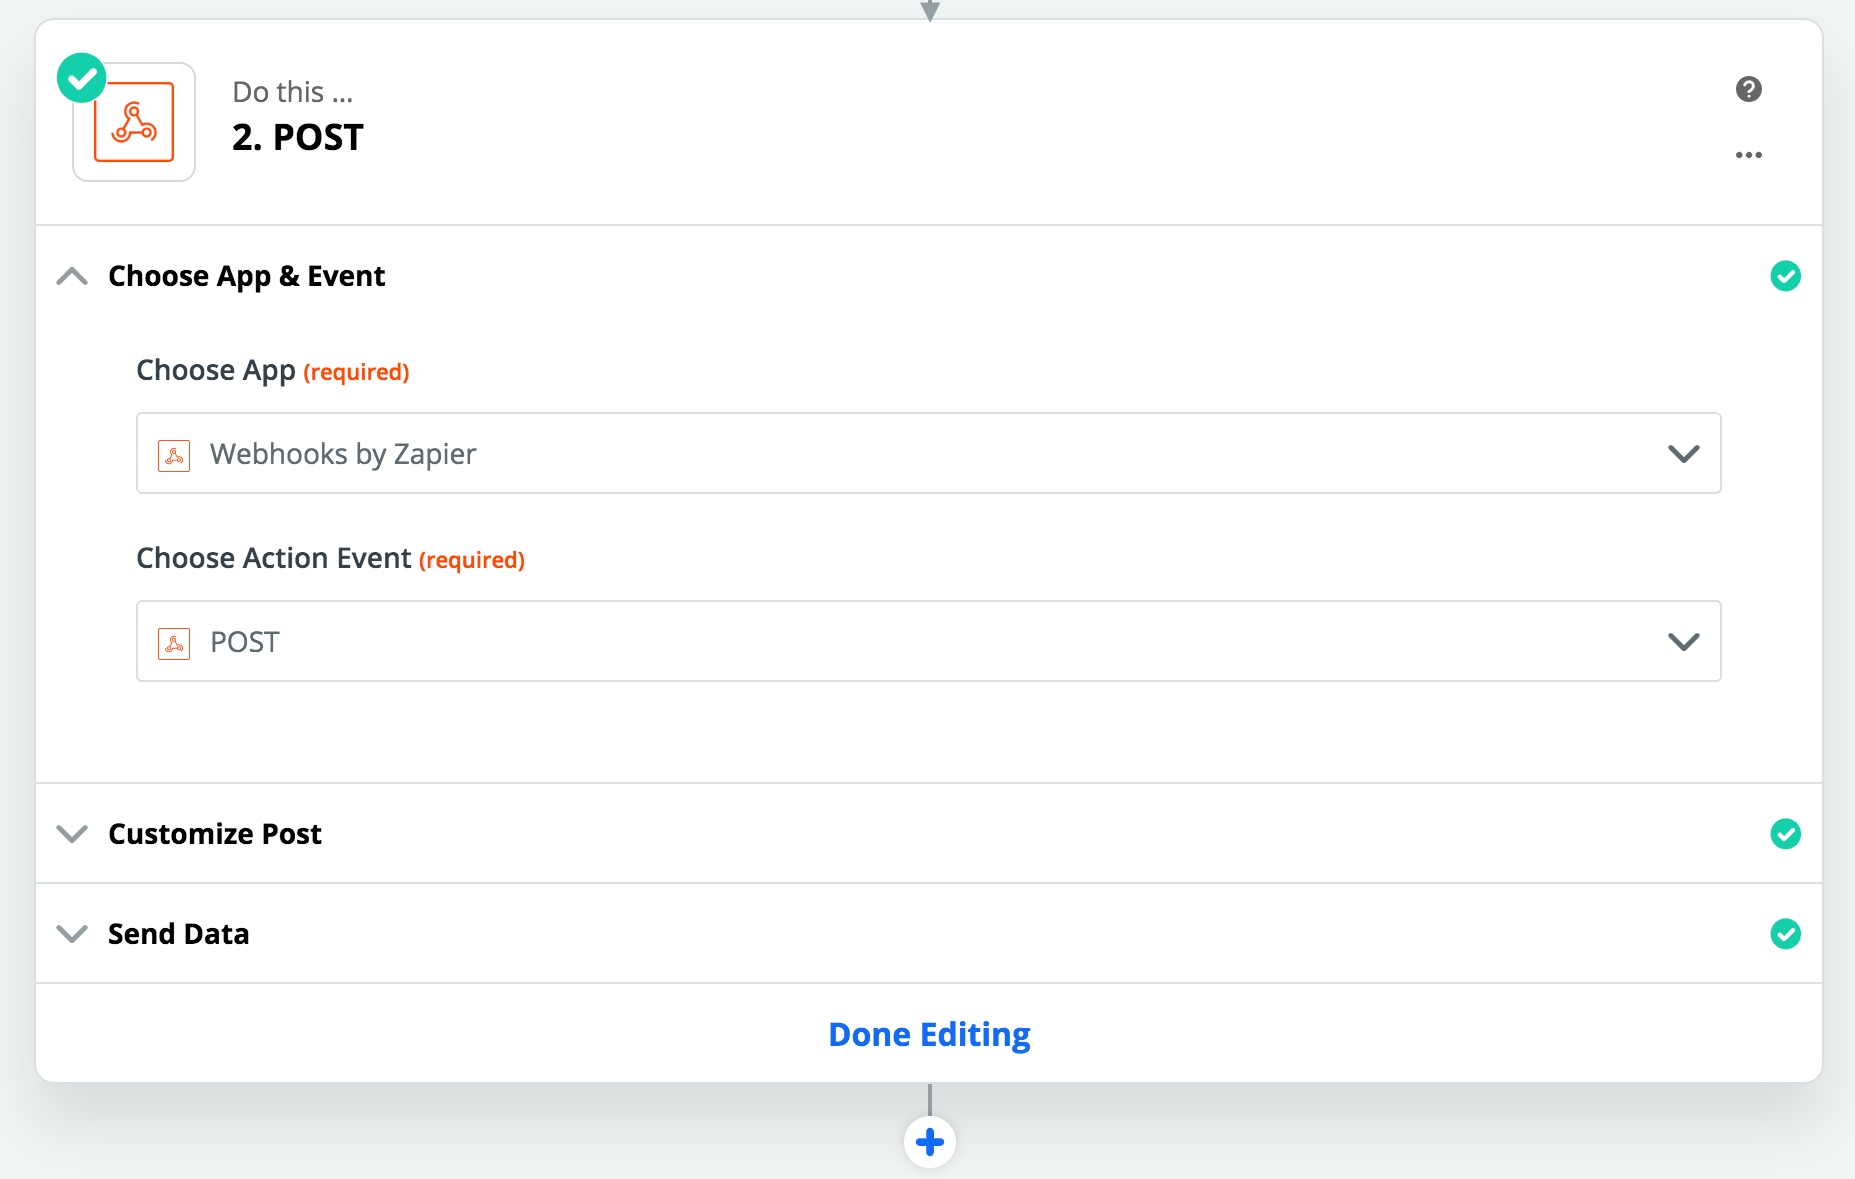
 For the next stage, you choose the app Webhooks by Zapier and select the action POST.
Then you’ll be asked to provide a URL to send your webhook data to. I generated a sample URL from webhooks.site which allows you to see whether your webhook is working.
Then I added the information I wanted the webhook to send and tested the zap to see if it was working. This is what my Webhooks Zapier step looked like:
 And then I went to check my page on webhooks.site to see if the data had been sent successfully.
There it was.
Low and behold, my unfunny tweet was laid out before me. The webhook worked.
Now, this approach is a very simple way to get started with webhooks and things can get more complex from here – but if you’re starting out, I’d recommend you give this kind of zap a try to help you understand how everything fits together.
Maybe try to connect a Twitter account with a Google Sheet via webhooks? You’ll be surprised how easy it is.
How do Process Street webhooks work?
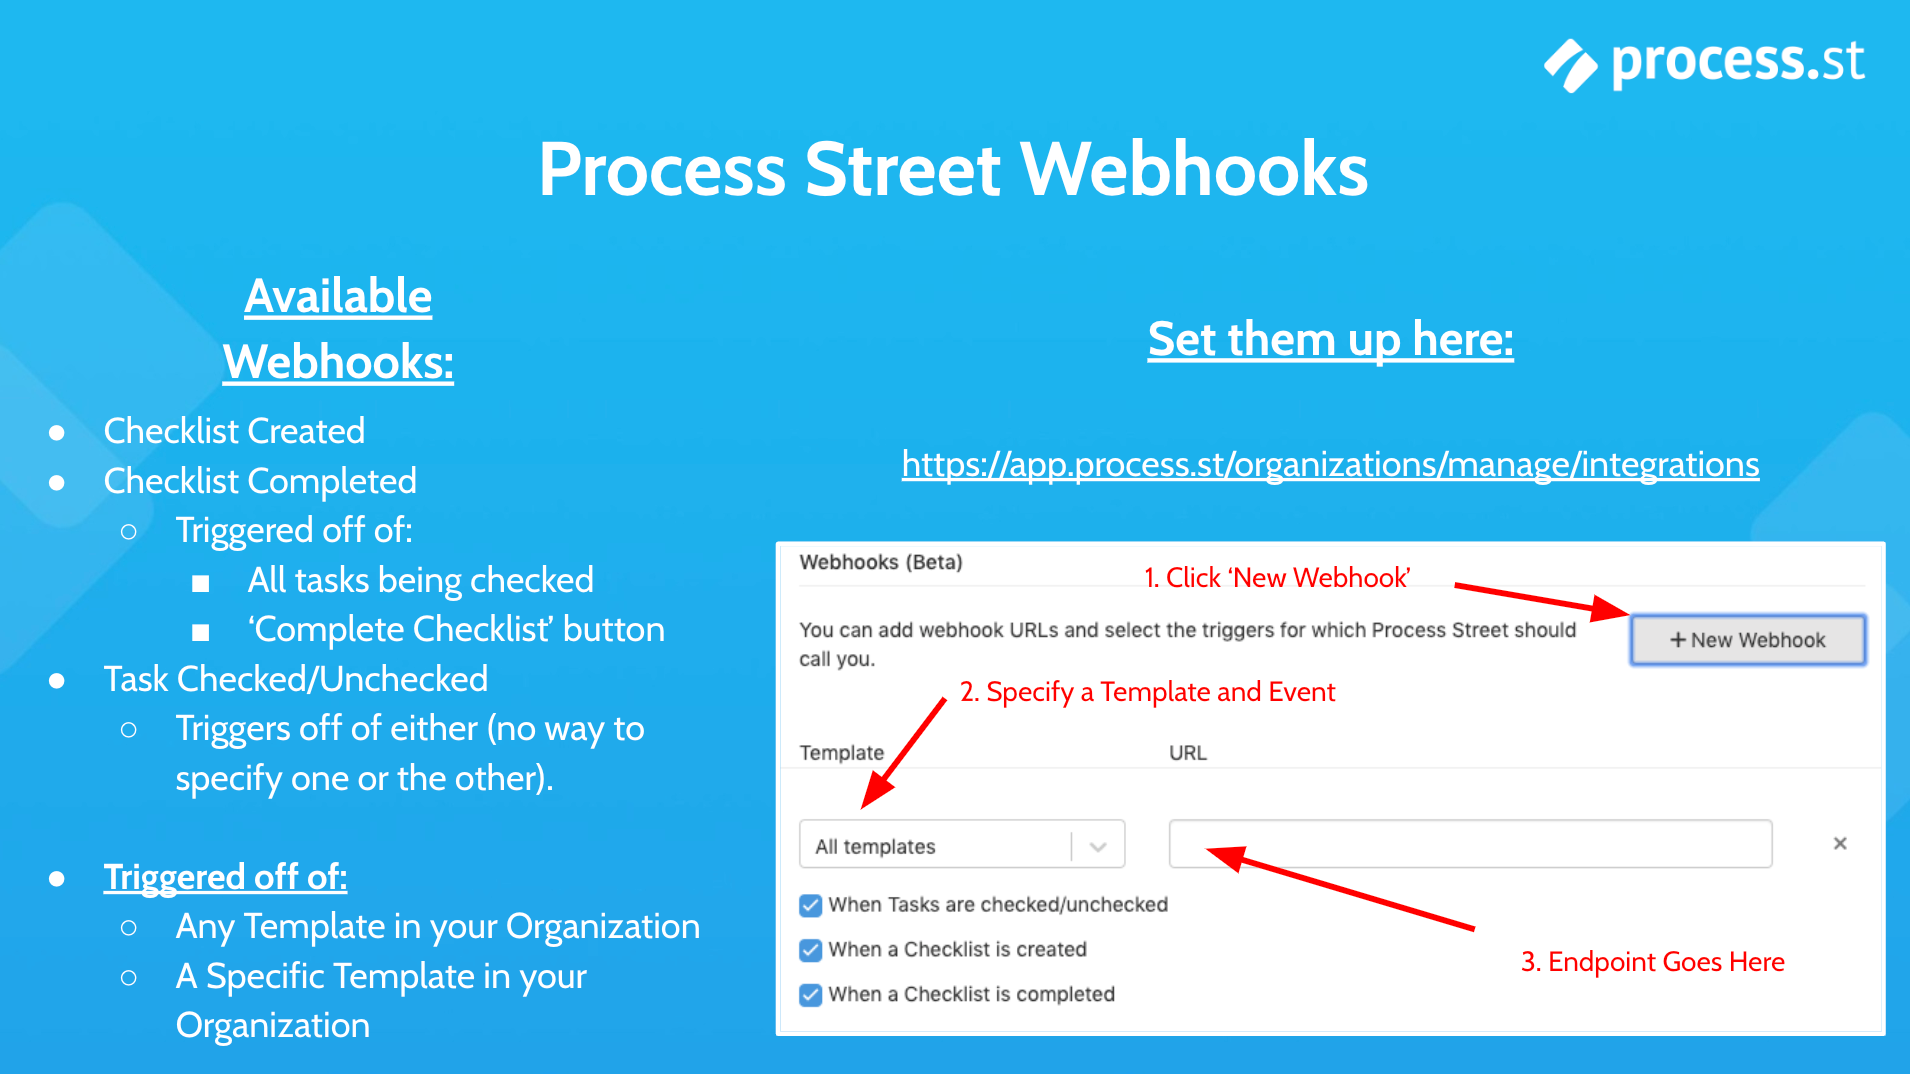 I know this is what you’ve all been waiting for!
Process Street is superpowered checklists. You create templates and run them as checklists. You follow the checklists to get work done, and you can automate tasks based upon how you work through your checklists.
What data can you get from your Process Street account via webhooks to help build more automations?
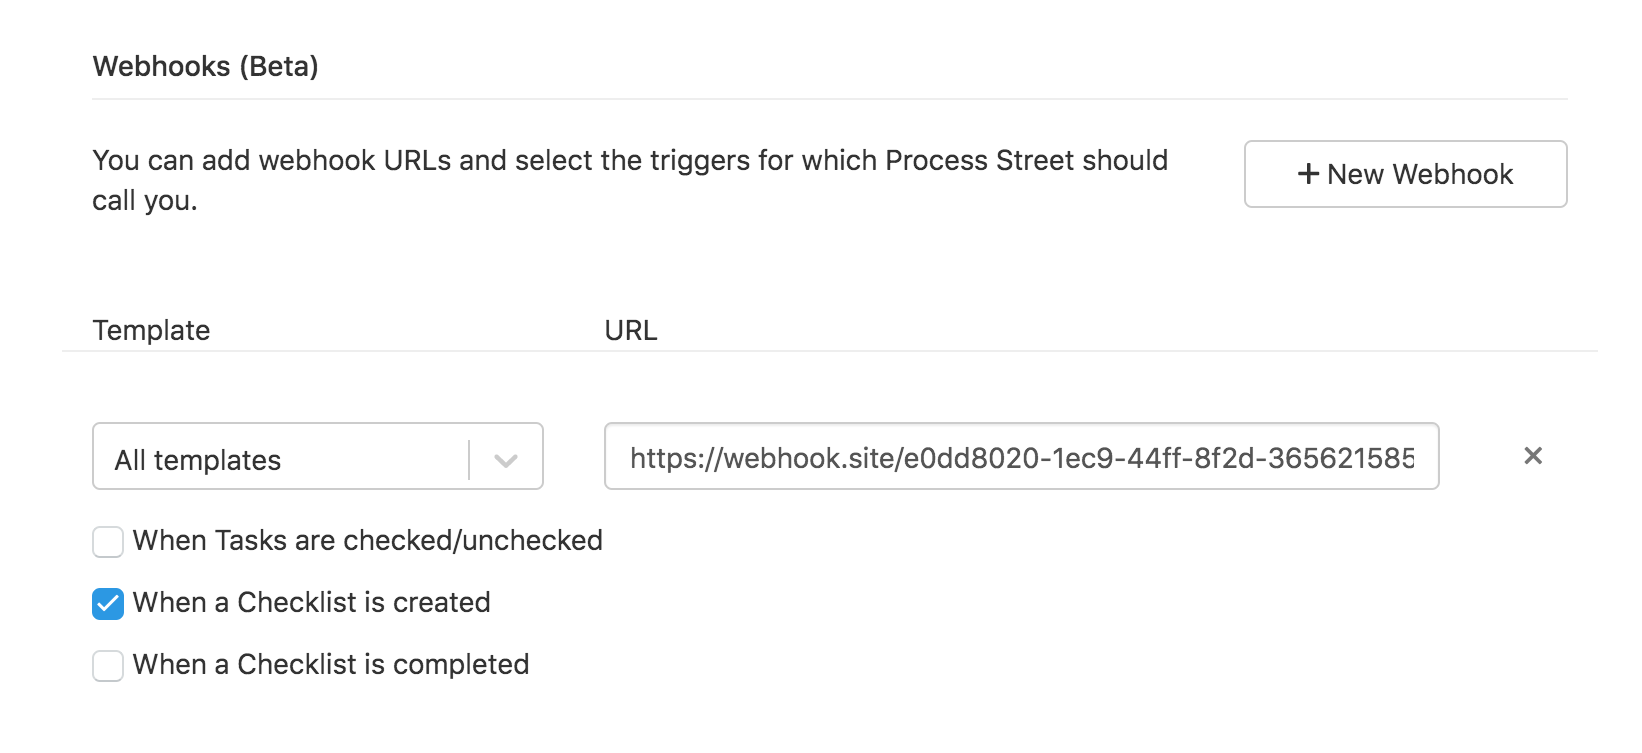
As you can hopefully see in the image above, a webhook can be triggered off:
- Any template in your organization, or
- A specific template in your organization
And your potential triggers consist of:
- A checklist being created
- A checklist being completed
- This one works the same whether you complete all tasks in your checklist, or you click to complete your checklist before all tasks are complete (like a sales process which doesn’t close)
- A task being checked or unchecked
It all seems pretty straightforward.
You can find all of the setup options for your webhooks in your Organization Manager, as shown below:

It’s surprisingly easy to get started.
We’ve talked about how you can use webhooks with Zapier, but many of you would probably rather hook a Process Street webhook up directly with your own system and cut out the middle man.
To do this you would need a destination for your webhook to send information to.
As an example, I’ve created a sample receiver and I’m going to create a webhook in Process Street which shoots information at that destination. I’m going to choose for it to fire whenever a new checklist is run in my organization:
 To test this, all I need to do is run a checklist and check my sample destination to see whether Process Street has sent me any info.
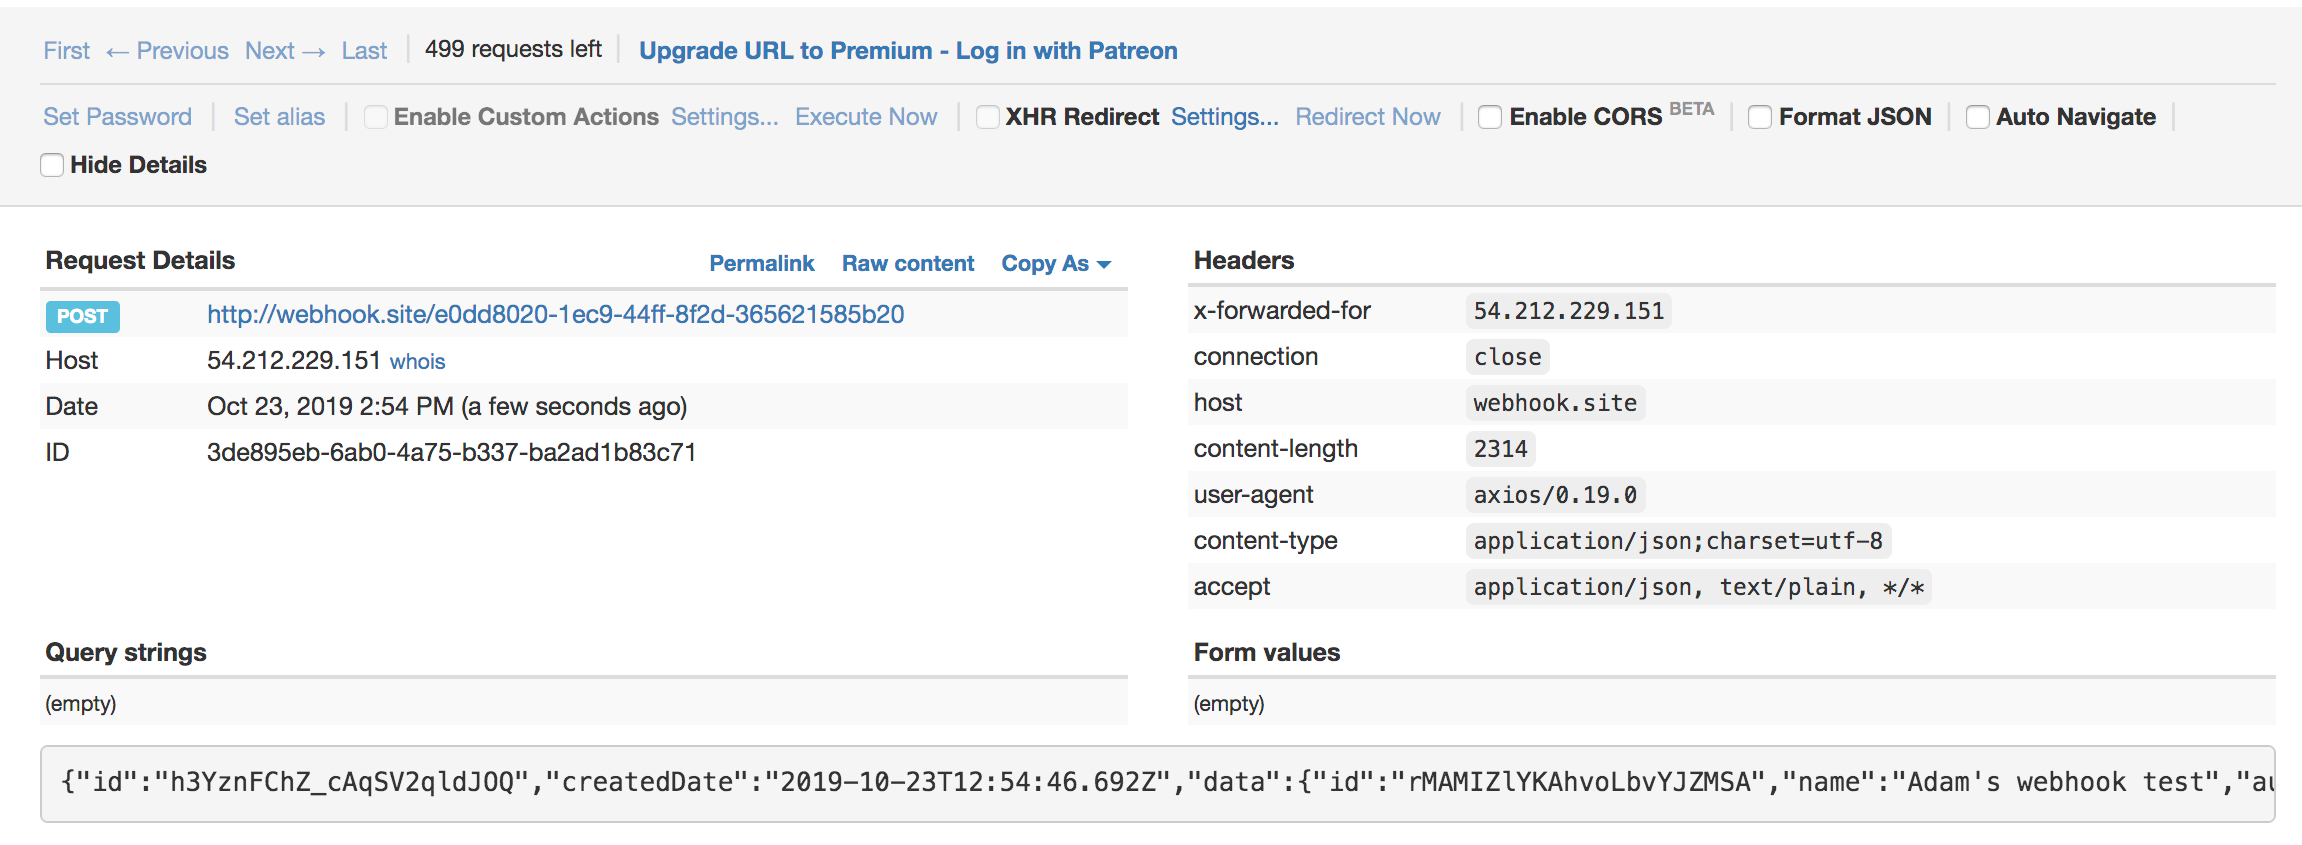
As you can see in the string at the bottom of the image, this webhook has given me a bunch of information about the checklist which has just been run. At the very bottom right you’ll see that the checklist has the name “Adam’s webhook test”.
It looks like all is working perfectly.
What you would do now is set up your system to receive this information and do something with it. You could use it to notify you, you could store it for records purposes, or you could use it to trigger another action.
But to configure your system to act on the webhook, there’s more technical information you might want to know…
Process Street webhooks technical info
For a task checked/unchecked webhook you can use the following code:
{
    “id”: “h9tahaTXnCcdyMq54lVF8A”,
     “createdDate”: “2019-09-03T12:10:19.483+02:00”,
    “data”: {
          “id”: “n97r3Z9bZClSK95H7shJ5g”,
          “status”: “NotCompleted”,
          “stopped”: false,
          “hidden”: false,
          “name”: “task-template”
    },
    “type”: “TaskCheckedUnchecked”
}
When checklists are created or completed, this is managed as a checklist notification using the following code:
{
     “id”: “tzyOoBrkWCY4UDbTBUJF5Q”,
     “createdDate”: “2019-09-03T12:52:51.379+02:00”,
     “data”: {
           “id”: “j1BEuA4W5vRS8r3NLZhHwA”,
          “name”: “gk7SwJBFpT”,
          “audit”: {
               “createdDate”: “2019-09-03T12:52:51.373+02:00”,
               “createdBy”: {
                    “id”: “rBWE5QaTqiYm35DdQJ5BTg”,
                   “email”: “[email protected]”
          },
          “updatedDate”: “2019-09-03T12:52:51.373+02:00”,
          “updatedBy”: {
               “id”: “rBWE5QaTqiYm35DdQJ5BTg”,
               “email”: “[email protected]”
          }
      },
     “template”: {
          “id”: “mv6Ndy6mHPC4pIsX3lhPUQ”,
          “name”: “template name”
     },
     “formFields”: [],
     “tasks”: [{
          “id”: “myOIwmUxm3yYoTxYGTNMFw”,
          “status”: “NotCompleted”,
          “stopped”: false,
          “hidden”: false,
          “name”: “task-template”
      }]
     },
     “type”: “ChecklistCreated”
}
And for those techies amongst you, here are some more bits of info!
Process Street webhooks object structure
Dates are stringified to ISO8601 format (yyyy-MM-ddTHH:mm:ss.SSSZZ).
Boolean is one of: true, false.
Event (notification sent to the webhook)
id: String
createdDate: DateTime
data: WebhookEventData – Checklist or Task
type: String – type of a trigger that fired notification, one of:
- TaskCheckedUnchecked
- ChecklistCreated
- ChecklistCompleted
Checklist
id: String
name: String – checklist name
audit: AuditMetadata – info about modifications
completedDate: Option[DateTime] – checklist completion date (optional)
completedBy: Option[User] – user which completed the checklist (optional)
template: Template – checklist template
formFields: List[FormField] – list of form fields
tasks: List[Task] – list of tasks
Task
id: String
completedDate: Option[DateTime] – task completion date (optional)
completedBy: Option[User] – user who completed the task (optional)
status: String – one of:
- Completed
- NotCompleted
dueDate: Option[DateTime] – task due date (optional)
stopped: Boolean – is task stopped from completion
hidden: Boolean – is task hidden by conditional logic
name: String – task name
AuditMetadata
createdDate: DateTime – creation date
createdBy: User – user who created the item
updatedDate: DateTime – date of last update
updatedBy: User – user who updated the item
FormField (editable form fields in a Checklist)
id: String
updatedDate: DateTime – date of last update
updatedBy: Option[User] – user who updated the item (optional)
label: String – field’s name
type: String – type of form field, can be one of:
- MultiSelect
- MultiChoice
- Text
- Textarea
- Date
- Hidden
- Select
- File
- Url
- Member
value: Option[String] – stringified field’s value (optional)
Template
id: String
name: String – template name
User
id: String
email: String – user’s primary email
Get started using webhooks today!
Hopefully this has given you a solid intro to webhooks and you have some ideas for how you could start using webhooks in your business.
You can sign up to Process Street for free at any point to play around with our easy template editor and build some processes. However, if you’re looking to use webhooks this is a feature only available on paid plans – but you can play with it and test it out on the free trial.
If you have any questions about Process Street or webhooks, don’t hesitate to reach out!
Have you used webhooks in your personal or professional life? What have been the most interesting use cases you’ve come up with? Let us know in the comments below!


Adam Henshall
I manage the content for Process Street and dabble in other projects inc language exchange app Idyoma on the side. Living in Sevilla in the south of Spain, my current hobby is learning Spanish! @adam_h_h on Twitter. Subscribe to my email newsletter here on Substack: Trust The Process. Or come join the conversation on Reddit at r/ProcessManagement.