






You might use the most efficient software on the market. Maybe you’ve hand-picked the most dedicated team available. Perhaps you documented and improved your methods until every rough edge and bottleneck has been wiped away.
You’re still going to fail if you can’t track your processes.
It’s the only way to know for sure that your methods are being followed, that work really is being completed, and to have a clear view of the state of your business at any given time. That’s why, over at Process Street, we’ve created a way to quickly review any and all information from the checklists your team uses.
If you’ve ever used a spreadsheet, think of an interactive version of that, except all of the information is automatically formatted based on your Process Street checklists.
It’s called the “Template Overview” tab, and here’s how it works…
How to use template overview
Using the template overview tab is easy, and it all starts with logging into Process Street. If you don’t have an account, you can start a free 14-day Pro trial.
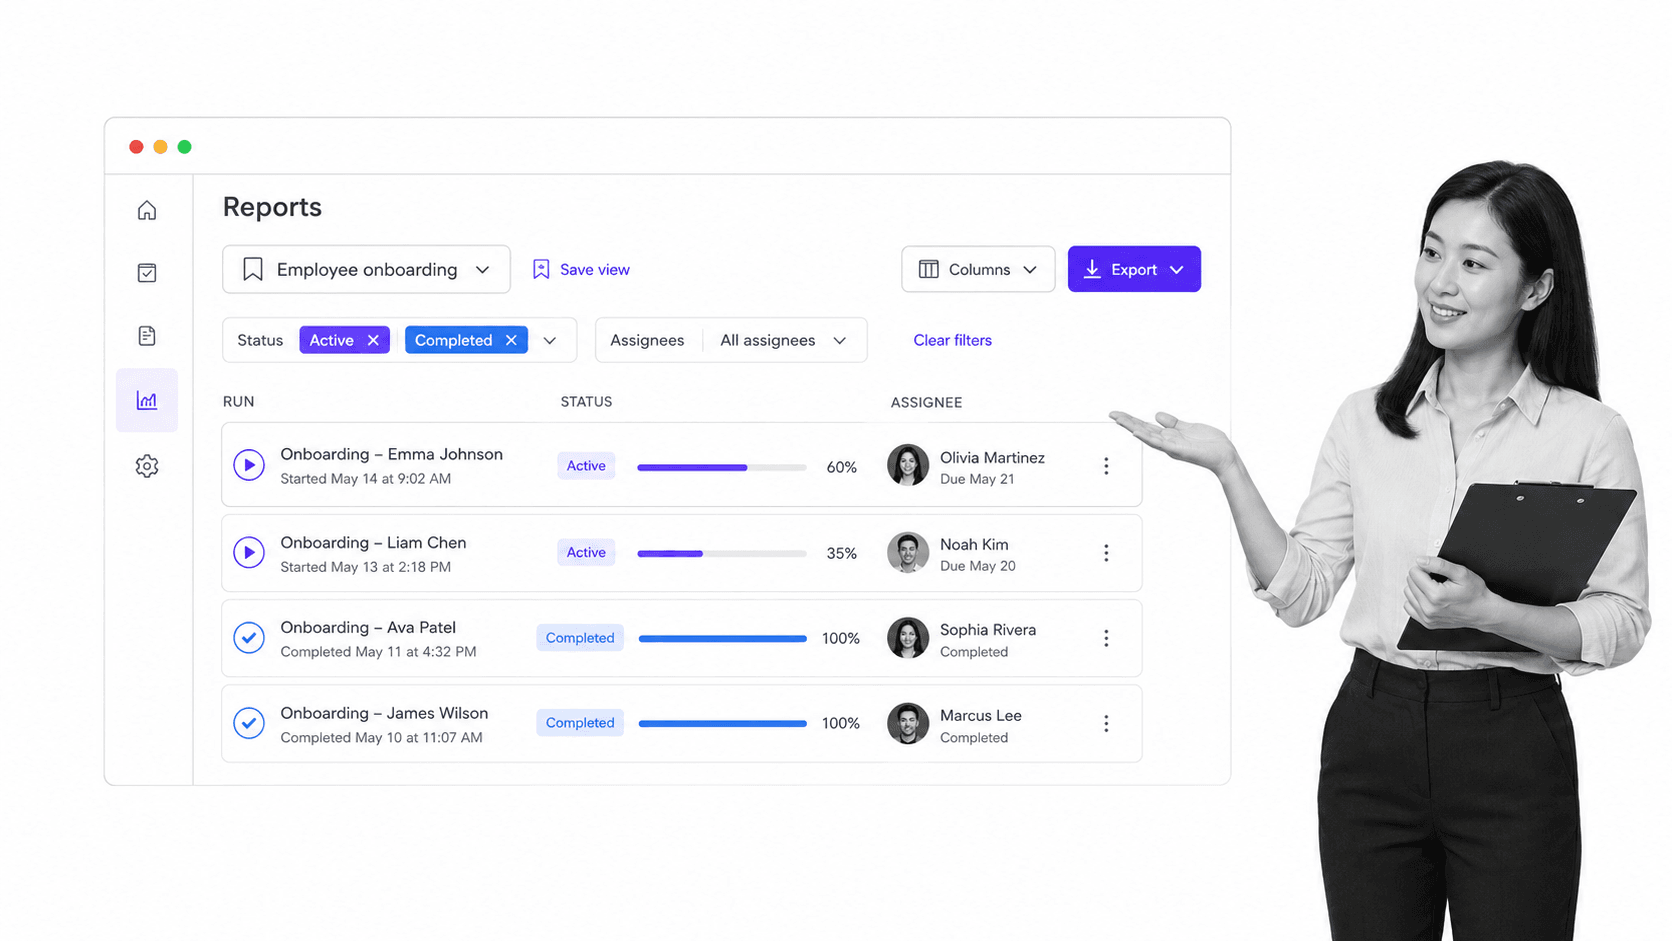
Once you’re in, open the template that you want to get an overview of by clicking it in your dashboard. Then click the “Overview” tab in the top left corner of your view.
From here you can view a summary of every checklist that has been run from your template, along with how complete it is, which tasks have been ticked off, and how any form fields have been filled in. This is all done by using the dropdown menus at the top of your overview.
The statuses menu lets you choose whether to show or hide checklists based on their state. These are:
- Active – checklists that are still being worked on
- Completed – checklists that have either had all tasks completed or someone has clicked the “complete checklist” button
- Archived – checklists that have been archived, so they cannot be worked on but are not necessarily complete
Next is the assignee menu, which lets you show checklists assigned to a particular person. This includes checklists assigned in their entirety, or those with certain tasks assigned rather than the whole thing.
The “Export to CSV” button does just that, exporting the checklist data into a CSV file for you to download and use in spreadsheet programs such as Microsoft Excel and Google Sheets. You can keep the live view for day-to-day workflow monitoring, then export a static snapshot when you need to analyze or share it elsewhere.
The final dropdown lets you choose which columns are displayed for each checklist. These are different pieces of information relating to the checklist, such as its name, date of creation, and progress. There are also columns to show the state of, and any information logged in, form fields, which can be useful for comparing specific information across your checklists.
Don’t like the way your overview tab looks, or wish you could change the columns to suit your needs better? No worries. You can resize and reorder columns by clicking and dragging their headers, or hide columns you do not need. The result is a focused view built around the information that matters for the process you’re reviewing.
Now onto the fun stuff: some real-world examples of how you can use the template overview tab to save time and keep track of your business.
9 ways to use template overview
1. Check for open tasks and checklists
The first, and most obvious, way to use the template overview tab is to browse for checklists that haven’t yet been completed. This could be done with any process, and serves as an incredibly easy way to monitor which tasks still need to be completed.
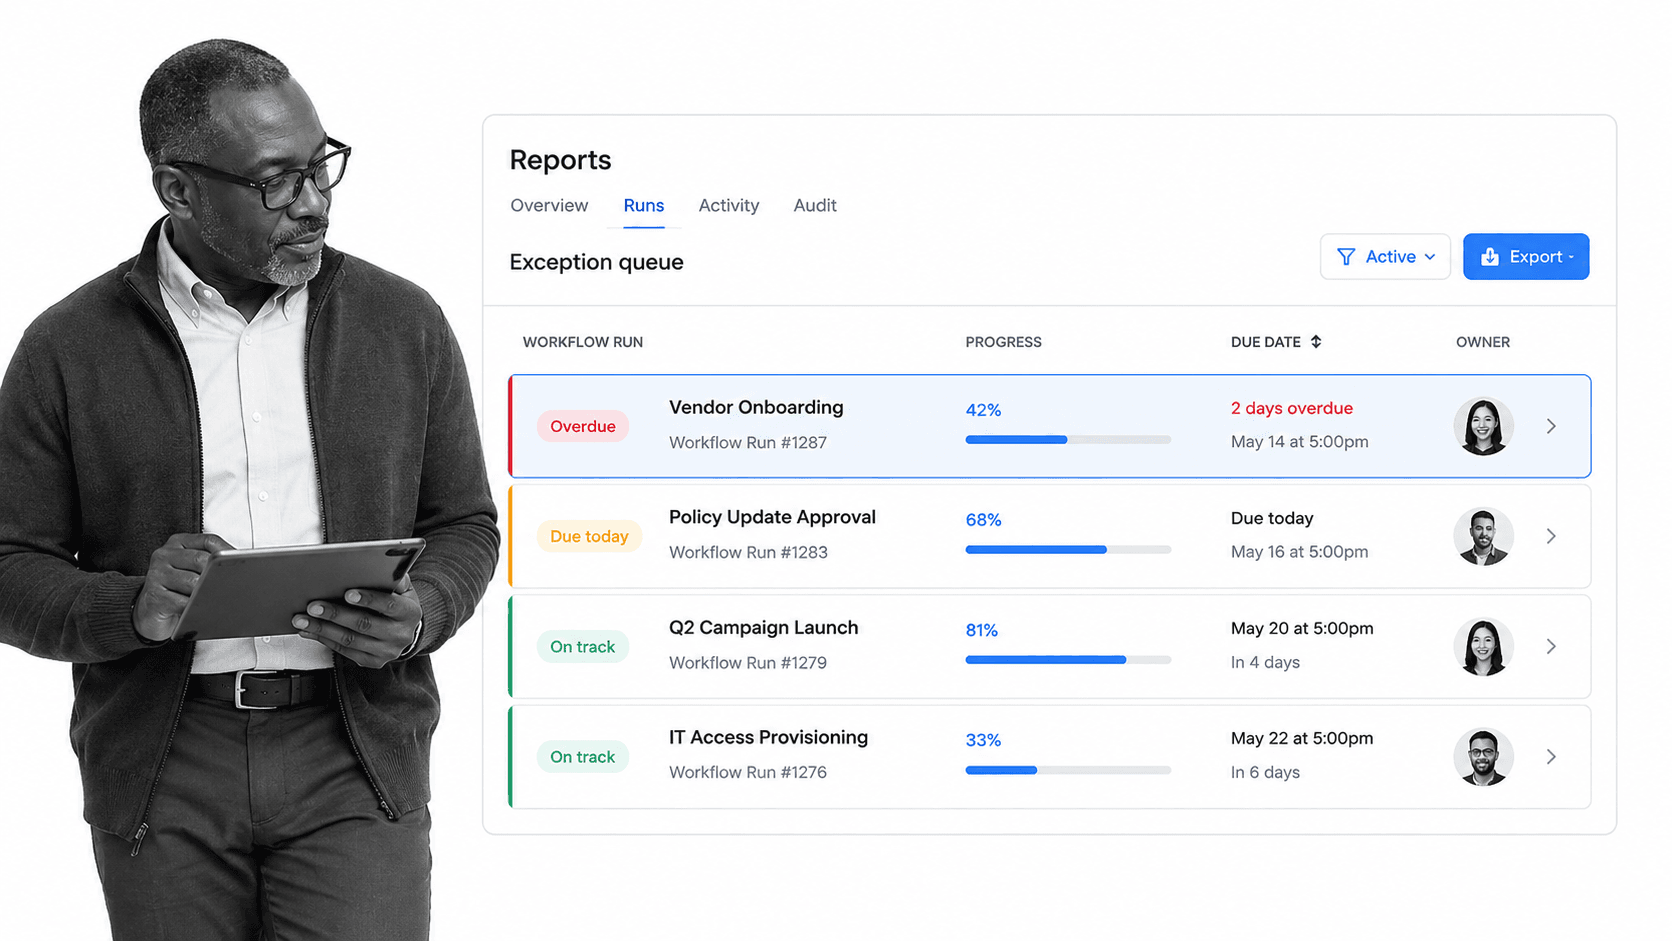
It’s also worth mentioning that the longer a process takes to complete, the more useful it becomes to check its progress quickly. Checklists that can be completed in a half-hour sitting will usually be done before you can review them, whereas longer processes can be monitored across the days, weeks, or even months they take to complete.
For example, let’s say that you want to know which clients have yet to be fully onboarded, and how far along the onboarding process they are. Open the overview tab for your client onboarding process and look at which checklists are complete, which are active, and how complete those active ones are.
2. Generate reports for your processes
Generating regular reports is a great way to present a snapshot of a system at any given time. Alone, they let you see the relative health of your business in one particular area; combined, they let you plot performance over time.
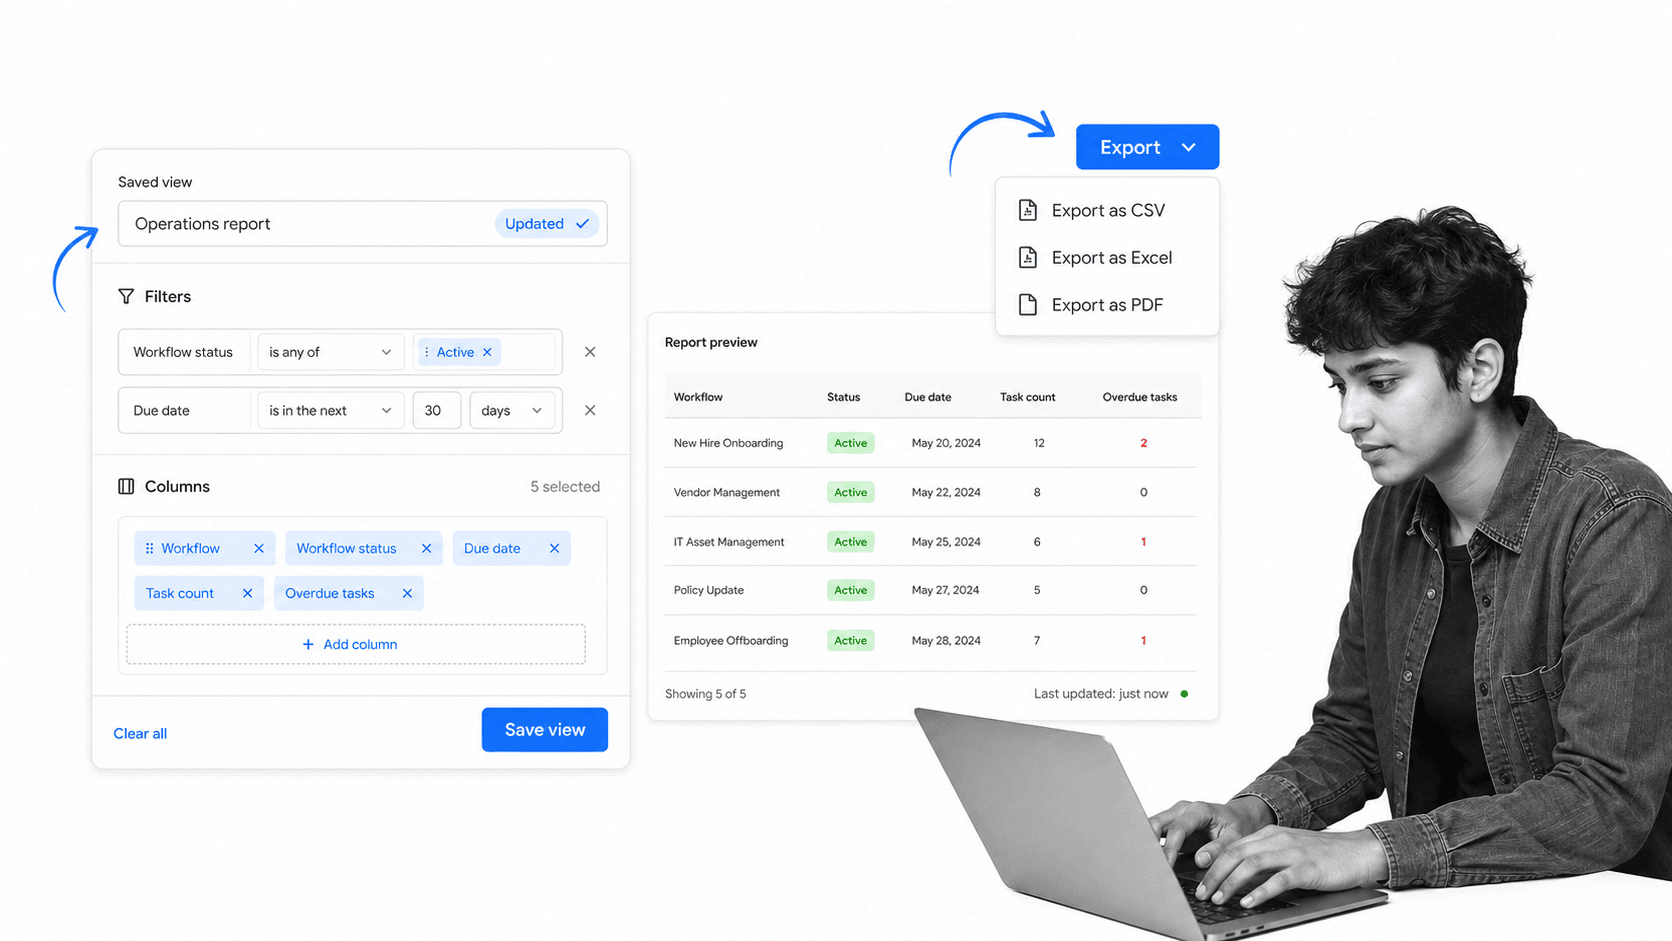
While you can export spreadsheets from Process Street that summarize the checklists run from a template, the overview tab gives you a live report without having to organize a spreadsheet first. In other words, you don’t need to maintain a separate documentation system: you can log in and inspect the current state of the work.
The overview tab also lets you customize your view to see precisely the information you want and hide what you don’t. Rather than sorting through a spreadsheet full of irrelevant information, you can keep the columns and filters that make the report useful.
3. Review checklist notes and supplementary materials
The overview tab doesn’t just show which checklists you’ve run and which tasks are complete; it also displays the contents of completed form fields. This means that you don’t always have to open a checklist to see information entered while someone worked through it.
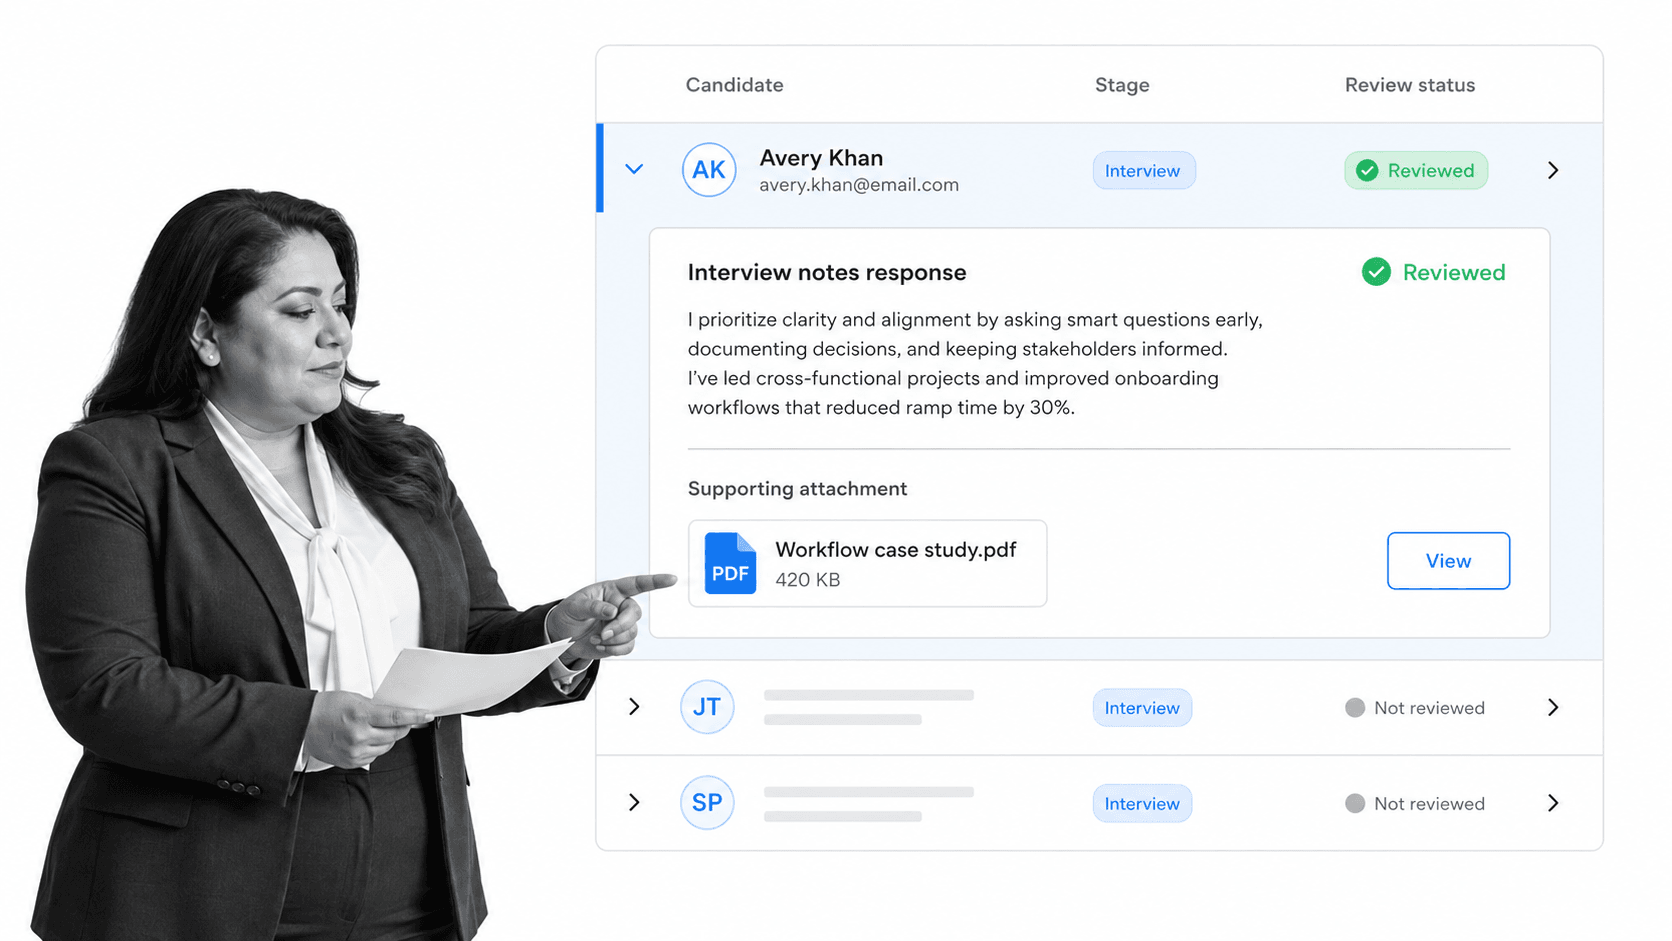
Let’s say that you had a recruitment process and wanted to review the answers candidates gave to a particular interview question. Usually, you’d need to open every checklist, navigate to the relevant task, then compare the answers one by one. With the overview, you can display the checklists and columns you need on the same page.
Once the view is set up, scroll through the answers to compare them. Everything can be reviewed together without a separate loading screen for every candidate, while uploaded evidence remains connected to the relevant workflow run.
4. Identify weaknesses in your sales processes
It’s not always obvious where improvements can be made to your processes but, thankfully, the overview tab can also highlight common problem areas. This works best for processes that are marked as complete without every task being ticked off when a problem occurs.
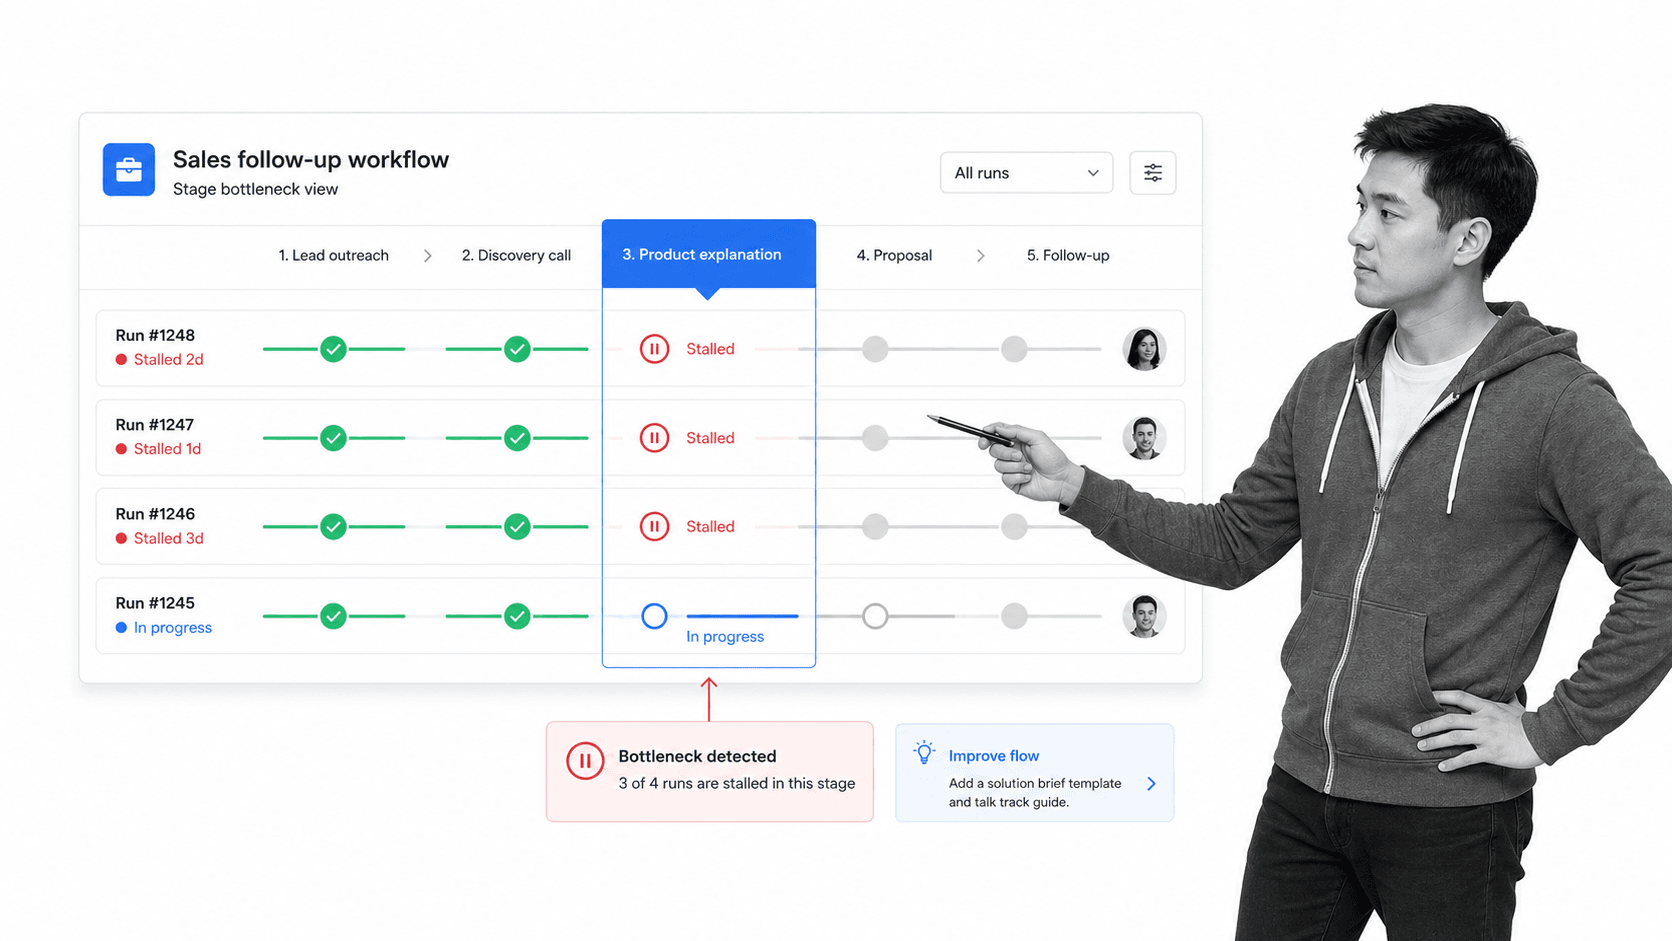
For example, consider a cold calling checklist. The process may be left incomplete if the operator fails in their task, since the phone call will end and it will be impossible to carry out the remaining tasks.
Knowing this, you can compare cold-calling checklists in the template overview to see which areas cause more failures than most. If many checklists stop progressing at the “explain the product” task, for example, you could improve the product explanation script and then monitor whether the pattern changes.
5. Check your most popular product or service
It pays to know what your most popular product, service, or even problem is at a glance, and the template overview tab lets you do exactly that.
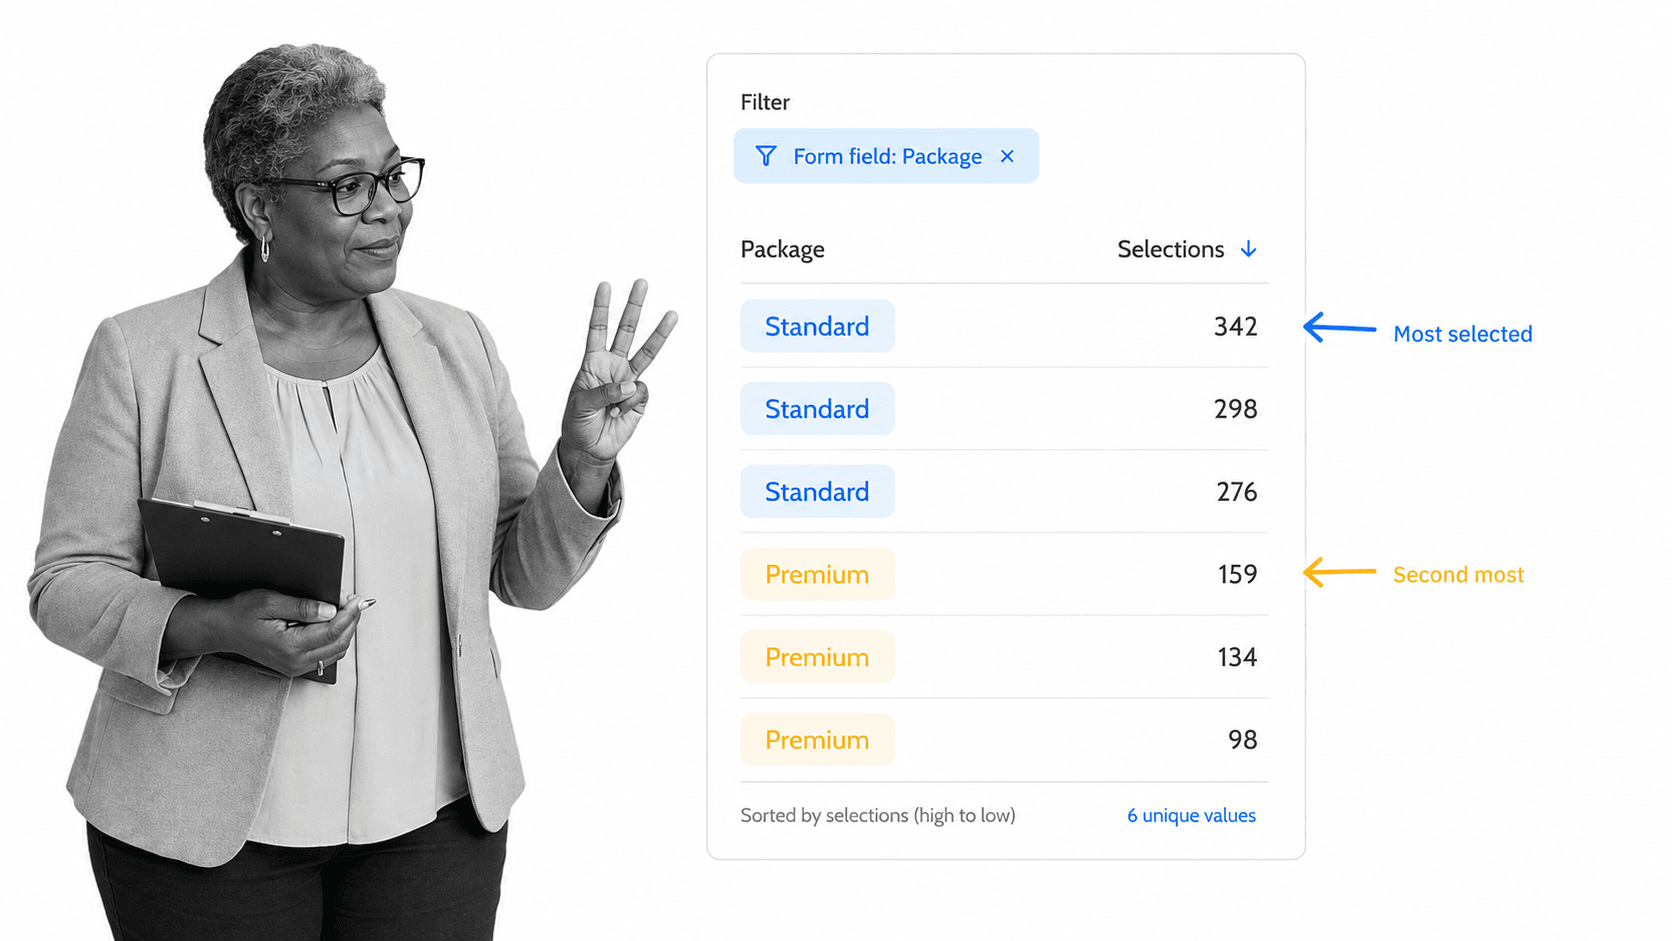
In the overview, you can see how each form field in your checklists has been answered, rather than opening every checklist and comparing it manually. That makes it much faster to compare information entered while the checklists are being completed.
For example, imagine a client onboarding process in which you record the product, service, or package a client requested. Whether it is recorded in a text, dropdown, or multi-choice field, you can compare client selections by sorting your overview using the corresponding form-field column.
This lets you see what’s in high demand or, if you’re monitoring a problem using form fields, what’s causing the most trouble.
6. Monitor team (and individual) performance
It’s difficult enough to monitor your team’s performance when you’re working in the same office, let alone with remote employees. One way to reduce confusion is to assign templates, tasks, and checklists to team members so everyone knows what they need to do.
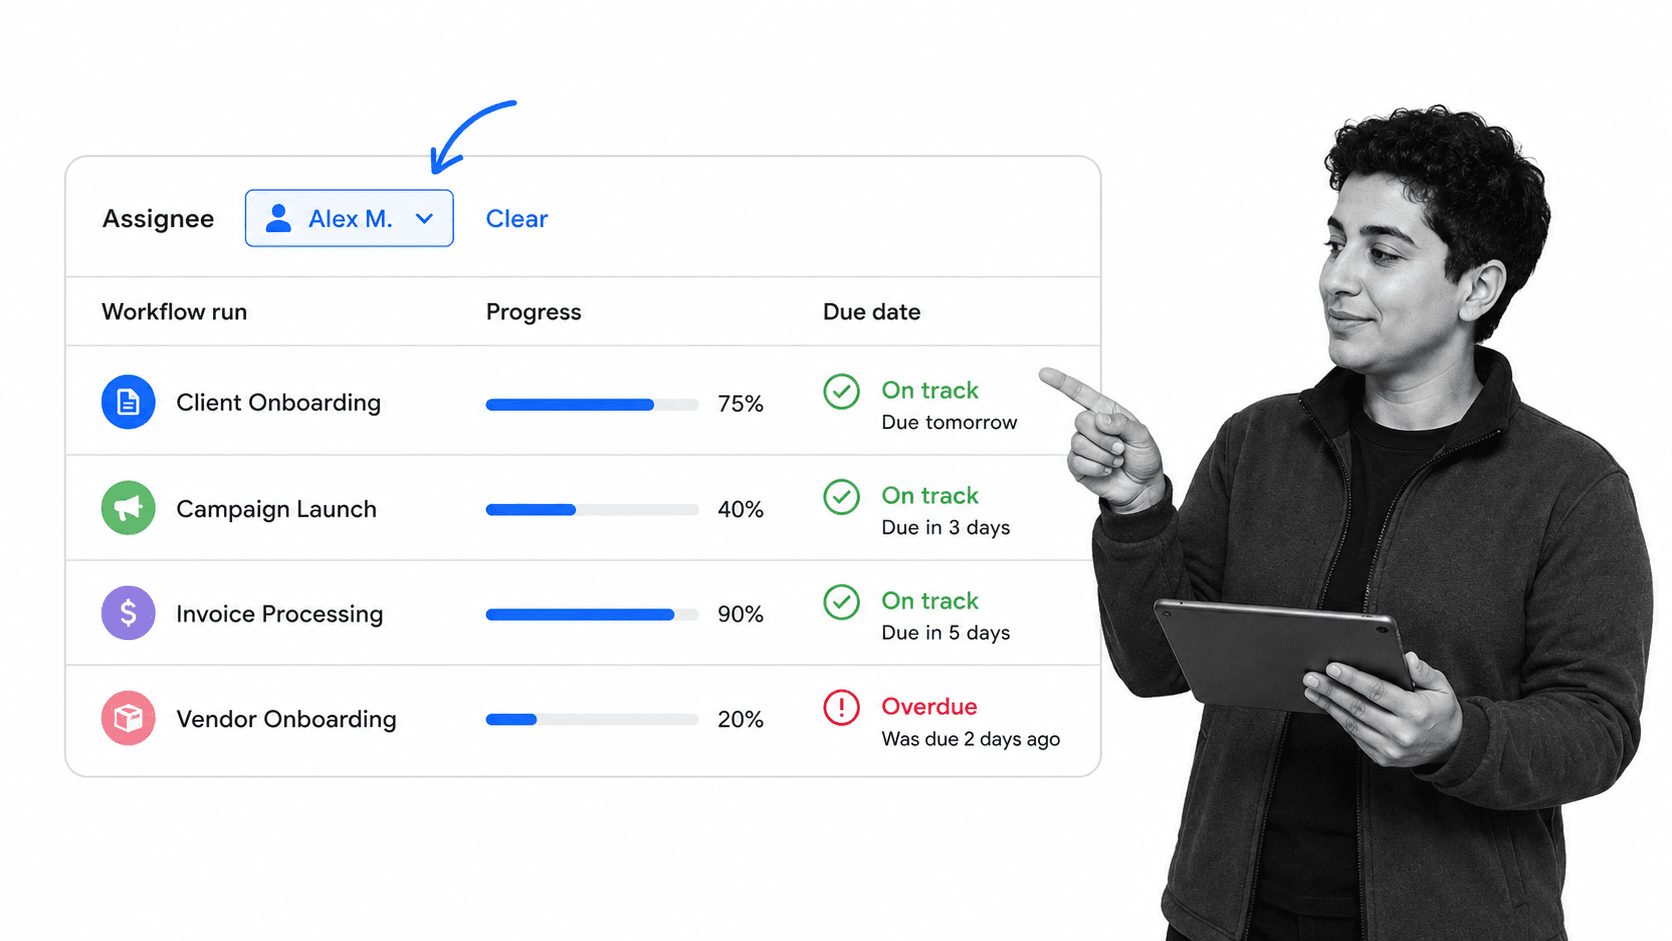
Doing this also lets you review what your team has achieved using the overview tab. Sort the view by the team member you want to support, then inspect the checklists and tasks assigned to them. Progress and due-date information can reveal where work is moving well and where someone may need help removing a blocker.
7. Manage performance reviews
Formal performance reviews require more context than a quick scan of completed tasks and checklists. A fair review needs the relevant workflow status, information entered into form fields, supporting file uploads, and evidence of how the process was followed.
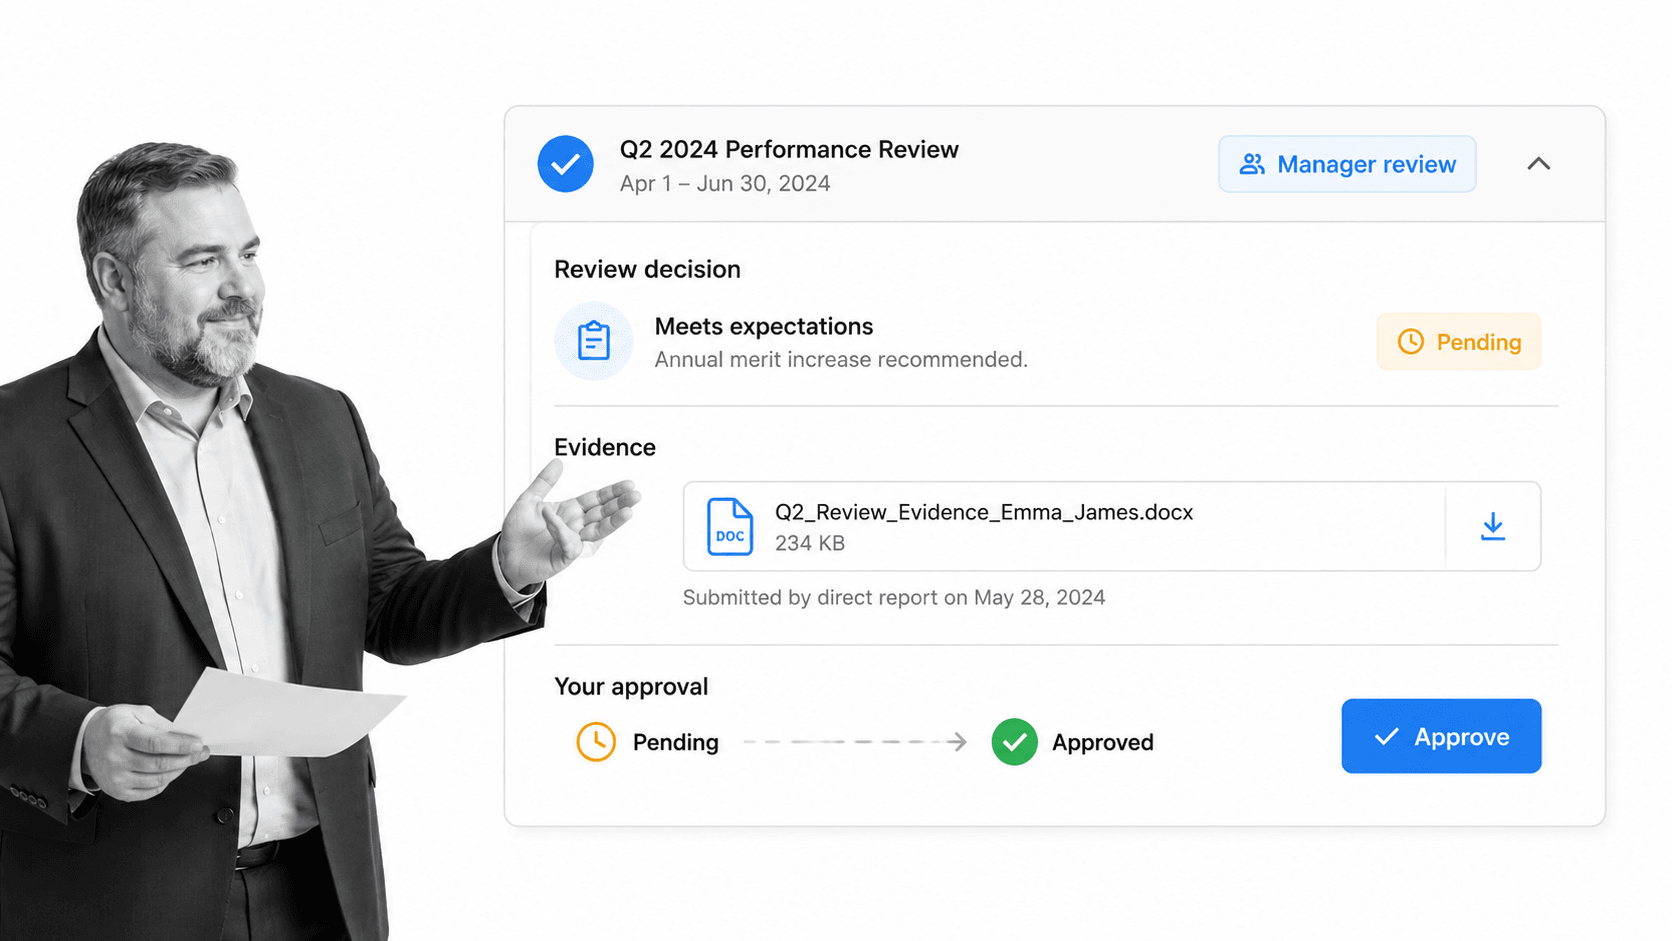
This is where the features covered in the previous examples come together. By filtering the overview tab for particular team members, reviewing active, completed, and archived checklists, and comparing the information captured in form fields, you can assemble a more complete picture of the work. The overview provides evidence for a structured conversation; it should support human judgment, not replace it.
8. Compare checklist completion time
One of the best ways to check your team’s efficiency as a whole is to know how long it takes to complete a checklist on average. This shows how long the process is taking now, which you can compare with how long it should take.
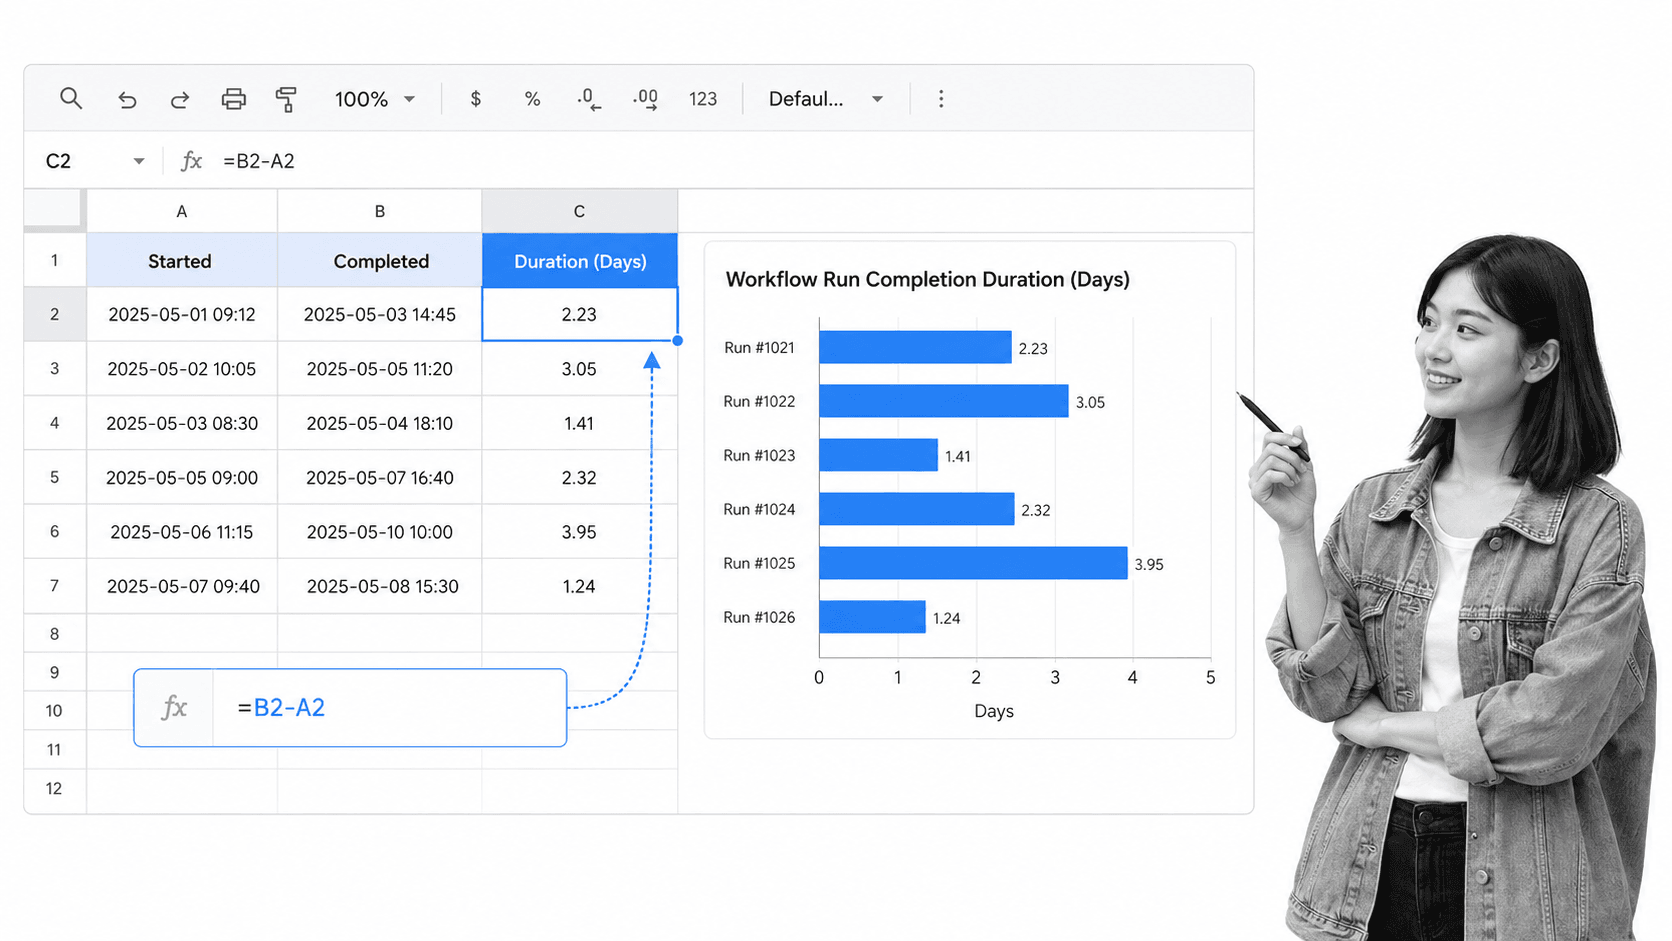
To turn the data into a graph, export the relevant saved view to a CSV and import the file into Microsoft Excel, Google Sheets, or another spreadsheet program that can create charts. Reports can export all columns or only the visible columns, so include the workflow-run name plus the Started and Completed date columns. Exported dates use UTC.
Once the data is in the spreadsheet, add a Duration column and subtract the Started value from the Completed value. Format the result in days or hours, then plot the workflow-run names against duration. The chart will make unusually long runs easy to spot, but check incomplete runs and time-zone assumptions before drawing conclusions.
9. Monitor task completion time
You can apply the same principle to individual tasks, but the data needs to contain a timestamp for the event you want to measure. Reports shows whether selected tasks are complete; it does not create an elapsed-time calculation for every task automatically. If task duration matters, capture the relevant start and completion timestamps in your workflow or through an automation, then include those fields in the exported view.
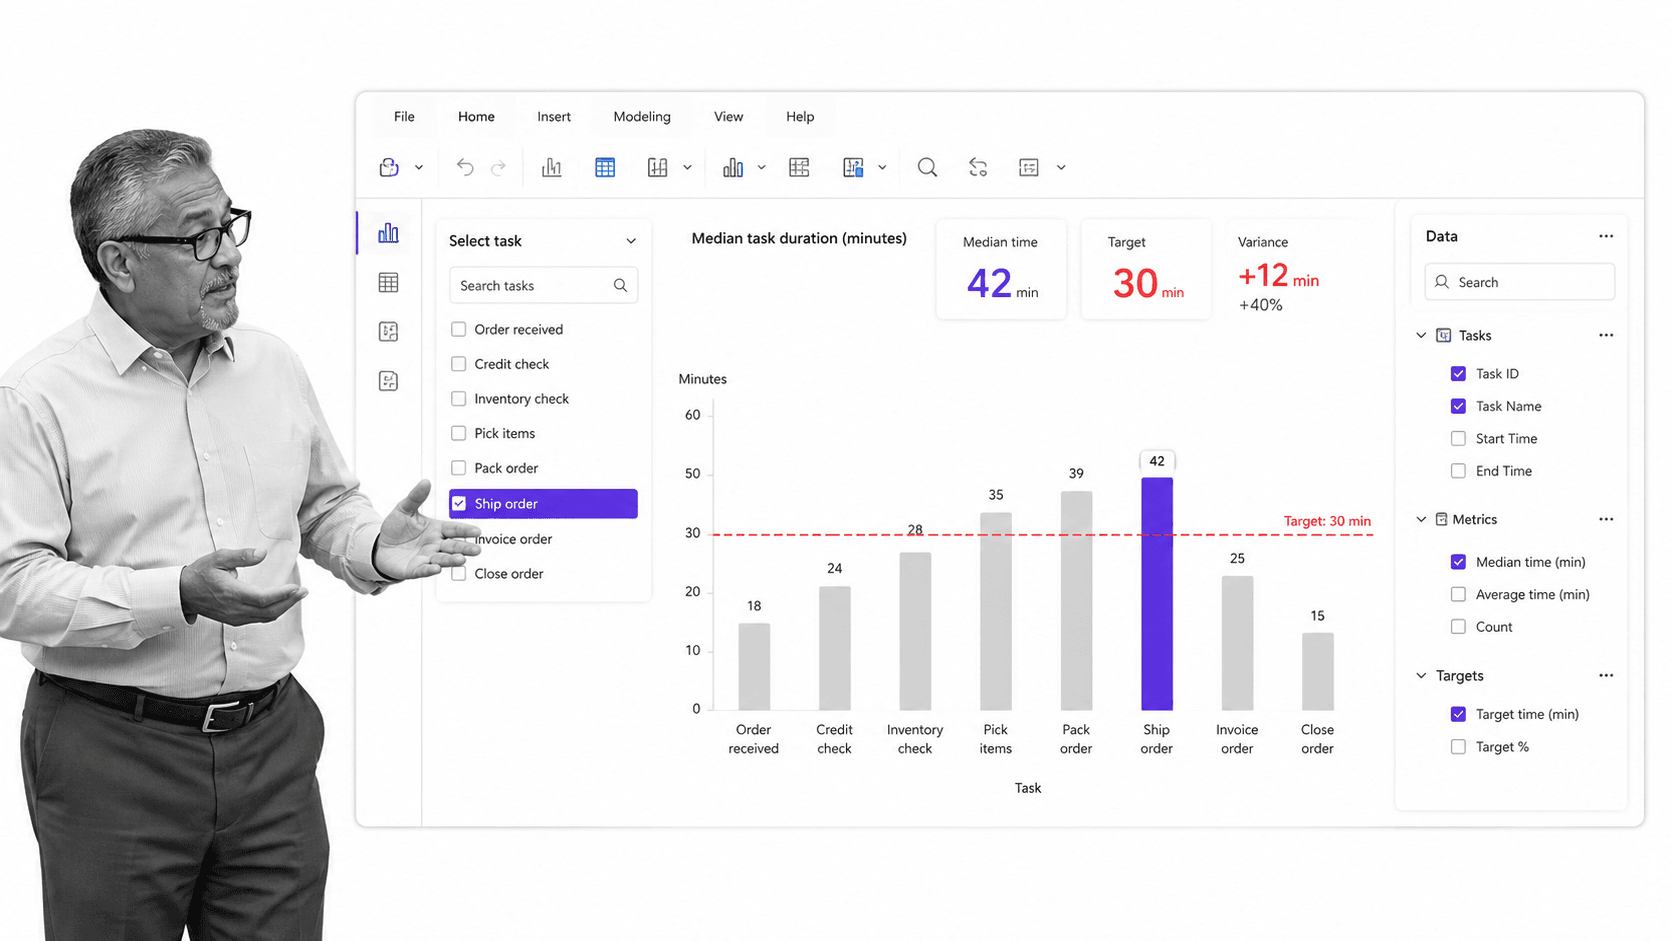
After export, calculate the difference between those timestamps in your spreadsheet or reporting tool. Your chart can compare one task across many checklists, or compare several tasks inside one checklist. Keep the definition of “start” consistent, separate waiting time from active work where possible, and investigate large variances before changing the process.
Overview your business by getting started with Process Street
Documenting and standardizing your processes is a great way to bring consistency to your methods and identify the best way to carry out your tasks, but the only way to monitor or improve them is to have a set tracking method in place. Rather than learning to use two separate tools or systems, why not try Process Street with a free 14-day Pro trial and see how much easier it becomes to keep work visible?
Have you tried using the template overview feature yet? Would you like to see any other features incorporated into the product? I’d love to hear from you in the comments below!