Zendesk support helps you to experience and provide the best customer support while having your team adapt to best practices. You can integrate Zendesk with Process Street to make your workflows super powerful and automate your work via Webhooks or Zapier.
This will let your technicians quickly and effectively respond to customers while letting you track the progress of each ticket and see the steps that were taken.
A Webhook integration can bring information from Zendesk that would trigger a new workflow run in your Process Street account. Webhooks are automated messages or payloads sent from apps as a trigger to cause an action in a receiving app.
In this example, we will create a Webhook that runs the Customer Support Tickets workflow when a new ticket is created in Zendesk.
Now, let’s jump into the integration.
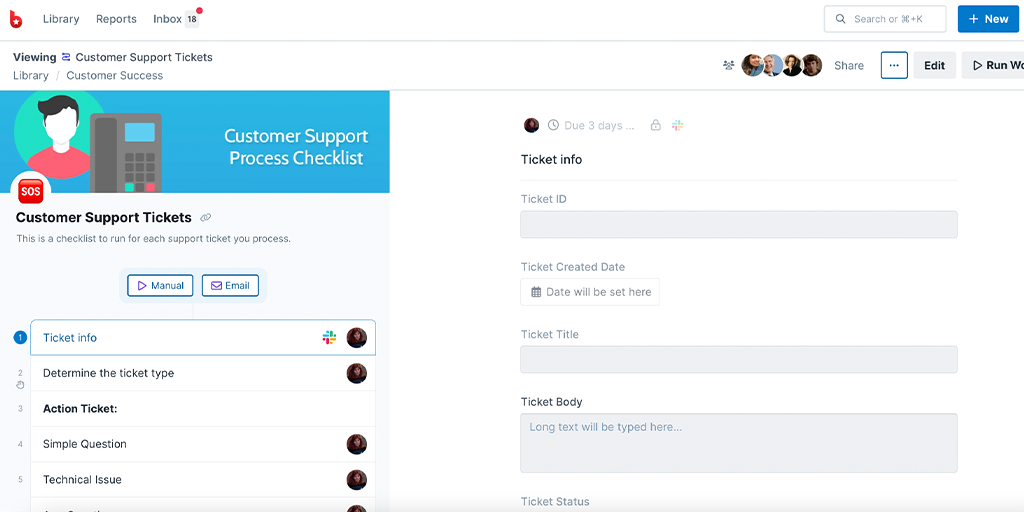
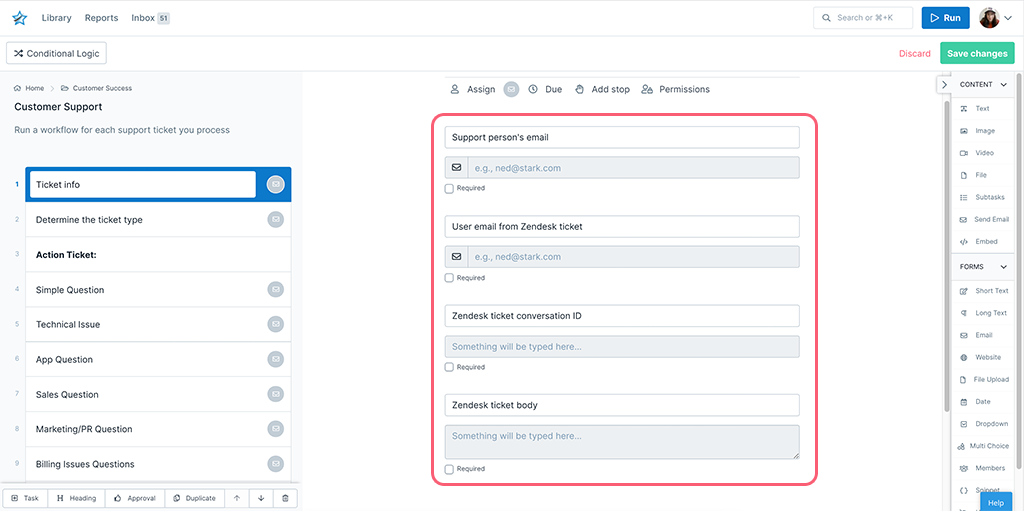
First, create a Workflow in Process Street and ensure to add form fields that are relevant to the data fields in Zendesk. This will help you to map the relevant information from Zendesk to Process Street.
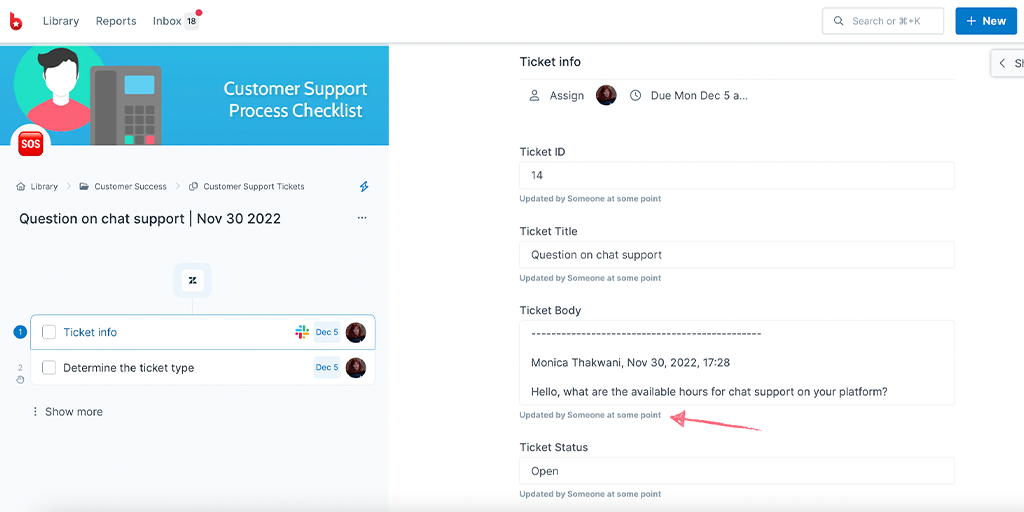
This information is stored in Zendesk when a ticket is created. So, we need to create relevant form fields in our workflow to push that information through to Process Street. For our example, these form fields should include the ticket name, ticket ID (short text fields), ticket created date (date field), ticket body (long text field), and so on.
This will mean that whoever is working on the support ticket won’t have to look up information in Zendesk, but can instead see all the details in Process Street.
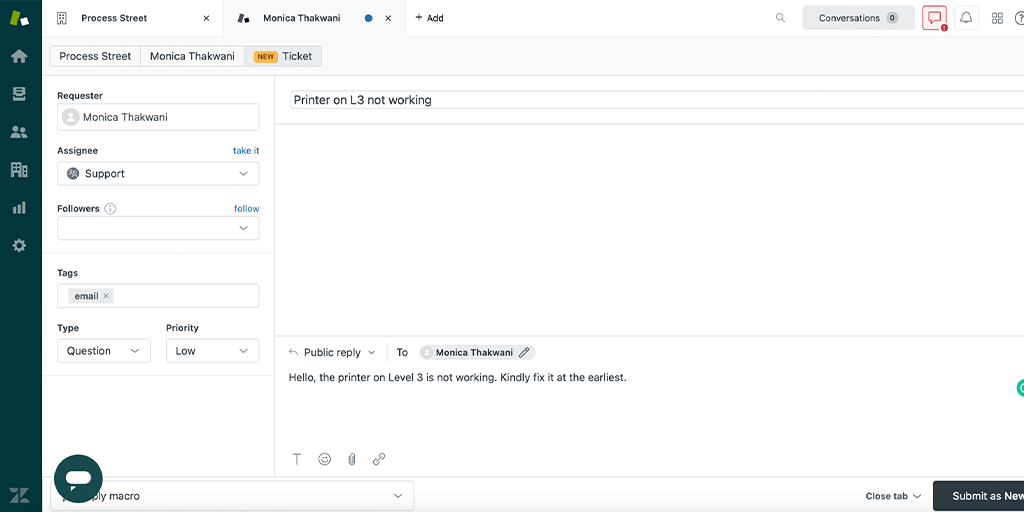
Log into your Zendesk account or create a new account. Since we want to trigger a new run in Process Street when a new ticket is created, we will be working in our organization dashboard in Zendesk. If you don’t have an organization yet, you can start by creating that first. To create a new ticket, click + Add > Ticket.

Now, add the details like ticket subject, description, tags, and other details you may want.
Note: You want to ensure that the form fields you have in your workflow match the fields you have in Zendesk.
To get the webhook URL from Process Street, when you’re editing your workflow, click the + icon above your task list on the left. Here, you can look for Zendesk as a Trigger to Run this workflow.
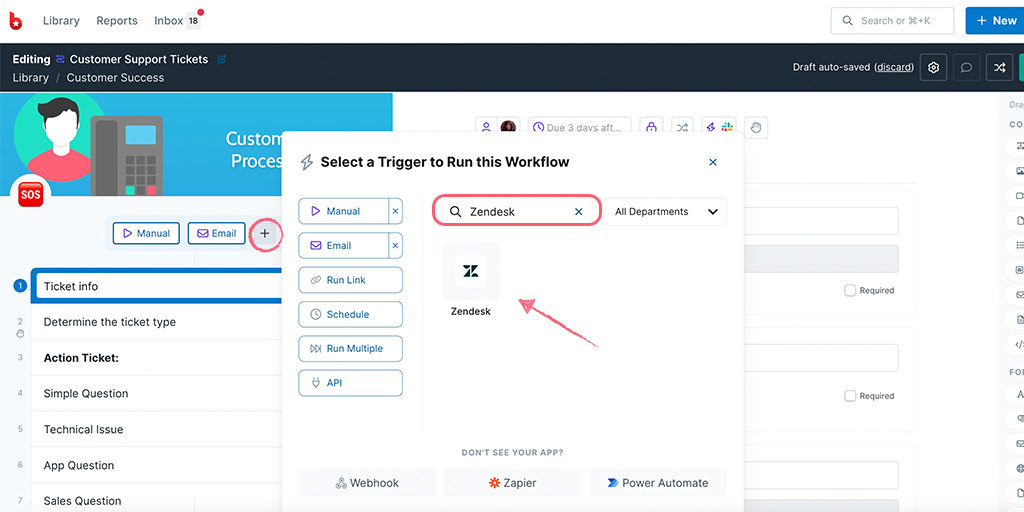
You can name your webhook as the app name or any phrase that helps you identify the Trigger. Then copy your Webhook URL.

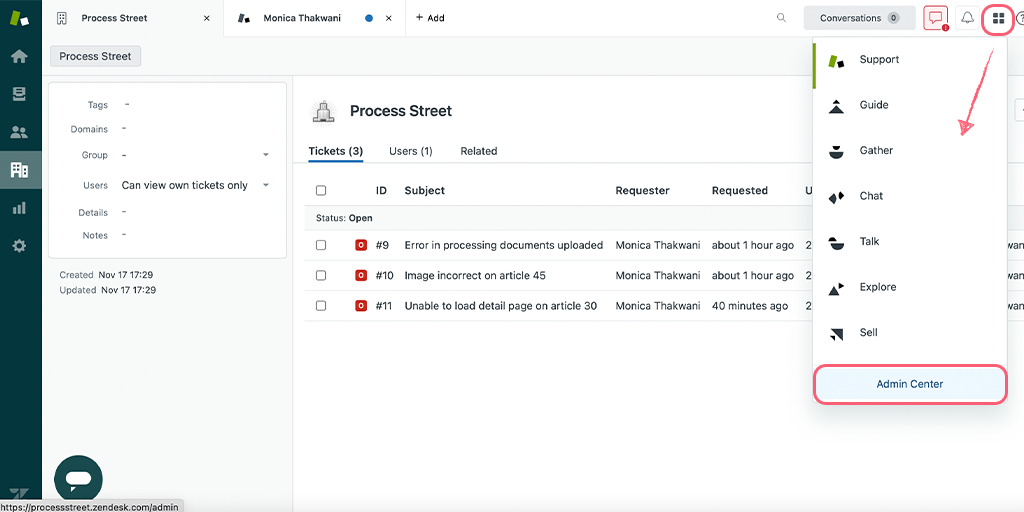
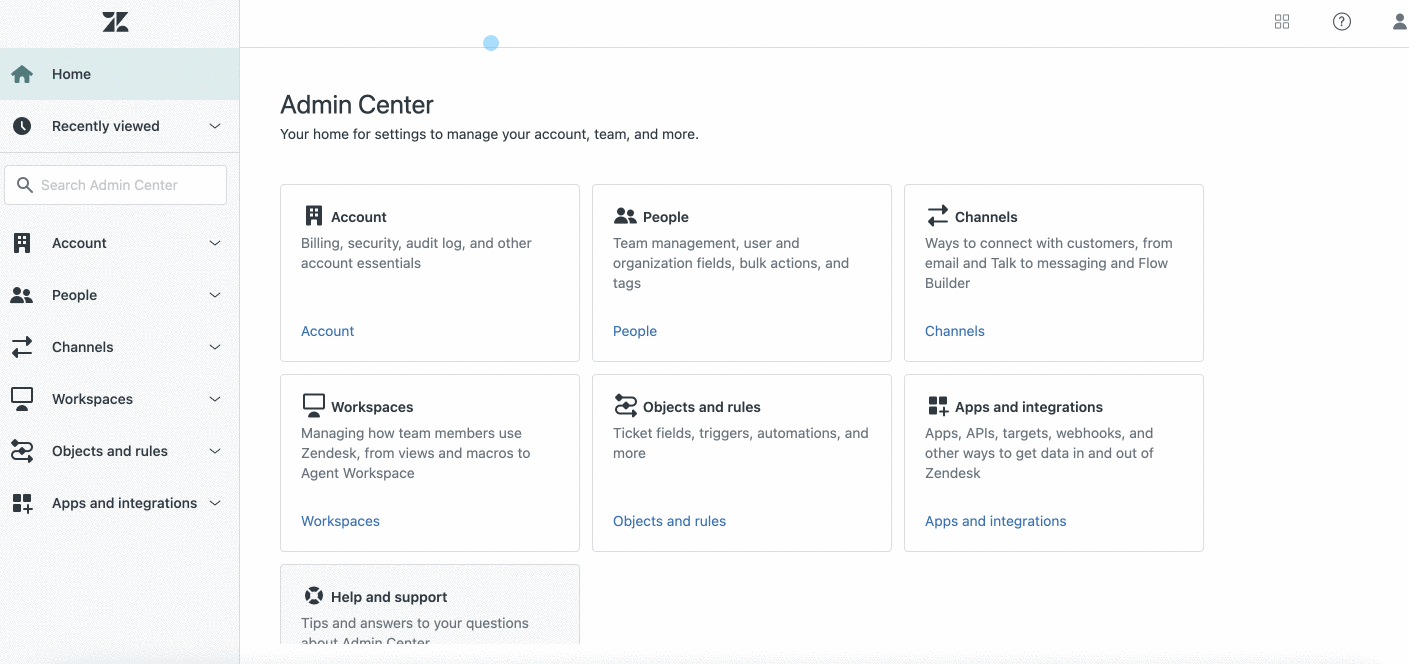
Click on the product menu and go to the Admin Center.
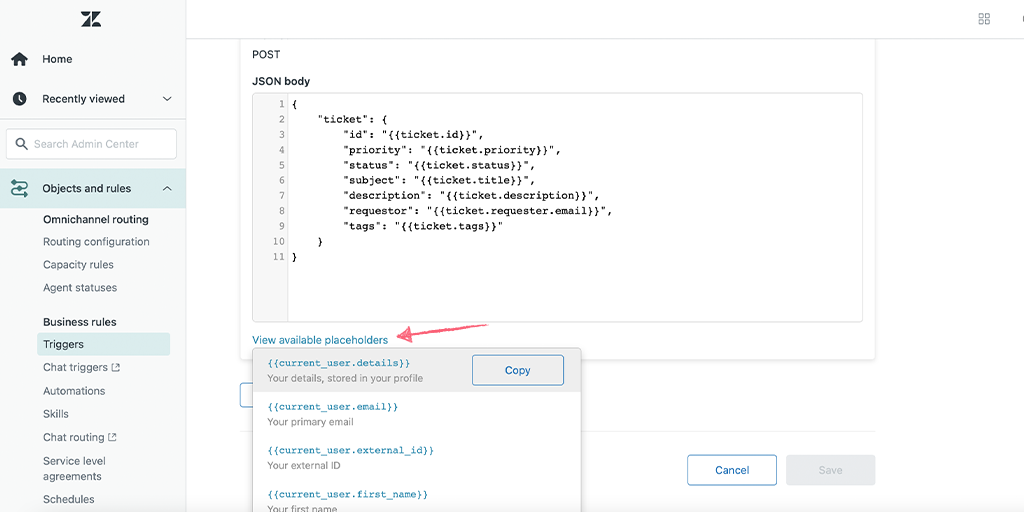
Then click on Apps and Integration > Webhooks. Next, click on Create webhook and fill in all the fields as shown below.
Since you want to send out information from Zendesk, you want to select the Request method as Post and Request format as JSON.
Note: You would have to write your own JSON code but you can use their available placeholders to get them.
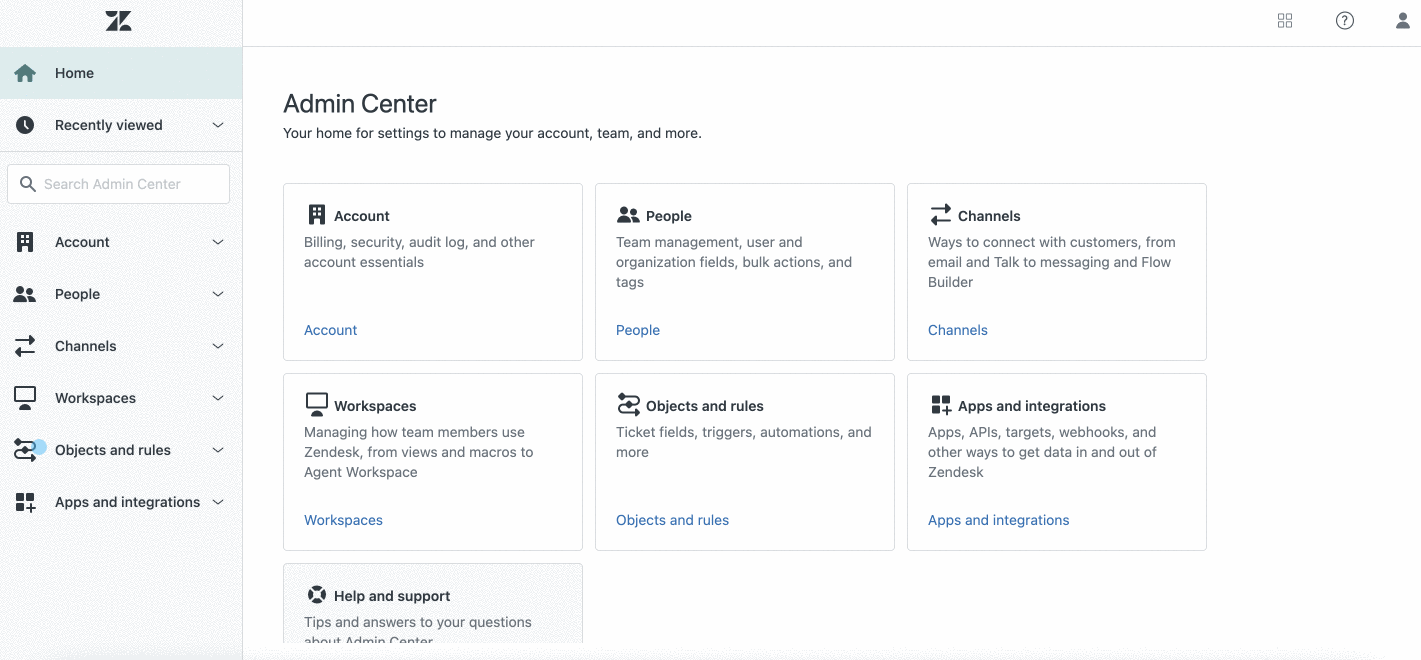
Once you have created the webhook, you have to assign it to a trigger or automation. For our use case, we are creating a new trigger to associate with our webhook. To set this up, in the Admin Center, go to Objects and rules > Business Rules > Triggers. Here, click on Add trigger in the top left corner.
Fill in all the fields ensuring you have selected Ticket is Created/Updated as a required condition along with any others that you may want. Then set up the action as Notify active webhook along with any other action you may want.
If you’re looking for more help on how to set up your webhook in Zendesk, you can refer to their help doc here.
Now come back to Process Street and test your trigger. Your payload should return as a success but if it doesn’t, you might want to go back to Zendesk and create a new ticket.
When your test returns successful, you can proceed to map your fields from your ticket’s properties to your Process Street form fields.
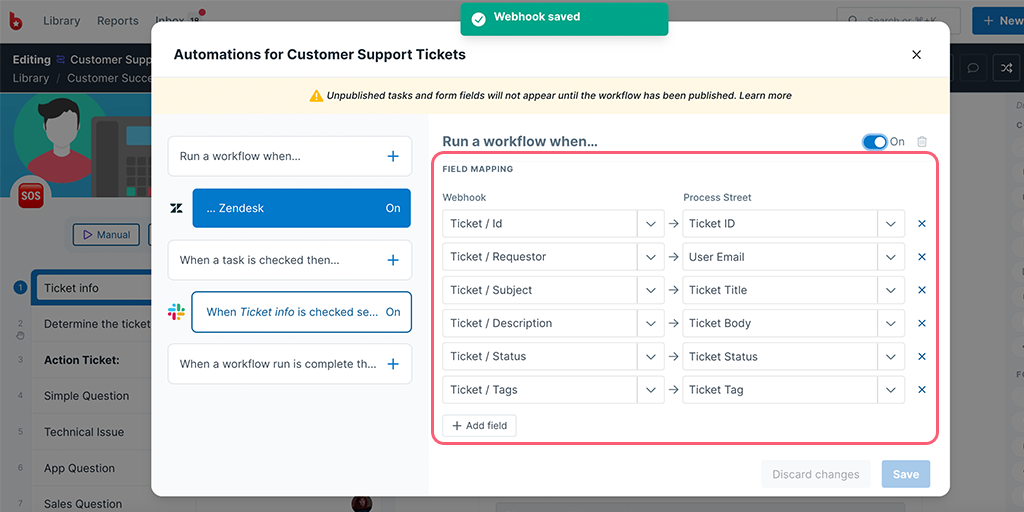
Lastly, turn your webhook On and Save it. Then Publish your workflow and you’re all set!
As an extra step, you can go to Zendesk, create a new ticket then come back to Process Street in the Reports Dashboard to confirm a new workflow is run.
Zapier connects over 1,000 apps together. It’s an “if this, then that” tool, meaning that once a trigger has occurred, an action will then take place. This helps to save you time and effort by automating processes.
In this example, we will look at how Zendesk can be integrated with Process Street so that when a new ticket is created in Zendesk, a new customer support workflow is run.
Users: In order to create an API key for integrations, you must be an Administrator.
Let’s look at how you can do this.
To launch a Process Street support process from Zendesk we’ll be using workflow run links and variables.
Run links are links that, when clicked, runs your workflow. Variables are pieces of variable information (such as a workflow run’s name, your username, and various form fields) that are automatically synced up to the original source.
Together, this run link with variables can be attached to a custom button inside Zendesk – this will let you click the button to run your support process while you’re viewing your tickets. Information from the ticket (like customer’s name and email) will then be pushed into your workflow run to save you time on data entry.
Finally, you will use Zapier to automatically update the Zendesk ticket with any information entered in your support workflow runs, such as comments and attachments.
Zapier is a third-party automation service that connects our platform with different apps. Within Zapier’s community, there are over 2,000 different apps and services you can connect to.
These connections are referred to as Zaps and follow “if this, then that” logic. As in, “if this happens, automatically do that“.
Generally, you will only need to set up the zap one time. This gives you the time to focus on what’s important things rather than repetitive tasks.
First you need a support workflow set up inside Process Street (if you already have one, skip ahead to the next step). The quickest way to do this is to copy our premade customer support process into your own organization.
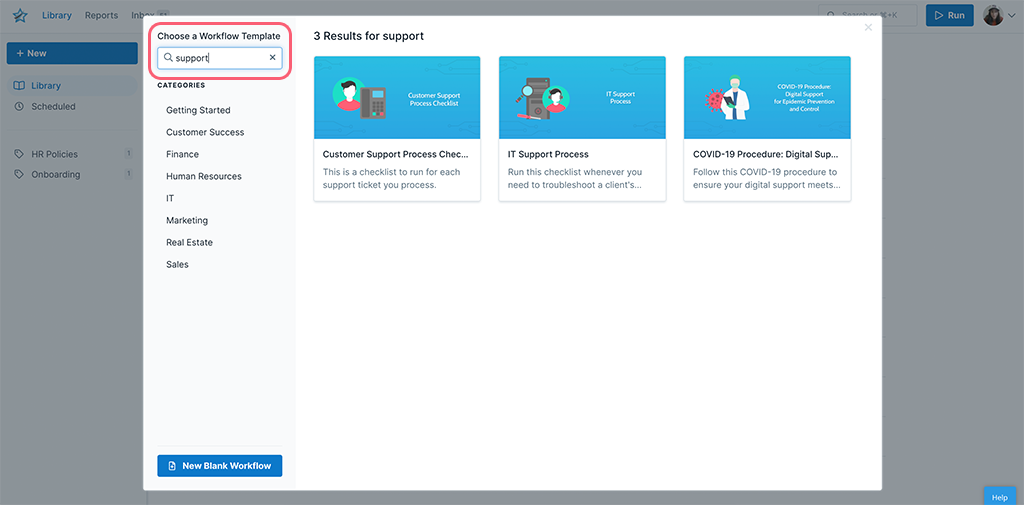
Open Process Street’s dashboard, click “New Workflow” in the top left corner of your screen.
Next, type “support” into the search box as shown below and click the result for the premade workflow you’d like to use. This makes a copy of that workflow in your library.
You can then edit your workflow if you want to tailor it more to your needs but for this example we’ll take it as it is.
So, with your support process set up and ready to follow next you need to set up the link you’re going to use to run your workflow from inside Zendesk.
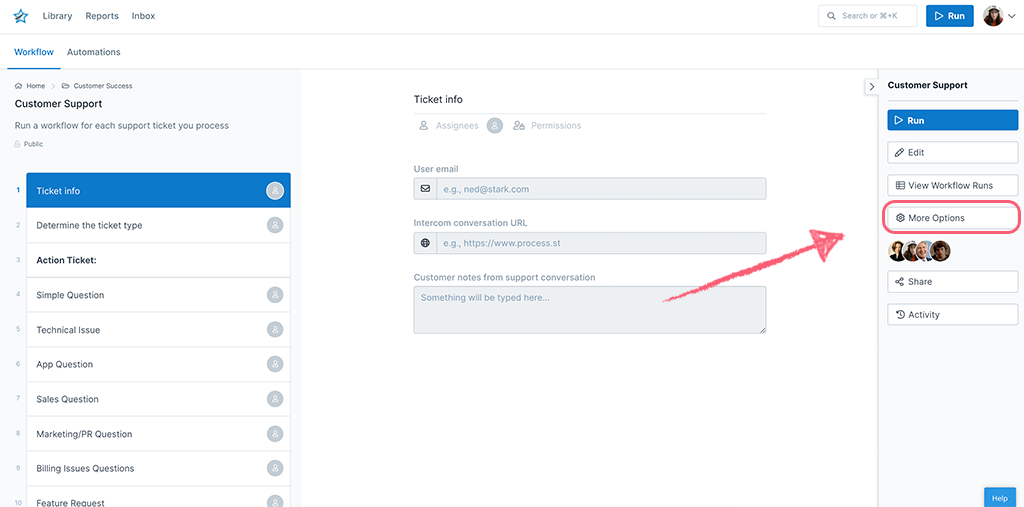
To create a workflow run link, first you’ll need to open the menu of the workflow that you’ll be running. In this case, this is your customer support process.
If you have your workflow open then this menu will be on the right-hand side of your screen, but if not, click the name of your workflow from your library.
Once the right-hand menu is open, click “More options“.
Next, click “Workflow run link“.
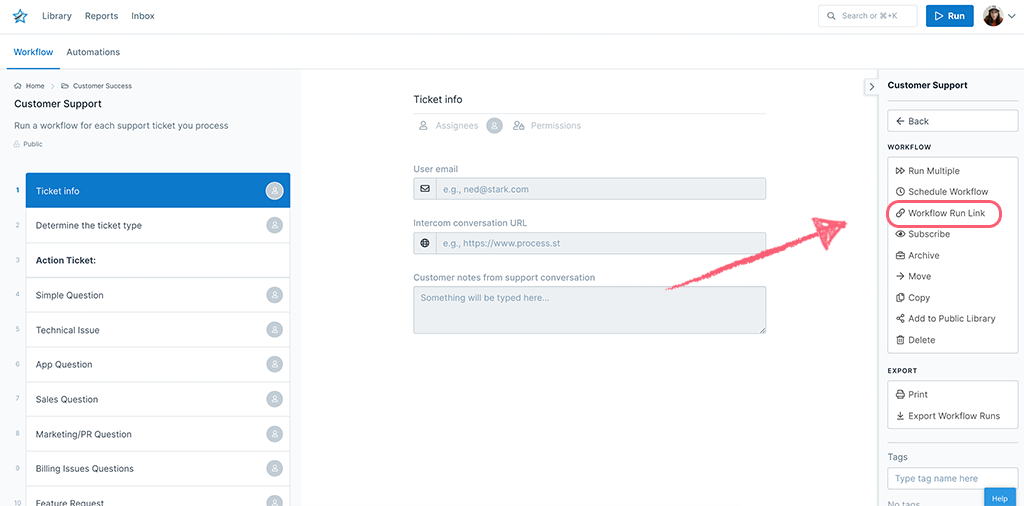
Now you have a couple of choices. If you want, you can take the link shown to you right now and carry on. When clicked this link will create a support workflow run, but it won’t push through any information from Zendesk.
You can also control who can create workflow runs using this link by selecting one of the permission options below the link. Running your workflow can be either limited to only builders who belong to your Process Street organization, or just anybody who clicks the link.
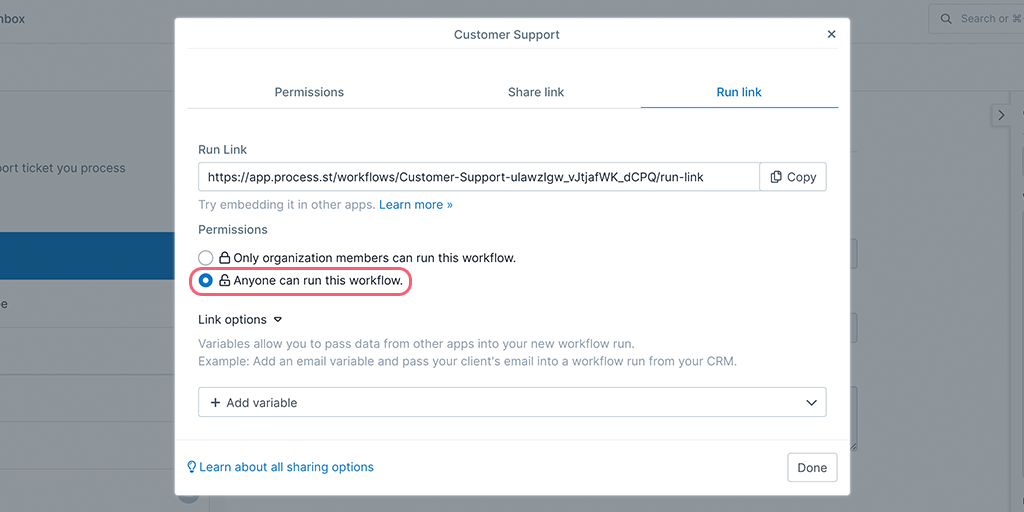
Choose the option “Anyone can run this workflow“.
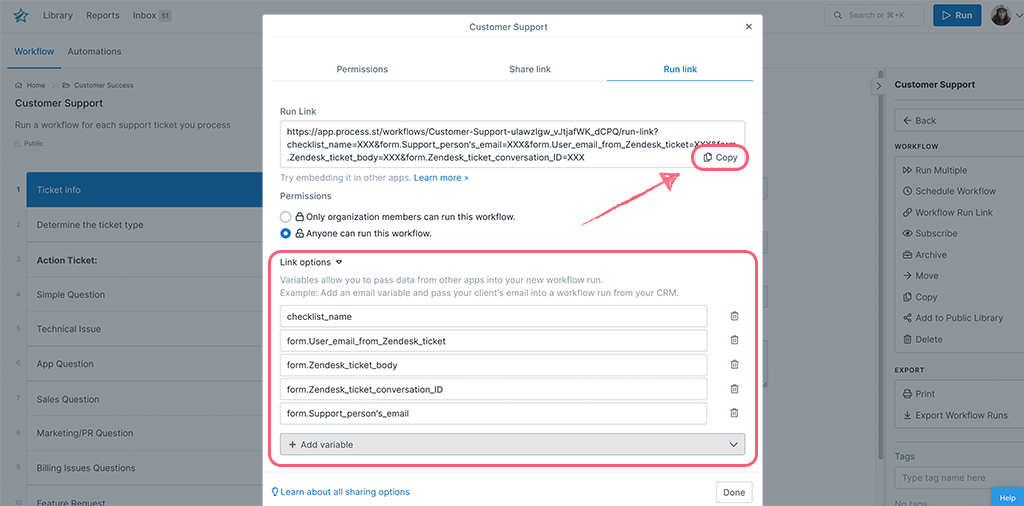
To change the link to push through information from Zendesk into your support workflow runs you’ll need to click “Link options“. This will show a dropdown menu from which you can choose what variables you want to use.
Remember, variables are pieces of variable information in your workflow runs, such as the name or the contents of various form fields. For example, if you wanted the workflow run’s name to automatically be the same as the support ticket’s ID in Zendesk, we’d include the “name” variable.
In this case, you want to automatically push through the following information from Zendesk:
Now you can add those variables (form fields) to your run link before continuing.
Also, any variables you add will be added to the end of the workflow run link, so make sure you add your variables in the link options before copying it!
Save this link for later (or just keep the link window open) as you move on to creating the button which will use it in Zendesk.
You can also learn more about workflow run links by watching the video below.
You’ve got the link to start a workflow run inside Process Street, but now you need to set up the custom button inside Zendesk which the link will be used on. This will let you click the button from inside any conversation in Zendesk to run a support workflow and pass through the variable information you set up earlier.
First, go the “Admin” section of Zendesk by clicking the cog in the left side of your screen.
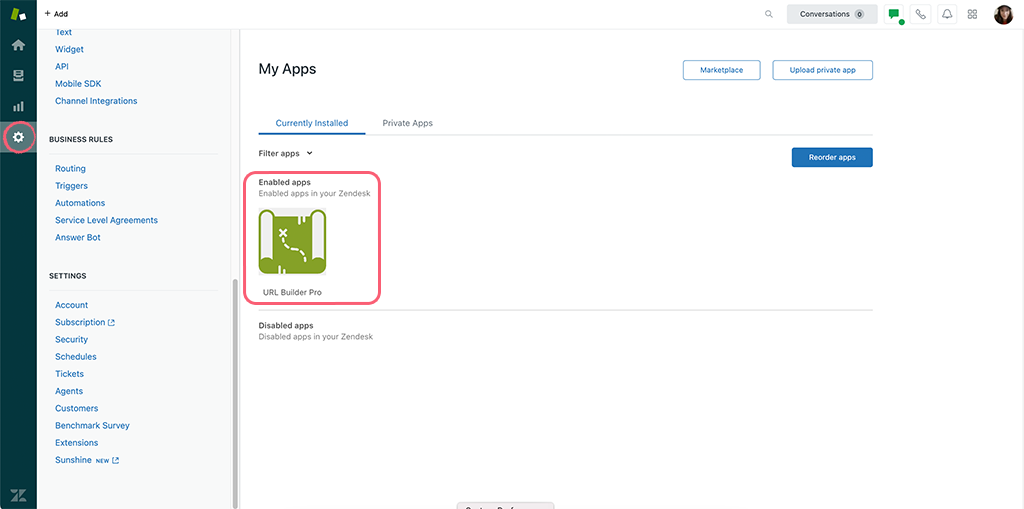
Next, you need to go into the “URL Builder” app, so click on it to open it up. If you don’t have this installed already, you can find it by browsing Zendesk’s marketplace.
To create a custom link you can refer to Zendesk help documentation for the code you’ll need to start with.
For example here’s the code for a link to Linked in, using the variable for {{ticket.requester.name}}
[
{
“title”: “LinkedIn”,
“url”: “https://www.linkedin.com/search/results/all/?keywords={{ticket.requester.name}}”
}
]
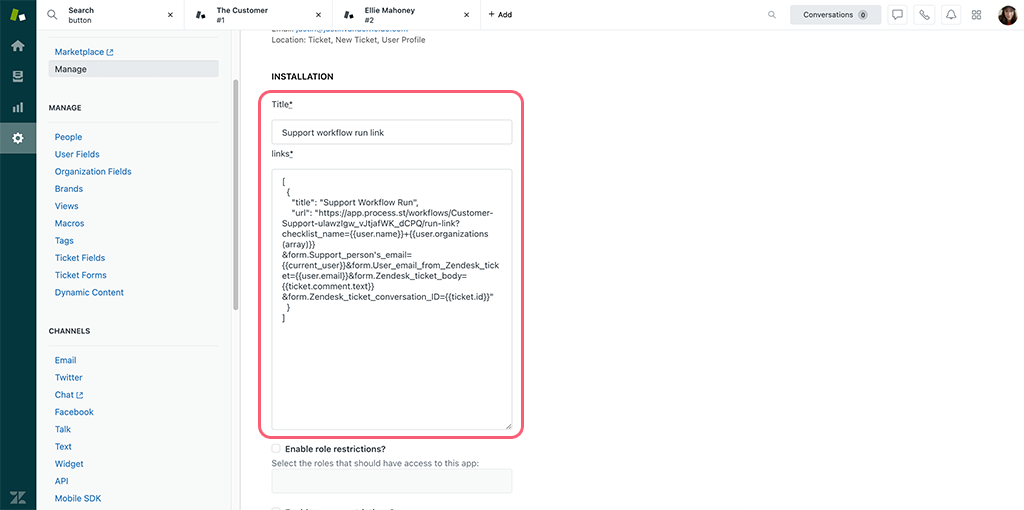
Paste this code into the links field inside the Custom URL builder and give your link a title.
Next, replace the example URL (the Linked in URL) with your workflow run link.
Once you’ve pasted the link, you now need to set up what information each variable in your workflow run will use. For example, the ID of the ticket in Zendesk needs to be linked back to the “Zendesk conversation ID” variable.
Here’s a list of variables from Zendesk to help you choose which ones you need.
Replace the “XXX” in your run link for the corresponding variable in Zendesk.
For example, let’s say that you want to set our new workflow’s name to be whatever the ticket ID in Zendesk is. To do this, we’d copy the “{{ticket.id}}” piece of code from the URL Builder and paste it to replace the XXX in the checklist_name=”XXX” section of our button’s code.
Once you’ve finished setting up your variables, click “Update” to create your button.
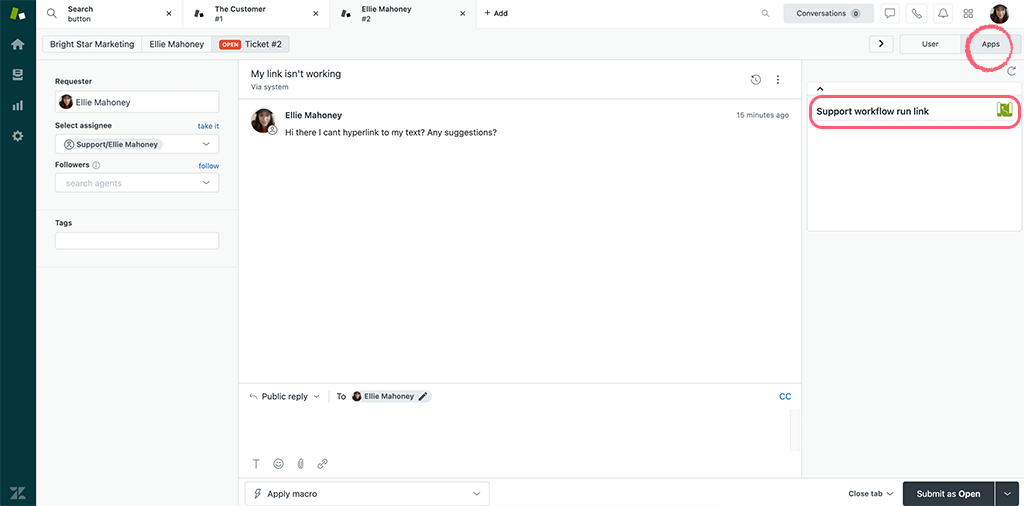
Your custom buttons will now show in the right-hand side of your screen while viewing a ticket in Zendesk.
You can use the third-party automation service Zapier to connect our platform with different apps. Within Zapier’s community, there are over 2,000 different apps and services you can connect to.
These connections are referred to as Zaps.
Generally, you will only need to set up the Zap one time. The Zap will then automatically carry out whatever task you’ve set it to do, saving you a huge amount of time and effort going forwards.
These work by letting you set a “Trigger” and “Action”, with the idea that “if this happens, Zapier will automatically do that“. When Zapier detects that the Trigger event has happened, the Action will be carried out.
This is what lets us set up the two-way sync between Zendesk and Process Street. While information can be pushed from Zendesk into your new support workflow run with your new custom button, in order to push back any information entered into your workflow run, you’ll need to use Zapier.
Log into Zapier and click “Make a Zap“.
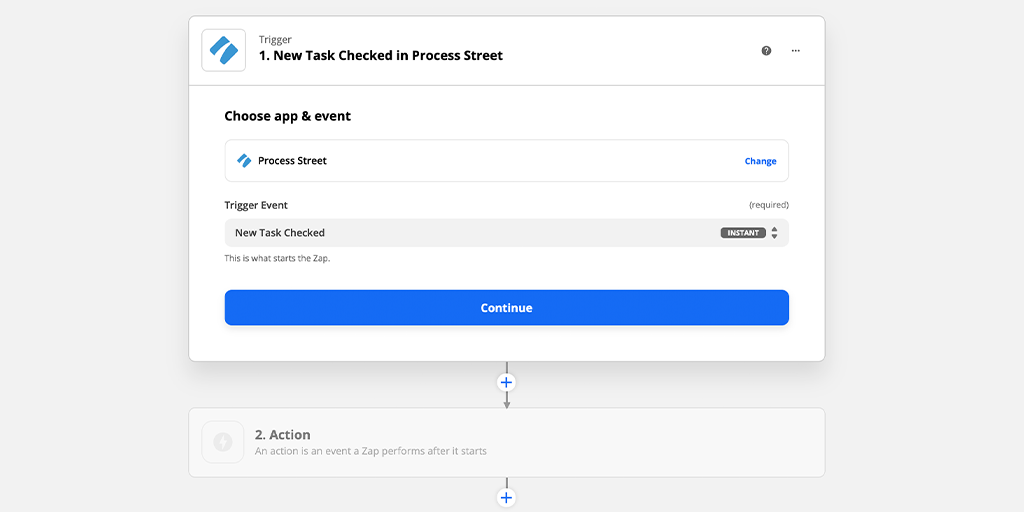
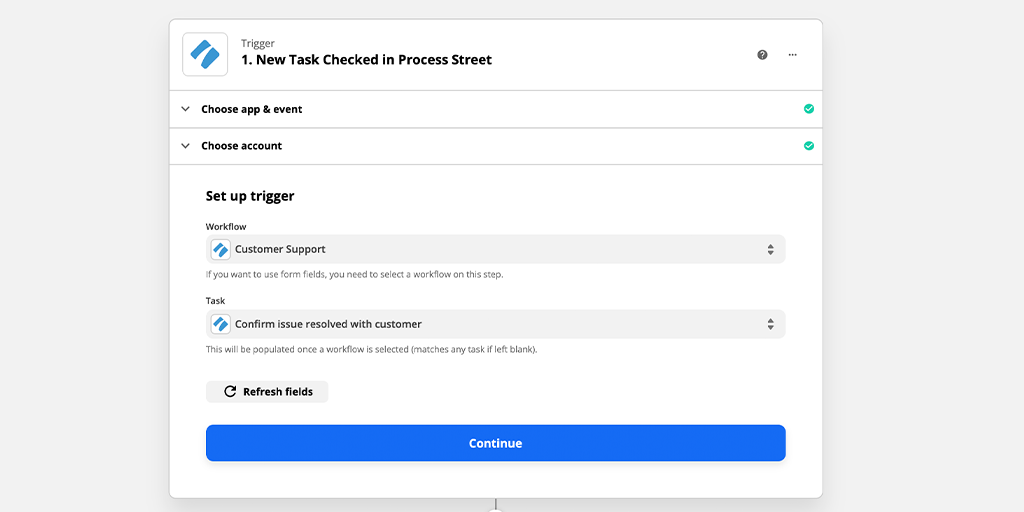
Set the trigger app to Process Street and the trigger will need to be “New Attachment“, “New Task Checked“, or “New Comment“, depending on when you want Zapier to push information back into your Zendesk ticket. If you want to have Zapier detect multiple events, you’ll need to create separate Zaps for each.
Click “Continue” and connect your Process Street account. Click continue again and make sure that you have the right workflow selected. In this case, it is your customer support process.
Select the trigger, in the example below, we’re using the final task in our workflow run.
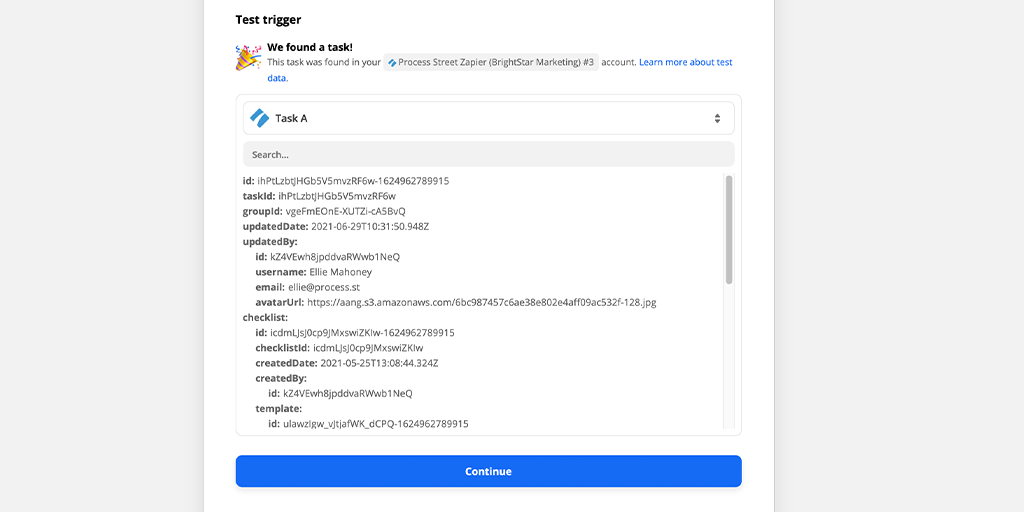
Test your trigger. For this you’ll need to have an active workflow run with the task checked, or comment or attachment added, to allow Zapier to pull in sample data.
If you’re using the final task in your workflow run as the trigger, you will need to reactivate your workflow run to pull sample data through.
If your test is successful it should look something like this:
Click “Continue” and move on to setting up your action step.
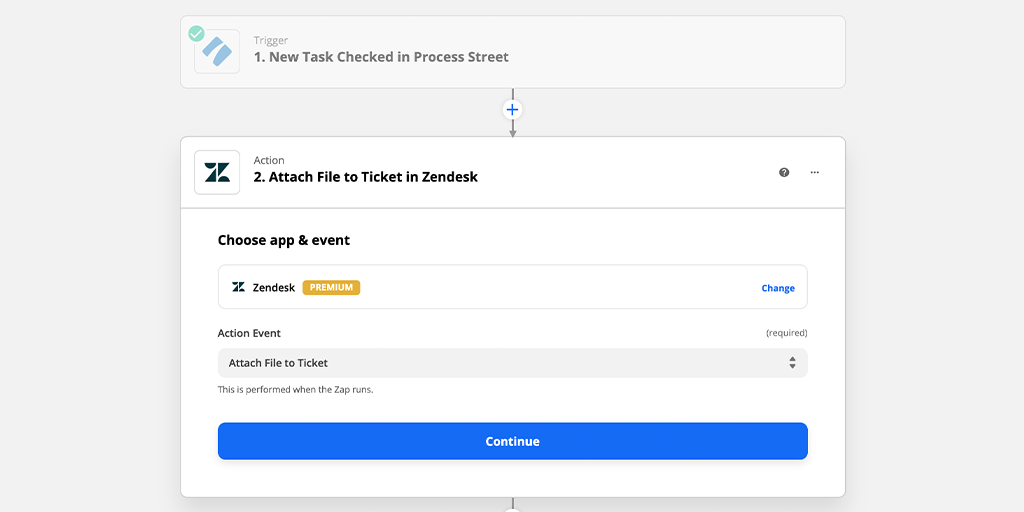
Setting up the Action that Zapier will carry out in Zendesk is much the same as setting up your trigger. You need to choose the app, connect your account, and so on. The best option for pushing information back into Zendesk is to “Attach File to Ticket” since this will keep everything documented clearly and in chronological order.
Search for the ticket that you used when creating the workflow run earlier, fill out all the required fields and use the “Checklist URL” to attach to that ticket in Zendesk.
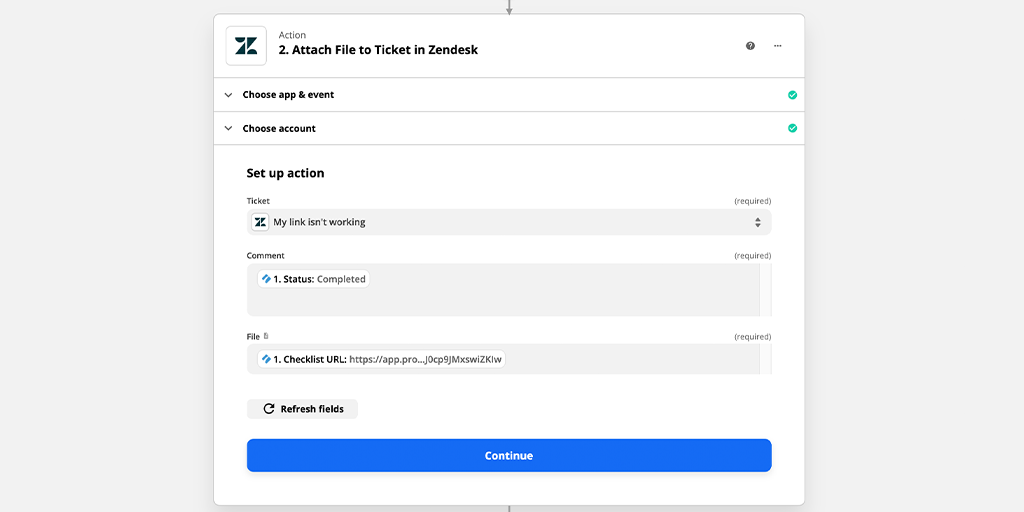
Click “Continue” and test your action.
Your attachment will show in your Zendesk ticket as an HTML file.
Give your zap a name and turn it on to start using it.
Check out our full business process automation guide for full details on how to automate the tasks you hate.
Help us improve this help center.


