
When I started at Process Street, I was just a writer. I had the organizational skills of a child, and I was used to delivering a single piece of work at a time. As I was given more responsibilities, I started forgetting my regular tasks and working on whatever seemed important at that moment.
Since every task management system I’ve tried has quickly become crowded and unmanageable, I decided to create a Process Street checklist specifically for my recurring weekly tasks.
Now, I get a simple list of tasks in my Process Street inbox every week. As I work through them, I can track my weekly progress and use the checklist as a way to report my work to my manager. You can do the same, and it only takes about 10 minutes.
Here’s my checklist:
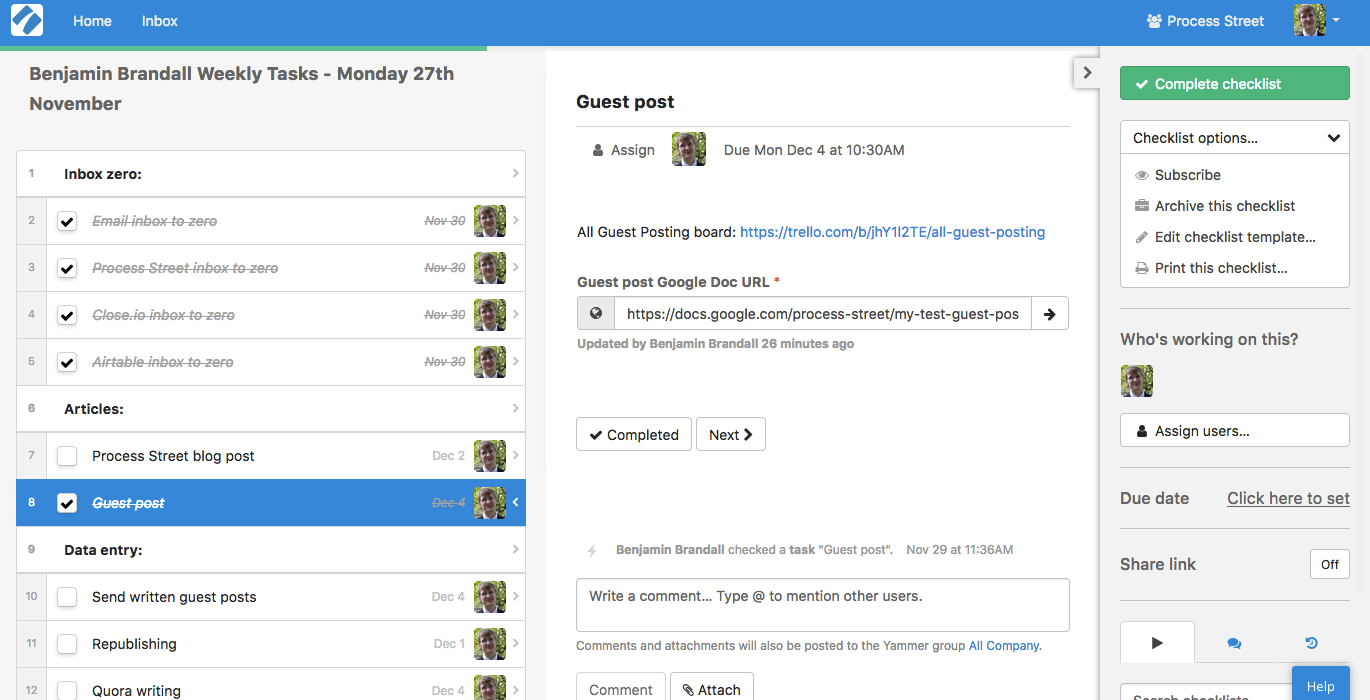
These tasks are automatically added to my Process Street inbox (alongside any other tasks assigned to me), so I can easily see what I need to do.

In this post I’m going to share how I created a weekly tasks template for myself, and tell you exactly how you can do the same. It’s time to stop relying on your memory, improve productivity, and start hitting your deadlines.
Assess your weekly tasks
The first step towards creating a checklist of your weekly to-do list is to get a rough idea of what you do every week. These should be tasks that need doing weekly, regardless of the situation. Hopefully this bit will be easy. For me, it was as simple as looking at my everything-goes dumping ground for tasks — Airtable.
We use Airtable to organize our marketing team’s one-off tasks, but I also have a list for ongoing duties. It’s organized as a kanban board, like Trello. We switched over from Trello to Airtable because Airtable lets us create links between our tasks and our assets, and export useful structured data.
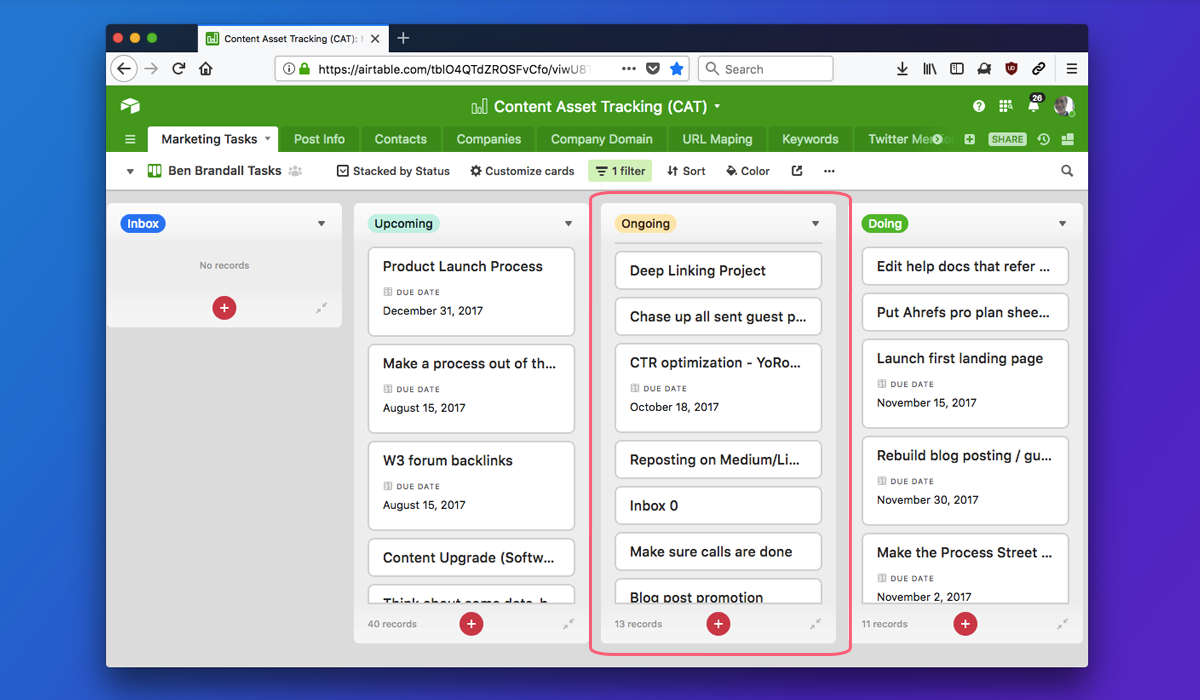
If you don’t have a list of ongoing tasks already, you can use a method I already covered in our guide to task management.
You can take a look at this post on task planning for the full method, but the condensed version is this:
- Quickly write down everything you need to do (don’t bother about making it fancy, a rough list will do)
- Add clarifying information to any vague items — e.g. ‘write post’ becomes ‘write one guest post’
- Remove anything that needs doing less often than weekly, or is a one-off task
To be totally sure you’ve missed nothing, it’d be a good idea to get manager approval on your weekly task list at this point.
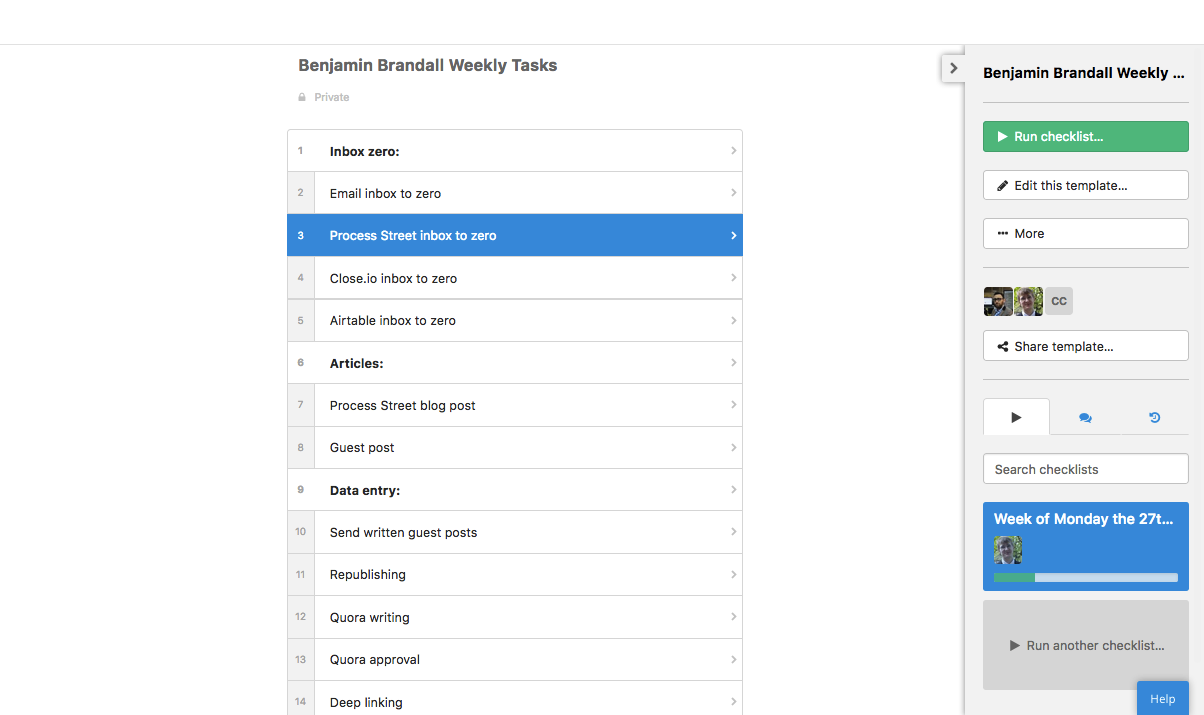
From my first quick brainstorming session, I came out with this list:
Some ideas of tasks you might include:
- Processing your inboxes
- Exporting/backing up data
- Creating content
- Approving content, reports, or invoices
- CRM maintenance
- Follow ups
My own list isn’t perfect, but I can go into the Process Street template at any time to update it. I know it sounds obvious, but I think Process Street is the perfect way to manage weekly tasks. And that’s because I can use this template to automatically run a checklist every week, and then work through it and track my progress.
Later on in this post, I’m going to show you how I use the full range of Process Street features to turn this from a simple checklist into a powerful workflow.
But, for now, let’s dive into a quick tutorial on creating a basic Process Street checklist template out of that rough task list you just created
Create a basic checklist
If you want to create, run and track a weekly task list, Process Street is the best free way to do that. Go grab yourself a free account now — we’ll use it for the rest of this tutorial.
The steps:
- Create a new template by clicking ‘New’ on the left side of the screen
- Name your template ‘Weekly Tasks’ (or anything you like)
- Click into the first task field, and paste your list of tasks in
- Save your changes
Check out the 34-second video below — that’s as long as it takes to do this.
Once you’ve got the basic structure down, there’s a whole range of features you can use to make your weekly workflow run more smoothly.
What about adding some helpful links inside the tasks so you can jump over to the right app more easily?
Head back into edit mode by clicking ‘Edit this template’ on the right sidebar. Click into a task, and you can add all sorts of rich media: text, images, video, form fields, and more.
To make processing my inboxes easier, I’m going to add links to each inbox inside their respective tasks.
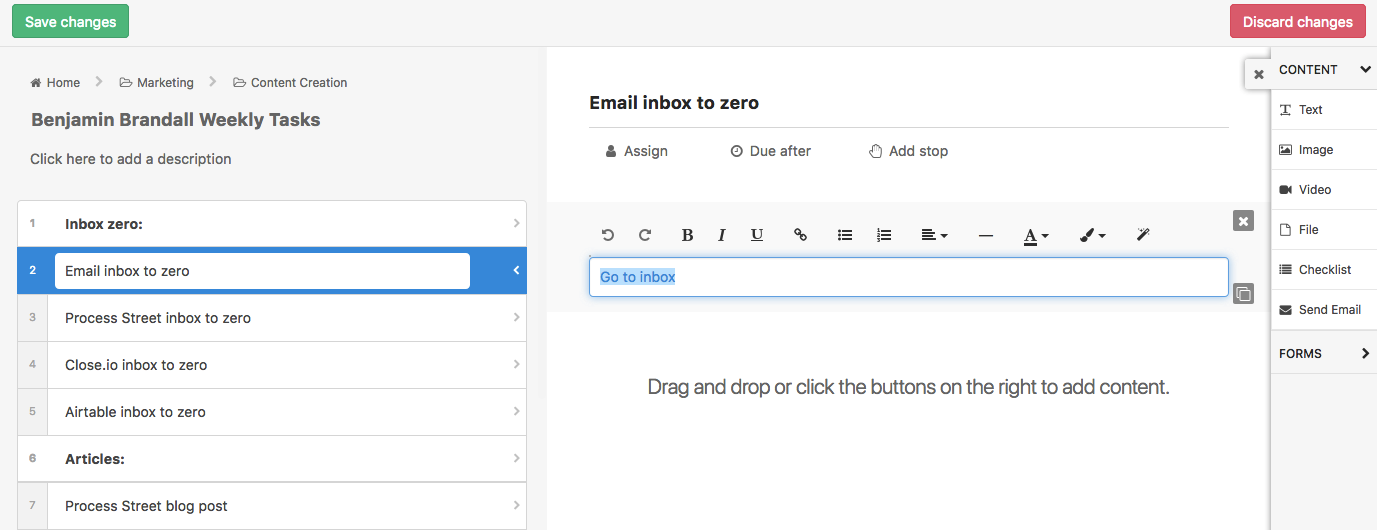
The same goes for anything else that references an external resource. The republishing task runs from an Airtable calendar, so I put a link to the calendar inside the checklist so I don’t have to go searching and clicking around more necessary.
Next up, we’ll be adding ways for you to track the details of your weekly work.
Create form fields to log your weekly progress
Some tasks aren’t as simple as hitting inbox zero — the tasks might need approval or progress updates. Submitting a guest post, for example, can be tracked by pasting a link to the draft into a form field. That’s especially useful if the post needs to undergo manager review because the manager can open your weekly checklist and see the pending work.
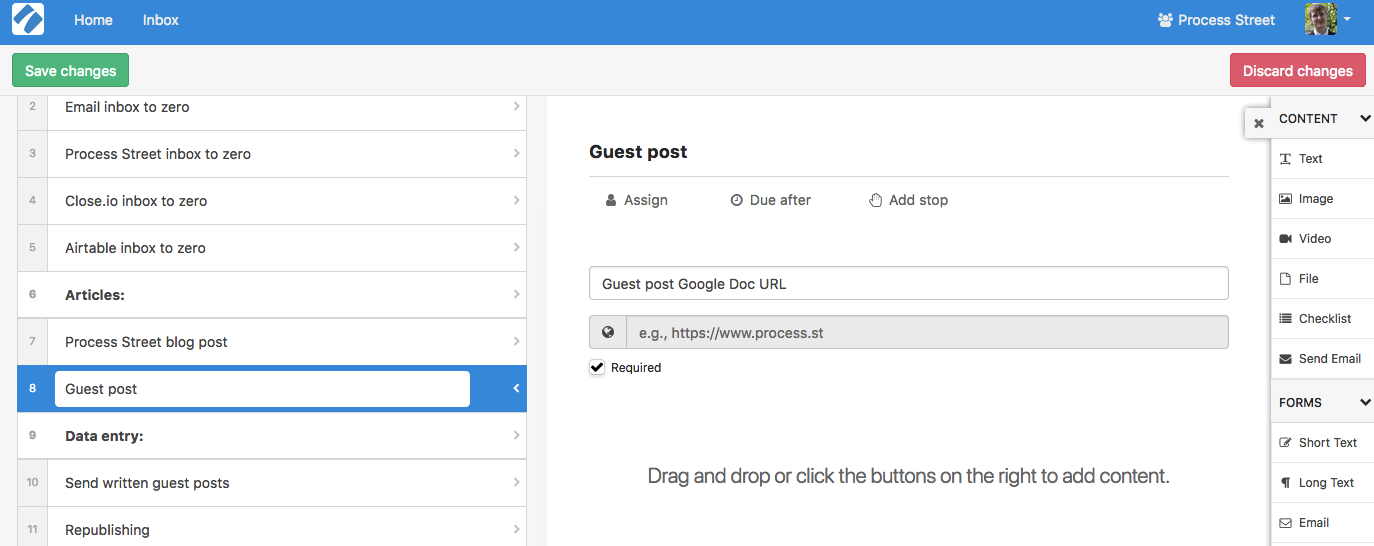
To create a form field like this, just drag an item from the forms menu in the sidebar. In this case, I’ve gone with a URL field.
You’ll also notice that I ticked the box to make the URL field required. This is so I can’t complete my checklist until I’ve submitted a post, which prevents me from overlooking something so important. After all, it’s a task with a deliverable, and I should’ve delivered it by the week’s end.
For ad hoc remarks, you can also use comments inside tasks.
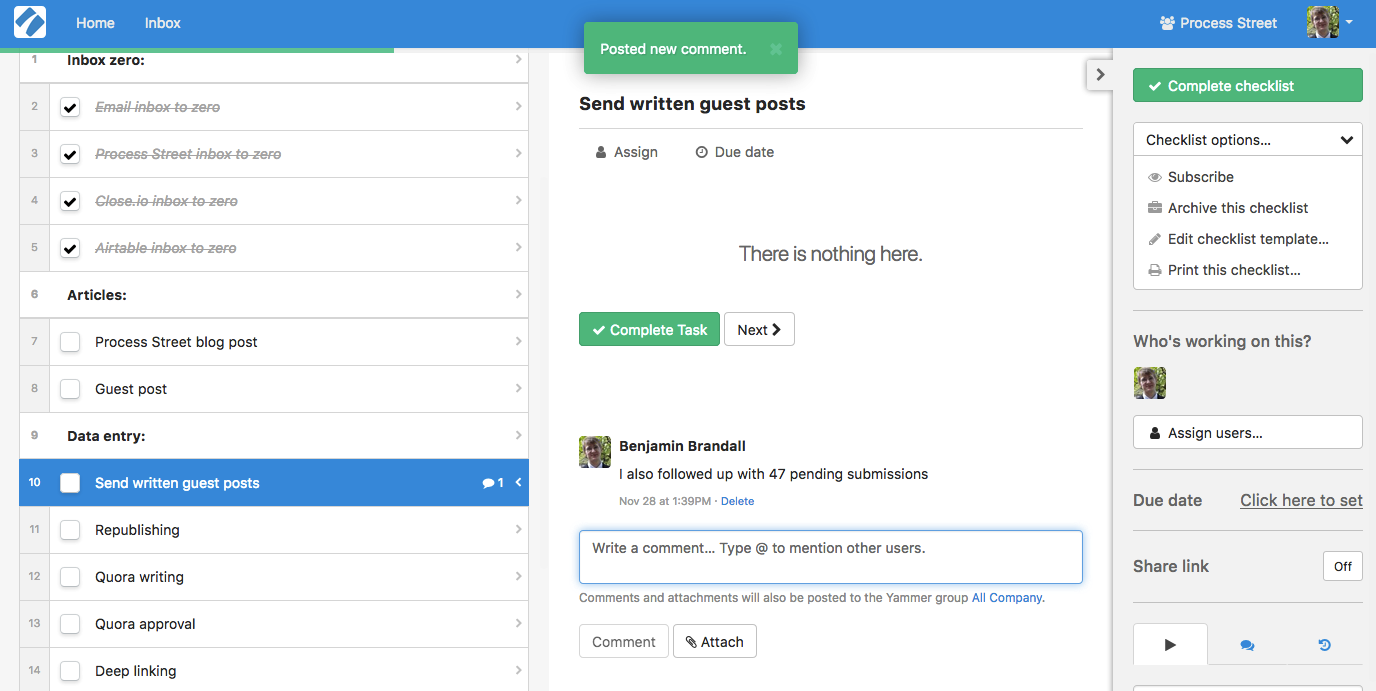
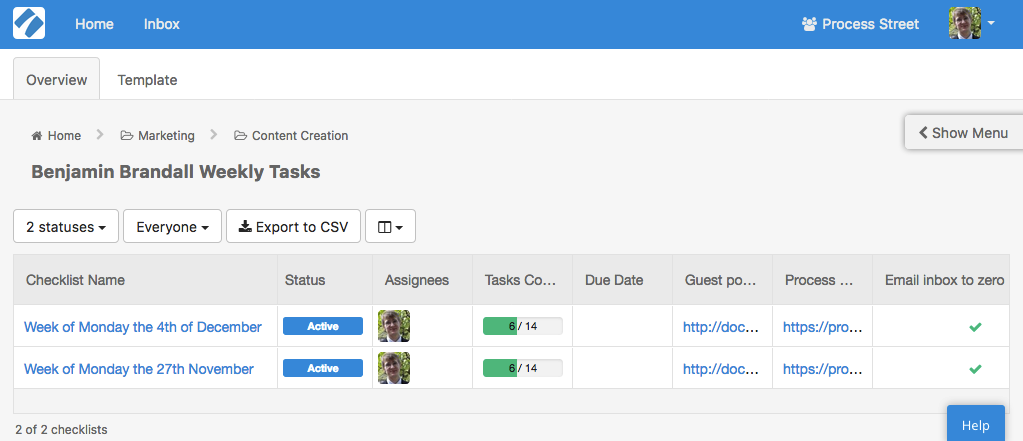
However, the benefit of using form fields for as much as possible is that you can export the structured data, or see it in a table inside Process Street.
As you can see in the screenshot below, with Process Street’s Reports feature, you can see data from all of your Workflow Runs, including information about form fields, the status of tasks, the assignee, and more.
Give your checklist superpowers
Since your checklist is inside Process Street, you might as well take advantage of the useful productivity features we offer. To summarize, you can:
- Schedule your checklist to automatically repeat weekly
- Assign yourself to tasks and add due dates so they appear in your Process Street inbox
- Add integrations to automatically send your task data to other apps
With these additions to my checklist, it would mean that I start every week with a fresh list of tasks in my Process Street inbox. These tasks would have due dates so I know which to prioritize. And, if necessary, I could send my task data to colleagues or format it into other apps with a single click. (For example, when I check off my ‘guest post’ task, the form field URL for the draft could be posted to a Slack channel asking for review.)
Let’s get this set up.
Schedule your checklist to automatically repeat weekly
First, you’ll want to schedule your checklist to run every Sunday so you wake up to your week’s tasks every Monday.
Open the right sidebar menu, and click ‘More’. Click ‘Schedule checklist…’.

On the next screen, you can configure the schedule to run checklists at regular intervals.
In this case, we want it to repeat every Sunday, assign you as a member, be due by the end of the week.
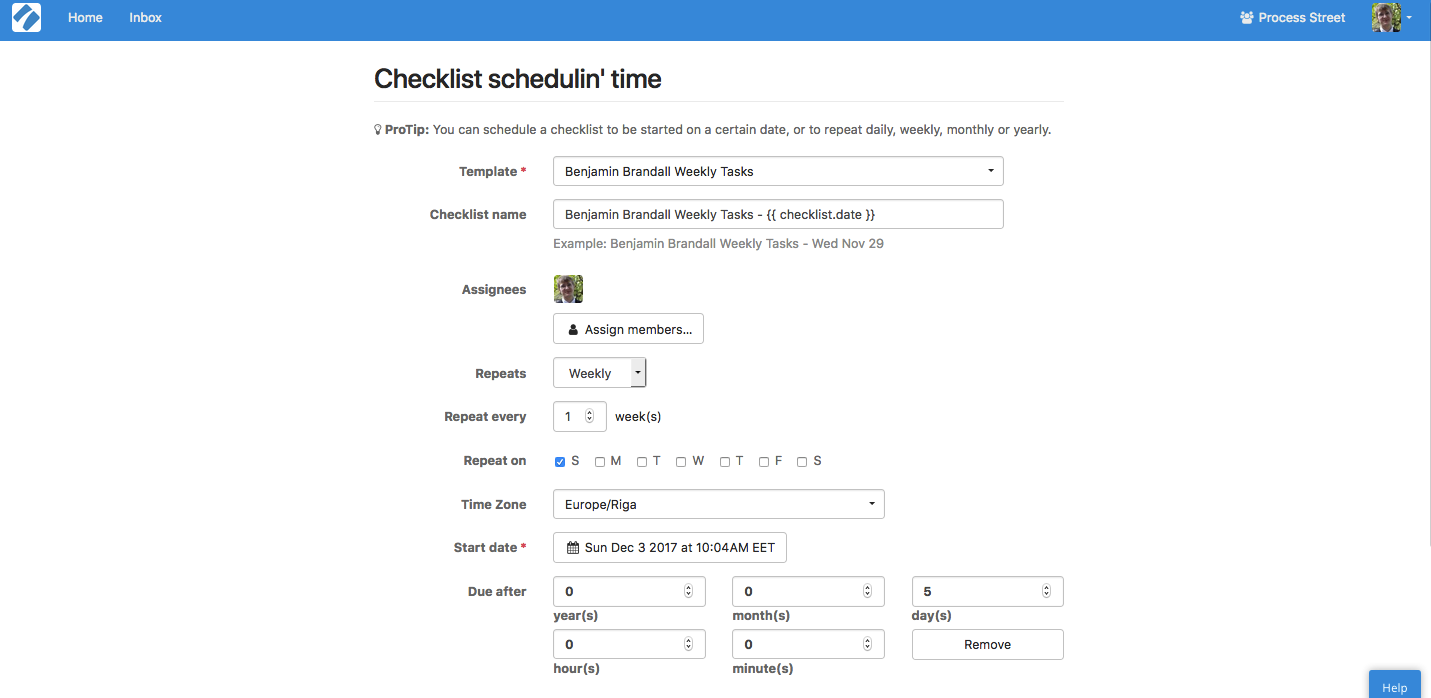
With this setup, I’ll now get my weekly checklist popping up in my Process Street inbox in time for Monday morning.
See every task in your Process Street inbox with due dates and assignments
Process Street’s inbox collates all of your assigned tasks from various checklists in one handy view.
If you’d rather see a task-by-task breakdown in your inbox rather than a single checklist, you should assign yourself to every task in the list individually by editing the template and adding yourself as a member to each task.
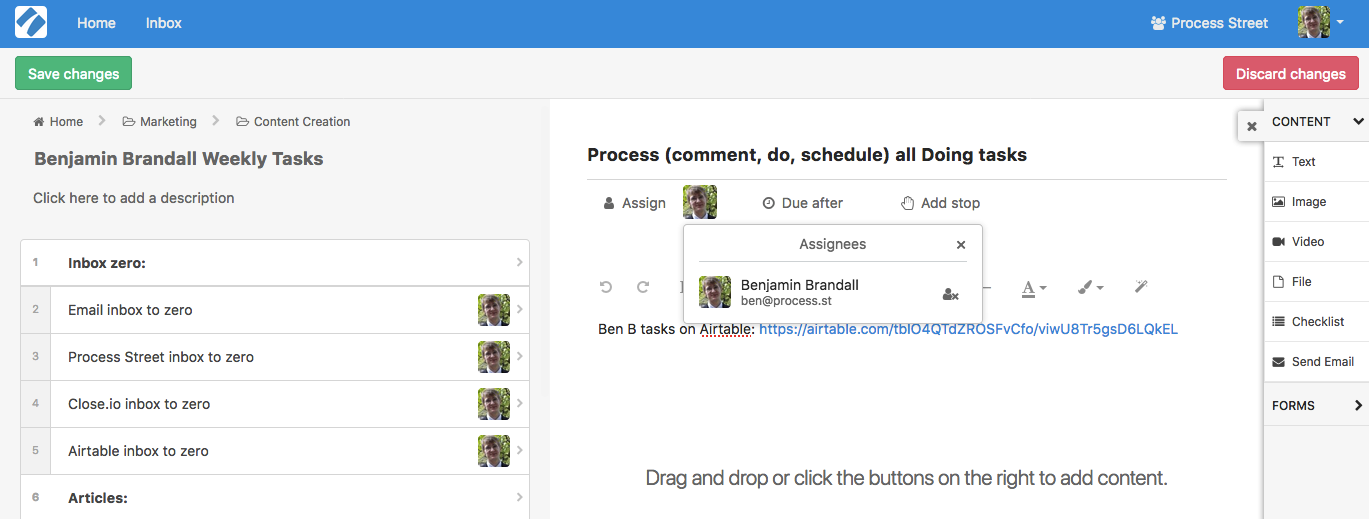
Next, ask yourself whether it matters if these tasks have due dates — do you need to have something done by Tuesday, or is your routine a little more flexible? If you’re responsible for tasks on particular days, you’ll want to make sure you remember by using the ‘Due after’ feature.
For a task due on Tuesday, set the offset for 2 days (since the checklist runs on Sunday).
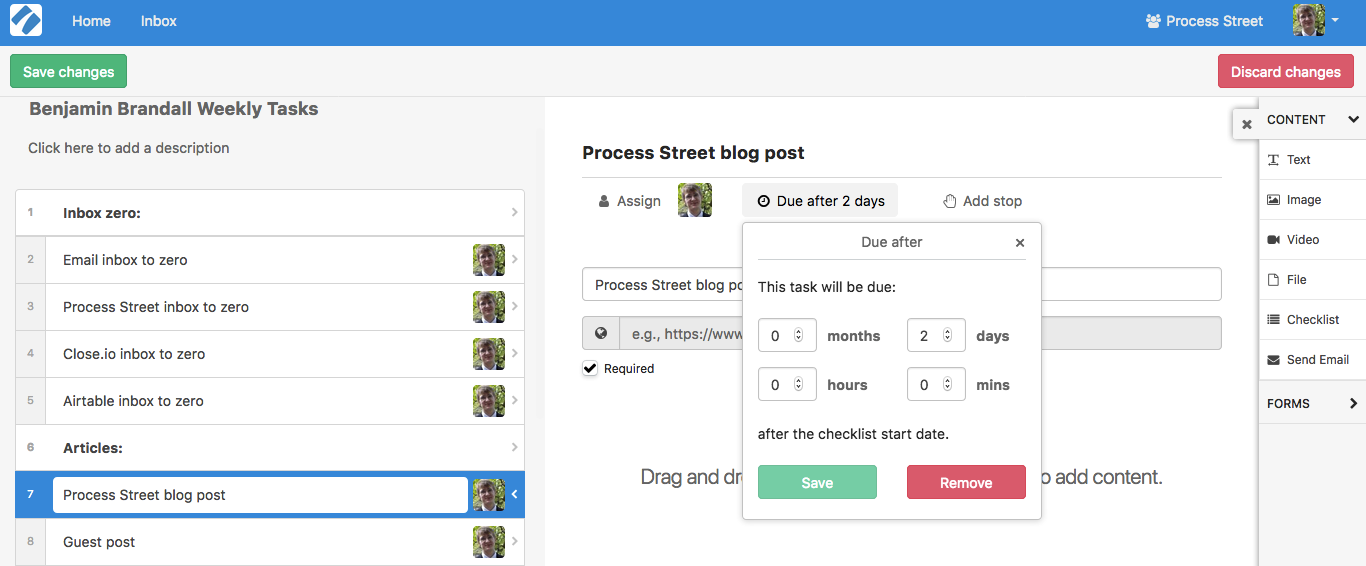
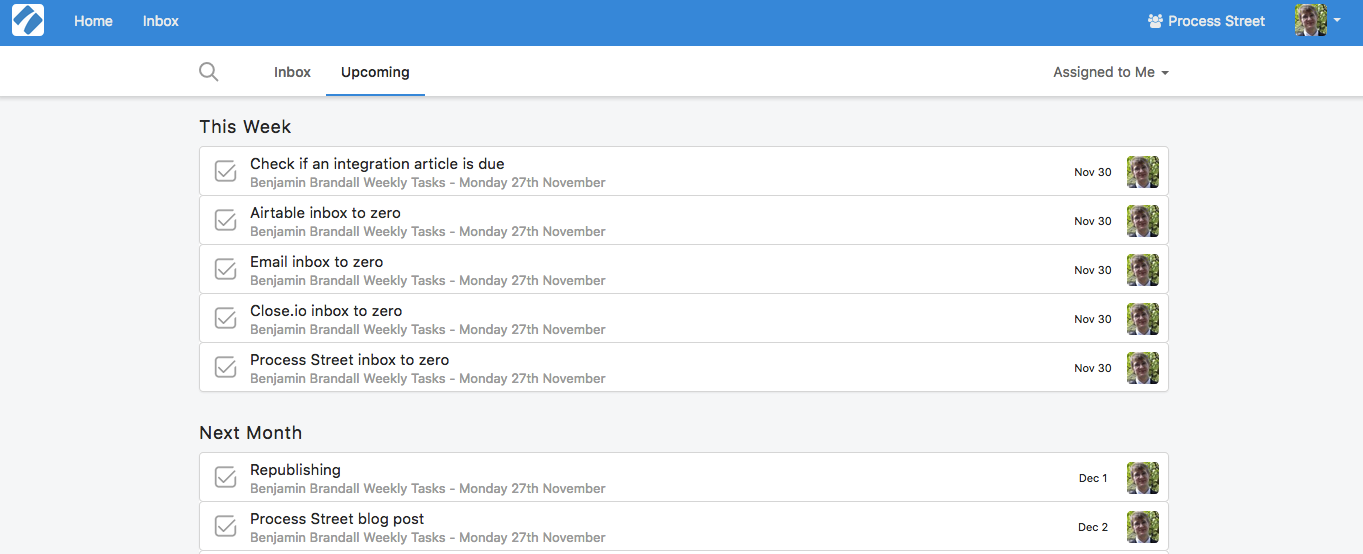
The due dates sync up with Process Street’s inbox, and display the tasks in order that they’re due so you can always work on the most urgent task.
Here’s my inbox after adding due dates to each task:
Add integrations to automatically send your task data to other apps
As Process Street power users might already know, there are a ton of effective integrations you can add to your checklists that help you centralize data, save time on data entry, and send information between different apps. Without going into too much detail (we have an entire ebook for that), I’m going to explain a simple integration you can use to send a Slack notification to your team when you’ve completed a task.
For example, let’s say I want to send the URL of my guest post draft to the content creation channel every time I check the task off for the week.
Start by signing up for Zapier, which is a free platform that can connect over 800 apps using simple rules. If you’ve ever used IFTTT or Microsoft Flow, you’ll already have an idea how it works.
To connect Process Street to Slack, you need to set up a simple rule inside Zapier called a zap.
- Choose Process Street as the trigger (‘New Task Checked’)
- Connect your Process Street account
- Set your template to your new weekly tasks list
- Set the task as a task with information you want to send to another app
Here’s what that looks like:
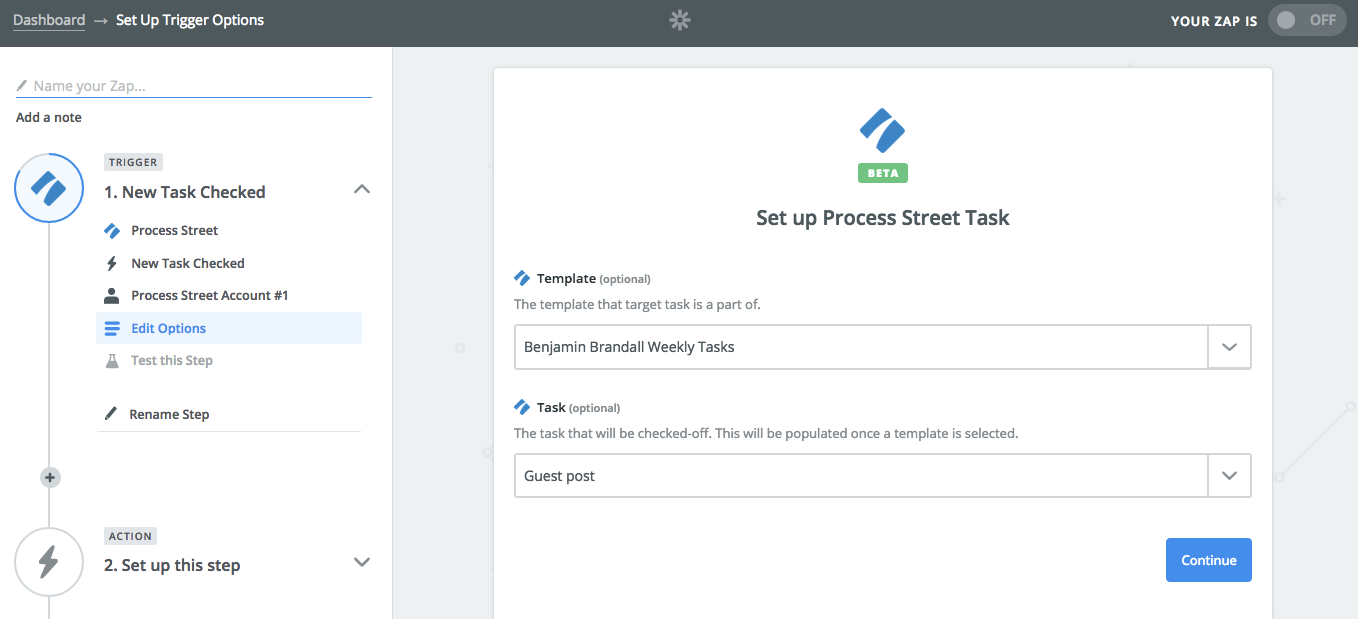
Make sure you’ve put a URL in the referenced task’s form field so Zapier can test the connection.
This part of the zap tells Zapier to watch out for new checked tasks, and to do something with the task data. Exactly what it does with that data is defined in the 2nd half of the zap. In this case, I’m going to set it to send the data to a Slack channel.
Here are the steps:
- Select Slack’s ‘Send Private Channel Message’ as the action
- Connect your Slack account
- Set the Slack channel to which you want to send Process Street task data
- Write the message text, and use the ‘Insert a Field’ button (top right of the message text box) to use the Process Street form field
Here’s what that configuration looks like:
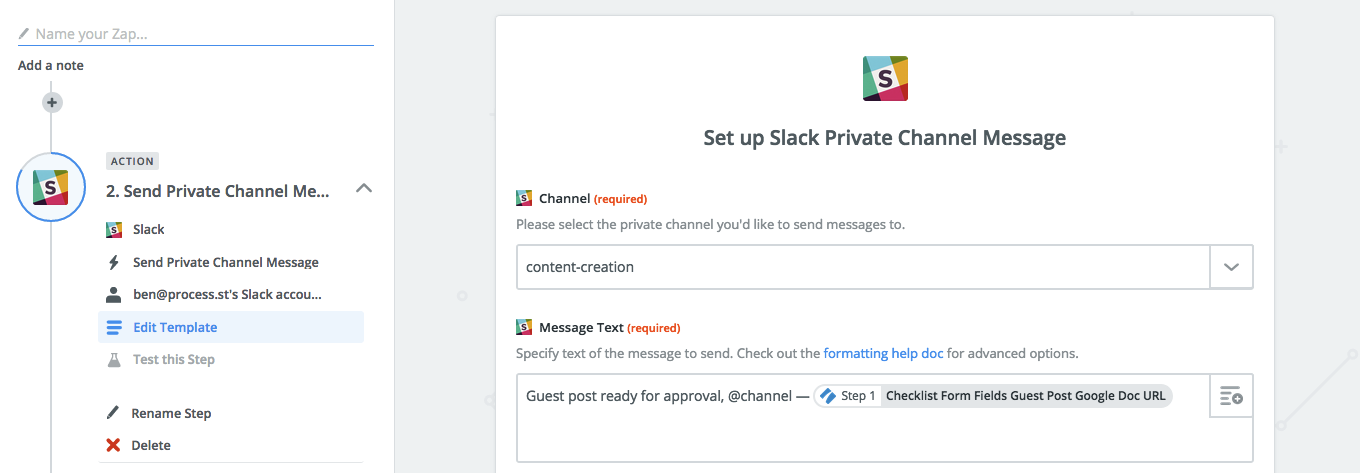
Now, when I go and check the defined task of any future weekly checklist, Zapier will automatically send that data to Slack, like this:
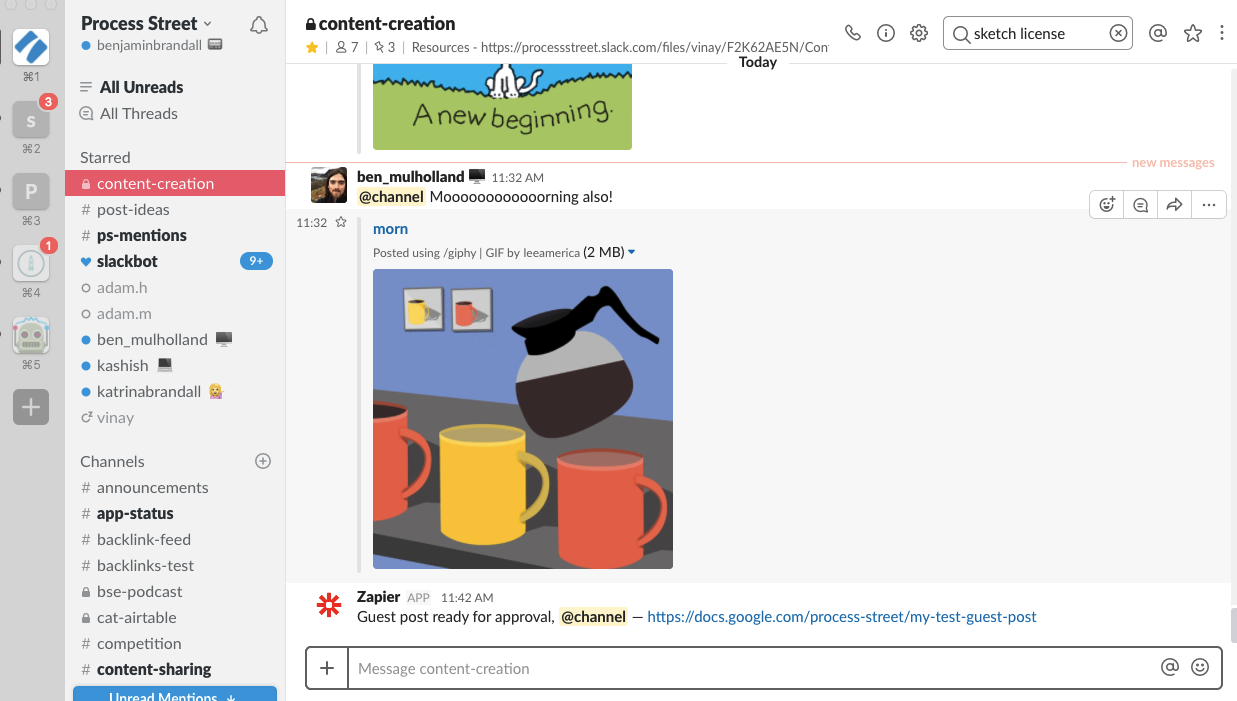
That’s just one integration out of a near infinite amount of possibilities. For more ideas on how you can automate Process Street checklists, see this big list.
Using your new weekly workflow
Once you’ve got this set up, the fantastic thing is that it’s all automated from then.
Every week, a fresh set of tasks will automatically be added to your inbox and you’ll know the urgency of each. The only thing you need to do is to check your Process Street inbox and complete tasks as they appear. Since your Process Street inbox is where the rest of your tasks also live, you can use inbox as a way to get a bird’s-eye view of your responsibilities.
With integrations, you can send structured data to other apps and save yourself some time you might otherwise waste on data entry.
Here’s an example weekly template designed by Ben Mulholland for a marketing employee. You can add it to your own organization and tweak the tasks, if you’d like.
I hope this post has helped you restructure your weekly workflow and get a handle on those pesky tasks that sometimes slip through the cracks. Let me know in the comments if you’ve tried this method — I’d love to chat.


Benjamin Brandall
Benjamin Brandall is a content marketer at Process Street.