In this lesson we’re going to cover:
Estimated time for this lesson ~ 25 minutes
This lesson is part of our onboarding program. Find out more about what you’ll learn from the program when you’re getting started.
The steps below outline how to build out your content from scratch, but there’s a quicker way! Discover how Cora AI can create content for you with just a few clicks.
Here’s an easy way to remember the difference:
Content = Giving information
Think about showing someone a video, an image, or some embedded content on how to complete your process. Give them a file or a document you’d like them to read or complete. Explain what you’d like them to do with some clearly written instructions or reminders.
Form Fields = Collecting information
Form fields let you gather contact names and email addresses, save a website address, or collect someone’s business address for later use. Got it? Great!
You’re at the point now in your Process Street learning curve where you’ve built out your priority process, added tasks, headings and form fields and run and/or scheduled some workflow runs from that lean-looking process. Now is the time to start perfecting that content, to add the proverbial icing on the cake, and maybe even a cherry or two on top!
Adding content to your workflows helps you define that process so that any users working through your workflow runs have a clear visual or written guide to help them understand how to do it. There may be some instances where you don’t need to add that much to your processes, but trust us, a little bit of content goes a long way.
Content creates consistency
Showing someone how to complete a task or to perform a process, helps them do it in the right way (and the same way) each time. Whoever fills out the workflow run has a guide to refer to each time they do it, and each new person sees the same guide, so they can follow the same instructions in the same way. Result = consistent output from your team.
Address learning styles
Another thing to consider is the way that people learn. Ever heard the phrase “Everyone learns differently?” It’s true. Depending on who you ask, there are at least three key ways that people learn; by listening, by watching, and by physically doing something. Therefore using different styles of content can help you engage those people with different styles of learning.
Think about this training program you’re undertaking with us.. it’s not just words, right? If you keep a balance of audio, visual, and written content in your workflows, all those learning style bases are covered.
Audio-visual content
Think about using a video guide that shows someone how to correctly perform that task before completing it on their workflow run. They can run through the actions of how to perform the task properly, listen to the instructions spoken in the video and pause it, or watch it over and over again to perfect it.
A picture (or a diagram) speaks a thousand words. Think about adding an image of a flowchart to your workflow, an image of how an object should look when it’s packaged properly, or how someone’s uniform should be worn.
As well as using static images, you can also embed visual and audio-visual content into your workflows and workflow runs.
Written content
Outlining your process in words is perhaps the easiest way for many people to explain how to work through a process. In your workflow editor, you’ll find lots of ways to highlight and embellish your words with some handy text editing tools.
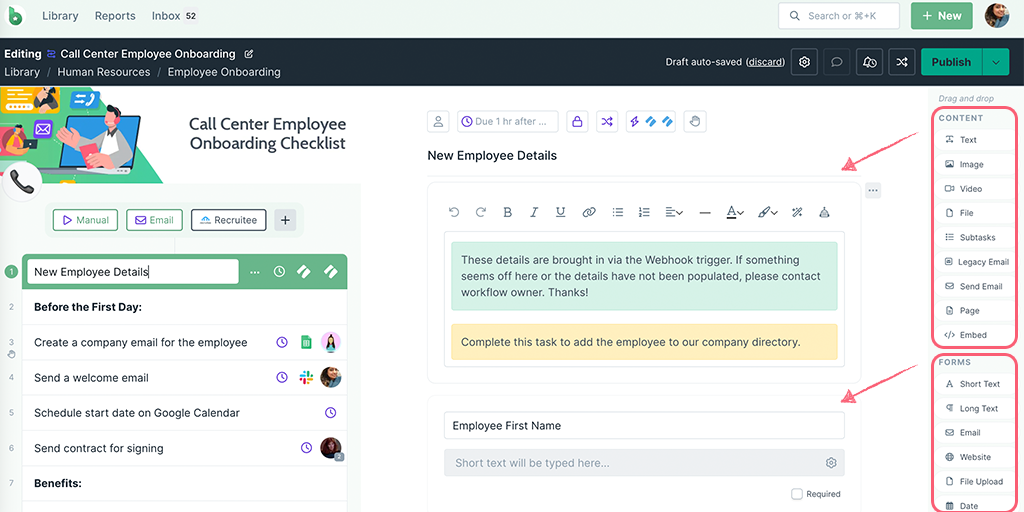
This is easy as 1, 2 (no 3 needed!) No really! Have we told you about the #NoCodeRevolution? We mentioned it in an earlier lesson, but don’t worry if you can’t remember that just now, you’ve been learning a lot young Jedi…
All you need to do to add content widgets is drag and drop them into place and start using them. Simple as that. No lessons needed.
Pro Tip: Collapse the form fields widgets if you’re only working on adding content fields.
Moving content
Within a task, you can drag and drop it into place. The green highlight shows you where you are about to drop it. Alternatively, you can click on the three dots next to the field and select the move up or move down option to move content around the page.
You can also move content from one task to another using the same three-dot menu, or duplicate it and then move a copy to another task.
Duplicating content
Each piece of content you use in your workflow can be copied or duplicated within a task. Click the three dots next to the field and select duplicate.
Deleting widgets
In the same three-dot menu, select delete to remove a content or form field.
Remember that you can always add content to your workflows further down the line, or as and when you need to. You can also push the changes live to all your active workflow runs at once so that your processes are always kept up to date.
Content upload limits
When uploading videos, images, or documents to your workflows, bear in mind that there are individual upload limits for each file. If you hit a snag when uploading a file, please contact our Support team.
You’ll start to build out more engaging workflow runs, which will be more informative, visual, and explanatory. They will provide your team with a better guide, give them a level of consistency to work with and also give them accountability (which you can reward them for later 🙂 )
One of our customers, Global AG Input have realized just that; that many of their processes need to be developed over time, and frequently are:
![]()
“These processes, once designed and written, can still be improved and often need to be changed. With Process Street, you can modify process workflows and push the new revision live immediately. This can auto-update existing and old workflow runs or you can do it manually, only changing the ones you really need.”
Head to a workflow that you’d like to add content to and choose at least one of these content types to add in:
You can delete individual widgets once you’ve added them, or you can delete a whole task, which will delete all the form fields within that task at the same time.
Go back to your priority process for starters, remember the first workflow you started to build? Work through each heading and each task, to see where you’d like to add content and get stuck in!
Next lesson: Adding form fields >
< Previous Lesson (Outline your Process)
< Back to the Getting Started home page
Help us improve this help center.


