In this lesson we’re going to cover:
Estimated time for this lesson ~ 20 minutes
This lesson is part of our onboarding program. Find out more about what you’ll learn from the program when you’re getting started.
The steps below outline how to add form fields from scratch, but there’s a quicker way! Discover how Cora AI can generate form fields and content with just a few clicks.
Form fields are handy little widgets that allow you to collect data within your workflow runs. They can pass that data on to other parts of your workflow run, and even share the data between other platforms or apps (we’ll get back to this final part later on).
They are super easy to add to your workflows, by dragging and dropping them as you build out your process – remember there’s no coding needed to use Process Street! #NoCodeMovement
Find the workflows you’d like to work on, or create a new blank workflow.
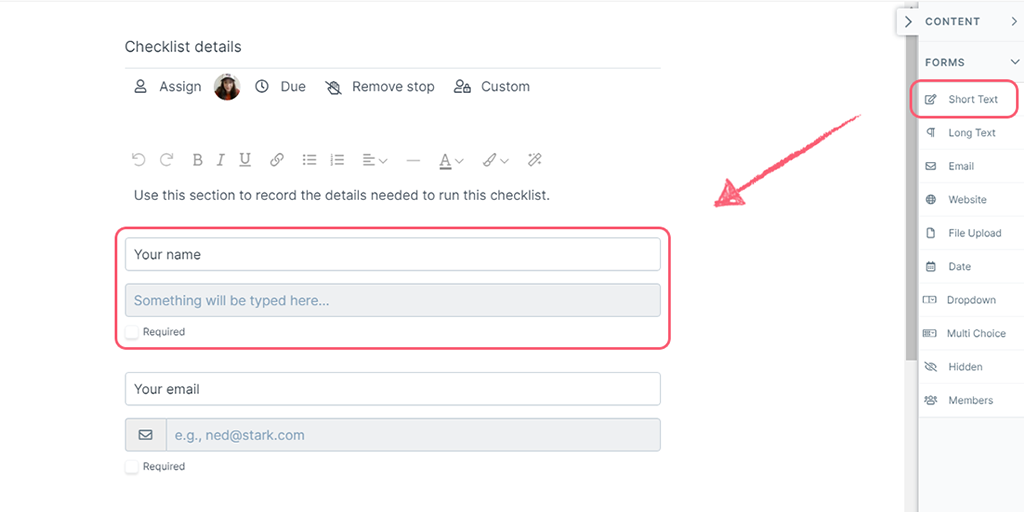
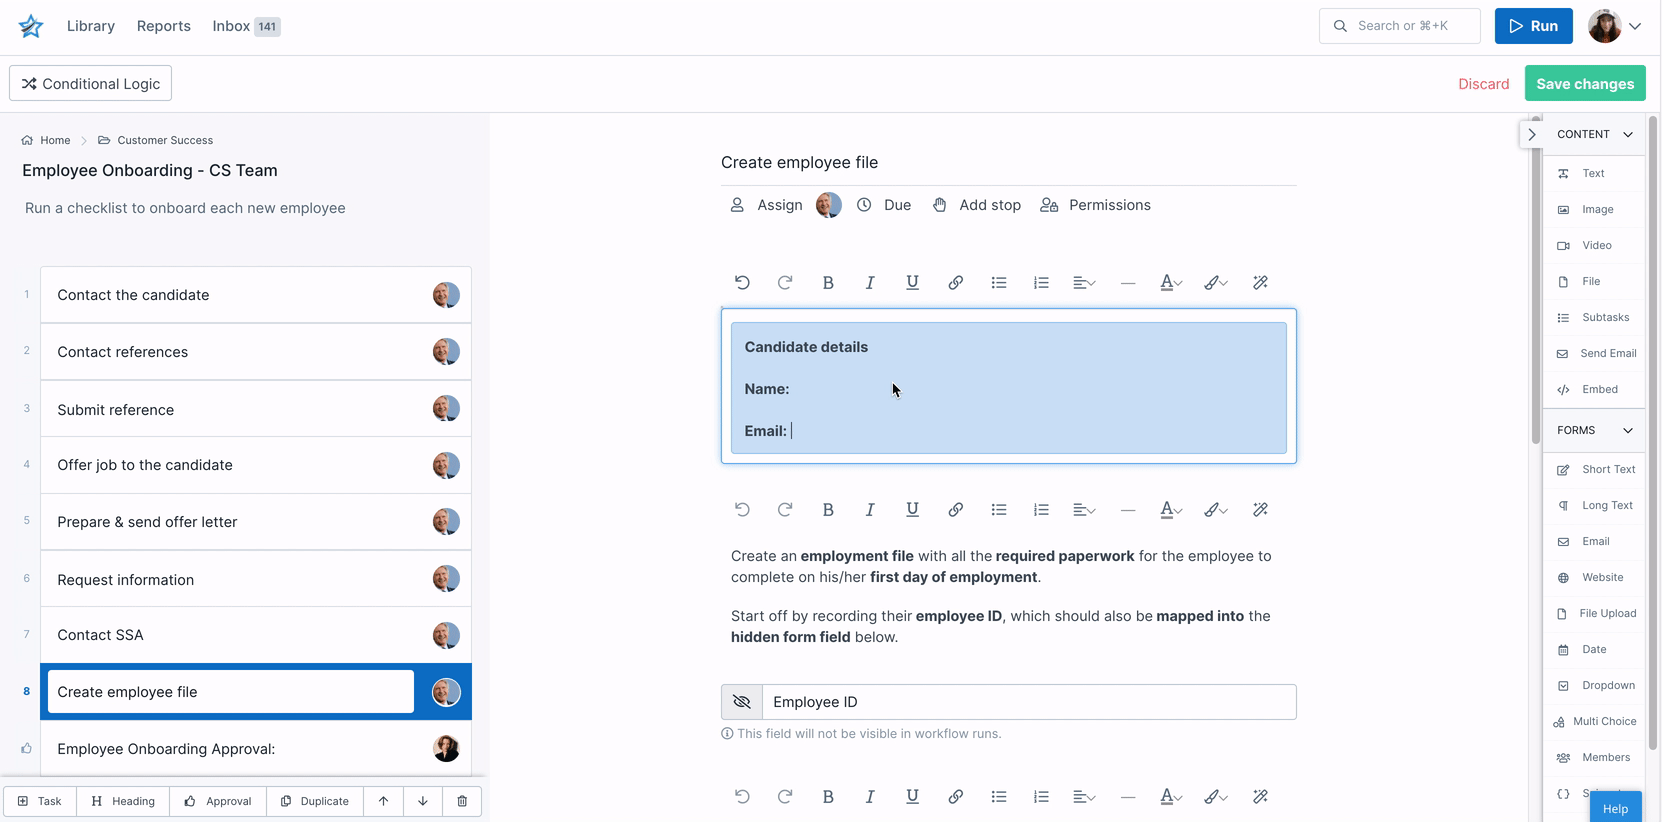
Click your workflow’s name to open up the right-hand menu and click “Edit“. Look over to the menu bar on the right of your screen. This is where you will find the form fields to drag and drop into your workflow.
Pro tip: Collapse the content fields at the top of the right-hand menu and expand the forms section so you can see the form fields clearly, as shown above.
Some of the form fields can be used as variables, which allow you to pull data to other places. We’ve mentioned which ones you can use as variables below, and we’ll explain more about how to use them later on.
The short text field is best suited for recording aspects such as employee or company names – any data which is guaranteed to be no more than a couple of words. The character count in short text fields is 254 characters.
This form field can be used as a variable, in workflow run links, and in Conditional Logic.
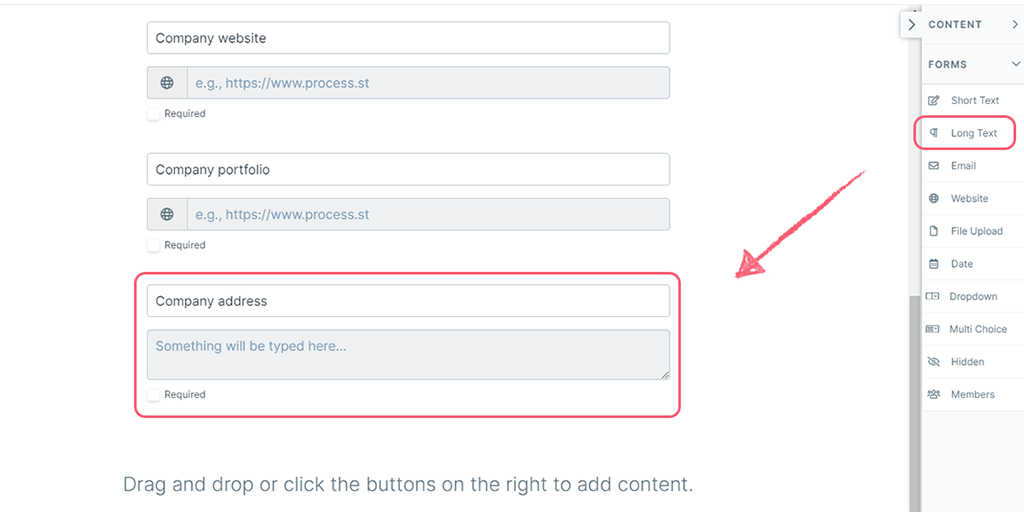
The long text field is best utilized for extra details or any information which is likely to go beyond 3 to 4 words. For example, you could record additional inspection or meeting notes, a support conversation, or an address. Using long text fields allows you to use more character or word count than a short text field.
This form field can be used as a variable, in workflow run links, and in Conditional Logic.
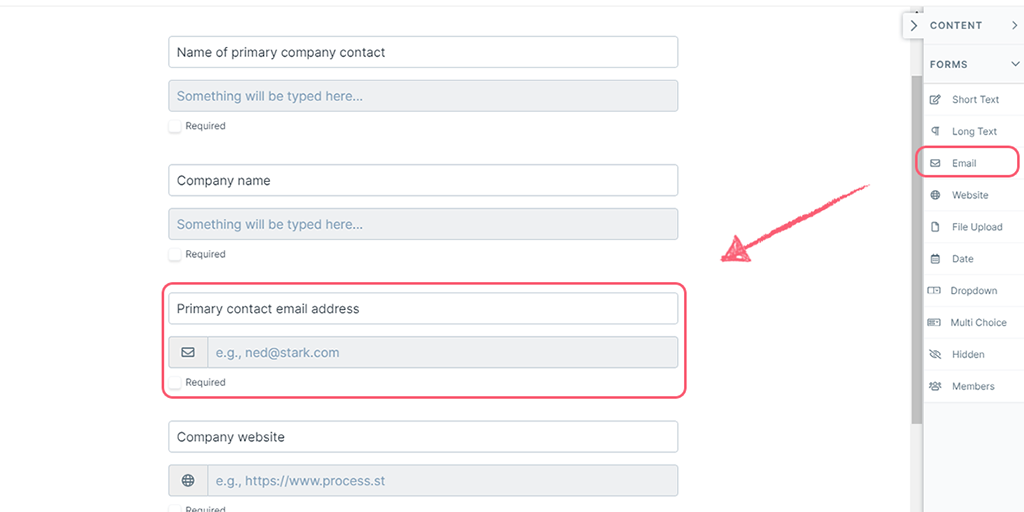
Email fields do exactly what they say on the tin; they store email addresses. Using these instead of the standard single-line fields will allow you to quickly differentiate between email addresses and other information, as the symbol is unmistakable. It will also allow you to use that email address in a Role Assignment.
Storing email addresses in these fields also makes it easier to integrate your workflow run with another app to send emails automatically. The information is separate and so easier to locate.
This form field can be used as a variable, in workflow run links, and in Conditional Logic.
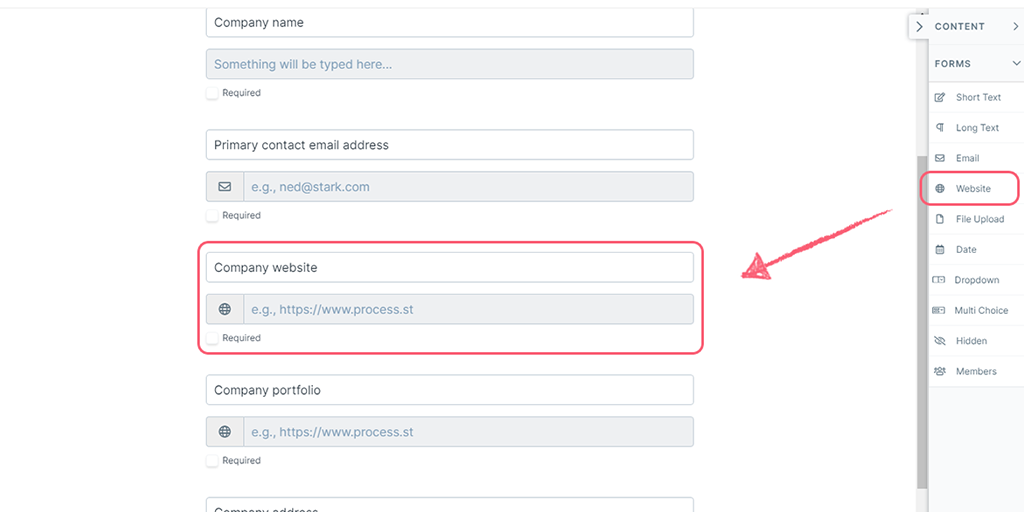
Website fields are specifically designed for storing URLs. Much like email address form fields, it is easier to distinguish them from single-line field data, but also to make integrations a cinch.
This form field can be used as a variable, in workflow run links, and in Conditional Logic.
The numbers field is designed for collecting numeric data in your workflow runs — quantities, amounts, scores, prices, or any other value that needs to be a number. It validates input so only numeric values are accepted.
This form field can be used as a variable, in workflow run links, and in Conditional Logic.
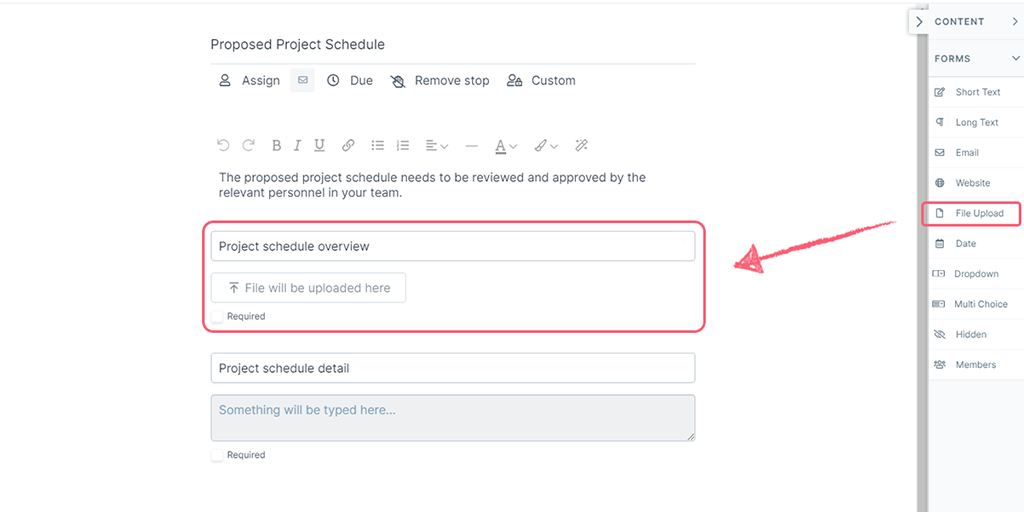
The file upload field allows the user working on a workflow run to upload any important file of their choice into it. For example, if an important document needs to be signed, a copy of the signed version can be scanned and then uploaded to your workflow run for safekeeping. See file upload limits.
This form field can be used as a variable, but not in Conditional Logic or workflow run links.
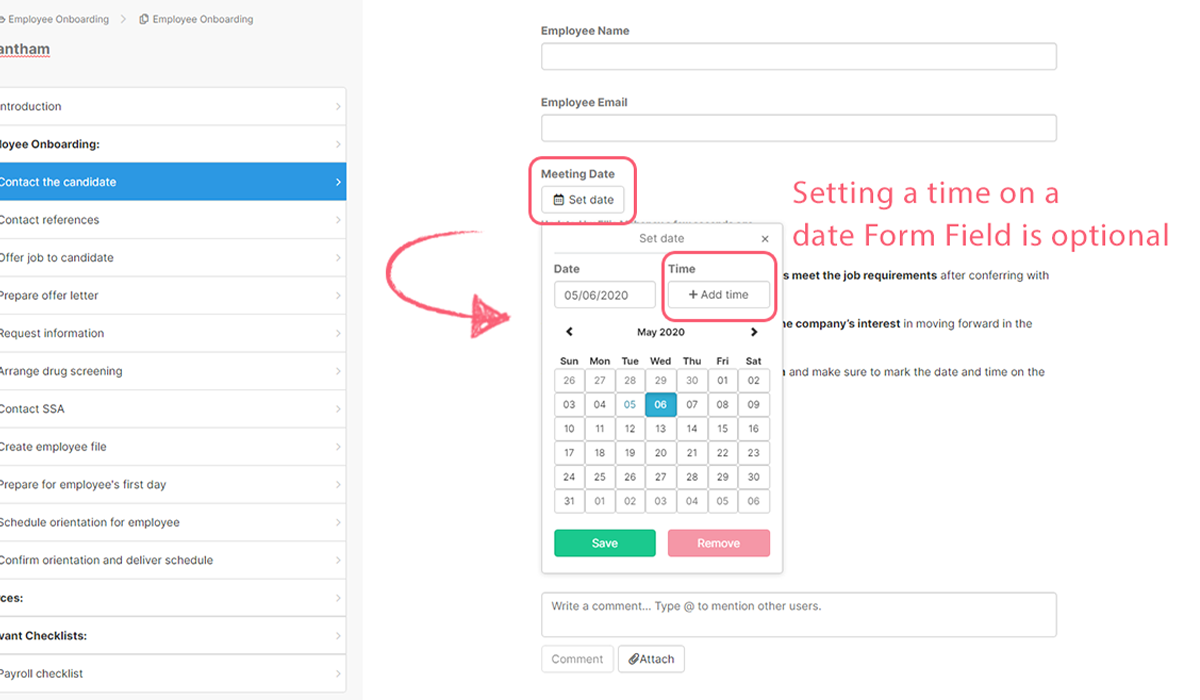
Date fields are perfect for just that – dates. Whether you’re recording the date that workflow run was started, a due date for a particular task, the time of a support conversation, or even the start and end of an upcoming holiday, any and all important dates (and times) can be set in stone.
This form field can be used as a variable and in Conditional Logic, however, you cannot use it in workflow run links.
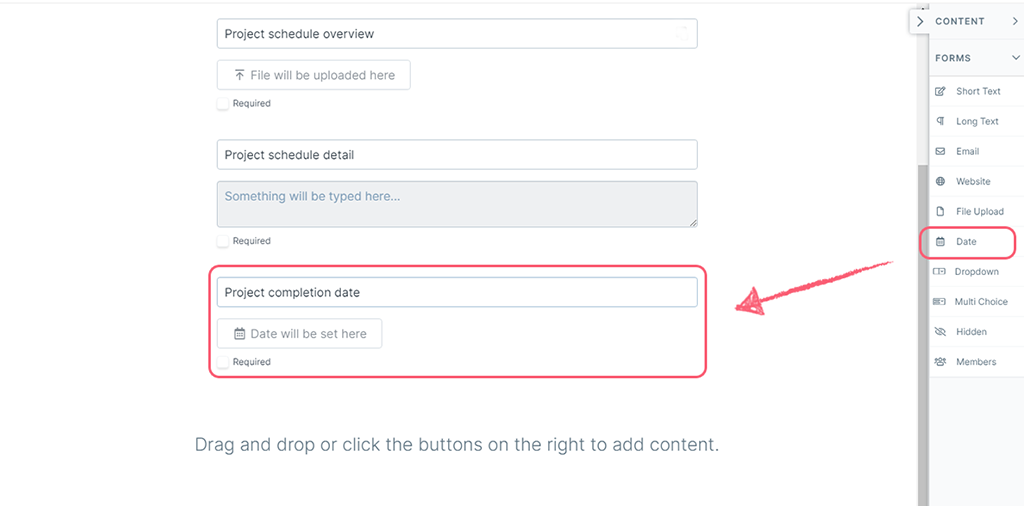
Date fields can be used in Conditional Logic and can be used to set Dynamic Due Dates. If you have a workflow run with a date form field in it, you are able to select a date (adding a time is optional).
For any automations or dynamic due dates where you haven’t set a time, the default time will always be 8 am PT.
Note: To strip out the time from a date field in automations or to alter the date/time formatting, you can use Zapier formatter.
Dropdowns are a fantastic way to add choices into your workflow runs. They allow users to select a single option from a dropdown list that you have predetermined.
For example, a potential drop-down could be “Project Status”, and the options could be “Incomplete”, “Awaiting Review” and “Complete”.
This form field can be used as a variable, in workflow run links, and in Conditional Logic.
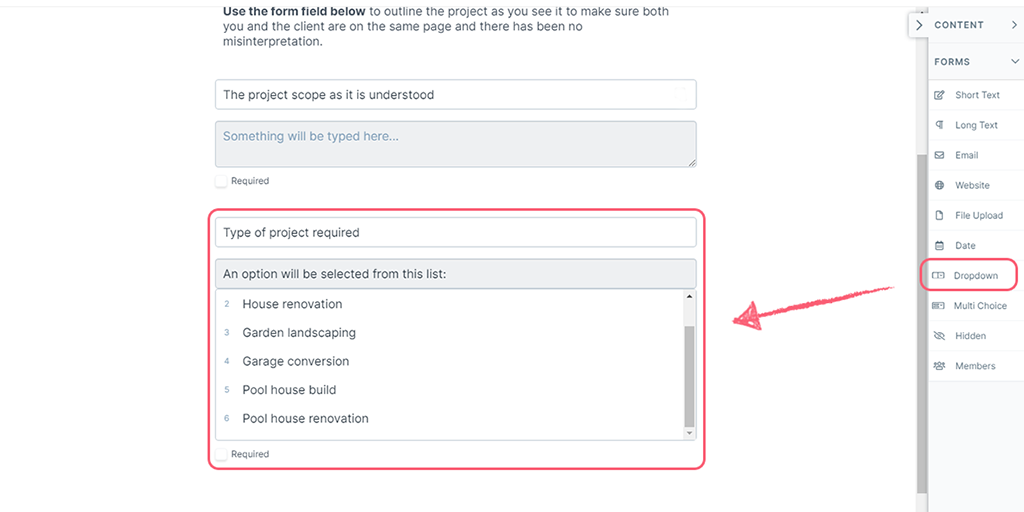
Pro tip: Use the backspace key to delete dropdown fields you don’t need, or hit the enter key to add more fields into your dropdown.
The multi-choice field is similar to the dropdown field, except that multiple options can be chosen at once instead of only one.
For example, you could have multiple options that you can include in a package for a client. Package A, B, C, D, E, and F. With the multi-choice field you can select all of the relevant options that the client may want, so you could select all or some of the choices.
This form field can be used as a variable and in Conditional Logic, however, you cannot use it in workflow run links.
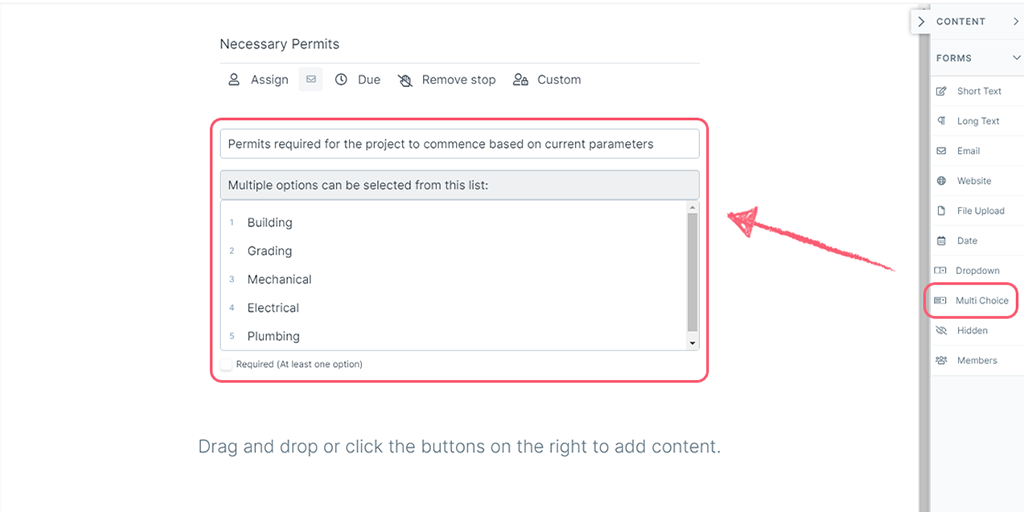
Pro tip: Use the backspace key to delete extra fields you don’t need, or hit the enter key to add more fields.
The table field lets you collect structured, tabular data within your workflow runs. Use it when you need to capture multiple rows of related information — for example, a list of line items, inventory counts, or attendee details. Each column can hold different types of data, and rows can be added as needed during workflow runs.
This form field can be used as a variable.
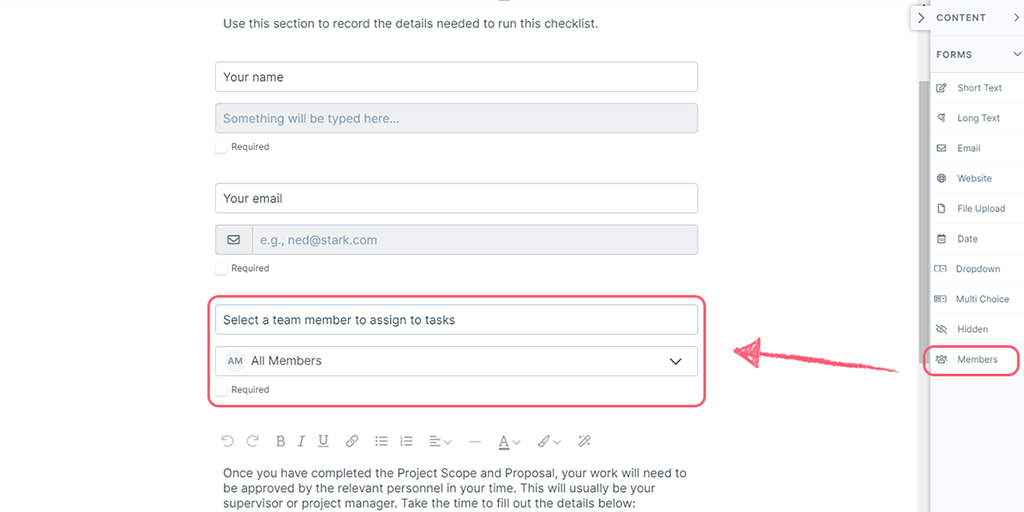
The users field displays a list of users from your Process Street account. You can also limit the list to only display users in a certain group.
This is a useful field when you are organizing work. For example, in an employee review, you might want an employee to choose their manager from a group of managers. Or for New Client Onboarding, you could specify who the client’s Account Manager is.
This form field can be used as a variable, but not in Conditional Logic or workflow run links.
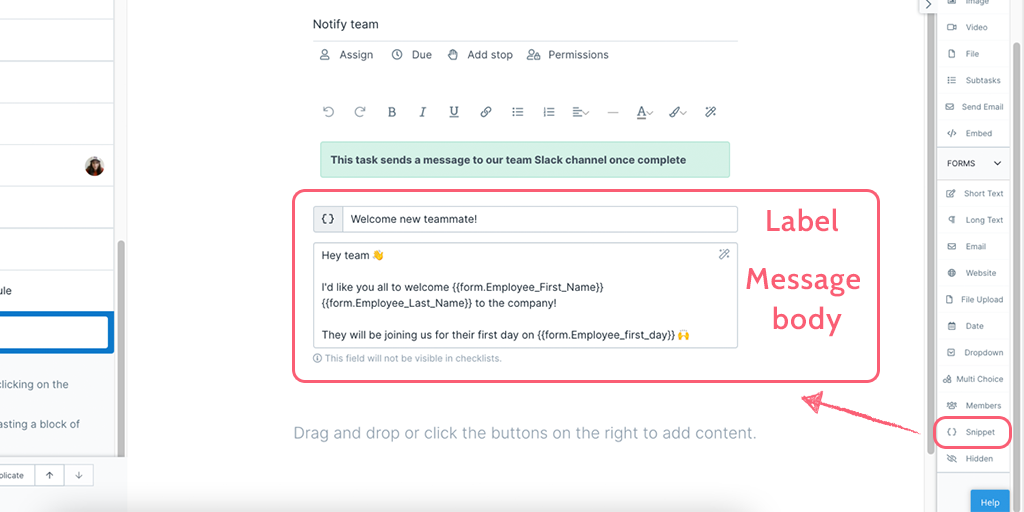
A snippet field can only be seen when editing a workflow and is used for passing text or variable data (or both) into Process Street’s automations, or into other apps.
Give your snippet a name or label, so that you can identify it easily when setting up automations. Next, start typing your text and use the magic wand icon to add any variable data fields into your message that you need.
For example, you can create a custom message in a workflow, which you use to send out, via an automation, to your team’s Slack channel. Learn more about how to create automations for Slack and other apps.
You can also use a snippet field without variables, to pass data into another app via an integration, for example, a picklist in Salesforce.
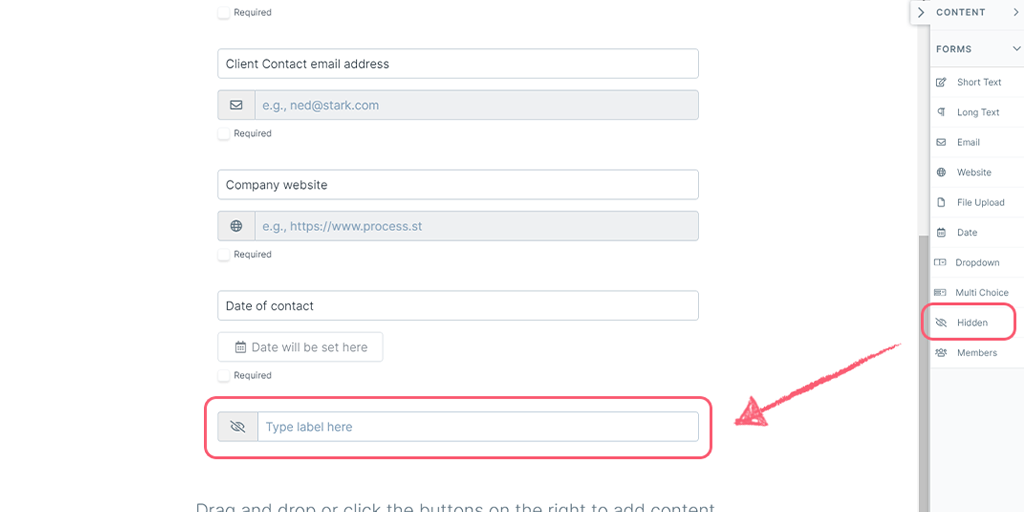
A hidden field can only be seen when editing a workflow and can be filled in by populating the field with data using integrations. This field is best suited for recording vital information which will never change and is unique.
For example, an email could change, so it’s best stored in an email field. However, a customer ID from your CRM will never change; this, along with any other kind of ID, is the main use for hidden fields.
This form field can be used as a variable and in workflow run links.
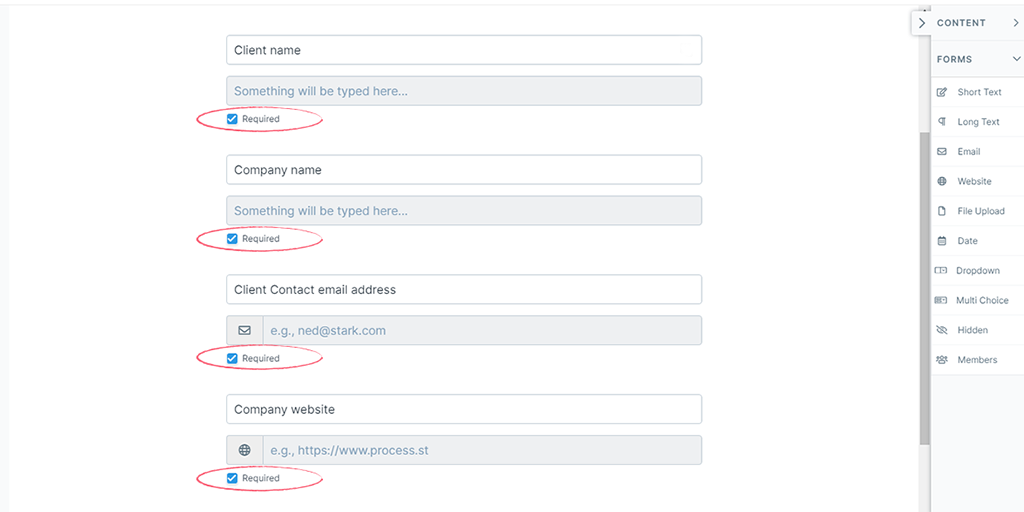
You can set form fields to be required fields so that when someone is filling out your workflow run, they can’t complete that task (or the run overall) before they have filled out the required data.
To make a field required, edit your workflow and check the “Required” checkbox underneath the fields you’d like to make mandatory.
What’s the difference between Content fields and Form fields again? This is our handy way of remembering the difference: Content fields are used to share or give information, whilst form fields are used to collect or gather information. Got it? Good!
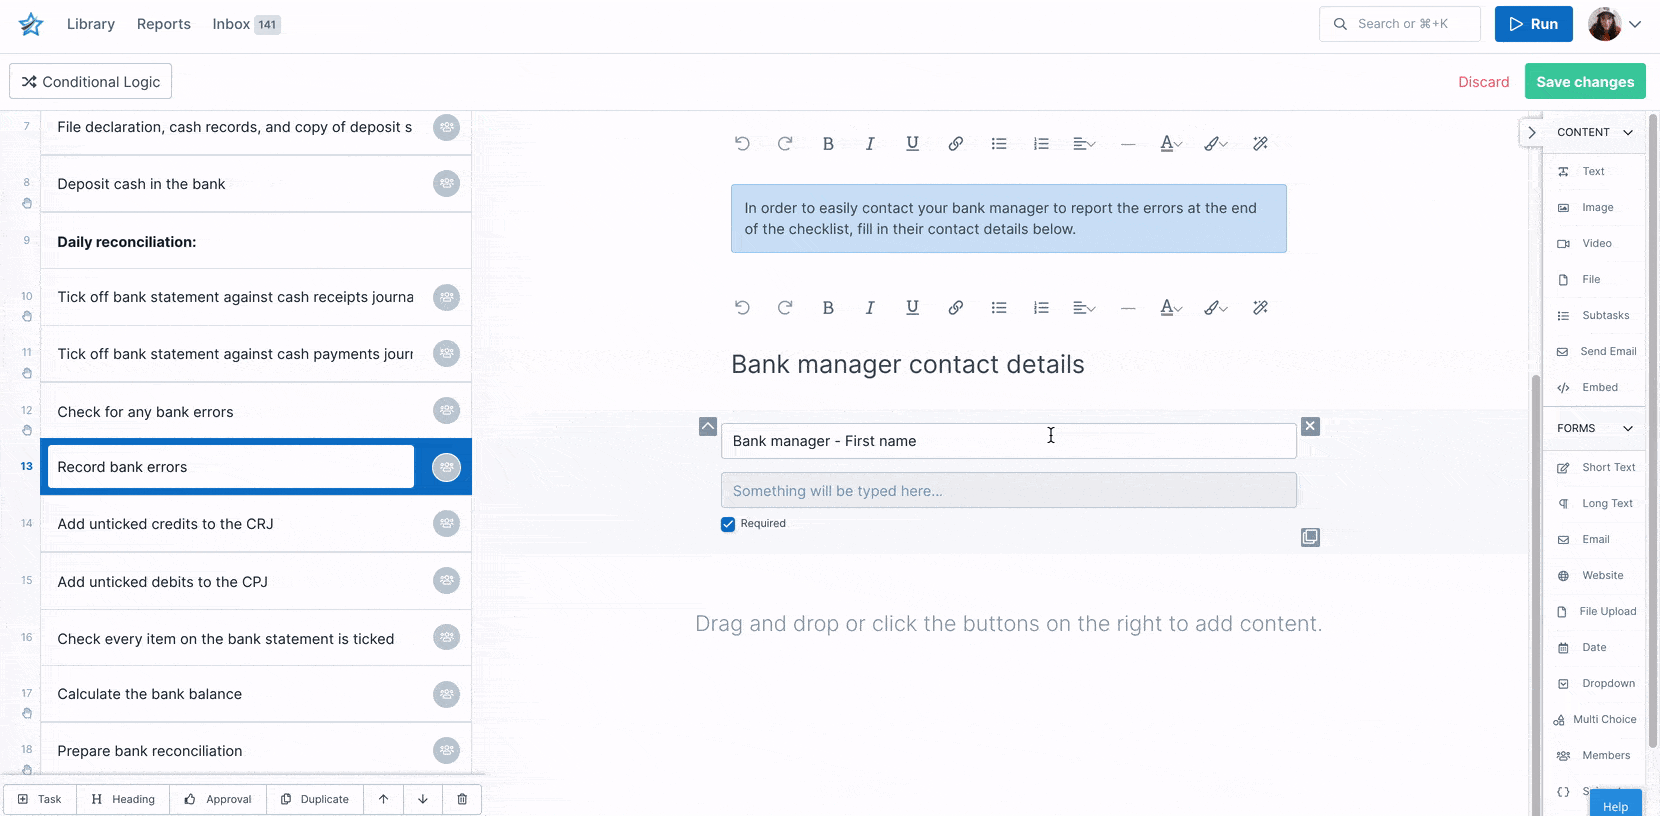
Not a lot can go wrong when you’re dragging and dropping form fields into your workflow editor, but if you find that one is in the wrong place you can easily move it. Moving form fields around can be done in two different ways, either by using the up and down arrows or by dragging and dropping it into a new location. See the example below for how you can do this.
If you want to duplicate one or more of your form fields, you can do that too. Look for the little stack of papers icon in the bottom right corner, we’ve shown you this in the example below. And in the top right corner is a little X where you can delete the form field if necessary.
You can also drag and drop your form fields, or use the up/down arrows to the left of each widget, to relocate them in your workflow.
We’ve let you know which form fields can be used as variables, but we hear you asking – What are variables anyway? Good question!
Variables come in two forms, global variables that are built into your workflow runs, and variables that you create when you create form fields. The more form fields you add, the more variables you will have access to. You can add variables anywhere in the workflow editor where you see the magic wand icon ![]()
Variables allow you to use data you’ve collected in your workflow run in other parts of your workflow run, as well as pushing that data out to other apps via an integration, or having an integration push data into your form fields. Say you want to add a summary of all the form fields you collected in a workflow run so a manager can take a quick look, without having to go through the whole workflow run – variables let you do just that!
In another example, you have collected the name, email address and contact details of a new client in your workflow run. You don’t want to have to type out that information again in your CRM, so you can use an integration to look up those form fields and pull that data directly into your CRM. Clever stuff, eh?
Pro tip: Don’t name all your form fields (variables) in a similar way, e.g. by always using ‘Meeting date’ for all meeting dates even on separate tasks. Instead, try naming them in a specific way, for example: ‘Sales Meeting date’ or ‘Project Meeting date’, as this will allow you to identify the correct one you want to use when you need to search for them as a variable.
Remember that all the data captured in your workflow run can be viewed and exported from your Reports at any time.
One of our customers, Alarca Realty, have really seen the benefits of using Process Street in their business. Their team…
![]()
“…greatly benefited from the ability to create complex workflows without making them confusing or difficult to follow. This is in large part thanks to the fact that each task can include various details such as sub-tasks and other form fields that keep the checklist compact and elegant while including rich information.”
Next Lesson – Running Workflows >
< Previous Lesson (Building content)
< Back to the Getting Started home page
Help us improve this help center.


