
Yahoo! lost $350 million to their sale price after the reveal that a security breach had caused 3 billion accounts to be compromised. They learned the hard way that if you have sensitive data you’ll also need measures to protect it.
You need an easy way to secure your processes without providing extra hoops for your team to jump through and get confused over.
That’s why we here at Process Street let you set task permissions in your checklists.
This feature lets you hide tasks from viewers with variable permission levels within your checklists. You’re left with a checklist that shows different tasks to different people based on what you think they should see.
The best thing? It solves your security and clarity issues while providing a singular location for your data to be stored, making it easy to review.
Enough dilly-dallying, let’s get to it!
Process and task security is essential
I don’t have to tell you why security is important.
Whether you’re protecting customer data or locking your front door to make your house harder to burgle, a vital part of security is making sure that only a select few can access what you’re trying to protect.
That’s one of the main reasons task permissions for processes exist.
Imagine you have a set of tasks to follow to fully onboard a client. These tasks involve recording the client’s data, so the last thing you’d want to do would be to stick the task list (data and all) in a public place for all to see.
To stop data from being accessed accidentally or maliciously you need to have measures in place to prevent anyone and everyone from opening it.
This is where most processes get needlessly complicated.

Suddenly you have to keep track of separate checklists for different people working on the same process. Each checklist is made to limit the view of the person completing it to no more than what they need to see.
Let’s go back to an onboarding example.
You’re an HR manager, and you’ve just hired a new team member. They need training up and assigning a mentor to help them along.
However, of the three people involved in the onboarding process, you’re the only one who should be able to see the process in full.
- The new employee shouldn’t see personal notes you’ve made during the onboarding process
- The mentor shouldn’t have to see all tasks that are unrelated to them
You could create three separate checklists for each person to work from but then syncing data across them becomes a headache. No, you need something which can dynamically show tasks based on what the current viewer needs to see.
You need task permissions by Process Street.
However, before we get any further I’ll stress that task permissions are a Business Pro plan feature only!
Task permissions explained
Task permissions in Process Street follow a simple concept:
Tasks in checklists can be hidden from users who don’t need to see them.
Whether a task contains sensitive information which you’d rather a user not see or it’s simply irrelevant to them and would confuse them in their duties, task permissions let you control exactly what anyone accessing one of your checklists can see.
This lets you effectively create custom checklist views for your users without the hassle of creating more than one checklist.
This doubles up by letting you track all data and tasks related to your checklist in a single location, rather than having to compare information from several sources.
You can control permission to see and access tasks based on:
- All members within your organization
- All guests
- Anyone accessing a checklist through a share link
- Individual members or guests
- Your organization’s roles
To return to our employee onboarding example, this means that you as the HR manager can have full access to the whole checklist. You’ll be able to see and take action on anything you want to.
However, for security reasons, you can limit the new employee to only be able to see the tasks where their input is required (such as a questionnaire task). Their mentor could also be limited to only see tasks where they need to take action.
The result is a central checklist where the onboarding process can be tracked in full, with secure tasks to protect sensitive information and custom views to let the participants focus on the tasks that they need to complete.
Once again though, remember that task permissions are a Business Pro plan feature only.
How to set task permissions in Process Street
All task permissions are set within the template editor. To access this, locate the process template you want to set task permissions within and click the “Edit this Template” button.
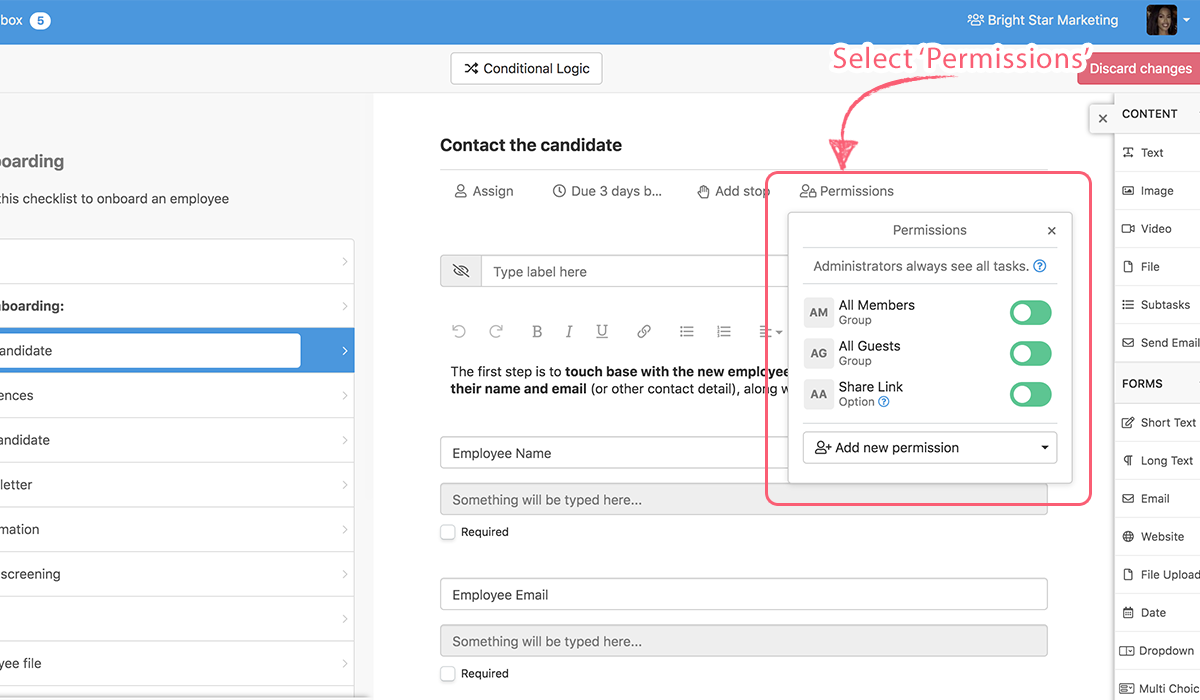
Next, open the task you want to limit the permission level on by clicking on it, then click on the “Permissions” button underneath the task’s title.
You’ll see that there are three main ways of setting task permissions to hide items from certain users:
- Setting general permissions
- Having user-specific permissions
- Using role-specific permissions
Setting general permissions
General permissions are the wide-brush approach to process security. If you’re not looking to achieve anything too technical or focus on specific people, you can easily limit access to a task based on the type of user viewing it.
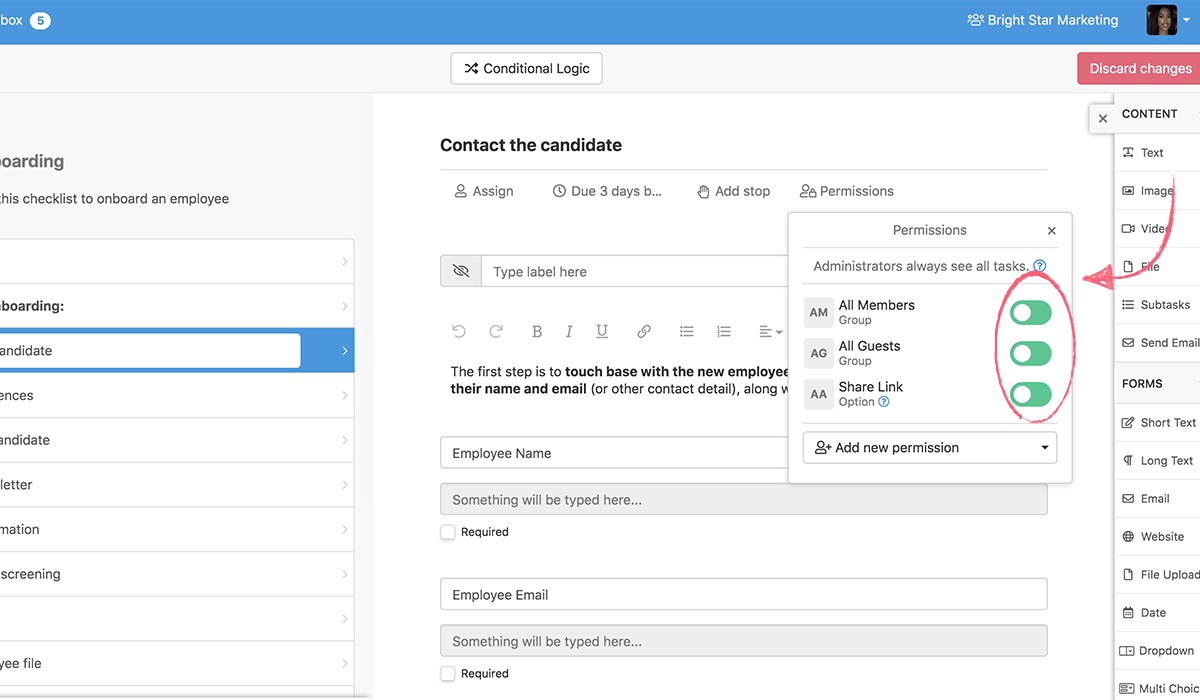
These are shown by the sliders which appear when you open the permissions menu in a task in Process Street.
You’ll have three options:
- All members
- All guests
- Share link
As a quick note for those who haven’t used Process Street before, think of “members” as paid users who are part of your team. They can be given access to your folders, process templates, and can edit your processes.
“Guests” are free users in your organization who can only see checklists that they’re assigned to and nothing more. A good example of a guest would be a client who you bring in to work on a specific checklist – they don’t need access to anything beyond that one checklist.
Giving “all members” permission to access the task will allow everyone who has a “member” account in your Process Street organization to see and interact with that task.
Similarly, giving guests permission will allow guests in your organization to see and access the task. Disabling either will result in those users not being able to see the task in a live checklist at all.
Meanwhile, turning on the “share link” permission means that anyone accessing a checklist through a share link will be able to see and interact with the task regardless of whether they have an account or not.
You can mix and match these options however you like too.
Let’s say you’re a property manager.

You have three managers (including yourself) as paid members in Process Street and 10 others from your business (handymen, estate agents, etc) as guests to cut down costs.
When you’re onboarding a tenant you could have the admin tasks such as preparing the lease agreement set to members permissions, have minor tasks such as taking meter readings set to members and guests, and tenant-specific tasks set to members and anyone with the share link.
This would mean that only your managers will be able to see every task, while your guests and tenants (through the share link) would only be able to see tasks related to them.
In other words, everyone sees the checklist and tasks therein only if they’re relevant to them. No private information is shared where it shouldn’t be, and no-one is left wondering whether they have to take action on a task or not – they just have to complete the items they can see.
Check out our help articles on members, guests, the difference between them, and our checklist share links for more information on any of these features.
User-specific permissions
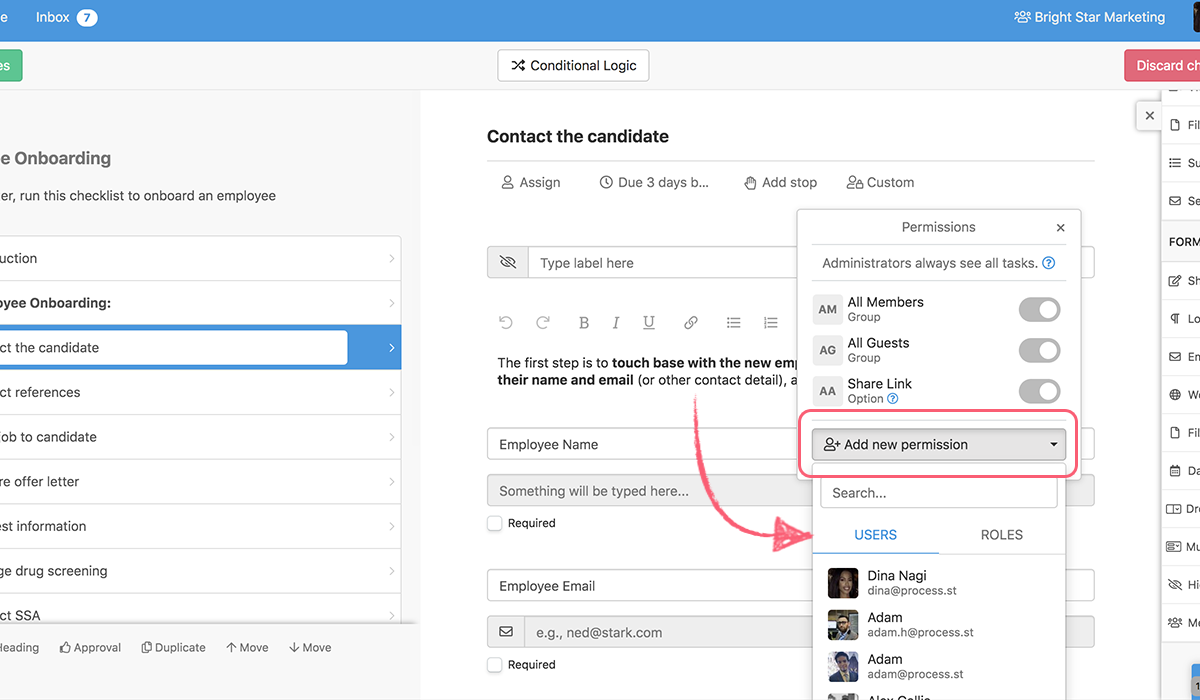
Below the three general sliders is the option to add a new permission. This is where you can give access to specific users in your organization rather than doing it based on the user’s wider status.
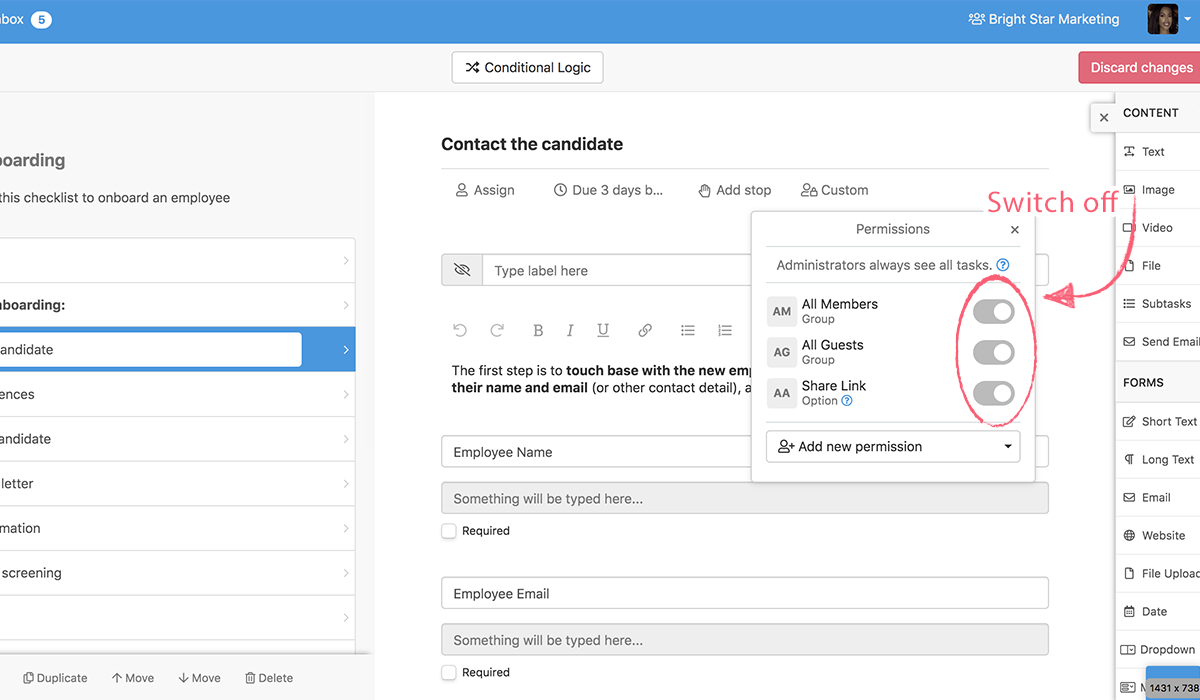
First, you’ll likely want to disable the option to permit members, guests, and anyone using the share link to access the task. That way you’ll have full control of who sees which tasks at the level of individual users.
Next, click “add new permission” at the bottom of the permissions menu and make sure that you’re in the “users” tab.
Now all you have to do is choose the user who you want to be assigned to the task.
This is a great way to make sure that a task which needs to be completed by a specific person will be put into their inbox and completed on time.
For example, let’s say that you have a process with a separate task for everyone in your organization to complete. This could be something akin to a monthly review where your team can state their achievements, what problems they’ve been having, and what they wish to talk about in your upcoming one-on-one session with them.
Allowing anyone to see and access another person’s task here is a blatant conflict of interest. It would prevent any issues from being brought up (especially if they relate to another team member) since your team will know that anyone and everyone can see what their complaints are.
To make sure that everyone has the freedom to voice their opinion and help you solve any problems that are happening, assigning each user to their task (and no others) in the checklist would mean that they can talk freely.
Plus you can be sure that nobody is tampering with anyone else’s tasks, which is always a bonus.
Role-specific permissions
With the advent of role assignments, you can also give permission to view and access a task based on the role of a user, rather than to a specific person or based on their status in your organization.
Some examples of roles would be “HR manager”, “Writer”, and “Landlord”. Roles are the position a user has, whether that’s their job title or based on information recorded in a form field earlier in the checklist.
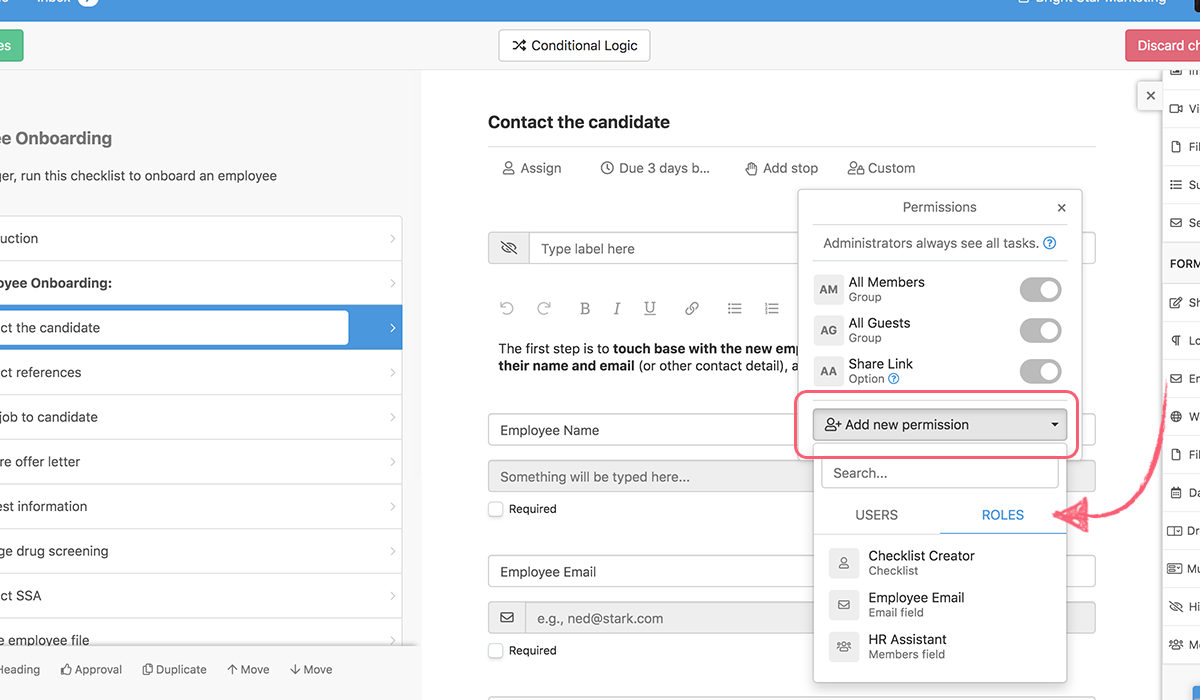
To extend task permissions to a role, choose “add new permission” and go to the “roles” tab in the permissions menu. From here you’ll be able to choose from roles based on three factors:
- The person who created the checklist
- Information from an email form field
- Information from a members form field
For example, let’s say that you want to assign an editor to a review task, and to only allow them to see it to prevent others from messing with the review.
Earlier in the checklist you could have a members form field set up labeled “Post editor”. You could then turn off all permissions for the review task and add permission for the editor to view it based on that form field.
In action, this would mean that as soon as the editor is chosen from your members using the members form field, they will be able to see the review task while no-one else will.
Task permission use cases
To show just how useful task permissions can be with Process Street, let’s go over some examples of how they can enhance the following processes:
- Tenant onboarding
- Employee onboarding
- Ray Dalio’s meeting process
Tenant onboarding checklist
Let’s start with a simple example; tenant onboarding.
In this process, you’ll need your tenant to work with you on certain steps. Not only would it prove to be easier for the tenant to be able to find everything in the same place but it would make collecting their details in a secure location more simple to boot.
However, at the same time, it would be extremely ill-advised to allow them access to the entire checklist. Doing so would allow them to see sensitive information such as your internal link to their tenant document records and allow them to change data that needs to remain constant for your records.
The solution is to limit your task permissions so that they can only see the tasks that they would benefit from.
The best way to do this for someone who will never be part of your Process Street organization (such as a tenant or client) is to limit task permissions based on the share link for the checklist.
This means that anyone (ie, the tenant) accessing the checklist through its shareable link would only be able to see the tasks that you’re happy to share.
In this example, that would mean that the only tasks with permissions where the share link option is turned on would be tasks 3, 7, 8, 10, 12, 21, 23, and 25. That would let the tenant fill in their details and upload signed documents directly to the checklist, saving you time and effort and letting the tenant sit safely in the knowledge of what they have and have not yet completed.
Click here to get your free tenant onboarding checklist!
Employee onboarding checklist
While I’ve already covered most of this example while explaining task permissions earlier in this article, employee onboarding is a classic example of a process which will be broken up into several checklists if you can’t hide tasks from certain users.
Task permissions mean that everyone can work from the same checklist without worrying about users seeing sensitive (or unnecessary) information.
The HR manager running this checklist should have access to the whole process, as they can effectively manage and monitor each task. However, the two others working with them on parts of this checklist (the new hire and their mentor) would benefit from only being able to see the tasks they need to take action on.
For example, the new employee could be limited to only have permission to see tasks 4, 6, 7, 8, 9 and 10. This would give them a clear idea of what tasks they need to have eyes on, let them easily see important information like the tools they will need and the accounts created for them while limiting their view of other items that they don’t need to see.
The new hire could be permitted to view these tasks by having them open to the “Employee Personal Email” role from task 3. This would assign them to the checklist using their personal email, so you don’t have to wait until their work account is set up.
Similarly, the hire’s mentor can only be shown tasks that need their attention such as tasks 18, 20, 21, and so on. They can be given permission to view the tasks via the “Employee Mentor” member’s form field in task 17.
Click here to get your free employee onboarding checklist!
Ray Dailo’s Meeting Process
As the founder of the world’s largest hedge fund (Bridgewater Associates), Ray Dalio is no stranger to conducting effective meetings. He’s got the practice down to an art, as can be seen through this meeting checklist based on his book Principles.
It’s a fantastic way to run your meetings, and a great example of how task permissions can enhance your regular processes.
In this checklist two people are selected to fulfill roles; the person running the meeting, and the person who will follow up on the action points from the meet.
These people can change with every meeting, so it makes no sense to try and assign permissions based on specific people. Nor does it make sense to allow everyone to view the tasks – all that would do is clutter their view and potentially confuse them with tasks they don’t have to act on.
Instead, by setting tasks 4 – 10 to be visible only to the person selected in the “Responsible person” form field in task 3 and task 11 to the person assigned to the “Follow up assignee” field in task 10, you ensure that everyone sees only what they need to.
Click here to get your free checklist for Ray Dalio’s meeting process!
Secure and simplify your processes today with task permissions
Checklists should simplify and standardize your regular processes, not confuse those who use them and share sensitive information where it isn’t necessary. That’s why task permissions with Process Street are so useful – you can simplify and secure practically any and every checklist with multiple users using this feature.
The optimizations don’t stop there though, as we’ve got plenty of in-depth, useful features for you to take advantage of, such as:
- Role assignments to dynamically assign users to tasks
- Dynamic due dates to make processes more flexible and accountable
- Conditional logic to simplify complex processes
- Inbox to easily manage your Process Street tasks
- Form fields to capture data while a checklist is being followed and allow for powerful business process automation
So what are you waiting for? Go ahead and try out task permissions yourself to see just how much you can improve your processes!
What do you think about task permissions? How have you used this feature? Let me know in the comments below!