

This is a guest post by Sarabeth Lewis, a freelance SaaS copywriter and UX writer based in Austin, Texas. Lewis regularly writes for AppSumo, a team of amazing folks who run insane lifetime deals on the best software tools in the world… while eating an impressive number of tacos.
Email. What a blessing (and a curse).
If you’re anything like me, you’ve let your inbox get away with far too many shenanigans. You want to take back control and organize your Gmail. But how?
At Process Street we understand that email is ubiquitous for working professionals. Despite its ubiquitous use, many complain email has a central flaw: a tendency to become your to-do list.
Am I wrong?
This usually occurs passively, inadvertently causing you to lose control of your own time.
When your day is commandeered by your inbox, it means that other people are controlling your calendar.
In this article, you will find out how to take back control and organize your Gmail. Click on the links below to jump to the relevant section, or scroll down to keep reading.
- Organize Gmail: Remove email distractions
- Organize Gmail: How to obtain inbox zero
- Organize Gmail with Kelly’s Gmail system, our 9 step process
- Organize Gmail: 2 more (optional) Gmail tips
- Organize your Gmail with Process Street
- Organize Gmail: Take it one step further with an automated email
Let’s get started.
Organize Gmail: Remove email distractions
The Radicati Group estimates that employees send and receive approximately 115 work emails every day. And that’s not to mention all the newsletters, junk, and account notifications that trickle through constantly.
Earlier this year, Eric Lawton named reading and replying to emails as efficiency killer #2 ☠:
“Well, the numbers are in, and it shows that this isn’t just in your head – most workers spend up to 2.5 hours a day reading and replying to emails.” Eric Lawton, The 11 Efficiency Killers in Your Workplace That You Should Know About
It’s undeniable that the status quo for today’s desk workers has become the expectation to be an all-day email lurker. Watching your inbox and responding immediately to anything that comes your way can leave you in a constant state of distraction… all day long.
And that, my friends, is just one of the myriad of reasons we live in a deep work crisis. When your brain gets distracted with a ping here and a message there, suddenly all your time will be spent following notifications instead of getting your core job responsibilities done – not to mention innovating and suggesting improvements for your company.
But email as a technology isn’t going anywhere. There has to be a new method for approaching the inbox that allows you to take back control of your focus.
Today I’m going to walk you through Kelly Stocker’s amazing Gmail inbox organizational system to show you how to create the optimal inbox using native tools within Gmail.
Organize Gmail: How to obtain inbox zero
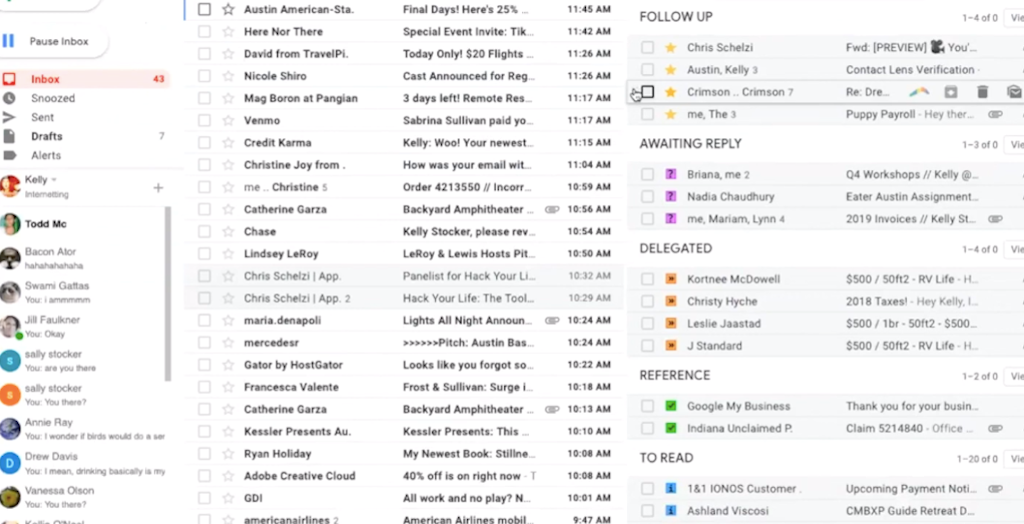
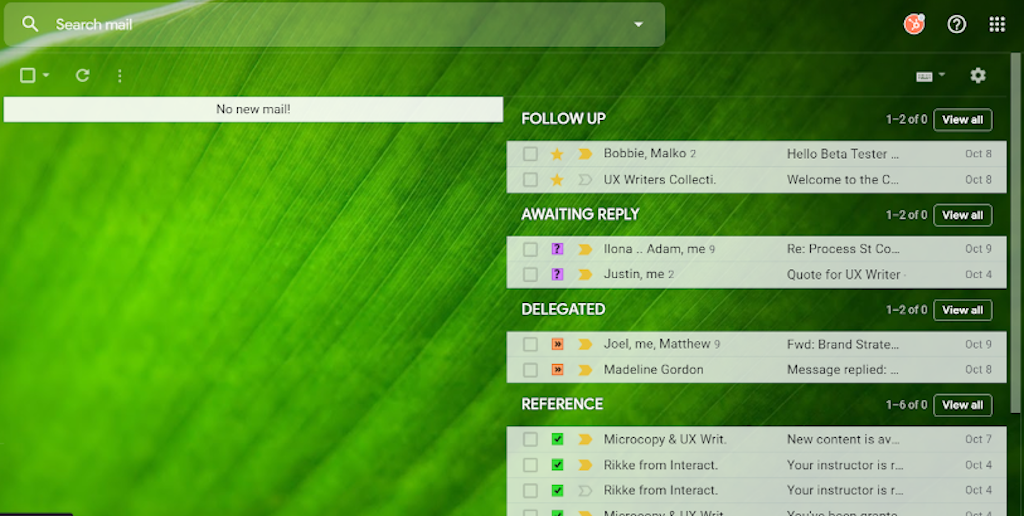
Inbox zero means your email inbox is empty. You are an email guru, at the top of your email game. This is what an optimal Gmail inbox (inbox zero) would look like:
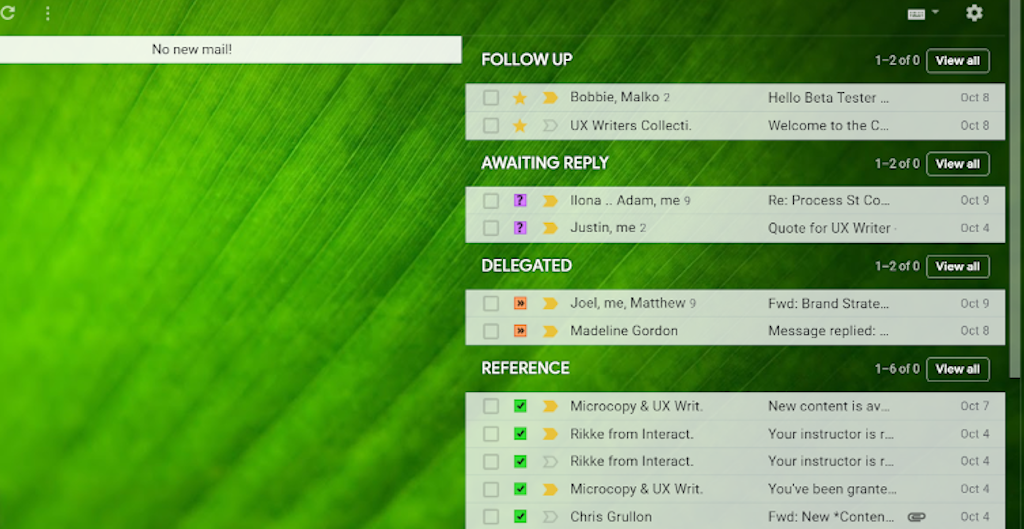
Look closely: on the left side, it says No new mail. This is inbox zero. On the right are multiple inboxes color-coded by task. They’re titled:
- FOLLOW UP
- AWAITING REPLY
- DELEGATED
- REFERENCE
- and the one you can’t see: TO READ
Using David Allen’s Getting Things Done productivity methodology, Kelly created the system to help you get your inbox looking like this every morning – in seconds.
Have you ever laid awake at night, with seemingly endless to do’s filtering through your mind? The principle behind David Allen’s work is to avoid having any tasks (in this case, in the form of emails) bouncing around in your head and bothering you.
If you don’t pay appropriate attention to what has your attention, it will take more of your attention than it deserves.” David Allen’s, Getting Things Done
Humans aren’t built for multitasking. For example, studies have shown that we are only able to withhold up to seven pieces of information at any one time.
One way to counteract our multitasking inability is to put everything down on paper or in a checklist. This will allow you to stay on top of your inbox so that you have the bandwidth to truly focus on the real work in front of you.
Kelly shared this system with the AppSumo team a few months ago and now our inboxes are beautiful things . We asked her to do a webinar to share this organizational system with the world.
Process Street is all about optimizing your team’s recurring checklists and procedures, for you to get more done faster. Similarly, this email organization system is all about optimizing your Gmail. With this system, you won’t have to constantly check your mail, scroll through unimportant messages, and forget to respond to important ones.
For many, inbox zero may seem like an unattainable goal. But if you follow Kelly’s instructions, you will be able to:
- Sift through your inbox in seconds, marking emails by task/importance
- Archive all to get to inbox zero faster
- See your important emails in multiple categorized inboxes in your Gmail
- Put unimportant emails out of sight (and out of mind) whilst still leaving them easily accessible in your Gmail archive
The value of implementing Kelly’s Gmail system is that you can quickly deal with your email each morning – and move on with your life.
This system ensures that important messages are safely accounted for whilst filtering away everything that is clogging up your inbox.
Organize Gmail with Kelly’s Gmail system, our 9 step process
If you prefer to follow Kelly’s steps along with her, you can watch the webinar above.
If you follow these steps closely, this should take you only 8-12 minutes.
But I promise: it will change your workday forever. ❣
Here we go…
Organize Gmail step 1: Open your Gmail
Open your Gmail and click the ⚙️ Settings button on the top right side of the screen. Scroll down and click Settings.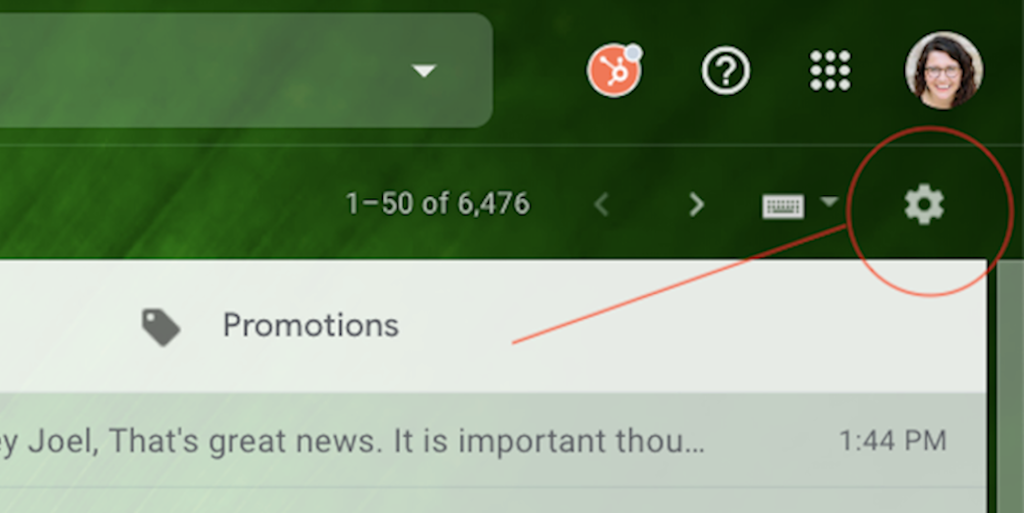
Organize Gmail step 2: Choose “Advanced” from the tab options
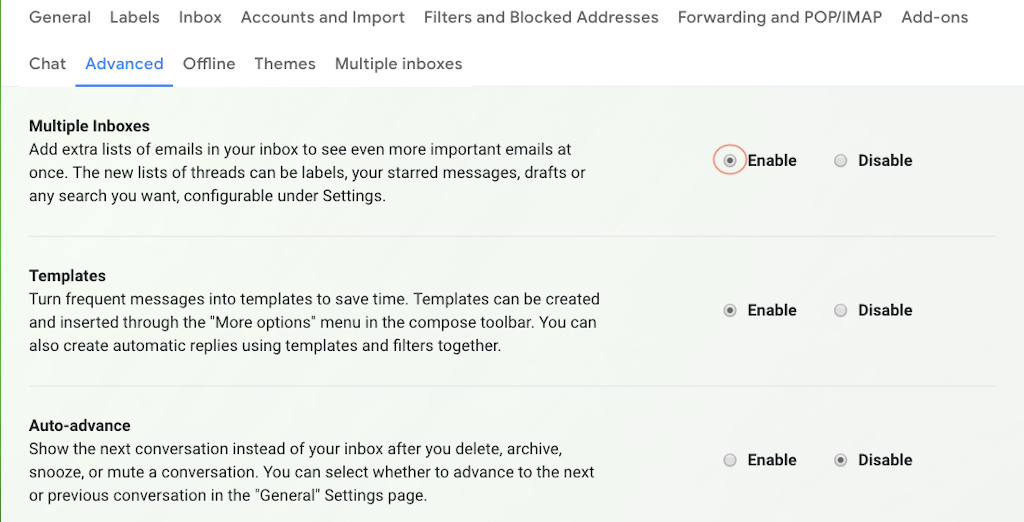
- Click on the button to enable Multiple Inboxes
- Click the radio button to disable unread message icon
- Click Save Changes at the bottom of the screen
Organize Gmail step 3: Refresh your Gmail
Click the ⚙️ Settings button and select Settings again. You should see the tab for Multiple Inboxes in the Settings options. Click to open that tab.
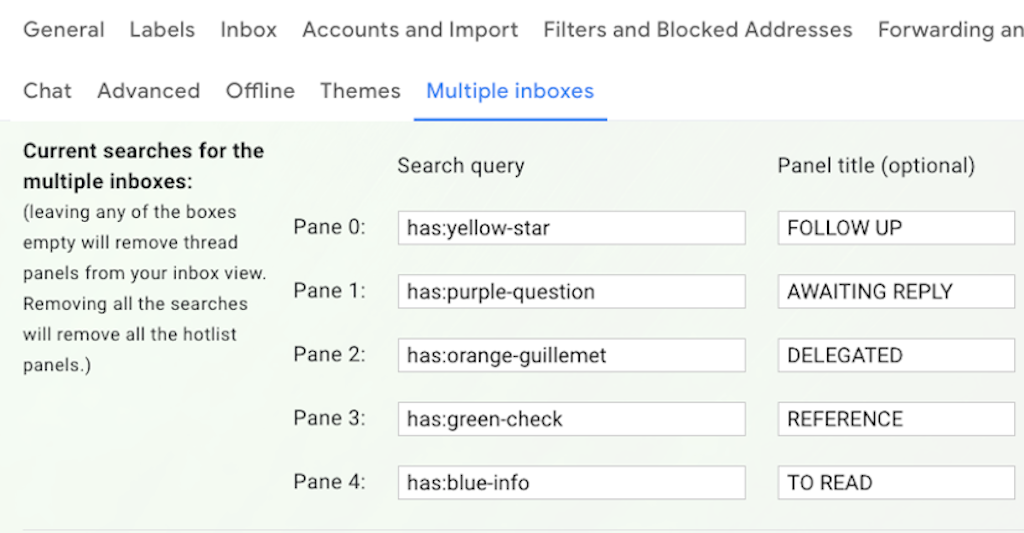
Organize Gmail step 4: Add search queries
Under Current searches for the multiple inboxes add these search queries:
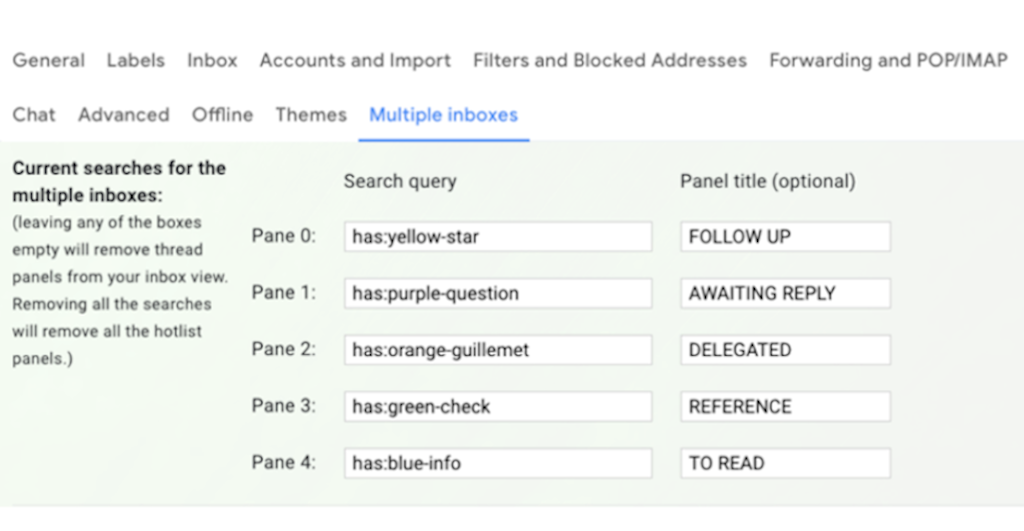
Don’t add any spaces or change the search query formatting – you can copy/paste from the table above. This formatting will tell Gmail what you want it to do.
2 more steps on this page.
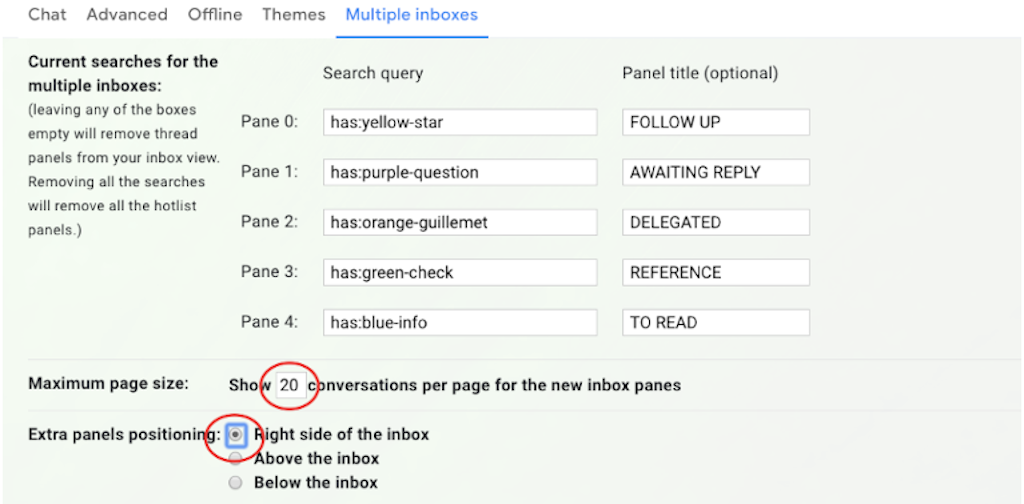
- Change Maximum page size to 20
- Under Extra panels positioning select Right side of inbox
- Then click Save Changes at the bottom of the screen
Organize Gmail step 5: Refresh your inbox
Click the ⚙️ Settings button and select Settings again. This time, select the General tab. Do the following:
- Undo Send: Change to 30 seconds (This is not mandatory, but you’re welcome. This will give you more time to undo a sent email vs. the default 5 seconds Gmail gives you. Helps you avoid those embarrassing email mistakes.)
- Stars: Drag the four icons into the In use line from the Not in use line. The four icons are the orange guillemet, purple question mark, the green check, and the blue information icon. You’re going to use these to organize your inbox.
- Click Save Changes at the bottom of the screen
Organize Gmail step 6: Refresh your inbox once more
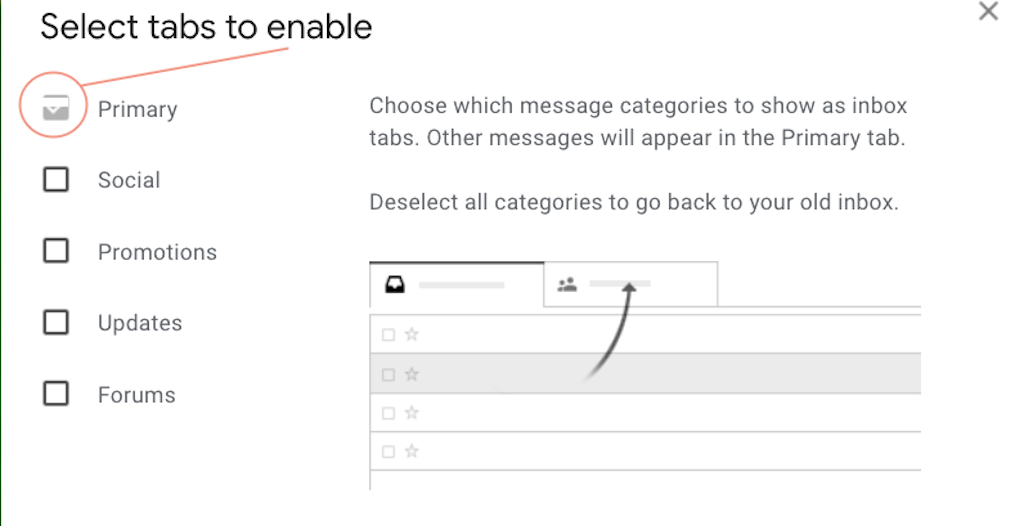
Next, refresh your inbox and click the ⚙️ Settings button again. Scroll down the menu and click Configure inbox.
Unselect every tab option except Primary (see below). Click Save
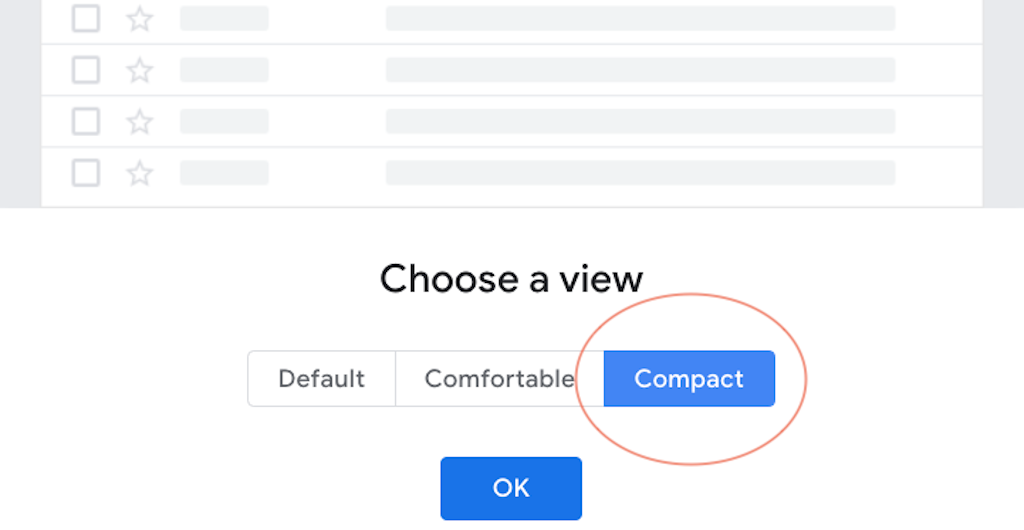
Organize Gmail step 7: Display density
Next, click the ⚙️ Settings button again. Scroll down the menu and click Display density.
Select Compact. Click OK (this will give you a better view by including subject lines, as well as generally helping your inbox look prettier).
Your inbox should be divided into 2 panes: general emails coming into your inbox on the left and your new categories on the right, like so:
Organize Gmail step 8: ⭐️ the emails that are important to you
Next, go through your most recent 2-3 pages of emails and star ⭐️ the emails that are important to you. Mark emails that you need to reply to, are waiting to hear back from, need to read, or reference materials/newsletters you intend to read.
Anything you need to take care of: star it.
Organize Gmail step 9: Archive your messages
Then, tick the select all box at the top of the left pane in your inbox, selecting every conversation in your entire inbox. Click the Archive icon next to it to archive all.
Yes, all!
Yikes, this feels scary, but all your emails will still be available under the All Mail label along with the folders on the left (where you normally find your Sent or Spam email folders).
This step took some fiddling for me — I had to refresh my inbox several times and kept trying to archive everything before it all went through. Possibly because I had over 13,000 emails in my inbox…
Starred emails will be visible in the FOLLOW UP section in the right pane.
You can click the star multiple times to rotate through your other colorful icon options, to add them to the corresponding sections in the right pane (Awaiting reply, Delegated, etc.)
Reminder, below are your colored icons/panel title categories:
Tip: How do I mark emails using the symbols other than a star? Keep clicking the star symbol to rotate through your various options (purple question, orange guillemet, green check, etc.
When you’re done with an email, click to remove the star and the email will go into your archive. Likewise, if you accidentally forget to star an important email, use the search bar to find it, star it, refresh your inbox, and it will appear in your FOLLOW UP section in the right pane.
And that’s it!
Organize Gmail: 2 more (optional) Gmail tips
There are 2 more optional tips to organize your Gmail, covered in this section.
- Turn emails into to-do’s ☑
- Pause email ⏱
Gmail tips: #1 turn emails into to-do’s
If you click the blue Tasks circle on the far right sidebar you can directly drag emails into your tasks. Rename them and give them a due date if you want.
Gmail tips: #2 pause email
This system should help you get to inbox zero every day. Pausing emails will force you to mark or archive every email that lands into your inbox. Don’t be afraid to use tools like CloudHQ’s Pause Gmail Inbox to make sure you don’t see new messages as they filter into your inbox throughout the day. You can pause your inbox for a couple of hours to get deep work done.
And that’s it. Every morning, you can sit down at your desk, glance at your email, mark the important ones, hit archive all, and get to inbox zero in seconds.
Stay in control of your email – instead of the other way around.
Organize your Gmail with Process Street
If you are new to Process Street and want more of an idea regarding our offering, watch our introductory video below.
In short, Process Street is superpowered checklists.
With our checklists, you can run any business process, with ease, efficiency, productivity, and effectiveness. Once more, your business processes will be free from human error.
Our checklists have been adapted and refined over the years to provide the optimal tool for you. Our checklists include features such as…
- Stop tasks, to ensure task order
- Dynamic due dates, so no deadline is missed
- Conditional logic, creating a dynamic template that caters to your needs
- Role assignments, to ease task delegation within your team
- Approvals, allowing decision-makers to give the go-ahead (or rejection) on important items, in addition to providing comments as necessary
It is these features that make our checklists superpowered.
Our checklists allow you to digitize your processes, meaning you can incorporate advanced automation in any of your business operations.
With the tips and tricks mentioned in this article and Process Street, you can take back control of your Gmail.
Organize Gmail: Take it one step further with an automated email
Optimizing your email isn’t complete without adding email automation that will make your work simpler and easier.
When it comes to Gmail + Process Street integrations, one of our core checklist features is an email widget that allows you to build Gmail templates into each of your processes.
For instance, if you send a ton of standardized emails, Process Street’s email widget allows you to create and send pre-made email templates. If you have processes that always include sending standardized emails – this feature is for you.
The email widget allows you to send a pre-made email with a click from a checklist. This means you can avoid constant switching between your working process and your inbox.
How? To send pre-made emails from a checklist or template, go to the bottom of the widget and tap the Send button (see below). This automatically opens your default client email with the pre-made email all ready to go.
Process Street has a ton of featured process templates to help you create your emails. For example, check out our Email Onboarding Sequence Process to familiarize yourself with the types of email templates we can provide to you for free. You can use this template to develop a professional email campaign familiarizing your customers with your product.
Click here to access our Email Onboarding Sequence Process.
With these free templates it is easy to add email automation to any of your business processes: marketing, sales, onboarding, accounting, HR and e-commerce processes, you name it.
Choose a template, customize it for your needs, then run specific instances of it as a checklist. You can do this every time you need to perform a specific business process, for instance, when you need to onboard a new colleague, or run a sales email sequence – or whatever your repeated processes are.
For more information regarding process automation, check out our Advanced Automations with Process Street and Zapier webinar below.
Organize Gmail with Kelly’s Gmail System and Process Street to take back control of YOUR time
“Your mind is for having ideas, not holding them.” David Allen’s Getting Things Done
Email is a powerful tool. On the one hand, it has the power to nudge you closer to your goals. On the other hand, it can be a huge distraction from what’s most important.
By taking greater control of your inbox via integrating the systems in this article, you can maximize your Gmail account: eliminate distractions, never miss an important message, automate email into your recurring processes, and get work done.
Use this easy email optimization system to make your inbox less overwhelming, your calendar freer, and keep your tasks in their right order.
Did you implement Kelly’s Gmail system? If you did, we would love to hear from you. Please tell us what you think in the comments below.