The excitement around a new project is intoxicating.
After all, it’s an opportunity for your team to collaborate and put their well-honed skills to use.
But with important projects, excitement can easily turn into dread. Especially considering that 70% of organizations have failed one or more of their projects in the last 12 months, with a lack of clear goals being the main issue.
So how can everyone involved know what’s expected of them? What deliverables they must bring to the table? How their actions figure into the bigger picture? And how can you, the project manager, break the project down into manageable segments?
While The Beatles professed that “love is all you need”, what’s going to be more useful in this scenario is a work breakdown structure.
That’s why, in this Process Street post, you’ll learn what the work breakdown structure is, why it’s so useful, different examples of it, and tips on how to create a work breakdown structure yourself. To boot, you’ll even get your hands on our easy-to-use Work Breakdown Structure Template!
Read through the following sections to get clued-up:
- What is a work breakdown structure (WBS)?
- Work breakdown structure examples
- Why a work breakdown structure is useful
- How to create a work breakdown structure
- Use Process Street for completing projects and processes alike!
Or, if you’re eager to get the template already, here it is:
Click here to get the Work Breakdown Structure Template!
Let’s break it down.
What is a work breakdown structure (WBS)?
A work breakdown structure (often shortened to the acronym WBS) is a hierarchical structure that defines what needs to be executed by the team to complete their project.
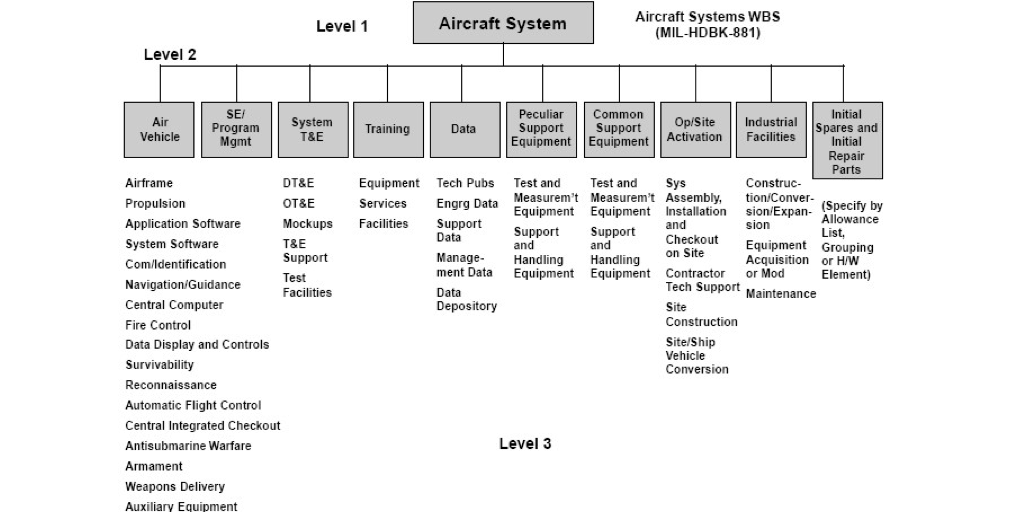
The work breakdown structure can be presented in various ways, but it always begins with the master “parent”, which is the project in question. Let’s say (and I’m being somewhat optimistic here) that I’m building an aircraft system. That means the work breakdown structure will start with “Aircraft System”.
Stemming from that master parent category will be the fundamental components of building an aircraft system. So, there will “Ops/Site activation”, “Training”, “Air Vehicle”, “Initial Repair Parts”, and so on.
Then, stemming from those will be what’s needed to make up those components. For instance, for “Air Vehicle”, an airframe is necessary, as is propulsion, a central computer, and system software, to name just a few. These are all written down so the entire scope is defined.
When a work breakdown structure has been fully written and/or designed, it could look similar to this:

The eagle-eyed among you will notice that, in the above image, there’s text that says “Level 1”, “Level 2”, and “Level 3”.
In layman’s terms, level 1 refers to the overall project (“Aircraft System”), level 2 concerns the major components of the project (“Air Vehicle”, etc), and level 3 (“Airframe”, “Propulsion”, etc) is what makes up each major component it stems from.
Now, what can be a little confusing is that there are different level systems. For instance, some organizations and people refer to level 1 as level 0. Similarly, sometimes there’s another level – level 4 – that stems out from level 3. However, the simpler level system described above is all you need to understand when getting started.
Speaking of getting started, let’s take a look at more examples of work breakdown structures.
Work breakdown structure examples

What’s wonderful about the work breakdown structure is its robustness; it doesn’t have to be presented in one way and one way only.
As long as there’s a master “parent” and its components stem out of it until appropriate, it’s down to you how you want to present the breakdown.
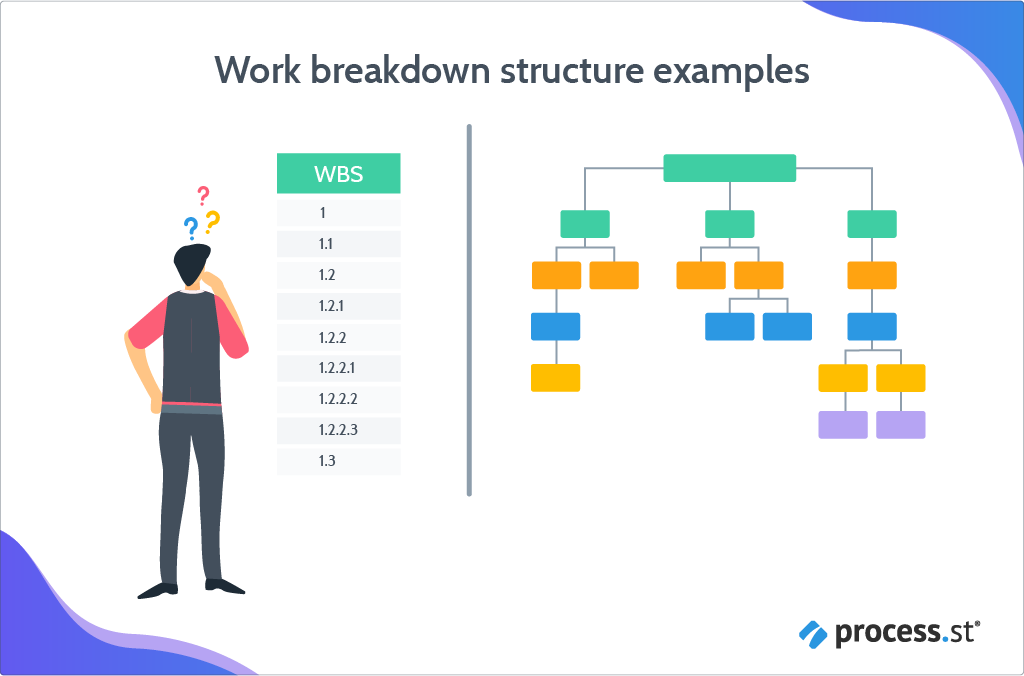
Most people, though, defer to two options: A graphical tree diagram with text or text and a numerical coding system.
Let’s explore both options a little further.
Work breakdown structure example #1: Graphic tree diagrams
One of the most common ways to present a work breakdown structure for a project is via a graphical tree diagram.
Graphic tree diagrams display the master “parent” inside a box (with text inside) at the top of the diagram. Then, the major components are displayed with their own boxes, with lines linking them back to their parent. They, quite literally, branch off until the scope has been covered, hence the name.
A perfect example of a tree diagram is the aircraft systems example in the previous section.
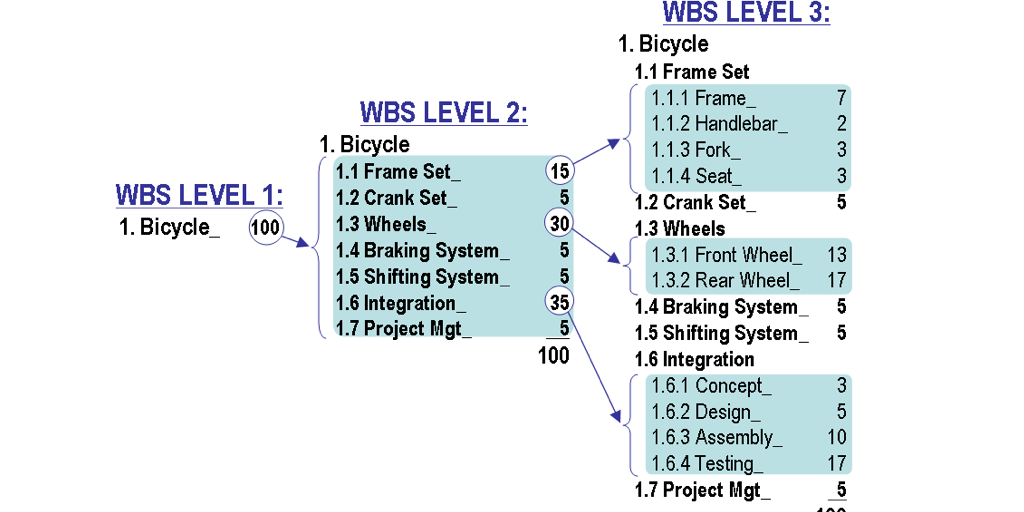
Another good example, though, is this, which is to do with building a bicycle from scratch:

Graphic tree diagrams, then, are best for those who are visual learners as it presents what needs to be done to complete a project through easy-to-understand shapes and symbols. Plus, the text clearly signifies what each shape represents and, sometimes, numerical coding (more on this soon!) also helps to distinguish each box further.
However, it is more time consuming to create a graphic tree diagram, especially if creating diagrams isn’t a part of your wheelhouse.
Work breakdown structure example #2: Text and a numerical coding system
Another way of presenting a work breakdown structure is through text that still makes use of the tree structure, but with the WBS coding scheme.
Let me simplify.
Let’s say creating graphics and diagrams is not a part of your skillset, but writing is. You can create a work breakdown structure simply through writing text and numbering it to still show the relationship between the master “parent” and what stems from it.
For instance, cast your mind back to the aircraft system example. In text form, it’d look a little like this:
1.0 Aircraft System
1.1 Air Vehicle
1.1.1 Airframe
1.1.2 Propulsion
1.1.3 Application Software
1.1.4 System Software
1.1.5 (And so on)
1.2 SE/Program Management
1.3 System T&E
1.4 Training
1.5 Data
1.6 Peculiar Support Equipment
1.7 Common Support Equipment
1.8 Ops/Site Activation
1.9 Industrial Facilities
1.10 Initial Spares and Initial Repair Parts
The numbers (and spaces, if you choose to use them) help to separate the master “parent” from its major component, and then whatever makes up those major components.
Level 1 is depicted with the number “1.0”, which makes sense. Level 2s, however, is “1.x”. So, “Air Vehicle” is “1.1”, and “SE/Program Management” is “1.2”, and so on. Then, level 3s are what have the further decimal point – “1.x.x”. If level 4s are needed, that’s, you guessed it, another decimal added – “1.x.x.x”.
The advantage of using text – that’s aided by the WBS coding system – is that it’s incredibly quick and easy to write and map out an entire work breakdown structure. No fiddling with diagrams, no extra resources or help needed.
Why a work breakdown structure is useful
Thus far, I’ve spent time explaining what a work breakdown structure is, how it works, and what it could look like. I haven’t, yet, got round to describing the benefits of creating and using work breakdown structures.
But that’s about to change.
Specifically, creating and using work breakdown structures:
- Makes the project more manageable.
- Gives complete oversight.
- Cuts stress. ✂️
- Saves time. ⏰
- Provides a solid foundation for the project.
At its core, the work breakdown structure is all about making important projects – no matter how many people it may involve – more approachable and manageable. After all, there’s nothing worse than being halfway through a project and thinking “what do I do now?”, or, even worse, thinking “where do I begin?” right at the start. But by displaying what needs to happen and how that fits into the grand scheme of the project, projects don’t seem as daunting not only for the project leader, but for everyone involved.
What makes a project more approachable and manageable is having the project dissected in a way that the work breakdown structure is fantastic at, whether via graphics or text. The project at hand doesn’t become some garbled, massive, sprawling thing inside project members’ heads – instead, what’s required is clearly laid out. Simply put, a work breakdown structure gives everyone much-needed oversight.
94% of people feel stressed at work. I’m not a betting man, but if I were, I’d put a lot of money on the fact that a sizable bulk of this stress came from project mismanagement. But by having a work breakdown structure for each project, employees will be far less stressed. Not only is this good in terms of company culture and employee retention, but it also means they’ll do better work when it comes to their project.
No matter if your business revolves around SaaS, IT, marketing, or any of the other sector businesses can operate in, I’m sure you’d appreciate it if you had more time in the day. With a work breakdown structure, you clinch some of that time back. Due to there being less confusion, less stress, and less to-ing and fro-ing, project team members will have more time in their workday to focus on the project at hand. Getting more stuff done has never been so easy.
Usually, a work breakdown structure is made before the project gets underway. By creating a work breakdown structure as part of the project planning process, it helps to cement what’s necessary (and what isn’t) so the project can be completed in a proper, professional manner. And with a solid foundation for each project, you and your team will free yourselves of major project constraints and never fail a project again.
Suffice to say, a work breakdown structure is incredibly nifty.
If, after reading through the list of rewards that can be reaped, you’re ready to get started making your own work breakdown structures, I’ll explain how to do so easily in the next section.
How to create a work breakdown structure
Want to make a work breakdown structure of your own?
Luckily it’s not, by any means, hard. And with Process Street‘s very own template for creating work breakdown structures, it’s even simpler.
Click here to get the Work Breakdown Structure Template!
All you need to do is sign up for a free trial account, add the template, and then follow the instructions written in the “How to use this Work Breakdown Structure Template” task.
But, for clarity’s sake, I’ll give you a brief walkthrough of how to use the template here, too.
Once a pristine (unedited) version of the template has been added, you’ll see on the left-hand side menu there’s text with decimal points. Just replace the text inside the brackets appropriately.
To use our trusty aircraft system example once again, “1 [WBS level 1]” will become “1 Aircraft System”. Then, “1.1 [WBS level 2]” would become “1.1 Aircraft Vehicle”. After that, “1.1.1 [WBS level 3]” would become “1.1.1 Airframe”, “1.1.2 [WBS level 3] would be “1.1.2 Propulsion”, and “1.1.3 [WBS level 3]” would be “1.1.3 Application Software”, and so on.
Considering that each project will have a different structure, if you need to add or remove level 2, 3, or 4 boxes, then that’s easily done after pressing the “Edit this template” button.
Once everything’s in tip-top shape and looking good, you’ve created your work breakdown structure for the project at hand inside Process Street! It can be then used as-is in text and decimal format, referred back to by project members, and sent to higher-ups. If you want the work breakdown structure in graphic tree diagram form too, then ask your graphic designer (if you have a graphic designer, that is) to create one for you.
What makes our Work Breakdown Structure Template different from others is that ours is superpowered.
You heard right: superpowered.
That’s because, when you click on each level 1, 2, or 3 box, you can add information. For example, if you click on “1 [WBS level 1]” (or whatever you rename it to), you can give additional context and essential information on the project in question.
This applies throughout the template. But for levels 3s in particular, you can also provide links to the relevant documented processes and procedures in Process Street. So, if you click on “1.1.1 [WBS level 3]” (or what it’s been renamed to) and that concerns the aircraft’s application software, you can supply the links to the process for building, implementing, and testing the application software, for instance.
That wraps it up for how to use this template.
You’ll not just want to use Process Street for work breakdown structures alone, though; our BPM software is massively beneficial for all your projects and processes.
Use Process Street for completing projects and processes alike!
Process Street is state-of-the-art business process management software.
With it, you can take full control of your projects and processes by using templates and checklists.
Teams around the globe love using Process Street for documenting their business processes, procedures, and integral workflows as templates. Once they’ve done that, they can launch superpowered checklists from those templates. The checklists guide users through documented processes, ensuring tasks are always completed to a high standard and without human error.
To learn more, watch our introductory video!
When it comes to work breakdown structures in particular, you can utilize Process Street in numerous ways.
For starters, you can document all of the necessary processes and procedures that need to be done to complete the project as templates. No matter if you’re building an aircraft system, overseeing a remote agency, or developing a SaaS product, documenting all relevant processes and procedures inside Process Street is super simple.
Even when you’re not actively working on a project, having these recurring tasks documented is hugely advantageous for when the next project comes around, and when you need to complete certain tasks in between projects. And checklists will make sure those tasks are completed properly and professionally.
To boot, you can also use our aforementioned Work Breakdown Structure Template to create, well, a work breakdown structure for each and every project!
Useful, right?
What’s also undeniably useful is Process Street’s workflow automation features.
These include (but aren’t limited to):
- Stop tasks ✋
- Conditional logic
- Dynamic due dates ⏱
- Task permissions
- Task assignments
- Role assignments
- Embed widget
- Webhooks
- Approvals ✅
- And more!
These features ensure that whenever you run a checklist, working through it is a truly streamlined and collaborative experience.
Watch the below webinar to deep dive further into some of these features.
Ready to get started?
Additional resources to help you with projects & processes
At Process Street, we don’t only want to supply you with stellar software – we want to provide you with helpful resources to read through, too!
Luckily, if this post has been helpful for you, there’s a lot more content for you to sink your teeth into:
- Getting Started with Process Street
- Project vs Process: What’s the Best Form of Management for Me?
- The 21 Best Free Project Management Software (And Why They’re Great)
- Ultimate SOP Guide: Standard Operating Procedures Made Easy (Free Templates!)
- 30+ Free SOP Templates to Make Recording Processes Quick and Painless
- How and Why to Document Your Workflows
- Why You Need to Document Business Processes
- Business Process Documentation: 5 Benefits and Why You Should Use It
- Best Process Documentation Software Compared: Office 365 vs Process Street
- Business Process Optimization: How to Improve Workflows Like a Pro (Free Templates!)
- And an extra, free template for the road: The Process for Optimizing a Process
There you have it.
With the info on work breakdown structures, the free template, an introduction to Process Street, and the blog posts, you’ve got everything you need to move forward.
I can’t wait for you to crush your projects and processes.
Do you regularly make work breakdown structures? If so, do you have any additional insight that you’d like to share with the Process Street community? Write your comments below!


Thom James Carter
Thom is one of Process Street’s content writers. He’s also contributed tech-related writing to The New Statesman, Insider, Atlassian, G2, The Content Marketing Institute, and more. Follow him on Twitter @thomjamescarter.