
 When creating content, it’s easy to think you should just make it and publish it. Simple.
But your content will not be highly effective if that’s your outlook – even if the substance of your content is brilliant!
Creating content – blogs, infographics, videos, podcasts – creates an opportunity for you to connect with your audience and to engage with a new audience. There is significant value which can be unearthed through an effective content strategy.
One of the simplest ways to improve your approach is to implement a documented content creation workflow.
It may increase the time you spend on a single piece of content or decrease it depending on your current process, but it could also prove to boost the effectiveness of your content by huge margins.
A blog post which is optimized for Google can bring you hundreds or thousands of hits every month. A post which is not optimized may be read by 10% of your email list and then disappear into the void.
Beyond the very real benefit of a good workflow improving the content, a solid team workflow can boost your overall output and practically run your content team itself.
Since implementing our new content creation workflow we jumped from 20k weekly visits from Google to 75k. In the space of 1 year. The new workflow has given us the consistency to keep breaking those numbers.
In this Process Street post, I’m going to explain to you:
- What our content creation workflow looked like when we had a small team
- What our scaled up content creation workflow looks like now
- How you can build a content creation workflow like ours
- The Process Street templates you can use to structure your new workflows
Content creation workflows for small teams
I’m going to jump straight into the nitty gritty.
When you’re a small team you want to be able to act quickly. Organization is a less intensive challenge for you as there are far fewer variables to keep track of at any one time.
As such, you can build robust systems which are still simple and intuitive.
As you scale your systems will scale and this can present difficulties, which we’ll address later.
But for now, you can leverage user friendly tools to craft a set up which is right for your team.
Our old system utilized Process Street and Trello.
Each tool represented a different part of the content creation workflow. Process Street was used to shape the content itself and Trello was used to organize the team and provide clarity over what was being worked on, by whom, and what the progress was.
This brings us to the two simple stages of a content creation workflow: Creation vs Organization.
Content creation vs Content team organization
At Process Street we’re all about having a documented process for people to follow when undertaking any task that needs doing more than twice. That’s pretty much our internal mantra.
With Process Street, you build a process template and then run checklists off that template each time you do the task.
So I would build a blog writing process template and then every time I write a blog post I run the checklist and follow it.
Really simple core concept.
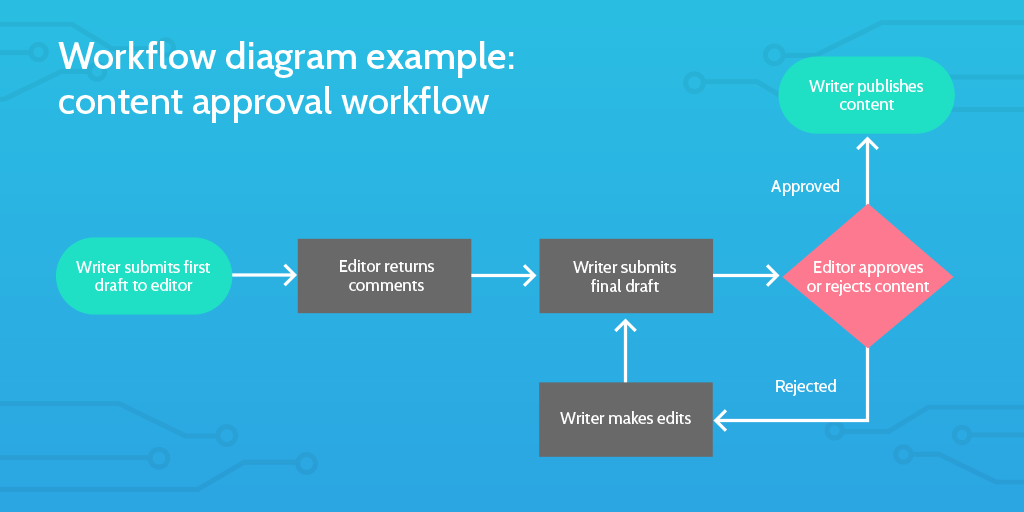
Our blog writing process used to look very similar to the template embed you can see below. This embed is a pre-publish checklist. This means that the scope is the final checks and edits you need to do on your blog before you hit the Publish button.
Check you’ve included the keyword in the different headers, make sure there are no typos, look at the formatting for each image, etc etc.
This blog pre-publish checklist means that you run your necessary SEO checks and it ensures you don’t publish content which is riddled with errors.
The blog pre-publish acts as the content creation section of the workflow. This is the use of organizational tools to improve the substance, optimization, and presentation of your content.
The template above is useful for anyone, but I recommend adding it to your Process Street account and editing it to add extra steps which are specifically relevant to your business. You can edit it to add new tasks or you could add extra detail inside tasks to more rigorously enforce a style-guide. Whatever you like.
So, every piece of content we would write would be examined against this checklist before it was handed to the editor to click Publish.
But what about all the steps before that point?
This brings us to the content team organization aspect of any good content creation workflow.
Task management tools can help with a high-level picture of your content team
We used to use Trello. We don’t any more. But that’s not to say that Trello isn’t good; it is. In fact, it’s great for small teams.
Later I’ll be talking about our migration to Airtable instead of Trello, but I won’t be going into an in depth analysis of the two. If you’d like to read that, then you should check out this article when you’ve finished: Airtable vs Trello: The Best of Task and Project Management.
Trello prides itself on its simplicity. The app works on the basis of Kanban boards, which means tasks are represented as cards and these cards can get dragged from one column to another.
So you have a card for Write Article and it’s currently in the Upcoming column, then you start it and move it into the Doing column. You can filter these boards to look at only your tasks or to look at all the tasks across the team. This means that everyone can see the progress of their team members while recording their progress too.
In each task card you can add comments or upload files, even add subtasks. This makes each card an exhaustive history of the progress on a particular task.
Our content creation board was roughly set up with the following columns:
- Inbox – For any tasks which had been added to the board.
- Upcoming – Tasks that were lined up to be started soon.
- Started – Tasks which had begun.
- Doing – Tasks we were actively working on.
- Review – Tasks we wanted to present to the team.
- Run Prepublish – Tasks we were running our checklists on.
- Sent to Editor – Tasks ready for editor approval.
- Published – Tasks which had been completed successfully.
- Not Done – Tasks which couldn’t be completed or are no longer needed.
When we came up with ideas for new articles we entered them into the Inbox column. If we decided that one of these articles was going to be done in the next two weeks we would move it into Upcoming.
This allowed us to store all our ideas and then assign due dates to the ideas we liked to show they were coming soon. We used the calendar view on Trello to get an overview of when each article would be published, ordered according to due date. This made it easy to move things around understand which tasks were priority items.
We used automation to tie the creation process with the organizational flow

This old process of ours wasn’t laden with automation, but it did contain some automated bits.
The most important one to note here was how we launched our pre-publish checklists.
Once an article had been written and the draft finished, we would move the card for the task into the Run Prepublish column. Using the third party automation app Zapier, this would then run a pre-publish checklist and post a link to it into the Trello card.
This was comprised of two “zaps” – individual automations via Zapier.
For the first, moving a card to a particular column was the trigger and running the checklist was the action. In the second, the URL of the checklist was taken and posted back into the Trello card as a comment.
This meant that the author didn’t have to jump between apps to make anything happen. It also meant that the Trello card contained an accurate record of when the formatting stage began.
This kind of small automation proved useful and the team liked how it improved the flow. We took this experience and applied it again when we built out our newer larger content creation workflow.
The overall workflow
To put it in simple terms, our team worked out of Trello and the different stages of the flow were defined by what column a task was moved into. Moving into one column would generate a pre-publish checklist, moving into another column would notify the editor that a piece was ready for review.
It was a smooth and simple process for a small team.
Content creation workflows for large teams
One of the problems with the above flow is that you don’t have an accurate searchable database of all your previous material.
When you’ve scaled up your team, you’ll want to have that kind of database to use for backlinking, for data gathering, and for performance tracking, amongst many other things.
What we ended up doing was recording all the details of each post in Airtable. We were able to do that by getting the author to put all the important post details into form fields within the pre-publish checklist; when the last task of the checklist was clicked a zap copied all of that information into an Airtable record.
Then Airtable released a Kanban view and we realized we didn’t really need Trello after all.
You see, Airtable is a big database that looks like a spreadsheet – it is easy to use and navigate. It’s much quicker than using a regular Google Sheet or Excel spreadsheet when you’re operating with thousands of complex records, and it’s much easier to do complex things with thanks to its intuitive filtering and grouping functionalities.
You can create different “views” in Airtable which are basically just predefined filters, allowing you to see all the data which matches a particular set of parameters.
I have my own view. This means that all records which contain my name in the Who field of the record will show up in this view. Everyone on the team has this view.
We also have a view for all blog posts. This means that all records which contain blog-post in the Type field will show up in this view. Each different type of content has its own version of this view.
You get the idea, hopefully.
Let me take you through our process step by step.
1. New post ideas are entered into Slack

We have a specific channel in our company Slack which is dedicated to new ideas for posts.
Whenever you have a new idea, you put it into that channel.
This triggers a zap which takes that idea and creates a new record in Airtable.
Each record has about 50 different fields. The zap will automatically fill the name of the record with the content of the Slack message. It will record who posted it into Slack. And it will record when it was posted.
It will also add some automatic tags because it was created via the Slack channel. It will tag the Team as content-creation and it will tag the Type as blog-post.
2. In our sprint planning we choose ideas for the month
When we plan our sprints we will go through the post-ideas view in Airtable and assign dates to ideas we want to use that month.
We can look at an overview of this in one of our calendar views. We change the Status of the record from Idea to Confirmed to Start. Changing the status automatically runs a checklist inside Process Street and posts a link to that checklist in the checklist-url field of the record.
But this isn’t the normal pre-publish checklist.
3. Our Blog Post Production checklist guides the writer through the content creation process
We decided that we liked processes so much we would put our previous pre-publish on steroids.
This new process begins when the writer does.
You have the idea assigned to you. The next step is to find a good keyword for the article and then to hash out a structure or basic plan. As such, those two tasks comprise the first tasks in this new checklist.
The first section of the checklist is dedicated to pre-writing tasks: keyword analysis, recording long tail keywords, determining 5 title ideas, settling on a provisional final title, and understanding what kind of header image the post would need.
Once the writer has done this, the next section of the checklist is assigned, via Process Street’s task assignments feature, to the designer.
The designer then creates the first iterations of the header image while the writer is working on their draft. There is an approvals section which allows for iterations on the header image. Once the final header image has been decided upon and is stored in the checklist, it passes back over to the writer.
From here, the checklist covers the pre-publish process and does so with a hell of a lot of detail.
4. The final section in the checklist is left for the editor
The last task the writer is faced with in the checklist is called Submit for Review. When checked, this task notifies the editor. The editor then works through the rest of the checklist.
The editor performs their checks on the article and publishes accordingly.
Then the editor works through the steps to send the article out via email to the subscribers list.
When the article has been published and the email received, the editor can check off the final task to complete the checklist.
5. Completing the checklist updates the original Airtable record
Checking off that final task in the checklist triggers yet another zap.
All the important information entered into the checklist, including:
- The URL of the post
- The head keyword
- The long tail keywords
- The categories the article is in
- The publish date
- The author of the post
- The type of post it is
- The email text which was sent to subscribers
… etc, is imported back into the relevant fields in the original Airtable record.
This means, for example, I could search on Airtable for all the articles I published last year in the category Processes. It takes all the important information and enters it automatically into a searchable database.
6. The content promotion team are automatically assigned tasks
Finishing the publishing process doesn’t just update Airtable.
It launches the content promotion team’s checklist. The promotion team are automatically handed their next tasks to circulate the article, reach out to individuals or companies mentioned in the article, and enter the article into their tracking systems.
All the work done by the content promotion team will now be stored on that very same original Airtable record.
That record becomes a … well … record of everything that was ever done in association with that article. It can also record the performance of that article over time.
The advantages of the new content creation workflow
There are a bunch of advantages, but let me just quickly summarize some of them for you:
- We now have a fully searchable database of every piece of content we’ve ever done, or has ever been done about us.
- We have a significant number of data points for each of these individual records, meaning we can perform complex filtering and performance assessments.
- The writer only needs to work from a single checklist at any point, making their lives easier and providing them with more guidance and steps to increase quality consistently.
- The editor can review work in regular meetings but only needs to act when notified, and the rigorous pre-publish section of the checklist reduces the workload on the editor.
- The publishing calendar can be planned a month or more in advance, not just because of calendar software but because the editors now have more time to carefully manage future output.
- The designer is built into the process; they know their tasks at the beginning of the month and are notified about specific content in advance of the writer needing it.
- Lots of data is being transferred throughout the process and the work is being done automatically.
How to build a content creation workflow like Process Street’s
We’ve basically covered all the detail of how to build this workflow in the above sections.
You know what the flow is, what the tools are, and some more information about how it all fits together.
What I’ll briefly do in this section is cover some of the mechanics of how you can link these systems up with Zapier.
To replicate our kind of setup you’ll need a paid account with Zapier, Airtable, and Process Street. But, to be fair, you can use these tools for any and all departments across your business.
We have some simple zaps like this one, for taking new ideas from Slack and using them to create new records in Airtable, which are pretty self explanatory:
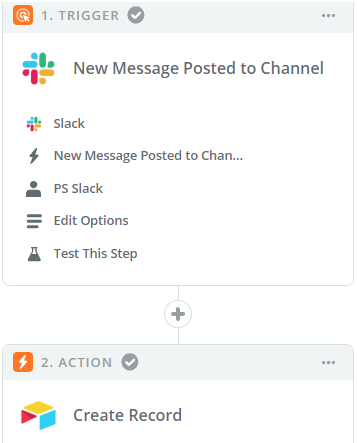 Within the Edit Options section of the Trigger, you define the Slack channel which these post ideas will go into. You also select to ignore any messages posted by bots, only humans.
Then, in the Edit Options section of the Action, you choose which Airtable Base you want to use. This is like choosing the parent database. Then you choose which Table you want to use. This is like choosing the specific sheet or section of the database you want this data to be entered into.
Once you’ve selected your Base and Table, you will see all the available fields for a record in that Table show up as options for you in Zapier. You then choose data pulled in from Slack and select to enter it into the relevant fields by using the little insert buttons on the right hand side of each field.
This is a fairly simple zap.
Once you have the hang of this kind of zap you can start building out more complex ones.
This zap below is the one which updates the Airtable record with the final post information once the editor completes the checklist inside Process Street to confirm that the article has been successfully published.
 As you can see, there’s a third step in the overview.
This time, it’s an additional Search step between the Trigger and the Action.
This step allows us to automatically search the Airtable database for the correct record in order to update it.
The way it does this is by searching for the Record ID of the original Airtable record.
You see, when we first changed the status of the Airtable record to Confirmed to Start in order to automatically generate a checklist for the writer to follow, we also moved some data into hidden fields in the checklist.
The record ID of the Airtable record was inserted into the Process Street checklist at the very beginning of the process. This ties that particular checklist to the original record and allows our zap to pull the record ID from the checklist to search for it in Airtable.
Moving around data like IDs allows you to use extra search steps later on in your flow.
Automation is a huge workflow timesaver
It may look complex to build these automations with Zapier, but you just need an afternoon and suddenly you’re in control and running all kinds of tasks while you sleep.
That small time investment to create a solid content creation workflow will reap dividends later down the line.
If it saves each writer 30 minutes per post and you publish 3 posts a week, then a 6 hour time investment is paid back to the team after 4 weeks. If it saves 10 minutes, it’s paid off in 12 weeks. Considering you build a process like this to work for multiple years and it’s designed to improve quality too, it’s a no brainer.
If you want to read more of our work on automation, check out these posts:
- The Ultimate Guide to Business Process Automation
- Ultimate Guide to Small Business Automation with Zapier
- 50 Ways To Save Time & Money with Workflow Automation
- Form Automation: Turning Your Checklists Into Databases
- 222 Zaps to Crush Your Current Process Automation
Process Street templates for your content creation workflows
To finish off, I’ll leave you with these extra templates in case you want to turn any of these into part of your own content creation workflow:
- Advanced Content Promotion Checklist
- SEO Checklist: The Keyword Research Process
- Social Media Influencer Outreach Checklist
- Blog Image Design Process
- Social Media Image Design
- Animation Design Process
- Podcast Publishing Checklist
- Accepting, Formatting, Editing and Publishing a Guest Post
You know how we do our content creation workflow! How do you do yours? Let us know what has worked for you and what hasn’t in the comments below!